Test data quality in a Dagster pipeline
Use this guide as an example of how to invoke Soda data quality tests in a Dagster pipeline.
Use this guide as an example for how to use Soda to test for data quality in an ETL pipeline in Dagster.

About this guide
The instructions below offer an example of how to execute several Soda Checks Language (SodaCL) tests for data quality at multiple points within a Dagster pipeline.
For context, the example follows a fictional organization called Bikes 4 All that operates several bicycle retail stores in different regions. The Data Analysts at the company are struggling with their sales forecasts and reporting dashboards. The company has tasked the Data Engineering team to automate the ETL pipeline that uses Dagster and dbt to orchestrate the ingestion and transformation of data before exporting it for use by Data Analysts in their business intelligence tools.
The pipeline built in an assets.py file in the Dagster project automates a flow which:
Tests data before ingestion: Uploaded from various stores into S3, the Data Engineers run Soda data quality checks before copying the data to a Redshift data source. To do so, they use Soda Library to load the files into DataFrames, then run a Soda scan for data quality to catch any issues with incomplete, missing, or invalid data early in the pipeline. For any Soda checks that fail, the team routes failed row samples, which contain sensitive data, back to their own S3 bucket to use to investigate data quality issues.
Loads data: After addressing any data quality issues in the retail data in S3, they load the data into Redshift in a staging environment.
Transforms data in staging: Using dbt, the Data Engineers build the models in a staging environment which transform the data for efficient use by the Data Analysts.
Tests transformed data: In a Soda Cloud staging environment, Data Analysts can prepare no-code checks for data quality based on their knowledge of the reports and dashboards that the data feeds. The Data Engineers use the Soda Cloud API to execute remote Soda scans for data quality that include the checks the Data Analysts defined.
Transforms data in production: After addressing any data quality issues after transformation in staging, the Data Engineers build the dbt models in the production environment.
Exports data quality results: The Data Engineers use the Soda Cloud API to load the data quality results into tables Redshift from which other BI tools can fetch data quality results.
As a final step, outside the Dagster pipeline, the Data Engineers also design a dashboard in Tableau to monitor data quality status.
Prerequisites
The Data Engineers in this example uses the following:
Python 3.8, 3.9, or 3.10
Pip 21.0 or greater
dbt-core and the required database adapter (dbt-redshift)
a Dagster account
access permission and connection credentials and details for Amazon Redshift
access permission and connection credentials and details for an Amazon S3 bucket
access to a Tableau account
Install dbt, Dagster, and Soda Library
Though listed as prerequisites, the following instructions include details for installing and initializing dbt-core and Dagster.
From the command-line, a Data Engineer installs dbt-core and the required database adapter for Redshift, and initializes a dbt project directory. Consult dbt documentation for details.
In the same directory that contains the
dbt_project.yml, they install and initialize the Dagster project inside the dbt project. Consult the Dagster install and new project documentation for details.cd project-namepip install dagster-dbt dagster-webserver dagster-awsdagster-dbt project scaffold --project-name my-dagster-projectcd my-dagster-projectThey install the Soda Library packages they need to run data quality scans in both Redshift and on data in DataFrames using Dask and Pandas.pip install -i https://pypi.cloud.soda.io soda-redshiftpip install -i https://pypi.cloud.soda.io soda-pandas-dask
They create a file in the
~/.dbt/directory namedprofiles.yml, then add the following configuration to use dbt with Dagster. Consult the Dagster documentation.Lastly, they make sure that Dagster can read the dbt project directories in
project.py.
Create and connect a Soda Cloud account
To validate an account license or free trial, Soda Library must communicate with a Soda Cloud account via API keys. You create a set of API keys in your Soda Cloud account, then use them to configure the connection to Soda Library.
In a browser, a Data Engineer navigates to cloud.soda.io/signup to create a new Soda account, which is free for a 45-day trial.
They navigate to your avatar > Profile, access the API keys tab, then click the plus icon to generate new API keys.
They create a new file called
configuration.ymlin the same directory in which they installed the Soda Library packages, then copy+paste the API key values into the file according to the following configuration. This config enables Soda Library to connect to Soda Cloud via API.
No Redshift connection details in the configuration.yml?
Normally, when connecting Soda Library to a data source so it can run data quality scans, you must configure data source connection details in a configuration.yml file, as instructed in Soda documentation.
However, in this example, because the Data Engineers need only use Soda Library to programmatically run scans on data loaded as DataFrames from S3, it is not necessary to provide the connection config details. See: Connect Soda to Dask and Pandas.
Later in this example, when the Data Engineers run Soda scans remotely, they do so via calls to Soda Cloud API endpoints. Soda Cloud is configured to connect to the Redshift data source and Soda executes the scan via the Soda-hosted Agent included out-of-the-box with a Soda Cloud account. Learn more about the flavors of Soda.
Set up Soda
To empower their Data Analyst colleagues to write their own no-code checks for data quality, a Data Engineer volunteers to set up Soda to:
connect to the Redshift data source that will contain the ingested data in a staging environment
discover the datasets and make them accessible by others in the Soda Cloud user interface
create check attributes to keep data quality check results organized
Logged in to Soda Cloud, the Data Engineer, who, as the initiator of the Soda Cloud account for the organization is automatically the Soda Admin, decides to use the out-of-the-box Soda-hosted agent made available for every Soda Cloud organization to securely connect to their Redshift data source.
The Data Engineer follows the guided workflow to Add a new data source to the Soda Cloud account to connect to their Redshift data source, making sure to include all datasets during discovery, and exclude datasets from profiling to avoid exposing any customer information in the Soda Cloud UI.
Lastly, they follow the instructions to create check attributes, which serve to label and sort check results by pipeline stage, data domain, etc.
Write pre-ingestion SodaCL checks
Before the Data Engineer loads the existing retail data from S3 to Redshift, they prepare several data quality tests using the Soda Checks Language (SodaCL), a YAML-based, domain-specific language for data reliability.
Read more: SodaCL reference
After creating a new checks.yaml file in the same directory in which they installed the Soda Library packages, the Data Engineer consults with their colleagues and defines the following checks for four datasets—stores, stocks, customers, and orders—being sure to add attributes to each to keep the check results organized.
Run pre-ingestion checks
In the assets.py file of their Dagster project, the Data Engineer begins defining the first asset under the @asset decorator. Consult the Dagster documentation for details.
The first definition loads the S3 data into a DataFrame, then runs the pre-ingestion checks on the data. Because the data contains sensitive customer information, the Data Engineer also includes a Soda custom sampler which sends failed row samples for checks that fail to an S3 bucket instead of automatically pushing them to Soda Cloud. To execute the scan programmatically, the script references two files that Soda uses:
the
configuration.ymlfile which contains the Soda Cloud API key values that Soda Library need to validate the user license before executing a scan, andthe
checks.ymlfile which contains all the pre-ingestion SodaCL checks that the Data Engineer prepared.
Load data into Redshift and define staging transformations
After all SodaCL checks pass, indicating that the data quality is good, the next step in the Dagster pipeline loads the data from the S3 bucket into Amazon Redshift. As the Redshift data source is connected to Soda Cloud, both Data Engineers and Data Analysts in the Soda Cloud account can access the data and prepare no-code SodaCL checks to test data for quality.
The Data Engineer then defines the dbt models that transform the data and which run under the @dbt_assets decorator in the staging environment.
Write post-transformation SodaCL checks
With the transformed data available in Redshift in a staging environment, the Data Engineer invites their Data Analyst colleagues to define their own no-code checks for data quality.
The Data Analysts in the organization know their data the best, particularly the data feeding their reports and dashboards. However, as they prefer not to write code—SQL, Python, or SodaCL—Soda Cloud offers them a UI-based experience to define the data quality tests they know are required.
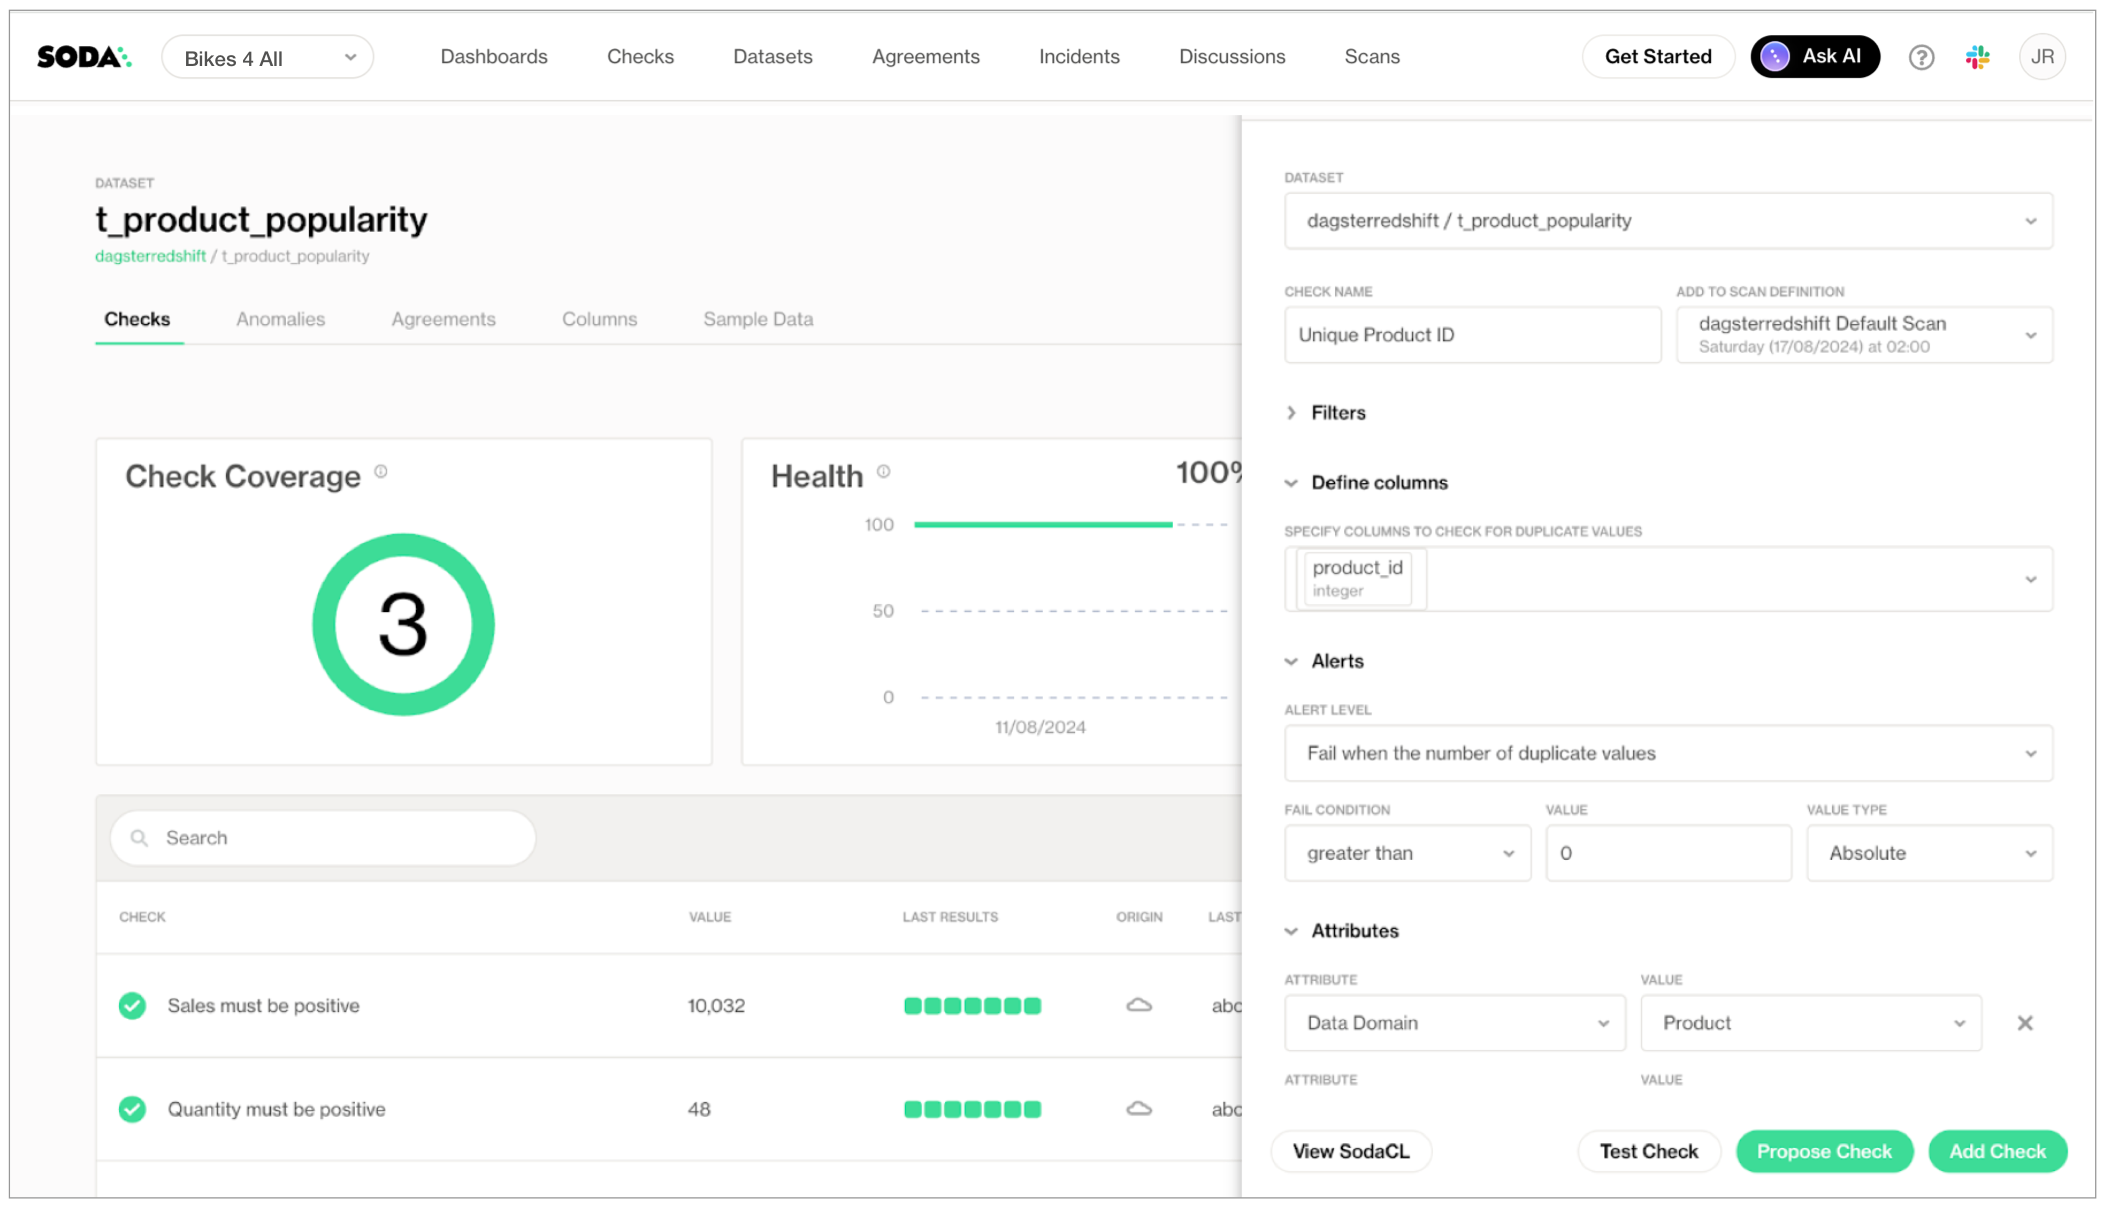
When they create a check for a dataset in Soda Cloud, they also make two selections that help gather and analyze check results later:
a scan definition in which to include their check
one or more check attributes
The scan definition is what Soda uses to run regularly-scheduled scans of data. For example, a scan definition may instruct Soda to use the Soda-hosted agent connected to a Redshift data source to execute the checks associated with it every day at 07:00 UTC. Additionally, a Data Engineer can programmatically trigger a scheduled scan in Soda Cloud using the scanDefinition identifier; see the next step!
The creator of a no-code check can select an existing scan definition, or choose to create a new one to define a schedule that runs at a different time of day, or at a different frequency. In this example, the Data Analysts creating the checks are following the Data Engineer's instruction that they use the same scan definition for their checks, dagsterredshift_default_scan, to facilitate running a single remote scan in the pipeline, later.
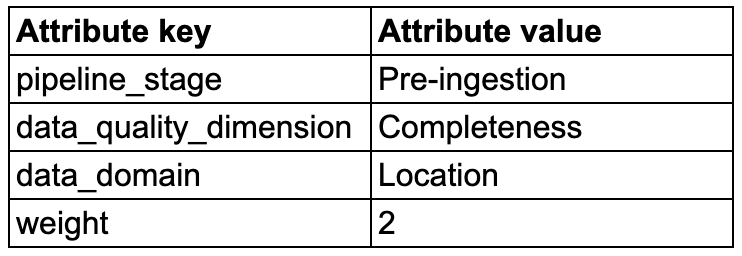
The check attributes that the Data Engineer defined when they Set up Soda are available in the Soda Cloud user interface for Data Analysts to select when they are creating a check. For example, a missing check on the store_id column validates that there are no NULL values in the column. By adding four attributes to the check, the Data Analyst makes it easier for themselves and their colleagues to filter and analyze check results in Soda Cloud, and other BI tools, according to these custom attributes.
Trigger a Soda scan via API
After the Data Analysts have added the data quality checks they need to the datasets in Soda Cloud, the next step in the pipeline triggers a Soda scan of the data remotely, via the Soda Cloud API. To do this, a Data Engineer uses the scan definition that the Data Analysts assigned to checks as they created them.
In the Dagster pipeline, the Data Engineer adds a script to first call the Soda Cloud API to trigger a scan via the Trigger a scan endpoint.
Then, using the scanID from the response of the first call, they send a request to the Get scan status endpoint which continues to call the endpoint as the scan executes until the scan status reaches an end state that indicates that the scan completed, issued a warning, or failed to complete. If the scan completes successfully, the pipeline continues to the next step; otherwise, it trips a “circuit breaker”, halting the pipeline.
Transform data in production
When all the Data Analysts' checks have been executed and the results indicate that the data is sound in staging, the Data Engineer adds a step in the pipeline to perform the same transformations on data in the production environment. The production data in Redshift feeds the reports and dashboards that the Data Analysts use, who now with more confidence in the reliability of the data.
Export data quality test results
As a last step in the Dagster pipeline, the Data Engineer goes the extra mile to export data quality check results to tables in Redshift. The script again accesses the Soda Cloud API to gather results, then transforms the API data quality responses into DataFrames and writes them to Redshift.
In this example, the check attributes that both the Data Engineers and Data Analysts applied to the checks they created prove useful: during export, the script adds separate columns to the tables in Redshift for the attributes' keys and values so that anyone using the data to create, say, a dashboard in Tableau, can organize the data according to attributes like Data Quality Dimension, Pipeline Stage, or Data Domain.
Download this asset definition: Export results
Create a Dagster asset job
After defining all the assets for the Dagster pipeline, the Data Engineer must define the asset jobs, schedules, and resources for the Dagster and dbt assets. The definitions.py in the Dagster project wires everything together. Consult Dagster documentation for more information.
Review results
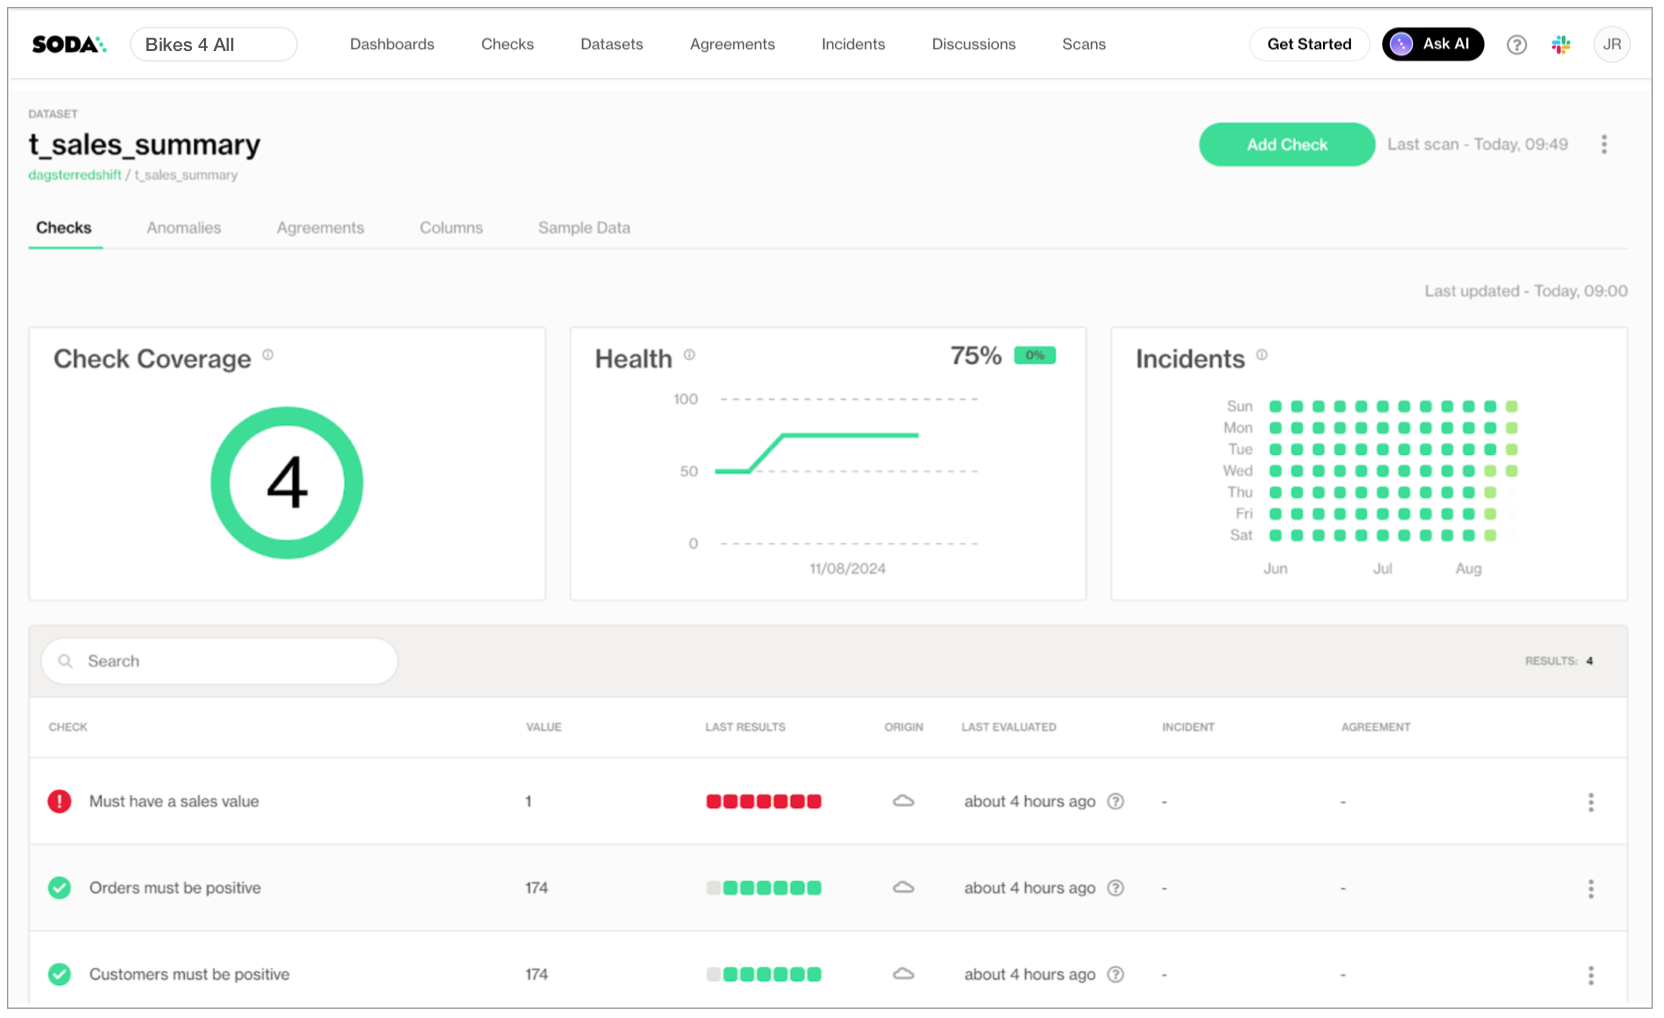
To review check results from the latest Soda scan for data quality, along with the historical measurements for each check, both Data Analysts and Data Engineers can use Soda Cloud.
They navigate to the Datasets page, then select a dataset from those listed to access a dataset overview page which offers info about check coverage, the dataset's health, and a list of its latest check results.
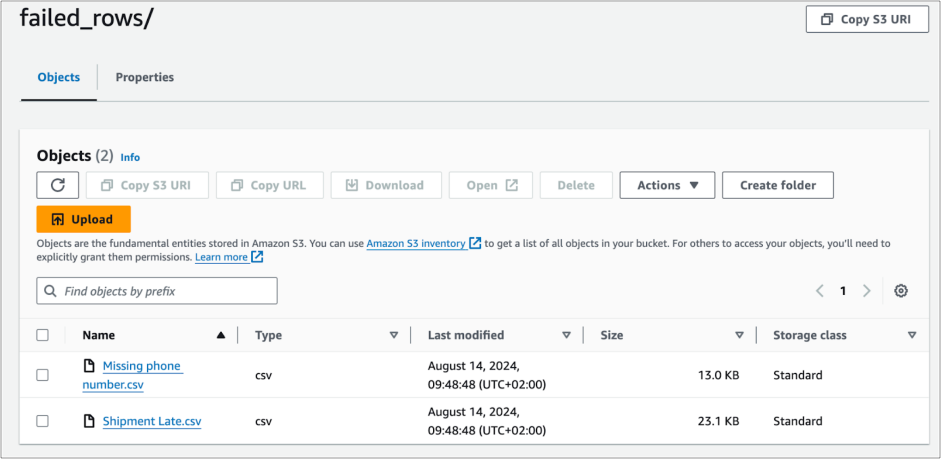
To keep sensitive customer data secure, the Data Engineers in this example chose to reroute any failed row samples that Soda implicitly collected for missing, validity, reference checks, and *explicitly* collected for failed row checks to an S3 bucket. Those with access to the bucket can review the CSV files which contain the failed row samples which can help Data Engineers investigate the cause of data quality issues.
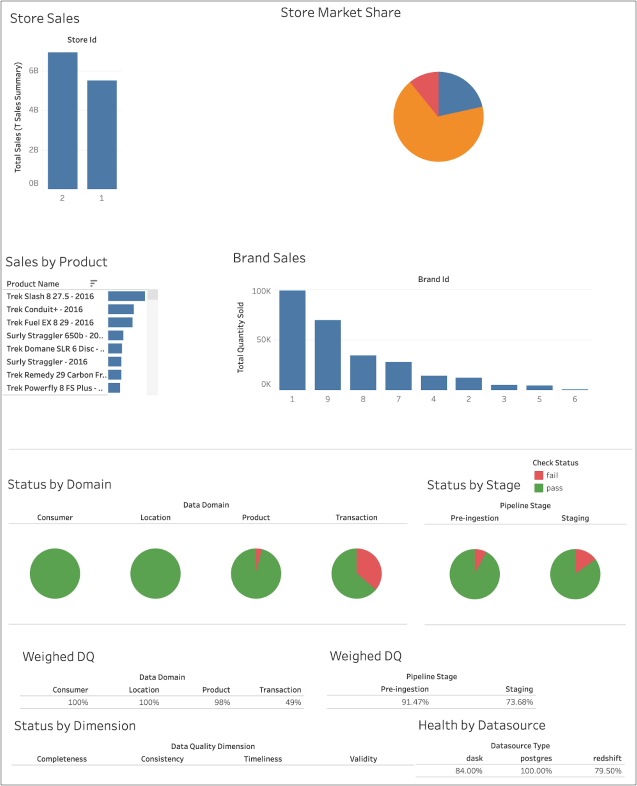
Further, because the Data Engineer went the extra mile to export data quality check results via the Soda Cloud API to tables in Redshift, they are able to prepare a Tableau dashboard using the check attributes to present data according to Domain, Dimension, etc.
To do so in Tableau, they added their data source, selected the Redshift connector, and entered the database connection configuration details. Consult Tableau documentation for details.
Go further
Learn more about integrating with Atlan to review Soda check results from within the catalog.
Learn more about integrating with Slack to set up alert notifications for data quality checks that fail.
Need help? Join the Soda community on Slack.
Last updated
Was this helpful?
