

Set up a Soda-hosted agent
Use an out-of-the-box Soda-hosted agent to connect to your data sources and begin testing data quality.
The Soda environment has been updated since this tutorial.
Refer to v4 documentation for updated tutorials.
The Soda Agent is a tool that empowers Soda Cloud users to securely access data sources to scan for data quality.
Use the secure, out-of-the-box Soda-hosted agent made available for every Soda Cloud organization or, alternatively, you can create a Kubernetes cluster in your organization's environment and use Helm to deploy a Self-hosted Soda Agent in the cluster; see Deploy a Soda Agent.
A Soda-hosted agent enables Soda Cloud users to securely connect to supported data sources and create checks for data quality in the new data source.
As a step in the Get started roadmap, this guide offers instructions to set up Soda in a Soda-hosted agent deployment model.
Get started roadmap
Choose a flavor of SodaSet up Soda: Soda-hosted agent 📍 You are here! a. Create a Soda Cloud account b. Add a new data source
Write SodaCL checks
Run scans and review results
Organize, alert, investigate
Compatibility
BigQuery
Databricks SQL
MS SQL Server
MySQL
PostgreSQL
Redshift
Snowflake
Create a Soda Cloud account
If you have not already done so, create a Soda Cloud account at cloud.soda.io. If you already have a Soda account, log in.
By default, Soda prepares a Soda-hosted agent for all newly-created accounts. However, if you are an Admin in an existing Soda Cloud account and wish to use a Soda-hosted agent, navigate to your avatar > Organization Settings. In the Organization tab, click the checkbox to Enable Soda-hosted Agent.
Navigate to your avatar > Data Sources, then access the Agents tab. Notice your out-of-the-box Soda-hosted agent that is up and running.

Add a new data source
In your Soda Cloud account, navigate to your avatar > Data Sources. Click New Data Source, then follow the guided steps to create a new data source. Refer to the sections below for insight into the values to enter in the fields and editing panels in the guided steps.
Already have data source connected to a self-hosted agent?
You can migrate a data source to a Soda-hosted agent.
1. Attributes
Data Source Label
Provide a unique identifier for the data source. Soda Cloud uses the label you provide to define the immutable name of the data source against which it runs the Default Scan.
Default Scan Agent
Select the Soda-hosted agent, or the name of a Soda Agent that you have previously set up in your secure environment. This identifies the Soda Agent to which Soda Cloud must connect in order to run its scan.
Check Schedule
Provide the scan frequency details Soda Cloud uses to execute scans according to your needs. If you wish, you can define the schedule as a cron expression.
Starting At (UTC)
Select the time of day to run the scan. The default value is midnight.
Custom Cron Expression
(Optional) Write your own cron expression to define the schedule Soda Cloud uses to run scans.
Anomaly Dashboard Scan Schedule (available in 2025)
Provide the scan frequency details Soda Cloud uses to execute a daily scan to automatically detect anomalies for the anomaly dashboard.
2. Connect
Enter values in the fields to provide the connection configurations Soda Cloud needs to be able to access the data in the data source. Connection configurations are data source-specific and include values for things such as a database's host and access credentials.
Soda hosts agents in a secure environment in Amazon AWS. As a SOC 2 Type 2 certified business, Soda responsibly manages Soda-hosted agents to ensure that they remain private, secure, and independent of all other hosted agents. See Data security and privacy for details.
Use the following data source-specific connection configuration pages to populate the connection fields in Soda Cloud.
3. Discover
During its initial scan of your data source, Soda Cloud discovers all the datasets the data source contains. It captures basic information about each dataset, including dataset names, the columns each contains, and the type of data each column contains such as integer, character varying, timestamp, etc.
In the editing panel, specify the datasets that Soda Cloud must include or exclude from this basic discovery activity. The default syntax in the editing panel instructs Soda to collect basic dataset information from all datasets in the data source except those with names that begin with test_. The % is a wildcard character. See Add dataset discovery for more detail on profiling syntax.
Known issue: SodaCL does not support using variables in column profiling and dataset discovery configurations.
4. Profile
To gather more detailed profile information about datasets in your data source and automatically build an anomaly dashboard for data quality observability (preview, only), you can configure Soda Cloud to profile the columns in datasets.
Profiling a dataset produces two tabs' worth of data in a dataset page:
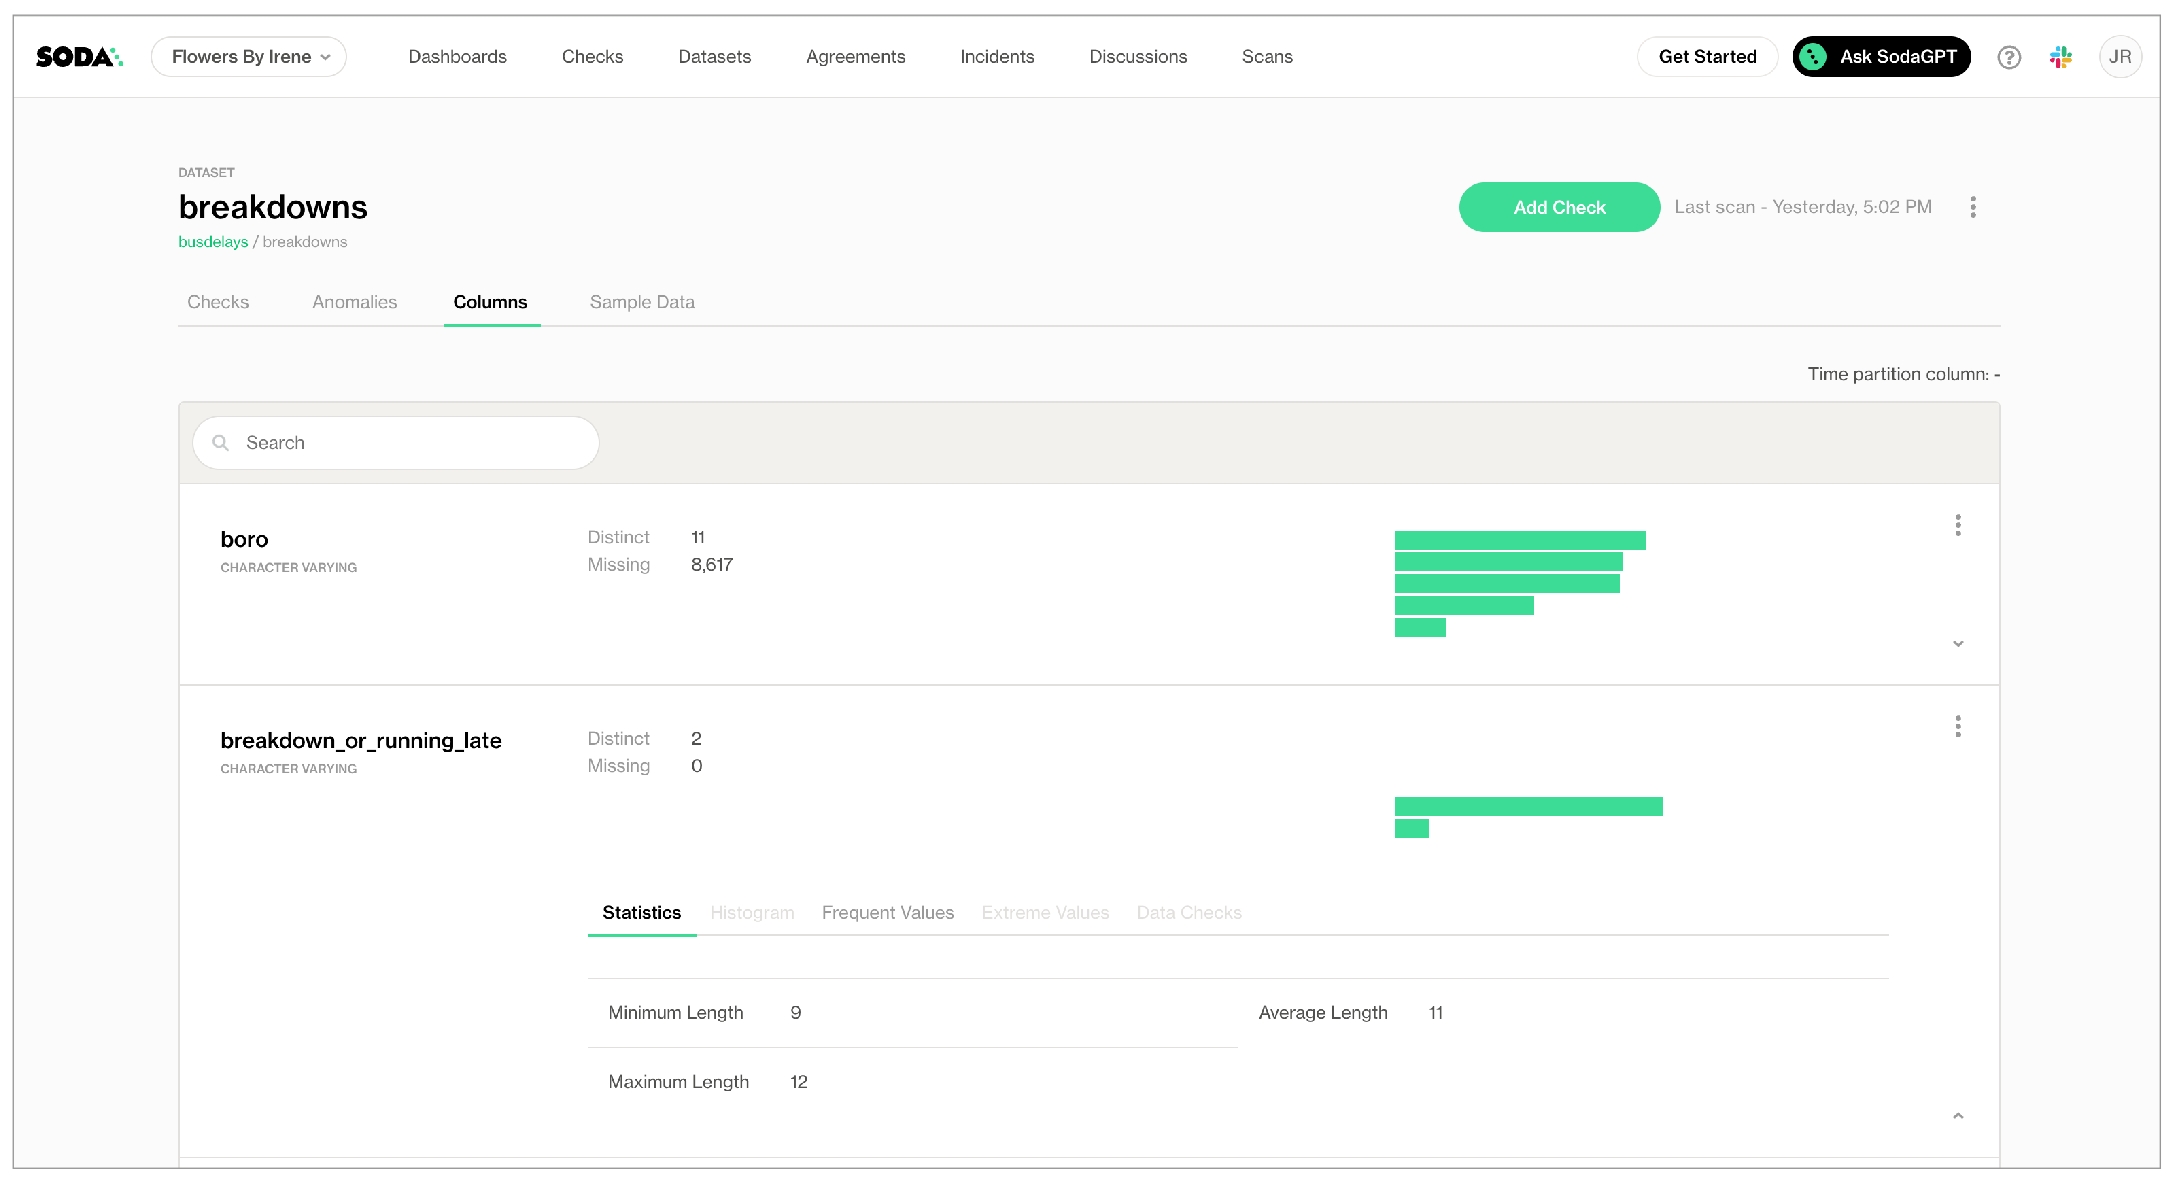
In the Columns tab, you can see column profile information including details such as the calculated mean value of data in a column, the maximum and minimum values in a column, and the number of rows with missing data.
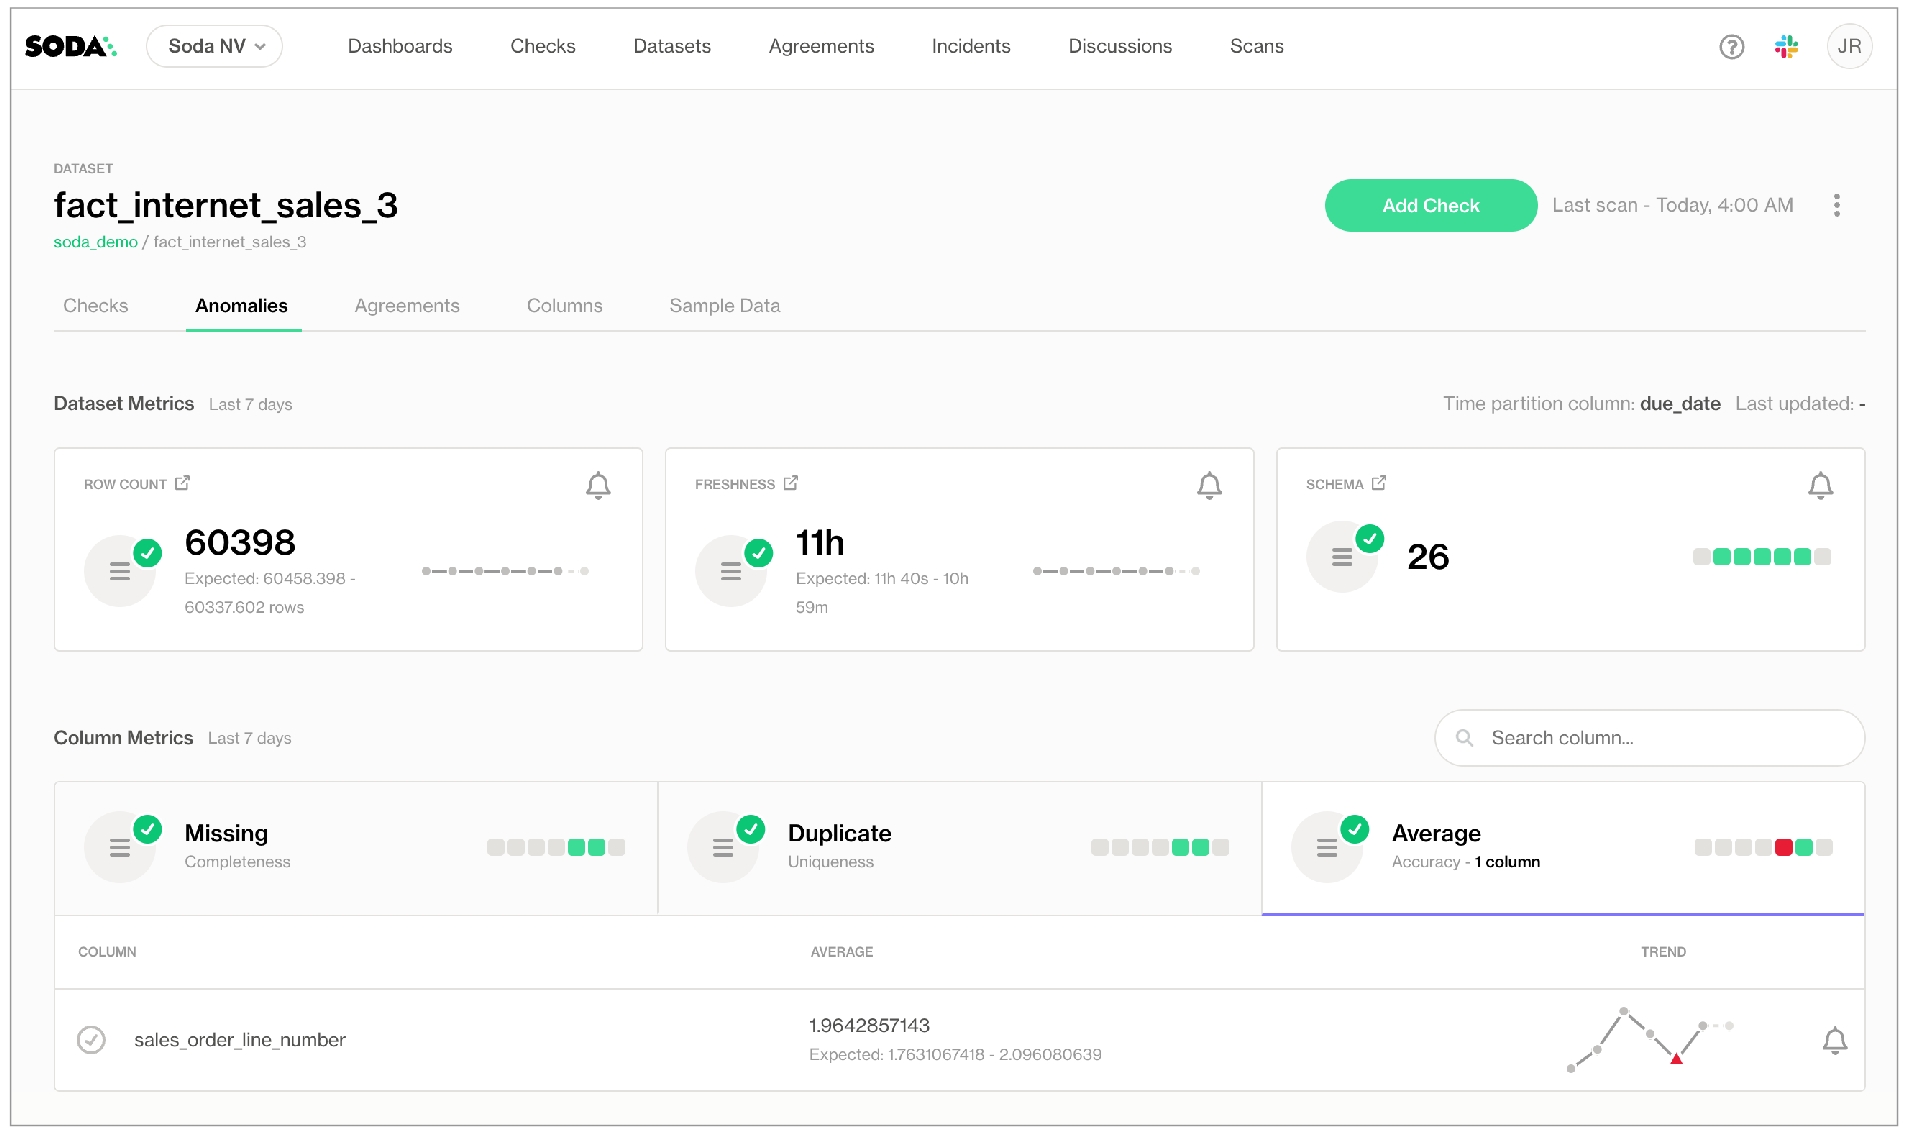
In the Anomalies tab, you can access an out-of-the-box anomaly dashboard that uses the column profile information to automatically begin detecting anomalies in your data relative to the patterns the machine learning algorithm learns over the course of approximately five days. (Available in 2025. Learn more)
In the editing panel, provide details that Soda Cloud uses to determine which datasets to include or exclude when it profiles the columns in a dataset. The default syntax in the editing panel instructs Soda to profile every column of every dataset in this data source, and, superfluously, all datasets with names that begin with prod. The % is a wildcard character. See Add column profiling for more detail on profiling syntax.
Column profiling and automated anomaly detection can be resource-heavy, so carefully consider the datasets for which you truly need column profile information. Refer to Compute consumption and cost considerations for more detail.
5. Check
When Soda Cloud automatically discovers the datasets in a data source, it prepares automated monitoring checks for each dataset. These checks detect anomalies and monitor schema evolution, corresponding to the SodaCL anomaly detection and schema evolution checks, respectively.
(Note that if you have signed up for early access to anomaly dashboards for datasets, this Check tab is unavailable as Soda performs all automated monitoring automatically in the dashboards.)
In the editing panel, specify the datasets that Soda Cloud must include or exclude when preparing automated monitoring checks. The default syntax in the editing panel indicates that Soda will add automated monitoring to all datasets in the data source except those with names that begin with test_. The % is a wildcard character. Refer to Add automated monitoring checks for further detail.
(5) 6. Assign
This tab is the fifth step in the guided workflow if the 5. Check tab is absent because you requested access to the anomaly dashboards feature.
Data Source Owner
The Data Source Owner maintains the connection details and settings for this data source and its Default Scan Definition.
Default Dataset Owner
g6driOiYtQZD
Next
Choose a flavor of SodaSet up Soda: self-hosted agentRun scans and review results
Organize, alert, investigate
Need help? Join the Soda community on Slack.
Last updated
Was this helpful?