Get started
Follow this tutorial to set up and run a simple Soda scan for data quality using example data.
The Soda environment has been updated since this tutorial.
Refer to v4 documentation for updated tutorials.
Is Soda the data quality testing solution you've been looking for? Take a sip and see! 🫧
Use the example data in this quick tutorial to set up and run a simple Soda scan for data quality.
Set up Soda | 3 minutes Build an example data source | 2 minutes Connect Soda | 5 minutes Write some checks and run a scan | 5 minutes
💡 For standard set up instructions, access the Get started roadmap.
✨ Want a total UI experience? Use the out-of-the-box Soda-hosted agent to skip the CLI.
Set up Soda
This tutorial references a MacOS environment.
Check the following prerequisites:
You have installed Python 3.8, 3.9, or 3.10.
You have installed Pip 21.0 or greater.
(Optional) You have installed Docker Desktop and have access to GitHub, to set up an example data source.
Visit https://cloud.soda.io/signup to sign up for a Soda Cloud account which is free for a 45-day trial.
In your command-line interface, create a Soda project directory in your local environment, then navigate to the directory.
mkdir soda_sip
cd soda_sip
Best practice dictates that you install the Soda using a virtual environment. In your command-line interface, create a virtual environment in the
.venvdirectory, then activate the environment.
Execute the following command to install the Soda package for PostgreSQL in your virtual environment. The example data is in a PostgreSQL data source, but there are 15+ data sources with which you can connect your own data beyond this tutorial.
Validate the installation.
To exit the virtual environment when you are done with this tutorial, use the command deactivate.
Build an example data source
To enable you to take a first sip of Soda, you can use Docker to quickly build an example PostgreSQL data source against which you can run scans for data quality. The example data source contains data for AdventureWorks, an imaginary online e-commerce organization.
(Optional) Access the
sodadata/sip-of-sodarepository in GitHub.(Optional) Access a quick view of the AdventureWorks schema.
Open a new tab in Terminal.
If it is not already running, start Docker Desktop.
Run the following command in Terminal to set up the prepared example data source.
When the output reads data system is ready to accept connections, your data source is set up and you are ready to proceed.
Troubleshoot
Problem: When you run docker-compose up you get an error that reads [17168] Failed to execute script docker-compose.
Solution: Start Docker Desktop running.
Problem: When you run docker-compose up you get an error that reads Cannot start service soda-adventureworks: Ports are not available: exposing port TCP 0.0.0.0:5432 -> 0.0.0.0:0: listen tcp 0.0.0.0:5432: bind: address already in use.
Solution:
1. Execute the command lsof -i tcp:5432 to print a list of PIDs using the port.
2. Use the PID value to run the following command to free up the port: kill -9 your_PID_value. You many need to prepend the commands with sudo .
3. Run the docker run command again.
Alternatively, you can use your own data for this tutorial. To do so:
Skip the steps above involving Docker.
Install the Soda Library package that corresponds with your data source, such as
soda-bigquery,soda-athena, etc. See full list.Collect your data source's login credentials that you must provide to Soda so that it can scan your data for quality.
Move on to Connect Soda.
Connect Soda
To connect to a data source such as Snowflake, PostgreSQL, Amazon Athena, or GCP BigQuery, you use a configuration.yml file which stores access details for your data source.
This tutorial also instructs you to connect to a Soda Cloud account using API keys that you create and add to the same configuration.yml file. Available for free as a 45-day trial, your Soda Cloud account validates your free trial or license, gives you access to visualized scan results, tracks trends in data quality over time, lets you set alert notifications, and much more.
In a code editor such as Sublime or Visual Studio Code, create a new file called
configuration.ymland save it in yoursoda_sipdirectory.Copy and paste the following connection details into the file. The
data_sourceconfiguration details connect Soda to the example AdventureWorks data source you set up using Docker. If you are using your own data, provide thedata_sourcevalues that correspond with your own data source.In your Soda account, navigate to your avatar > Profile, then access the API keys tab. Click the plus icon to generate new API keys. Copy+paste the
soda_cloudconfiguration syntax, including the API keys, into theconfiguration.ymlfile, as in the example below.Save the
configuration.ymlfile and close the API modal in your Soda account.In Terminal, return to the tab in which the virtual environment is active in the
soda_sipdirectory. Run the following command to test Soda's connection to the data source. Command:
Output:
Write some checks and run a scan
Create another file in the
soda_sipdirectory calledchecks.yml. A check is a test that Soda executes when it scans a dataset in your data source. Thechecks.ymlfile stores the checks you write using the Soda Checks Language (SodaCL).Open the
checks.ymlfile in your code editor, then copy and paste the following checks into the file.
What do these checks do?
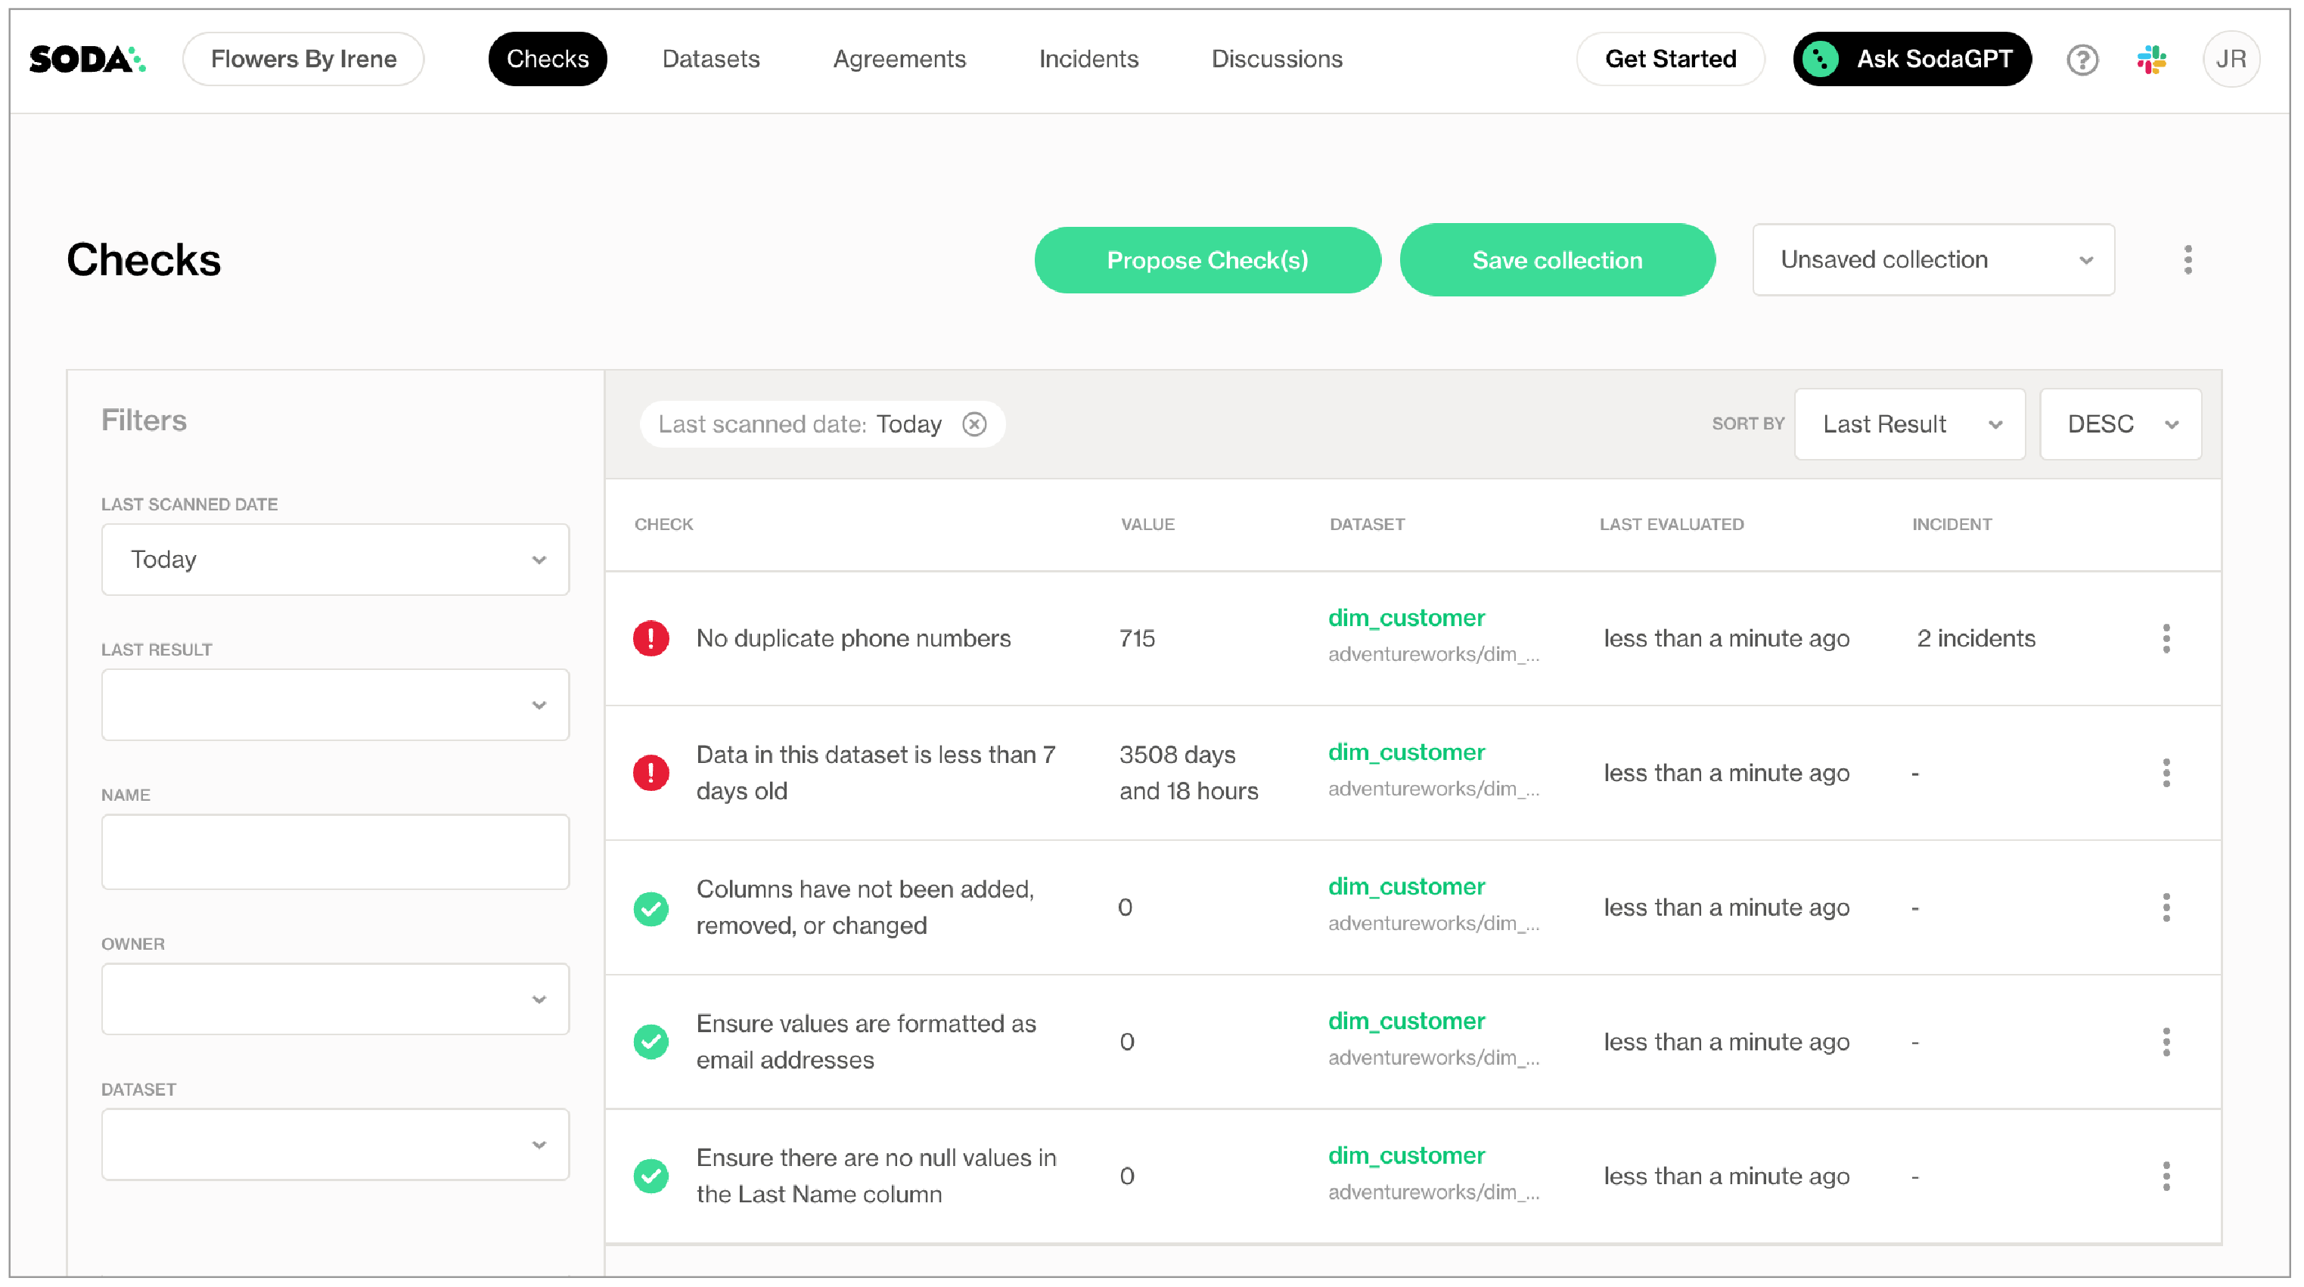
Ensure values are formatted as email addresses checks that all entries in the
email_addresscolumn are formatted as[email protected]. See Validity metrics.Ensure there are no null values in the Last Name column automatically checks for NULL values in the
last_namecolumn. See Missing metrics.No duplicate phone numbers validates that each value in the
phonecolumn is unique. See Numeric metrics.Columns have not been added, removed, or changed compares the schema of the dataset to the last scan result to determine if any columns were added, deleted, changed data type, or changed index. The first time this check executes, the results show
[NOT EVALUATED]because there are no previous values to which to compare current results. In other words, this check requires a minimum of two scans to evaluate properly. See Schema checks.Data in this dataset is less than 7 days old confirms that the data in the dataset is less than seven days old. See Freshness checks.
Save the changes to the
checks.ymlfile, then, in Terminal, use the following command to run a scan. A scan is a CLI command which instructs Soda to prepare SQL queries that execute data quality checks on your data source. As input, the command requires:
-dthe name of the data source to scan-cthe filepath and name of theconfiguration.ymlfilethe filepath and name of the
checks.ymlfile Command:
Output:
As you can see in the Scan Summary in the command-line output, some checks failed and Soda sent the results to your Cloud account. To access visualized check results and further examine the failed checks, return to your Soda account in your browser and click Checks.

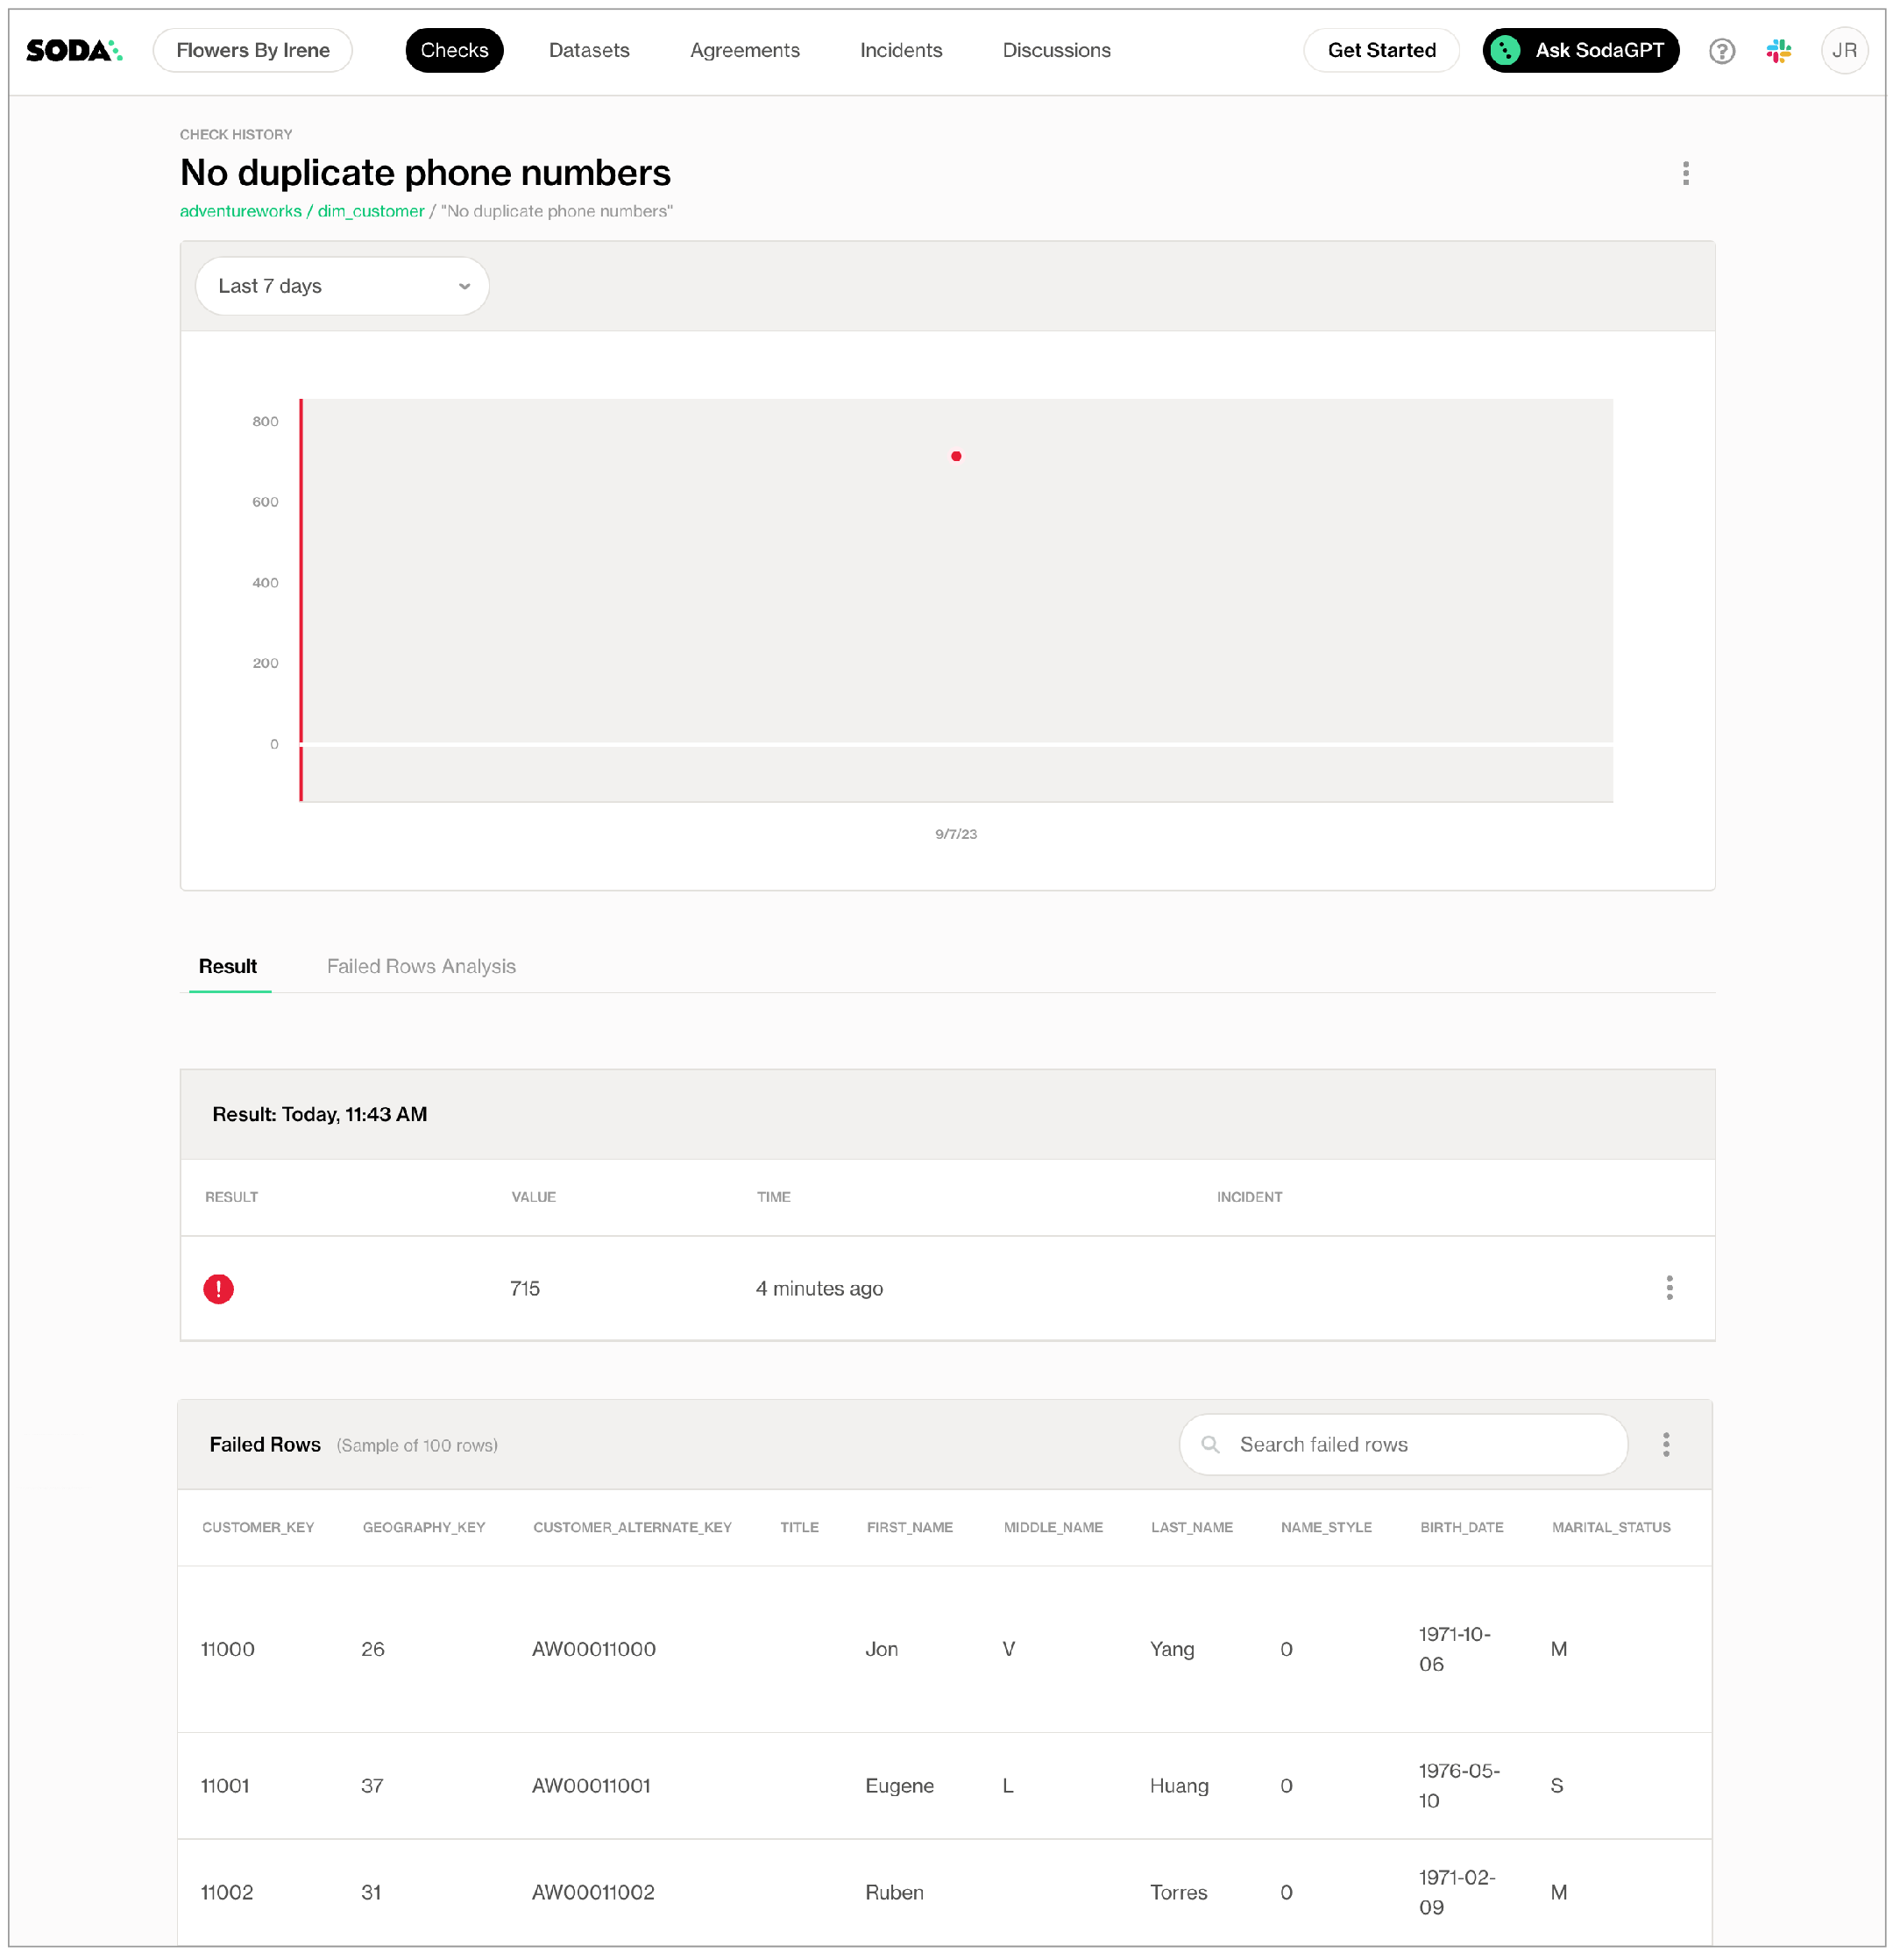
In the table of checks that Soda displays, you can click the line item for one of the checks that failed to examine the visualized results in a line graph, and to access the failed row samples that Soda automatically collected when it ran the scan and executed the checks. Use the failed row samples, as in the example below, to determine what caused a data quality check to fail.

✨Well done!✨ You've taken the first step towards a future in which you and your colleagues can trust the quality and reliability of your data. Huzzah!
If you are done with the example data, you can delete it from your account to start fresh with your own data.
Navigate to your avatar > Data Sources.
In the Data Sources tab, click the stacked dots to the right of the
adventureworksdata source, then select Delete Data Source.Follow the steps to confirm deletion.
Connect to your own data by configuring your data source connections in your existing
configuration.ymlfile. 5. Adjust yourchecks.ymlto point to your own dataset in your data source, then adjust the checks to apply to your own data. Go ahead and run a scan!
Go further
Get inspired on how to set up Soda to meet your use case needs.
Use check suggestions to quickly get off the ground with basic checks for data quality.
Learn how to start writing SodaCL checks.
Read more about SodaCL metrics and checks in general.
Learn more about How Soda works.
Need help?
What can Soda do for you? Request a demo.
Join the Soda community on Slack.
Last updated
Was this helpful?
