Loading...
Loading...
Loading...
Loading...
Loading...
Loading...
Loading...
Loading...
Loading...
Loading...
Loading...
Loading...
Loading...
Loading...
Loading...
Loading...
Loading...
Loading...
Loading...
Loading...
Loading...
Loading...
Loading...
Loading...
Loading...
Loading...
Loading...
Loading...
Loading...
Loading...
Loading...
Loading...
Loading...
Loading...
Loading...
Loading...
Loading...
Loading...
Loading...
Loading...
Loading...
Loading...
Loading...
Loading...
Loading...
Loading...
Loading...
Loading...
Loading...
Loading...
Loading...
Loading...
Loading...
Loading...
Loading...
Loading...
Loading...
Loading...
Loading...
Loading...
Loading...
Loading...
Loading...
Loading...
Loading...
Loading...
Loading...
Loading...
Loading...
Loading...
Loading...
Loading...
Loading...
Loading...
Loading...
Loading...
Loading...
Loading...
Loading...
Loading...
Loading...
Loading...
Loading...
Loading...
Loading...
Loading...
Loading...
Loading...
Loading...
Loading...
Loading...
Loading...
Loading...
Loading...
Loading...
Loading...
Loading...
Loading...
Loading...
Loading...
Access configuration details to connect Soda to Databricks using a Spark data source.
You can use the Soda Library packages for Apache Spark to connect to Databricks SQL or to use Spark DataFrames on Databricks.
Refer to Connect to Spark for Databricks SQL.
Refer to Use Soda Library with Spark DataFrames on Databricks. 🎥 Watch a video that demonstrates how to add Soda to your Databricks pipeline: https://go.soda.io/soda-databricks-video
Integrate Soda with Atlan to access details about the quality of your data from right within your data catalog.
Integrate Soda with Atlan to access details about the quality of your data from within the data catalog.
Run data quality checks using Soda and visualize quality metrics and rules within the context of a data source, dataset, or column in Atlan.
Use Soda Cloud to flag poor-quality data in lineage diagrams.
Give your Atlan users the confidence of knowing that the data they are using is sound.
You have completed at least one Soda scan to validate that the data source’s datasets appear in Soda Cloud as expected.
You have an Atlan account with the privileges necessary to allow you to set up a Connection in your Atlan workspace.
Follow the instructions to Generate API keys in Soda to use for authentication in your Atlan connection.
Follow Atlan's documentation to set up the Connection to Soda in your Atlan workspace.
🎥 Watch the Atlan-Soda integration in action!
Access a list of all integrations that Soda Cloud supports.
Use a webhook to integrate with Jira, ServiceNow, and other tools your team already uses.
Soda is a data quality platform that provides tools to monitor, test, and improve data quality across all stacks.
Welcome to the Soda documentation hub, your one-stop resource for everything you need to know about Soda’s data quality platform. Dive into our guides, tutorials, reference materials, and integration pages to learn how keep your data quality fresh across your entire stack.
This is the documentation for Soda v3. If you are using Soda v4 or want to learn more about the next iteration of Soda, head to the .
Soda v3 is a checks-based, CLI-driven data quality tool.
Soda v4 has incorporated collaborative data contracts and end-to-end observability features to become a unified data-quality platform for all.
Learn core concepts and best practices:
: Practical Soda usage scenarios
: Define data quality checks
: Execute Soda data scans
: Check results and investigate issues
Extend Soda into your existing tools and workflows:
Detailed command, API, and configuration docs:
Need help or want to contribute?
Join our Slack Community:
Browse GitHub Discussions:
Still have questions? Use the search bar above or reach out through our community channels for additional help.
Integrate Soda with Microsoft Purview to access details about the quality of your data from right within your data catalog.
Integrate Soda with Microsoft's Purview data catalog to access details about the quality of your data from within the catalog.
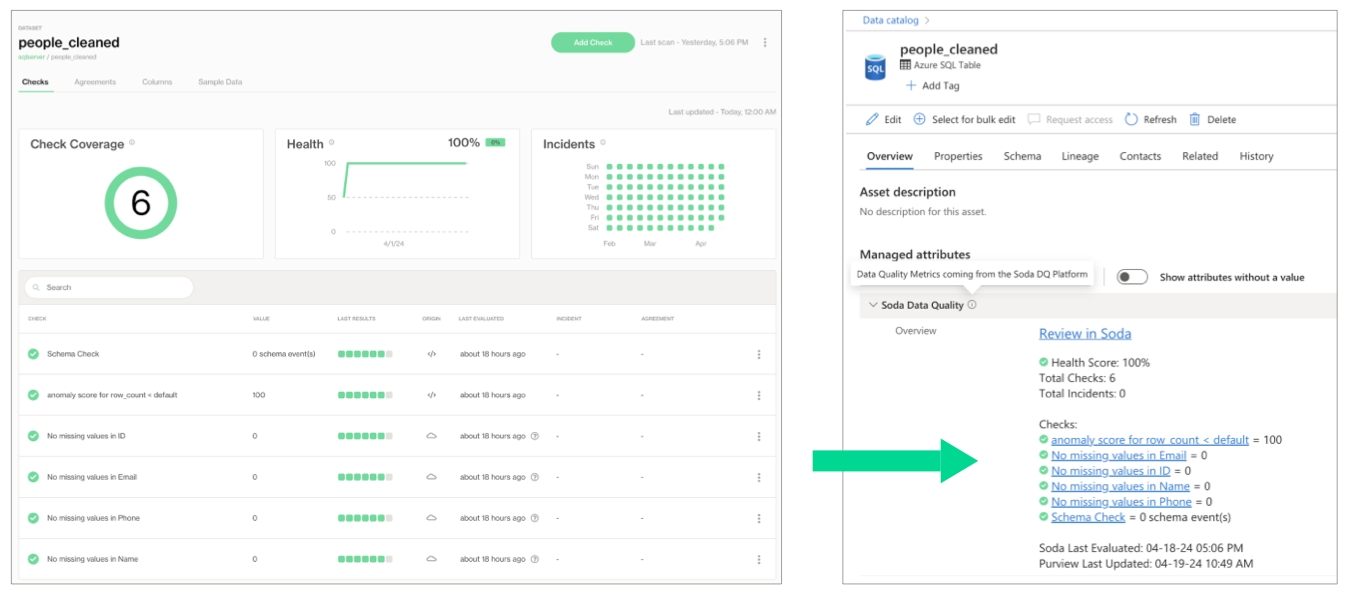
Run data quality checks using Soda and visualize quality metrics and rules within the context of a table in Purview.
Give your Purview-using colleagues the confidence of knowing that the data they are using is sound.
Encourage others to add data quality checks using a link in Purview that connects directly to Soda.
In Purview, you can see all the Soda data quality checks and the value associated with the check's latest measurement, the health score of the dataset, and the timestamp for the most recent update. Each of these checks listed in Purview includes a link that opens a new page in Soda Cloud so you can examine diagnostic and historic information about the check.
Purview displays the latest check results according to the most recent Soda scan for data quality, where color-coded icons indicate the latest result. A gray icon indicates that a check was not evaluated as part of a scan.
If Soda is performing no data quality checks on a dataset, the instructions in Purview invite a catalog user to access soda and create new checks.
You have completed at least one to validate that the data source’s datasets appear in Soda Cloud as expected.
You have a Purview account with the privileges necessary to collect the information Soda needs to complete the integration.
The data source that contains the data you wish to check for data quality is available in Purview.
Sign into your Soda Cloud account and confirm that you see the datasets you expect to see in the data source you wish to test for quality.
In your Soda Cloud account, navigate to your avatar > Profile, then navigate to the API Keys tab. Click the plus icon to generate new API keys.
Copy the following values and paste to a temporary, secure, local location.
API Key ID
API Key Secret
Access for instructions on how to create the following values, then paste to a temporary, secure, local location.
client_id
client_secret
tenant_id
Copy the value of your purview endpoint from the URL (https://XXX.purview.azure.com) and paste to a temporary, secure, local location.
To connect your Soda Cloud account to your Purview Account, contact your Soda Account Executive or email with the details you collected in the previous steps to request Purview integration.
Access configuration details to connect Soda to a Google CloudSQL data source.
Integrate your Slack workspace in your Soda Cloud account so that Soda Cloud can send Slack notifications to your team when a data issue triggers an alert.
As a user with permission to do so in your Soda Cloud account, you can integrate your Slack workspace in your Soda Cloud account so that Soda Cloud can interact with individuals and channels in the workspace. Use the Slack integration to:
send notifications to Slack when a check result triggers an alert
create a private channel whenever you open new incident to investigate a failed check result
track Soda Discussions wherein your fellow Soda users collaborate on data quality checks
In Soda Cloud, navigate to your avatar > Organization Settings, then navigate to the Integrations tab and click the + icon to add a new integration.
Follow the guided steps to authorize Soda Cloud to connect to your Slack workspace. If necessary, contact your organization’s Slack Administrator to approve the integration with Soda Cloud.
Configuration tab: select the public channels to which Soda can post messages; Soda cannot post to private channels.
Note that Soda caches the response from the Slack API, refreshing it hourly. If you created a new public channel in Slack to use for your integration with Soda, be aware that the new channel may not appear in the Configuration tab in Soda until the hourly Slack API refresh is complete.
You can use this integration to enable Soda Cloud to send alert notifications to a Slack channel to notify your team of warn and fail check results.
With such an integration, Soda Cloud enables users to select a Slack channel as the destination for an alert notification of an individual check or checks that form a part of an agreement, or multiple checks.
To send notifications that apply to multiple checks, see .
You can use this integration to notify your team when a new incident has been created in Soda Cloud. With such an integration, Soda Cloud displays an external link to an incident-specific Slack channel in the Incident Details.
Refer to for more details about using incidents in Soda Cloud.
You can set a default Slack channel that Soda Cloud applies to all alert notifications. If you have not already set the default Slack channel when you initially set up the integration, you can edit it to set the default.
In your Soda Cloud account, go to your avatar > Organization Settings.
Go to the Integrations tab, then click the stacked dots to the right of the Slack integration. Select Edit Integration Settings.
In the Slack Channels dialog, go to the Scope tab.
Set that apply to multiple checks in your account.
Learn more about using Slack to collaborate on resolving .
Access a list of that Soda Cloud supports.
Access reference configuration to connect Soda to a MotherDuck data source.
Install package: soda-duckdb
Refer to MotherDuck instructions for further detail.
data_source quack:
type: duckdb
database: "md:sample_data?motherduck_token=eyJhbGciOxxxxx.eyJzZXxxxxx.l4sxxxxx"
read_only: trueUse Soda's Ask AI assistant to turn natural language into production-ready data quality checks in SodaCL.
Ask AI is an in-product generative AI assistant for data quality testing. Ask AI replaces SodaGPT, the original implementation of a generative AI assistant.
✖️ Requires Soda Core Scientific (included in a Soda Agent) ✖️ Supported in Soda Core ✔️ Supported in Soda Library + Soda Cloud ✔️ Supported in Soda Cloud + Soda Agent
to your Soda Cloud account, click the Ask AI button in the main nav, then provide natural language instructions to the interface to:
receive fully-formed, syntax-correct checks in the
Generate API keys to securely connect Soda Library or a Soda Agent to Soda Cloud, or to access Soda Cloud via API.
Soda Cloud uses API keys to securely communicate with other entities such as Soda Library and self-hosted Soda Agents, and to provide secure access to Soda Cloud via API.
There are two sets of API keys that you can generate and use with Soda Cloud:
API keys for communicating with Soda Library, the Soda Cloud API or Soda Cloud Reporting API, and the Soda Library Docker image that the GitHub Action for Soda uses
API keys for communicating with a self-hosted Soda Agent
Get started with Soda! Use this curated set of instructions to quickly get data quality tests up and running.
The Soda environment has been updated since this tutorial.
Refer to for updated tutorials.
The roadmap to get started offers a curated experience to help you get from zero to productive with Soda software.
However, if a guided experience is not your style, take a different path!
data_source my_datasource_name:
type: postgres
host: db
port: "5432"
username: simple
password: simple_pass
database: postgres
schema: publicData Testing
(Checks)
CLI-centric checks written in YAML/SodaCL, run via the Python library or Agent.
Still supports YAML/SodaCL checks.
Adds full Data Testing workflows in both CLI and Web UI.
Data Observability
(Monitoring)
Anomaly dashboards provide threshold-based monitoring configured via Soda Cloud.
Metric Monitoring leverages an in-house anomaly detection algorithm to monitor data and metadata metric trends, and provide built-in alerts via Soda Cloud.
Data Contracts
File-based contracts executed via CLI/Git; verification via soda scan.
Collaborative data contracts: file-based and UI-based, executed via CLI/Git or the Soda Cloud UI.
Scope tab: select the Soda features (alert notifications and/or incidents) which can access the Slack integration.
obtain advice about how to resolve an error while using Soda
If you do not already have an account, sign up for Soda Cloud for a 45-day free trial. Then, as a user with permission to do so, navigate to your avatar > Organization Settings, then check the box to Enable Ask AI powered by Kapa.
The Ask AI Assistant is powered by kapa.ai and replaces SodaGPT. While Soda collaborates with third parties to develop certain AI features, it’s important to note that Soda does not disclose any primary data with our partners, such as data samples or data profiling details. We only share prompts and some schema information with OpenAI and kapa.ai to enhance the accuracy of the assistants.
Refer to Soda’s General Terms & Conditions in the Use of AI section for further details.
Create no-code checks via the Soda Cloud user interface.
Get started with Soda by following a tutorial.
Consider using check suggestions to profile your data and suggest basic checks for data quality.
In your Soda Cloud account, navigate to your avatar > Profile, then navigate to the API Keys tab. Click the plus icon to generate new API keys.
Copy the syntax for the soda_cloud configuration, including the values API Key ID and API Key Secret, then apply the keys according to how you intend to use them:
for use in a configuration.yml file: follow
for use with the Reporting API if your organization uses Single Sign On (SSO) to access Soda Cloud: follow
In your Soda Cloud account, navigate to your avatar > Data Sources, then navigate to the Agents tab. Click New Soda Agent.
Copy the values of the API Key ID and API Key Secret to a secure location, then apply the keys according to the instructions in the Deploy a Soda Agent documentation.
Learn more about integrating with third-party tools via a webhook.
Access a list of all integrations that Soda Cloud supports.
required
Identify the type of data source for Soda.
database
required
Identify the location of the . Refer to DuckDB documentation for details on and . This can also be a .
Some users have reported issues using the database key, but have been successful using path instead.
read_only
required
Indicate users’ access by providing a boolean value: true or false
schema_name
optional
Provide an identifier for the schema in which your dataset exists.
To confirm that you have correctly configured the connection details for the data source(s) in your configuration YAML file, use the test-connection command. If you wish, add a -V option to the command to returns results in verbose mode in the CLI.
text
CHARACTER VARYING, CHARACTER, CHAR, TEXT
number
SMALLINT, INTEGER, BIGINT, DECIMAL, NUMERIC, VARIABLE, REAL, DOUBLE PRECISION, SMALLSERIAL, SERIAL, BIGSERIAL
time
TIMESTAMP, DATE, TIME, TIMESTAMP WITH TIME ZONE, TIMESTAMP WITHOUT TIME ZONE, TIME WITH TIME ZONE, TIME WITHOUT TIME ZONE
type
Install package: soda-db2
type
required
Identify the type of data source for Soda.
host
required
Provide a host identifier.
port
required
Provide a port identifier.
username
required
Consider using system variables to retrieve this value securely.
text
VARCHAR
number
INT, INTEGER, DOUBLE, FLOAT
time
DATE, TIME, TIMESTAMP
Follow a 15-min tutorial to set up and run Soda using demo data.
Follow a Use case guide for implementation instructions that target a specific outcome.
Request a demo so we can help you get the most out of your Soda experience.
Choose a flavor of Soda 🚀 Start here!
Set up Soda
Need help? Join the Soda community on Slack.
Soda enables Data Engineers, Data Scientists, and Data Analysts to test data for quality where and when they need to.
Is your data fresh? Is it complete or missing values? Are there unexpected duplicate values? Did something go wrong during transformation? Are all the data values valid? These are the questions that Soda answers.
Use Soda with GitHub Actions to test data quality during CI/CD development.
Use Soda to build data quality rules in a collaborative, browser user interface.
Use it with Airflow to test data quality after ingestion and transformation in your pipeline.
Import your dbt tests into Soda to facilitate issue investigation and track dataset health over time.
Integrate Soda with your data catalog to gauge dataset health from within the catalog.
Soda works by taking the data quality checks that you prepare and using them to run a scan of datasets in a data source. A scan is a command which instructs Soda to prepare optimized SQL queries that execute data quality checks on your data source to find invalid, missing, or unexpected data. When checks fail, they surface bad-quality data and present check results that help you investigate and address quality issues.
To test your data quality, you choose a flavor of Soda (choose a deployment model) which enables you to configure connections with your data sources and define data quality checks, then run scans that execute your data quality checks.
Connect to your data source. Connect Soda to a data source such as Snowflake, Amazon Athena, or BigQuery by providing access details for your data source such as host, port, and data source login credentials.
Define checks to surface bad-quality data. Define data quality checks using Soda Checks Language (SodaCL), a domain-specific language for data quality testing. A Soda Check is a test that Soda performs when it scans a dataset in your data source.
Run a scan to execute your data quality checks. During a scan, Soda does not ingest your data, it only scans it for quality metrics, then uses the metadata to prepare scan results1. After a scan, each check results in one of three default states:
pass: the values in the dataset match or fall within the thresholds you specified
fail: the values in the dataset do not match or fall within the thresholds you specified
error: the syntax of the check is invalid, or there are runtime or credential errors
A fourth state, warn, is something you can explicitly configure for individual checks.
Review scan results and investigate issues. You can review the scan output in the command-line and in your Soda Cloud account. Access visualized scan results, set alert notifications, track trends in data quality over time, and integrate with the messaging, ticketing, and data cataloging tools you already use, like Slack, Jira, and Atlan.
1 An exception to this rule is when Soda collects failed row samples that it presents in scan output to aid with issue investigation, a feature you can disable.
Access a Soda product overview.
Learn more about How Soda works.
Learn more about SodaCL.
Access the Glossary for a full list of Soda terminology.
type
required
Identify the type of data source for Soda.
host
required
Provide a host identifier.
port
required
Provide a port identifier.
username
required
Consider using system variables to retrieve this value securely.
password
required
Consider using system variables to retrieve this value securely.
database
required
Identify the name of your database.
schema
required
Provide an identifier for the schema in which your table exists.
text
CHARACTER VARYING, CHARACTER, CHAR, TEXT
number
SMALLINT, INTEGER, BIGINT, DECIMAL, NUMERIC, VARIABLE, REAL, DOUBLE PRECISION, SMALLSERIAL, SERIAL, BIGSERIAL
time
TIMESTAMP, DATE, TIME, TIMESTAMP WITH TIME ZONE, TIMESTAMP WITHOUT TIME ZONE, TIME WITH TIME ZONE, TIME WITHOUT TIME ZONE
type
required
Identify the type of data source for Soda.
database
required
Provide an identifier for your database.
Some users have reported issues using the database key, but have been successful using path instead.
read_only
required
Indicate users' access by providing a boolean value: true or false
text
CHARACTER VARYING, CHARACTER, CHAR, TEXT
number
SMALLINT, INTEGER, BIGINT, DECIMAL, NUMERIC, VARIABLE, REAL, DOUBLE PRECISION, SMALLSERIAL, SERIAL, BIGSERIAL
time
TIMESTAMP, DATE, TIME, TIMESTAMP WITH TIME ZONE, TIMESTAMP WITHOUT TIME ZONE, TIME WITH TIME ZONE, TIME WITHOUT TIME ZONE
Follow this tutorial to set up and run a simple Soda scan for data quality using example data.
The Soda environment has been updated since this tutorial.
Refer to for updated tutorials.
Is Soda the data quality testing solution you've been looking for? Take a sip and see! 🫧
Use the example data in this quick tutorial to set up and run a simple Soda scan for data quality.
Set up Soda | 3 minutes Build an example data source | 2 minutes | 5 minutes | 5 minutes
💡 For standard set up instructions, access the .
✨ Want a total UI experience? Use the out-of-the-box to skip the CLI.
This tutorial references a MacOS environment.
Check the following prerequisites:
You have installed Python 3.8, 3.9, or 3.10.
You have installed Pip 21.0 or greater.
(Optional) You have installed and have access to , to set up an example data source.
Visit to sign up for a Soda Cloud account which is free for a 45-day trial.
In your command-line interface, create a Soda project directory in your local environment, then navigate to the directory.
Best practice dictates that you install the Soda using a virtual environment. In your command-line interface, create a virtual environment in the .venv directory, then activate the environment.
Execute the following command to install the Soda package for PostgreSQL in your virtual environment. The example data is in a PostgreSQL data source, but there are 15+ data sources with which you can connect your own data beyond this tutorial.
Validate the installation.
To exit the virtual environment when you are done with this tutorial, use the command deactivate.
To enable you to take a first sip of Soda, you can use Docker to quickly build an example PostgreSQL data source against which you can run scans for data quality. The example data source contains data for AdventureWorks, an imaginary online e-commerce organization.
(Optional) Access the repository in GitHub.
(Optional) Access a quick view of the .
Open a new tab in Terminal.
If it is not already running, start Docker Desktop.
Run the following command in Terminal to set up the prepared example data source.
When the output reads data system is ready to accept connections, your data source is set up and you are ready to proceed.
Alternatively, you can use your own data for this tutorial. To do so:
Skip the steps above involving Docker.
Install the Soda Library package that corresponds with your data source, such as soda-bigquery, soda-athena, etc. See full list.
Collect your data source's login credentials that you must provide to Soda so that it can scan your data for quality.
To connect to a data source such as Snowflake, PostgreSQL, Amazon Athena, or GCP BigQuery, you use a configuration.yml file which stores access details for your data source.
This tutorial also instructs you to connect to a Soda Cloud account using API keys that you create and add to the same configuration.yml file. Available for free as a 45-day trial, your Soda Cloud account validates your free trial or license, gives you access to visualized scan results, tracks trends in data quality over time, lets you set alert notifications, and much more.
In a code editor such as Sublime or Visual Studio Code, create a new file called configuration.yml and save it in your soda_sip directory.
Copy and paste the following connection details into the file. The data_source configuration details connect Soda to the example AdventureWorks data source you set up using Docker. If you are using your own data, provide the data_source values that correspond with your own data source.
Output:
Create another file in the soda_sip directory called checks.yml. A check is a test that Soda executes when it scans a dataset in your data source. The checks.yml file stores the checks you write using the Soda Checks Language (SodaCL).
Open the checks.yml file in your code editor, then copy and paste the following checks into the file.
Save the changes to the checks.yml file, then, in Terminal, use the following command to run a scan. A scan is a CLI command which instructs Soda to prepare SQL queries that execute data quality checks on your data source. As input, the command requires:
-d the name of the data source to scan
-c the filepath and name of the configuration.yml file
the filepath and name of the checks.yml file
Command:
Output:
As you can see in the Scan Summary in the command-line output, some checks failed and Soda sent the results to your Cloud account. To access visualized check results and further examine the failed checks, return to your Soda account in your browser and click Checks.
In the table of checks that Soda displays, you can click the line item for one of the checks that failed to examine the visualized results in a line graph, and to access the failed row samples that Soda automatically collected when it ran the scan and executed the checks. Use the failed row samples, as in the example below, to determine what caused a data quality check to fail.
✨Well done!✨ You've taken the first step towards a future in which you and your colleagues can trust the quality and reliability of your data. Huzzah!
If you are done with the example data, you can delete it from your account to start fresh with your own data.
Navigate to your avatar > Data Sources.
In the Data Sources tab, click the stacked dots to the right of the adventureworks data source, then select Delete Data Source.
Follow the steps to confirm deletion.
Get inspired on how to set up Soda to meet your .
Use to quickly get off the ground with basic checks for data quality.
Learn writing SodaCL checks.
Read more about in general.
What can Soda do for you? .
Join the .
Use Soda Cloud to set alert notification rules for multiple checks across datasets in your account.
In Soda Cloud, you can define where and when to send alert notifications when check results warn or fail. You can define these parameters for:
agreements as you create or edit them; see Define SodaCL checks for Use an agreement.
no-code checks after you have created them; see Define SodaCL checks for Use a no-code check.
multiple checks by defining notification rules; read on!
For example, you can define a notification rule to instruct Soda Cloud to send an alert to your #sales-engineering Slack channel whenever a data quality check on the snowflake_sales data source fails.
By default, Soda Cloud establishes two notification rules on your Soda Cloud account by default. You can these rules if you wish.
Refer to for details on resource ownership.
For a new rule, you define conditions for sending notifications including the severity of a check result and whom to notify when bad data triggers an alert.
In Soda Cloud, navigate to your avatar > Notification Rules, then click New Notification Rule. Follow the guided steps to complete the new rule. Use the table below for insight into the values to enter in the fields and editing panels.
Navigate to your avatar > Notification Rules, then click the stacked dots at the right of a check and select Edit Notification Rule or Delete Notification Rule.
Learn more about SodaCL .
Integrate your Soda Cloud account with your .
Integrate your Soda Cloud account with a third-party tool using a .
Use a SodaCL automated monitoring check to automatically check for row count anomalies and schema changes.
This feature is not supported in Soda Core OSS.
Migrate to Soda Library in minutes to start using this feature for free with a 45-day trial.
Use automated monitoring checks to instruct Soda to automatically check for row count anomalies and schema changes in a dataset.
✔️ Requires Soda Core Scientific (included in a Soda Agent) ✖️ Supported in Soda Core ✔️ Supported in Soda Library + Soda Cloud ✔️ Supported in Soda Cloud Agreements + Soda Agent ✖️ Available as no-code checks
When you add automated monitoring checks to a data source connected to your Soda Cloud account via a self-hosted agent, Soda prepares and executes two checks on all the datasets you indicated as included in the configuration.
Anomaly score check on row count: This check counts the number of rows in a dataset during scan and registers anomalous counts relative to previous measurements for the row count metric. Refer to for details. Anomaly score checks require a minimum of four data points (four scans at stable intervals) to establish a baseline against which to gauge anomalies. If you do not see check results immediately, allow Soda Library to accumulate the necessary data points for relative comparison.
Schema evolution check: This check monitors schema changes in datasets, including column addition, deletion, data type changes, and index changes. By default, this automated check results in a failure if a column is deleted, its type changes, or its index changes; it results in a warning if a column is added. Refer to for details. Schema checks require a minimum of one data point to use as a baseline against which to gauge schema changes. If you do not see check results immediately, wait until after you have scanned the dataset twice.
Add automated monitoring checks as part of the guided workflow to create a new data source only in deployment models that use a self-hosted Soda agent, not a Soda-hosted Soda agent. For a Soda-hosted agent, consider using the automated for observability into basic data quality in your datasets.
If you are using a self-operated deployment model that leverages Soda Library, add the column profiling configuration outlined below to your checks YAML file.
In Soda Cloud, navigate to your avatar > Data Sources > New Data Source to begin.
In step 5. Check of the guided workflow, you have the option of listing the datasets to which you wish to automatically add anomaly score and schema evolution checks. (Note that if you have signed up for early access to for datasets, this Check tab is unavailable as Soda performs all automated monitoring automatically in the dashboards.)
The example check below uses a wildcard character (%) to specify that Soda Library executes automated monitoring checks against all datasets with names that begin with prod, and not to execute the checks against any dataset with a name that begins with test.
You can also specify individual datasets to include or exclude, as in the following example.
To review the check results for automated monitoring checks in Soda Cloud, you can:
navigate to the Checks dashboard to see the check results
navigate to the Datasets dashboard to see the check results for an individual dataset
To add those necessary quotes to dataset names that Soda acts upon automatically – discovering, profiling, or sampling datasets, or creating automated monitoring checks – you can add a quote_tables configuration to your data source, as in the following example.
If your dataset names include white spaces or use special characters, you must wrap those dataset names in quotes whenever you identify them to Soda, such as in a checks YAML file.
Learn more about the for datasets.
Reference .
Use a to gauge how recently your data was captured.
Use to compare the values of one column to another.
Soda enables you to seamlessly integrate data quality checks into the tools and workflows you already use across your data stack, whether aligning data governance efforts, collaborating across teams, or triggering automated CI/CD and incident-management workflows.
These integrations surface data quality metrics and rule definitions directly within your existing tools, automate alert notifications to your teams, and streamline the creation and tracking of incidents and tickets based on check results.
To get started, select the integration you need from the list below for detailed instructions, prerequisites, and troubleshooting tips:
Data catalogs & governance tools
Access data quality insights directly within your Alation catalog. Run Soda scans to surface quality metrics and rules in the context of data sources, datasets, or columns.
Surface Soda-driven quality checks and metrics alongside your Atlan metadata. Flag poor-quality data in lineage diagrams and explore data-profile details in Atlan.
Explore any of these guides to get started with your preferred integration, and unlock end-to-end data-quality observability across your stack.
From time to time, Soda may encounter runtime issues when it attempts to run a data quality scan on data in your data source. Issues such as unresponsive databases, or incorrectly defined checks may cause delays in the scan process which can result in excessive check execution times, sluggish database responsiveness due to heavy loads, or scheduling conflicts with other processes that cause bottlenecks.
You can view the status of scans that are in progress, queuing, completed, or partially complete with errors in the Scans dashboard in Soda Cloud.
To provide visibility into slow, incomplete, or failed Soda scans, you can set up customized alerts notifications for each Scan Definition that you created using Soda Cloud.
Log in to your Soda Cloud account, then navigate to Scans, and access the Agents tab. (You cannot set scan definition notifications for scans that you run using Soda Library.)
From the list, select one that uses the Scan Definition for which you wish to configure alerts.
On the scan definition's page, click the stacked dots at right, then select Edit Scan Definition.
When you notice or receive a notification about a scan failure or delay, you can access the scan’s logs to investigate what is causing the issue.
Log in to your Soda Cloud account, then navigate to Scans, and access the Agents tab.
From the list of scan definitions, select the one that failed or timed out.
On the scan definitions’s page, in the list of scan results, locate the one that failed or timed out, then click the stacked dots to its right and select Scan Logs.
Review the scan log, using the filter to show only warning or errors if you wish, or downloading the log file for external analysis.
Use the Scans page to access an overview of the executing and queuing scans in your Soda Cloud account. If you wish, you can cancel and restart a scan to manage the order in the queue.
On the Scans page, select a scan that is in an Executing state.
On the scan definition's page, click Cancel Scan.
When the scan state reads Canceled, you can click Run Scan from the same page to restart the scan.
To prevent processing bottlenecks, configure a scan timeout on your Soda Agent to ensure that excessively long-running scans stop automatically. If you have configured a delayed completion alert using the procedure above, Soda uses this timeout value to trigger alert notifications.
By default, Soda sets the scan timeout to two hours; follow the steps below to adjust that value.
Log in to your Soda Cloud account, then navigate to your avatar, Data Sources, and access the Agents tab.
From the list of Agents, select the one for which you wish to adjust the timeout value.
On the agent's page, click the stacked dots at right, then select Edit Agent.
Use the dropdown to adjust the value of Timeout Scans After
Best practice dictates that to enhance scan efficiency, you avoid scheduling resource-intensive tasks, such as , concurrently with checks. This practice minimizes the likelihood of delays caused by resource contention, ensuring smoother execution of scans.
Do not set all of your scan definitions to run at the same time, particularly if the scans use the same Soda Agent. Mindfully stagger scan definition times to more evenly distribute executions and reduce the risk of bottlenecks, delays, and failed scans.
As the volume of checks a scan executes organically increases over time, scans may take longer to execute. If your scans are timing out too frequently, adjust the to a higher threshold.
for checks that fail or warn during a Soda scan.
Configure a webhook to connect Soda to your ServiceNow account.
Configure a webhook in Soda Cloud to connect to your ServiceNow account.
In ServiceNow, you can create a Scripted REST API that enables you to prepare a resource to work as an incoming webhook. Use the ServiceNow Resource Path in the URL field in the Soda Cloud integration setup.
This example offers guidance on how to set up a Scripted REST API Resource to generate an external link which Soda Cloud displays in the Incident Details; see image below. When you change the status of a Soda Cloud incident, the webhook also updates the status of the SNOW issue that corresponds with the incident.
Refer to Event payloads for details information.
The following steps offer a brief overview of how to set up a ServiceNow Scripted REST API Resource to integrate with a Soda Cloud webhook. Reference the ServiceNow documentation for details:
and
In ServiceNow, start by navigating to the All menu, then use the filter to search for and select Scripted REST APIs.
Click New to create a new scripted REST API. Provide a name and API ID, then click Submit to save.
In the Scipted Rest APIs list, find and open your newly-created API, then, in the Resources tab, click New to create a new resource.
As a business user, learn more about in Soda Cloud.
Set that apply to multiple checks in your account.
Learn more about creating, tracking, and resolving data quality .
Access a list of that Soda Cloud supports.
Learn how to double-onboard a data source to leverage all the features supported by Soda Agents.
To scan your data for quality, Soda must connect to a data source using connection configurations (host, port, login credentials, etc.) that you either define in Soda Cloud during onboarding using a Soda Agent, or in a configuration YAML file you reference during programmatic or CLI scans using Soda Library. Soda recognizes each data source you onboard as an independent resource in Soda Cloud, where it displays all scan results and failed row samples for all data sources regardless of onboarding method.
However, data sources you connect via a Soda agent using the guided workflow in Soda Cloud support several features which data sources you connect via Soda Library do not, including:
Available in 2025
If you have onboarded a data source via Soda Library but you wish to take advantage of the features available to Soda Agent-onboarded data sources, you can double-onboard an existing data source.
See also:
See also:
See also: in Soda Cloud
You , you have configured it to connect to your data source, and you have run at least one programmatically or via the Soda Library CLI.
You have deployed a helm chart in a Kubernetes cluster in your cloud services environment OR Someone with Soda Admin privileges in your organization’s Soda Cloud account has navigated to your avatar > Organization Settings check the box to Enable Soda-hosted Agent; see .
You have access to the connection configurations (host, port, login credentials, etc.) for your data source.
1 MS SQL Server with Windows Authentication does not work with Soda Agent out-of-the-box.
Log in to Soda Cloud, then navigate to your avatar > Data Sources.
From the list of data sources connected to your Soda Cloud account, click to select and open the one you onboarded via Soda Library and now wish to double-onboard via a Soda Agent.
Follow the guided workflow to onboard the existing data source via a Soda Agent, starting by using the dropdown to select the Default Scan Agent you wish to use to connect to the data source.
define a schedule for your default scan definition
provide connection configuration details for the data source such as name, schema, and login credentials, and test the connection to the data source
profile the datasets in the data source to gather basic metadata about the contents of each
identify the datasets to which you wish to apply automated monitoring for anomalies and schema changes
Save your changes, then navigate to the Datasets page and select a dataset in the data source you just double-onboarded.
(Optional) If you wish, and if you have for the feature, you can follow the instructions to for the dataset.
(Optional) Click Add Check and begin adding to the dataset.
Known issue: Double-onboarding a data source renders Soda Library API keys invalid. After double-onboarding a data source, if you run a programmatic or CLI scan of that data source using Soda Library, an error appears to indicate that the API keys are invalid. As a workaround, in Soda Cloud, then, in your configuration YAML, replace the old API key values with the newly-generated ones.
Learn more about for observability.
Access configuration details to connect Soda to a Microsoft Fabric data source.
Install package: soda-fabric
Soda support for Fabric data source is based on soda-sqlserver package.
data_source my_datasource_name:
type: fabric
host: host
port: '1433'
username: simple
password: simple_pass
database: database
schema: dbo
trusted_connection: false
encrypt: false
trust_server_certificate: false
driver: ODBC Driver 18 for SQL Server
scope: DW
connection_parameters:
multi_subnet_failover: true
authentication: sqlIf you have integrated Soda Cloud with Slack, you can use an Incident’s built-in ability to create a channel that your team can use to investigate an issue.
When Soda runs a scan to execute the SodaCL checks you defined, Soda Cloud displays the checks and their latest scan results in the Checks dashboard. For a check that failed or triggered a warning, you have the option of creating an Incident for that check result in Soda Cloud to track your team's investigation and resolution of a data quality issue.
If you have integrated your Soda Cloud account with a Slack workspace, or MS Teams channel, or another third-party messaging or ticketing tool that your team uses such as Jira or ServiceNow, you can use an incident’s built-in ability to create an incident-specific link where you and your team can collaborate on the issue investigation.
Log in to your Soda Cloud account, then navigate to the Checks dashboard.
For the check you wish to investigate, click the stacked dots at right, then select Create Incident. Provide a Title, Severity, and Description of your new incident, then save.
In the Incident column of the check result, click the Incident link to access the Incident page where you can record the following details:
As your team works through the investigation of an Incident, use the Incident's Status field to keep track of your progress.
In the Incidents dashboard, review all Incidents, their severity and status, and the assigned lead. Sort the list of Incidents by severity.
From an Incident's page, link other check results to the same Incident to expand the investigation landscape.
If you opened a Slack channel to investigate the incident, Soda archives the channel when you set the
to facilitate your search for the right data.
for a check result.
Collaborate with your team using a .
Integrate Soda with your or .
Access configuration details to connect Soda to a ClickHouse data source.
Because ClickHouse is compatible with MySQL wire protocol, Soda offers indirect support for ClickHouse data sources using the soda-mysql package.
To confirm that you have correctly configured the connection details for the data source(s) in your configuration YAML file, use the test-connection command. If you wish, add a -V option to the command to returns results in verbose mode in the CLI.
Use this guide to invoke Soda data quality tests from inside a Databricks notebook.
Use this guide to install and set up Soda in a Databricks notebook so you can run data quality tests on data in a Spark data source.
🎥 Watch a video that demonstrates how to add Soda to your Databricks pipeline:
The instructions below offer Data Engineers an example of how to write Python in a Databricks notebook to set up Soda, then write and execute scans for data quality in Spark.
This example uses a programmatic deployment model which invokes the Soda Python library, and uses Soda Cloud to validate a commercial usage license and display visualized data quality test results. See:
Access configuration details to connect Soda to an Athena data source.
Use attributes, tags, and filters to facilitate your search for the specific data quality status of your datasets.
With dozens, or even hundreds of datasets in your Soda Cloud account, it may be laborious to try to find the data quality information you're looking for. To facilitate your search for specific data quality status, consider defining your own Attributes and Tags for datasets, then use filters to narrow your search.
Define new attributes for datasets in your organization that your colleagues can use to categorize datasets for easy identification and discovery. Consider adding multiple attributes to access precise cross-sections of data quality.
Use a SodaCL cross check to compare row counts across datasets in the same, or different, data sources.
Use a cross check to compare row counts between datasets within the same, or different, data sources.
See also:
✖️ Requires Soda Core Scientific (included in a Soda Agent) ✔️ Supported in Soda Core ✔️ Supported in Soda Library + Soda Cloud ✔️ Supported in Soda Cloud Agreements + Soda Agent ✖️ Available as a no-code check
In the context of , cross checks are unique. This check employs the row_count metric and is limited in its syntax variation, with only a few mutable parts to specify dataset and data source names.
Integrate MS Teams in your Soda Cloud account so that Soda sends alert notifications and incident events to your MS Teams conversation.
Access examples of Soda implementations according to use case and data quality testing needs.
Use the following guides as example implementations based on how you intend to use Soda for data quality testing. For standard set up instructions, see .
Set up Soda to programmatically scan the contents of a local file using Dask.
For use with , only. Refer to .
to use Soda to scan a local file for data quality. Refer to the following example that executes a simple check for row count of the dataset.
data_source my_datasource_name:
type: duckdb
database: filename.db
read_only: true
schema_name: publicsoda test-connection -d my_datasource -c configuration.yml -Vdata_source my_datasource_name:
type: db2
host: 127.0.0.1
port: 50000
username: simple
password: simple_pass
database: database
schema: publicautomated monitoring:
datasets:
- include %
- exclude test%data_source my_datasource_name:
type: denodo
username: simple
password: simple_pass
host: 127.0.0.1
port: 5432
sslmode: preferdata_source my_datasource_name:
type: mysql
host: 127.0.0.1
port: `9004`
username: simple
password: simple_pass
database: customersEmbed Soda’s data quality details within Metaphor’s catalog interface. Leverage the Metaphor integration to visualize rules, metrics, and profiles in your governance workflow.
View Soda-powered data quality rules and metrics in Microsoft Purview. Provide your colleagues with confidence in table-level data through inline quality indicators.
CI/CD & development tools
Ingest dbt-core or dbt Cloud test results into Soda Cloud to track and visualize your test outcomes over time, set alerts on failures, and manage data-quality incidents alongside dbt runs.
Add the Soda GitHub Action to your workflows to automatically execute data-quality scans on pull requests or commits, with results posted as PR comments and in Soda Cloud reports.
Messaging & collaboration
Send alert notifications and incident events to Slack channels. Create private incident channels, track Soda Discussions, and collaborate on failed checks in real time.
Route Soda alert notifications and incident updates into Microsoft Teams channels. Use Teams workflows to manage and triage data-quality issues.
Incident & ticketing systems
Configure Soda Cloud incidents to automatically create and sync Jira tickets. Keep incident status, descriptions, and links up to date between Soda and Jira.
Use webhooks to bridge Soda incidents with ServiceNow issues. Automate ticket creation and status updates from Soda Cloud into ServiceNow.
Connect Soda Cloud to any HTTP endpoint—PagerDuty, OpsGenie, custom apps—for alert notifications, incident tracking, and agreement events.
Security & access
Configure SAML 2.0 SSO with Azure AD, Okta, Google Workspace, or other IdPs. Simplify secure access, user provisioning, and group syncing for your Soda Cloud organization.
import dask.dataframe as dd
from soda.scan import Scan
# Create Soda Library Scan object and set a few required properties
scan = Scan()
scan.set_scan_definition_name("test")
scan.set_data_source_name("dask")
# Read a `cities` CSV file with columns 'city', 'population'
ddf = dd.read_csv('cities.csv')
scan.add_dask_dataframe(dataset_name="cities", dask_df=ddf)
# Define checks using SodaCL
checks = """
checks for cities:
- row_count > 0
"""
# Add the checks to the scan and set output to verbose
scan.add_sodacl_yaml_str(checks)
scan.set_verbose(True)
# Execute the scan
scan.execute()
# Inspect the scan object to review scan results
scan.get_scan_results()Solution: Start Docker Desktop running.
Problem: When you run docker-compose up you get an error that reads Cannot start service soda-adventureworks: Ports are not available: exposing port TCP 0.0.0.0:5432 -> 0.0.0.0:0: listen tcp 0.0.0.0:5432: bind: address already in use.
Solution:
1. Execute the command lsof -i tcp:5432 to print a list of PIDs using the port.
2. Use the PID value to run the following command to free up the port: kill -9 your_PID_value. You many need to prepend the commands with sudo .
3. Run the docker run command again.
soda_cloudconfiguration.ymlSave the configuration.yml file and close the API modal in your Soda account.
In Terminal, return to the tab in which the virtual environment is active in the soda_sip directory. Run the following command to test Soda's connection to the data source.
Command:
last_nameNo duplicate phone numbers validates that each value in the phone column is unique. See Numeric metrics.
Columns have not been added, removed, or changed compares the schema of the dataset to the last scan result to determine if any columns were added, deleted, changed data type, or changed index. The first time this check executes, the results show [NOT EVALUATED] because there are no previous values to which to compare current results. In other words, this check requires a minimum of two scans to evaluate properly. See Schema checks.
Data in this dataset is less than 7 days old confirms that the data in the dataset is less than seven days old. See Freshness checks.
configuration.yml file.
5. Adjust your checks.yml to point to your own dataset in your data source, then adjust the checks to apply to your own data. Go ahead and run a scan!Learn more about How Soda works.
Send a notification when a scan fails.
Check this box to instruct Soda to send a notification when a scan fails to complete, or completes with errors.
Send a notification when a scan does not occur according to the scan definition.
Check this box to instruct Soda to send a notification when a scan times out, meaning it does not complete within a specific time frame after the scheduled start time. See: Configure scan timeouts.
Notify after
Use the dropdown to select the time delay between when a scheduled scan fails or does not complete within the expected timeframe, and when Soda sends an alert notification. For example, set this to 12h to receive a notification 12 hours after Soda logged the failed or delayed scan.
Notify recipients
Use this field to identify to whom Soda sends scan failure or delay alert notifications.
Need help? Join the .
In the Script field, define a script that creates new tickets when a Soda Cloud incident is opened, and updates existing tickets when a Soda Cloud incident status is updated. Use the example below for reference. You may also need to define Security settings according to your organizations authentication rules.
Click Submit, then copy the value of the Resource path to use in the URL field in the Soda Cloud integration setup.
Need help? Join the .
Your data source is compatible with a Soda Agent; refer to tables below.
assign ownership roles for the data source and its datasets
Amazon Athena Amazon Redshift Azure Synapse ClickHouse Databricks SQL Denodo Dremio DuckDB GCP BigQuery Google CloudSQL
IBM DB2 MotherDuck MS SQL Server1 MySQL OracleDB PostgreSQL Presto Snowflake Trino Vertica
BigQuery Databricks SQL MS SQL Server MySQL
PostgreSQL Redshift Snowflake
Need help? Join the .
Provide an identifier for your database.
schema
required
Provide an identifier for the schema in which your dataset exists.
trusted_connection
optional
Indicate connection trustworthiness by providing a boolean value: true or false. The default value is false. Set to true if you are using Active Directory authentication.
encrypt
optional
Indicate the encryption status by providing a boolean value: true or false. The default value is false.
trust_server_certificate
optional
Specifies whether encryption occurs if there is no verifiable server certificate. Provide a boolean value: true or false. The default value is false.
driver
optional
Use this config setting to specify the ODBC driver version you use. For example, SQL Server Native Client 11.0 or ODBC Driver 18 for SQL Server.
scope
optional
Access token scope.
multi_subnet_failover
optional
Enable MultiSubnetFailover; see .
authentication
optional
Authentication method to use. Supported values: sql, activedirectoryinteractive, activedirectorypassword, activedirectoryserviceprincipal, activedirectory, auto, cli, environment, synapsespark, and fabricspark. The default value is sql, which uses username and password
type
required
Identify the type of data source for Soda.
host
required
Provide a host identifier.
port
optional
Provide a port identifier. You can remove the port config setting entirely. Default: 1433.
username
required
Use system variables to retrieve this value securely.
password
required
Use system variables to retrieve this value securely.
database
required
For Soda to run quality scans on your data, you must configure it to connect to your data source. To learn how to set up Soda and configure it to connect to your data sources, see .
Severity: Minor, Major, or Critical
Status: Reported, Investigating, Fixing, Resolved
Lead: a list of team members from whom you can assign the Lead Investigator role
Save your changes.
If you have connected your Soda Cloud account to Slack, navigate to the Integrations tile, then click the auto-generated link that connects directly to a newly-created, public channel in your Slack workspace that is dedicated to the investigation and resolution of the incident and invite team members to the channel to collaborate on resolving the data quality issue. If you have integrated Soda Cloud with MS Teams or another third-party tool, like Jira or ServiceNow, you can access those tools via auto-generated links in the Integrations tile, as well.
Need help? Join the .
soda-dremiotype
required
Identify the type of data source for Soda.
host
required
Provide a host identifier.
port
required
Provide a port identifier.
username
required
Consider using system variables to retrieve this value securely.
To confirm that you have correctly configured the connection details for the data source(s) in your configuration YAML file, use the test-connection command. If you wish, add a -V option to the command to returns results in verbose mode in the CLI.
text
CHAR, VARCHAR, STRING
number
TINYINT, SMALLINT, INT, INTEGER, BIGINT, DOUBLE, FLOAT, DECIMAL
time
DATE, TIMESTAMP
For Soda to run quality scans on your data, you must configure it to connect to your data source. To learn how to set up Soda and configure it to connect to your data sources, see .
To validate your account license or free trial, Soda Library must communicate with a Soda Cloud account via API keys. You create a set of API keys in your Soda Cloud account, then use them to configure the connection to Soda Library.
In a browser, navigate to cloud.soda.io/signup to create a new Soda account, which is free for a 45-day trial. If you already have a Soda account, log in.
Navigate to your avatar > Profile, then access the API keys tab. Click the plus icon to generate new API keys.
Copy+paste the API key values to a temporary, secure place in your local environment.
Soda Library has the following requirements:
Python 3.8, 3.9, or 3.10
Pip 21.0 or greater
Download the notebook: Soda Databricks notebook
Use Soda to test data in a Databricks pipeline.
Learn more about SodaCL checks and metrics.
Access instructions to Generate API Keys.
Need help? Join the .
type
required
Identify the type of data source for Soda.
access_key_id
required 1
Consider using system variables to retrieve this value securely. See .
secret_access_key
required 1
Consider using system variables to retrieve this value securely. See .
region_name
optional
The endpoint your AWS account uses. Refer to .
role_arn
optional 2
Specify role to use for authentication and authorization.
staging_dir
1 access_key_id and secret_access_key are required parameters to obtain an authentication token from Amazon Athena or Redshift. You can provide these key values in the configuration file or as environment variables.
2You may add the optional role_arn parameter which first authenticates with the access keys, then uses the role to access temporary tokens that allow for authentication. Depending on your Athena or Redshift setup, you may be able to use only the role_arn to authenticate, though Athena still must access the keys from a config file or environment variables. See AWS Boto3 documentation for details on the progressive steps it takes to access the credentials it needs to authenticate.
Some users who access their Athena or Redshift data source via a self-hosted Soda Agent deployed in a Kubernetes cluster have reported that they can use IAM roles for Service Accounts to authenticate, as long as the IAM role that the Kubernetes pod has from the Kubernetes Service Account has the permissions to access Athena or Redshift. See Enable IAM Roles for Service Accounts (IRSA) on the EKS cluster.
To confirm that you have correctly configured the connection details for the data source(s) in your configuration YAML file, use the test-connection command. If you wish, add a -V option to the command to returns results in verbose mode in the CLI.
text
CHAR, VARCHAR, STRING
number
TINYINT, SMALLINT, INT, INTEGER, BIGINT, DOUBLE, FLOAT, DECIMAL
time
DATE, TIMESTAMP
required
Identify the type of data source for Soda.
host
required
Provide a host identifier.
port
optional
Provide a port identifier. You can remove the port config setting entirely. Default: 1433.
username
required
Use system variables to retrieve this value securely.
password
required
Use system variables to retrieve this value securely.
database
required
Provide an identifier for your database.
schema
required
Provide an identifier for the schema in which your dataset exists.
trusted_connection
optional
Indicate connection trustworthiness by providing a boolean value: true or false. The default value is false. Set to true if you are using Active Directory authentication.
encrypt
optional
Indicate the encryption status by providing a boolean value: true or false. The default value is false.
trust_server_certificate
optional
Specifies whether encryption occurs if there is no verifiable server certificate. Providing a boolean value: true or false. The default value is false.
driver
optional
Use this config setting to specify the ODBC driver version you use. For example, SQL Server Native Client 11.0 or ODBC Driver 18 for SQL Server.
scope
optional
Access token scope.
multi_subnet_failover
optional
Enable MultiSubnetFailover; see .
authentication
optional
Authentication method to use. Supported values: sql, activedirectoryinteractive, activedirectorypassword, activedirectoryserviceprincipal, activedirectory. The default value is sql which uses username and password to authenticate.
text
CHAR, VARCHAR, TEXT, NCHAR, NVARCHAR, BINARY
number
BIG INT, NUMERIC, BIT, SMALLINT, DECIMAL, SMALLMONEY, INT, TINYINT, MONEY, FLOAT, REAL
time
DATE, TIME, DATETIME, DATETIMEOFFSET
type
For Soda to run quality scans on your data, you must configure it to connect to your data source. To learn how to set up Soda and configure it to connect to your data sources, see .
by organizational department: Product Marketing, Engineering-FE, Finance-AP, Customer Success
by product
by data domain: Customer data, Product data, Order & Fulfillment data
by internal objectives and key results (OKR)
As a user with the permission to do so in your Soda Cloud account, navigate to your avatar > Attributes > New Attribute.
Follow the guided steps to create the new attribute. Use the details below for insight into the values to enter in the fields in the guided steps.
Label
Enter the key for the key:value pair that makes up the attribute. For example, if you define a dataset attribute's key department, its value could be marketing or finance.
Resource Type
Select Dataset to define an attribute for a dataset.
Type
Define the type of input a dataset owner may use for the value that pairs with the attribute's key:
Single select
Multi select
Checkbox
Text
Number
Date
Note that during a scan, Soda validates that the type of input for an attribute's value matches the expected type. For example, if your attribute's type is Number and the dataset owner enters a value of one instead of 1, the scan produces an error to indicate the incorrect attribute value.
Allowed Values
Applies only to Single select and Multi select. Provide a list of values that a check author may use when applying the attribute key:value pair to a check.
Description
(Optional) Provide details about the check attribute to offer guidance for your fellow Soda users.
Once created, you cannot change the type of your attribute. For example, you cannot change a checkbox attribute into a multi-select attribute.
Once created, you can change the display name of an attribute.
For a single- or multi-select attribute, you can remove, change, or add values to the list of available selections. However, if you remove or change values on such a list, you cannot search for the deleted or previous value in the dataset filter.
While only a Soda Cloud Admin can define or revise dataset attributes, any Admin, Manager, or Editor for a dataset can apply attributes to it.
Navigate to the Datasets dashboard, click the stacked dots next to a dataset, then select Edit Dataset. Use the attributes fields to apply the appropriate attributes to the dataset.
While editing a dataset, consider adding Tags to the dataset as well. Use tags to:
identify datasets that are associated with a particular marketing campaign
identify datasets that are relevant for a particular customer account
identify datasets whose quality is critical to business operations, or to categorize datasets according to their criticality in general, such as “high”, “medium”, and “low”.
identify datasets that populate a particular report or dashboard
After saving your changes and applying tags and attributes to multiple datasets, use the Filters in the Datasets dashboard to display the datasets that help narrow your study of data quality, then click Save Collection to name the custom filtered view.
In the future, use the dropdown in the Checks dashboard to quickly access your collection again.
Create alerts to notify your team of data quality issues.
Learn how to create and track data quality Incidents.
Need help? Join the .
The example check below compares the volume of rows in two datasets in the same data source. If the row count in the dim_department_group is not the same as in dim_customer, the check fails.
You can use cross checks to compare row counts between datasets in different data sources, as in the example below.
In the example, retail_customers is the name of the other dataset, and aws_postgres_retail is the name of the data source in which retail_customers exists.
If you wish to compare row counts of datasets in different data sources, you must have configured a connection to both data sources. Soda needs access to both data sources in order to execute a cross check between data sources.
The data sources do not need to be the same type; you can compare a dataset in a PostgreSQL data source to a dataset in a BigQuery data source.
✓
Define a name for a cross check; see .
✓
Add an identity to a check.
Define alert configurations to specify warn and fail alert conditions.
-
Apply an in-check filter to return results for a specific portion of the data in your dataset.
Learn more about SodaCL metrics and checks in general.
Learn more about Comparing data using SodaCL.
Use a schema check to discover missing or forbidden columns in a dataset.
Reference tips and best practices for SodaCL.
Need help? Join the .
As a user with permission to do so, log in to your Soda Cloud account, navigate to your avatar > Organization Settings, then select the Integrations tab.
Click the + at the upper right of the table of integrations to add a new integration.
In the Add Integration dialog box, select Microsoft Teams.
In the first step of the guided integration workflow, follow the instructions to navigate to your MS Teams account to create a Workflow; see Microsoft's documentation for . Use the Workflow template to Post to a channel when a webhook request is received.
In the last step of the guided Workflow creation, copy the URL created after successfully adding the workflow.
Returning to Soda Cloud with the URL for Workflow, continue to follow the guided steps to complete the integration. Reference the following tables for guidance on the values to input in the guided steps.
Name
Provide a unique name for your integration in Soda Cloud.
URL
Input the Workflow URL you obtained from MS Teams.
Enable to send notifications to Microsoft Teams when a check result triggers an alert.
Check to allow users to select MS Teams as a destination for alert notifications when check results warn or fail.
Use Microsoft Teams to track and resolve incidents in Soda Cloud.
Check to automatically send incident information to an MS Teams channel.
Channel URL
Provide a channel identifier to which Soda Cloud sends all incident events.
Use Microsoft Teams to track discussions in Soda Cloud.
Check to automatically send notifications to an MS Teams channel when a user creates or modifies a discussion in Soda Cloud.
Use the Alert Notification scope to enable Soda Cloud to send alert notifications to an MS Teams channel to notify your team of warn and fail check results. With such an integration, Soda Cloud enables users to select MS Teams as the destination for an alert notification of an individual check or checks that form a part of an agreement, or multiple checks. To send notifications that apply to multiple checks, see Set notification rules.
Use the Incident scope to notify your team when a new incident has been created in Soda Cloud. With such a scope, Soda Cloud displays an external link to the MS Teams channel in the Incident Details. Soda Cloud sends all incident events to only one channel in MS Teams. As such, you must provide a separate link in the Channel URL field in the Define Scope tab. For example, https://teams.microsoft.com/mychannel. To obtain the channel link in MS Teams, right-click on the channel name in the overview sidebar. Refer to Incidents for more details about using incidents in Soda Cloud.
Use the Discussions scope to post to a channel when a user creates or modifies a Soda Cloud discussion. Soda Cloud sends all incident events to only one channel in MS Teams. As such, you must provide a separate link in the Channel URL field in the Define Scope tab. For example, https://teams.microsoft.com/mychannel. To obtain the channel link in MS Teams, right-click on the channel name in the overview sidebar. Refer to Begin a discussion and propose checks for more details about using incidents in Soda Cloud.
Problem: You encounter an error that reads, "Error encountered while rendering this message."
Solution: A fix is documented, the short version of which is as follows.
Restart MS Teams.
Clear your cache and cookies.
If you have not already done so, update to the latest version of MS Teams.
Learn more about general webhooks to integrate Soda Cloud with other third-party service providers.
Set notification rules that apply to multiple checks in your account.
Access a list of all integrations that Soda Cloud supports.
Need help? Join the .
Soda Library Soda Cloud
Use this guide to set up Soda to test before and after data migration between data sources.
Soda Library Soda Cloud
Use this guide to set up Soda Cloud to enable users across your organization to serve themselves when it comes to testing data quality.
Soda Cloud Soda Agent
Use this guide to set up Soda to test the quality of your data during your development lifecycle in a GitHub Workflow.
Soda Library Soda Cloud
Use this guide to set up Soda to automatically monitor data quality.
Soda Cloud Soda Agent
Use the following How tos for practical advice, examples, and instructions for using Soda.
Learn how to build a customized data quality reporting dashboard in Sigma using the Soda Cloud API.
Soda Library Soda Cloud
Learn how to build a customized data quality reporting dashboard in Grafana using the Soda Cloud API.
Soda Cloud
Learn how to invoke Soda data quality tests in a Databricks notebook.
Soda Library Soda Cloud
Learn how to set up a Soda Agent to use an External Secrets Manager to retrieve frequently-rotated data source passwords.
Soda Cloud Self-hosted Agent
Learn how to use Soda Cloud API keys to securely communicate with other entities such as Soda Library and self-hosted Soda Agents, and to provide secure access to Soda Cloud via API.
Soda Cloud
Need help? Join the Soda community on Slack.
Use this guide as an example for how to set up Soda to test the quality of your data in an Airflow pipeline that uses dbt transformations.
Soda Library Soda Cloud
Learn how to invoke Soda data quality tests in an ETL pipeline in Azure Data Factory.
Soda Library Soda Cloud
Learn how to invoke Soda data quality tests in a Dagster pipeline.
Soda Library Soda Cloud
Learn how to use Databricks notesbooks with Soda to test data quality before feeding a machine learning model.
password
required
Consider using system variables to retrieve this value securely.
database
required
Provide an identifier for your database.
schema
optional
Provide an identifier for the schema in which your dataset exists.
For Soda to run quality scans on your data, you must configure it to connect to your data source. To learn how to set up Soda and configure it to connect to your data sources, see .
Send all check alerts to the Check Owner
Soda Cloud sends all check results that fail or warn to the Soda Cloud user who created or owns an individual check.
Send all check alerts to the Dataset Owner
Soda Cloud sends all check results that fail or warn to the Soda Cloud user who created or owns the dataset to which the checks are associated.
Name
Provide a unique identifier for your notification.
For
Select All Checks, or select Selected Checks to use conditions to identify specific checks to which you want the rule to apply. You can identify checks according to several attributes such as Data Source Name, Dataset Name, or Check Name.
Notify Recipient
Select the destination to which this rule sends its notifications. For example, you can send the rule’s notifications to a channel in Slack.
Notify About
Identify the notifications this rule sends based on the severity of the check result: warn, fail, or both.
Need help? Join the .
Need help? Join the .
type
required
Identify the type of data source for Soda.
username
required
Consider using system variables to retrieve this value securely.
password
required
Consider using system variables to retrieve this value securely.
host
required
Provide a host identifier.
port
optional
Provide a port identifier.
database
optional
Provide a virtual database (VDB) name.
connection_timeout
optional
Provide an integer value to represent seconds.
sslmode
optional
Provide a value to indicate the type of SSL support:
prefer
require
allow
diable
Default value is prefer.
text
CHARACTER VARYING, CHARACTER, CHAR, TEXT
number
SMALLINT, INTEGER, BIGINT, DECIMAL, NUMERIC, VARIABLE, REAL, DOUBLE PRECISION, SMALLSERIAL, SERIAL, BIGSERIAL
time
TIMESTAMP, DATE, TIME, TIMESTAMP WITH TIME ZONE, TIMESTAMP WITHOUT TIME ZONE, TIME WITH TIME ZONE, TIME WITHOUT TIME ZONE
For Soda to run quality scans on your data, you must configure it to connect to your data source. To learn how to set up Soda and configure it to connect to your data sources, see .
type
required
Identify the type of data source for Soda.
host
required
Provide a host identifier.
port
required
Provide a port identifier.
username
required
Use system variables to retrieve this value securely.
password
required
Use system variables to retrieve this value securely.
database
required
Provide an identifier for your database.
text
CHAR, VARCHAR, TEXT
number
BIG INT, NUMERIC, BIT, SMALLINT, DECIMAL, SMALLMONEY, INT, TINYINT, MONEY, FLOAT, REAL
time
DATE, TIME, DATETIME, DATETIMEOFFSET
For Soda to run quality scans on your data, you must configure it to connect to your data source. To learn how to set up Soda and configure it to connect to your data sources, see .
Need help? Join the .
For Soda to run quality scans on your data, you must configure it to connect to your data source. To learn how to set up Soda and configure it to connect to your data sources, see .
Learn how to use the Soda Checks Language to compare data across datasets in the same, or different, data sources.
There are several ways to use SodaCL metrics and checks to compare data across datasets and data sources. The following offers some advice about how and when to use different types of checks to obtain the comparison results you need.
See also: Reconciliation checks
Have you got an idea or example of how to compare data that we haven't documented here? Let us know!
Use a to conduct a row count comparison between datasets in the same data source. If you wish to compare datasets in different data sources, or datasets in the same data source but with different schemas, see .
Use a to conduct a row-by-row comparison of values in two datasets in the same data source and return a result that indicates the volume and samples of mismatched rows, as in the following example which ensures that the values in each of the two names columns are identical. If you wish to compare datasets in the same data source but with different schemas, see .
Alternatively, you can use a to customize a SQL query that compares the values of datasets.
If you wish to compare data between datasets in different schemas, but only compare partitioned data from each dataset, you can use dataset filters.
Note that not all data sources fully support the schema.dataset format for the dataset identifier in a check, as included in the following example. Some users have reported success using this syntax.
Output:
Use a to conduct a simple row count comparison of datasets in two different data sources, as in the following example that compares the row counts of two datasets in different data sources.
Note that each data source involved in this check has been connected to data source either in the configuration.yml file with Soda Library, or in the Add Data Source workflow in Soda Cloud.
You can use a to compare the values of different datasets in the same data source (same data source, same schema), but if the datasets are in different schemas, as might happen when you have different environments like production, staging, development, etc., then Soda considers those datasets as different data sources. Where that is the case, you have a couple of options.
You can use a cross check to compare the row count of datasets in the same data source, but with different schemas. First, you must add dataset + schema as a separate data source connection in your configuration.yml, as in the following example that uses the same connection details but provides different schemas:
Then, you can define a cross check that compares values across these data sources.
Alternatively, depending on the type of data source you are using, you can use a to write a custom SQL query that compares contents of datasets that you define by adding the schema before the dataset name, such as prod.retail_customers and staging.retail_customers.
The following example accesses a single Snowflake data source and compares values between the same datasets but in different databases and schemas: prod.staging.dmds_scores and prod.measurement.post_scores.
See also:
You can use a user-defined metric to write a custom SQL query that compares date values in the same dataset. Refer to .
Read more about in Soda Cloud.
Learn more about in general.
Use this guide to help you decide which Soda deployment model best fits your data quality testing needs.
The Soda environment has been updated since this tutorial.
Refer to for updated tutorials.
A lightweight, versatile tool for testing and monitoring data quality, you have several options for deploying Soda in your environment.
As the first step in the Get started roadmap, this guide helps you decide how to set up Soda to best meet your data quality testing and monitoring needs. After choosing a flavor of Soda (type of deployment model), access the corresponding Set up Soda instructions below.
Choose a flavor of Soda 📍 You are here!
Set up Soda: sign up and install, deploy, or invoke
Write SodaCL checks
Run scans and review results
This guide helps you decide how to set up Soda to best meet your data quality testing and monitoring needs. You can set up Soda in one or more of four flavors.
This simple setup enables you to pip install Soda Library from the command-line, then prepare YAML files to:
configure connections to your data sources to run scans
configure the connection to your Soda Cloud account to validate your license and visualize and share data quality check results
write data quality checks
Use this setup for:
✅ A small team: Manage data quality within a small data engineering team or data analytics team who is comfortable working with the command-line and YAML files to design and execute scans for data quality.
✅ POC: Conduct a proof-of-concept evaluation of Soda as a data quality testing and monitoring tool. See:
✅ Basic DQ: Start from scratch to set up basic data quality checks on key datasets. See:
✅ Data migration: Migrate good-quality data from one data source to another. See:
Requirements:
Python 3.8, 3.9, or 3.10
Pip 21.0 or greater
Login credentials for your data source (Snowflake, Athena, MS SQL Server, etc.)
Recommended
This setup provides a secure, out-of-the-box Soda Agent to manage access to data sources from within your Soda Cloud account. Quickly configure connections to your data sources in the Soda Cloud user interface, then empower all your colleagues to explore datasets, access check results, customize collections, and create their own no-code checks for data quality.
See also:
Use this setup for:
✅ A quick start: Use the out-of-the-box agent to start testing data quality right away from within the Soda Cloud user interface, without the need to install or deploy any other tools.
✅ Anomaly detection dashboard:
Available in 2025
Use Soda's out-of-the-box anomaly dashboards to get automated insights into basic data quality metrics for your datasets. See:
✅ Automated data monitoring: Set up data profiling and automated data quality monitoring. See:
✅ Self-serve data quality: Empower data analysts and scientists to self-serve and create their own no-code checks for data quality. See:
✅ Data migration: Migrate good-quality data from one data source to another. See:
✅ Data catalog integration: Integrate Soda with a data catalog such as Atlan, Alation, or Metaphor. See:
Soda hosts agents in a secure environment in Amazon AWS. As a SOC 2 Type 2 certified business, Soda responsibly manages Soda-hosted agents to ensure that they remain private, secure, and independent of all other hosted agents. See for details.
Requirements:
Login credentials for your data source (BigQuery, Databricks SQL, MS SQL Server, MySQL, PostgreSQL, Redshift, or Snowflake); Soda securely stores passwords as
This setup enables a data or infrastructure engineer to deploy Soda Library as an agent in a Kubernetes cluster within a cloud-services environment such as Google Cloud Platform, Azure, or AWS.
The engineer can manage access to data sources while giving Soda Cloud end-users easy access to Soda check results and enabling them to write their own checks for data quality. Users connect to data sources and create no-code checks for data quality directly in the Soda Cloud user interface.
See also:
Use this setup for:
✅ Self-serve data quality: Empower data analysts and scientists to self-serve and create their own checks for data quality. See:
✅ Data migration: Migrate good-quality data from one data source to another. See:
✅ Anomaly detection dashboard:
Available in 2025
Use Soda's out-of-the-box anomaly dashboards to get automated insights into basic data quality metrics for your datasets. See:
✅ Data catalog integration: Integrate Soda with a data catalog such as Atlan, Alation, or Metaphor. See:
✅ Secrets manager integration: Integrate your Soda Agent with an external secrets manager to securely access frequently-rotated data source login credentials. See:
Requirements:
Access to your cloud-services environment, plus the authorization to deploy containerized apps in a new or existing Kubernetes cluster
Login credentials for your data source (Snowflake, Athena, MS SQL Server, etc.)
Use this setup to invoke Soda programmatically in, for example, and Airflow DAG or GitHub Workflow. You provide connection details for data sources and Soda Cloud inline or in external YAML files, and similarly define data quality checks inline or in a separate YAML file.
Use this setup for:
✅ Testing during development: Test data before and after ingestion and transformation during development. See:
✅ Circuit-breaking in a pipeline: Test data in an Airflow pipeline so as to enable circuit breaking that prevents bad-quality data from having a downstream impact. See:
✅ Databricks Notebook: Invoke Soda data quality scans in a Databricks Notebook. See:
Requirements:
Python 3.8, 3.9, or 3.10
Pip 21.0 or greater
Login credentials for your data source (Snowflake, Athena, MS SQL Server, etc.)
Though similar, the type of Soda agent you choose to use depends upon the following factors.
Choose a flavor of Soda
Set up Soda. Select the setup instructions that correspond with your flavor of Soda:
Write SodaCL checks
Run scans and review results
Organize, alert, investigate
Need help? Join the .
Configure Soda Cloud to retrieve sample data from your datasets so you can leverage the information to write SodaCL checks for data quality.
When you add or edit a data source in Soda Cloud, use the sample datasets configuration to send 100 sample rows to Soda Cloud. Examine the sample rows to gain insight into the type of checks you can prepare to test for data quality.
✖️ Requires Soda Core Scientific (included in a Soda Agent) ✖️ Supported in Soda Core ✔️ Supported in Soda Library + Soda Cloud ✔️ Supported in Soda Cloud Agreements + Soda Agent
Sample datasets captures sample rows from datasets you identify. You add sample datasets configurations as part of the guided workflow to create a new data source or edit an existing one. Navigate to your avatar > Data Sources > New Data Source, or select an existing data source, to begin. You can add this configuration to one of two places:
to either step OR
or step
The example configuration below uses a wildcard character (%) to specify that Soda Library sends sample rows to Soda Cloud for all datasets with names that begin with customer, and not to send samples for any dataset with a name that begins with test.
You can also specify individual datasets to include or exclude, as in the following example.
To review the sample rows in Soda Cloud, first of your data source so that Soda can gather and send samples to Soda Cloud.
In Soda Cloud, navigate to the Datasets dashboard, then click a dataset name to open the dataset's info page.
Access the Sample Data tab to review the sample rows.
If your dataset names include white spaces or use special characters, you must wrap those dataset names in quotes whenever you identify them to Soda, such as in a checks YAML file.
To add those necessary quotes to dataset names that Soda acts upon automatically – discovering, profiling, or sampling datasets, or creating automated monitoring checks – you can add a quote_tables configuration to your data source, as in the following example.
If you configure sample datasets to include specific datasets, Soda implicitly excludes all other datasets from sampling.
If you combine an include config and an exclude config and a dataset fits both patterns, Soda excludes the dataset from sampling.
Where your datasets contain sensitive or private information, you may not want to send samples from your data source to Soda Cloud. In such a circumstance, you can disable the feature completely in Soda Cloud.
To prevent Soda Cloud from receiving any sample data or failed row samples for any datasets in any data sources to which you have connected your Soda Cloud account, proceed as follows:
As a user with to do so, log in to your Soda Cloud account and navigate to your avatar > Organization Settings.
In the Organization tab, uncheck the box to Allow Soda to collect sample data and failed row samples for all datasets, then Save.
Alternatively, if you use Soda Library, you can adjust the configuration in your configuration.yml to disable all samples for an individual data source, as in the following example.
Note that you cannot use an exclude_columns configuration to disable sample row collections from specific columns in a dataset. That configuration applies only to .
Learn more about managing with Soda.
Reference .
Use a to gauge how recently your data was captured.
Use to compare the values of one column to another.
Access configuration details to connect Soda to a MySQL data source.
For Soda to run quality scans on your data, you must configure it to connect to your data source. To learn how to set up Soda and configure it to connect to your data sources, see .
Install package: soda-mysql
data_source my_datasource_name:
type: mysql
host: 127.0.0.1
username: simple
password: simple_pass
database: customersIntegrate Soda Library with a data orchestration tool to automate and schedule your search for "bad" data.
Integrate Soda Library with a data orchestration tool such as, Airflow, to automate and schedule your search for bad-quality data.
Configure actions that the orchestration tool can take based on scan output. For example, if the output of a scan reveals a large number of failed tests, the orchestration tool can automatically block "bad" data from contaminating your data pipeline.
📚 Consider following the guide for specific details about embedding Soda tests in an Airflow pipeline.
🎥 Consider following a 30-minute Astronomer tutorial for .
Integrate Soda with Alation to access details about the quality of your data from right within your data catalog.
Integrate Soda with Alation to access details about the quality of your data from within the data catalog.
Run data quality checks using Soda and visualize quality metrics and rules within the context of a data source, dataset, or column in Alation.
Use Soda Cloud to flag poor-quality data in lineage diagrams and during live querying.
Give your Alation users the confidence of knowing that the data they are using is sound.
Use a SodaCL for each check to specify a list of checks you wish to execute on a multiple datasets.
Use a for each configuration to execute checks against multiple datasets during a scan.
✖️ Requires Soda Core Scientific (included in a Soda Agent) ✔️ Supported in Soda Core ✔️ Supported in Soda Library + Soda Cloud ✔️ Supported in Soda Cloud Agreements + Soda Agent ✖️ Available as a no-code check
Add a for each section to your checks configuration to specify a list of checks you wish to execute on multiple datasets.
As of July 2025, the container images required for the self-hosted Soda agent will be distributed using private registries, hosted by Soda.
EU cloud customers will use the EU registry located at registry.cloud.soda.io. US cloud customers will use the US registry located at registry.us.soda.io.
The images currently distributed through Docker Hub will stay available there. New releases will only be available in the Soda-hosted registries.
Existing or new Soda cloud API keys can be used to authenticate to the Soda-hosted registries. Starting from version
Need help? Join the .
Need help? Join the .
Need help? Join the .
Need help? Join the .
For Soda to run quality scans on your data, you must configure it to connect to your data source. To learn how to set up Soda and configure it to connect to your data sources, see .
For Soda to run quality scans on your data, you must configure it to connect to your data source. To learn how to set up Soda and configure it to connect to your data sources, see .
mkdir soda_sip
cd soda_sippython3 -m venv .venv
source .venv/bin/activatepip install -i https://pypi.cloud.soda.io soda-postgressoda --helpdocker run \
--name sip-of-soda \
-p 5432:5432 \
-e POSTGRES_PASSWORD=secret \
sodadata/soda-adventureworksdata_source adventureworks:
type: postgres
host: localhost
username: postgres
password: secret
database: postgres
schema: publicsoda test-connection -d adventureworks -c configuration.ymlSoda Library 1.x.x
Soda Core 3.x.x
Successfully connected to 'adventureworks'.
Connection 'adventureworks' is valid.checks for dim_customer:
- invalid_count(email_address) = 0:
valid format: email
name: Ensure values are formatted as email addresses
- missing_count(last_name) = 0:
name: Ensure there are no null values in the Last Name column
- duplicate_count(phone) = 0:
name: No duplicate phone numbers
- freshness(date_first_purchase) < 7d:
name: Data in this dataset is less than 7 days old
- schema:
warn:
when schema changes: any
name: Columns have not been added, removed, or changedsoda scan -d adventureworks -c configuration.yml checks.ymlSoda Library 1.0.x
Soda Core 3.0.x
Sending failed row samples to Soda Cloud
Scan summary:
3/5 checks PASSED:
dim_customer in adventureworks
No changes to schema [PASSED]
Emails formatted correctly [PASSED]
No null values for last name [PASSED]
2/5 checks FAILED:
dim_customer in adventureworks
No duplicate phone numbers [FAILED]
check_value: 715
Data is fresh [FAILED]
max_column_timestamp: 2014-01-28 23:59:59.999999
max_column_timestamp_utc: 2014-01-28 23:59:59.999999+00:00
now_variable_name: NOW
now_timestamp: 2023-04-24T21:02:15.900007+00:00
now_timestamp_utc: 2023-04-24 21:02:15.900007+00:00
freshness: 3372 days, 21:02:15.900008
Oops! 2 failures. 0 warnings. 0 errors. 3 pass.
Sending results to Soda Cloud
Soda Cloud Trace: 4417******32502data_source adventureworks:
type: postgres
host: localhost
...
schema: public
soda_cloud:
host: cloud.soda.io
api_key_id: 2e0ba0cb-**7b
api_key_secret: 5wdx**aGuRg(function process(/*RESTAPIRequest*/ request, /*RESTAPIResponse*/ response) {
var businessServiceId = '28***';
var snowInstanceId = 'dev***';
var requestBody = request.body;
var requestData = requestBody.data;
gs.info(requestData.event);
if (requestData.event == 'incidentCreated'){
gs.log("*** Incident Created ***");
var grIncident = new GlideRecord('incident');
grIncident.initialize();
grIncident.short_description = requestData.incident.description;
grIncident.description = requestData.incident.sodaCloudUrl;
grIncident.correlation_id = requestData.incident.id;
if(requestData.incident.severity == 'critical'){
grIncident.impact = 1;
}else if(requestData.incident.severity == 'major'){
grIncident.impact = 2;
}else if(requestData.incident.severity == 'minor'){
grIncident.impact = 3;
}
grIncident.business_service = businessServiceId;
grIncident.insert();
var incidentNumber = grIncident.number;
var sysid = grIncident.sys_id;
var callBackURL = requestData.incidentLinkCallbackUrl;
var req, rsp;
req = new sn_ws.RESTMessageV2();
req.setEndpoint(callBackURL.toString());
req.setHttpMethod("post");
var sodaUpdate = '{"url":"https://'+ snowInstanceId +'.service-now.com/incident.do?sys_id='+sysid + '", "text":"SNOW Incident '+incidentNumber+'"}';
req.setRequestBody(sodaUpdate.toString());
resp = req.execute();
gs.log(resp.getBody());
}else if(requestData.event == 'incidentUpdated'){
gs.log("*** Incident Updated ***");
var target = new GlideRecord('incident');
target.addQuery('correlation_id', requestData.incident.id);
target.query();
target.next();
if(requestData.incident.status == 'resolved'){
//Change this according to how SNOW is used.
target.state = 6;
target.close_notes = requestData.incident.resolutionNotes;
}else{
//Change this according to how SNOW is used.
target.state = 4;
}
target.update();
}
})(request, response);data_source my_datasource_name:
type: dremio
host: 127.0.0.1
port: 5432
username: simple
password: simple_pass
schema: public
use_encryption: "false"
routing_queue: queue
disable_certificate_verification: "false"
soda test-connection -d my_datasource -c configuration.yml -V# Install a Soda Library package with Apache Spark DataFrame
pip install -i https://pypi.cloud.soda.io soda-spark-df
# Import Scan from Soda Library
# A scan is a command that executes checks to extract information about data in a dataset.
from soda.scan import Scan
# Create a Spark DataFrame, or use the Spark API to read data and create a DataFrame
# A Spark DataFrame is a distributed collection of data organized into named columns which provides a structured and tabular representation of data within the Apache Spark framework.
df = spark.table("delta.`/databricks-datasets/adventureworks/tables/adventureworks`")
# Create a view that Soda uses as a dataset
df.createOrReplaceTempView("adventureworks")
# Create a scan object
scan = Scan()
# Set a scan definition
# Use a scan definition to configure which data to scan, and when and how to execute the scan.
scan.set_scan_definition_name("Databricks Notebook")
scan.set_data_source_name("spark_df")
# Attach a Spark session
scan.add_spark_session(spark)
# Define checks for datasets
# A Soda Check is a test that Soda Library performs when it scans a dataset in your data source. You can define your checks in-line in the notebook, or define them in a separate checks.yml fail that is accessible by Spark.
checks = """
checks for dim_customer:
- invalid_count(email_address) = 0:
valid format: email
name: Ensure values are formatted as email addresses
- missing_count(last_name) = 0:
name: Ensure there are no null values in the Last Name column
- duplicate_count(phone) = 0:
name: No duplicate phone numbers
- freshness(date_first_purchase) < 7d:
name: Data in this dataset is less than 7 days old
- schema:
warn:
when schema changes: any
name: Columns have not been added, removed, or changed
sample datasets:
datasets:
- include dim_%
"""
# OR, define checks in a file accessible via Spark, then use the scan.add_sodacl_yaml method to retrieve the checks
scan.add_sodacl_yaml_str(checks)
# Add your Soda Cloud connection configuration using the API Keys you created in Soda Cloud
# Use cloud.soda.io for EU region
# Use cloud.us.soda.io for US region
config ="""
soda_cloud:
host: cloud.soda.io
api_key_id: 39**9
api_key_secret: hN**_W1Q
"""
# OR, configure the connection details in a file accessible via Spark, then use the scan.add_configuration_yaml method to retrieve the config
scan.add_configuration_yaml_str(config)
# Execute a scan
scan.execute()
# Check the Scan object for methods to inspect the scan result
# The following prints all logs to the console
print(scan.get_logs_text()) data_source my_datasource_name:
type: athena
access_key_id: kk9gDU6800xxxx
secret_access_key: 88f&eeTuT47xxxx
region_name: eu-west-1
staging_dir: s3://s3-results-bucket/output/
schema: publicsoda test-connection -d my_datasource -c configuration.yml -Vdata_source my_datasource_name:
type: sqlserver
host: host
port: '1433'
username: simple
password: simple_pass
database: database
schema: dbo
trusted_connection: false
encrypt: false
trust_server_certificate: false
driver: ODBC Driver 18 for SQL Server
scope: DW
connection_parameters:
multi_subnet_failover: truechecks for dim_customer:
# Check row count between datasets in one data source
- row_count same as dim_department_group
# Check row count between datasets in different data sources
- row_count same as retail_customers in aws_postgres_retailchecks for dim_customer:
- row_count same as dim_department_groupchecks for dim_customer:
- row_count same as retail_customers in aws_postgres_retailchecks for dim_customer:
- row_count same as retail_customers in aws_postgres_retail:
name: Cross check customer datasetschecks for dim_customer:
- row_count same as "dim_department_group"filter dim_promotion [daily]:
where: discount_pct = '0.5'
filter retail_orders [daily]:
where: discount = `50'
checks for dim_promotion [daily]:
- row_count same as retail_orders [daily] in aws_postgres_retail:
name: Cross check between data sourcesautomated monitoring:
datasets:
- include prod%
- exclude test%automated monitoring:
datasets:
- include ordersdata_source soda_demo:
type: sqlserver
host: localhost
username: ${SQL_USERNAME}
password: ${SQL_PASSWORD}
quote_tables: truesoda test-connection -d my_datasource -c configuration.yml -Vsample datasets:
datasets:
- dim_customer
- include prod%
- exclude test%required
Identify the Amazon S3 Staging Directory (the Query Result Location in AWS); see Specifying a query result location
schema
required
Identify the schema in the data source in which your tables exist.
catalog
optional
Identify the name of the Data Source, also referred to as a Catalog. The default value is awsdatacatalog.
work_group
optional
Identify a non-default workgroup in your region. In your Athena console, access your current workgroup in the Workgroup option on the upper right. Read more about Athena Workgroups.
session_token
optional
Add a session Token to use for authentication and authorization.
profile_name
optional
Specify the profile Name from local AWS configuration to use for authentication and authorization.
Learn how to adjust several configurable settings that help you manage access to sensitive data in Soda Cloud.
Soda Cloud
Learn how to programmatically set up Soda Library to display failed row samples in the command-line.
Soda Library Soda Cloud
Learn how to onboard a data source in Soda Cloud that you have already onboarded via Soda Library.
Soda Library Soda Cloud
-
✓
Use quotes when identifying dataset or column names; see example. Note that the type of quotes you use must match that which your data source uses. For example, BigQuery uses a backtick (`) as a quotation mark.
Use wildcard characters ( % or * ) in values in the check.
-
Use for each to apply schema checks to multiple datasets in one scan.
-
✓
Apply a dataset filter to partition data during a scan; see example.
-
password
required
Consider using system variables to retrieve this value securely.
schema
optional
Provide an identifier for the schema in which your dataset exists.
use_encryption
optional
Specify a boolean value to use, or not use, encryption. Default is false. Value requires double quotes.
routing_queue
optional
Provide an identifier for the routing queue to use.
disable_certificate_verification
optional
Specify a boolean value to demand that Dremio verify the host certificate against the truststore. If set to true, Dremio does not verify the host certificate. Default value is false to verify certificate. Value requires double quotes.
To confirm that you have correctly configured the connection details for the data source(s) in your configuration YAML file, use the test-connection command. If you wish, add a -V option to the command to return results in verbose mode in the CLI.
soda test-connection -d my_datasource -c configuration.yml -VTo confirm that you have correctly configured the connection details for the data source(s) in your configuration YAML file, use the test-connection command. If you wish, add a -V option to the command to return results in verbose mode in the CLI.
soda test-connection -d my_datasource -c configuration.yml -VTo confirm that you have correctly configured the connection details for the data source(s) in your configuration YAML file, use the test-connection command. If you wish, add a -V option to the command to return results in verbose mode in the CLI.
soda test-connection -d my_datasource -c configuration.yml -VTo confirm that you have correctly configured the connection details for the data source(s) in your configuration YAML file, use the test-connection command. If you wish, add a -V option to the command to return results in verbose mode in the CLI.
soda test-connection -d my_datasource -c configuration.yml -VTo confirm that you have correctly configured the connection details for the data source(s) in your configuration YAML file, use the test-connection command. If you wish, add a -V option to the command to return results in verbose mode in the CLI.
soda test-connection -d my_datasource -c configuration.yml -Vtype
required
Identify the type of data source for Soda.
host
required
Provide a host identifier.
username
required
Use system variables to retrieve this value securely.
password
required
Use system variables to retrieve this value securely.
database
required
Provide an identifier for your database.
text
CHAR, VARCHAR, TEXT
number
BIG INT, NUMERIC, BIT, SMALLINT, DECIMAL, SMALLMONEY, INT, TINYINT, MONEY, FLOAT, REAL
time
DATE, TIME, DATETIME, DATETIMEOFFSET
To confirm that you have correctly configured the connection details for the data source(s) in your configuration YAML file, use the test-connection command. If you wish, add a -V option to the command to return results in verbose mode in the CLI.
soda test-connection -d my_datasource -c configuration.yml -V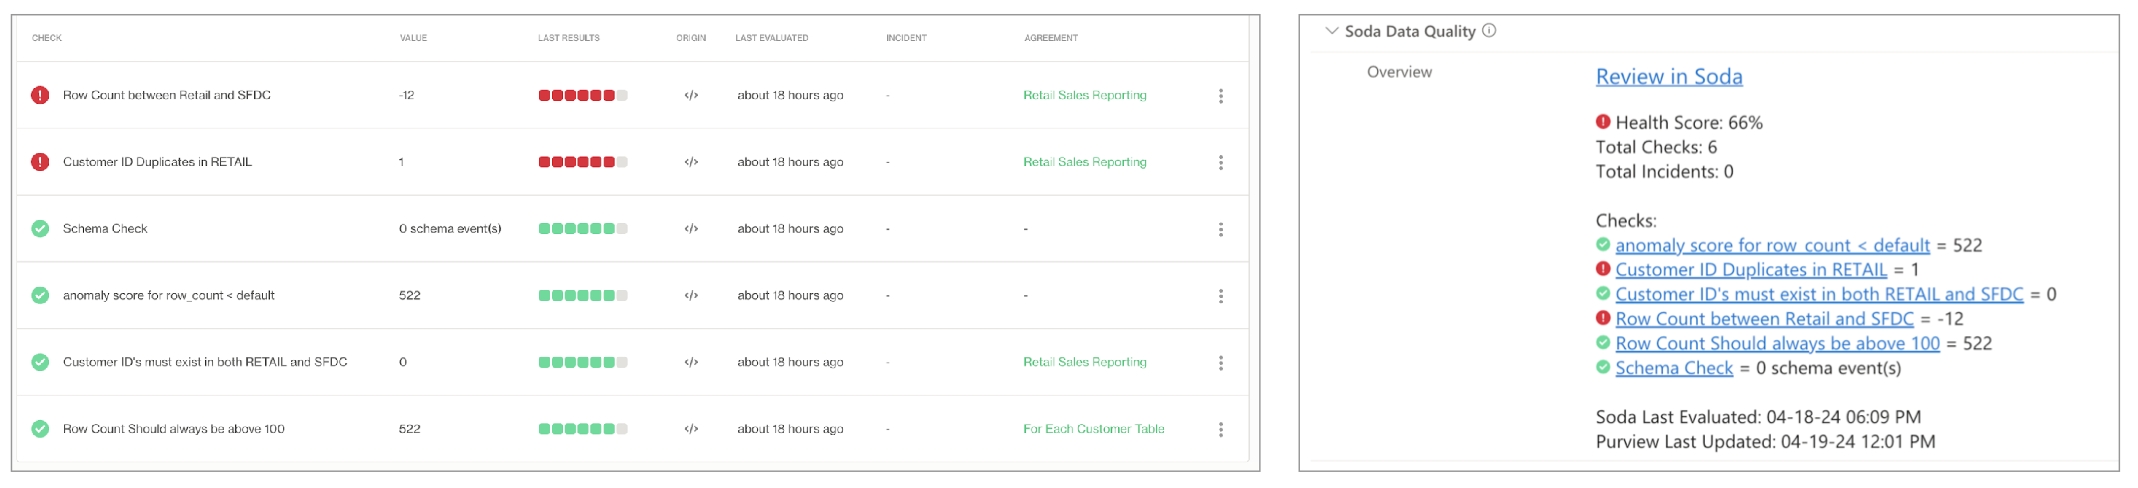
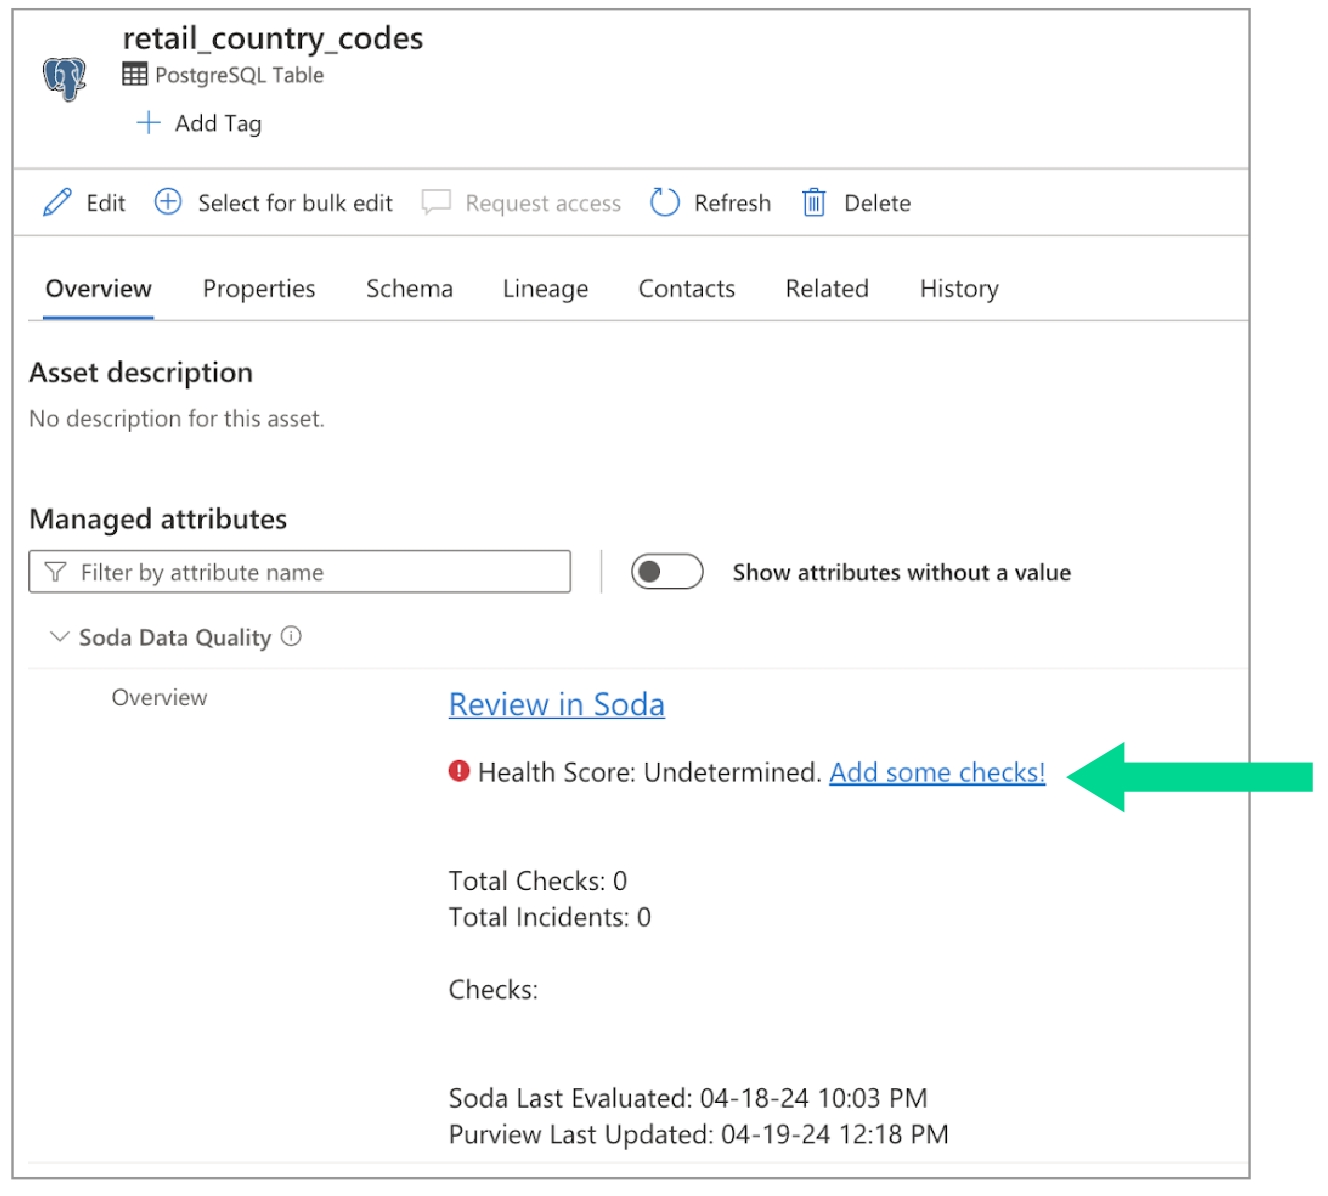
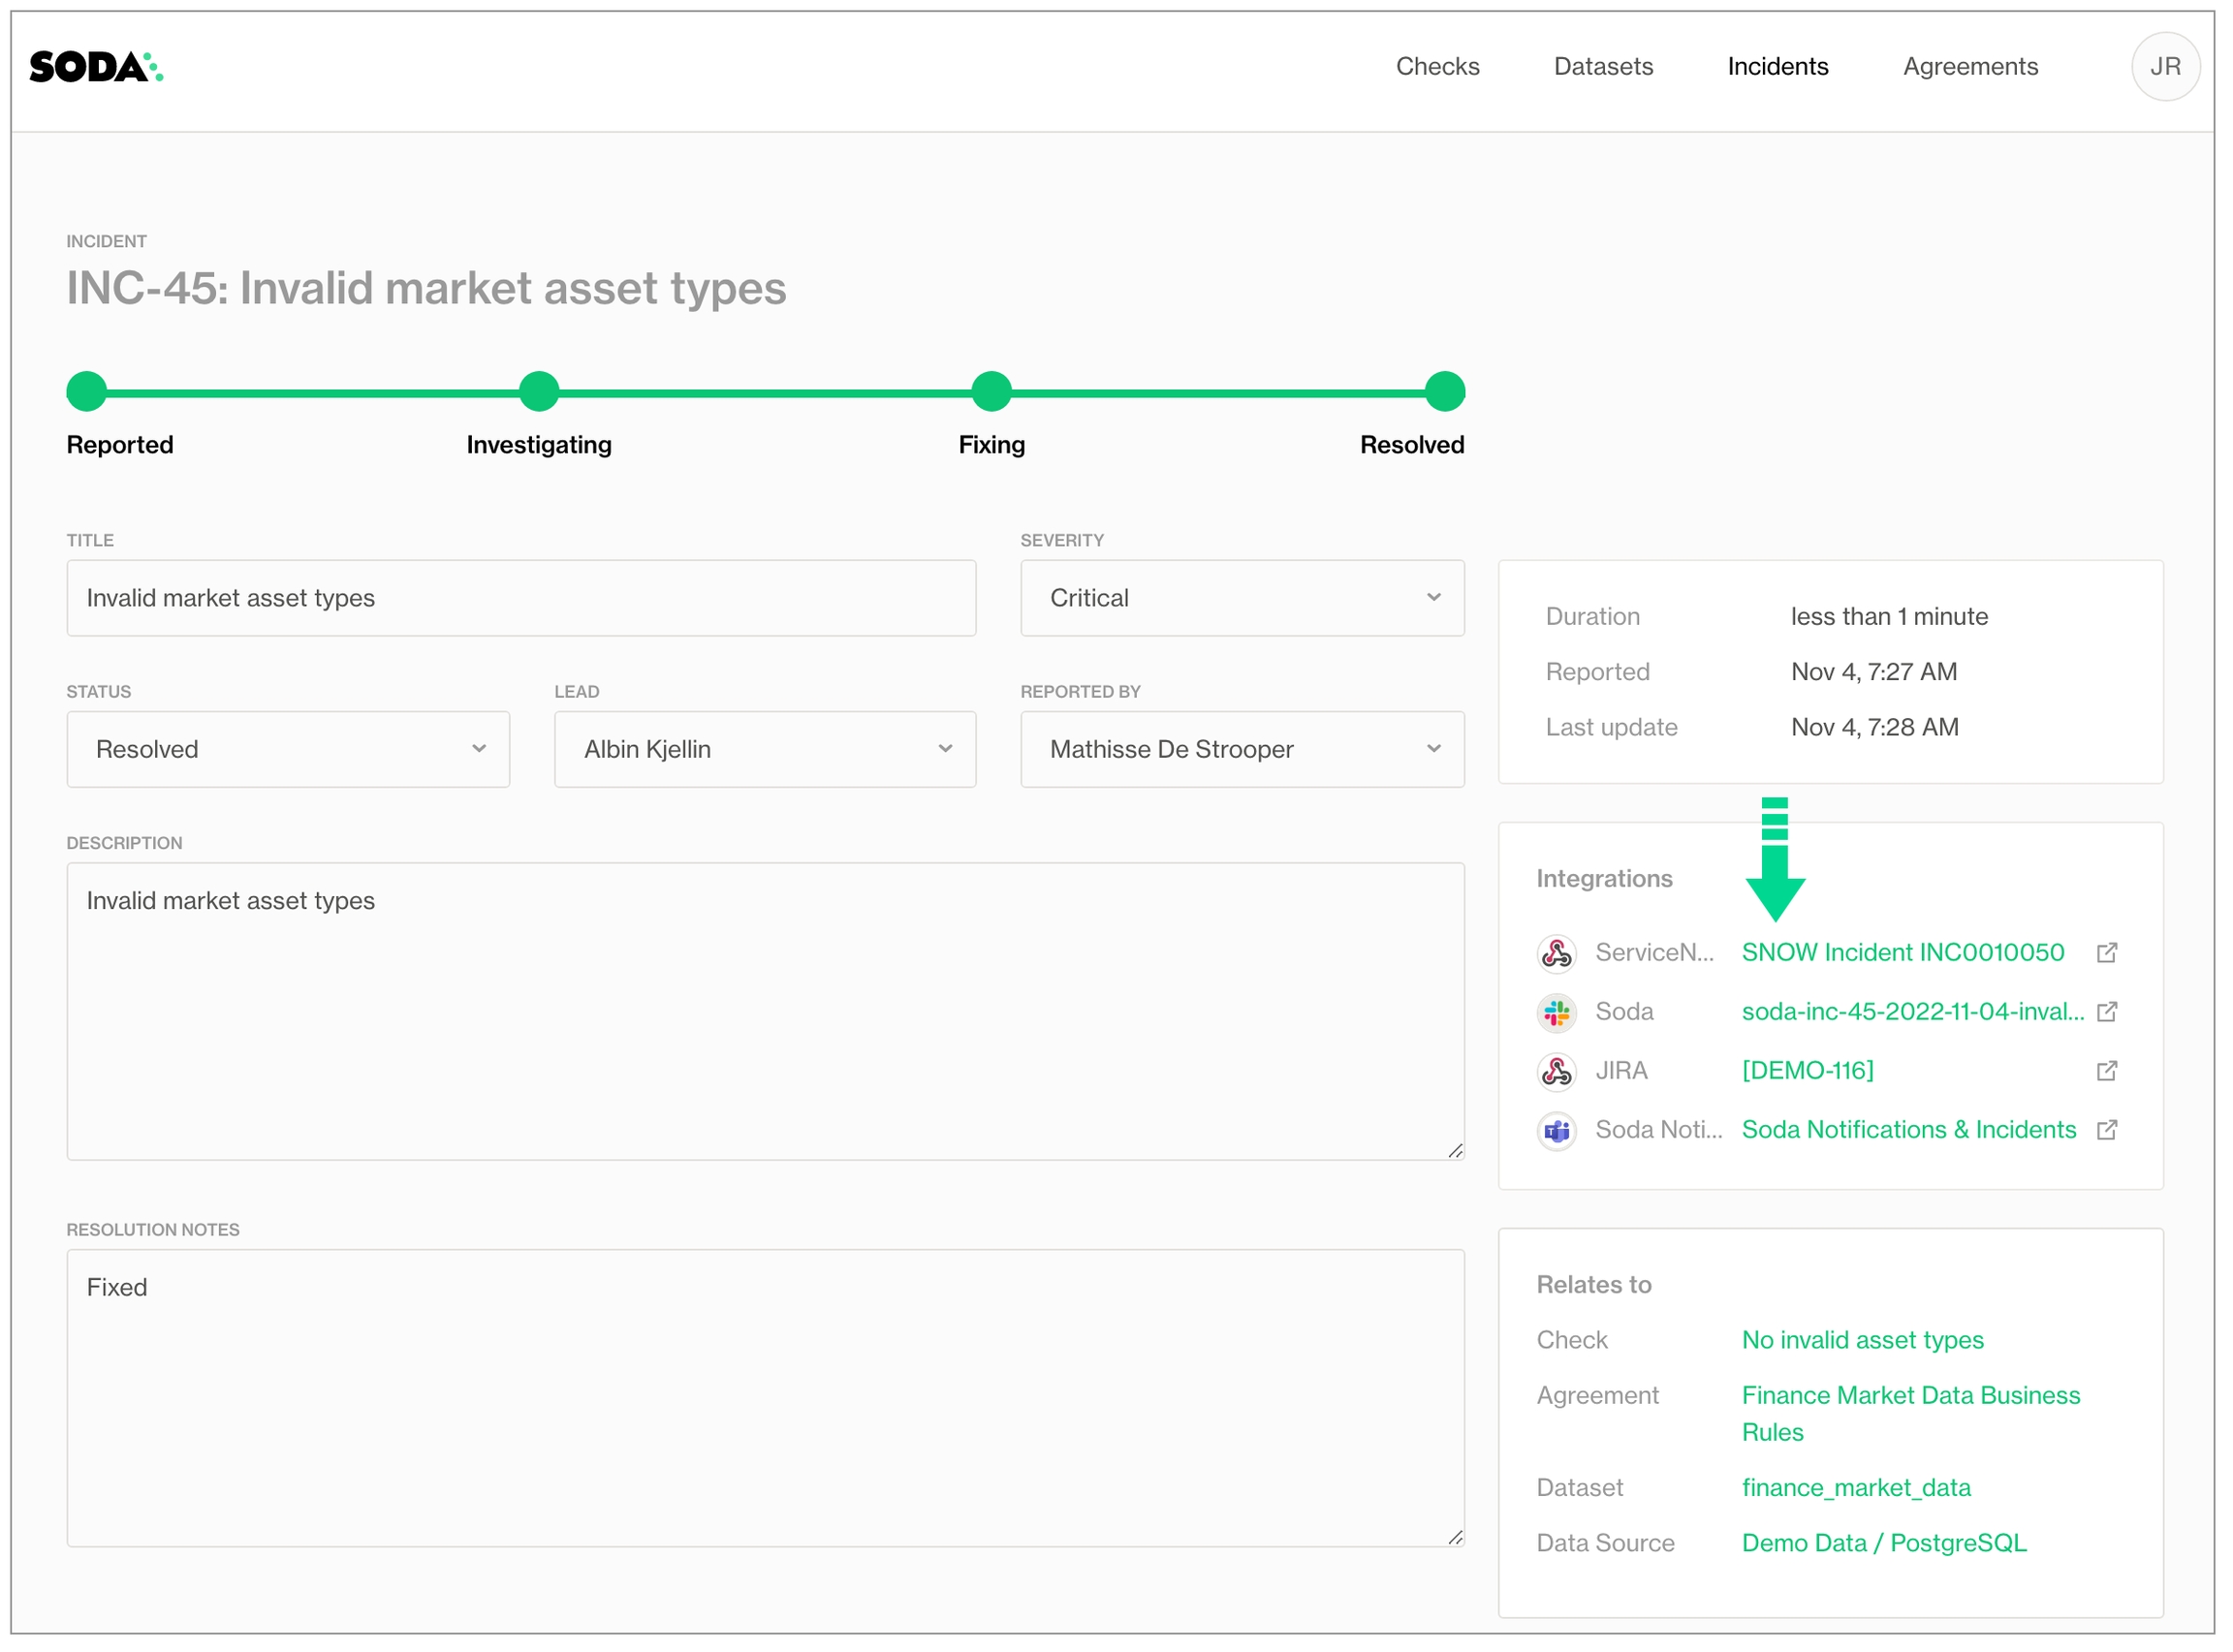
Need help? Join the Soda community on Slack.
1.2.0soda-agentIn order to enjoy the latest features Soda has to offer, please upgrade any self-hosted Soda agent you manage using one of the following guides.
Follow the self-hosted Soda agent upgrade or redeployment guides. Don't execute the final helm install or helm upgrade step yet.
Ensure you retrieve the soda.apikey.id and soda.apikey.secret values first, by using
helm get values -n <namespace> <release_name> .
Now pass these values back to the upgrade command via the CLI
or by using a values file:
Ensure you have a new API key id and secret by following the API key creation guide .
Follow the self-hosted Soda agent upgrade or redeployment guides. Don't execute the final helm install or helm upgrade step yet.
Now pass the API keys to use for registry access in the upgrade command via the CLI, using the imageCredentials.apikey.id and imageCredentials.apikey.secret properties.
Note that we're also still passing the soda.apikey.id and soda.apikey.secret values, which are still required for the agent to authenticate to Soda cloud.
Or when using a values file:
You can also use a self-managed, existing secret to authenticate to the Soda-hosted our your self-hosted private container registry, e.g. when mirroring container images.
You can refer to existing secrets as follows for the CLI:
Or using a values file:
When you're onboarded on the US region of Soda Cloud, you'll have to use the container registry associated with that region.
You can alter the soda.cloud.region value to automatically render the correct container registry and Soda Cloud API endpoint. Simply follow any of the above instructions and include the soda.cloud.region value.
To do so in the CLI:
Or using a values file:
If you want to mirror the Soda images into your own registries, you'll need to login to the appropriate container registry. This will allow you to pull the images into your custom container image registry.
The following values.yaml file illustrates the changes required for the Helm release to work with mirrored images:
Your existing Soda agent deployments will continue to function.
This does mean that your self-hosted agent will not be able to support features like collaborative data contracts and the fully revamped metric monitoring.
The images hosted on Dockerhub, required to run the self-hosted agent, will remain there in their current state for a grace period of 6 months. There will be no more maintenance (updates, bug fixes, security patches) for the old self-hosted agent versions.
checks for dim_employee:
- row_count same as dim_department_groupchecks for dim_customers_dev:
- values in (last_name, first_name) must exist in dim_customers_prod (last_name, first_name)- failed rows:
name: Validate that the data is the same as retail customers
fail query: |
with table_1_not_in_table_2 as (
select
*
from retail_customers
except
select
*
from retail_sfdc_customers
)
, table_2_not_in_table_1 as (
select
*
from retail_sfdc_customers
except
select
*
from retail_customers
)
select
'found in retail_sfdc_customers but missing in retail_customers' as directionality,
*
from table_1_not_in_table_2
union all
select
'found in retail_customers but missing in retail_sfdc_customers' as directionality,
*
from table_2_not_in_table_1filter public.employee_dimension [west]:
where: employee_region = 'West'
# Add a second filter for the dataset
filter online_sales.online_page_dimension [monthly]:
where: page_type = 'monthly'
checks for public.employee_dimension [west]:
# Add the second filter to the check but without brackets
- row_count same as online_sales.online_page_dimension monthly: ...
DEBUG | Query vertica_local.public.employee_dimension[west].aggregation[0]:
SELECT
COUNT(*)
FROM public.employee_dimension
WHERE employee_region = 'West'
DEBUG | Query vertica_local.online_sales.online_page_dimension[monthly].aggregation[0]:
SELECT
COUNT(*)
FROM online_sales.online_page_dimension
WHERE page_type = 'monthly'
...checks for dim_customer:
- row_count same as dim_customer in aws_postgres_retaildata_source retail_customers_stage:
type: postgres
host: location.eu-west-1.rds.amazonaws.com
username: ${USER}
password: ${PASS}
database: postgres
schema: staging
data_source retail_customers_prod:
type: postgres
host: location.eu-west-1.rds.amazonaws.com
username: ${USER}
password: ${PASS}
database: postgres
schema: productionchecks for dim_customer:
# Check row count between datasets in different data sources
- row_count same as retail_customers_stage in retail_customers_prod- failed rows:
fail query: |
WITH src as (
SELECT src_page_id, src_post_id
FROM prod.staging.dmds_scores
), tgt as (
SELECT page_id, post_id, partition_date FROM prod.measurement.post_scores
)
SELECT src_page_id, src_post_id
FROM src
LEFT JOIN tgt
ON src.src_page_id = tgt.page_id AND src.src_post_id = tgt.post_id
WHERE (src.src_page_id IS NOT NULL AND src.src_post_id IS NOT NULL)
AND (tgt.page_id IS NULL AND tgt.post_id IS NULL)helm upgrade <release> soda-agent/soda-agent
--set soda.apikey.id=*** \
--set soda.apikey.secret=****> cat values-local.yaml
soda:
apikey:
id: ***
secret: ***
> helm upgrade soda-agent soda-agent/soda-agent \
--values values-local.yml --namespace soda-agenthelm upgrade <release> soda-agent/soda-agent
--set soda.apikey.id=*** \
--set soda.apikey.secret=****
--set imageCredentials.apikey.id=*** \
--set imageCredentials.apikey.secret=***> cat values-local.yaml
soda:
apikey:
id: ***
secret: ***
imageCredentials:
apikey:
id: ***
secret: ***
> helm upgrade soda-agent soda-agent/soda-agent \
--values values-local.yml --namespace soda-agenthelm upgrade <release> soda-agent/soda-agent
--set soda.apikey.id=*** \
--set soda.apikey.secret=****
--set existingImagePullSecrets[0].name=my-existing-secret # Mind the array and indexing syntax!> cat values-local.yaml
soda:
apikey:
id: ***
secret: ***
existingImagePullSecrets
- name: my-existing-secret
> helm upgrade soda-agent soda-agent/soda-agent \
--values values-local.yml --namespace soda-agenthelm upgrade <release> soda-agent/soda-agent
--set soda.apikey.id=*** \
--set soda.apikey.secret=****
--set soda.cloud.region=us> cat values-local.yaml
soda:
apikey:
id: ***
secret: ***
cloud:
region: "us"
> helm upgrade soda-agent soda-agent/soda-agent \
--values values-local.yml --namespace soda-agent# For Soda Cloud customers in the EU region
docker login registry.cloud.soda.io -u <APIKEY_ID> -p <APIKEY_SECRET>
# For Soda Cloud customers in the US region
docker login registry.us.soda.io -u <APIKEY_ID> -p <APIKEY_SECRET>existingImagePullSecrets
- name: my-existing-secret
soda:
apikey:
id: ***
secret: ***
agent:
image:
repository: custom.registry.org/sodadata/agent-orchestrator
scanLauncher:
image:
repository: custom.registry.org/sodadata/soda-scan-launcher
contractLauncher:
image:
repository: custom.registry.org/sodadata/soda-contract-launcher
hooks:
image:
repository: custom.registry.org/sodadata/soda-agent-utils✅
✅
A simple setup in which you install Soda Library locally and connect it to Soda Cloud via API keys.
✅
✅
Recommended A Saas-style setup in which you manage data quality entirely from your Soda Cloud account.
✅
✅
A setup in which you deploy a Soda Agent in a Kubernetes cluster in a cloud-services environment and connect it to Soda Cloud via different API keys.
✅
✅
Data source compatibility
Compatible with a limited subset of Soda-supported data sources.
Compatible with nearly all Soda-supported data sources.
Upgrade maintenance
Soda manages all upgrades to the latest available version of the Soda Agent.
You manage all upgrades to your Soda Agent deployed on your Kubernetes cluster.
External Secrets manager integration
Unable to integrate with an External Secrets manager.
Able to integrate with an External Secrets manager (Hashicorp Vault, Azure Key Vault, etc.) to better manage frequently-rotated login credentials.
Network connectivity
Access Soda Agent via public networks of passlisting.
A setup in which you invoke Soda Library programmatically.
Deploy the Soda Agent inside your own private cloud on on premises network infrastructure.
If you have an internal requirement to run Soda tasks in isolated environments in Airflow or Astro, you can do so using one of the following options; refer to Astro documentation for more detail.
A Virtualenv operator uses the same Python runtime as Airflow, but it creates a new virtual environment. Python considers this a separated runtime environment, but it uses the same Python executable as does Airflow.
An External Python operator works almost the same as Virtualenv operator, but this environment is set up outside of Airflow so it can use different Python executables, or use a different version of Python, etc.
A Kubernetes + Docker setup offers a completely separated environment; this is the only one that is fully detached from Airflow/Astro, but it requires a Kubernetes cluster. Soda provides a Docker image that you can use in a cluster; see Install Soda Library > Docker tab for details.
As a Python library, Soda can handle big data engineering tasks. Soda compute occurs almost solely in the data source and it runs queries to gather metrics in the data source, and then only evaluates the outcome of the metrics in Python. Soda does not extract large volumes of data out of the data source to process in Python. There are two exceptions to this rule:
For user-defined failed rows queries, Soda executes the query as provided, so if user includes select * … , then Soda loads data in Python.
For record-level reconciliation checks, Soda loads all data into memory, but only one row at a time (or a defined batch of rows based on configuration). However, this does not result in large volumes of data in memory as rows just pass through during processing.
Also, configure the following:
Learn more about the Metrics and checks you can use to check for data quality.
Follow an example implementation in Test data in an Airflow pipeline.
Need help? Join the .
🎥 Watch a 5-minute overview showcasing the integration of Soda and Alation.
You have completed at least one Soda scan to validate that the data source’s datasets appear in Soda Cloud as expected.
You have an Alation account with the privileges necessary to allow you to add a data source, create custom fields, and customize templates.
You have a git repository in which to store the integration project files.
🎥 Watch a 5-minute video that demonstrates how to integrate Soda and Alation.
Sign into your Soda Cloud account and confirm that you see the datasets you expect to see in the data source you wish to test for quality.
To connect your Soda Cloud account to your Alation Service Account, create an o the example below. Refer to [Generate API keys]() to obtain the values for your Soda API keys.
To sync a data source and schema in the Alation catalog to a data source in Soda Cloud, you must map it from Soda Cloud to Alation. Create a .datasource-mapping.yml file in your integration project and populate it with mapping data according to the following example. The table below describes where to retrieve the values for each field.
name
A name you choose as an identifier for an integration between Soda Cloud and a data catalog.
soda:
datasource_id
The data source information panel in Soda Cloud.
soda:
datasource_name
The data source information panel in Soda Cloud.
soda:
dataset_mapping
(Optional) When you run the integration, Soda automatically maps all of the datasets between data sources. However, if the names of the datasets differ in the tools you can use this property to manually map datasets between tools.
catalog:
type:
The name of the cataloging software; in this case, “alation”.
catalog:
datasource_id
Retrieve this value from the URL on the data source page in the Alation catalog; see image below.
Retrieve the Alation datasource_id from the URL
Retrieve the Alation datasource_container_name (schema) from the data source page
Retrieve the Alation datasource_container_id for the datasource_container_name from the URL in the Schema page.
If your Alation account employs single sign-on (SSO) access, you must Create an API service account for Soda to integrate with Alation.
If your Alation account does not use SSO, skip this step and proceed to Customize the catalog.
Create custom fields in Alation that reference information that Soda Cloud pushes to the catalog. These are the fields the catalog users will see that will display Soda Cloud data quality details. In your Alation account, navigate to Settings > Catalog Admin > Customize Catalog. In the Custom Fields tab, create the following fields:
Under the Pickers heading, create a field for “Has DQ” with Options “True” and “False”. The Alation API is case sensitive so be sure to use these exact values.
Under the Dates heading, create a field for “Profile - Last Run”.
Under the Rich Texts heading, create the following fields:
“Soda DQ Overview”
“Soda Data Quality Rules”
“Data Quality Metrics”
Add each new custom field to a Custom Template in Alation. In Customize Catalog, in the Custom Templates tab, select the Table template, then click Insert… to add a custom field to the template:
“Soda DQ Overview”
In the Table template, click Insert… to add a Grouping of Custom Fields. Label the grouping “Data Quality Info”, then Insert… two custom fields:
“Has DQ”
“Profile - Last Run”
In the Column template, click Insert… to add a custom field to the template:
“Has DQ”
In the Column template, click Insert… to add a Grouping of Custom Fields. Label the grouping “Soda Data Profile Information”, then Insert… two custom fields:
Data Quality Metrics
Soda Data Quality Rules
Contact [email protected] directly to acquire the assets and instructions to run the integration and view Soda Cloud details in your Alation catalog.
Access Soda Cloud to create no-code checks or create agreements that execute checks against datasets in your data source each time you run a Soda scan manually, or orchestrate a scan using a data pipeline tool such as Airflow. Soda Cloud pushes data quality scan results to the corresponding data source in Alation so that users can review data quality information from within the catalog.
In Alation, beyond reviewing data quality information for the data source, users can access the Joins and Lineage tabs of individual datasets to examine details and investigate the source of any data quality issues.
In a dataset page in Alation, in the Overview tab, users have the opportunity to click links to directly access Soda Cloud to scrutinize data quality details; see image below.
Under the Soda DQ Overview heading in Alation, click Open in Soda to access the dataset page in Soda Cloud.
Under the Dataset Level Monitors heading in Alation, click the title of any monitor to access the check info page in Soda Cloud.
Access a list of all integrations that Soda Cloud supports.
Need help? Join the .
Add a for each dataset T section header anywhere in your YAML file. The purpose of the T is only to ensure that every for each configuration has a unique name.
Nested under the section header, add two nested keys, one for datasets and one for checks.
Nested under datasets, add a list of datasets against which to run the checks. Refer to the example below that illustrates how to use include and exclude configurations and wildcard characters (%) .
Nested under checks, write the checks you wish to execute against all the datasets listed under datasets.
For each is not compatible with dataset filters.
Soda dataset names matching is case insensitive.
You cannot use quotes around dataset names in a for each configuration.
If any of your checks specify column names as arguments, make sure the column exists in all datasets listed under the datasets heading.
To add multiple for each configurations, configure another for each section header with a different letter identifier, such as for each dataset R.
✓
Define a name for a for each check; see .
✓
Add an identity to a check.
✓
Define alert configurations to specify warn and fail alert conditions; see .
.
✓
Apply an in-check filter to return results for a specific portion of the data in your dataset; see .
To keep your for each check results organized in Soda Cloud, you may wish to dynamically add a name to each check so that you can easily identify to which dataset the check result applies.
For example, if you use for each to execute an anomaly detection check on many datasets, you can use a variable in the syntax of the check name so that Soda dynamically adds a dataset name to each check result.
Soda pushes the check results for each dataset to Soda Cloud where each check appears in the Checks dashboard, with an icon indicating their latest scan result. Filter the results by dataset to review dataset-specific results.
Reference tips and best practices for SodaCL.
Need help? Join the .
Channel URL
Provide a channel identifier to which Soda Cloud sends all discussion events.
Need help? Join the Soda community on Slack.
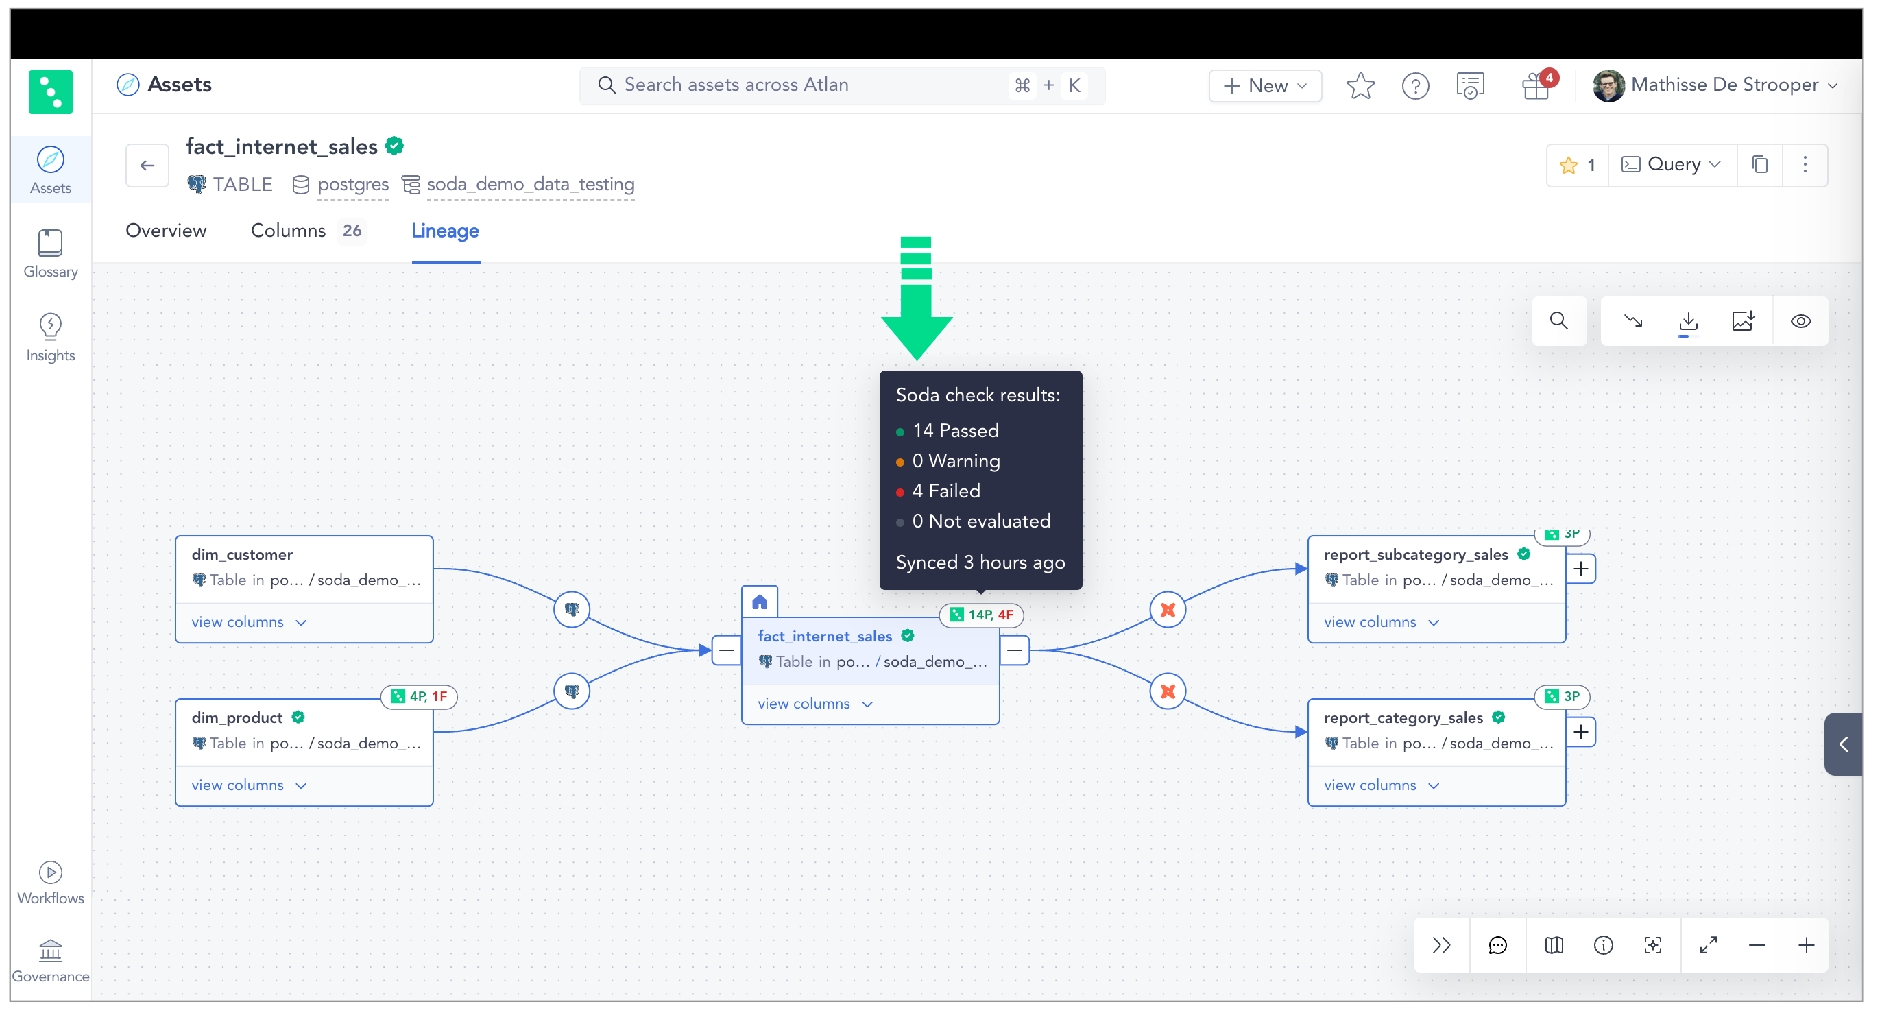
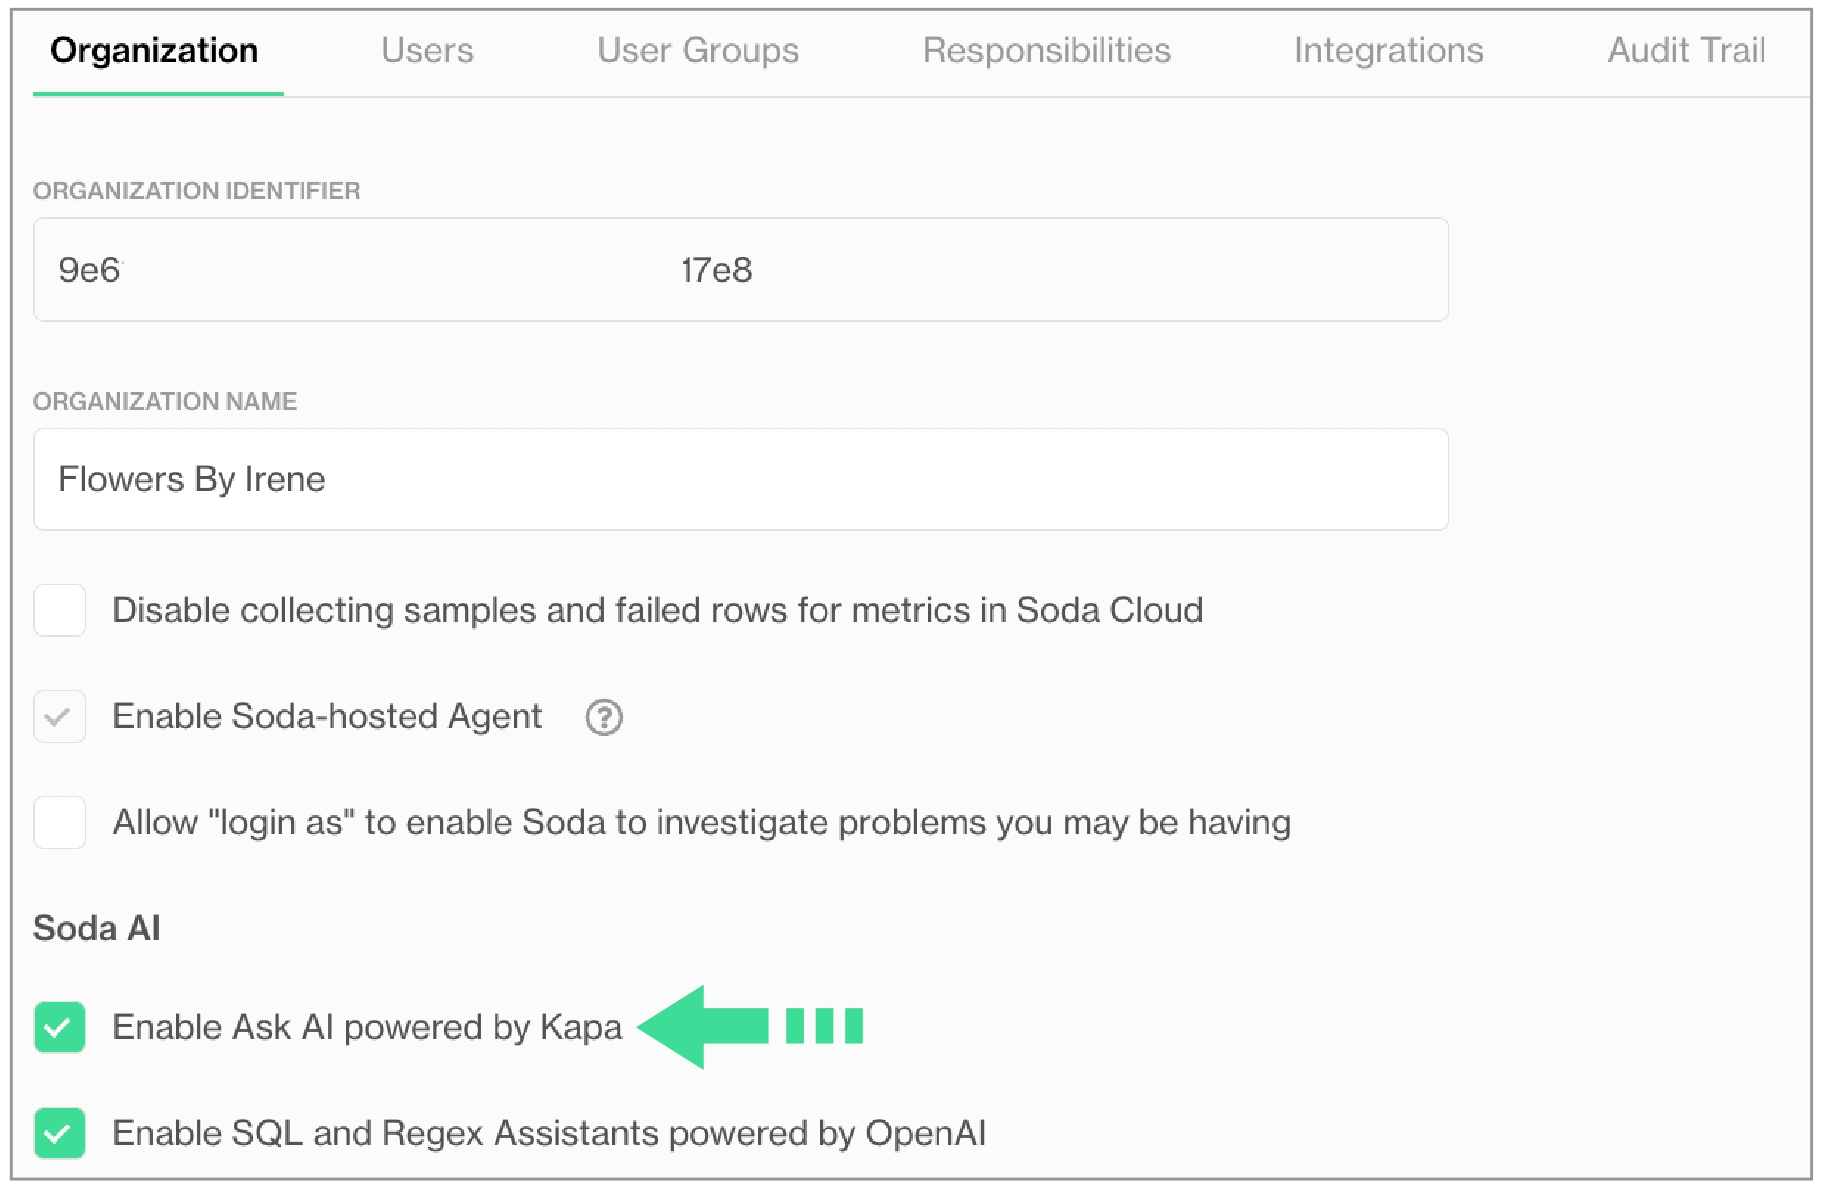
Follow this guide to enable Soda Cloud end users to create no-code checks for data quality for the data that matters to them the most.
Use this guide to set up Soda Cloud and enable users across your organization to serve themselves when it comes to testing data quality.
Deploy a Soda Agent in a Kubernetes cluster to connect to both a data source and the Soda Cloud, then invite your Data Analyst and Data Scientist colleagues to join the account, start data quality discussions, and begin creating their own SodaCL checks for data quality.
The instructions below offer Data Engineers an example of how to set up the Soda Cloud to enable non-coder colleagues to propose, discuss, and create their own data quality tests. After all, data quality testing is a team sport!
Once you have completed the set-up, you can direct your non-coding colleagues to log in to Soda Cloud and begin creating Discussions. A Discussion in Soda is a messaging space that facilitates collaboration between data producers and data consumers. Together, colleagues can establish the expected and agreed-upon state of data quality in a dataset by proposing, then approving data quality checks that execute as part of a scheduled scan in Soda.
When checks fail during data quality scans, you and your colleagues get alerts via Slack which enable you to address issues before they have a downstream impact on the users or applications that depend upon the data.
If you have not already done so, create a Soda Cloud account at . If you already have a Soda account, log in.
By default, Soda prepares a Soda-hosted agent for all newly-created accounts. However, if you are an Admin in an existing Soda Cloud account and wish to use a Soda-hosted agent, navigate to your avatar > Organization Settings. In the Organization tab, click the checkbox to Enable Soda-hosted Agent.
Navigate to your avatar
Depending on your deployment model, Soda Agent supports connections with the following data sources.
1 MS SQL Server with Windows Authentication does not work with Soda Agent out-of-the-box.
Log in to your Soda Cloud account, then navigate to your avatar > Data Sources.
In the Agents tab, confirm that you can see a Soda-hosted agent, or the Soda Agent you deployed, and that its status is “green” in the Last Seen column. If not, refer to the Soda Agent documentation to its status.
Navigate to the Data Sources tab, then click New Data Source and follow the to:
Use this integration to enable Soda to send alert notifications to a Slack channel to notify your team when check results warn and fail.
If your team does not use Slack, you can follow the instructions to integrate with , instead, or skip this step as Soda sends alert notifications via email by default.
Log in to your Soda Cloud account and navigate to your avatar > Organization Settings, then navigate to the Integrations tab and click the + icon to add a new integration.
Follow the guided steps to authorize Soda to connect to your Slack workspace. If necessary, contact your organization's Slack Administrator to approve the integration with Soda.
Configuration tab: select the public channels to which Soda can post messages; Soda cannot post to private channels.
Scope tab: select the two Soda features, Alert Notifications and Discussions, which can access the Slack integration.
To dictate where Soda must send alert notifications for checks that fail, create a new notification rule. Navigate to your avatar > Notification Rules, then click New Notification Rule. Follow the guided steps to complete the new rule directly Soda to send check results that fail to a specific channel in your Slack workspace.
Learn more about .
Learn more about .
After testing and saving the new data source, invite your colleagues to your Soda Cloud account so they can begin creating new agreements.
Navigate to your avatar > Invite Team Members, then complete the form to send invitations to your colleagues.
While waiting for your colleagues to accept your Soda invitation, get a head start on setting up data quality checks on the data that matters the most to your data consumers.
🎥 Watch a of the following procedure, if you like!
In Soda Cloud, navigate to Discussions from the main navigation bar.
Start a New Discussion, providing relevant details for a discussion on data quality metrics, and adding people whose perspectives will add value to the data quality of a particular dataset.
Kick off the data quality discussion with your colleagues: begin with Propose Check, then use the no-code check interface to select from the list available checks for the dataset. Most common baseline data quality checks include: missing, invalid, duplicate, and freshness. Refer to for more detail on how to leverage no-code checks.
✨Well done!✨ You've taken the first step towards a future in which you and your colleagues can collaborate on defining and maintaining good-quality data. Huzzah!
in Soda!
with your data catalog.
Use to investigate data quality issues.
. Hey, what can Soda do for you?
Access configuration details to connect Soda to Dask and Pandas.
For use with programmatic Soda scans, only.
Install package: soda-pandas-dask
Define a programmatic scan for the data in the DataFrames. You do not need to configure a connection to a data source, but you must still configure a connection to Soda Cloud using API Keys. Refer to the following example.
COUNTPrior to soda-pandas-dask version 1.6.4, Soda only supported dask-sql versions up to 2023.10 in which the COUNT(*) clause behaved as COUNT(1) by default. With dask-sql versions greater than 2023.10, Dask's behavior changed so that COUNT(*) behaves as COUNT(*). Therefore, upgrading your soda-pandas-dask package, which supports newer versions of dask-sql with the new behavior, might lead to unexpected differences in your check results.
To mitigate confusion, with soda-pandas-dask version 1.6.4 or greater, use the optional use_dask_count_star_as_count_one parameter when calling scan.add_dask_dataframe() or scan.add_pandas_dataframe() to explicitly set the behavior of the COUNT(*) clause, as in the following example.
If you do not add the parameter, Soda defaults to use_dask_count_star_as_count_one=True.
In dask>=2023.7.1 and later, if you use pandas>=2 and pyarrow>=12, Dask Dataframe automatically converts text data to string[pyarrow] data type. With soda-pandas-dask version 1.6.4, Soda's updated codebase uses dask>=2023.7.1 but it still expects text data to be converted to object data type.
Add the dask.config.set({"dataframe.convert-string": False}) parameter set to False, as in the following example, to avoid KeyError: string[pyarrow] errors. Access for further details.
Problem: You encounter errors when trying to install soda-pandas-dask in an environment that uses Python 3.11. This may manifest as an issue with dependencies or as an error that reads, Pre-scan validation failed, see logs for details.
Workaround: Uninstall the soda-pandas-dask package, then downgrade the version of Python your environment uses to Python 3.9. Install the soda-pandas-dask package again.
Problem: The COUNT(*) behavior in dask-sql is behaving unexpectedly or yielding confusing check results.
Solution: Upgrade soda-pandas-dask to version 1.6.4 or greater and use the optional use_dask_count_star_as_count_one=True parameter when calling scan.add_dask_dataframe() or scan.add_pandas_dataframe() to persist old dask-sql behavior. See .
Problem: You encounter an error that reads KeyError: string[pyarrow].
Solution: Upgrade soda-pandas-dask to version 1.6.4 or greater and use the dask.config.set({"dataframe.convert-string": False}) parameter set to False. See .
Follow this guide to set up and run automated Soda scans for data quality during CI/CD development using GitHub Actions.
Use this guide to install and set up Soda to test the quality of your data during your development lifecycle. Catch data quality issues in a GitHub pull request before merging data management changes, such as transformations, into production.
The instructions below offer Data Engineers an example of how to use the Soda Library Action to execute SodaCL checks for data quality on data in a Snowflake data source.
For context, the example assumes that a team of people use GitHub to collaborate on managing data ingestion and transformation with dbt. In the same repo, team members collaborate to write tests for data quality in SodaCL checks YAML files. With each new pull request, or commit to an existing one, in the repository that adds a transformation or makes changes to a dbt model, the GitHub Action in Workflow executes a Soda scan for data quality and presents the results of the scan in a comment in the pull request, and in Soda Cloud.
Where the scan results indicate an issue with data quality, Soda notifies the team via a notification in Slack so that they can investigate and address any issues before merging the PR into production.
Borrow from this guide to connect to your own data source, add the GitHub Action for Soda to a Workflow, and execute your own relevant tests for data quality to prevent issues in production.
In a browser, navigate to to create a new Soda account, which is free for a 45-day trial. If you already have a Soda account, log in.
Navigate to your avatar > Profile, then access the API keys tab. Click the plus icon to generate new API keys. Copy+paste the API key values to a temporary, secure place in your local environment.
In the GitHub repository in which you wish to include data quality scans in a Workflow, create a folder named soda for the configuration files that Soda requires as input to run a scan.
In this folder, create two files:
a configuration.yml file to store the connection configuration Soda needs to connect to your data source and your Soda Cloud account.
a checks.yml file to store the SodaCL checks you wish to execute to test for data quality; see .
Follow the to add connection configuration details for both your data source and your Soda Cloud account to the configuration.yml, as per the example below.
In the .github/workflows folder in your GitHub repository, open an existing Workflow or file.
In your browser, navigate to the GitHub Marketplace to access the . Click Use latest version to copy the code snippet for the Action.
Paste the snippet into your new or existing workflow as an independent step, then add the required action inputs and environment variable as in the following example.
Be sure to add the Soda Action after the step in the workflow that completes a dbt run that executes your dbt tests.
Best practice dictates that you configure sensitive credentials using GitHub secrets. Read more about .
Save the changes to your workflow file.
A check is a test that Soda executes when it scans a dataset in your data source. The checks.yml file stores the checks you write using the . You can create multiple checks.yml files to organize your data quality checks and run all, or some of them, at scan time.
In your soda folder, open the checks.yml file, then copy and paste the following rather generic checks into the file.
Replace the value of dataset_name with the name of a dataset in your data source.
Replace the value of column1 with the name of a column in the dataset.
yaml checks for dataset_name: # Checks that dataset contains rows - row_count > 0: name: Dataset contains data # Checks that column contains no NULL values - missing_count(column1) = 0: name: No NULL values
Save the checks.yml file.
To trigger the GitHub Action and initiate a Soda scan for data quality, create a new pull request in your repository. Be sure to trigger a Soda scan after the step in your Workflow that completes the dbt run that executed your dbt tests.
For the purposes of this exercise, create a new branch in your GitHub repo, then make a small change to an existing file and commit and push the change to the branch.
Execute a .
Create a new pull request, then navigate to your GitHub account and review the pull request you just created. Notice that the Soda scan action is queued and perhaps already running against your data to check for quality.
When the job completes, navigate to the pull request's Conversation tab to view the comment the Action posted via the github-action bot. The table indicates the states and volumes of the check results.x
✨Well done!✨ You've taken the first step towards a future in which you and your colleagues prevent data quality issues from getting into production. Huzzah!
in Soda!
. Hey, what can Soda do for you?
Use a SodaCL failed rows check to explicitly send sample failed rows to Soda Cloud.
Use a failed rows check to explicitly send samples of rows that failed a check to Soda Cloud.
You can also use a failed row check to configure Soda Library to execute a CTE or SQL query against your data, or to group failed check results by one or more categories.
✔️ Requires Soda Core Scientific (included in a Soda Agent) ✔️ Supported in Soda Core ✔️ Supported in Soda Library + Soda Cloud ✔️ Supported in Soda Cloud Agreements + Soda Agent
✔️ Available as a no-code check with a self-hosted Soda Agent connected to any Soda-supported data source, except Spark, and Dask and Pandas OR with a Soda-hosted Agent connected to a BigQuery, Databricks SQL, MS SQL Server, MySQL, PostgreSQL, Redshift, or Snowflake data source
To send failed rows samples to Soda Cloud, samples collection must be enabled in Soda Cloud.
As a user with to do so, navigate to your avatar > Organization Settings, then check the box to Allow Soda to collect sample data and failed row samples for all datasets.
In the context of , failed row checks are user-defined. This check is limited in its syntax variation, but you can customize your expression or query as much as you like.
When a failed rows check results in a warn or fail Soda collects up to 100 failed row samples by default. You can decrease or increase the volume of sample rows using the samples limit parameter; see .
The example below uses to define the fail condition that any rows in the dim_customer dataset must meet in order to qualify as failed rows, during a scan, get sent to Soda Cloud. Soda sends any rows which contain the value 2 in the total_children column and which contain a value greater than or equal to 3 in the number_cars_owned column to Soda Cloud as failed row samples, up to a default volume of 100 rows. The check also uses the name configuration key to customize a name for the check so that it displays in a more readable form in Soda Cloud; see image below.
If you prefer, you can use a SQL query to define what qualifies as a failed row for Soda to send to Soda Cloud, as in the following simple example. Use this cofiguration to include complete SQL queries in the Soda scan of your data.
Known issue: Dataset filters are not compatible with failed rows checks which use a SQL query. With such a check, Soda does not apply the dataset filter at scan time.
Learn how to .
Learn more about in general.
Borrow user-defined check syntax to define a reusable .
Use a to discover missing or forbidden columns in a dataset.
Configure a webhook to connect Soda to your Jira workspace.
Configure a webhook in Soda Cloud to connect to your Jira workspace.
In this guide, we will show how you can integrate Soda Cloud Incidents with Jira. After the integration is set up, then creating an incident in Soda will automatically trigger the creation of corresponding bug ticket in Jira. The Jira ticket will include information related to the incident created in Soda, including:
The number and title of the Incident
The description of the Incident
The severity of the incident
The status of the incident
The user who reported the Incident
A link to the Incident in Soda Cloud
A link to the associated Check in Soda Cloud
A link to this Jira ticket will be sent back to Soda and displayed on the Incident page in the Integrations box. Any updates to the status of the Incident in Soda Cloud will trigger corresponding changes to the Status of the Jira ticket. Any updates to the status of the Jira ticket will trigger corresponding changes to the Status of the Incident in Soda Cloud.
In Jira, you can set up an Automation Rule that enables you to define what you want an incoming webhook to do, then provides you with a URL that you use in the URL field in the Soda Cloud integration setup.
This integration is built on two webhook events IncidentCreated and IncidentUpdated (Soda -> Jira; ), as well as the Soda Cloud API endpoint for updating incidents (Jira -> Soda; ).
In Jira, start by creating a new project dedicated to tracking data quality tickets. Navigate to the Project settings > Work Items, and make sure you have a bug type work item with the fields, as shown in the image below:
Summary
Description
Assignee
IncidentSeverity
From the same page, next click the Edit Workflow button, and make sure your workflow includes the following statuses:
Reported
Investigating
Fixing
Resolved
Here we will set up the automation in Jira so that when an Incident is created or updated in Soda, then a bug ticket will automatically be created or updated in Jira.
Navigate to Project settings > Automation, then click Create rule and, for the type of New trigger, select Incoming webhook.
Under the When: Incoming webhook trigger, click Add a component, select IF: Add a condition, then smart values condition.
What this means is that, if an incoming webhook has the incidentCreated event, then we will do something.
Next we will add another component: THEN: Add an action.
The action will be to Create work item and the Issue Type should be Bug and the Project should be our new project.
Next we add some steps to fill out our ticket with extra information obtained from the webhook data.
We start by creating a branch rule to identify our ticket:
Then we Edit the ticket fields:
Finally, the last step in our incident creation workflow is to send a post request back to Soda with a link to the issue in Jira:
The remaining parts of this automation rule cover the scenarios where the status of the incident is updated in Soda, then we will detect this change and make the corresponding updates to the issue in Jira.
When the status changes to Reported:
The same logic is used for other status changes such as Investigating and Fixing.
In case the status changes to Resolved, our rule uses a similar logic, but with the additional step of adding resolution notes as a comment to the issue in Jira:
Once you save/enable this new rule, then you can access a URL and secret that you will provide to Soda when setting up the new webhook integration.
After saving or enabling the rule, you can view details of the webhook trigger as shown below:
Next, you create a new webhook integration in Soda and provide the details from the webhook trigger above, as shown in the image below.
Paste the Webhook URL from Jira into the URL field in Soda and paste the Secret from Jira into a custom HTTP header called X-Automation-Webhook-Token.
Finally, in the Define Scope tab, make sure to select Incidents - Triggered when users create or update incidents.
Lastly we will set up a second automation rule in Jira so that when the status of the ticket changes in Jira, these changes are also reflected in Soda.
First, we set up the trigger for this automation to be when a Work item is transitioned:
Finally, we send a post request to the Soda Cloud API incidents endpoint, using information from our Jira ticket to update the severity and status of the corresponding incident in Soda:
Note that the Authorization header value must be formatted like: Basic <base64_encoded_credentials>.
Base64-encoded credentials can be generated using Soda Cloud API keys in Python like so:
As a business user, learn more about in Soda Cloud.
Set that apply to multiple checks in your account.
Learn more about creating, tracking, and resolving data quality .
Access a list of that Soda Cloud supports.
This example helps you build a customized data quality reporting dashboard in Sigma using the Soda Cloud API.
This guide offers a comprehensive example for building a customized data quality reporting dashboard in Sigma. Use the Soda Cloud API to capture metadata from your Soda Cloud account, store it in Snowflake, then access the data in Snowflake to create a Sigma dashboard.
Python 3.8, 3.9, or 3.10
Pip 21.0 or greater
access to an account in Sigma
access to a Snowflake data source
a Soda Cloud account; see
permission in Soda Cloud to access dataset metadata; see
Install an HTTP request library and Snowflake connector.
In a new Python script, configure the following details to integrate with Soda Cloud. See for detailed instructions.
In the same script, define the tables in which to store the Soda dataset information and check results in Snowflake, ensuring they are in uppercase to avoid issues with Snowflake's case sensitivity requirements.
In the same script, configure your Snowflake connection details. This configuration enables your script to securely access your Snowflake data source.
In the script, prepare an HTTP GET request to the Soda Cloud API to retrieve dataset information. Direct the request to the endpoint, including the authentication API keys to access the data. This script prints an error if the request is unauthorized.
Run the script to ensure that the GET request results in HTTP status code 200, confirming the successful connection to Soda Cloud.
With a functional connection to Soda Cloud, adjust the API call to extract all dataset information from Soda Cloud, iterating over each page of the datasets. Then, create a Pandas Dataframe to contain the retrieved metadata. This adjusted call retrieves information about each dataset's name, its last update, the data source in which it exists, its health status, and the volume of checks and incidents with which it is associated.
Inspect the information you retrieved with the following Pandas command; see example output below.
{:height="700px" width="700px"} 3. Following the same logic, extract all the check-related information from Soda Cloud using the endpoint. This call retrieves information about the checks in Soda Cloud, including the dataset and column each runs against, the latest check evaluation time and the result—pass, warn, or fail—and any attributes associated with the check.
4. Again, inspect the output with a Pandas command.
5. Finally, move the two sets of metadata into your Snowflake data source. Optionally, if you wish to track updates and changes to dataset and check metadata over time, you can store the metadata to incremental tables and set up a flow to update the values on a regular basis using the latest information retrieved from Soda Cloud.
Run the script to populate the tables in Snowflake with the metadata pulled from Soda Cloud.
To build a custom dashboard, this example uses , a cloud-based analytics and business intelligence platform designed to facilitate data exploration and analysis. You may wish to use a different tool to build a dashboard such as Metabase, Lightdash, Looker, PowerBI, or Tableau.
This example leverages , an optional configuration that helps categorize or segment check results so you can better filter and organize not only your views in Soda Cloud, but your customized dashboard. Checks in this example use the following attributes:
Data Quality Dimension: Completeness, Validity, Consistency, Accuracy, Timeliness, Uniqueness
Data Domain: Customer, Location, Product, Transaction
Data Team: Data Engineering, Data Science, Sales Operations
Pipeline stage: Destination, Ingest, Report, Transform
The weight attribute, in particular, is very useful in allocating a numerical level of importance to checks which you can use to create a custom data health quality score.
Follow the Sigma documentation to .
Follow Sigma documentation to access the metadata you stored in Snowflake, either by , or .
Create a new in Sigma where you can create your .
The Sigma dashboard below tracks data quality status within an organization. It includes some basic KPI information including the number of datasets monitored by Soda, as well as the number of checks that it regularly executes. It displays a weighted data quality score based on the custom values provided in the Weight attribute for each check (here shown according to data quality dimension) which it compares to previous measurements gathered over time.
Access full and documentation.
Learn more about and .
Access configuration details to connect Soda to an OracleDB data source.
For Soda to run quality scans on your data, you must configure it to connect to your data source. To learn how to set up Soda and configure it to connect to your data sources, see .
Soda supports Oracle version 21.3 or greater.
Install package: soda-oracle
Alternatively, you can configure a connection without a connectstring.
Data quality is a team sport! Integrate with Slack so Soda Cloud can send alerts to your team. Invite your team to join your Soda Cloud account.
After you have set up Soda, there are several recommended steps to take to customize your implementation and maximize your team's efficiency in monitoring data quality. Though recommended, these customizations are optional.
As the last step in the Get started roadmap, this guide offers instructions to organize your check results, customize alert notifications, open incidents to investigate issues, and more.
Use an out-of-the-box Soda-hosted agent to connect to your data sources and begin testing data quality.
The Soda environment has been updated since this tutorial.
Refer to for updated tutorials.
The Soda Agent is a tool that empowers Soda Cloud users to securely access data sources to scan for data quality.
Use the secure, out-of-the-box Soda-hosted agent made available for every Soda Cloud organization or, alternatively, you can create a Kubernetes cluster in your organization's environment and use Helm to deploy a Self-hosted Soda Agent in the cluster; see
Learn how to mitigate the exposure of sensitive information in Soda Cloud.
Soda provides several capabilities and configurable settings that help you manage access to sensitive data. What follows are several options that you can implement to guard against unauthorized access to sensitive data that Soda may check for data quality.
Soda Cloud employs roles and permissions that apply to users of an organization's account. These access controls enable you to define who can access, add, change, or delete metadata or access to data in the account.
Refer to for much more detail and guidance on how to limit access.
Use the GitHub Action for Soda to automatically scan for data quality during development.
Add the to your GitHub Workflow to automatically execute scans for data quality during development.
Soda works by taking the data quality checks that you prepare and using them to run a scan of datasets in a data source. A scan is a CLI command which instructs Soda to prepare optimized SQL queries that execute data quality checks on your data source to find invalid, missing, or unexpected data. When checks fail, they surface bad-quality data and present check results that help you investigate and address quality issues.
For example, in a repository in which are adding a transformation or making changes to a dbt model, you can add the GitHub Action for Soda to your workflow, as above. With each new pull request, or commit to an existing one, it executes a Soda scan for data quality and presents the results of the scan in a comment in the pull request, and in a report in Soda Cloud.
Integrate Soda with dbt-core or dbt Cloud to access dbt test results from within your Soda Cloud account and leverage all its features.
Integrate Soda with dbt to access dbt test results from within your Soda Cloud account.
Use Soda Library to ingest the results of your dbt tests and push them to Soda Cloud so you can leverage features such as:
visualizing your data quality over time
setting up alert notifications for your team when dbt tests fail
class SodaScanOperator(PythonOperator):
def __init__(self,
task_id: str,
dag: DAG,
data_sources: list,
soda_cl_path: str,
variables: dict = None,
airflow_variables: list = None,
airflow_variables_json: list = None,
soda_cloud_api_key: Optional[str] = None,
soda_cloud_api_key_var_name: Optional[str] = None):
if variables is None:
variables = {}
if isinstance(airflow_variables, list):
for airflow_variable in airflow_variables:
variables[airflow_variable] = Variable.get(airflow_variable)
if isinstance(airflow_variables_json, list):
for airflow_variable in airflow_variables_json:
variables[airflow_variable] = Variable.get(airflow_variable, deserialize_json=True)
if not soda_cloud_api_key and soda_cloud_api_key_var_name:
soda_cloud_api_key = Variable.get(soda_cloud_api_key_var_name)
super().__init__(
task_id=task_id,
python_callable=SodaAirflow.scan,
op_kwargs={
'scan_name': f'{dag.dag_id}.{task_id}',
'data_sources': data_sources,
'soda_cl_path': soda_cl_path,
'variables': variables,
'soda_cloud_api_key': soda_cloud_api_key
},
dag=dag
)class SodaAirflow:
@staticmethod
def scan(datasource_name,
data_sources: list,
soda_cl_path: str,
schedule_name: Optional[str] = None,
variables: dict = None,
soda_cloud_api_key: str = None):
scan = Scan()
scan.set_data_source_name('')
if data_sources:
for data_source_details in data_sources:
data_source_properties = data_source_details.copy()
data_source_name = data_source_properties.pop('data_source_name')
airflow_conn_id = data_source_properties.pop('airflow_conn_id')
connection = Variable.get(f'conn.{airflow_conn_id}')
scan.add_environment_provided_data_source_connection(
connection=connection,
data_source_name=data_source_name,
data_source_properties=data_source_properties
)
scan.add_sodacl_yaml_files(soda_cl_path)
scan.add_variables(variables)
scan.add_soda_cloud_api_key(soda_cloud_api_key)
scan.execute()
scan.assert_no_error_logs()
scan.assert_no_checks_fail()from airflow import DAG
from airflow.models.variable import Variable
from airflow.operators.python import PythonVirtualenvOperator
from airflow.operators.dummy import DummyOperator
from airflow.utils.dates import days_ago
from datetime import timedelta
import os
from airflow.exceptions import AirflowFailException
default_args = {
'owner': 'soda_core',
'retries': 1,
'retry_delay': timedelta(minutes=5),
}
def run_soda_scan():
from soda.scan import Scan
print("Running Soda Scan ...")
config_file = "/Users/path-to-your-config-file/configuration.yml"
checks_file = "/Users/path-to-your-checks-file/checks.yml"
data_source = "srcdb"
scan = Scan()
scan.set_verbose()
scan.add_configuration_yaml_file(config_file)
scan.set_data_source_name(data_source)
scan.add_sodacl_yaml_files(checks_file)
scan.execute()
print(scan.get_logs_text())
if scan.has_check_fails():
raise ValueError(f"Soda Scan failed with errors!")
else:
print("Soda scan successful")
return 0
dag = DAG(
'soda_core_python_venv_op',
default_args=default_args,
description='A simple Soda Library scan DAG',
schedule_interval=timedelta(days=1),
start_date=days_ago(1),
)
ingest_data_op = DummyOperator(
task_id='ingest_data'
)
soda_core_scan_op = PythonVirtualenvOperator(
task_id='soda_core_scan_demodata',
python_callable=run_soda_scan,
requirements=["-i https://pypi.cloud.soda.io", "soda-postgres"],
system_site_packages=False,
dag=dag
)
publish_data_op = DummyOperator(
task_id='publish_data'
)
ingest_data_op >> soda_core_scan_op >> publish_data_op- name: Cars
soda:
datasource_id: 2d33bf0a-9a1c-4c4b-b148-b5af318761b3
datasource_name: adventureworks
# optional dataset_mapping soda: catalog
dataset_mapping:
Cars_data: Cars
catalog:
type: "alation"
datasource_id: "31"
datasource_container_name: "soda"
datasource_container_id: "1"
- name: Soda Demo
soda:
datasource_id: 8505cbbd-d8b3-48a4-bad4-cfb0bec4c02f
catalog:
type: "alation"
datasource_id: "37"
datasource_container_name: "public"
datasource_container_id: "2"ALATION_HOST=yourcompany.alationcatalog.com
ALATION_USER=<your username for your Alation account>
ALATION_PASSWORD=<your password for your Alation account>
SODA_HOST=cloud.soda.io
SODA_API_KEY_ID=<your Soda Cloud pubic key>
SODA_API_KEY_SECRET=<your Soda Cloud private key>for each dataset T:
datasets:
- dim_products%
- fact%
- exclude fact_survey_response
checks:
- row_count > 0for each dataset T:
datasets:
# include the dataset
- dim_customers
# include all datasets matching the wildcard expression
- dim_products%
# (optional) explicitly add the word include to make the list more readable
- include dim_employee
# exclude a specific dataset
- exclude fact_survey_response
# exclude any datasets matching the wildcard expression
- exclude prospective_%
checks:
- row_count > 0for each dataset T:
datasets:
- dim_employee
checks:
- max(vacation_hours) < 80:
name: Too many vacation hours for US Salesfor each dataset T:
datasets:
- dim_employee
- dim_customer
checks:
- row_count:
fail:
when < 5
warn:
when > 10for each dataset T:
datasets:
- dim_employee
checks:
- max(vacation_hours) < 80:
filter: sales_territory_key = 11for each dataset T:
datasets:
- dim_%
checks:
- row_count > 1for each dataset R:
datasets:
- retail%
checks:
- anomaly detection for row_count:
name: Row count anomaly for ${R}for each dataset T:
datasets:
- dim_employee
- dim_customer
checks:
- row_count > 1sample datasets:
datasets:
- include customer%
- exclude test%sample datasets:
datasets:
- include retail_ordersdata_source soda_demo:
type: sqlserver
host: localhost
username: ${SQL_USERNAME}
password: ${SQL_PASSWORD}
quote_tables: truedata_source my_datasource:
type: postgres
...
sampler:
disable_samples: Truechecks for dim_customer:
# Failed rows defined using common table expression
- failed rows:
samples limit: 50
fail condition: total_children = '2' and number_cars_owned >= 3checks for dim_customer:
# Failed rows defined using SQL query
- failed rows:
fail query: |
SELECT DISTINCT geography_key
FROM dim_customer as customer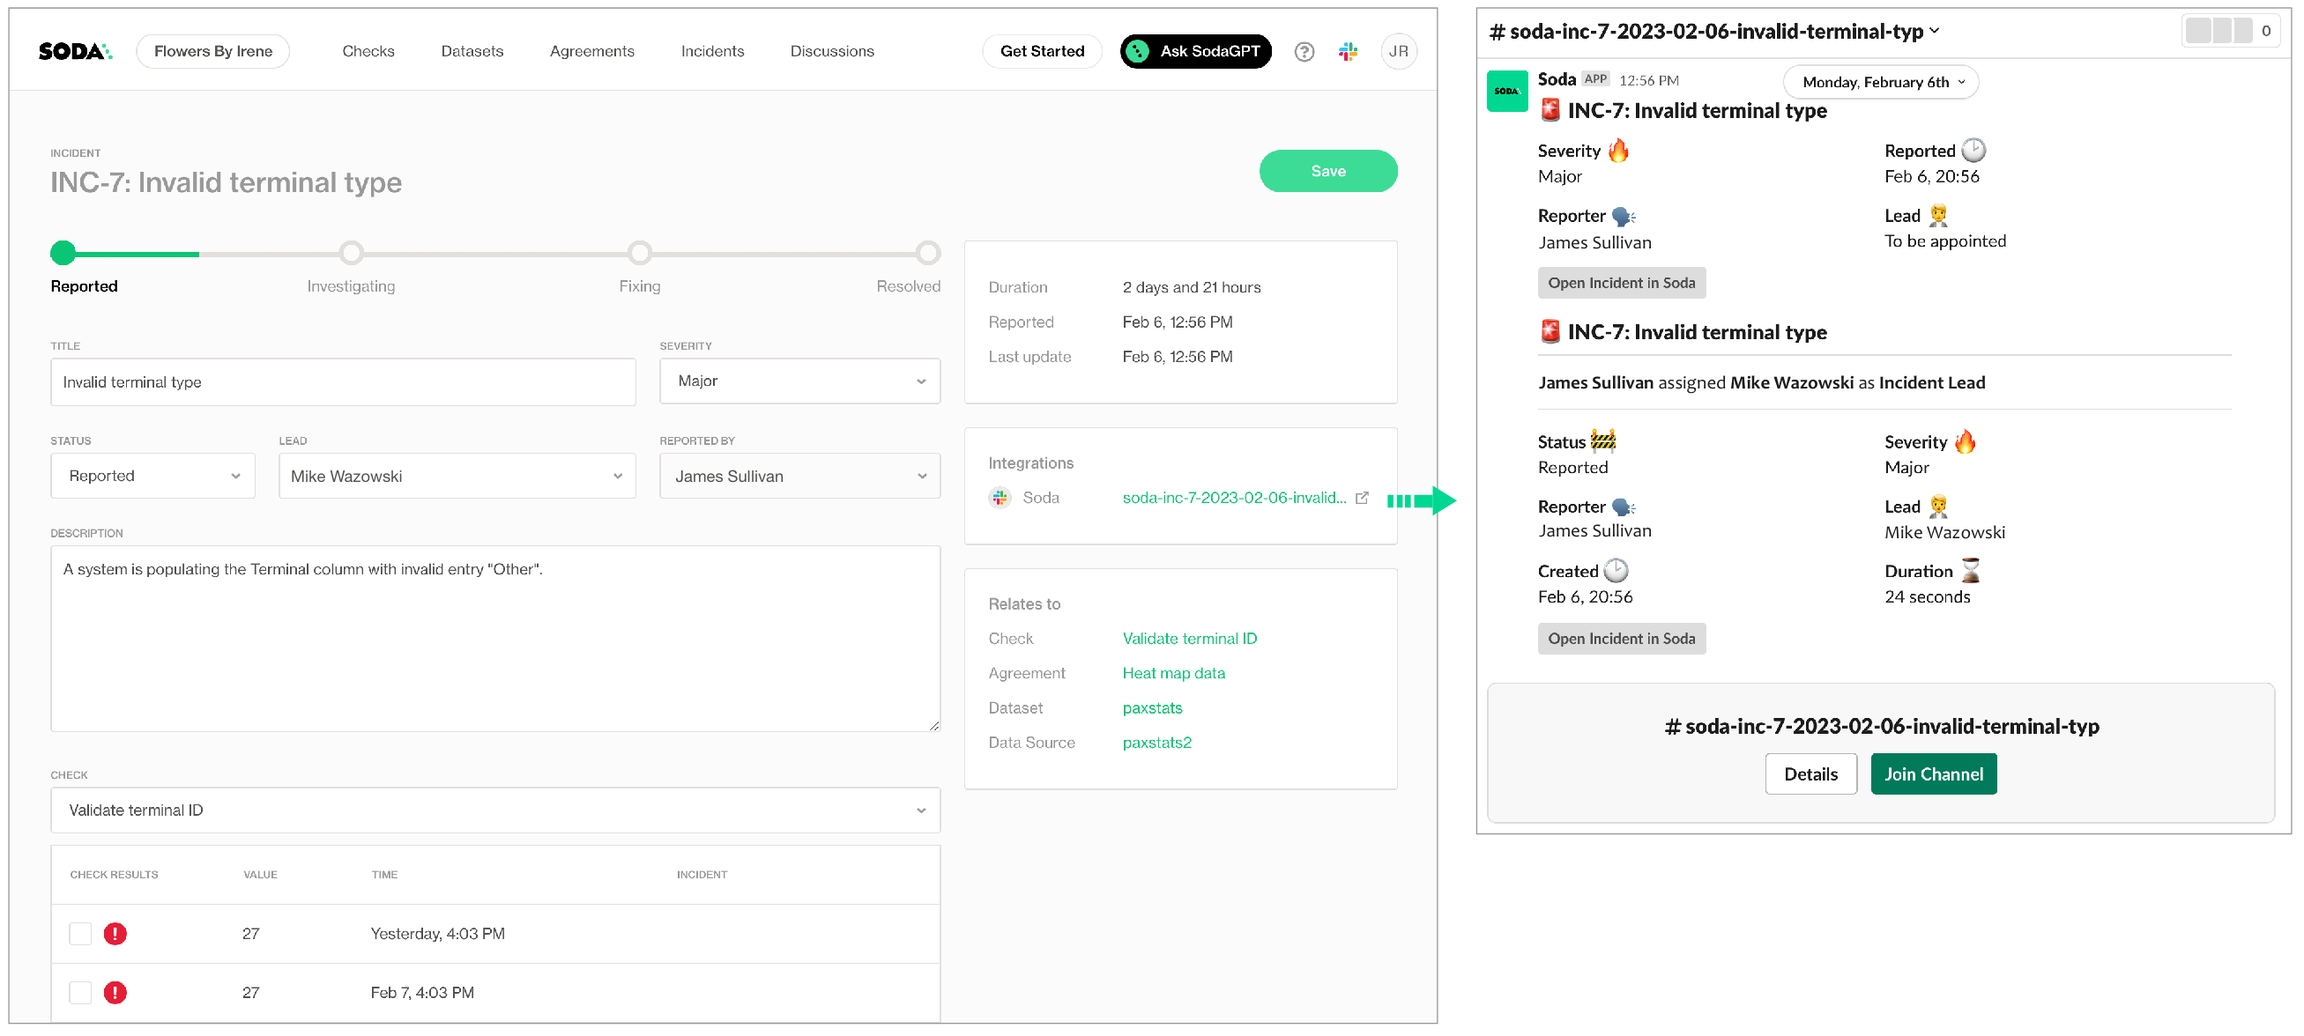
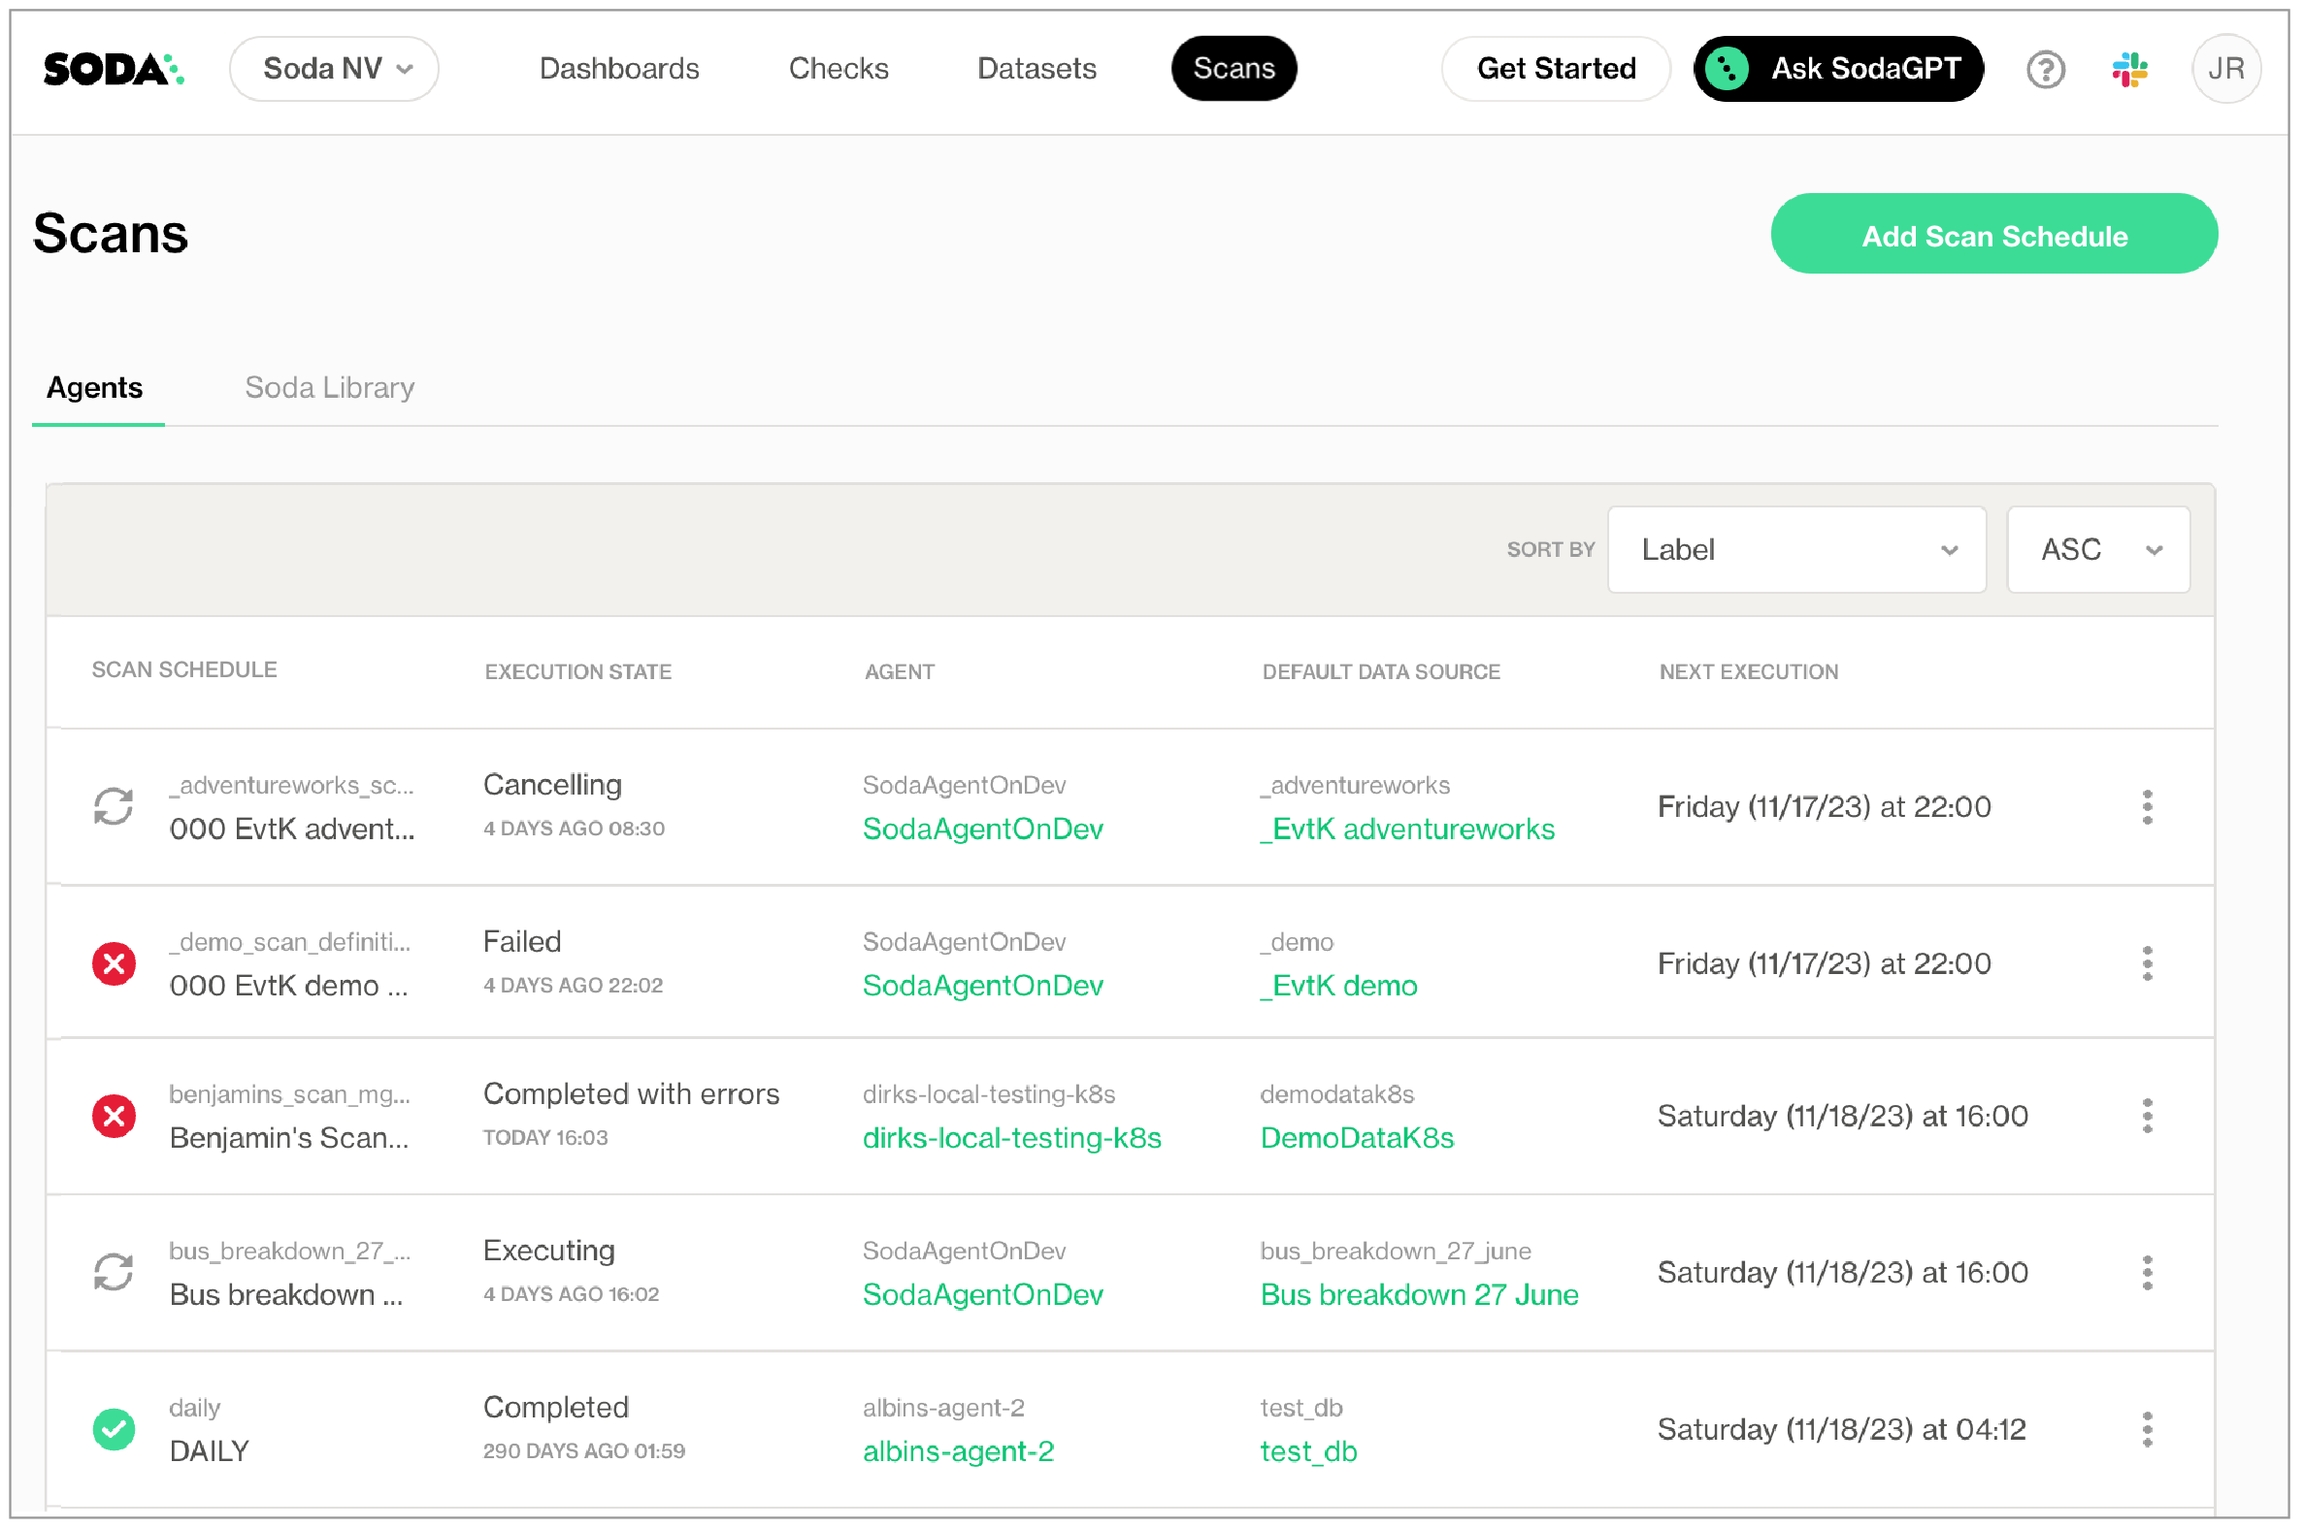
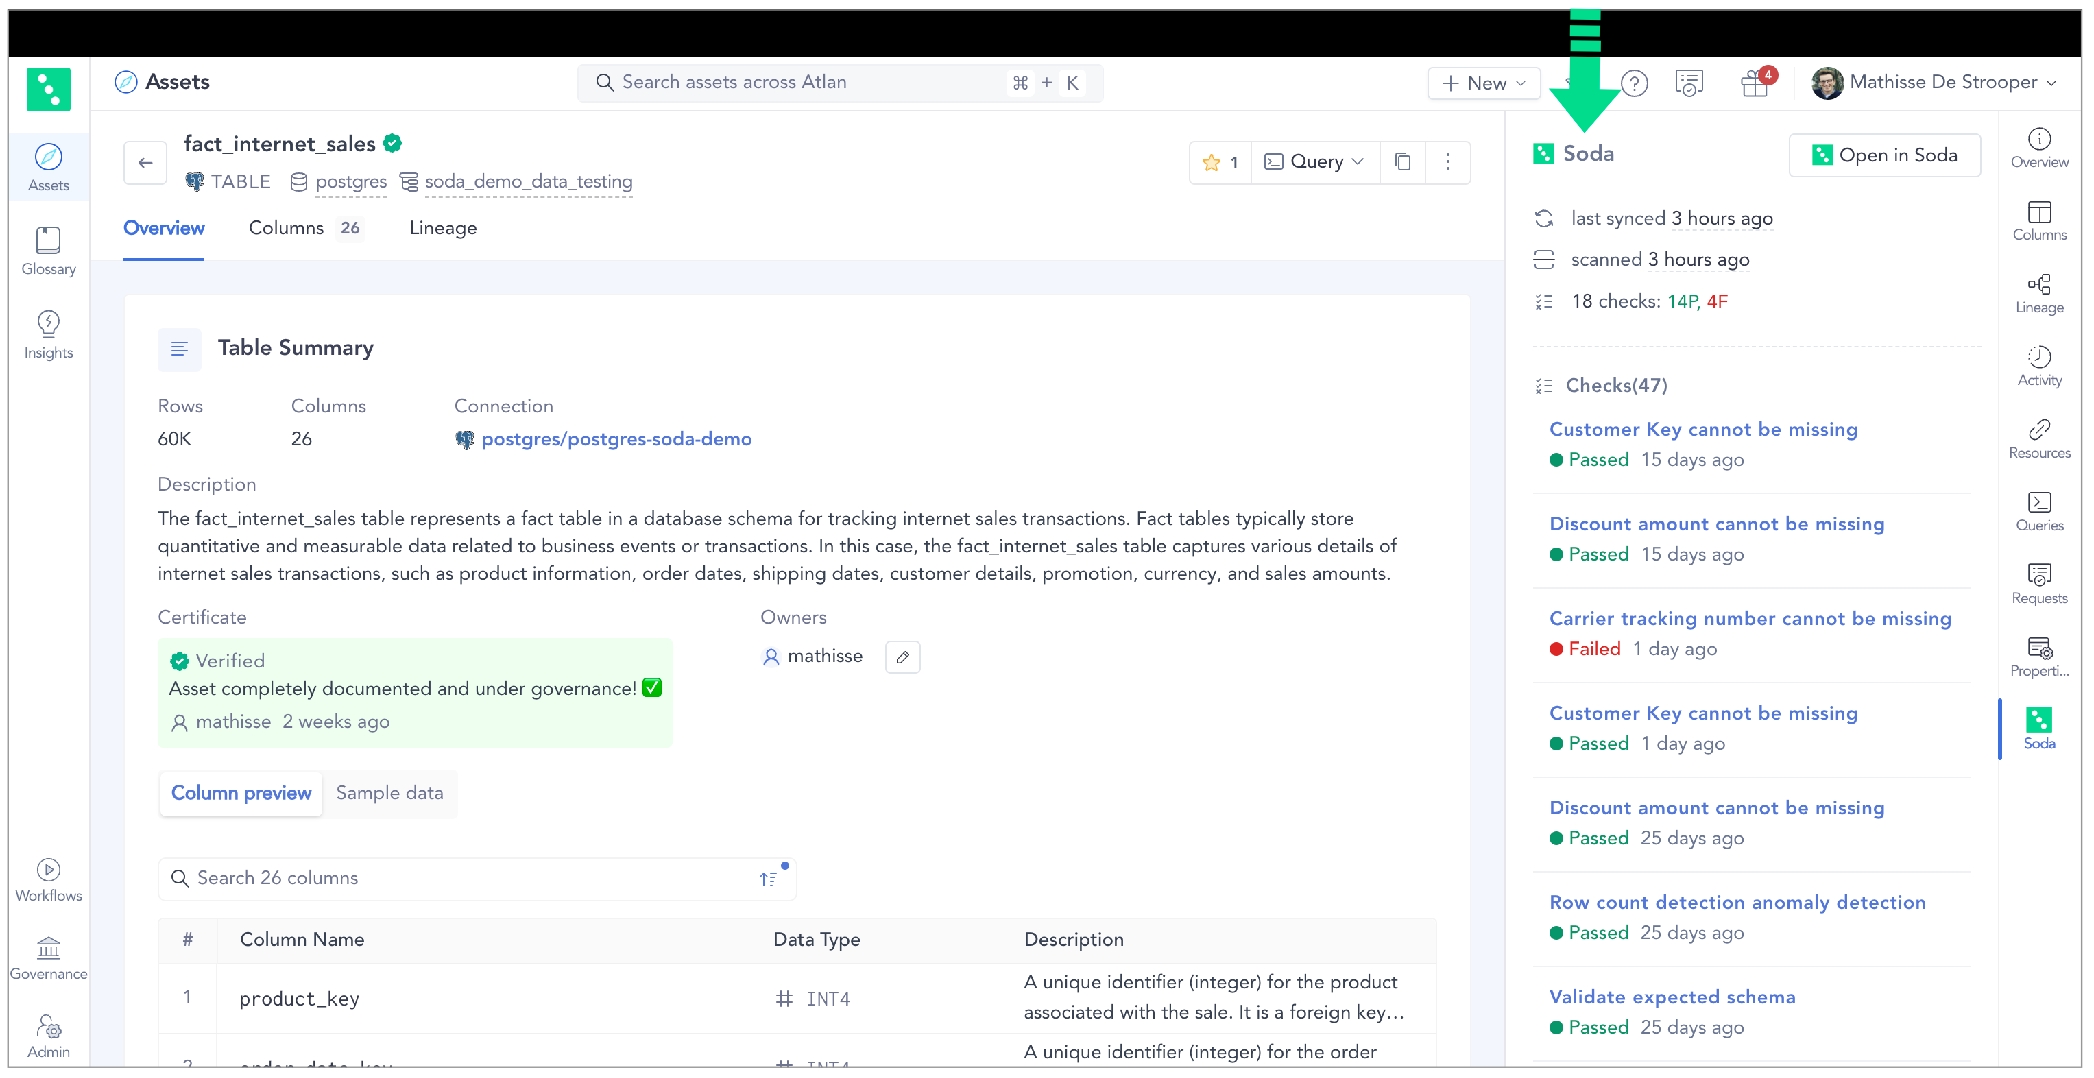
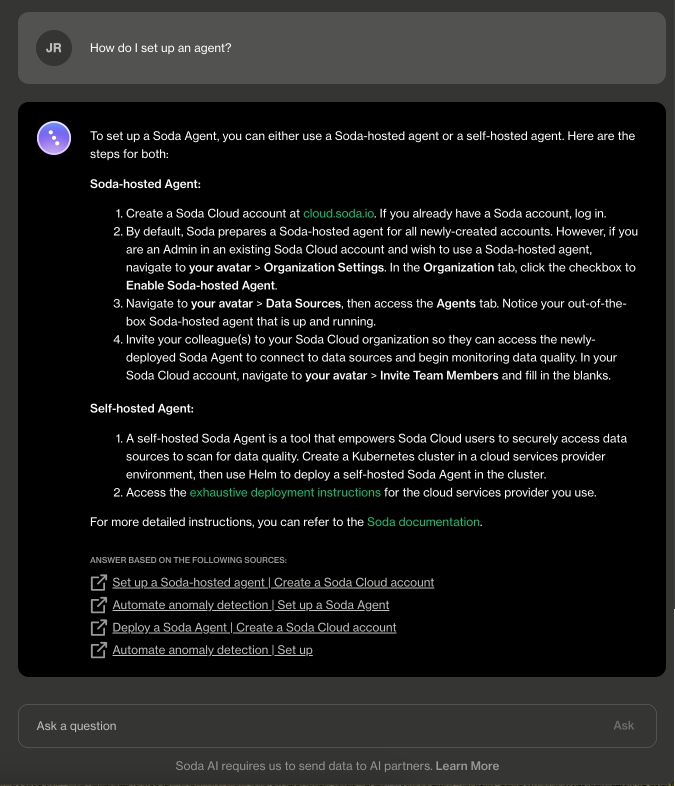
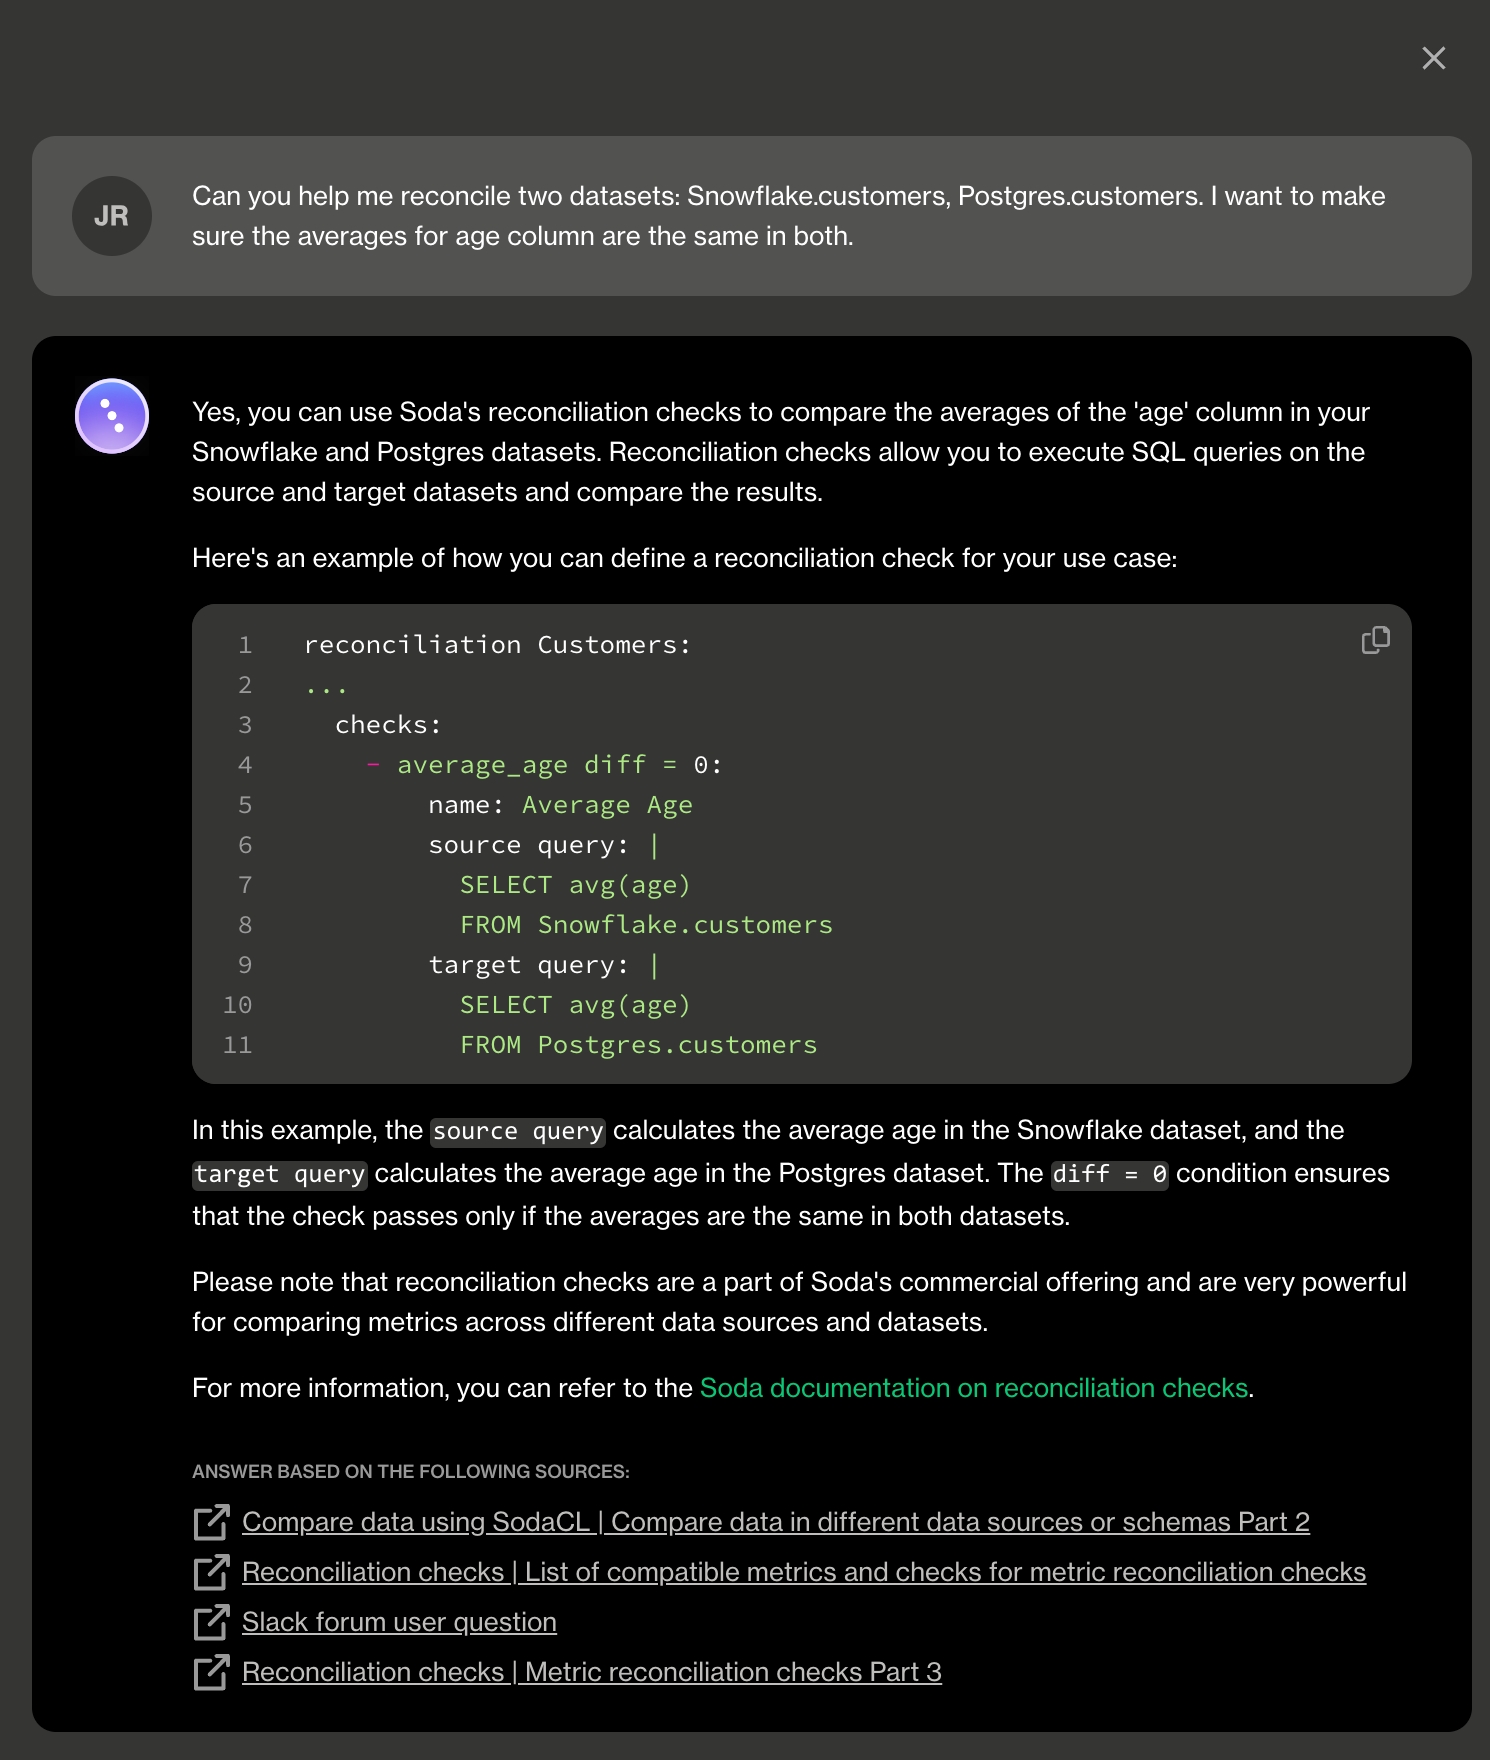
use_dask_count_star_as_count_one=True
COUNT(*) behaves as SQL COUNT(1) operation
use_dask_count_star_as_count_one=False
COUNT(*) behaves as SQL COUNT(*) operation
import pandas as pd
import dask
import dask.datasets
from soda.scan import Scan
# Read more info in "Note on new release" section
dask.config.set({"dataframe.convert-string": False})
# Create a Soda scan object
scan = Scan()
# Load timeseries data from dask datasets
df_timeseries = dask.datasets.timeseries().reset_index()
df_timeseries["email"] = "[email protected]"
# Create an artificial pandas dataframe
df_employee = pd.DataFrame({"email": ["[email protected]", "[email protected]", "[email protected]"]})
# Either add Dask dataframe to scan and assign a dataset name to refer from checks.yaml
scan.add_dask_dataframe(dataset_name="timeseries", dask_df=df_timeseries, data_source_name="orders")
# OR, add Pandas dataframe to scan and assign a dataset name to refer from checks.yaml
scan.add_pandas_dataframe(dataset_name="employee", pandas_df=df_employee, data_source_name="orders")
# Optionally, add multiple dataframes as unique data sources. Note the change of
# the data_source_name parameter.
scan.add_dask_dataframe(dataset_name="inquiries", dask_df=[...], data_source_name="customers")
# Set the scan definition name and default data source to use
scan.set_scan_definition_name("test")
scan.set_data_source_name("orders")
# Add configuration YAML file
# You do not need connection to a data source; you must have a connection to Soda Cloud
# Choose one of the following two options:
# 1) From a file
scan.add_configuration_yaml_file(file_path="~/.soda/configuration.yml")
# 2) Inline in the code
# For host, use cloud.soda.io for EU region; use cloud.us.soda.io for US region
scan.add_configuration_yaml_str(
"""
soda_cloud:
host: cloud.soda.io
api_key_id: 2e0ba0cb-your-api-key-7b
api_key_secret: 5wd-your-api-key-secret-aGuRg
"""
# Define checks in yaml format
# Alternatively, refer to a yaml file using scan.add_sodacl_yaml_file(<filepath>)
checks = """
for each dataset T:
datasets:
- include %
checks:
- row_count > 0
profile columns:
columns:
- employee.%
checks for employee:
- values in (email) must exist in timeseries (email) # Error expected
- row_count same as timeseries # Error expected
checks for timeseries:
- avg_x_minus_y between -1 and 1:
avg_x_minus_y expression: AVG(x - y)
- failed rows:
samples limit: 50
fail condition: x >= 3
- schema:
name: Confirm that required columns are present
warn:
when required column missing: [x]
when forbidden column present: [email]
when wrong column type:
email: varchar
fail:
when required column missing:
- y
- invalid_count(email) = 0:
valid format: email
- valid_count(email) > 0:
valid format: email
"""
scan.add_sodacl_yaml_str(checks)
scan.set_verbose(True)
scan.execute()import pandas as pd
from soda.scan import Scan
# Create a Soda scan object
scan = Scan()
# Load JSON file into DataFrame
df = pd.read_json('your_file.json')
...import pandas as pd
import dask
import dask.datasets
from soda.scan import Scan
# Create a Soda scan object
scan = Scan()
# Load timeseries data from Dask datasets
df_timeseries = dask.datasets.timeseries().reset_index()
df_timeseries["email"] = "[email protected]"
# Add Dask Dataframe to scan and assign a dataset name to refer from checks.yaml
# Dask uses SQL COUNT(*) operation, instead of COUNT(1)
scan.add_dask_dataframe(dataset_name="timeseries", dask_df=df_timeseries, data_source_name="orders", use_dask_count_star_as_count_one=False)import pandas as pd
import dask
import dask.datasets
from soda.scan import Scan
# Avoid string conversion errors
dask.config.set({"dataframe.convert-string": False})
# Create a Soda scan object
scan = Scan()
# Load timeseries data from Dask datasets
df_timeseries = dask.datasets.timeseries().reset_index()
df_timeseries["email"] = "[email protected]"
# Add Dask Dataframe to scan and assign a dataset name to refer from checks.yaml
scan.add_dask_dataframe(dataset_name="timeseries", dask_df=df_timeseries, data_source_name="orders", use_dask_count_star_as_count_one=False)Soda Agent is a tool that empowers Soda Cloud users to securely access data sources to scan for data quality. Create a Kubernetes cluster in a cloud services provider environment, then use Helm to deploy a self-hosted Soda Agent in the cluster.
For context, this example assumes that:
you have the appropriate access to a cloud services provider environment such as Azure, AWS, or Google Cloud that allows you to create and deploy applications to a cluster,
you, or someone on your team, has access to the login credentials that Soda needs to be able to access a data source such as MS SQL, BigQuery, or Athena so that it can run scans of the data.
Access the exhaustive deployment instructions for the cloud services provider you use.
Cloud services provider-agnostic instructions
Amazon Elastic Kubernetes Service (EKS)
Microsoft Azure Kubernetes Service (AKS)
Google Kubernetes Engine (GKE)
See also:
identify the new data source and its default scan definition
provide connection configuration details for the data source such as name, schema, and login credentials, and test the connection to the data source
profile the datasets in the data source to gather basic metadata about the contents of each
identify the datasets to which you wish to apply automated monitoring for anomalies and schema changes
assign ownership roles for the data source and its datasets
Save the new data source.
After filling in the blanks and testing the check, Propose Check to add the SodaCL check to the discussion. When your colleagues join and review the Discussions, they can add comments or propose new or different checks to address the data quality issues of this dataset.
When you and your team agree on the data quality checks to add to the dataset, you, as the data producer, can Review & Add the check to a scan for the dataset – either existing or new – so that Soda begins executing the check as per the data source's default scan schedule.
Amazon Athena Amazon Redshift Azure Synapse ClickHouse Databricks SQL Denodo Dremio DuckDB GCP BigQuery Google CloudSQL
IBM DB2 MotherDuck MS SQL Server1 MySQL OracleDB PostgreSQL Presto Snowflake Trino Vertica
BigQuery Databricks SQL MS SQL Server MySQL
PostgreSQL Redshift Snowflake

Need help? Join the Soda community on Slack.
Expands the environment variables to pass to the Docker run command as these variables can be configured in the workflow file and contain secrets.
Runs the built image to trigger the Soda scan for data quality.
Converts the Soda Library scan results to a markdown table using newest hash from 1.0.0 version.
Creates a pull request comment.
Posts any additional messages to make it clear whether or not the scan failed.
See the public soda-github-action repository for more detail.
To examine the full scan report and troubleshoot any issues, click the link in the comment to View full scan results, then click View Scan Log. Use [Troubleshoot SocaCL]() for help diagnosing issues.
Need help? Join the Soda community on Slack.
✓
Use quotes when identifying dataset or column names; see . Note that the type of quotes you use must match that which your data source uses. For example, BigQuery uses a backtick (`) as a quotation mark.
✓
Use wildcard characters in the value in the check.
Use wildcard values as you would with CTE or SQL.
Use for each to apply failed rows checks to multiple datasets in one scan.
-
✓
Apply a dataset filter to partition data during a scan; see . Known issue: Dataset filters are not compatible with failed rows checks which use a SQL query. With such a check, Soda does not apply the dataset filter at scan time.
✓
Specify a single column against which to run a failed rows check; see .
-
Supports samples columns parameter to specify columns from which Soda draws failed row samples.
Supports samples limit parameter to control the volume of failed row samples Soda collects.
Supports collect failed rows parameter instruct Soda to collect, or not to collect, failed row samples for a check.
Reference tips and best practices for SodaCL.
✓
Define a name for a failed rows check; see example.
✓
Add an identity to a check.
✓
Define alert configurations to specify warn and fail alert conditions; see example.
Apply an in-check filter to return results for a specific portion of the data in your dataset.
Need help? Join the Soda community on Slack.
-
IncidentURL
CheckURL
Need help? Join the Soda community on Slack.
Weight
Need help? Join the Soda community on Slack.
port
optional
Provide a port identifier. Default is 1523. Only used when connectstring is not provided.
service_name
optional
Provide a service_name. Only used when connectstring is not provided.
connectstring
optional
Specify connection information for the Oracle database. Must be a semicolon-separated list of attribute name and value pairings. See in Oracle documentation. If you do not specify one, Soda attempts to construct a connectstring using host, port and service_name properties.
dataset_prefix
optional
Added in 1.10.1. A list of strings to be used for prefixing datasets. Useful for catalog integrations. Example: dataset_prefix: ["my_db", "my_schema"]
type
required
Identify the type of data source for Soda.
username
required
Consider using system variables to retrieve this value securely.
password
required
Consider using system variables to retrieve this value securely.
host
optional
Provide a host identifier. Only used when connectstring is not provided.
text
CHARACTER VARYING, CHARACTER, CHAR, TEXT
number
SMALLINT, INTEGER, BIGINT, DECIMAL, NUMERIC, VARIABLE, REAL, DOUBLE PRECISION, SMALLSERIAL, SERIAL, BIGSERIAL
time
TIMESTAMP, DATE, TIME, TIMESTAMP WITH TIME ZONE, TIMESTAMP WITHOUT TIME ZONE, TIME WITH TIME ZONE, TIME WITHOUT TIME ZONE
To confirm that you have correctly configured the connection details for the data source(s) in your configuration YAML file, use the test-connection command. If you wish, add a -V option to the command to return results in verbose mode in the CLI.
soda test-connection -d my_datasource -c configuration.yml -VSet up Soda: install, deploy, or invoke
Write SodaCL checks
Run scans and review results
Organize, alert, investigate 📍 You are here!
Customize your dashboard by adding filters to distill the data the dashboard displays. Save your customized dashboard so you can easily return to your distilled view.
For preview participants, only.
✔️ Requires Soda Core Scientific (included in a Soda Agent) ✖️ Supported in Soda Core ✖️ Supported in Soda Library + Soda Cloud ✔️ Supported in Soda Cloud + self-hosted Soda Agent connected to any Soda-supported data source, except Spark, and Dask and Pandas ✔️ Supported in Soda Cloud + Soda-hosted Agent connected to a BigQuery, Databricks SQL, MS SQL Server, MySQL, PostgreSQL, Redshift, or Snowflake data source
To automatically build an anomaly dashboard for one or more dataset in a data source, you can configure Soda Cloud to profile the columns in datasets. During the guided workflow to add a new data source, add profiling configuration to indicate the datasets to which you wish to activate an anomaly dashboard.
During the following five or more days, Soda's machine learning algorithm gathers measurements that allow it to recognize patterns in your data. When it has gathered enough information to reliably discern patterns, it automatically begin detecting anomalies in your data relative to the patterns. In the Anomalies tab of a dataset, you can access an anomaly dashboard displays the results of multiple automated anomaly detection checks that Soda calibrated to your data.
As a user with permission to do so in your Soda Cloud account, you can integrate your Slack workspace in your Soda Cloud account so that Soda Cloud can interact with individuals and channels in the workspace. Use the Slack integration to:
send notifications to Slack when a check result triggers an alert
create a private channel whenever you open new incident to investigate a failed check result
track Soda Discussions wherein your fellow Soda users collaborate on data quality checks
In Soda Cloud, navigate to your avatar > Organization Settings, then navigate to the Integrations tab and click the + icon to add a new integration.
Follow the guided steps to authorize Soda Cloud to connect to your Slack workspace. If necessary, contact your organization’s Slack Administrator to approve the integration with Soda Cloud.
Configuration tab: select the public channels to which Soda can post messages; Soda cannot post to private channels.
Scope tab: select the Soda features (alert notifications and/or incidents) which can access the Slack integration.
Note that Soda caches the response from the Slack API, refreshing it hourly. If you created a new public channel in Slack to use for your integration with Soda, be aware that the new channel may not appear in the Configuration tab in Soda until the hourly Slack API refresh is complete.
Organize results, set alerts, investigate issues Alternatively, you can integrate Soda with MS Teams or another third-party ticketing or messaging tool using a webhook.
Invite the members of your team to join you in your work to monitor data quality in your organization.
In your Soda Cloud account, navigate to your avatar > Invite Team Members and fill in the blanks.
When your team members receive the invitation email, they can click the link in the email to create their own login credentials to access your Soda Cloud account directly. Refer to Manage global roles, user groups, and settings to learn more about the default access rights Soda Cloud assigns to new users.
Note that if your organization uses a single sign-on (SSO) identity provider to access Soda Cloud, you cannot invite team members in Soda Cloud. Instead, contact your IT Admin to request access to Soda Cloud using your SSO. See also, Single Sign-on with Soda Cloud.
Define check attributes that your team can apply to checks to filter check results and customize alert notifications.
Apply attributes to checks to label and sort them by department, priority, location, etc.
Add a check attribute to identify, for example, checks that execute against personally identifiable information (PII).
Define rules to route alert notifications according to check attributes.
You must define check attributes first, before a user can apply the attribute to new or existing checks. In your Soda Cloud account, navigate to your avatar > Attributes > New Attribute.
Follow the guided steps to create and save a new attribute. Learn more
Apply the new attribute to SodaCL checks using key:value pairs, as in the following example which applies five attributes to a new row_count check.
Ascribing to a "No noise" policy, Soda enables you define rules to customize the alert notifications you receive when check results warn or fail. For example, you can define a notification rule to instruct Soda Cloud to send an alert to your #sales-engineering Slack channel whenever a data quality check on the snowflake_sales data source fails.
In Soda Cloud, navigate to your avatar > Notification Rules, then click New Notification Rule and follow the guided steps to complete the new rule. Learn more
If there are checks which you wish to review frequently, consider building a Collection.
In your Soda Cloud account, navigate to the Checks dashboard.
Use a combination of Soda Cloud filters to display your ideal set of data quality checks, then click Save Collection to name the custom filtered view.
In the future, use the dropdown in the Checks dashboard to quickly access your collection again.
When a check fails, you can create an incident in Soda Cloud to track your team’s investigation and resolution of a data quality issue. Read more
Log in to your Soda Cloud account, then navigate to the Checks dashboard.
For the check you wish to investigate, click the stacked dots at right, then select Create Incident. Provide a Title, Severity, and Description of your new incident, then save.
In the Incident column of the check result, click the Incident link to access the Incident page where you can record the following details:
Severity: Minor, Major, or Critical
Status: Reported, Investigating, Fixing, Resolved
Lead: a list of team members from whom you can assign the Lead Investigator role
Save your changes.
If you have connected your Soda Cloud account to Slack, navigate to the Integrations tile, then click the auto-generated link that connects directly to a newly-created, public channel in your Slack workspace that is dedicated to the investigation and resolution of the incident and invite team members to the channel to collaborate on resolving the data quality issue. If you have integrated Soda Cloud with or another , like Jira or ServiceNow, you can access those tools via auto-generated links in the Integrations tile, as well.
If you have integrated your Soda Cloud account with a Slack workspace, you can use an incident's built-in ability to create an incident-specific Slack channel where you and your team can collaborate on the issue investigation.
With dozens, or even hundreds of datasets in your Soda Cloud account, it may be difficult to find the data quality information you’re looking for. To facilitate your search for specific data quality status, consider defining your own Attributes and Tags for datasets, then use filters to narrow your search.
Use dataset attributes to:
identify datasets that are associated with a particular marketing campaign
identify datasets that are relevant for a particular customer account
identify datasets whose quality is critical to business operations, or to categorize datasets according to their criticality in general, such as “high”, “medium”, and “low”.
identify datasets that populate a particular report or dashboard
You must define attributes first, before applying them to datasets. In your Soda Cloud account, navigate to your avatar > Attributes > New Attribute.
Follow the guided steps to create the new attribute. Learn more
Navigate to the Datasets dashboard, click the stacked dots next to a dataset, then select Edit Dataset. Use the attributes fields to apply the appropriate attributes to the dataset, and add any tags you wish as further dataset identifiers. 4. After saving your changes and applying tags and attributes to multiple datasets, use the Filters in the Datasets dashboard to display the datasets that help narrow your study of data quality.
If your team uses a data catalog such as Alation, Atlan, or Metaphor, consider integrating it with Soda to access details about the quality of your data directly within the data catalog.
Run data quality checks using Soda and visualize quality metrics and rules within the context of a data source, dataset, or column in Alation.
Use Soda Cloud to flag poor-quality data in lineage diagrams and during live querying.
Give your Alation users the confidence of knowing that the data they are using is sound.
Use the links below to access catalog-specific integration instructions.
Choose a flavor of Soda
Set up Soda: install, deploy, or invoke
Write SodaCL checks
Run scans and review results
Organize, alert, investigate
🌟 Well done! You've complete the roadmap! 🌟
Use the Reporting API to access metadata about your Soda Cloud account.
Are you a dbt user? Consider ingesting dbt tests into Soda Cloud for a single-pane-of-glass view of your data quality tests.
Access the Use case guides for example implementations of Soda.
Need help? Join the .
A Soda-hosted agent enables Soda Cloud users to securely connect to supported data sources and create checks for data quality in the new data source.
As a step in the Get started roadmap, this guide offers instructions to set up Soda in a Soda-hosted agent deployment model.
Choose a flavor of Soda
Set up Soda: Soda-hosted agent 📍 You are here! a. Create a Soda Cloud account b. Add a new data source
Write SodaCL checks
Run scans and review results
Organize, alert, investigate
BigQuery
Databricks SQL
MS SQL Server
MySQL
PostgreSQL
Redshift
Snowflake
If you have not already done so, create a Soda Cloud account at cloud.soda.io. If you already have a Soda account, log in.
By default, Soda prepares a Soda-hosted agent for all newly-created accounts. However, if you are an Admin in an existing Soda Cloud account and wish to use a Soda-hosted agent, navigate to your avatar > Organization Settings. In the Organization tab, click the checkbox to Enable Soda-hosted Agent.
Navigate to your avatar > Data Sources, then access the Agents tab. Notice your out-of-the-box Soda-hosted agent that is up and running.
In your Soda Cloud account, navigate to your avatar > Data Sources. Click New Data Source, then follow the guided steps to create a new data source. Refer to the sections below for insight into the values to enter in the fields and editing panels in the guided steps.
Already have data source connected to a self-hosted agent?
You can migrate a data source to a Soda-hosted agent.
Data Source Label
Provide a unique identifier for the data source. Soda Cloud uses the label you provide to define the immutable name of the data source against which it runs the Default Scan.
Default Scan Agent
Select the Soda-hosted agent, or the name of a Soda Agent that you have previously set up in your secure environment. This identifies the Soda Agent to which Soda Cloud must connect in order to run its scan.
Check Schedule
Provide the scan frequency details Soda Cloud uses to execute scans according to your needs. If you wish, you can define the schedule as a cron expression.
Starting At (UTC)
Select the time of day to run the scan. The default value is midnight.
Custom Cron Expression
(Optional) Write your own to define the schedule Soda Cloud uses to run scans.
Anomaly Dashboard Scan Schedule (available in 2025)
Provide the scan frequency details Soda Cloud uses to execute a daily scan to automatically detect anomalies for the anomaly dashboard.
Enter values in the fields to provide the connection configurations Soda Cloud needs to be able to access the data in the data source. Connection configurations are data source-specific and include values for things such as a database's host and access credentials.
Soda hosts agents in a secure environment in Amazon AWS. As a SOC 2 Type 2 certified business, Soda responsibly manages Soda-hosted agents to ensure that they remain private, secure, and independent of all other hosted agents. See Data security and privacy for details.
Use the following data source-specific connection configuration pages to populate the connection fields in Soda Cloud.
During its initial scan of your data source, Soda Cloud discovers all the datasets the data source contains. It captures basic information about each dataset, including dataset names, the columns each contains, and the type of data each column contains such as integer, character varying, timestamp, etc.
In the editing panel, specify the datasets that Soda Cloud must include or exclude from this basic discovery activity. The default syntax in the editing panel instructs Soda to collect basic dataset information from all datasets in the data source except those with names that begin with test_. The % is a wildcard character. See Add dataset discovery for more detail on profiling syntax.
Known issue: SodaCL does not support using variables in column profiling and dataset discovery configurations.
To gather more detailed profile information about datasets in your data source and automatically build an anomaly dashboard for data quality observability (preview, only), you can configure Soda Cloud to profile the columns in datasets.
Profiling a dataset produces two tabs' worth of data in a dataset page:
In the Columns tab, you can see column profile information including details such as the calculated mean value of data in a column, the maximum and minimum values in a column, and the number of rows with missing data.
In the Anomalies tab, you can access an out-of-the-box anomaly dashboard that uses the column profile information to automatically begin detecting anomalies in your data relative to the patterns the machine learning algorithm learns over the course of approximately five days. (Available in 2025. Learn more)
In the editing panel, provide details that Soda Cloud uses to determine which datasets to include or exclude when it profiles the columns in a dataset. The default syntax in the editing panel instructs Soda to profile every column of every dataset in this data source, and, superfluously, all datasets with names that begin with prod. The % is a wildcard character. See Add column profiling for more detail on profiling syntax.
Column profiling and automated anomaly detection can be resource-heavy, so carefully consider the datasets for which you truly need column profile information. Refer to Compute consumption and cost considerations for more detail.
When Soda Cloud automatically discovers the datasets in a data source, it prepares automated monitoring checks for each dataset. These checks detect anomalies and monitor schema evolution, corresponding to the SodaCL anomaly detection and schema evolution checks, respectively.
(Note that if you have signed up for early access to anomaly dashboards for datasets, this Check tab is unavailable as Soda performs all automated monitoring automatically in the dashboards.)
In the editing panel, specify the datasets that Soda Cloud must include or exclude when preparing automated monitoring checks. The default syntax in the editing panel indicates that Soda will add automated monitoring to all datasets in the data source except those with names that begin with test_. The % is a wildcard character. Refer to Add automated monitoring checks for further detail.
This tab is the fifth step in the guided workflow if the 5. Check tab is absent because you requested access to the anomaly dashboards feature.
Data Source Owner
The Data Source Owner maintains the connection details and settings for this data source and its Default Scan Definition.
Default Dataset Owner
g6driOiYtQZD
Choose a flavor of Soda
Set up Soda: self-hosted agent
Run scans and review results
Organize, alert, investigate
Need help? Join the Soda community on Slack.
Soda's self-hosted agent is a containerized Soda Library deployed in a Kubernetes cluster in your cloud services provider environment, such as Azure or AWS. It enables users of Soda Cloud to securely access your data sources so it can perform data quality scanning while meeting your infrastructure team’s security rules and requirements that protect credentials and record-level data from exposure.
Consider deploying a self-hosted agent in your own infrastructure to securely manage access to your data sources. See also: Soda architecture
Further, if you use an external secrets manager such as Hashicorp Vault or AWS Secrets Manager, you may wish to integrate your self-hosted Soda Agent with your secrets manager to securely and efficiently grant Soda access to data sources that use frequently-rotated login credentials.
During the data source onboarding process, you have the option to configure Soda to collect and store 100 rows of sample data for the datasets in the data source. This is a feature you must implicitly configure; Soda does not collect sample rows of data by default.
These samples, accessible in Soda Cloud as in the example below, enable users to gain insight into the data's characteristics, facilitating the formulation of data quality rules.
Where your datasets contain sensitive or private information, you may not want to collect, send, store, or visualize any samples from your data source to Soda Cloud. In such a circumstance, you can disable the feature completely in Soda Cloud.
To prevent Soda Cloud from receiving any sample data or failed row samples for any datasets in any data sources to which you have connected your Soda Cloud account, proceed as follows:
As a user with permission to do so, log in to your Soda Cloud account and navigate to your avatar > Organization Settings.
In the Organization tab, uncheck the box to Allow Soda to collect sample data and failed row samples for all datasets, then Save.
Alternatively, if you use Soda Library, you can adjust the configuration in your configuration.yml to disable all samples for an individual data source, as in the following example.
If you wish to provide sample rows for some datasets and only wish to limit the ones for which Soda collects samples, you can add a sample datasets configuration to your data source.
Navigate to your avatar > Data Sources > New Data Source, or select an existing data source, to begin. You can add this configuration to one of two places:
to either step 3. Discover OR
step 4. Profile
The example configuration below uses a wildcard character (%) to specify that Soda collects sample rows for all datasets with names that begin with region, and not to send samples for any other datasets in the data source.
The following example excludes a list of datasets from any sampling, and implicitly collects samples for all other datasets in the data source.
If you configure sample datasets to include specific datasets, Soda implicitly excludes all other datasets from sampling.
If you combine an include config and an exclude config and a dataset fits both patterns, Soda excludes the dataset from sampling.
For excluded datasets, Soda does not generate, store, or offer visualizations of sample rows anywhere. For those datasets without sample rows, users must use another tool, such as a query builder for a data source, to collect any sample data they require.
No other functionality within Soda relies on these sample rows; if you exclude a dataset in a sample configuration, you can still configure individual failed row checks which collect independent failed row samples at scan time. Learn more about .
During the data source onboarding process, you have the option to configure Soda to profile the datasets, and/or their columns, when it connects to the data source.
When it discovers datasets, as in the example below, Soda captures only the names of the datasets in the data source, each dataset's schema, and the data type of each column.
When it profiles datasets, as in the example below, Soda automatically evaluates several data quality metrics for each column of a dataset based on the column's data type, such as missing and distinct values, calculated statistical metrics, and frequently occurring values. The majority of these metrics are aggregated which safeguards against the exposure of record-level data.
In instances where a column contains categorical data, profiling provides insights into the most extreme and frequent values, which could potentially reveal information about the data. However, as Soda only exposes individual metric values, end-users cannot link these calculated metrics to specific records.
If you wish to limit the profiling that Soda performs on datasets in a data source, or limit the datasets which it discovers, you can do so at the data source level as part of the guided workflow to create or edit a data source. Navigate to your avatar > Data Sources > New Data Source, or select an existing data source, to begin.
In step 3 of the guided workflow, Discover, you have the option of listing the datasets you wish to discover, as in the example below. Refer to Add dataset discovery for many examples and variations of this configuration.
To avoid discovering any datasets in your data source, use the following configuration.
If you wish to limit the profiling that Soda performs on datasets in a data source, or limit the datasets which it profiles, you can do so at the data source level as part of the guided workflow to create or edit a data source. Navigate to your avatar > Data Sources > New Data Source, or select an existing data source, to begin.
In step 4 of the guided workflow, Profile, you have the option of listing the datasets you wish to profile, as in the example below which excludes columns that begin with pii and any columns that contain email in their names. Refer to Add column profiling for many examples and variations of this configuration.
To avoid profiling any datasets in your data source, use the following configuration.
Dataset profiling can be resource-heavy, so carefully consider the datasets for which you truly need column profile information. Refer to Compute consumption and cost considerations for more detail.
When a scan results in a failed check, the CLI output displays information about the check that failed and why, including the actual SQL queries that retrieve failed row samples. To offer more insight into the data that failed a check, Soda Cloud displays failed row samples in a check result’s measurement history, as in the example below.
There are two ways Soda collects and displays failed row samples in your Soda Cloud account.
Implicitly: Soda automatically collects 100 failed row samples for the following checks:
checks that use a missing metric
checks that use a validity metric
checks that use a
that include missing, validity, or duplicate metrics, or reference checks
Explicitly: Soda automatically collects 100 failed row samples for the following explicitly-configured checks:
that use the failed rows query configuration
Where your datasets contain sensitive or private information, you may not want to collect, send, store, or visualize any samples from your data source to Soda Cloud. In such a circumstance, you can disable the feature completely in Soda Cloud.
Users frequently disable failed row sampling in Soda Cloud and, instead, reroute failed row samples to an internal database; see Reroute failed row samples below.
For checks which implicitly collect failed rows samples, you can add a configuration to prevent Soda from collecting those samples from specific columns or datasets that contain sensitive data. For example, you may wish to exclude a column that contains personal identifiable information (PII) such as credit card numbers from the Soda query that collects samples.
Refer to manage failed row samples for extensive options and details.
If the data you are checking contains sensitive information, you may wish to send any failed rows samples that Soda collects to a secure, internal location rather than Soda Cloud. These configurations apply to checks defined as no-code checks, in an agreement, or in a checks YAML file.
To do so, you have two options:
HTTP sampler: Create a function, such as a lambda function, available at a specific URL within your environment that Soda can invoke for every check result in a data source that fails and includes failed row samples. Use the function to perform any necessary parsing from JSON to your desired format (CSV, Parquet, etc.) and store the failed row samples in a location of your choice.
Python CustomSampler: If you run programmatic Soda scans of your data, add a custom sampler to your Python script to collect samples of rows with a fail check result. Once collected, you can print the failed row samples in the CLI, for example, or save them to an alternate destination.
Learn how to define custom samplers in Manage failed rows samples.
Learn more about how to manage failed row samples.
Run scans locally to prevent Soda Library from pushing results to Soda Cloud. Access the Prevent pushing scan results to Soda Cloud in the Run a scan tab.
Need help? Join the .
Where the scan results indicate an issue with data quality, Soda notifies you in both a PR comment and by email so that you can investigate and address any issues before merging your PR into production. Note that the Action does not yet support sending notifications via Slack, only email; see Notes and limitations.
Further, you can access a full report of the data quality scan results, including scan logs, in your Soda Cloud account via the link in the PR comment.
You have a GitHub account, and are familiar with using GitHub Workflows and Actions.
You have access to the data source login credentials that Soda needs to access your data to run a scan for quality.
If you have not already done so, create a Soda Cloud account, which is free for a 45-day trial.
In the GitHub repository in which you wish to include data quality scans in a Workflow, create a folder named soda for the configuration files that Soda requires as input to run a scan.
In this folder, create two files:
a configuration.yml file to store the connection configuration Soda needs to connect to your data source and your Soda Cloud account.
a checks.yml file to store the SodaCL checks you wish to execute to test for data quality. A check is a test that Soda executes when it scans a dataset in your data source.
Follow the to add connection configuration details for both your data source and Soda Cloud account to the configuration.yml, and add checks for data quality for a dataset to your checks.yml. Examples of each follow.
In the .github/workflows folder in your GitHub repository, open an existing Workflow or create a new workflow file. Determine where you wish to add a Soda scan for data quality in your workflow, such as after a trasnformation and dbt run. Refer to Test data in development for a recommended approach.
Access the GitHub Marketplace to access the Soda GitHub Action. Click Use latest version to copy the code snippet for the Action.
Paste the snippet into your new or existing workflow as an independent step, then add the required action inputs as in the following example. Refer to table below for input details.
(Optional) Following best practice, add a list of variables for sensitive login credentials and keys, as in the following example. Read more about GitHub encrypted secrets.
Save the changes to your workflow file, then test the action's functionality by triggering the event that workflow job in GitHub, such as creating a pull request. To monitor the progress of the workflow, access the Actions tab in your GitHub repository, select the workflow in which you added the GitHub Action for Soda, then find the run in the list of Workflow Runs.
When the job completes, navigate to the pull request’s Conversation tab to view the comment the Action posted via the github-action bot. To examine the full scan report and troubleshoot any issues, click the link to View the full scan results in the comment, then click View Scan Log. Use Troubleshoot SocaCL for help diagnosing issues with SodaCL checks.
Next:
Add more SodaCL checks to your checks.yml file to validate data according to your own use cases and requirements. Refer to SodaCL reference documentation, and the SodaCL tutorial.
Follow the guide for Test data during development for more insight into a use case for the GitHub Action for Soda.
soda_library_version
Version of the Soda Library that runs the scan. Supply a specific version, such as v1.0.4, or latest. See for possible versions. Compatible with Soda Library 1.0.4 and higher.
✓
data_source
Name of data source on which to perform the scan.
✓
configuration
File path to configuration YAML file. See Soda docs.
✓
checks
File path to checks YAML file. See Soda docs. Compatible with shell filename extensions.
Identify multiple check files, if you wish. For example: ./checks_*.yaml or ./{check1.yaml,check2.yaml}
✓
Be aware that for self-hosted runners in GitHub:
Windows runners are not supported, including the use of official Windows-based images such as windows-latest
MacOS runners require Docker installation because the macos-latest does not come with Docker pre-installed.
The scan results that the GitHub Action for Soda produces do not appear among your primary checks results. The results are ephemeral and serve only to flag and fix issues during development. Though the results are ephemeral, checks that Soda executes via the GitHub Action for Soda count towards the check allotment associated with your license.
The ephemeral scan results that the GitHub Action for Soda produces do not persist historical measurements. Thus, checks that normally evaluate against stored values in the Cloud Metric Store, such as schema checks, do not evaluate in scans that the GitHub Action for Soda executes.
The ephemeral scan results that the GitHub Action for Soda produces cannot send notifications according to Notification Rules in your Soda Cloud account. The only notifications for the results are:
the status report in the GitHub PR comment
an email to the email address you used to create your Soda Cloud account
Learn how to Test data in an Airflow pipeline.
Learn more about using webhooks to integrate Soda Cloud with other third-party service providers.
Access a list of all integrations that Soda Cloud supports.
Need help? Join the .
✖️ Requires Soda Core Scientific (included in a Soda Agent) ✔️ Supported in Soda Core ✔️ Supported in Soda Library + Soda Cloud ✖️ Supported in Soda Cloud + Self-hosted Soda Agent ✖️ Supported in Soda Cloud + Soda-hosted Agent
You have installed a Soda Library package in your environment and have configured it to connect to a data source and your Soda Cloud account using a configuration.yml file.
You use dbt Cloud or dbt-core version >= 1.5, <2.0. Note: As dbt no longer supports v1.4, Soda does not support that version.
Every time you execute tests in dbt, dbt captures information about the test results. Soda Library can access this information and translate it into test results that Soda Cloud can display. You must first run your tests in dbt before Soda Library can find and translate test results, then push them to Soda Cloud.
First, ensure that your dbt tests results are available in your local filesystem. You can generate the necessary files by running your dbt pipeline with one of the following commands:
If you have not already done so, install the soda-dbt package in the Python environment used for your Soda Library scans:
Note: It is recommended that you use separate Python environments for your dbt pipeline and Soda scans to avoid dependency conflicts.
Have a configuration.yml file that includes your Soda Cloud credentials and the Soda Datasource to be associated with the dbt tests.
To ingest dbt test results, Soda Library uses the files that dbt generates when it builds or tests models: manifest.json and run_results.json.
Use Soda Library to execute one of the following ingest commands to ingest the JSON files into Soda Cloud.
Specify the file path for the directory in which you store both the manifest.json and run_results.json files; Soda finds the files it needs in this directory.
OR
Specify the path and filename for each individual JSON file that Soda Cloud must ingest.
Run soda ingest --help to review a list of all command options.
Every run that is part of a Job on dbt Cloud generates metadata about your dbt project as well as the results from the run. Use Soda Library to get this data directly from the dbt Cloud API.
Note that you must use Soda Library to run the CLI command to ingest dbt test results into Soda Cloud from dbt cloud. You cannot configure the connection to dbt Cloud from within the Soda Cloud user interface, as with a new data source, for example.
If you have not already done so, install the soda-dbt package in the Python environment that also runs Soda Library scans:
Obtain a dbt Cloud Admin API Service Token.
Add the following configuration in your Soda configuration.yml file as in the following example. Look for the account ID after the word account in a dbt Cloud URL. For example, https://cloud.getdbt.com/#/accounts/840923545***/ or navigate to your dbtCloud Account Settings page.
Note that as of March 1, 2024, dbtCloud users must use region-specific access URLs for API connections. Because the Soda integration with dbtCloud interacts with dbt's admin API, users may have to specify the base URL of the admin api via the access_url property, as in the example below. Find your access URL in your dbtCloud account in Account Settings. If you do not provide this in your configuration, Soda defaults to "cloud.getdbt.com". Find out more in Access, Regions & IP Addresses.
From the command-line, run the soda ingest command to capture the test results from dbt Cloud and send them to Soda Cloud and include one of two identifiers from dbt Cloud. Refer to dbt Cloud documentation for more information.
Use the run ID from which you want Soda to ingest results.
Look for the run ID at the top of any Run page "Run #40732579" in dbt Cloud, or in the URL of the Run page. For example, https://cloud.getdbt.com/#/accounts/ 1234/projects/1234/runs/40732579/
OR
Use the job ID from which you want Soda to ingest results. Using the job ID enables you to write the command once, and and know that Soda always ingests the latest run of the job, which is ideal if you perform ingests on a regular schedule via a cron job or other scheduler.
Look for the job ID after the word "jobs" in the URL of the Job page in dbt Cloud. For example, https://cloud.getdbt.com/#/accounts/ 1234/projects/5678/jobs/123445/
When you call the ingestion integration, Soda Library reads the information from manifest.json and run_results.json files (or gets them from the dbt Cloud API), then maps the information onto the corresponding datasets in Soda Cloud. If the mapping fails, Soda Library creates a new dataset and Soda Cloud displays the dbt monitor results associated with the new dataset.
In Soda Cloud, the displayed scan time of a dbt test is the time that Soda Library ingested the test result from dbt. The scan time in Soda Cloud does not represent the time that the dbt pipeline executed the test. If you want those times to be close to each other, we recommend running a soda ingest right after your dbt transformation or testing pipeline has completed.
The command soda scan cannot trigger a dbt run, and the command dbt run cannot trigger a Soda scan. You must execute Soda scans and dbt runs individually, then ingest the results from a dbt run into Soda by explicitly executing a soda ingest command.
Soda can ingest dbt tests that:
have test metadata (test_metadata in the test node json)
have a run result
After completing the steps above to ingest dbt tests, log in to your Soda Cloud account, then navigate to the Checks dashboard.
Each row in the table of Check represents a check that Soda Library executed, or a dbt test that Soda Library ingested. dbt tests are prefixed with dbt: in the table of Checks.
Click the row of a dbt test to examine visualized historic data for the test, details of the results, and information that can help you diagnose a data quality issue.
Click the stacked dots at the far right of a dbt check, then select Create Incident to begin investigating a data quality issue with your team.
Set up an alert notification rule for checks with fail or warn results. Navigate to your avatar > Notification Rules, then click New Notification Rule. Follow the guided steps to complete the new rule. Send notifications to an individual or a team in Slack.
Learn more about How Soda works.
Read more about running a Soda scan.
As a business user, learn how to create no-code checks in Soda Cloud.
Learn more about creating, tracking, and resolving data quality incidents in Soda Cloud.
Access a list of that Soda Cloud supports.
Need help? Join the .
catalog:
datasource_container_name
The schema of the data source; retrieve this value from the data source page in the Alation catalog under the subheading Schemas. See image below.
catalog:
datasource_container_id
The ID of the datasource_container_name (the schema of the data source); retrieve this value from the schema page in the Alation catalog. See image below
Use quotes when identifying dataset or column names.
-
✓
Use wildcard characters ( % ) in values in the for each configuration; see example.
-
Apply a dataset filter to partition data during a scan.
-

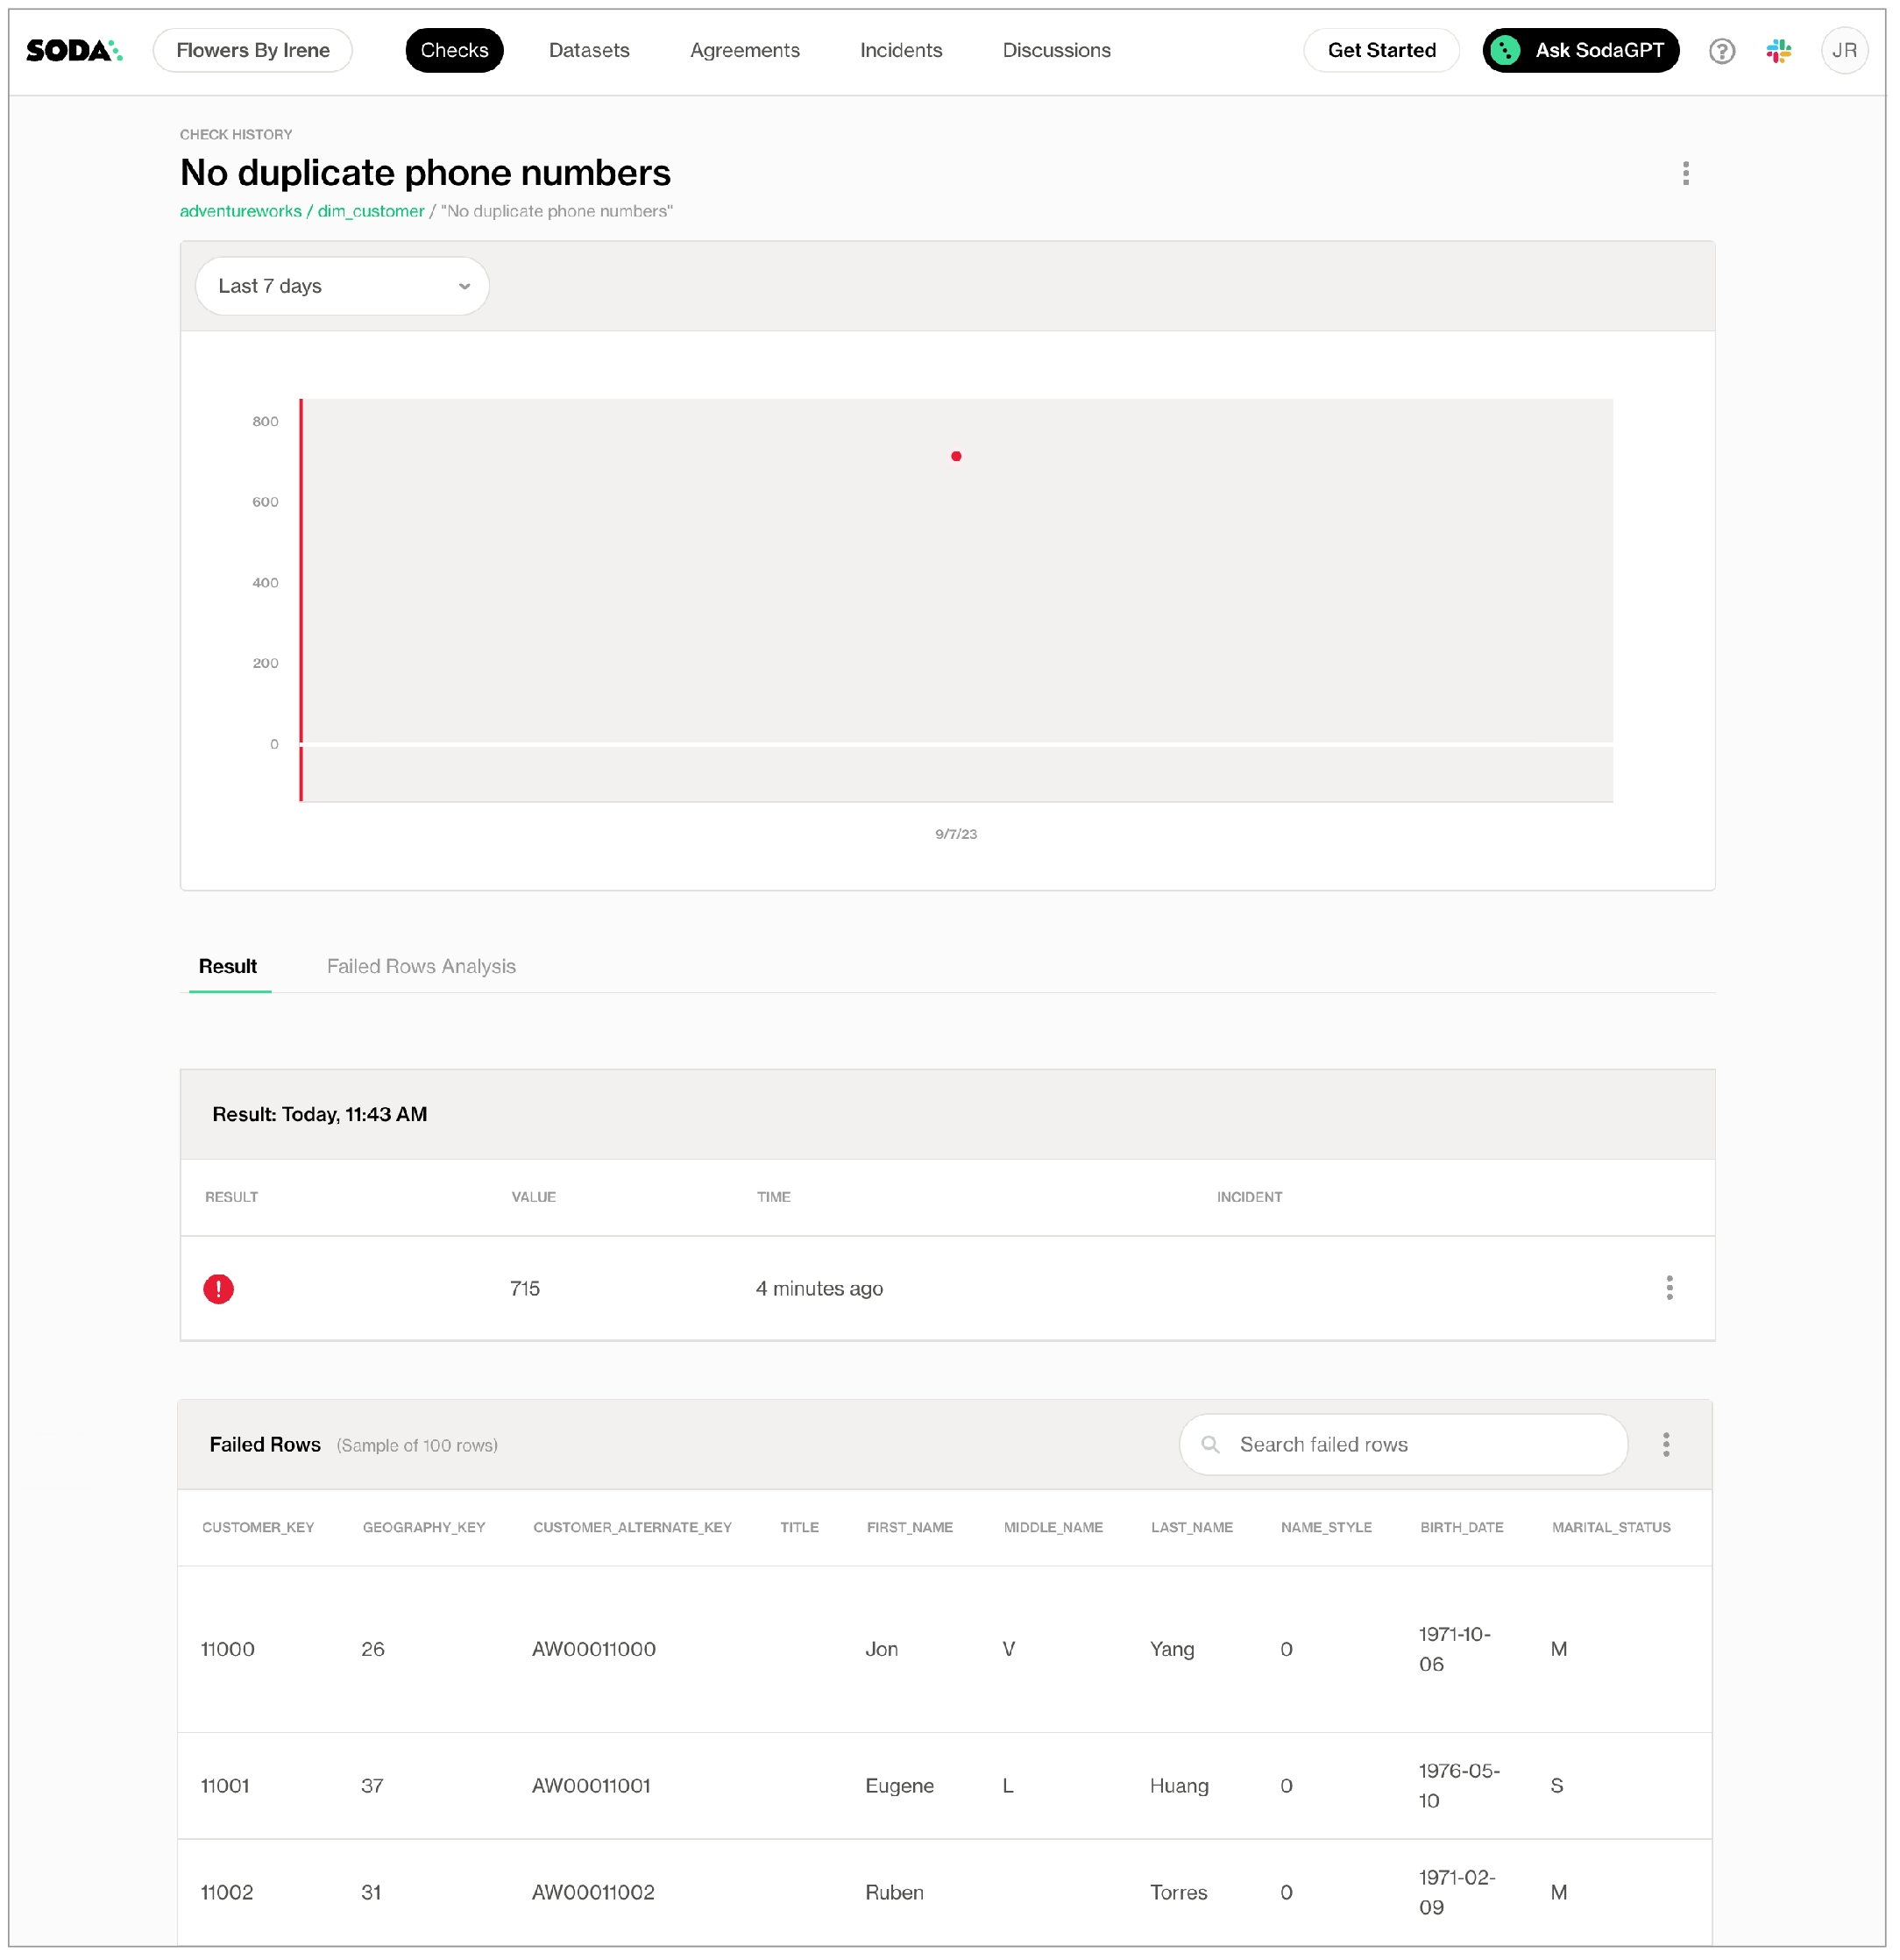
Learn how to manage user access to datasets in an organization's Soda Cloud account.
To manage the dataset-level permissions of users that belong to a single organization, Soda Cloud uses roles, groups, and access permissions. These role-based access permissions enforce limits on the abilities for people to make additions and changes to datasets in Soda Cloud.
There are two type of roles that regulate permissions in Soda Cloud: Global and Dataset. You can assign each type of role to users or user groups in Soda Cloud to organize role-based access control to resources and functionality in your account. You can also customize the permissions of the out-of-the-box roles Soda Cloud includes, or you can create new roles and assign permissions to roles as you wish.
The content that follows offers information about dataset roles. For details on terminology, global roles, custom user groups, and organizational settings, see Manage global roles, user groups, and settings.
The out-of-the-box roles that define who has permission to access or make changes to datasets in your Soda Cloud account are Admin, Manager, Editor, and Viewer. An Admin role has all permissions to access or act upon a dataset; the following table outlines the permission groups for the remaining out-of-the-box dataset roles.
This permission group cannot be removed from any of the out-of-the-box or custom dataset roles.
View a dataset in the list on the Datasets page
View a dataset's checks in the Checks page
Access a dataset via API
Access a dataset's checks via API
View a dataset's Columns tab, schema and profiling info
View a dataset's Samples tab
View the check history for a dataset's checks, including failed row samples
Edit a dataset's attributes
Edit a dataset's profiling configuration
Edit a dataset's responsibilities
Select a dataset in a New Discussion form
Select a dataset in an Add Check form
Click Propose Check when creating a no-code check
Push a dataset's check results from Soda Library scans to Soda Cloud. At present, Soda Cloud does not reject check results from a Soda Library scan executed by a user without "Manage checks" permission for a dataset. Instead, Soda issues a soft warning to indicate that the user does not have permission to manage checks for the dataset. In future iterations, the warning will be changed to a rejection of any results pushed without proper permissions for the dataset.
Edit the description of a dataset's checks
Edit the owner of a dataset's checks
Delete a dataset's checks
Create an incident related to a dataset's check
Update an incident related to a dataset's check
Delete a dataset
You can create or edit dataset roles to assign to users or user groups in Soda Cloud.
As a user with permission to do so, navigate to your avatar > Organization Settings, then access the Dataset Roles tab. Click Add Dataset Role, then follow the guided workflow to name a role and add permissions groups. Refer to the for a list of permissions groups, and their associated permissions, that you can assign to global roles.
The only out-of-the-box user group that Soda Cloud provides is called Everyone. When a new user accepts an invitation to join an existing Soda Cloud organization, or when they gain access to an organization via SSO, Soda Cloud applies the the global role of user in the organization and, depending on the Responsibilities settings, may add the new user to the Everyone user group. You cannot add users to, or remove them from the Everyone user group. To learn about how to create your own user groups, see .
When setting responsibilities for newly-onboarded, or discovered, datasets, users with permissions to do so can access the Organization Settings to define:
whether to add newly invited or added users to the out-of-the-box Everyone user group
the default dataset role of the Everyone user group
the default dataset role to assign to Dataset Owners to datasets that are onboarded in Soda Cloud
When any user uses Soda Library or Soda Cloud to add a new data source, and its datasets, to the Soda Cloud account, the user automatically becomes the Dataset Owner of each dataset in the data source. Depending upon the Responsibilities settings in the Dataset Roles tab of Organization Settings, the Dataset Owner is assigned a role according to the Default Dataset Owner Role setting.
Beyond the default users and roles assigned to a dataset upon addition to Soda Cloud, you can edit the responsibilities for an individual dataset to make changes to the way users and user groups can access or act upon the dataset.
As a user with the permission to do so, login to your Soda Cloud account and navigate to the Datasets dashboard.
Click the stacked dots to the right of the dataset for which you wish to adjust the role assignments, then select Edit Responsibilities.
Use the search bar to find specific users or user groups to which you wish to assign a role for the dataset, then use the dropdown next to each name to adjust their role, then Save your changes.
If you have added a user to a group to which you have assigned a level of permission for a dataset, then manually assigned a different level of permission to the individual user for a dataset, Soda honors the higher set of permissions.
For example, say you add Manny Jacinto to a user group called Marketing Team. For a new_signups dataset, you assign the Marketing Team the out-of-the-box role of Viewer. Then, for the same dataset, you assign Manny's individual user the out-of-the-box role of Manager. Soda honors the permissions of the higher role, Manager, for Manny's access to new_signups.
There are four types of resource owners in Soda Cloud that identify the user, or user group, that owns a data source, dataset, agreement, or check. These ownership roles do not enforce any permissions, they are simply resource metadata.
By default, the user who added the data source becomes the Data Source Owner and Dataset Owner of all datasets in that data source. The default that Soda Cloud assigns to the Dataset Owner is that of Manager.
By default, the user who creates an agreement becomes the Check Owner of all checks defined in the agreement.
By default, the user who creates a no-code check becomes its Check Owner.
With the permission to do so, login to your Soda Cloud account and navigate to your avatar > Data Sources.
In the Data Sources tab, click the stacked dots to the right of the data source for which you wish to adjust the ownership, then select Edit Datasource.
In the Assign Owner tab, use the dropdown to select the name of another user or user group to take ownership of the data source, then Save.
With the permission to do so, login to your Soda Cloud account and navigate to the Datasets dashboard.
Click the stacked dots to the right of the dataset for which you wish to adjust the ownership, then select Edit Dataset.
In the Attributes tab, use the dropdown to select the name of another user or user group to take ownership of the dataset, then Save.
To bulk-change the owner of all new datasets added to a data source, follow the steps to and, in the Assign Owner tab, use the dropdown to change the owner of all the datasets in the data source.
If you are the Admin of the organization, or have a Manager or Editor role for the check's dataset, login to your Soda Cloud account and navigate to the Checks dashboard.
Click the stacked dots to the right of the check for which you wish to adjust the ownership, then select Edit Check.
In the Attributes tab, use the dropdown to select the name of another user to take ownership of the check, then Save. Note that you cannot assign a user group as a check owner.
Learn more about the relationship between resources in .
to facilitate your search for the right data.
to join your organization’s Soda Cloud account.
Learn more about creating and tracking .
Use Soda Library to programmatically execute scans and automate the checks for bad-quality data.
The Soda environment has been updated since this tutorial.
Refer to for updated tutorials.
To automate the search for bad-quality data, you can use Soda library to programmatically set up and execute scans. As a Python library, you can invoke Soda just about anywhere you need it; the invocation instructions below offers a very simple invocation example to extrapolate from. Consult the Use case guides for more examples of how to programmatically run Soda scans for data quality.
Alternatively, you can install and use the Soda Library CLI to run scans; see .
As a step in the Get started roadmap, this guide offers instructions to set up, install, and configure Soda in a .
Choose a flavor of Soda
Set up Soda: programmatic 📍 You are here! a. b. c.
Write SodaCL checks
Run scans and review results
To use Soda Library, you must have installed the following on your system.
Python 3.8, 3.9, or 3.10
Pip 21.0 or greater
A Soda Cloud account; see next section.
A Soda Cloud account; see next section.
In a browser, navigate to to create a new Soda account, which is free for a 45-day trial. If you already have a Soda account, log in.
Navigate to your avatar > Profile, then access the API keys tab. Click the plus icon to generate new API keys.
Copy+paste the API key values to a temporary, secure place in your local environment.
As in the simple example below, invoke the Python library and provide:
your data source connection configuration details, including environment variables, using one of the listed methods; consult for data source-specific connection config
your Soda Cloud account API key values:
use cloud.soda.io for EU region
use cloud.us.soda.io for US region
Use the following guidance for optional elements of a programmatic scan.
You can save Soda Library scan results anywhere in your system; the scan_result object contains all the scan result information. To import Soda Library in Python so you can utilize the Scan() object, , then use from soda.scan import Scan.
If you provide a name for the scan definition to identify inline checks in a programmatic scan as independent of other inline checks in a different programmatic scan or pipeline, be sure to set a unique scan definition name for each programmatic scan. Using the same scan definition name in multiple programmatic scans results in confused check results in Soda Cloud.
See the for detailed documentation of the Scan class in Soda Library.
You can save Soda Library scan results anywhere in your system; the scan_result object contains all the scan result information. To import Soda Library in Python so you can utilize the Scan() object, , then use from soda.scan import Scan.
Be sure to include any variables in your programmatic scan before the check YAML files. Soda requires the variable input for any variables defined in the check YAML files.
Because Soda Library pushes scan results to Soda Cloud, you may not want to change the scan definition name with each scan. Soda Cloud uses the scan definition name to correlate subsequent scan results, thus retaining an historical record of the measurements over time. Sometimes, changing the name is useful, like when you wish to configure a single scan to run in multiple environments. Be aware, however, that if you change the scan definition name with each scan for the same environment, Soda Cloud recognizes each set of scan results as independent from previous scan results, thereby making it appear as though it records a new, separate check result with each scan and archives or "disappears" previous results. See also:
Soda Library’s scan output includes an exit code which indicates the outcome of the scan.
To obtain the exit code, you can add the following to your programmatic scan.
Choose a flavor of Soda
Set up Soda: programmatic
Run scans and review results
Need help? Join the .
Access Python reference content for the Soda Scan class and its methods.
Use the Python API to programmatically execute Soda scans. The following content offers a reference for the Soda scan class and its methods.
Refer to Program a scan, Program a scan tab, for instructional details and an example of a complete file.
Use the Scan class to programmatically define and execute data quality scans. See Invoke Soda Library for an example of how to use the Soda Library Python API in a programmatic scan.
Use this method to execute the scan. When executed, Soda returns an integer exit code as per the table that follows.
Specify the data source on which Soda executes the checks.
Provide the scan definition name if the scan has been defined in Soda Cloud. By providing this value, Soda correlates subsequent scans from the same pipeline.
To retrieve this value, navigate to the Scans page in Soda Cloud, then select the scan definition you wish to execute remotely and copy the scan name, which is the smaller text under the label. For example, weekday_scan_schedule.
Add data source and Soda Cloud connection configurations from a YAML file. file_path is a string that points to a configuration file. ~ expands to the user's home directory.
Optionally, add all connection configurations from all matching YAML files in the file path according to your specifications.
path is a string that is the path to a directory, but you can use it as a path to a configuration file. ~ expands to the user's home directory or the directory in which to search for configuration files.
recursive requires a boolean value that controls whether Soda scans nested directories. If unspecified, the default value is true.
suffixes
Optionally, add connection configurations from a YAML-formatted string.
environment_yaml_str is a string that represents a configuration and must be YAML-formatted.
file_path is an optional string that you use to get the location of errors in the logs.
Add a SodaCL checks YAML file to the scan according to a file path you specify. file_path is a string that identifies a checks YAML file.
Optionally, add all the files in a directory to the scan as SodaCL checks YAML files.
path is a string that identifies a directory, but you can use it as a path to a configuration file. ~ expands to the user's home directory or the directory in which to search for checks YAML files.
recursive is an optional boolean value that controls whether Soda scans nested directories. If unspecified, the default value is true.
suffixes
Optionally, add SodaCL checks from a YAML-formatted string.
sodacl_yaml_str is a string that represents the SodaCL checks and must be YAML-formatted.
file_path is an optional string that you use to get the location of errors in the logs.
If you use a for SodaCL checks, add a SodaCL template file to the scan. file_path is a string that identifies a SodaCL template file.
If you use multiple for SodaCL checks, add all the template files in a directory to the scan. path is a string that identifies the directory that contains the SodaCL template files.
If you use Pandas, add a Pandas Dataframe dataset to the scan.
dataset_name is a string to identify a dataset.
pandas_df is a Pandas Dataframe object.
data_source_name is a string to identify a data source.
If you use Dask, add a Dask Dataframe dataset to the scan.
dataset_name is a string used to identify a dataset.
dask_df is a Dask Dataframe object.
data_source_name is a string to identify a data source.
If you use PySpark, add a Spark session to the scan.
spark_session is a Spark session object.
data_source_name is a string to identify a data source.
If you use a pre-existing DuckDB connection object as a data source, add a DuckDB connection to the scan.
duckdb_connection is a DuckDB connection object.
data_source_name is a string to identify a data source.
Configure a scan to output verbose log information. This is useful when you wish to see the SQL queries that Soda executes or to troubleshoot scan issues.
Configure Soda to prevent it from sending scan results to Soda Cloud. This is useful if, for example, you are testing checks locally and do not wish to muddy the measurements in your Soda Cloud account with test run metadata.
Configure a scan to have access to custom variables that can be referenced in your SodaCL files.variables is a dictionary with string keys and string values.
Use the following configurations to handle errors and/or warnings that occurred during a Soda scan.
Instruct Soda to raise an AssertionError when errors occur in the scan logs.
Instruct Soda to raise an AssertionError when errors or warnings occur in the scan logs.
Instruct Soda to raise an AssertionError when a specific error message occurs in the scan logs. Use expected_error_message to specify the error message as a string.
Instruct Soda to return a boolean value to indicate that errors occurred in the scan logs.
Instruct Soda to return a boolean value to indicate that errors or warnings occurred in the scan logs.
Instruct Soda to return a string that represents the logs from the scan.
Instruct Soda to return a list of strings of scan errors in the logs.
Instruct Soda to return a list of strings of scan errors and warnings in the logs.
Instruct Soda to return a string of all scan errors in the logs.
Instruct Soda to return a dictionary containing the results of the scan.
The scan results dictionary includes the following keys:
Use the following configurations to handle the results of checks executed during a Soda scan.
Instruct Soda to raise an AssertionError when any check execution results in a fail state.
Instruct Soda to raise an AssertionError when any check execution results in a fail or warn state.
Instruct Soda to return a boolean value to indicate that one or more checks executed during the scan resulted in a fail state.
Instruct Soda to return a boolean value to indicate that one or more checks executed during the scan resulted in a warn state.
Instruct Soda to return a boolean value to indicate that one or more checks executed during the scan resulted in a fail or warn state.
Instruct Soda to return a list of strings of checks that resulted in a fail state.
Instruct Soda to return a string of checks that resulted in a fail state.
Instruct Soda to return a list of strings of checks that resulted in a fail or warn state.
Instruct Soda to return a string of checks that resulted in a fail or warn state.
Instruct Soda to return a string of all check results.
Configure the datasource-level samples limit for the failed rows sampler. This is useful when scanning Pandas, Dask, or Spark Dataframes.
Replace the failed rows sampler with a custom sampler. See for instructions about how to define a custom sampler.
Access configuration details to connect Soda to a BigQuery data source.
For Soda to run quality scans on your data, you must configure it to connect to your data source. To learn how to set up Soda and configure it to connect to your data sources, see Get started.
A note about BigQuery datasets: Google uses the term dataset slightly differently than Soda (and many others) do.
In the context of Soda, a dataset is a representation of a tabular data structure with rows and columns. A dataset can take the form of a table in PostgreSQL or Snowflake, or a DataFrame in a Spark application.
In the context of BigQuery, a dataset is “a top-level container that is used to organize and control access to your tables and views. A table or view must belong to a dataset…”
Instances of "dataset" in Soda documentation always reference the former.
Install package: soda-bigquery
Using GCP BigQuery, you have the option of using one of several methods to authenticate the connection.
Application Default Credentials
Application Default Credentials with Service Account impersonation
Service Account Key (see above)
Service Account Key with Service Account Impersonation
Add the use_context_auth property to your connection configuration, as per the following example.
Add the use_context_auth and impersonation_account properties to your connection configuration, as per the following example.
Add the impersonation_account property to your connection configuration, as per the following example.
If you already store information about your data source in a JSON file in a secure location, you can configure your BigQuery data source connection details in Soda Cloud to refer to the JSON file for service account information. To do so, you must add two elements:
volumes and volumeMounts parameters in the values.yml file that your Soda Agent helm chart uses
the account_info_json_path in your data source connection configuration
You, or an IT Admin in your organization, can add the following scanlauncher parameters to the existing values.yml that your Soda Agent uses for deployment and redployment in your Kubernetes cluster. Refer to for details.
Use the following command to add the service account information to a Kubernetes secret that the Soda Agent consumes according to the configuration above; replace the angle brackets and the values in them with your own values.
After you make both of these changes, you must redeploy the Soda Agent. Refer to for details.
Adjust the data source connection configuration to include the account_info_json_path configuration, as per the following example.
Problem: When running a scan, you encounter an error that reads, 400 Cannot query over table 'event_logs' without a filter over column(s) 'serverTimestamp' that can be used for partition elimination.
Workaround: The error occurs because the table in BigQuery is configured to require partitioning.
If the error occurs when you are your data with Soda, you must disable profiling.
If the error occurs when the scan is executing regular SodaCL checks, be sure you always apply a filter on serverTimestamp. See
Follow this guide to set up an integration with an External Secrets Manager for a Soda Agent to use to securely retrieve frequently-rotated passwords.
Use this guide to set up a Soda Agent to securely retrieve frequently-rotated and/or encrypted data source login credentials.
Rather than managing sensitive login credentials for data sources passed via the Helm chart value soda.env, you can set up a Soda Agent to integrate with external secrets managers such as Hashicorp Vault, AWS Secrets Manager, or Azure Key Vault, so that it can securely access up-to-date, externally-stored login credentials for data sources.
This exercise points to a GitHub repository from which you can set up a locally-run, example Kubernetes cluster to illustrate what an integration between a Soda Agent and an external secrets manager looks like.
When you complete the exercise, you will have examples of the things you need for a Soda Agent to access an external secrets manager:
External Secrets Operator (ESO) which is a Kubernetes operator that facilitates a connection between the Soda Agent and your secrets manager; see .
a ClusterSecretStore resource which provides a central gateway with instructions on how to access your secret backend
an ExternalSecret resource which instructs the cluster on which values to fetch, and references the ClusterSecretStore
Follow the instructions below to use the Terraform files in the repository to:
set up and configure a local Kubernetes cluster
deploy External Secrets Operator
configure both a ClusterSecretStore and ExternalSecrets to access username and password examples in a Hashicorp Vault
set up an example PostgreSQL data source containing NYC bus breakdowns and delays data
For this exercise, you must have installed the following tools:
to build a locally-run example environment
One container runtime that provides containers to use as local Kubernetes cluster nodes, either:
, for users who prefer to use a UI
, for users who prefer to use the command-line OR
Clone the repository locally.
Navigate to the setup directory in the repository.
Use the Terraform commands below to:
create a local Kubernetes cluster,
Navigate to the configure directory in the repository.
Use the Terraform commands below to:
configure a Hashicorp Vault,
configure the Vault provider of the ESO,
The configuration output produces a URL value for vault_access which, by default, is . Click the link to access the Hashicorp Vault login page in your browser.
To log in, change the Method to Username, then use the vault_admin_username to populate the first field. To extract the value for vault_admin_password for the second field, use the following command:
Hint: To copy the password directly to the clipboard the command, use one of the following commands:
Access and follow the instructions to create a free, 45-day trial Soda Cloud account and an API key id, and an API key secret for the Soda Agent.
Prepare a values YAML file to deploy a Soda Agent in your cluster, as per the following example.
Deploy the Soda Agent using the following command:
To use your newly-deployed Soda Agent, you start by creating a new data source in your Soda Cloud account, then you can create a Soda Agreement to write checks for data quality.
In your Soda Cloud account, navigate to your avatar > Scans & Data. Click New Data Source, then follow the guided steps to create a new data source. Refer to for full instructions for setting up a data source.
In step 2 of the flow, use the following data source connection configuration. This connects to the example data source you created during .
Complete the guided workflow to Save & Run a scan of the data source to validate that Soda Cloud can access the data in the example data source via the Soda Agent. It uses the external secrets manager configuration you set up to fetch, then pass the username and password to the data source.
The ClusterSecretStore is a YAML-configured set of instructions for accessing the external secrets manager which, in this case, is a Hashicorp Vault using a KV Secrets Engine V2. Note that some values in the example are generated; values in your own file vary.
The ExternalSecret is a separate YAML-based set of instructions for which secrets to fetch. The example below references the ClusterSecretStore above, which facilitates access to the Hashicorp Vault. The Soda Agent uses the ExternalSecret to retrieve data source credential values.
The target template configuration in the ExernalSecret creates a file called soda-agent.conf into which it adds the username and password values in the that the Soda Agent expects.
Access standard instructions to .
in Soda!
. Hey, what can Soda do for you?
Learn how to programmatically use Soda Library with an example script to reroute failed row samples to the CLI output instead of Soda Cloud.
Using Soda Library, you can programmatically run scans that reroute failed row samples to display them in the command-line instead of Soda Cloud.
By default, Soda Library implicitly pushes samples of any failed rows to Soda Cloud for missing, validity, duplicate, and reference checks; see About failed row samples. Instead of sending the results to Soda Cloud, you can use a Python custom sampler to programmatically instruct Soda to display those samples in the command-line.
Follow the instructions below to modify an example script and run it locally to invoke Soda to run a scan on example data and display samples in the command-line for the rows that failed missing, validity, duplicate, and reference checks. This example uses Dask and Pandas to convert CSV sample data into a DataFrame on which Soda can run a scan, and also to convert failed row samples into a CSV to route them to, or display them in, a non-Soda Cloud location.
Note that although the example does not send failed row samples to Soda Cloud, it does still send dataset profile information and the data quality check results to Soda Cloud.
a code or text editor such as PyCharm or Visual Studio Code
Python 3.8, 3.9, or 3.10
Pip 21.0 or greater
Jump to:
In a browser, navigate to to create a new Soda account, which is free for a 45-day trial. If you already have a Soda account, log in.
Navigate to your avatar > Profile, then access the API keys tab. Click the plus icon to generate new API keys. Copy+paste the API key values to a temporary, secure place in your local environment.
Best practice dictates that you run Soda in a virtual environment. From the command line, create a new directory in your environment, then use the following command to create, then activate, a virtual environment called .sodadataframes.
Run the following commands to upgrade pip, then install Soda Library for Dask and Pandas.
Copy + paste the below into a new Soda-dask-pandas-example.py file in the same directory in which you created your virtual environment. In the file, replace the above-the-line values with your own Soda Cloud values, then save the file.
From the command-line, use the following command to run the example and see both the scan results and the failed row samples as command-line output.
Output:
In your Soda Cloud account, navigate to Datasets, then click to open soda.pandas.example. Soda displays the check results for the scan you just executed via the command-line. If you wish, click the Columns tab to view the dataset profile information Soda Library collected and pushed to Soda Cloud.
Click the Alpha2 Country Codes must be valid row to view the latest check result, which failed. Note that Soda Cloud does not display a tab for Failed Rows Analysis which would normally contain samples of failed rows from the scan.
Learn how to in Soda Cloud.
Learn how to .
entirely.
Learn how to use a custom sampler to route failed row samples to an .
Use Soda's anomaly dashboard to get automated observability insights into your data quality.
Available in 2025 — See
Use Soda's anomaly dashboards to get automated insights into basic data quality metrics for your datasets.
To activate these out-of-the-box dashboards, Soda learns enough about your data to automatically create checks for your datasets that monitor several built-in metrics for anomalous measurements. To offer this observability into the basic quality of your data, the anomaly dashboard gauges:
Use a check template to write one SQL query that you can reuse in multiple Soda checks for data quality.
This feature is not supported in Soda Core OSS. to Soda Library in minutes to start using this feature for free with a 45-day trial.
Use a check template to define a reusable, user-defined metric that you can apply to many checks in multiple checks files.
✖️ Requires Soda Core Scientific (included in a Soda Agent) ✖️ Supported in Soda Core ✔️ Supported in Soda Library + Soda Cloud ✖️ Supported in Soda Cloud Agreements + Soda Agent ✖️ Available as a no-code check
SodaCL uses metrics in checks for data quality in one or more datasets.
Soda Checks Language (SodaCL) is a YAML-based, domain-specific language for data reliability. Use SodaCL to write checks for data quality which Soda then executes when it scans the data in your data source.
A metric is a property of the data in your dataset. A threshold is the value for a metric that Soda checks against during a scan. Usually, you use both a metric and a threshold to define a SodaCL check in a checks YAML file, like the following example that checks that the dim_customer dataset is not empty.
{:height="325px" width="325px"}
A check is a test for data quality that you write using the Soda Checks Language (SodaCL). SodaCL includes over 25 built-in metrics that you can use to write checks, but you also have the option of writing your own SQL queries or expressions using SodaCL.
See a .
When it scans datasets in your data source, Soda Library executes the checks you defined in your checks YAML file. Technically, a check is a Python expression that, during a Soda scan, checks metrics to see if they match the parameters you defined for a threshold. A single Soda scan executes multiple checks against one or more datasets in your data source. Read more about
Use this guide to set up Soda and start automatically monitoring your data for quality.
Access guidance for resolving issues with Soda Checks Language checks and metrics.
Problem: During a scan, Soda returns an error that reads | NoneType object is not iteratable.
Solution: The most likely cause of the error is incorrect indentation of your SodaCL. Double check that nested items in checks have proper indentation; refer to to validate your syntax.
Use a SodaCL group evolution data quality check to validate changes to the categorical groups you defined.
Use a group evolution check to validate the presence or absence of a group in a dataset, or to check for changes to groups in a dataset relative to their previous state.
✖️ Requires Soda Core Scientific (included in a Soda Agent) ✖️ Supported in Soda Core ✔️ Supported in Soda Library + Soda Cloud ✔️ Supported in Soda Cloud Agreements + Soda Agent ✖️ Available as a no-code check
Define and apply check attributes to categorize and organize SodaCL checks in Soda Cloud.
As user with to do so, you can define check attributes that your team can apply to checks when they write them.
Use attributes to organize your checks and alert notifications in Soda Cloud.
Apply attributes to checks to label and sort them by department, priority, location, etc.
Add a check attribute to identify, for example, checks that execute against personally identifiable information (PII).
data_source my_datasource_name:
type: snowflake
username: ${ SNOWFLAKE_USER }
password: ${ SNOWFLAKE_PASS }
account: ${ SNOWFLAKE_ACCOUNT }
database: sodadata_test
warehouse: compute_wh
role: analyst
session_parameters:
QUERY_TAG: soda-queries
QUOTED_IDENTIFIERS_IGNORE_CASE: false
schema: public
soda_cloud:
host: cloud.us.soda.io
api_key_id: ${ SODA_CLOUD_API_KEY }
api_key_secret: ${ SODA_CLOUD_API_SECRET } # This GitHub Action runs a Soda scan on a Snowflake data source called reporting_api_marts.
name: Run Soda Scan on [reporting_api_marts]
# GitHub triggers this job when a user creates or updates a pull request.
on: pull_request
jobs:
soda_scan:
runs-on: ubuntu-latest
name: Run Soda Scan
steps:
- name: Checkout
uses: actions/checkout@v3
- name: Perform Soda Scan
uses: sodadata/soda-github-action@main
env:
SODA_CLOUD_API_KEY: ${{ secrets.SODA_CLOUD_API_KEY }}
SODA_CLOUD_API_SECRET: ${{ secrets.SODA_CLOUD_API_SECRET }}
SNOWFLAKE_USERNAME: ${{ secrets.SNOWFLAKE_USERNAME }}
SNOWFLAKE_PASSWORD: ${{ secrets.SNOWFLAKE_PASSWORD }}
with:
soda_library_version: v1.0.4
data_source: snowflake_api_marts
configuration: ./soda/configuration.yml
checks: ./soda/checks.ymlchecks for dim_customer:
- failed rows:
name: Failed rows with CTE
fail condition: total_children = '2' and number_cars_owned >= 3
# OR
- failed rows:
name: Failed rows with CTE
fail condition: |
total_children = '2' and number_cars_owned >= 3
checks for dim_customer:
- failed rows:
fail query: |
SELECT DISTINCT geography_key
FROM dim_customer as customerchecks for dim_customer:
- failed rows:
name: Failed rows query test
fail query: |
SELECT DISTINCT geography_key
FROM dim_customer as customerchecks for dim_customer:
- failed rows:
fail condition: total_children = '2' and number_cars_owned >= 3
warn: when between 1 and 10
fail: when > 10checks for dim_customer:
- failed rows:
name: Failed rows query test
fail query: |
SELECT DISTINCT "geography_key"
FROM dim_customer as customerfilter dim_product [new]:
where: start_date < TIMESTAMP '2015-01-01'
checks for dim_product [new]:
- failed rows:
name: Failed CTE with filter
fail condition: weight < '200' and reorder_point >= 3checks for dim_product:
# with SQL query
- failed rows:
name: Brand must be LUCKY DOG
column: product_line
fail query: |
SELECT *
FROM dim_product
WHERE product_line LIKE '%LUCKY DOG%'
# with CTE
- failed rows:
name: Brand must be LUCKY DOG
column: product_line
fail condition: brand LIKE '%LUCKY DOG%'import base64
api_key_id = "your_api_key_id"
api_key_secret = "your_api_key_secret"
credentials = f"{api_key_id}:{api_key_secret}"
encoded_credentials = base64.b64encode(credentials.encode()).decode()
print(f"Basic {encoded_credentials}")pip install pandas requests
pip install snowflake-connector-python# Use cloud.us.soda.io in the US region; use cloud.soda.io in the EU region
soda_cloud_url = 'https://cloud.us.soda.io'
soda_apikey = 'xxx' # API key ID from Soda Cloud
soda_apikey_secret = 'xxx' # API key secret from Soda Cloud# Tables to store Soda metadata. Use UPPERCASE.
datasets_table = 'DATASETS_REPORT'
checks_table = 'CHECKS_REPORT'# Snowflake connection details
snowflake_details = snowflake.connector.connect(
user=user,
password=password,
account=account,
warehouse=warehouse,
database=database,
schema=schema,
)response_datasets = requests.get(
soda_cloud_url + '/api/v1/datasets?page=0',
auth=(soda_apikey , soda_apikey_secret)
)
if response_datasets.status_code == 401 or response_datasets.status_code == 403:
print("Unauthorized or Forbidden access. Please check your API keys and/or permissions in Soda.")
sys.exit()# Fetch info about all datasets
if response_datasets.status_code == 200:
dataset_pages = response_datasets.json().get('totalPages')
i = 0
while i < dataset_pages:
dq_datasets = requests.get(
soda_cloud_url + '/api/v1/datasets?page='+str(i),
auth=(soda_apikey , soda_apikey_secret))
if dq_datasets.status_code == 200:
print("Fetching all datasets on page: "+str(i))
list = dq_datasets.json().get("content")
datasets.extend(list)
i += 1
elif dq_datasets.status_code == 429:
print("API Rate Limit reached when fetching datasets on page: " +str(i)+ ". Pausing for 30 seconds.")
time.sleep(30)
# Retry fetching the same page
else:
print("Error fetching datasets on page "+str(i)+". Status code:", dq_datasets.status_code)
else:
print("Error fetching initial datasets. Status code:", response_datasets.status_code)
sys(exit)
df_datasets = pd.DataFrame(datasets)df_datasets.head()# Fetch info about all checks
response_checks = requests.get(
soda_cloud_url + '/api/v1/checks?size=100',
auth=(soda_apikey , soda_apikey_secret))
if response_checks.status_code == 200:
check_pages = response_checks.json().get('totalPages')
i = 0
while i < check_pages:
dq_checks = requests.get(
soda_cloud_url + '/api/v1/checks?size=100&page='+str(i),
auth=(soda_apikey , soda_apikey_secret))
if dq_checks.status_code == 200:
print("Fetching all checks on page "+str(i))
check_list = dq_checks.json().get("content")
checks.extend(check_list)
i += 1
elif dq_checks.status_code == 429:
print("API Rate Limit reached when fetching checks on page: " +str(i)+ ". Pausing for 30 seconds.")
time.sleep(30)
# Retry fetching the same page
else:
print("Error fetching checks on page "+str(i)+". Status code:", dq_checks.status_code)
else:
print("Error fetching initial checks. Status code:", response_checks.status_code)
sys(exit)
df_checks = pd.DataFrame(checks)
```df_checks.head()write_pandas(snowflake_details, df_checks, checks_table, auto_create_table=True)
write_pandas(snowflake_details, df_datasets, datasets_table, auto_create_table=True)data_source my_datasource_name:
type: oracle
username: ${USARBIG_USER}
password: ${USARBIG_PASSWORD}
connectstring: "${USARBIG_HOST}:${UARBIG_PORT}/USARBIG_SID}"data_source my_datasource_name:
type: oracle
username: simple
password: simple_pass
host: host
service_name: servicechecks for dim_product:
- row_count = 10:
attributes:
department: Marketing
priority: 1
tags: [event_campaign, webinar]
pii: true
best_before: 2022-02-20discover datasets:
datasets:
- include %
- exclude test_%profile columns:
columns:
- "%.%" # Includes all your datasets
- prod% # Includes all datasets that begin with 'prod'automated monitoring:
datasets:
- include %
- exclude test_%data_source my_datasource:
type: postgres
...
sampler:
disable_samples: Truesample datasets:
datasets:
- include region%sample datasets:
datasets:
- exclude [credit_card, birth_date]discover datasets:
datasets:
- include %
- exclude test%discover datasets:
datasets:
- exclude %profile columns:
columns:
- exclude %.pii_%
- exclude %.%email%profile columns:
columns:
- exclude %.% name: Scan for data quality
on: pull_request
jobs:
soda_scan:
runs-on: ubuntu-latest
name: Run Soda Scan
steps:
- name: Checkout
uses: actions/checkout@v3
- name: Perform Soda Scan
uses: sodadata/soda-github-action@v1
env:
SODA_CLOUD_API_KEY: ${{ secrets.SODA_CLOUD_API_KEY }}
SODA_CLOUD_API_SECRET: ${{ secrets.SODA_CLOUD_API_SECRET }}
SNOWFLAKE_USERNAME: ${{ secrets.SNOWFLAKE_USERNAME }}
SNOWFLAKE_PASSWORD: ${{ secrets.SNOWFLAKE_PASSWORD }}
with:
soda_library_version: v1.0.4
data_source: snowflake
configuration: ./configuration.yaml
checks: ./checks.yaml# checks.yml file
checks for retail_orders:
- row_count > 0
- missing_count(order_quantity) < 3- name: Soda Library Action
uses: sodadata/[email protected]
with:
soda_library_version: v1.0.4
data_source: aws_postgres_retail
configuration: .soda/configuration.yaml
checks: .soda/checks.yaml- name: Perform Soda Scan
uses: sodadata/soda-github-action@v1
env:
SODA_CLOUD_API_KEY: ${{ secrets.SODA_CLOUD_API_KEY }}
SODA_CLOUD_API_SECRET: ${{ secrets.SODA_CLOUD_API_SECRET }}
POSTGRES_USERNAME: ${{ secrets.POSTGRES_USERNAME }}
POSTGRES_PASSWORD: ${{ secrets.POSTGRES_PASSWORD }}
with:
soda_library_version: v1.0.4
data_source: snowflake1
configuration: .soda/configuration.yaml
checks: .soda/checks.yamlpip install -i https://pypi.cloud.soda.io soda-dbtsoda ingest dbt -d my_datasource_name -c /path/to/configuration.yml --dbt-artifacts /path/to/filessoda ingest dbt -d my_datasource_name -c /path/to/configuration.yml --dbt-manifest path/to/manifest.json --dbt-run-results path/to/run_results.jsonpip install -i https://pypi.cloud.soda.io soda-dbtdbt_cloud:
account_id: account_id
api_token: serviceAccountTokenFromDbt1234dbt_cloud:
account_id: account_id
api_token: serviceAccountTokenFromDbt1234
access_url: ab123.us1.dbt.comsoda ingest dbt -d my_datasource_name -c /path/to/configuration.yml --dbt-cloud-run-id the_run_idsoda ingest dbt -d my_datasource_name -c /path/to/configuration.yml --dbt-cloud-job-id the_job_idclass Scan()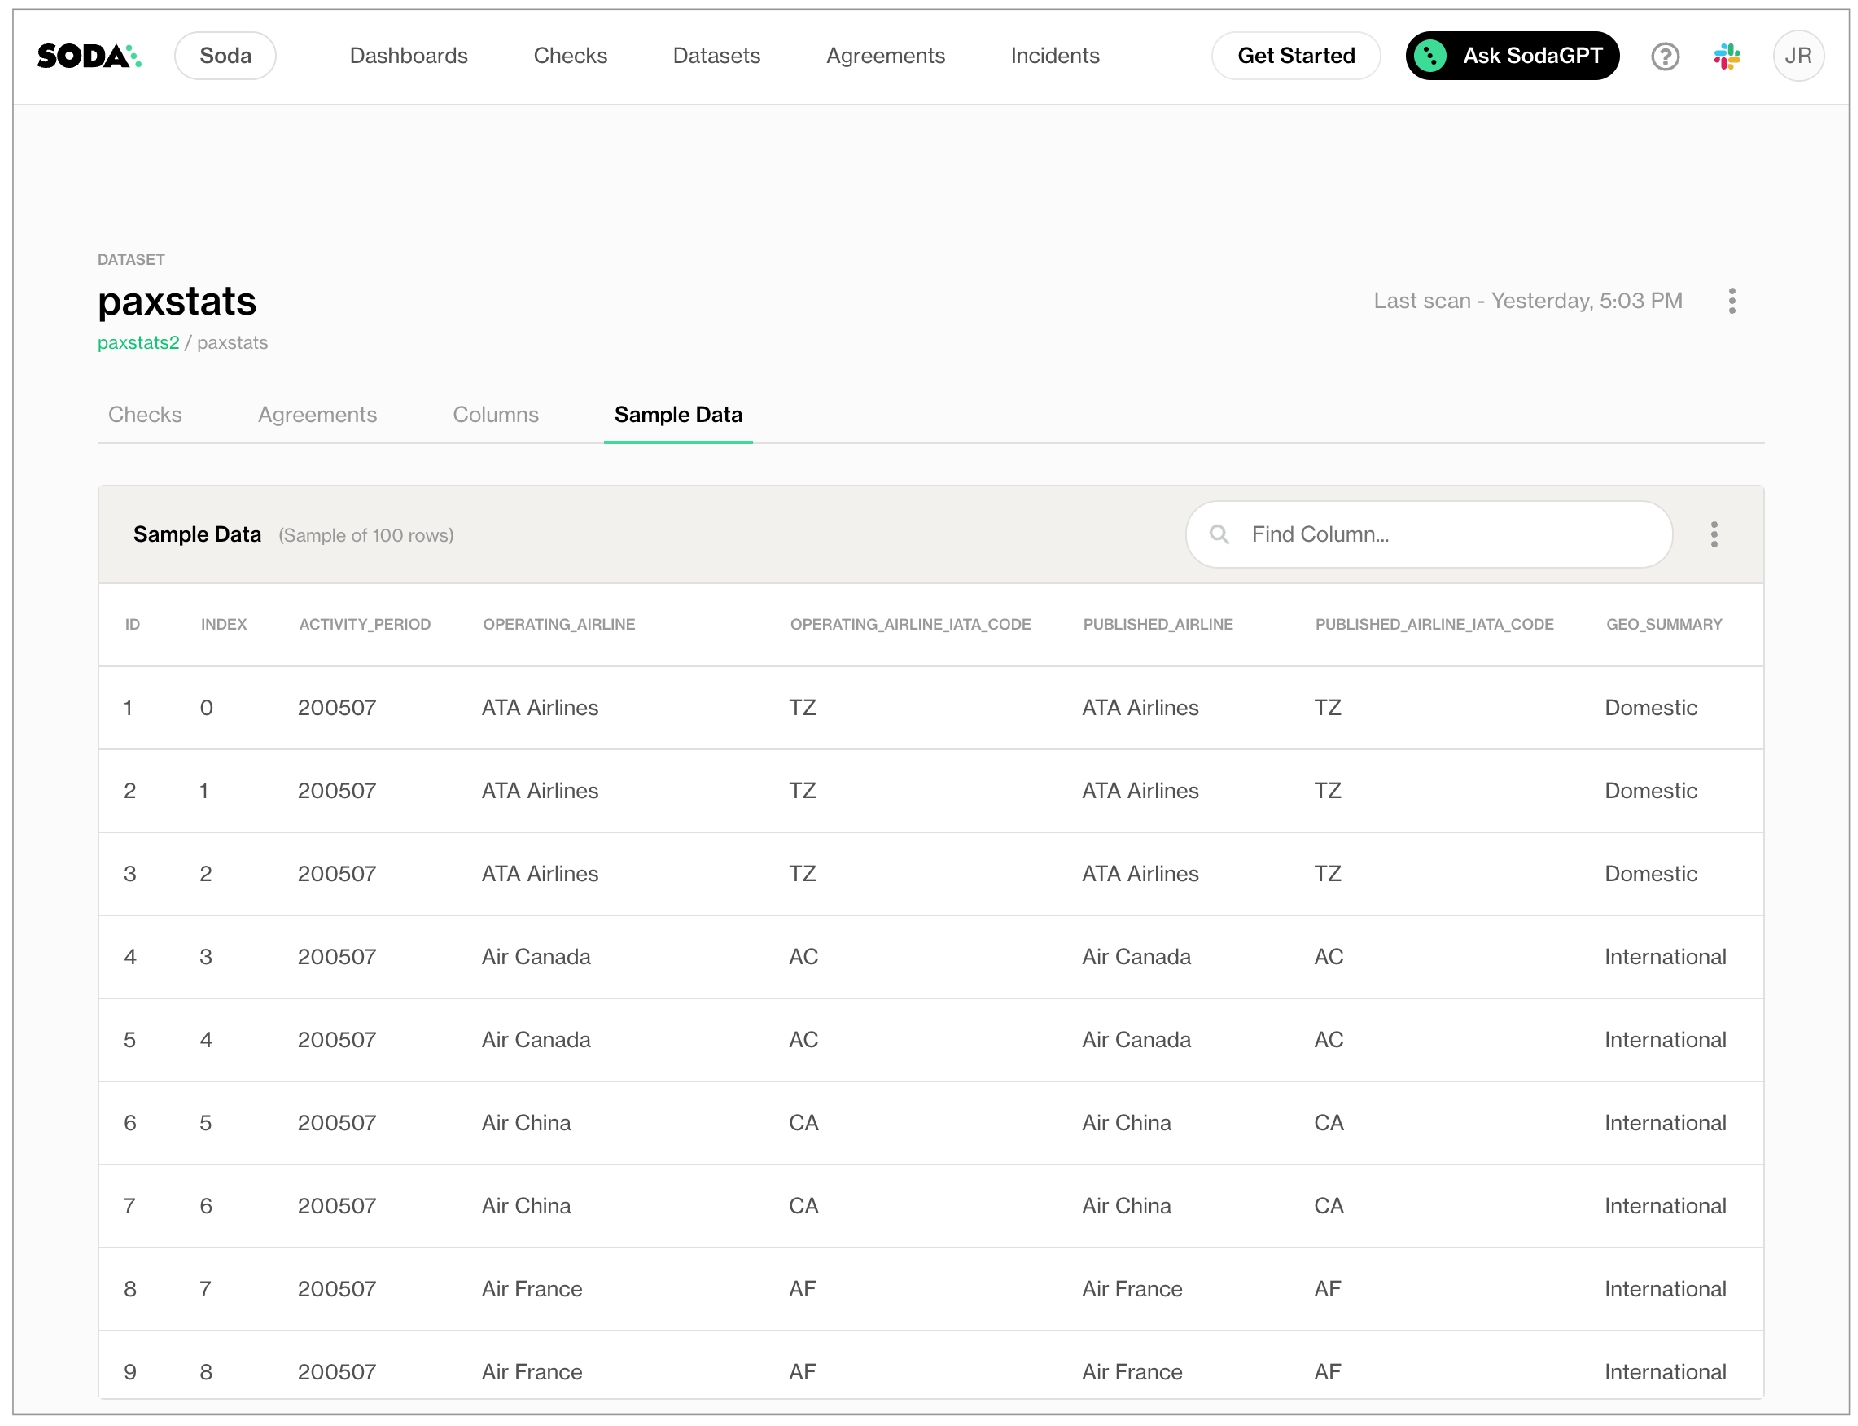
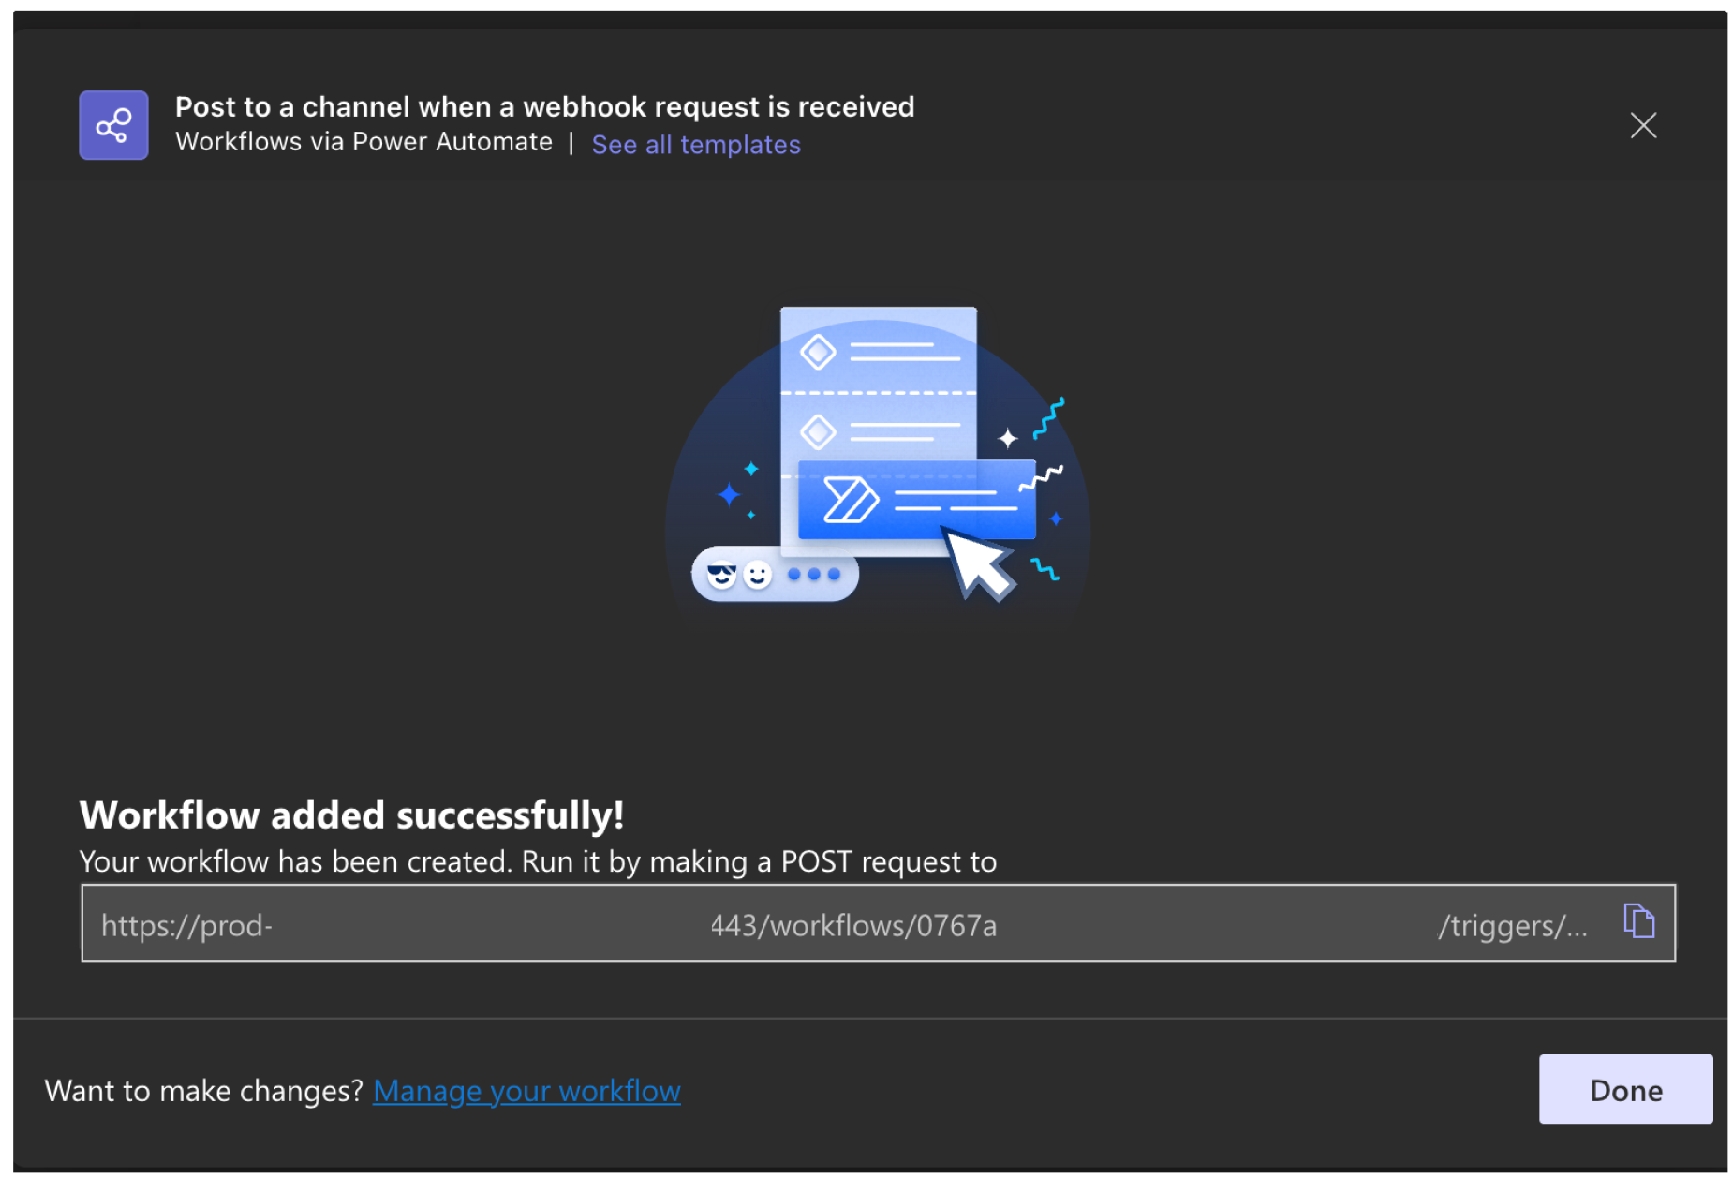


.yml.yaml.yml.yaml0
All checks passed. No runtime errors.
1
Soda recorded a warn result for one or more checks.
2
Soda recorded a fail result for one or more checks.
3
Soda encountered a runtime issue but was able to send check results to Soda Cloud.
4
Soda encountered a runtime issue and was unable to send check results to Soda Cloud.
Need help? Join the Soda community on Slack.
# configuration.yml file
data_source aws_postgres_retail:
type: postgres
host: soda-demo
username: ${POSTGRES_USERNAME}
password: ${POSTGRES_PASSWORD}
database: postgres
schema: public
# Refer to https://go.soda.io/api-keys
soda_cloud:
host: cloud.us.soda.io
api_key_id: ${SODA_CLOUD_API_KEY}
api_key_secret: ${SODA_CLOUD_API_KEY}def execute(self) -> intdef set_data_source_name(self, data_source_name: str)def set_scan_definition_name(self, scan_definition_name: str)def add_configuration_yaml_file(self, file_path: str)def add_configuration_yaml_files(self, path: str, recursive: bool | None = True, suffixes: str | None = None)def add_configuration_yaml_str(self, environment_yaml_str: str, file_path: str = "yaml string")def add_sodacl_yaml_file(self, file_path: str)def add_sodacl_yaml_files(self, path: str, recursive: bool | None = True, suffixes: list[str] | None = None)def add_sodacl_yaml_str(self, sodacl_yaml_str: str, file_name: str | None = None):def add_template_file(self, file_path: str)def add_template_files(self, path: str)def add_pandas_dataframe(self, dataset_name: str, pandas_df, data_source_name: str = "dask")def add_dask_dataframe(self, dataset_name: str, dask_df, data_source_name: str = "dask")def add_spark_session(self, spark_session, data_source_name: str = "spark_df")def add_duckdb_connection(self, duckdb_connection, data_source_name: str = "duckdb")def set_verbose(self, verbose_var: bool = True)def set_is_local(self, local_var: bool = True)def add_variables(self, variables: dict[str, str])def assert_no_error_logs(self)def assert_no_error_nor_warning_logs(self)def assert_has_error(self, expected_error_message: str)def has_error_logs(self) -> booldef has_error_or_warning_logs(self) -> booldef get_logs_text(self) -> str | Nonedef get_error_logs(self) -> list[Log]def get_error_or_warning_logs(self) -> list[Log]def get_error_logs_text(self) -> str | Nonedef get_scan_results(self) -> dict"definitionName"
"defaultDataSource"
"dataTimestamp"
"scanStartTimestamp"
"scanEndTimestamp"
"hasErrors"
"hasWarnings"
"hasFailures"
"metrics"
"checks"
"checksMetadata"
"queries"
"automatedMonitoringChecks"
"profiling"
"metadata"
"logs"def assert_no_checks_fail(self)def assert_no_checks_warn_or_fail(self)def has_check_fails(self) -> booldef has_check_warns(self) -> booldef has_check_warns_or_fails(self) -> booldef get_checks_fail(self) -> list[Check]def get_checks_fail_text(self) -> str | Nonedef get_checks_warn_or_fail(self) -> list[Check]def get_checks_warn_or_fail_text(self) -> str | Nonedef get_all_checks_text(self) -> str | Noneself._configuration.samples_limit: intself.sampler: Sampler✓
✓
✓
✓
✓
✓
✓
✓
✓
✓
✓
✓
View a dataset Checks tab
View a dataset's Anomalies tab
View a dataset's Agreements tab
View a dataset's Columns tab, schema info only
View the check history for a dataset's checks, though not failed row samples
Create no-code checks for a dataset
Edit no-code checks for a dataset
Delete no-code checks for a dataset
Add proposed no-code checks to a dataset
✓
✓
✓
✓
✓
✓
✓
✓
Need help? Join the Soda community on Slack.
✓
Organize, alert, investigate
Be sure to include any variables in your programmatic scan before the check YAML files. Soda requires the variable input for any variables defined in the check YAML files.
0
all checks passed, all good from both runtime and Soda perspective
1
Soda issues a warning on a check(s)
2
Soda issues a failure on a check(s)
3
Soda encountered a runtime issue, and was able to submit scan results to Soda Cloud
4
Soda encountered a runtime issue, but was unable to submit any results to Soda Cloud
required
A unique identifier that you generate in your console. See .
private_key
required
A unique identifier that you generate in your console. See .
client_email
required
Also known as the service account ID, find this value in the IAM & Admin > Service Accounts > Details tab in your Google Cloud Console.
client_id
required
Your unique ID, find this value in the IAM & Admin > Service Accounts > Details tab in your Google Cloud Console.
auth_uri
required
BigQuery's authentication URI to which you send auth credentials. Default: https://accounts.google.com/o/oauth2/auth
token_uri
required
BigQuery's token URI to which you send access tokens. Default: https://oauth2.googleapis.com/ token
auth_provider_x509_cert_url
required
BigQuery's public x509 certificate URL that it uses to verify the JWT signed by the authentication provider. Default: https://www.googleapis.com/ oauth2/v1/certs
client_x509_cert_url
required
BigQuery's public x509 certificate URL that it uses to verify the JWT signed by the client.
auth_scopes
optional
Soda applies three :
• https://www.googleapis.com/auth/bigquery to view and manage your data in BigQuery
• https://www.googleapis.com/auth/cloud-platform to view, configure, and delete your Google Cloud data
• https://www.googleapis.com/auth/drive to view and add to the record of file activity in your Google Drive
project_id
optional
Add an identifier to override the project_id from the account_info_json
storage_project_id
optional
Add an identifier to use a separate BigQuery project for compute and storage.
dataset
required
The identifier for your BigQuery dataset, the top-level container that is used to organize and control access to your tables and views.
Property
Required
Notes (See Google BigQuery Integration parameters)
type
required
Identify the type of data source for Soda.
account_info_json
required
The integration parameters for account info are listed below. If you do not provide values for the properties, Soda uses the Google application default values.
type
required
This the type of BigQuery account. Default: service_account
project_id
required
This is the unique identifier for the project in your console. See Locate the project ID.
text
STRING
number
INT64, DECIMAL, BINUMERIC, BIGDECIMAL, FLOAT64
time
DATE, DATETIME, TIME, TIMESTAMP
private_key_id
deploy a Soda Agent configured to use the external secrets manager to access login credentials for a data source
create a Soda Cloud account and set up a new data source that accesses the data in the PostgreSQL data source via the Soda Agent and the external secrets manager
Podman Desktop, for users who prefer to use a UI
Podman engine, for users who prefer to use the command-line
(Optional) kind to create and run a Kubernetes cluster locally
(Optional) kubectl to execute commands against the Kubernetes cluster
setup a Hashicorp Vault,
deploy External Secrets Operator,
setup a Kubernetes UI dashboard called Headlamp
create a PostgreSQL data source containing a NYC bus breakdowns and delays dataset
Output (last few lines):
create a Kubernetes secret with a value for appRoleSecretId to access the Hashicorp Vault,
create an ExternalSecret,
create a ClusterSecretstore,
populate some secret values into Vault
Output (last few lines):
Now logged in, from the list of Secret Engines, navigate to kv/local/soda to see the example username and password secrets in the vault. If you wish, you can set new secrets that the Soda Agent can use.
Follow the instructions to Define SodaCL checks using no-code checks in Soda Cloud, then run scans for data quality.
Need help? Join the Soda community on Slack.
anomalies in a dataset's row count volume
anomalies in the timeliness of new data in a dataset that contain a column with a TIME data type
evolutions in a dataset's schemas, monitoring columns that have been moved, added, or removed
anomalies in the volume of missing values in columns in a dataset
anomalies in the volume of duplicate values in columns in a dataset
anomalies in the calculated average of the values in columns in a dataset that contain numeric values
Using a self-hosted or Soda-hosted agent connected to your Soda Cloud account, you configure a data source to partition, then profile the datasets to which you wish to add an anomaly dashboard. Soda then leverages machine learning algorithms to run daily scans of your datasets to gather measurements which, after a few days, enable Soda to recognize patterns in your data.
After establishing these patterns, Soda automatically detects anomalies relative to the patterns and flags them for your review in each dataset's anomaly dashboard.
✔️ Requires Soda Core Scientific (included in a Soda Agent) ✖️ Supported in Soda Core ✖️ Supported in Soda Library + Soda Cloud ✔️ Supported in Soda Cloud + self-hosted Soda Agent connected to a BigQuery, Databricks SQL, MS SQL Server, MySQL, PostgreSQL, Redshift, or Snowflake data source
BigQuery Databricks SQL MS SQL Server MySQL
PostgreSQL Redshift Snowflake
For preview particpants, only
Activate an anomaly dashboard to one or more datasets by configuring profiling for a new data source in Soda Cloud. Refer to the Get started documentation for full data source onboarding instructions.
To activate anomaly dashboards, you must use a self-hosted or Soda-hosted agent to connect to your data sources. If you already use a self-hosted Soda agent, upgrade the agent to version 1.1.2 or greater. If you do not already have an active Soda agent in your Soda Cloud account:
navigate to your avatar > Organization Settings to validate that the checkbox for Enable Soda-hosted Agent is checked OR
follow the instructions to deploy self-hosted agent in Kubernetes cluster in your cloud services environment
You can activate anomaly dashboards on existing data sources or on new ones you add via a Soda agent.
For existing data sources, follow to activate an anomaly dashboard to an existing dataset.
For a new data source, navigate to your avatar > Data Sources, then click Add New to begin the guided data source onboarding workflow.
In the editing panel of 4. Profile, use the include and exclude syntax to indicate the datasets for which Soda must profile and prepare an anomaly dashboard. The default syntax in the editing panel instructs Soda to profile every column of every dataset in the data source, and, superfluously, all datasets with names that begin with prod. The % is a wildcard character. See for more detail on profiling syntax
Continue the remaining steps to add your new data source, then Test Connection, if you wish, and Save the data source configuration. Soda begins profiling the datasets according to your Profile configuration while the algorithm uses the first measurements collected from a scan of your data to begin the work of identifying patterns in the data.
After approximately five days, during which Soda's machine learning studies your data, you can navigate to the Dataset page for a dataset you included in profiling. Click the Anomalies tab to view the issues Soda automatically detected.
(Optional) Consider setting up a notification for any of the automated anomaly detection checks in the dashboard; see .
(Optional) If you wish, you can adjust the time of day that the daily anomaly detection scan definition runs to collect its measurements. To do so, navigate to the Scans dashboard, then, for the scan definition that runs daily for your anomaly dashboard updates, click the stacked dots at right and select Edit Scan Definition. Adjust the time of day as you wish, then Save.
Use the following procedure to activate the anomaly dashboard for an existing dataset in a data source you already connected to your Soda Cloud account via a self-hosted or Soda-hosted agent.
If you have the permission to do so for a dataset, navigate to the Datasets dashboard, then open the dataset to which you wish to activate an anomaly dashboard.
Navigate to the Anomalies tab where a message appears that advises you that the anomaly dashboard has not been activated for this dataset. Click Activate.
Follow the guided steps and carefully read the warning about the changes to any existing profiling you have configured for the data source (see below). If you accept the permanent changes, specify the time of day you wish to run the daily anomaly scan, then proceed.
After approximately five days, during which Soda's machine learning studies your data, you can return to the Anomalies tab on the Dataset page to view the issues Soda automatically detected.
(Optional) Consider setting up a notification for any of the automated anomaly detection checks in the dashboard; see Add anomaly notification.
(Optional) If you wish, you can adjust the time of day that the daily anomaly detection scan definition runs to collect its measurements. To do so, navigate to the Scans dashboard, then, for the scan definition that runs daily for your anomaly dashboard updates, click the stacked dots at right and select Edit Scan Definition. Adjust the time of day as you wish, then Save.
To access a dataset's anomaly dashboard in Soda Cloud, navigate to the Datasets dashboard, then select a dataset from the presented list to open an individual dataset page. Navigate to the Anomalies tab.
The three Dataset Metrics tiles represent the most recent measurement or, in other words, one day’s worth of data anomaly detection. The three Column Metrics tiles display the last seven days’ worth of measurements and any anomalies that Soda detected.
When you click a Column Metrics tile to access more information, the list below details which columns contained anomalies.
A red warning icon for a column indicates that Soda registered an anomaly in the last daily scan of the dataset.
A green check icon for a column indicates that Soda resgisterd no anomalies in the last daily scan of the dataset.
A grayed-out icon for a column indicates that Soda registered an anomaly for a check at least once in the last seven days, but not on the most recent daily scan.
Click a Dataset Metric tile or the column name for a Column Metric to open the Check History for the anomaly detection check. Optionally, you can add feedback to individual data points in the check history graph to help refine the anomaly detection’s algorithm pattern recognition and its ability to recognize anomalies.
If, after the anomaly detection algorithm has completed its pattern training, the anomaly dashboard does not display anomaly info in one or more tiles, it may be for one of a couple of reasons.
There is no column that contains TIME type data (TIMESTAMP, DATE, DATETIME, etc.) which a freshness check requires. Where it cannot detect a column with the necessary data type, Soda leaves the Freshness tile blank.
There is no column that contains NUMBER type data (INT, FLOAT, etc.) which an average metric check requires. Where it cannot detect a column with the necessary data type, Soda leaves the Average tile blank.
Soda anomaly dashboard does not profile columns that contain timestamps or dates. As such, Soda only executes a freshness check for such columns for the anomaly dashboard to validate data freshness, but not anomalies in the columns that contain dates or timestamps.
The anomaly dashboard adheres to Soda’s “no noise” policy when it comes to alert notifications for data quality issues. As such, the dashboard does not automatically send any notifications to anyone out of the box. If you wish to received alert notifications for any of the anomalies the dashboard detects, use the bell (🔔) icon.
If your Soda Admin has integrated your Soda Cloud account with Slack or MS Teams to receive check notifications, you can direct anomaly dashboard alerts to those channels. The dashboard does not support sending alerts via webhook.
For a Dataset Metric, click the bell to follow the guided instructions to set up a rule that defines where to send an alert notification when Soda detects an anomalous measurement for the metric.
For a Column Metric, click the bell next to an individual column name from those listed in the table below the three column metric tiles. Follow the guided instructions to set up a rule that defines where to send an alert notification when Soda detects an anomalous measurement for the metric.
For example, if you want to receive notifications any time Soda detects an anomalous volume of duplicate values in an order_id column, click the Duplicate tile to display all the columns for which Soda automatically detects anomalies, then click the bell for order_id and set up a rule. If you also wish to receive notifications for anomalous volumes of missing values in the same column, click the Missing tile, then click the bell for order_id to set up a second rule.
The anomaly dashboard is powered by a machine learning algorithm that works with measured values for a metric that occur over time. Soda leverages the Facebook Prophet algorithm to learn patterns in your data so it can identify and flag anomalies.
As the checks in the dashboard track and analyze metrics over time, the algorithm learns from historical patterns in your data, including trends and seasonal variations in the measurements it collects. After learning the normal behavior of your data, the checks become capable of detecting variations from the norm which it flags as anomalies.
Notably, it takes some time – approximately five or more days – for the anomaly dashboard to learn the patterns of your data before it can display meaningful results.
When you set up or activate the anomaly dashboard, Soda begins by partitioning your data. To maximize efficiency, Soda does not profile the entirety of data in a dataset; instead, it partitions your data so that it profiles only a sample of the data.
To partition the data, first, Soda detects a column that contains TIME type data that it can use to partition the data to only the last 30 days' worth of data. If it does not detect a column of TIME type data, it uses one million rows of data against which to perform its profiling. If there are fewer than one million rows in a dataset, it profiles all the data; if there are more than a million rows, it selects a random sample of a million rows to use to profile the data.
After partitioning a sample of data, Soda begins profiling it. The profiling activity collects metadata for your datasets such as the names of the columns in the datasets you configured for profiling, and the type of data that each contains. After profiling the data, Soda automatically creates relevant anomaly detection checks for the dataset and some of its columns.
If you wish, you can change the column which Soda automatically selected to partition your data. For example, if Soda selected a column with TIMESTAMP data labeled created_at to partition your data, but you would prefer that it use a last_updated column instead, you can make the change in Soda Cloud.
When you choose a new time partition column, the anomaly dashboard algorithm resets, freshly partitioning the data based on the new column, then profiling the data and training on at least five days of measurements before displaying new results. The dashboard does not persist any existing anomaly dashboard measurements.
With Admin, Manager, or Editor rights to a dataset in Soda Cloud, navigate to the Dataset page, then access the Anomalies tab.
Click the stacked dots at the upper right of the page, then select Edit dataset.
In the dialog box that appears, access the Profiling tab, then use the dropdown list of columns to select the one that you want Soda to use to partition your data for profiling for use in the anomaly dashboard.
Carefully read the warning message about the consequences of the change, then Save.
Add your own anomaly detection checks for other metrics for your data.
Need help? Join the .
Requires Soda Library Not yet supported in Soda Cloud
A check template involves both a template YAML file in which you define resuable user-defined metrics, and at least one checks YAML file, in which you use the metric in a check for data quality.
A check template borrows from the user-defined check syntax and has several parameters to define:
a name
a description
an author
a metric
a query
In the very simple example below, in a file called template.yml, the SQL query defines a metric called alpha. Together with the other parameters, this user-defined metric forms the template named template_alpha. The SQL query uses a variable for the value of table so that Soda uses the value for the table parameter that you provide when you write the SodaCL check in the checks.yml file.
a name
template_alpha
a description
Reusable SQL for writing checks.
an author
Jean-Paul
a metric
alpha
a query
SELECT count(*) as alpha FROM ${table}
Having defined the check template, you can now use it in a check in your checks.yml file, as in the following example.
Because the SQL query in the check template uses a variable for the value of table, you must supply the value in the check as a parameter.
Be sure to add an identifier for the dataset in the first line, even if you supply the name of the dataset in the check using a parameter. To render properly in Soda Cloud, the check must include a dataset identifier.
The check must include at least one alert configuration to define when the check result ought to fail or warn.
When you run a scan from the command-line, you must incude a -T option to idenfity the file path and file name of the template YAML file in which you defined your reuseable metric(s). In a programmatic scan, add the path to the template file.
Command:
Add to programmatic scan:
Output:
In a variation of the example above, you can use a template within a failed row check so as to collect failed row samples, as in the example below.
In the following example, the same template.yml file contains a second template definition for beta. Together with the other parameters, this user-defined metric forms the template named template_beta and does not use a variable for the table name.
You can then use the template in a check in the same, or different, checks.yml file. Even though the name of the dataset is included in the SQL query, you need to identify it in the check. The check must include at least one alert configuration to define when the check result ought to fail or warn.
When you run a scan from the command-line, you must incude a -T option to idenfity the file path and file name of the template YAML file in which you defined your reuseable metric(s). In a programmatic scan, add the path to the template file.
CLI command:
Add to programmatic scan:
Output:
✓
Define a name for a freshness check; see .
✓
Add an identity to a check.
✓
Define alert configurations to specify warn and fail thresholds; see .
Apply an in-check filter to return results for a specific portion of the data in your dataset.
Learn more about user-defined checks.
Need help? Join the .
As a result of a scan, each check results in one of three default states:
pass: the values in the dataset match or fall within the thresholds you specified
fail: the values in the dataset do not match or fall within the thresholds you specified
error: the syntax of the check is invalid
A fourth state, warn, is something you can explicitly configure for individual checks. See Add alert configurations.
The scan results appear in your Soda Library command-line interface (CLI) and the latest result appears in the Checks dashboard in the Soda Cloud web application; examples follow.
Optionally, you can add --local option to the scan command to prevent Soda Library from sending check results and any other metadata to Soda Cloud.
In general, SodaCL checks fall into one of three broad categories:
standard
unique
user-defined
A standard check, as illustrated above with row_count, uses a language pattern that includes a metric and a threshold. All numeric, missing, and validity metrics use this pattern and have a multitude of optional configurations. Read more about standard check types below.
Some checks that you write with SodaCL do not use metrics and thresholds, and instead follow unique patterns relevant to the data quality parameters they check. Each unique check type has its own documentation.
For example, a reference check that validates that the values in a column in one dataset match exactly with the values in another column in another dataset uses a unique pattern.
Finally, the user-defined checks make use of common table expressions (CTE) or SQL queries to construct a check; see an example below. This check type is designed to meet the needs of more complex and specific data quality checks, needs which cannot otherwise be met using the built-in standard and unique checks SodaCL provides. Each user-defined check type has its own documentation.
Use these checks to prepare expressions or queries for your data that Soda Library executes during a scan along with all the other checks in your checks YAML file.
Standard check types use the same pattern to compose a check, but the metrics they use can, themselves, be divided into three categories:
All standard checks that use numeric, missing, or validity metrics can specify a fixed threshold which is not relative to any other threshold. row_count > 0 is an example of a check with a fixed threshold as the threshold value, 0, is absolute.
Generally, a fixed threshold check has three or four mutable parts:
a metric
an argument (optional)
a comparison symbol or phrase
a threshold
The example above defines two checks. The first check applies to the entire dataset and counts the rows to confirm that it is not empty. If the retail_products dataset contains more than 0 rows, the check result is pass.
metric
row_count
comparison symbol
>
threshold
0
The second check applies to only the size column in the dataset and checks that the values in that column do not exceed 500. If the size column in the retail_products dataset contains values larger than 500, the check result is fail.
metric
max
argument
(size)
comparison symbol
<=
threshold
500
Only checks that use numeric metrics can specify a change-over-time threshold, a value that is relative to a previously-measured, or historic, value. Sometimes referred to a dynamic threshold, you use these change-over-time thresholds to gauge changes to the same metric over time.
You must have a Soda Cloud account to use change-over-time thresholds.
Refer to change-over-time thresholds for further details.
While the most basic of standard checks use a single value to identify a fixed threshold, such as row_count >= 10, you can use comparison phrases to define the upper and lower boundaries for a fixed threshold value. Read more about fixed and dynamic thresholds.
The following sections present several ways to set boundaries using the row_count metric in the example checks. You can use any numeric, missing, or validity metric in lieu of row_count.
By default, SodaCL includes the values that define the boundary thresholds when Soda Library executes a check. In the following example, the check passes if the number of rows is equal to 10, 11, 12, 13, 14, or 15 because SodaCL includes both boundary thresholds, 10 and 15, when Soda Library executes the check.
Use negative values to set boundaries, if you wish. The check in the following example passes if the number of rows is equal to -3, -2, -1, 0, 1, 2, 3, 4, or 5.
Use the not between comparison phrase to establish a range of acceptable thresholds, so that anything that falls outside the boundaries you specify yields a fail check result. The check in the following example passes if the number of rows is not equal to -3, -2, -1, 0, 1, 2, 3, 4, or 5.
To exclude the values that define the boundary thresholds, use the opening bracket ( and closing bracket ) characters. In the following example, the check passes if the number of rows is equal to 11, 12, 13, 14, or 15 because the opening bracket excludes 10 as an acceptable value.
Similarly, the following example check passes if the number of rows is equal to 11, 12, 13, or 14.
Though SodaCL includes the values that define the boundary thresholds during a check by default, you can use square brackets, [ and ], to explicitly specify which values to include, if you wish.
For example, all of the following checks are equivalent and pass if the number of rows is equal to 10, 11, 12, 13, 14, or 15.
Access information about optional configurations that you can use in SodaCL checks.
Reference tips and best practices for SodaCL.
Need help? Join the .
This guide offers Data Analysts, Data Scientists, and business users instructions to set up Soda to profile and begin monitoring data for quality, right out of the box.
This example offers instructions for both a self-hosted and Soda-hosted agent deployment models which use Soda Cloud connected to a Soda Agent to securely access data sources and execute scheduled scans for data quality anomaly detections. See: Choose a flavor of Soda.
This setup provides a secure, out-of-the-box Soda-hosted Agent to manage access to data sources from within your Soda Cloud account.
BigQuery Databricks SQL MS SQL Server MySQL
PostgreSQL Redshift Snowflake
If you have not already done so, create a Soda Cloud account at . If you already have a Soda account, log in.
By default, Soda prepares a Soda-hosted agent for all newly-created accounts. However, if you are an Admin in an existing Soda Cloud account and wish to use a Soda-hosted agent, navigate to your avatar > Organization Settings. In the Organization tab, click the checkbox to Enable Soda-hosted Agent.
Navigate to your avatar > Data Sources, then access the Agents tab. Notice your out-of-the-box Soda-hosted agent that is up and running.
Invite your colleague(s) to your Soda Cloud organization so they can access the newly-deployed Soda Agent to connect to data sources and begin monitoring data quality. In your Soda Cloud account, navigate to your avatar > Invite Team Members and fill in the blanks.
For preview participants, only.
As a user with permission to do so in your Soda Cloud account, navigate to your avatar > Data Sources.
In the Agents tab, confirm that you can see your Soda-hosted agent and that its status is "green" in the Last Seen column.
Navigate to the Data source tab, then click New Data Source and follow the guided steps to connect to a new data source. Refer to the subsections below for insight into the values to enter in the fields and editing panels in the guided steps.
Data Source Label
Provide a unique identifier for the data source. Soda Cloud uses the label you provide to define the immutable name of the data source against which it runs the Default Scan.
Default Scan Agent
Select the Soda-hosted agent, or the name of a Soda Agent that you have previously set up in your secure environment. This identifies the Soda Agent to which Soda Cloud must connect in order to run its scan.
Check Schedule
Provide the scan frequency details Soda Cloud uses to execute scans according to your needs. If you wish, you can define the schedule as a cron expression.
Starting At
Select the time of day to run the scan. The default value is midnight.
Cron Expression
(Optional) Write your own to define the schedule Soda Cloud uses to run scans.
Anomaly Dashboard Scan Schedule in 2025
Provide the scan frequency details Soda Cloud uses to execute a daily scan to automatically detect anomalies for the anomaly dashboard.
In the editing panel, provide the connection configurations Soda Cloud needs to be able to access the data in the data source. Connection configurations are data source-specific and include values for things such as a database's host and access credentials.
Access the data source-specific connection configurations for the connection syntax and descriptions; adjust the values to correspond with your data source’s details.
To more securely provide sensitive values such as usernames and passwords in a self-hosted agent deployment model, use environment variables in a values.yml file when you deploy the Soda Agent. See Use environment variables for data source connection credentials for details.
During its initial scan of your datasource, Soda Cloud discovers all the datasets the data source contains. It captures basic information about each dataset, including a dataset's schema and the columns it contains.
In the editing panel, specify the datasets that Soda Cloud must include or exclude from this basic discovery activity. The default syntax in the editing panel instructs Soda to collect basic dataset information from all datasets in the data source except those with names that begin with test_. The % is a wildcard character. See Add dataset discovery for more detail on profiling syntax.
Known issue: SodaCL does not support using variables in column profiling and dataset discovery configurations.
To gather more detailed profile information about datasets in your data source and automatically build an anomaly dashboard for data quality observability, you can configure Soda Cloud to profile the columns in datasets.
Profiling a dataset produces two tabs' worth of data in a dataset page:
In the Columns tab, you can see column profile information including details such as the calculated mean value of data in a column, the maximum and minimum values in a column, and the number of rows with missing data.
In the Anomalies tab, you can access an out-of-the-box Anomaly Dashboard that uses the column profile information to automatically begin detecting anomalies in your data relative to the patterns the machine learning algorithm learns over the course of approximately five days. Available in 2025:
In the editing panel, provide details that Soda Cloud uses to determine which datasets to include or exclude when it profiles the columns in a dataset. The default syntax in the editing panel instructs Soda to profile every column of every dataset in this data source, and, superfluously, all datasets with names that begin with prod. The % is a wildcard character. See Add column profiling for more detail on profiling syntax.
Column profiling can be resource-heavy, so carefully consider the datasets for which you truly need column profile information. Refer to Compute consumption and cost considerations for more detail.
Data Source Owner
The Data Source Owner maintains the connection details and settings for this data source and its Default Scan Definition.
Default Dataset Owner
The Datasets Owner is the user who, by default, becomes the owner of each dataset the Default Scan discovers. Refer to to learn how to adjust the Dataset Owner of individual datasets
After approximately five days, during which Soda’s machine learning studies your data, you can navigate to the Anomalies tab on the Dataset page on one of the datasets you included in profiling to view the issues Soda automatically detected.
The three Dataset Metrics tiles represent the most recent measurement or, in other words, one day’s worth of data anomaly detection. The three Column Metrics tiles display the last seven days’ worth of measurements and any anomalies that Soda detected.
When you click a Column Metrics tile to access more information, the list below details which columns contained anomalies.
A red warning icon for a column indicates that Soda registered an anomaly in the last daily scan of the dataset.
A green check icon for a column indicates that Soda resgisterd no anomalies in the last daily scan of the dataset.
A grayed-out icon for a column indicates that Soda registered an anomaly for a check at least once in the last seven days, but not on the most recent daily scan.
Click a Dataset Metric tile or the column name for a Column Metric to open the Check History for the anomaly detection check. Optionally, you can add feedback to individual data points in the check history graph to help refine the anomaly detection’s algorithm pattern recognition and its ability to recognize anomalies.
The anomaly dashboard adheres to Soda’s “no noise” policy when it comes to alert notifications for data quality issues. As such, the dashboard does not automatically send any notifications to anyone out of the box. If you wish to received alert notifications for any of the anomalies the dashboard detects, use the bell (🔔) icon.
If your Soda Admin has integrated your Soda Cloud account with Slack or MS Teams to receive check notifications, you can direct anomaly dashboard alerts to those channels. The dashboard does not support sending alerts via webhook.
For a Dataset Metric, click the bell to follow the guided instructions to set up a rule that defines where to send an alert notification when Soda detects an anomalous measurement for the metric.
For a Column Metric, click the bell next to an individual column name from those listed in the table below the three column metric tiles. Follow the guided instructions to set up a rule that defines where to send an alert notification when Soda detects an anomalous measurement for the metric.
For example, if you want to receive notifications any time Soda detects an anomalous volume of duplicate values in an order_id column, click the Duplicate tile to display all the columns for which Soda automatically detects anomalies, then click the bell for order_id and set up a rule. If you also wish to receive notifications for anomalous volumes of missing values in the same column, click the Missing tile, then click the bell for order_id to set up a second rule.
Learn more about the anomaly dashboard for datasets.
Learn more about organizing check results, setting alerts, and investigating issues.
Write your own checks for data quality.
Integrate Soda with Slack to send alert notifications directly to channels in your workspace.
Integrate Soda with a data catalog to see data quality results from within the catalog:
Need help? Join the .
Problem: You have written a check using an invalid_count or invalid_percent metric and used a valid format config key to specify the values that qualify as valid, but Soda errors on scan.
Solution: The valid format configuration key only works with data type TEXT. See Specify valid format.
See also: Tips and best practices for SodaCL
Problem: You have implemented a missing_count check on a Redshift dataset and it was able to properly detect NULL values, but when applying the same check to an Athena dataset, the check will not detect the missing values.
Solution: In some data sources, rather than detecting NULL values, Soda ought to look for empty strings. Configure your missing check to explicitly check for empty strings as in the example below.
Problem: You execute a programmatic scan using Soda Library, but Soda does not seem to recognize the variables you included in the programmatic scan.
Solution: Be sure to include any variables in your programmatic scan before the check YAML file identification. Refer to a basic programmatic scan for an example.
Problem: You wrote one or more checks for a dataset and the scan produced check results for the check as expected. Then, you adjusted the check -- for example, to apply a different threshold value, as in the example below -- and ran another scan. The latest scan appears in the check results, but the previous check result seems to have disappeared or been archived.
Solution: Soda Cloud archives check results if they have been removed, by deletion or alteration, from the check file. If two scans run using the same checks YAML file, but an alteration or deletion of the checks in the file took place between scans (such as adjusting the threshold in the example above), Soda Cloud automatically archives the check results of any check that appeared in the file for the first scan, but does not exist in the same checks YAML file during the second scan.
Note that this behavior does not apply to changing values that use an in-check variable, as in the example below.
To force Soda Cloud to retain the check results of previous scans, you can use one of the following options:
Write individual checks and keep them static between scan executions.
Add the same check to different checks YAML files, then execute the scan command to include two separate checks YAML files.
Add a check identity parameter to the check so that Soda Cloud can accurately correlate new measurements from scan results to the same check, thus maintaining the history of check results.
Problem, variation 1: You have written a check using the exact syntax provided in SodaCL documentation but when you run a scan, Soda produces an error that reads something like, Metrics 'schema' were not computed for check 'schema'.
Problem, variation 2: You can run scans successfully on some datasets but one or two of them always produce errors when trying to execute checks.
Solution: In your checks YAML file, you cannot use a dataset identifier that includes a schema, such as soda.test_table. You can only use a dataset name as an identifier, such as test_table.
However, if you were including the schema in the dataset identifier in an attempt to run the same set of checks against multiple environments, you can do so using the instructions to Configure a single scan to run in multiple environments in the Run a scan tab.
See also: Add a check identity
Problem: When you run a scan to execute a freshness check, the CLI returns one of the following error message.
Solution: The error indicates that you are using an incorrect comparison symbol. Remember that freshness checks can only use < in check, unless the freshness check employs an alert configuration, in which case it can only use > in the check.
Problem: When you run a scan to execute a freshness check that uses a NOW variable, the CLI returns an following error message for Invalid check.
Solution: Until the known issue is resolved, use a deprecated syntax for freshness checks using a NOW variable, and ignore the deprecated syntax message in the output. For example, define a check as per the following.
Problem: You have written a check that has accurate syntax but which returns scan results that include a [NOT EVALUATED]message like the following:
Solution: The cause of the issue may be one of the following:
Where a check returns None, it means there are no results or the values is 0, which Soda cannot evaluate. In the example above, the check involved calculating a sum which resulted in a value of 0 which, consequently, translates as [NOT EVALUATED] by Soda.
For a change-over-time check, if the previous measurement value is 0 and the new value is 0, Soda calculates the relative change as 0%. However, if the previous measurement value is 0 and the new value is not 0, then Soda indicates the check as [NOT EVALUATED] because the calculation is a division by zero.
If your check involves a threshold that compares relative values, such as , , or , Soda needs a value for a previous measurement before it can make a comparison. In other words, if you are executing these checks for the first time, there is no previous measurement value against which Soda can compare, so it returns a check result of [NOT EVALUATED].
Soda begins evaluating schema check results after the first scan; anomaly detection after four scan of regular frequency.
Problem: When trying to run a Soda Library reference against a partitioned dataset in combination with a dataset filter, Soda does not pass the filter which results in an execution error.
Solution: Where both datasets in a reference check have the same name, the dataset filter cannot build a valid query because it does not know to which dataset to apply the filter.
For example, this reference check compares values of columns in datasets with the same name, customers_c8d90f60. In this case, Soda does not know which ts column to use to apply the WHERE clause because the column is present in both datasets. Thus, it produces an error.
As a workaround, you can create a separate dataset filter for such a reference check and prefix the column name with wither SOURCE. or TARGET. to identify to Soda the column to which it should apply the filter.
In a separate filter in the example below, the ts uses the prefix SOURCE. to specify that Soda ought to apply the dataset filter to the source of the comparison and not the target.
Problem: Running scan with a failed row check produces and error that reads YAML syntax error while parsing a block mapping.
Solution:
If you are using a failed row check with a CTE fail condition, the syntax checker does not accept an expression that begins with double-quotes. In that case, as a workaround, add a meaningless true and to the beginning of the CTE, as in the following example.
Problem: A check you've written executes against a column with a name that includes a period or colon, and scans produce an error.
Solution: Column names that contain colons or periods can interfere with SodaCL’s YAML-based syntax. For any column names that contain these punctuation marks, apply quotes to the column name in the check to prevent issues.
Problem: When preparing an in-check filter using quotes for the column names, the Soda scan produces an error.
Solution: The quotes are the cause of the problem; they produce invalid YAML syntax which results in an error message. Instead, write the check without the quotes or, if the quotes are mandatory for the filter to work, prepare the filter in a text block as in the following example.
If you are using reference checks with a Spark or Databricks data source to validate the existence of values in two datasets within the same schema, you must first convert your DataFrames into temp views to add them to the Spark session, as in the following example.
Problem: Using an invalid_count check, the list of valid_values includes a value with a single quote, such as Tuesday's orders. During scanning, he check results in and error because it does not recognize the special character.
Solution: When using single-quoted strings, any single quote ' inside its contents must be doubled to escape it. For example, Tuesday''s orders.
Problem: When running scans on Databricks, Soda encounters an error on columns that begin with a number.
Solution: In Databricks, when dealing with column names that start with numbers or contain special characters such as spaces, you typically need to use backticks to enclose the column identifier. This is because Databricks uses a SQL dialect that is similar to Hive SQL, which supports backticks for escaping identifiers. For example:
Need help? Join the .
In the context of SodaCL check types, group by checks are unique. Evolution checks always employ a custom SQL query and an alert configuration – specifying warn and/or fail alert conditions – with validation keys. Refer to Add alert configurations for exhaustive alert configuration details.
The validation key:value pairs in group evolution checks set the conditions for a warn or a fail check result. See a List of validation keys below.
For example, the following check uses a group by configuration to execute a check on a dataset and return check results in groups. In a group evolution check, the when required group missing validation key confirms that specific groups are present in a dataset; if any of groups in the list are absent, the check result is warn.
In the example above, the values for the validation key are in a nested list format, but you can use an inline list of comma-separated values inside square brackets instead. The following example yields identical checks results to the example above.
You can define a group evolution check with both warn and fail alert conditions, each with multiple validation keys. Refer to Configure multiple alerts for details. Be aware, however, that a single group evolution check only ever produces a single check result. See Expect one check result below for details.
The following example is a single check; Soda executes each of its validations during a scan and returns a single result for the check: pass, warn, or fail.
Rather than specifying exact parameters for group changes, you can use the when groups change validation key to warn or fail when indistinct changes occur in a dataset.
Soda Cloud must have at least two measurements to yield a check result for group changes. In other words, the first time you run a scan to execute a group evolution check, Soda does not evaluate the check because it has nothing against which to compare; the second scan that executes the check yields a check result.
✓
Define a name for a group evolution check; see .
✓
Add an identity to a check.
✓
Define alert configurations to specify warn and fail alert conditions; see .
Apply an in-check filter to return results for a specific portion of the data in your dataset.
Be aware that Soda only ever returns a single check result per check. See Expect one check result for details.
You can use * or % as wildcard characters in a list of column names. If the column name begins with a wildcard character, add single quotes as per the example below.
when required group missing
one or more group names in an inline list of comma-separated values, or a nested list
when forbidden group present
one or more group names in an inline list of comma-separated values, or a nested list
when groups change
any as an inline value
group add as a nested list item
group delete as a nested list item
Be aware that a check that contains one or more alert configurations only ever yields a single check result; one check yields one check result. If your check triggers both a warn and a fail, the check result only displays the more severe, failed check result. (Schema checks behave slightly differently; see Schema checks.)
Using the following example, Soda Library, during a scan, discovers that the data in the dataset triggers both alerts, but the check result is still Only 1 warning. Nonetheless, the results in the CLI still display both alerts as having both triggered a [WARNED] state.
The check in the example below data triggers both warn alerts and the fail alert, but only returns a single check result, the more severe Oops! 1 failures.
Use a group by configuration to categorize your check results into groups.
Learn more about alert configurations.
Learn more about SodaCL metrics and checks in general.
Reference tips and best practices for SodaCL.
Need help? Join the .
Define rules to route alert notifications according to check attributes.
To define new check attributes, you must have the permission to do so on your Soda Cloud account. Any Soda Cloud user or Soda Library user can apply existing attributes to new or existing checks.
Note that you can only define or edit check attributes as a user with permission to do so in Soda Cloud. You cannot define new attributes in Soda Library. Once defined in Soda Cloud, any Soda Cloud or Soda Library user can apply the attribute to new or existing checks.
In your Soda Cloud account, navigate to your avatar > Attributes > New Attribute.
Follow the guided steps to create the new attribute. Use the details below for insight into the values to enter in the fields in the guided steps.
Label
Enter the key for the key:value pair that makes up the attribute. In the example above, the check attribute's key is department and the value is marketing.
Note that though you enter a value for label that may contain spaces or uppercase characters, users must use the attribute's NAME as the key, not the Label as Soda Cloud automatically formats the label into SodaCL-friendly syntax. Refer to the screenshot in the .
Resource Type
Select Check to define an attribute for a check.
Type
Define the type of input a check author may use for the value that pairs with the attribute's key. - Single select - Multi select - Checkbox - Text - Number - Date
Allowed Values
Applies only to Single select and Multi select. Provide a list of values that a check author may use when applying the attribute key:value pair to a check.
Description
(Optional) Provide details about the check attribute to offer guidance for your fellow Soda users.
Once created, you cannot change the type of your attribute. For example, you cannot change a checkbox attribute into a multi-select attribute.
Once created, you can change the display name of an attribute.
For a single- or multi-select attribute, you can remove, change, or add values to the list of available selections. However, if you remove or change values on such a list, you cannot use a previous value to route alert notifications.
While only a Soda Cloud Admin can define or revise check attributes, any user with permission to define or change checks on a dataset can apply attributes to new or existing checks when:
writing or editing checks in an agreement in Soda Cloud
creating or editing no-code checks in Soda Cloud
writing or editing checks in a checks YAML file for Soda Library
Apply attributes to checks using key:value pairs, as in the following example which applies five Soda Cloud-created attributes to a new row_count check.
Optionally, you can add attributes to all the checks for a dataset. Using the following example configuration, Soda applies the check attributes to the duplicate_count, missing_percent checks for the dim_product dataset. Note that if you specify a different attribute value for an individual check than is defined in the configurations for block, Soda obeys the individual check's attribute instructions.
During a scan, Soda validates the attribute's input—NAME (the key in the key:value pair), Type, Allowed Values—to ensure that the key:value pairs match the expected input. If the input is unexpected, Soda evaluates no checks, and the scan results in an error. For example, if your attribute's type is Number and the check author enters a value of one instead of 1, the scan produces an error to indicate the incorrect attribute value.
The following table outlines the expected values for each type of attribute.
Single select
Any value that exactly matches the Allowed Values for the attribute as defined by the Soda Admin who created the attribute. Values are case sensitive.
Refer to example above in which the department attribute is a Single select attribute.
Multi select
Any value(s) that exactly matches the Allowed Values for the attribute as defined by the Soda Admin who created the attribute. Values are case sensitive.
You must wrap input in square brackets, which indicates a list, when adding Multi select attribute key:value pair to a check.
Refer to example above in which the tags attribute is a Multi select attribute.
Checkbox
true or false
Text
string
Number
integer or float
Date
ISO-formatted date or datetime.
Note that users must use the attribute's NAME as the attribute's key in a check, not the LABEL as defined by a Soda Admin in Soda Cloud. Refer to screenshot below.
Using SodaCL, you can use variables to populate either the key or value of an existing attribute, as in the following example. Refer to Configure variables in SodaCL for further details.
You cannot use variables in checks you write in an agreement in Soda Cloud as it is impossible to provide the variable values at scan time.
You can use attributes in checks that Soda executes as part of a for each configuration, as in the following example. Refer to Optional check configuration for further details on for each.
Add attributes to datasets to get organized in Soda Cloud.
Need help? Join the .
Not quite ready for this big gulp of Soda? 🥤Try taking a sip, first.
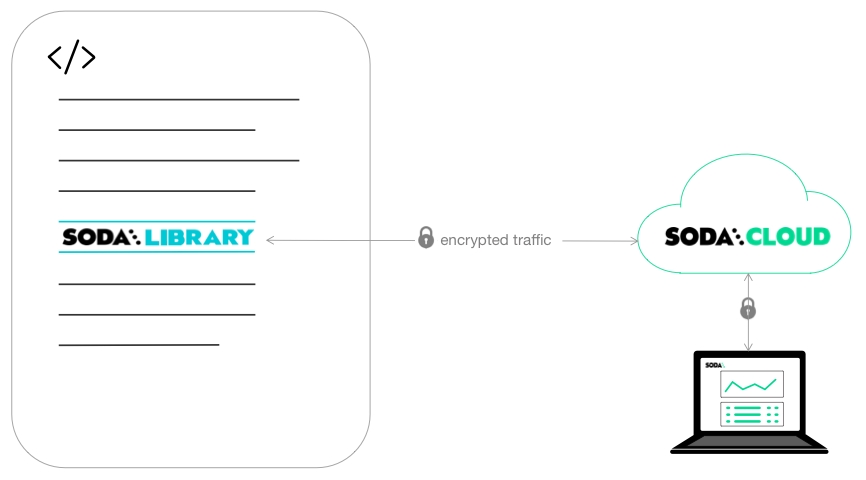
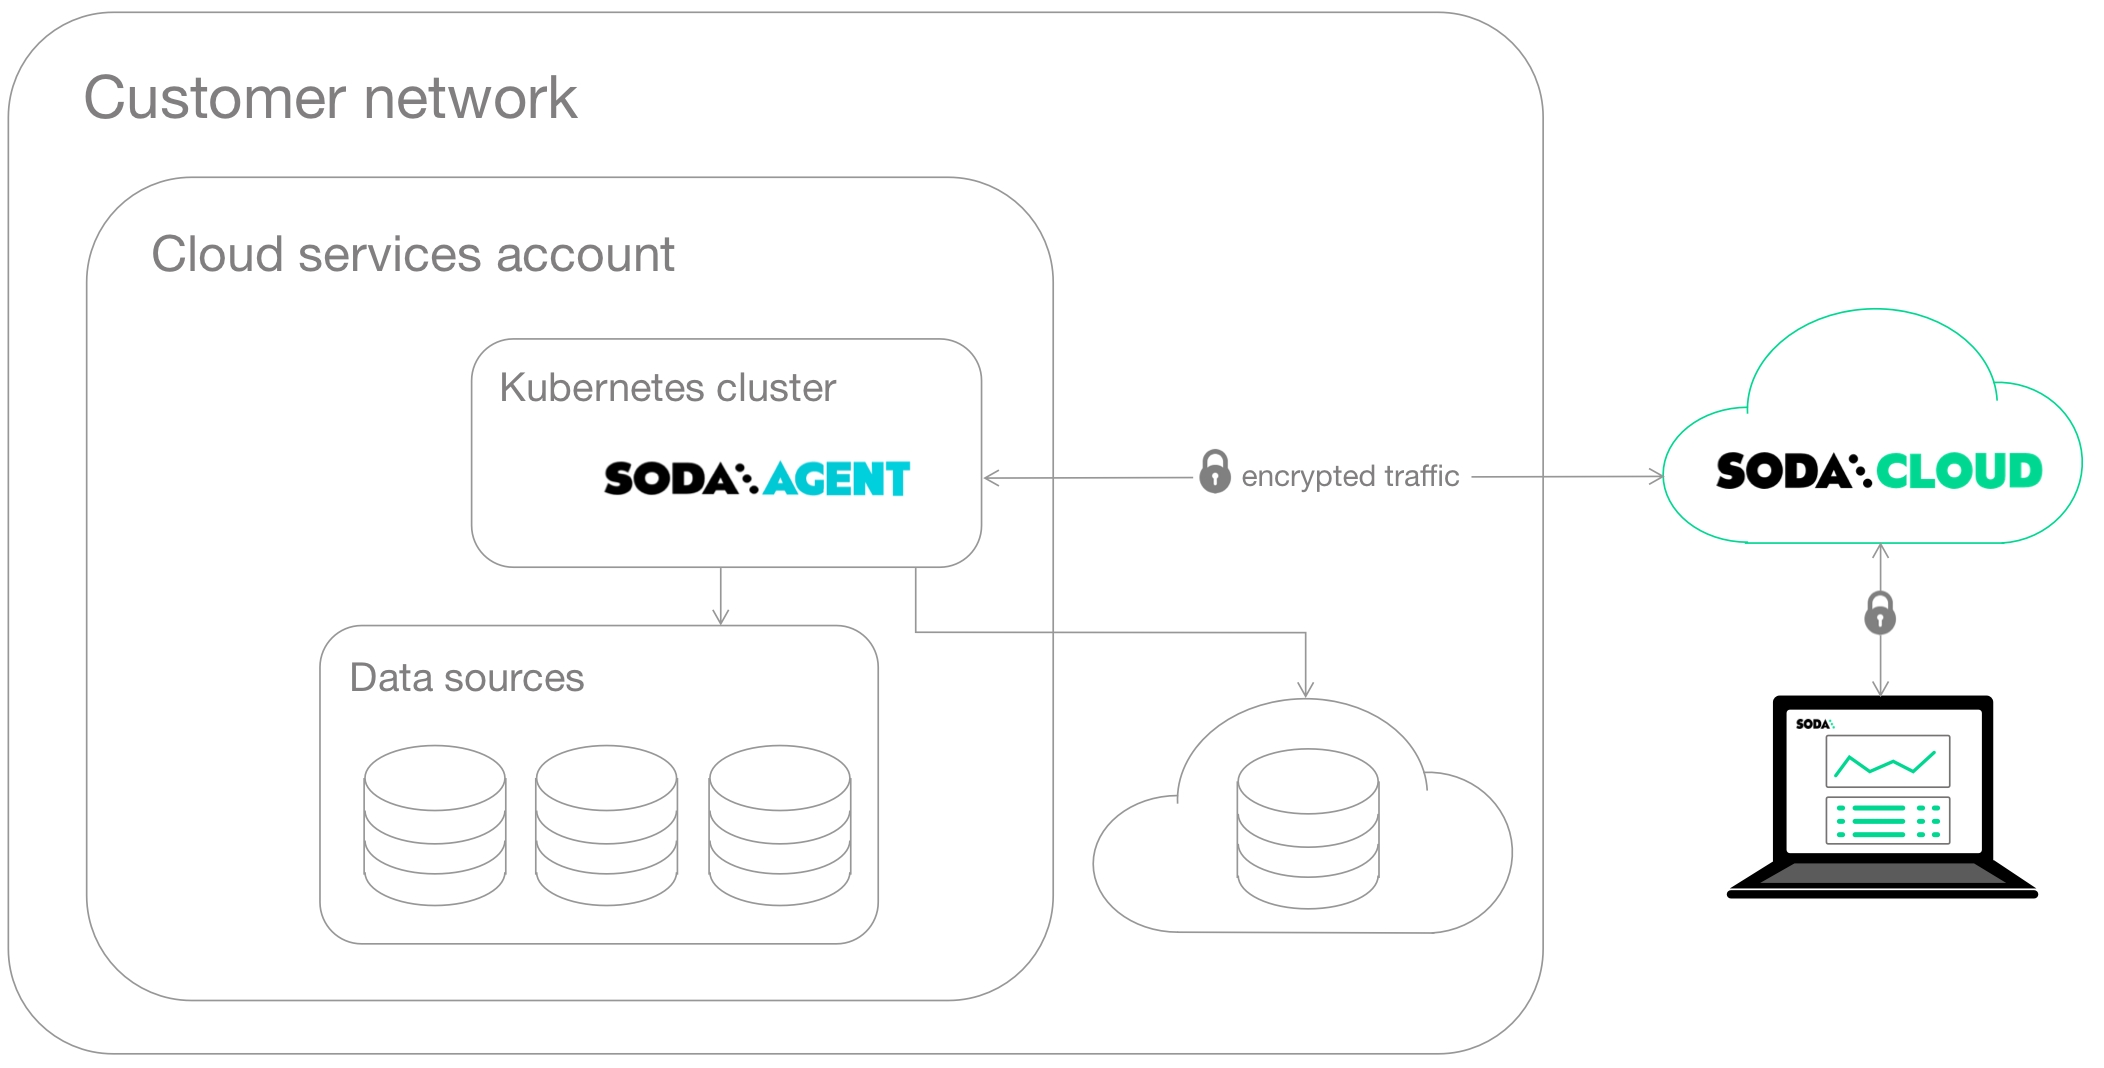
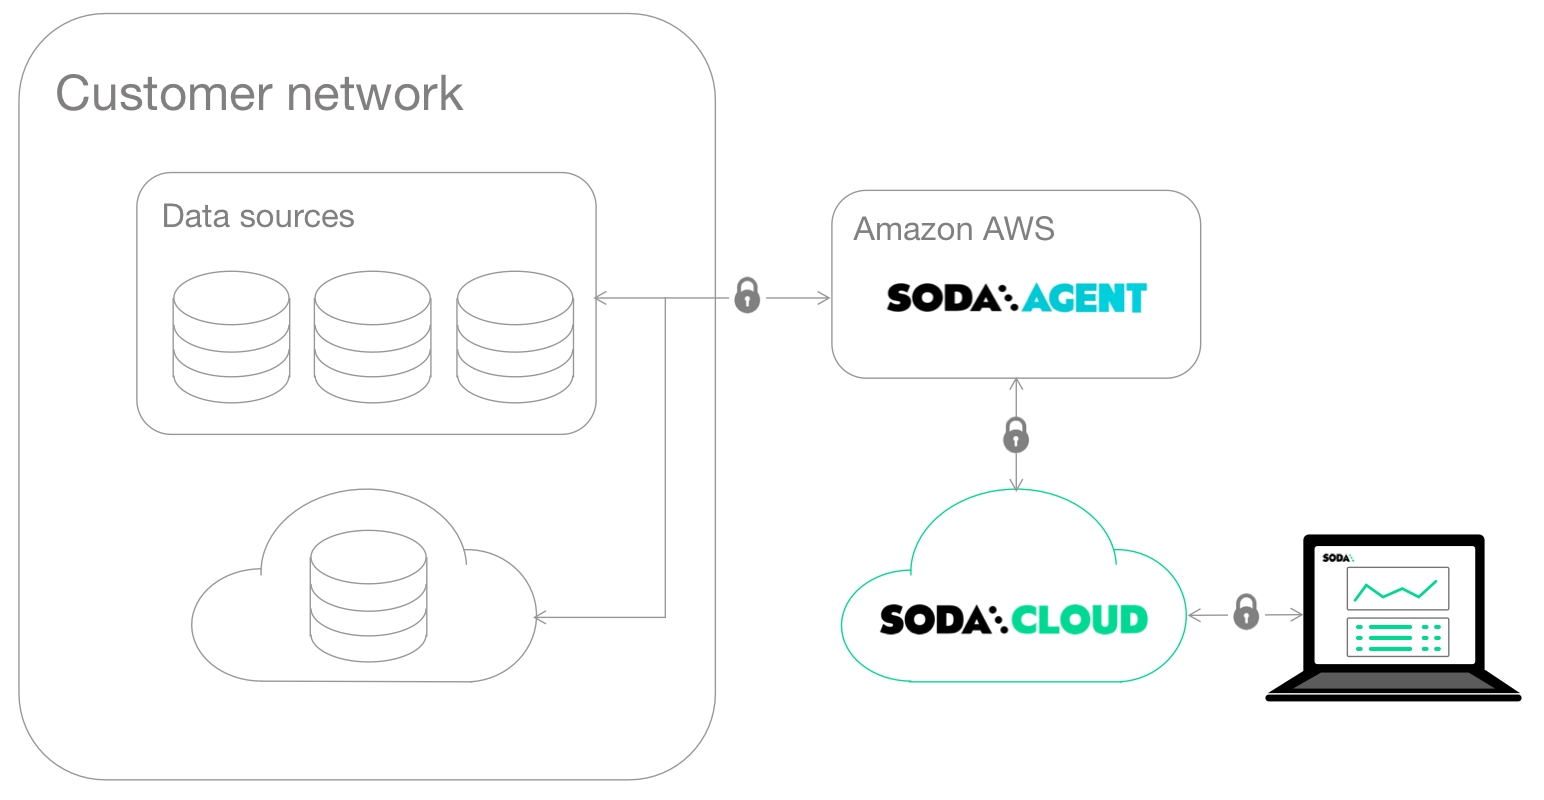
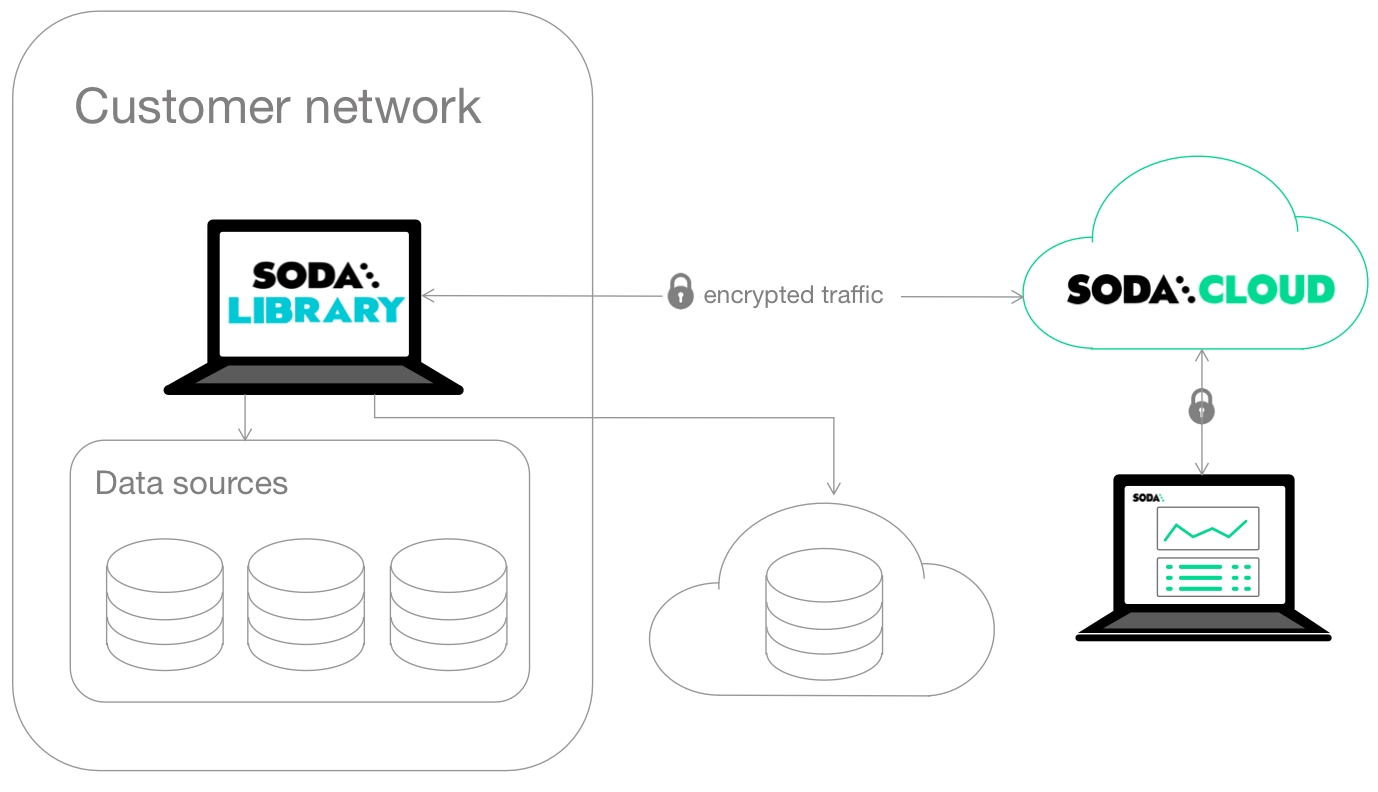
Use this guide to set up Soda to check data quality before and after migrating data between data sources.
Use this guide to install and set up Soda to test the quality in a data migration project. Test data quality at both source and target, both before and after migration to prevent data quality issues from polluting a new data source.
Not quite ready for this big gulp of Soda? 🥤Try , first.
The instructions below offer Data Engineers an example of how to set up Soda and use reconciliation checks to compare data quality between data sources before and after migrating data.
For context, this guide presents an example of how you could use Soda to prepare to migrate data from one data source, such as PostgreSQL to another, such as Snowflake. It makes suggestions about how to prepare for a data migration project and use a staging environment to validate data quality before migrating data in production.
This example uses a self-operated deployment model which uses Soda Library and Soda Cloud, though you could as easily use a self-hosted agent model (Soda Agent and Soda Cloud) instead.
This example imagines moving data from PostgreSQL to Snowflake. The following outlines the high level steps involved in preparing for and executing such a project.
Confirm your access to the source data in a PostgreSQL data source; you have the authorization and access credentials to query the data.
Set up or confirm that you have a Snowflake account and the authorization and credentials to set up and query a new data source.
Confirm that you have a data orchestration tool such as Airflow to extract data from PostgreSQL, perform any transformations, then load the data into Snowflake. Reference for an Airflow setup example.
to perform preliminary tests for data quality in the source data. Use this opportunity to make sure that the quality of the data you are about to migrate is in a good state. Ideally, you perform this step in a production environment, before replicating the source data source in a staging environment to ensure that you begin the project with good-quality data.
What follows is an abridged version of installing and configuring Soda for PostgreSQL. Refer to for details.
In a browser, navigate to to create a new Soda account, which is free for a 45-day trial. If you already have a Soda account, log in.
Navigate to your avatar > Profile, then access the API keys tab. Click the plus icon to generate new API keys. Copy+paste the API key values to a temporary, secure place in your local environment.
With Python 3.8, 3.9, or 3.10 and Pip 21.0 or greater, use the command-line to install Soda locally in a new virtual environment.
In a code editor, create a new file called configuration.yml, then copy paste the following config details into the file. Provide your own values for the fields, using your own API key and secret values you created in Soda Cloud. Replace the value of my_database_name with the name of your PostgreSQL data source.
Save the file. From the command-line, in the same directory in which you created the configuration.yml run the following command to test Soda's connection to your data source. Replace the value of my_datasource with the name of your own PostgreSQL data source.
To create some basic checks for data quality, run the following command to launch Check Suggestions which auto-generates checks using the Soda Checks Language (SodaCL), a domain-specific language for data quality testing.
Identify one dataset in your data source to use as the value for the -ds option in the command below.
Replace the value of my_datasource with the name of your own PostgreSQL data source.
Answer the prompts in the command-line and, at the end, select y to run a scan using the suggested checks.
In a browser, log in to your Soda Cloud account, then navigate to the Checks dashboard. Here, you can review the results of the checks that Soda executed in the first scan for data quality. After a scan, each check results in one of three default states:
pass: the values in the dataset match or fall within the thresholds you specified
fail: the values in the dataset do not match or fall within the thresholds you specified
error: the syntax of the check is invalid, or there are runtime or credential errors
Based on the check results from the first scan, address any data quality issues that Soda surfaced so that your data migration project begins with good-quality data. Refer to for much more detail.
If you wish, open the checks.yml that the check suggestions command saved locally for you and add more checks for data quality, then use the following command to run the scan again. Refer to for exhaustive details on all types of checks.
Having tested data quality on the PostgreSQL data source, best practice dictates that you back up the existing data in the PostgreSQL data source, then replicate both the PostgreSQL and an empty Snowflake data source in a staging environment.
As in the example that follows, add two more configurations to your configuration.yml for:
the PostgreSQL staging data source
the Snowflake staging data source
Run the following commands to test the connection to each new data source in the staging environment.
Using an orchestrator such as Airflow, migrate your data in the staging environment from PostgreSQL to Snowflake, making any necessary transformations to your data to populate the new data source. Reference for an Airflow setup example.
With both source and target data sources, you can use to compare the data in the target to the source to ensure that it is expected and free of data quality issues.
Begin by using a code editor to prepare a recon.yml file in the same directory as you installed Soda, as per the following example which identifies the source and target datasets to compare, and defines basic checks to compare schemas and row counts.
Referencing the checks that checks suggestions created, add corresponding to the file to surface any delta between the metrics Soda measures for the source and the measurements it collects for the target. Refer to the that are available as reconciliation checks.
Examples of checks.yml and recon.yml files follow.
Based on the scan results, make adjustments to the transformations in your orchestrated flow and repeat the scans, adding more metric reconciliation checks needed.
Compare more source and target datasets by adding more reconciliation blocks to the recon.yml file. Tip: You can run check suggestions against new datasets and use those checks as a baseline for writing metric reconciliation checks for other datasets in your data source.
After reconciling metrics between multiple datasets, consider writing more granular for the most critical data, as in the example below. As these checks execute a row-by-row comparison of data in a dataset, they are resource-heavy relative to metric and schema reconciliation checks. However, for the datasets that matter most, the resource usage is warranted to ensure that the data you migrate remains intact and as expected in the target data source.
After reviewing multiple scan results and correcting any reconciliation issues between source and target datasets, you can execute the migration in production.
After the migration, use the same recon.yml file to run a scan on the migrated data in production to confirm that the data in the target is as expected. Adjust the soda scan command to run against your production data source instead of the staging data source.
(Optional) If you intend to execute the migration of data between data sources frequently, you may wish to invoke Soda scan with the reconciliation checks programmatically within your pipeline orchestration, such as in your Airflow DAG. To access an example of how to include Soda scans in your DAG, see .
Learn more about in general.
Write reconciliation checks that produce in Soda Cloud to help you investigate the root cause of data quality issues.
If the built-in metrics that SodaCL offers do not quite cover your more specific or complex needs, you can define your own metrics. See examples to copy+paste.
Out of the box, Soda Checks Language (SodaCL) makes several built-in metrics and checks, such as row_count, available for you to use to define checks for data quality. If the built-in metrics that Soda offers do not quite cover some of your more specific or complex needs, you can use user-defined and failed rows checks.
User-defined checks and failed rows checks enable you to define your own metrics that you can use in a SodaCL check. You can also use these checks to simply define SQL queries or Common Table Expressions (CTE) that Soda executes during a scan, which is what most of these examples do.
The examples below offer examples of how you can define user-defined checks in your checks YAML file, if using Soda Library or, if using Soda Cloud, within a no-code SQL Failed Rows check or an agreement, to extract more complex, customized, business-specific measurements from your data.
Though you can use a built-in to compare row counts between dataset in the same, or different, data sources, you may wish to add a little more complexity to the comparison, as in the following example. Replace the values in the double curly braces {{ }} with your own relevant values.
If you want to compare row counts between two datasets and allow for some acceptable difference between counts, use the following query.
✅ Amazon Redshift ✅ GCP BigQuery ✅ PostgreSQL ✅ Snowflake
You can use the built-in to check the contents of a column for duplicate values and Soda automatically sends any failed rows – that is, rows containing duplicate values – to Soda Cloud for you to .
However, if your dataset does not contain a unique ID column, as with a denormalized dataset or a dataset produced from several joins, you may need to define uniqueness using a combination of columns. This example uses a failed rows check with SQL queries to go beyond a simple, single-column check. Replace the values in the double curly braces {{ }} with your own relevant values.
Ideally, you would generate a from the concatenation of columns as part of a transformation, such as with this dbt Core™ utility that . However, if that is not possible, you can use the following example to test for uniqueness using a .
✅ Amazon Redshift ✅ GCP BigQuery ✅ PostgreSQL ✅ Snowflake
Use one of the following examples to validate that data in records in your data source match your expectations.
The first example is a skeletal query into which you can insert a variety of conditions; the others offer examples of how you might use the query. Replace the values in the double curly braces {{ }} with your own relevant values.
✅ Amazon Redshift ✅ GCP BigQuery ✅ PostgreSQL ✅ Snowflake
✅ Amazon Redshift ✅ GCP BigQuery ✅ PostgreSQL ✅ Snowflake
Confirm Paid in Full
✅ Amazon Redshift ✅ GCP BigQuery ✅ PostgreSQL ✅ Snowflake
Where a dataset does not validate its contents on entry, you may wish to assert that entries map correctly to standard values. For example, where end users enter a free-form value for a country field, you can use a SQL query to confirm that the entry maps correctly to an ISO country code, as in the following table.
Use one of the following data source-specific custom metric examples in your checks YAML file. Replace the values in the double curly braces {{ }} with your own relevant values.
✅ Amazon Redshift ✅ PostgreSQL
✅ GCP BigQuery
✅ Snowflake
You can use a user-defined metric to compare date values in the same dataset. For example, you may wish to compare the value of start_date to end_date to confirm that an event does not end before it starts, as in the second line, below.
✅ GCP BigQuery
Learn more about .
Read more about in Soda Cloud.
Organizations that use a Security Assertion Markup Language (SAML) 2.0 single sign-on (SSO) identity provider can add Soda Cloud as a service provider.
Organizations that use a Security Assertion Markup Language (SAML) 2.0 single sign-on (SSO) identity provider (IdP) can add Soda Cloud as a service provider.
Once added, employees of the organization can gain authorized and authenticated access to the organization's Soda Cloud account by successfully logging in to their SSO. This solution not only simplifies a secure login experience for users, it enables IT Admins to:
grant their internal users' access to Soda Cloud from within their existing SSO solution
revoke their internal users' access to Soda Cloud from within their existing SSO solution if a user leaves their organization or no longer requires access to Soda Cloud
set up one-way user group syncing from their IdP into Soda Cloud (tested and documented for Azure Active Directory and Okta)
Soda Cloud is able to act as a service provider for any SAML 2.0 SSO identity provider. In particular, Soda has tested and has written instructions for setting up SSO access with the following identity providers:
Soda has tested and confirmed that SSO setup works with the following identity providers:
OneLogin
Auth0
Patronus
When an employee uses their SSO provider to access Soda Cloud for the first time, Soda Cloud automatically assigns the new user to roles and groups according to the for any new users. Soda Cloud also notifies the Soda Cloud Admin that a new user has joined the organization, and the new user receives a message indicating that their Soda Cloud Admin was notified of their first login. A Soda Cloud Admin or user with the permission to do so can adjust users’ roles in Organization Settings. See for details.
When an organization’s IT Admin revokes a user’s access to Soda Cloud through the SSO provider, a Soda Cloud Admin is responsible for updating the resources and ownerships linked to the User.
Once your organization enables SSO for all Soda Cloud users, Soda Cloud blocks all non-SSO login attempts and password changes via . If an employee attempts a non-SSO login or attempts to change a password using “Forgot password?” on , Soda Cloud presents a message that explains that they must log in or change their password using their SSO provider.
Optionally, you can set up the SSO integration Soda to include a one-way sync of user groups from your IdP into Soda Cloud which synchronizes with each user login to Soda via SSO. .
Soda Cloud supports both Identity Provider Initiated (IdP-initiated), and Service Provider Initiated (SP-initiated) single sign-on integrations. Be sure to indicate which type of SSO your organization uses when setting it up with the Soda Support team.
Email to request SSO set-up for Soda Cloud and provide your Soda Cloud organization identifier, accessible via your avatar > Organization Settings, in the Organization tab.
Soda Support sends you the samlUrl that you need to configure the set up with your identity provider.
As a user with sufficient privileges in your organization's Azure AD account, sign in through , then navigate to Enterprise applications. Click New application.
Click Create your own application.
Email to request SSO set-up for Soda Cloud and provide your Soda Cloud organization identifier, accessible via your avatar > Organization Settings, in the Organization tab.
Soda Support sends you the samlURL that you need to configure the set up with your identity provider.
As an Okta Administrator, log in to Okta and navigate Applications > Applications overview, then click Create App Integration. Refer to for full procedure.
Select SAML 2.0.
Email to request SSO set-up for Soda Cloud and provide your Soda Cloud organization identifier, accessible via your avatar > Organization Settings, in the Organization tab.
Soda Support sends you the samlURL that you need to configure the set up with your identity provider.
As an administrator in your Google Workspace, follow the instructions in to Set up your own custom SAML application.
Optionally, upload the so it appears in the app launcher with the logo instead of the first two letters of the app name.
If you wish, you can choose to regularly one-way sync the user groups you have defined in your IdP into Soda Cloud.
Cloud that you have already defined in your IdP, and enables your team to select an IdP-managed user groups when assigning ownership access permissions to a resource, in addition to any user groups you may have created manually in Soda Cloud. See:
Soda has tested and documented one-way syncing of user groups with Soda Cloud for Okta and Azure Active Directory. to request tested and documented support for other IdPs.
Soda synchronizes user groups with the IdP every time a user in your organization logs in to Soda via SSO. Soda updates the user's group membership according to the IdP user groups to which they belong at each log in.
You cannot manage IdP user group settings or membership in Soda Cloud. Any changes that you wish to make to IdP-managed user groups must be done in the IdP itself.
In step 10 of the SAML application setup procedure , in the same User Attributes & Claims section of your Soda SAML Application in Azure AD, follow to add a group claim to your Soda SAML Application.
For the choice of which groups should be returned in the claim, best practice suggests selecting Groups assigned to the application.
For the choice of Source attribute, select Cloud-only group display names.
In step 7 of the SAML application integration procedure , follow Okta's instructions to .
For the Name value, use Group.Authorization.
Leave the optional Name Format value as Unspecified.
Use the Filter to find a group that you wish to make available in Soda Cloud to manage access and permissions. Exercise caution! A broad filter may include user groups you do not wish to include in the sync. Double-check that the groups you select are appropriate.
Use the Add Another button to add as many groups as you wish to make available in Soda Cloud.
In your message to Soda Support or your Soda Customer Engineer, advise Soda that you wish to enable user group syncing. Soda adds a setting to your SSO configuration to enable it.
When the SSO integration is complete, you and your team can select your IdP user groups from the dropdown list of choices available when assigning ownership or permissions to resources.
To renew an SSO certificate, you need to provide Soda with the new X.509 certificate, with which Soda will update your Soda organization's SSO configuration. Since Soda can only validate SSO against one certificate, there will be downtime between you deactivating the old certificate, and Soda updating the SSO configuration.
Depending on your organization's process of renewing the certificate, you could notify Soda (or arrange for a call) in advance of the specific datetime you want to renew, so Soda can be prepared for your update and minimize the mentioned downtime.
Learn more about .
Learn more about creating and tracking in Soda Cloud.
Use a SodaCL freshness check to infer data freshness according to the age of the most recently added row in a table.
Use a freshness check to determine the relative age of the data in a column in your dataset.
✖️ Requires Soda Core Scientific (included in a Soda Agent) ✔️ Supported in Soda Core ✔️ Supported in Soda Library + Soda Cloud ✔️ Supported in Soda Cloud Agreements + Soda Agent ✔️ Available as a no-code check
In the context of SodaCL check types, freshness checks are unique. This check is limited in its syntax variation, with only a few mutable parts to specify column name, threshold, and, optionally, a NOW variable.
A freshness check has two or three mutable parts:
The example below defines a check that measures freshness relative to "now", where "now" is the moment you run the scan that executes the freshness check. This example discovers when the last row was added to the start_date timestamp column, then compares that timestamp to "now". If Soda discovers that the last row was added more than three days ago, the check fails.
Instead of using the default value for "now" (the time you run the scan that executes the freshness check), you can use a variable to specify the value of "now" at scan time. For example, the following check measures freshness relative to a date that a user specifies at scan time. You cannot use variables in checks you write in an agreement in Soda Cloud as it is impossible to provide the variable values at scan time.
At scan time, you use a -v option to pass a value for the variable that the check expects for the value of "now". The scan command below passes a variable that the check uses. In your scan command, if you pass a variable with a timestamp, the variable must be in ISO8601 format such as "2022-02-16 21:00:00" or "2022-02-16T21:00:00".
Known issue:
When introducing a NOW variable into a freshness check, you must use the deprecated syntax that includes using. This syntax yields an error message in the scan output, Syntax of freshness check has changed and is deprecated. Use freshness(column_name) < 24h30m See docs but does not prevent Soda from executing the check. Workaround: ignore the deprecated syntax message.
Out-of-the-box, freshness checks only work with columns that contain data types TIMESTAMP or DATE. However, though it does not universally apply to all data sources, you may be able to apply a freshness check to TEXT type data using the following syntax to cast the column:
Note that casting a column in a check does not work with a NOW variable.
The only comparison symbol you can use with freshness checks is < except when you employ and alert configuration. See for details.
The default value for "now" is the time you run the scan that executes the freshness check.
Problem: When you run a scan to execute a freshness check, the CLI returns one of the following error message.
Solution: The error indicates that you are using an incorrect comparison symbol. Remember that freshness checks can only use < in check, unless the freshness check employs an alert configuration, in which case it can only use > in the check.
Problem: When you run a scan to execute a freshness check that uses a NOW variable, the CLI returns an following error message for Invalid check.
Solution: Until the known issue is resolved, use a deprecated syntax for freshness checks using a NOW variable, and ignore the deprecated syntax message in the output. For example, define a check as per the following.
When you run a scan that includes a freshness check, the output in the Soda Library CLI provides several values for measurements Soda used to calculate freshness. The value for freshness itself is displayed in days, hours, minutes, seconds, and milliseconds; see the example below.
In Soda Cloud, the freshness value represents age of the data in the days, hours, minutes, etc. relative to now_timestamp. In other words, (scan time - (max of date_column)).
The only comparison symbol that you can use with freshness checks that employ an alert configuration is >.
OR
Use missing metrics in checks with alert configurations to establish
Use missing metrics in checks to define ranges of acceptable thresholds using .
Reference .
Use a SodaCL reference check to validate that the values in a column in a table are present in a column in a different table.
Use a reference check to validate that column contents match between datasets in the same data source.
See also: Compare data using SodaCL
✖️ Requires Soda Core Scientific (included in a Soda Agent) ✔️ Supported in Soda Core ✔️ Supported in Soda Library + Soda Cloud ✔️ Supported in Soda Cloud Agreements + Soda Agent ✖️ Available as a no-code check
In the context of SodaCL check types, reference checks are unique. This check is limited in its syntax variation, with only a few mutable parts to specify column and dataset names.
The example below checks that the values in the source column, department_group_name, in the dim_department_group dataset exist somewhere in the destination column, department_name, in the dim_employee dataset. If the values are absent in the department_name column, the check fails.
Soda CL considers missing values in the source column as invalid.
Optionally, do not use brackets around column names. The brackets serve as visual aids to improve check readability.
You can also validate that data in one dataset does not exist in another.
If you are using reference checks with a Spark or Databricks data source to validate the existence of values in two datasets within the same schema, you must first convert your DataFrames into temp views to add them to the Spark session, as in the following example.
Reference checks automatically collect samples of any failed rows to display Soda Cloud. The default number of failed row samples that Soda collects and displays is 100.
If you wish to limit or broaden the sample size, you can use the samples limit configuration in a reference check configuration. You can add this configuration to your checks YAML file for Soda Library, or when writing checks as part of an agreement in Soda Cloud. See: .
For security, you can add a configuration to your data source connection details to prevent Soda from collecting failed rows samples from specific columns that contain sensitive data. See: .
Alternatively, you can set the samples limit to 0 to prevent Soda from collecting and sending failed rows samples for an individual check, as in the following example.
You can also use a samples columns or a collect failed rows configuration to a check to specify the columns for which Soda must implicitly collect failed row sample values, as in the following example with the former. Soda only collects this check’s failed row samples for the columns you specify in the list. See: .
Note that the comma-separated list of samples columns does not support wildcard characters (%).
To review the failed rows in Soda Cloud, navigate to the Checks dashboard, then click the row for a reference check. Examine failed rows in the Failed Rows Analysis tab; see for further details.
Refer to to address challenges specific to reference checks with dataset filters.
Problems with reference checks and dataset filters? Refer to .
Learn more about in general.
Learn more about using SodaCL.
Use a to discover missing or forbidden columns in a dataset.
Not quite ready for this big gulp of Soda? 🥤Try taking a sip, first.
Not quite ready for this big gulp of Soda? 🥤Try taking a sip, first.
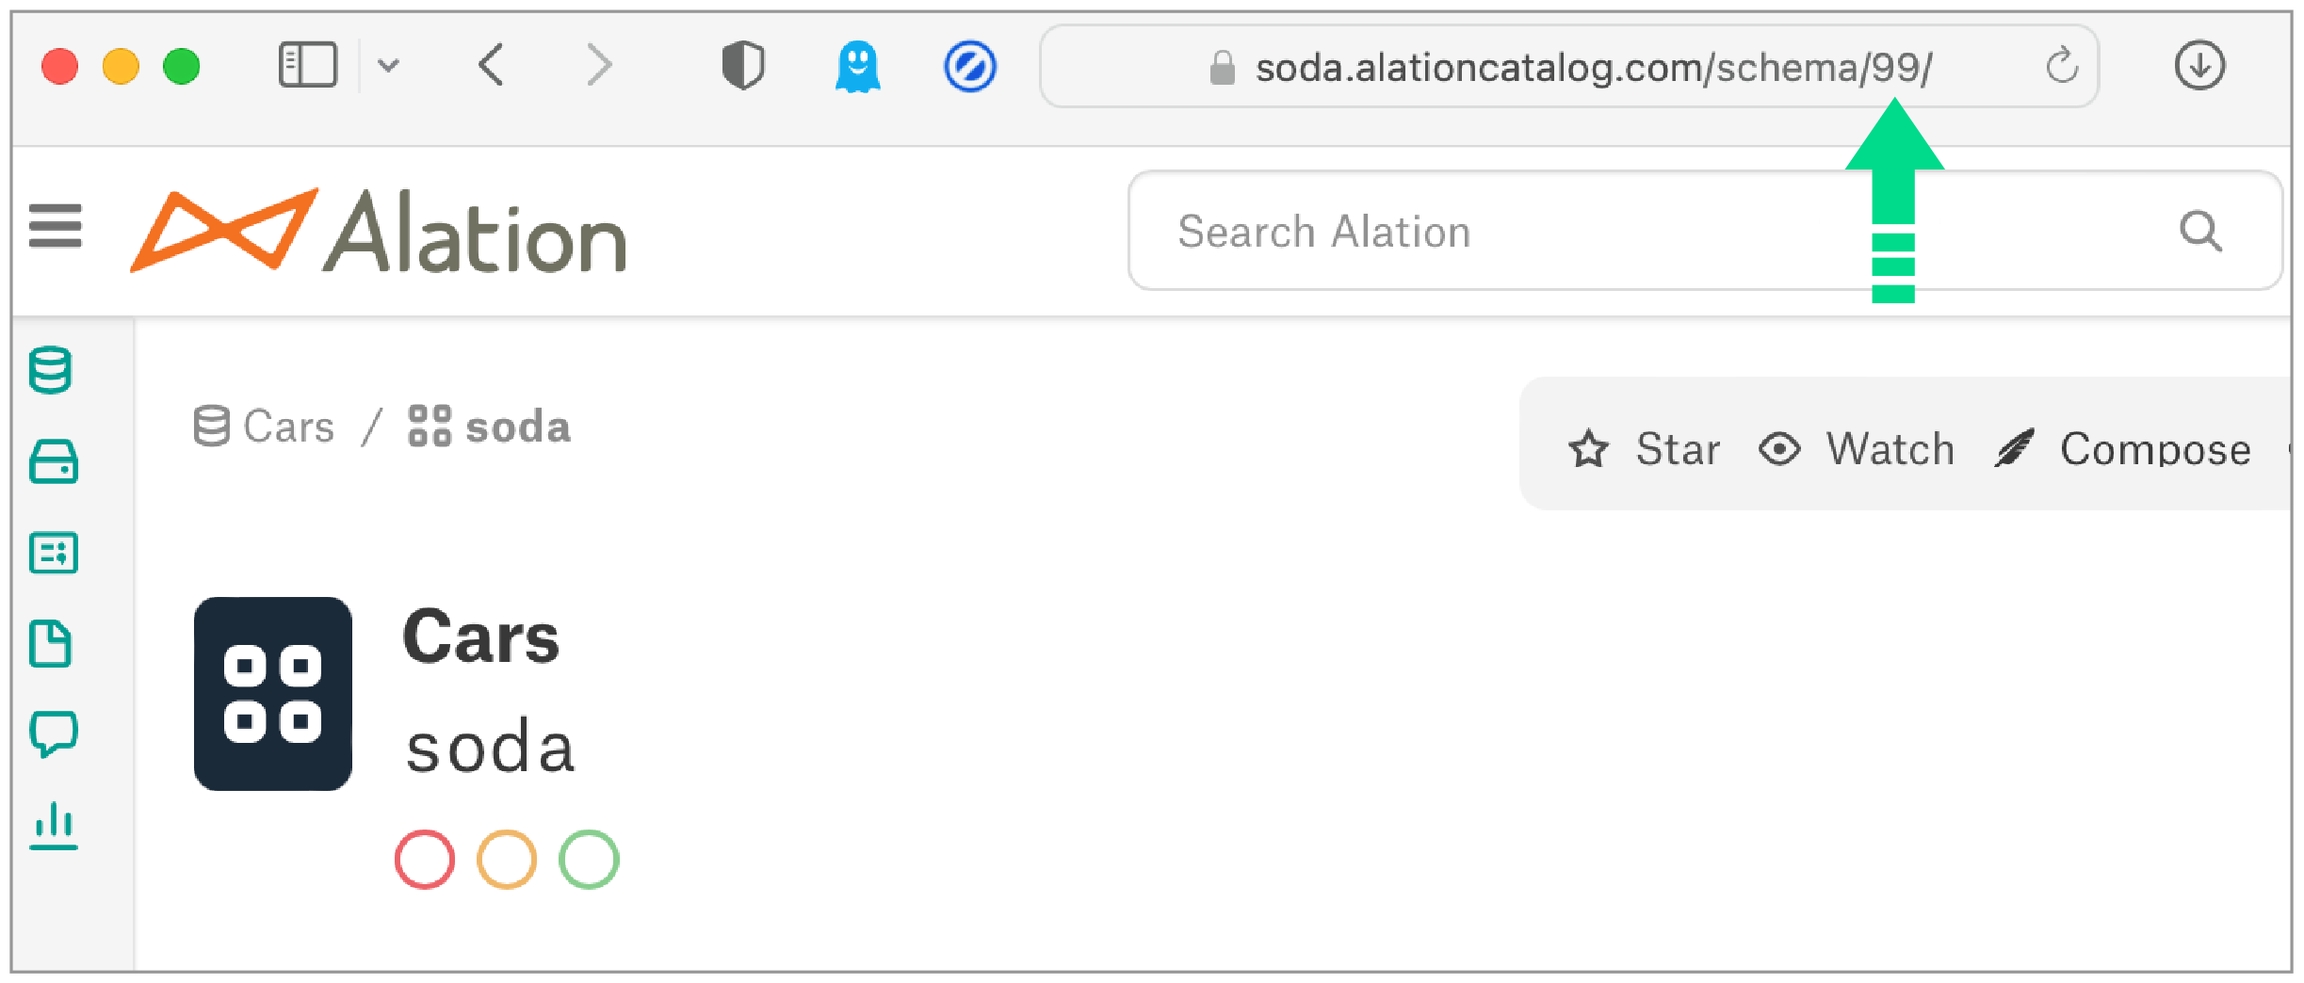
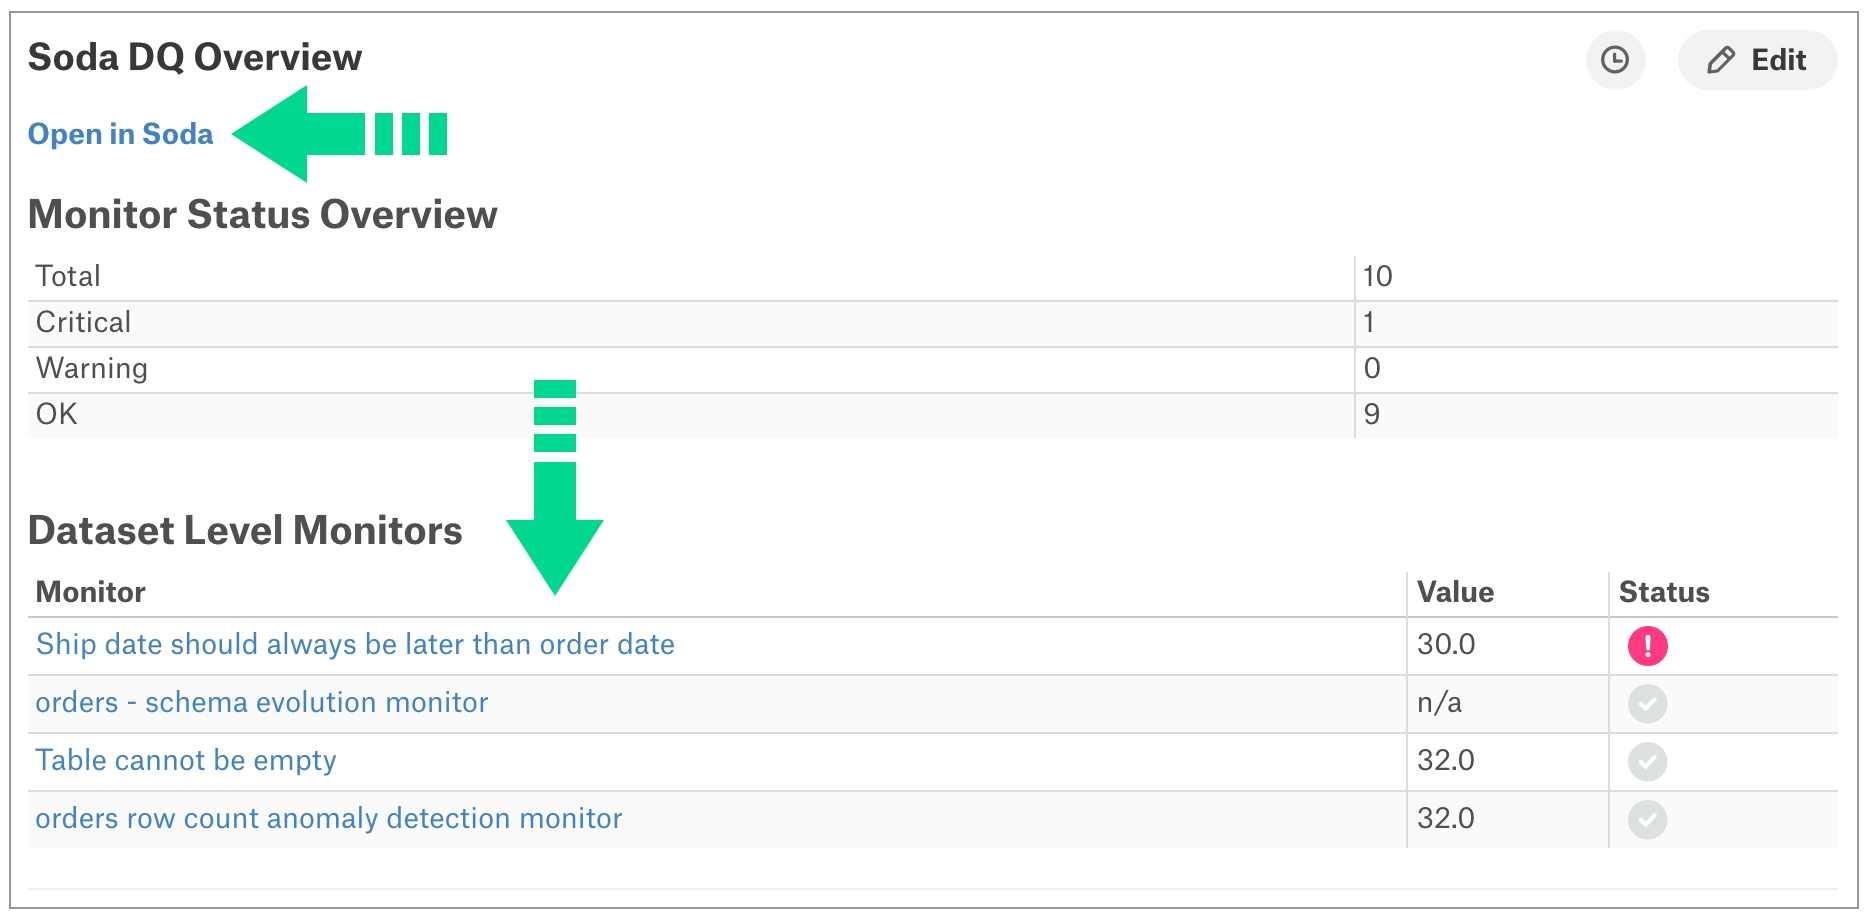
Learn how to upgrade or uninstall Soda Library, or redploy a Soda Agent.
The Soda environment has been updated since this tutorial.
Refer to for updated tutorials.
Learn how to adjust the Soda Agent to fit your security standards by leveraging secrets managers, environment variables, and other controls.
The Soda environment has been updated since this tutorial.
Refer to for updated tutorials.
When you deploy a self-hosted Soda Agent to a Kubernetes cluster in your cloud service provider environment, you need to provide several key parameters and values to ensure optimal operation and to allow the agent to connect to your Soda Cloud account (API keys), and connect to your data sources (data source login credentials) so that Soda can run data quality scans on the data.
To manage the actions of users that belong to a single organization, Soda Cloud uses roles and access permissions. Admins can access an Audit Trail of user actions.
To manage the actions of users that belong to a single organization, Soda Cloud uses roles, groups, and access permissions.
These roles and groups and their associated permissions enforce limits on the abilities for users to access or make changes to resources, or to make additions and changes to organization settings and default access permissions.
Soda Cloud makes use of roles, groups, and permissions to manage user access to functionalities, such as alert notifications, and resources, such as datasets and data sources, in the organization. The following table defines the terminology Soda Cloud uses.
Use a SodaCL schema check to validate column presence, absence, or position in a table, or the type of data column contains.
Use a schema check to validate the presence, absence or position of columns in a dataset, or to validate the type of data column contains.
✖️ Requires Soda Core Scientific (included in a Soda Agent) ✔️ Supported in Soda Core ✔️ Supported in Soda Library + Soda Cloud ✔️ Supported in Soda Cloud Agreements + Soda Agent ✔️ Available as a no-code check with a self-hosted Soda Agent connected to any Soda-supported data source, except Spark, and Dask and Pandas OR with a Soda-hosted Agent connected to a BigQuery, Databricks SQL, MS SQL Server, MySQL, PostgreSQL, Redshift, or Snowflake data source
In the context of , schema checks are unique. Schema checks always employ alert configurations – specifying warn and/or fail alert conditions – with validation keys. Refer to
Follow the quick start tutorial to get started with SodaCL, a human-readable, domain-specific language for data reliability.
If you are staring at a blank page wondering what SodaCL checks to write to surface data quality issues, this quick start tutorial is for you.
Alternatively, use the assistant in the Soda Library CLI to profile a dataset and auto-generate basic checks for data quality.
✖️ Requires Soda Core Scientific (included in a Soda Agent) ✔️ Supported in Soda Core ✔️ Supported in Soda Library + Soda Cloud ✔️ Supported in Soda Cloud Agreements + Soda Agent ✔️ Some available as no-code checks}
Configure Soda Cloud to profile datasets and their columns so you can leverage the information to write SodaCL checks for data quality.
When you add or edit a data source in Soda Cloud, use the discover datasets and/or profile columns configurations to automatically profile data in your data source.
Examine the profile information to gain insight into the type of SodaCL checks you can prepare to test for data quality.
Use profiled data to create no-code data quality checks.
Configure webhooks to connect Soda to any number of third-party service providers.
Configure a webhook in Soda Cloud to connect your account to a third-party service provider such as Jira, ServiceNow, PagerDuty, and more.
Use a webhook to:
send alert notifications for failed or warning check results to a third-party, such as ServiceNow
create and track data quality incidents with a third-party, such as Jira
send a notification to a third-party when a user adds, changes, or deletes a Soda agreement
Instead of checking whole sets of data, use filters to specify a portion of data against which to execute a check. Use variables to specify values at scan time.
Use filters or variables to specify portions of data in your dataset against which Soda executes checks during a scan.
The following expanation aims to help you decide when to use an in-check filter, and when to use a dataset filter.
Use dataset filters to create one or more partitions of data, commonly time partitions, upon which you want to execute large volumes of checks.
Instead of executing a great many checks on all the data in a dataset, you can specify a smaller portion of data against which to execute all the checks. Doing so helps avoid having to repeatedly apply the same filter to many checks, and it produces a
from soda.scan import Scan
scan = Scan()
scan.set_data_source_name("events")
# Add configuration YAML files
#########################
# Choose one of the following to specify data source connection configurations :
# 1) From a file
scan.add_configuration_yaml_file(file_path="~/.soda/my_local_soda_environment.yml")
# 2) Inline in the code
# For host, use cloud.soda.io for EU region; use cloud.us.soda.io for US region
scan.add_configuration_yaml_str(
"""
data_source events:
type: snowflake
host: ${SNOWFLAKE_HOST}
username: ${SNOWFLAKE_USERNAME}
password: ${SNOWFLAKE_PASSWORD}
database: events
schema: public
soda_cloud:
host: cloud.soda.io
api_key_id: 2e0ba0cb-your-api-key-7b
api_key_secret: 5wd-your-api-key-secret-aGuRg
scheme:
"""
)
# Add variables
###############
scan.add_variables({"date": "2022-01-01"})
# Add check YAML files
##################
scan.add_sodacl_yaml_file("./my_programmatic_test_scan/sodacl_file_one.yml")
scan.add_sodacl_yaml_file("./my_programmatic_test_scan/sodacl_file_two.yml")
scan.add_sodacl_yaml_files("./my_scan_dir")
scan.add_sodacl_yaml_files("./my_scan_dir/sodacl_file_three.yml")
# OR
# Define checks using SodaCL
##################
checks = """
checks for cities:
- row_count > 0
"""
# Add template YAML files, if used
##################
scan.add_template_files(template_path)
# Add the checks to the scan
####################
scan.add_sodacl_yaml_str(checks)
# OR Add the checks to scan with virtual filename identifier
# for advanced use cases such as partial/concurrent scans
####################
scan.add_sodacl_yaml_str(
checks
file_name=f"checks-{scan_name}.yml",
)
# Set scan definition name, equivalent to CLI -s option
# The scan definition name MUST be unique to this scan, and
# not duplicated in any other programmatic scan
##################
scan.set_scan_definition_name("YOUR_SCHEDULE_NAME")
# Execute the scan
##################
scan.execute()
# Set logs to verbose mode, equivalent to CLI -V option
##################
scan.set_verbose(True)
# Do not send results to Soda Cloud, equivalent to CLI -l option;
##################
scan.set_is_local(True)
# Inspect the scan result
#########################
scan.get_scan_results()
# Inspect the scan logs
#######################
scan.get_logs_text()
# Typical log inspection
##################
scan.assert_no_error_logs()
scan.assert_no_checks_fail()
# Advanced methods to inspect scan execution logs
#################################################
scan.has_error_logs()
scan.get_error_logs_text()
# Advanced methods to review check results details
########################################
scan.get_checks_fail()
scan.has_check_fails()
scan.get_checks_fail_text()
scan.assert_no_checks_warn_or_fail()
scan.get_checks_warn_or_fail()
scan.has_checks_warn_or_fail()
scan.get_checks_warn_or_fail_text()
scan.get_all_checks_text()exit_code = scan.execute()
print(exit_code)# Service Account Key authentication method
# See Authentication methods below for more config options
data_source my_datasource_name:
type: bigquery
account_info_json: '{
"type": "service_account",
"project_id": "gold-platform-67883",
"private_key_id": "d0121d000000870xxx",
"private_key": "-----BEGIN PRIVATE KEY-----\n...\n-----END PRIVATE KEY-----\n",
"client_email": "[email protected]",
"client_id": "XXXXXXXXXXXXXXXXXXXX.apps.googleusercontent.com",
"auth_uri": "https://accounts.google.com/o/oauth2/auth",
"token_uri": "https://accounts.google.com/o/oauth2/token",
"auth_provider_x509_cert_url": "https://www.googleapis.com/oauth2/v1/certs",
"client_x509_cert_url": "https://www.googleapis.com/robot/v1/metadata/x509/..."
}'
auth_scopes:
- https://www.googleapis.com/auth/bigquery
- https://www.googleapis.com/auth/cloud-platform
- https://www.googleapis.com/auth/drive
project_id: "platinum-platform-67883"
dataset: sodacoredata_source my_datasource:
type: bigquery
...
use_context_auth: Truedata_source my_datasource:
type: bigquery
...
use_context_auth: True
impersonation_account: <SA_EMAIL>data_source my_database_name:
type: bigquery
...
account_info_json: '{
"type": "service_account",
"project_id": "...",
"private_key_id": "...",
...}'
impersonation_account: <SA_EMAIL>soda:
scanlauncher:
volumeMounts:
- name: gcloud-credentials
mountPath: /opt/soda/etc
volumes:
- name: gcloud-credentials
secret:
secretName: gcloud-credentials
items:
- key: serviceaccount.json
path: serviceaccount.jsonkubectl create secret generic -n <soda-agent-namespace> gcloud-credentials --from-file=serviceaccount.json=<local path to the serviceccount.json>my_datasource_name:
type: bigquery
account_info_json_path: /opt/soda/etc/serviceaccount.json
auth_scopes:
- https://www.googleapis.com/auth/bigquery
- https://www.googleapis.com/auth/cloud-platform
- https://www.googleapis.com/auth/drive
project_id: ***
dataset: sodalibrarycd soda-agent-external-secrets/setupcd ..
cd configureterraform output -raw vault_admin_password# MacOS
terraform output -raw vault_admin_password | pbcopy# Linux
terraform output -raw vault_admin_password | xclip -selection clipboardsoda:
apikey:
id: "value-from-step1"
secret: "value-from-step1"
agent:
name: "my-soda-agent-external-secrets"
scanlauncher:
existingSecrets:
# from spec.target.name in the ExternalSecret file
- soda-agent-secrets
idle:
enabled: true
replicas: 1
cloud:
# Use https://cloud.us.soda.io for US region
# Use https://cloud.soda.io for EU region
endpoint: "https://cloud.soda.io"helm install soda-agent soda-agent/soda-agent \
--values values.yml \
--namespace soda-agentdata_source nyc_bus_breakdowns_and_delays:
type: postgres
connection:
host: sodademonyc-postgresql
port: "5432"
username: ${POSTGRES_USERNAME}
password: ${POSTGRES_PASSWORD}
database: nyc
schema: publicapiVersion: external-secrets.io/v1beta1
kind: ClusterSecretStore
metadata:
name: vault-app-role
spec:
provider:
vault:
auth:
appRole:
path: approle
roleId: 3e94ee54-1799-936e-9cec-5c5a19a5eeeb
secretRef:
key: appRoleSecretId
name: external-secrets-vault-app-role-secret-id
namespace: external-secrets
path: kv
server: http://vault.vault.svc.cluster.local:8200
version: v2apiVersion: external-secrets.io/v1beta1
kind: ExternalSecret
metadata:
name: soda-agent
namespace: soda-agent
spec:
data:
- remoteRef:
key: local/soda
property: POSTGRES_USERNAME
secretKey: POSTGRES_USERNAME
- remoteRef:
key: local/soda
property: POSTGRES_PASSWORD
secretKey: POSTGRES_PASSWORD
refreshInterval: 1m
secretStoreRef:
kind: ClusterSecretStore
name: vault-app-role
target:
name: soda-agent-secrets
template:
data:
soda-agent.conf: |
POSTGRES_USERNAME={{ .POSTGRES_USERNAME }}
POSTGRES_PASSWORD={{ .POSTGRES_PASSWORD }}
engineVersion: v2terraform init
terraform apply -auto-approve...
Apply complete! Resources: 13 added, 0 changed, 0 destroyed.
Outputs:
base_port = 30200
cluster_admin_token = <sensitive>
cluster_name = "soda-agent-external-secrets"
dashboard_access = "http://127.0.0.1:30202"
soda_agent_namespace = "soda-agent"
vault_access = "http://127.0.0.1:30200"
vault_init_access = "http://127.0.0.1:30201"
vault_root_token = <sensitive>terraform init
terraform apply -auto-approve...
Apply complete! Resources: 20 added, 0 changed, 0 destroyed.
Outputs:
dashboard_access = "http://127.0.0.1:30202"
dashboard_token = <sensitive>
vault_access = "http://127.0.0.1:30200"
vault_admin_password = <sensitive>
vault_admin_username = "admin"
vault_read_only_password = <sensitive>
vault_read_only_role_id = "3e94ee54-1799-936e-9cec-5c5a19a5eeeb"
vault_read_only_role_secret_id = <sensitive>
vault_read_only_token = <sensitive>
vault_read_only_username = "soda"templates:
- name: template_alpha
description: Reusable SQL for writing checks.
author: Jean-Claude
metric: alpha
query: |
SELECT count(*) as alpha FROM ${table}checks for dim_account:
- $template_alpha:
parameters:
table: dim_account
fail: when > 0templates:
- name: template_alpha
description: Reusable SQL for writing checks.
author: Jean-Paul
metric: alpha
query: |
SELECT count(*) as alpha FROM ${table}checks for dim_account:
- $template_alpha:
parameters:
table: dim_account
fail: when > 0soda scan -d adventureworks -c configuration.yml checks.yml -T templates.ymlscan.add_template_files(template_path)Soda 1.0.x
Soda Core 3.0.x
Loaded check templates from templates.yml
Processing template $template_alpha
Scan summary:
1/1 checks FAILED:
$template_alpha fail when > 0 [FAILED]
check_value: 99.0
Oops! 1 failures. 0 warnings. 0 errors. 0 pass.checks for dim_account:
- failed rows:
$template_alpha:
parameters:
table: dim_account - name: template_beta
description: Simplified reusable SQL query.
author: Jean-Claude
metric: beta
query: |
SELECT count(*) as beta FROM dim_customerchecks for dim_customer:
- $template_beta:
warn: when between 1000 and 9999soda scan -d adventureworks -c configuration.yml checks.yml -T templates.ymlscan.add_template_files(template_path)soda scan -d adventureworks -c configuration.yml checks2.yml -T templates.yml
Soda 1.0.x
Soda Core 3.0.x
Loaded check templates from templates.yml
Processing template $template_beta
Scan summary:
1/1 check PASSED:
$template_beta warn when between 1000 and 9999 [PASSED]
All is good. No failures. No warnings. No errors.checks:
- $template_beta:
warn: when between 1000 and 9999
name: Check with beta templatechecks:
- $template_alpha:
parameters:
table: dim_account
fail: when > 0checks:
- $template_alpha:
parameters:
table: "dim_account"
fail: when > 0 =
<
>
<=
>=
!=
<>
between
not between checks for dim_customer:
- row_count > 0Soda Library 1.0.x
Soda Core 3.0.x
Sending failed row samples to Soda Cloud
Scan summary:
6/9 checks PASSED:
paxstats in paxstats2
row_count > 0 [PASSED]
check_value: 15007
Look for PII [PASSED]
duplicate_percent(id) = 0 [PASSED]
check_value: 0.0
row_count: 15007
duplicate_count: 0
missing_count(adjusted_passenger_count) = 0 [PASSED]
check_value: 0
anomaly detection for row_count [PASSED]
check_value: 0.0
Schema Check [PASSED]
1/9 checks WARNED:
paxstats in paxstats2
Abnormally large PAX count [WARNED]
check_value: 659837
2/9 checks FAILED:
paxstats in paxstats2
Validate terminal ID [FAILED]
check_value: 27
Verify 2-digit IATA [FAILED]
check_value: 3
Oops! 2 failure. 1 warning. 0 errors. 6 pass.
Sending results to Soda Cloud
Soda Cloud Trace: 4774***8checks for dim_employees_dev:
- values in salary must exist in dim_employee_prod salarychecks for customers:
- avg_surface < 1068:
avg_surface expression: AVG(size * distance)checks for retail_products:
- row_count > 0
- max(size) <= 500checks for dim_customer:
- row_count between 10 and 15checks for dim_customer:
- row_count between -3 and 5checks for dim_customer:
- row_count not between -3 and 5checks for dim_customer:
- row_count between (10 and 15checks for dim_customer:
- row_count between (10 and 15)checks for dim_customer:
- row_count between 10 and 15
- row_count between [10 and 15
- row_count between 10 and 15]
- row_count between [10 and 15]anomaly detection
anomaly score (deprecated)
avg
avg_length
cross
distribution
duplicate_count
duplicate_percent
failed rows
freshness
group by
group evolution
invalid_count
invalid_percent
max
max_length
min
min_length
missing_count
missing_percent
percentile
reconciliation
reference
row_count
schema
schema evolution
stddev
stddev_pop
stddev_samp
sum
user-defined
variance
var_pop
var_sampdiscover datasets:
datasets:
- include %
- exclude test_%profile columns:
columns:
- "%.%" # Includes all your datasets
- prod% # Includes all datasets that begin with 'prod'- missing_count(column) = 0:
missing values: ['']checks for dataset_1:
- row_count > 0checks for dataset_1:
- row_count > 10checks for dataset_1:
- row_count > ${VAR}soda scan -d adventureworks -c configuration.yml checks_test.yml checks_test2.ymlInvalid staleness threshold "when < 3256d"
+-> line=2,col=5 in checks_test.yml
Invalid check "freshness(start_date) > 1d": no viable alternative at input ' >'Invalid check "freshness(end_date) ${NOW} < 1d": mismatched input '${NOW}' expecting {'between', 'not', '!=', '<>', '<=', '>=', '=', '<', '>'}checks for dim_product:
- freshness using end_date with NOW < 1d1/3 checks NOT EVALUATED:
INFO:soda.scan:[13:50:53] my_df in dask
INFO:soda.scan:[13:50:53] time_key_duplicates < 1 [soda-checks/checks.yaml] [NOT EVALUATED]
INFO:soda.scan:[13:50:53] check_value: None
INFO:soda.scan:[13:50:53] 1 checks not evaluated.filter customers_c8d90f60 [daily]:
where: ts > TIMESTAMP '${NOW}' - interval '100y'
checks for customers_c8d90f60 [daily]:
- values in (cat) must exist in customers_c8d90f60 (cat2)
# This is a reference check using the same dataset name as both target and source of the comparison.filter customers_c8d90f60 [daily]:
where: ts > TIMESTAMP '${NOW}' - interval '100y'
filter customers_c8d90f60 [daily-ref]:
where: SOURCE.ts > TIMESTAMP '${NOW}' - interval '100y'
checks for customers_c8d90f60 [daily]:
- duplicate_count(cat) < 10
- row_count > 10
checks for customers_c8d90f60 [daily-ref]:
- values in (cst_size, cat) must exist in customers_c8d90f60 (cst_size, cat)checks for corp_value:
- failed rows:
fail condition: true and "column.name.PX" IS NOT nullchecks for my_dataset:
- missing_count("Email") = 0:
name: missing email
filter: "Status" = 'Client'checks for my_dataset:
- missing_count("Email") = 0:
name: missing email
filter: |
"Status" = 'Client' # after adding your Spark session to the scan
df.createOrReplaceTempView("df")
df2.createOrReplaceTempView("df2")checks for soda_test:
- missing_count(`1_bigint`):
name: test
fail: when > 0checks for dim_customer:
- group evolution:
name: Marital status
query: |
SELECT marital_status FROM dim_employee GROUP BY marital_status
warn:
when required group missing: [M]
when forbidden group present: [T]
fail:
when groups change: anychecks for dim_product:
- group by:
query: |
SELECT style, AVG(days_to_manufacture) as rare
FROM dim_product
GROUP BY style
fields:
- style
checks:
- rare > 3:
name: Rare
- group evolution:
query: |
SELECT style FROM dim_product GROUP BY style
warn:
when required group missing:
- U
- Wchecks for dim_product:
- group evolution:
query: |
SELECT style FROM dim_product GROUP BY style
warn:
when required group missing: [U, W]checks for dim_employee:
- group evolution:
name: Marital status
query: |
SELECT marital_status FROM dim_employee GROUP BY marital_status
warn:
when required group missing: [M]
when forbidden group present: [S]
fail:
when required group missing: [T]- group evolution:
name: Rare product
query: |
SELECT style FROM dim_product GROUP BY style
warn:
when groups change: any
fail:
when groups change:
- group delete
- group add- group evolution:
name: Rare product
query: |
SELECT style FROM dim_product GROUP BY style
warn:
when groups change: any- group evolution:
name: Rare product
query: |
SELECT style FROM dim_product GROUP BY style
warn:
when forbidden column present: [T]
fail:
when groups change:
- group delete
- group add- group evolution:
name: Marital status
query: |
SELECT marital_status FROM "dim_employee" GROUP BY marital_status
warn:
when required group missing: ["M"]
when forbidden group present: ["T"]- group evolution:
name: Rare product
query: |
SELECT style FROM dim_product GROUP BY style
warn:
when forbidden group present: [T%]checks for dim_customer:
- row_count:
warn:
when > 2
when < 0Soda Library 1.0.x
Soda Core 3.0.x
Scan summary:
1/1 check WARNED:
dim_customer in adventureworks
row_count warn when > 2 when > 3 [WARNED]
check_value: 18484
Only 1 warning. 0 failure. 0 errors. 0 pass.
Sending results to Soda Cloud
Soda Cloud Trace: 42812***checks for dim_product:
- sum(safety_stock_level):
name: Stock levels are safe
warn:
when > 0
fail:
when > 0Soda Library 1.0.x
Soda Core 3.0.x
Scan summary:
1/1 check FAILED:
dim_product in adventureworks
Stock levels are safe [FAILED]
check_value: 275936
Oops! 1 failures. 0 warnings. 0 errors. 0 pass.
Sending results to Soda Cloud
Soda Cloud Trace: 6016***checks for dim_product:
- missing_count(discount) < 10:
attributes:
department: Marketing
priority: 1
tags: [event_campaign, webinar]
pii: true
created_at: 2022-02-20checks for dim_product:
- row_count = 10:
attributes:
department: Marketing
priority: 1
tags: [event_campaign, webinar]
pii: true
best_before: 2022-02-20configurations for dim_product:
attributes:
department: []Marketing]
priority: [1]
checks for dim_product:
- duplicate_count(product_line) = 0
- missing_percent(standard_cost) < 3%checks for dim_product:
- row_count = 10:
attributes:
department: ${DEPT}
${DEPT}_owner: Mohammed Patelfor each dataset T:
datasets:
- dim_customers
checks:
- row_count > 0:
attributes:
department: [Marketing]
priority: 2python -m venv .sodadataframes
# MacOS
source .sodadataframes/bin/activate
# Windows
source .sodadataframes\Scripts\activate# MacOS
pip install --upgrade pip
# Windows
python.exe -m pip install --upgrade pip
pip install -i https://pypi.cloud.soda.io soda-pandas-daskpython Soda-dask-pandas-example.py By downloading and using Soda Library, you agree to Sodas Terms & Conditions (https://go.soda.io/t&c) and Privacy Policy (https://go.soda.io/privacy).
Running column profiling for data source: pandas_reference_example
Profiling columns for the following tables:
- soda_pandas_example
Scan summary:
5/7 checks PASSED:
soda_pandas_example in pandas_reference_example
No blank values in Name [PASSED]
No blank values in Age [PASSED]
No blank values in City [PASSED]
No blank values in Country [PASSED]
Emails Addresses are formatted correctly [PASSED]
2/7 checks FAILED:
soda_pandas_example in pandas_reference_example
Alpha2 Country Codes must be valid [FAILED]
value: 1
No duplicate Email Addresses [FAILED]
check_value: 1
Oops! 2 failures. 0 warnings. 0 errors. 5 pass.
Sending results to Soda Cloud
Soda Cloud Trace: 628131****
Failed Rows in a Dataframe Example
-----------------------------------
name age city email country failed_check created_at
0 Alice 25 New York [email protected] US No duplicate Email Addresses 2024-03-12 10:40:55.681690
1 Bob 30 Los Angeles [email protected] BT No duplicate Email Addresses 2024-03-12 10:40:55.681690
2 Charlie 66 Chicago [email protected] BO No duplicate Email Addresses 2024-03-12 10:40:55.681690
3 David 87 Chicago1 [email protected] ABC No duplicate Email Addresses 2024-03-12 10:40:55.681690
4 David 87 Chicago1 [email protected] ABC Alpha2 Country Codes must be valid 2024-03-12 10:40:55.731225import pandas as pd
from soda.scan import Scan
from soda.sampler.sampler import Sampler
from soda.sampler.sample_context import SampleContext
from datetime import datetime
import json
import os
# For the US Region, use "cloud.us.soda.io".
# For the EU region, use "cloud.soda.io".
soda_cloud_host = "cloud.soda.io"
# Input the API keys you generated in step 2.
cloud_apikeyID = "XXX"
cloud_apikeySecret = "XXX"
# Set to "true" to view failed row samples in Soda Cloud.
# Set to "false" to view samples in the CLI/separate DataFrame.
failed_rows_cloud = "false"
# ----------------------------------------------------------------------------------------
# Reroute failed row samples (exceptions)
class CustomSampler(Sampler):
def store_sample(self, sample_context: SampleContext):
rows = sample_context.sample.get_rows()
json_data = json.dumps(rows) # Convert failed rows to JSON
exceptions_df = pd.read_json(json_data) #create dataframe with failed rows
# Define exceptions dataframe
exceptions_schema = sample_context.sample.get_schema().get_dict()
exception_df_schema = []
for n in exceptions_schema:
exception_df_schema.append(n["name"])
exceptions_df.columns = exception_df_schema
check_name = sample_context.check_name
exceptions_df['failed_check'] = check_name
exceptions_df['created_at'] = datetime.now()
exceptions_df.to_csv(check_name+".csv", sep=",", index=False, encoding="utf-8")
# Sample data1
data_list = [
{'name': 'Alice', 'age': 25, 'city': 'New York', 'email': '[email protected]', 'country': 'US'},
{'name': 'Bob', 'age': 30, 'city': 'Los Angeles', 'email': '[email protected]', 'country': 'BT'},
{'name': 'Charlie', 'age': 66, 'city': 'Chicago', 'email': '[email protected]', 'country': 'BO'},
{'name': 'David', 'age': 87, 'city': 'Chicago1', 'email': '[email protected]', 'country': 'ABC'}
]
# Sample data2
reference_list = [
{'iso2_country': 'US'},
{'iso2_country': 'BT'},
{'iso2_country': 'BO'},
{'iso2_country': 'CN'}
]
# Convert Sample data1 to a Pandas DataFrame
pandas_frame1 = pd.DataFrame(data_list)
# Convert Sample data2 to a Pandas DataFrame
pandas_frame2 = pd.DataFrame(reference_list)
# Setup Soda data quality scan
scan = Scan()
scan.add_pandas_dataframe(dataset_name="soda_pandas_example", pandas_df=pandas_frame1, data_source_name="pandas_reference_example")
scan.add_pandas_dataframe(dataset_name="reference", pandas_df=pandas_frame2, data_source_name="pandas_reference_example") # reference List
scan.set_scan_definition_name("pandas_reference_example")
scan.set_data_source_name("pandas_reference_example")
if failed_rows_cloud == "false":
scan.sampler = CustomSampler()
# Define data quality checks using SodaCL
checks = """
checks for soda_pandas_example:
- missing_count(name) = 0:
name: No blank values in Name
- missing_count(age) = 0:
name: No blank values in Age
- missing_count(city) = 0:
name: No blank values in City
- missing_count(country) = 0:
name: No blank values in Country
- invalid_count(email) = 0:
valid format: email
name: Email addresses are formatted correctly
- duplicate_count(email) = 0:
name: No duplicate email addresses
- values in (country) must exist in reference (iso2_country):
name: Alpha2 country codes must be valid
profile columns:
columns:
- include soda_pandas_example.%
"""
config = f"""
soda_cloud:
host: {soda_cloud_host}
api_key_id: {cloud_apikeyID}
api_key_secret: {cloud_apikeySecret}
"""
# Execute a scan
scan.add_sodacl_yaml_str(checks)
scan.add_configuration_yaml_str(config)
# When testing, you can set scan.set_is_local(True) to avoid sending failed row samples to Soda Cloud.
scan.set_is_local(False)
scan.execute()
# Create a DataFrame for any exceptions
# Optionally, you can write this DataFrame to an external table.
if failed_rows_cloud == "false":
current_dir = os.path.dirname(os.path.realpath(__file__))
csv_files = [file for file in os.listdir(current_dir) if file.endswith('.soda')]
if len(csv_files) == 0:
pass
else:
dfs = []
for file in csv_files:
file_path = os.path.join(current_dir, file)
df = pd.read_csv(file_path)
dfs.append(df)
if len(dfs) == 1:
combined_df = dfs[0]
else:
combined_df = pd.concat(dfs, ignore_index=True)
print("Failed Rows in a Dataframe Example")
print("-----------------------------------")
print(combined_df)
# remove the CSV files that were created
for file in csv_files:
os.remove(os.path.join(current_dir, file))checks for dim_product:
- freshness(start_date) < 3dchecks for dim_department_group:
- values in (department_group_name) must exist in dim_employee (department_name)
- values in (birthdate) must not exist in dim_department_group_prod (birthdate)-
✓
Use quotes when identifying dataset or column names; see example. Note that the type of quotes you use must match that which your data source uses. For example, BigQuery uses a backtick (`) as a quotation mark.
✓
Use wildcard characters in the value in the check.
Use wildcard values as you would with CTE or SQL.
Use for each to apply checks that use templates to multiple datasets in one scan.
-
Apply a dataset filter to partition data during a scan. Known issue: Dataset filters are not compatible with user-defined metrics in check templates.
-
-
✓
Use quotes when identifying dataset or group names; see example. Note that the type of quotes you use must match that which your data source uses. For example, BigQuery uses a backtick (`) as a quotation mark.
✓
Use wildcard characters ( % or * ) in values in the check; see example.
See note in example below.
Use for each to apply group evolution checks to multiple datasets in one scan.
-
Apply a dataset filter to partition data during a scan.
-
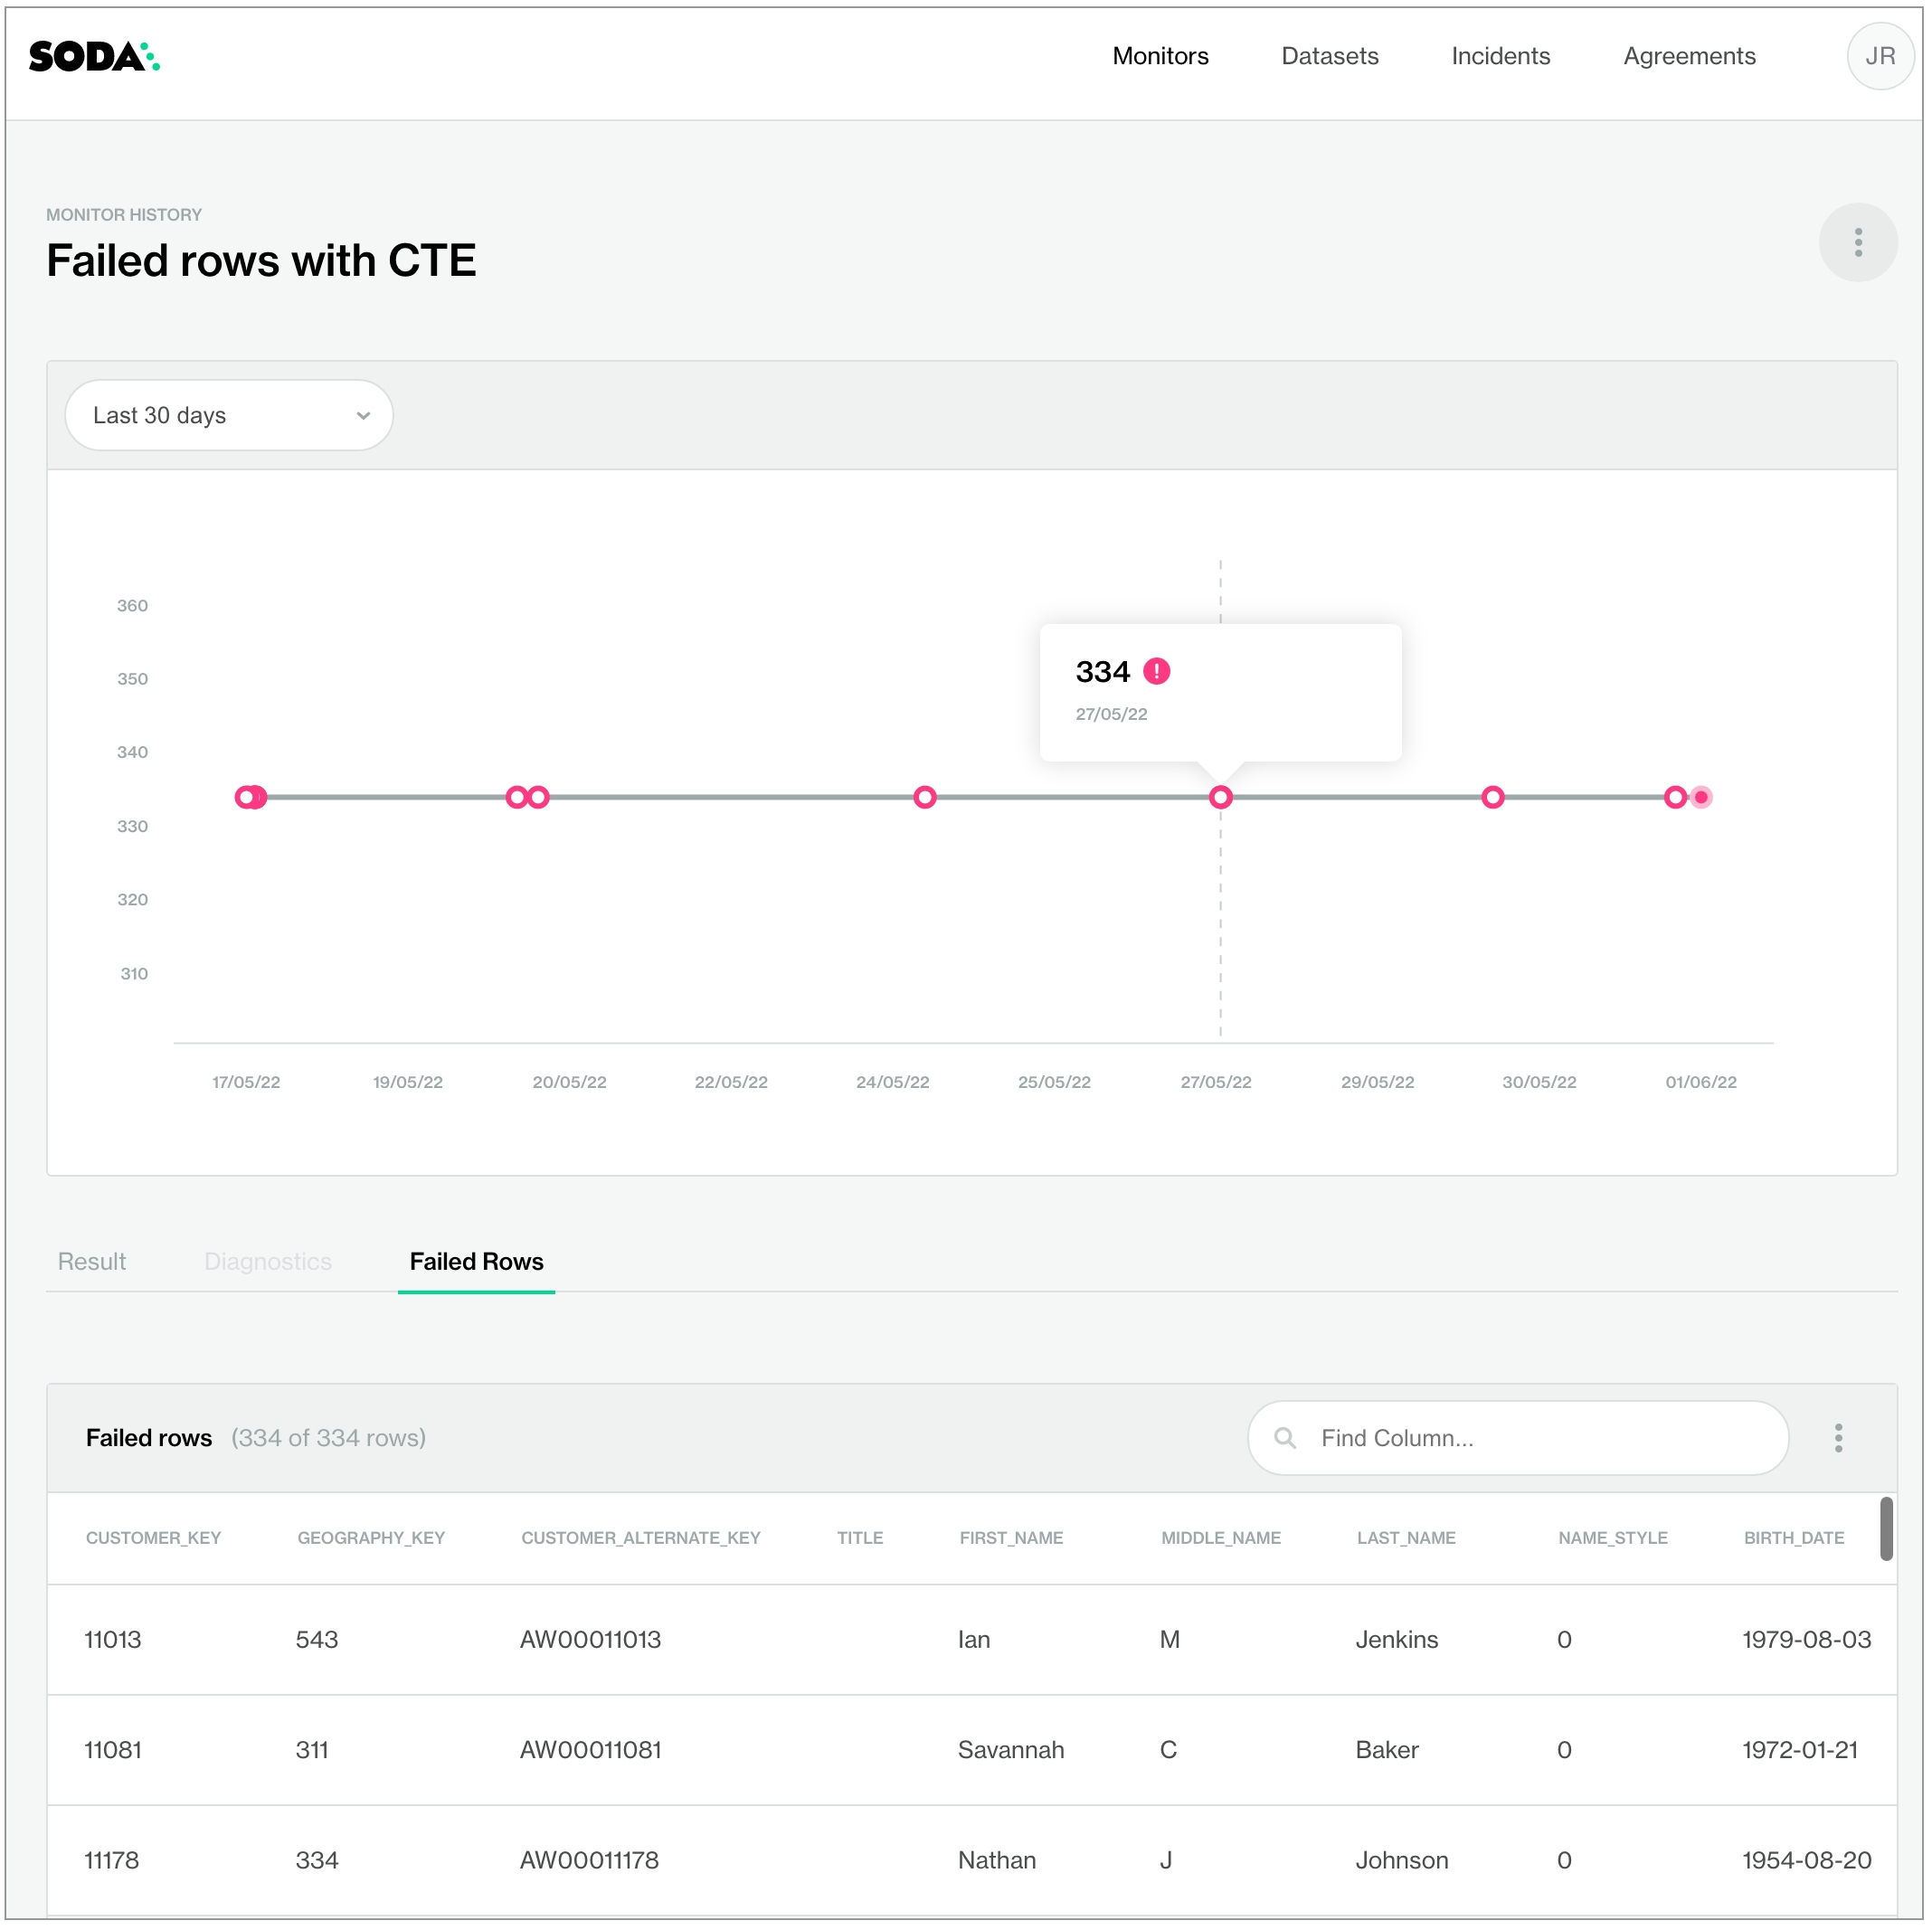
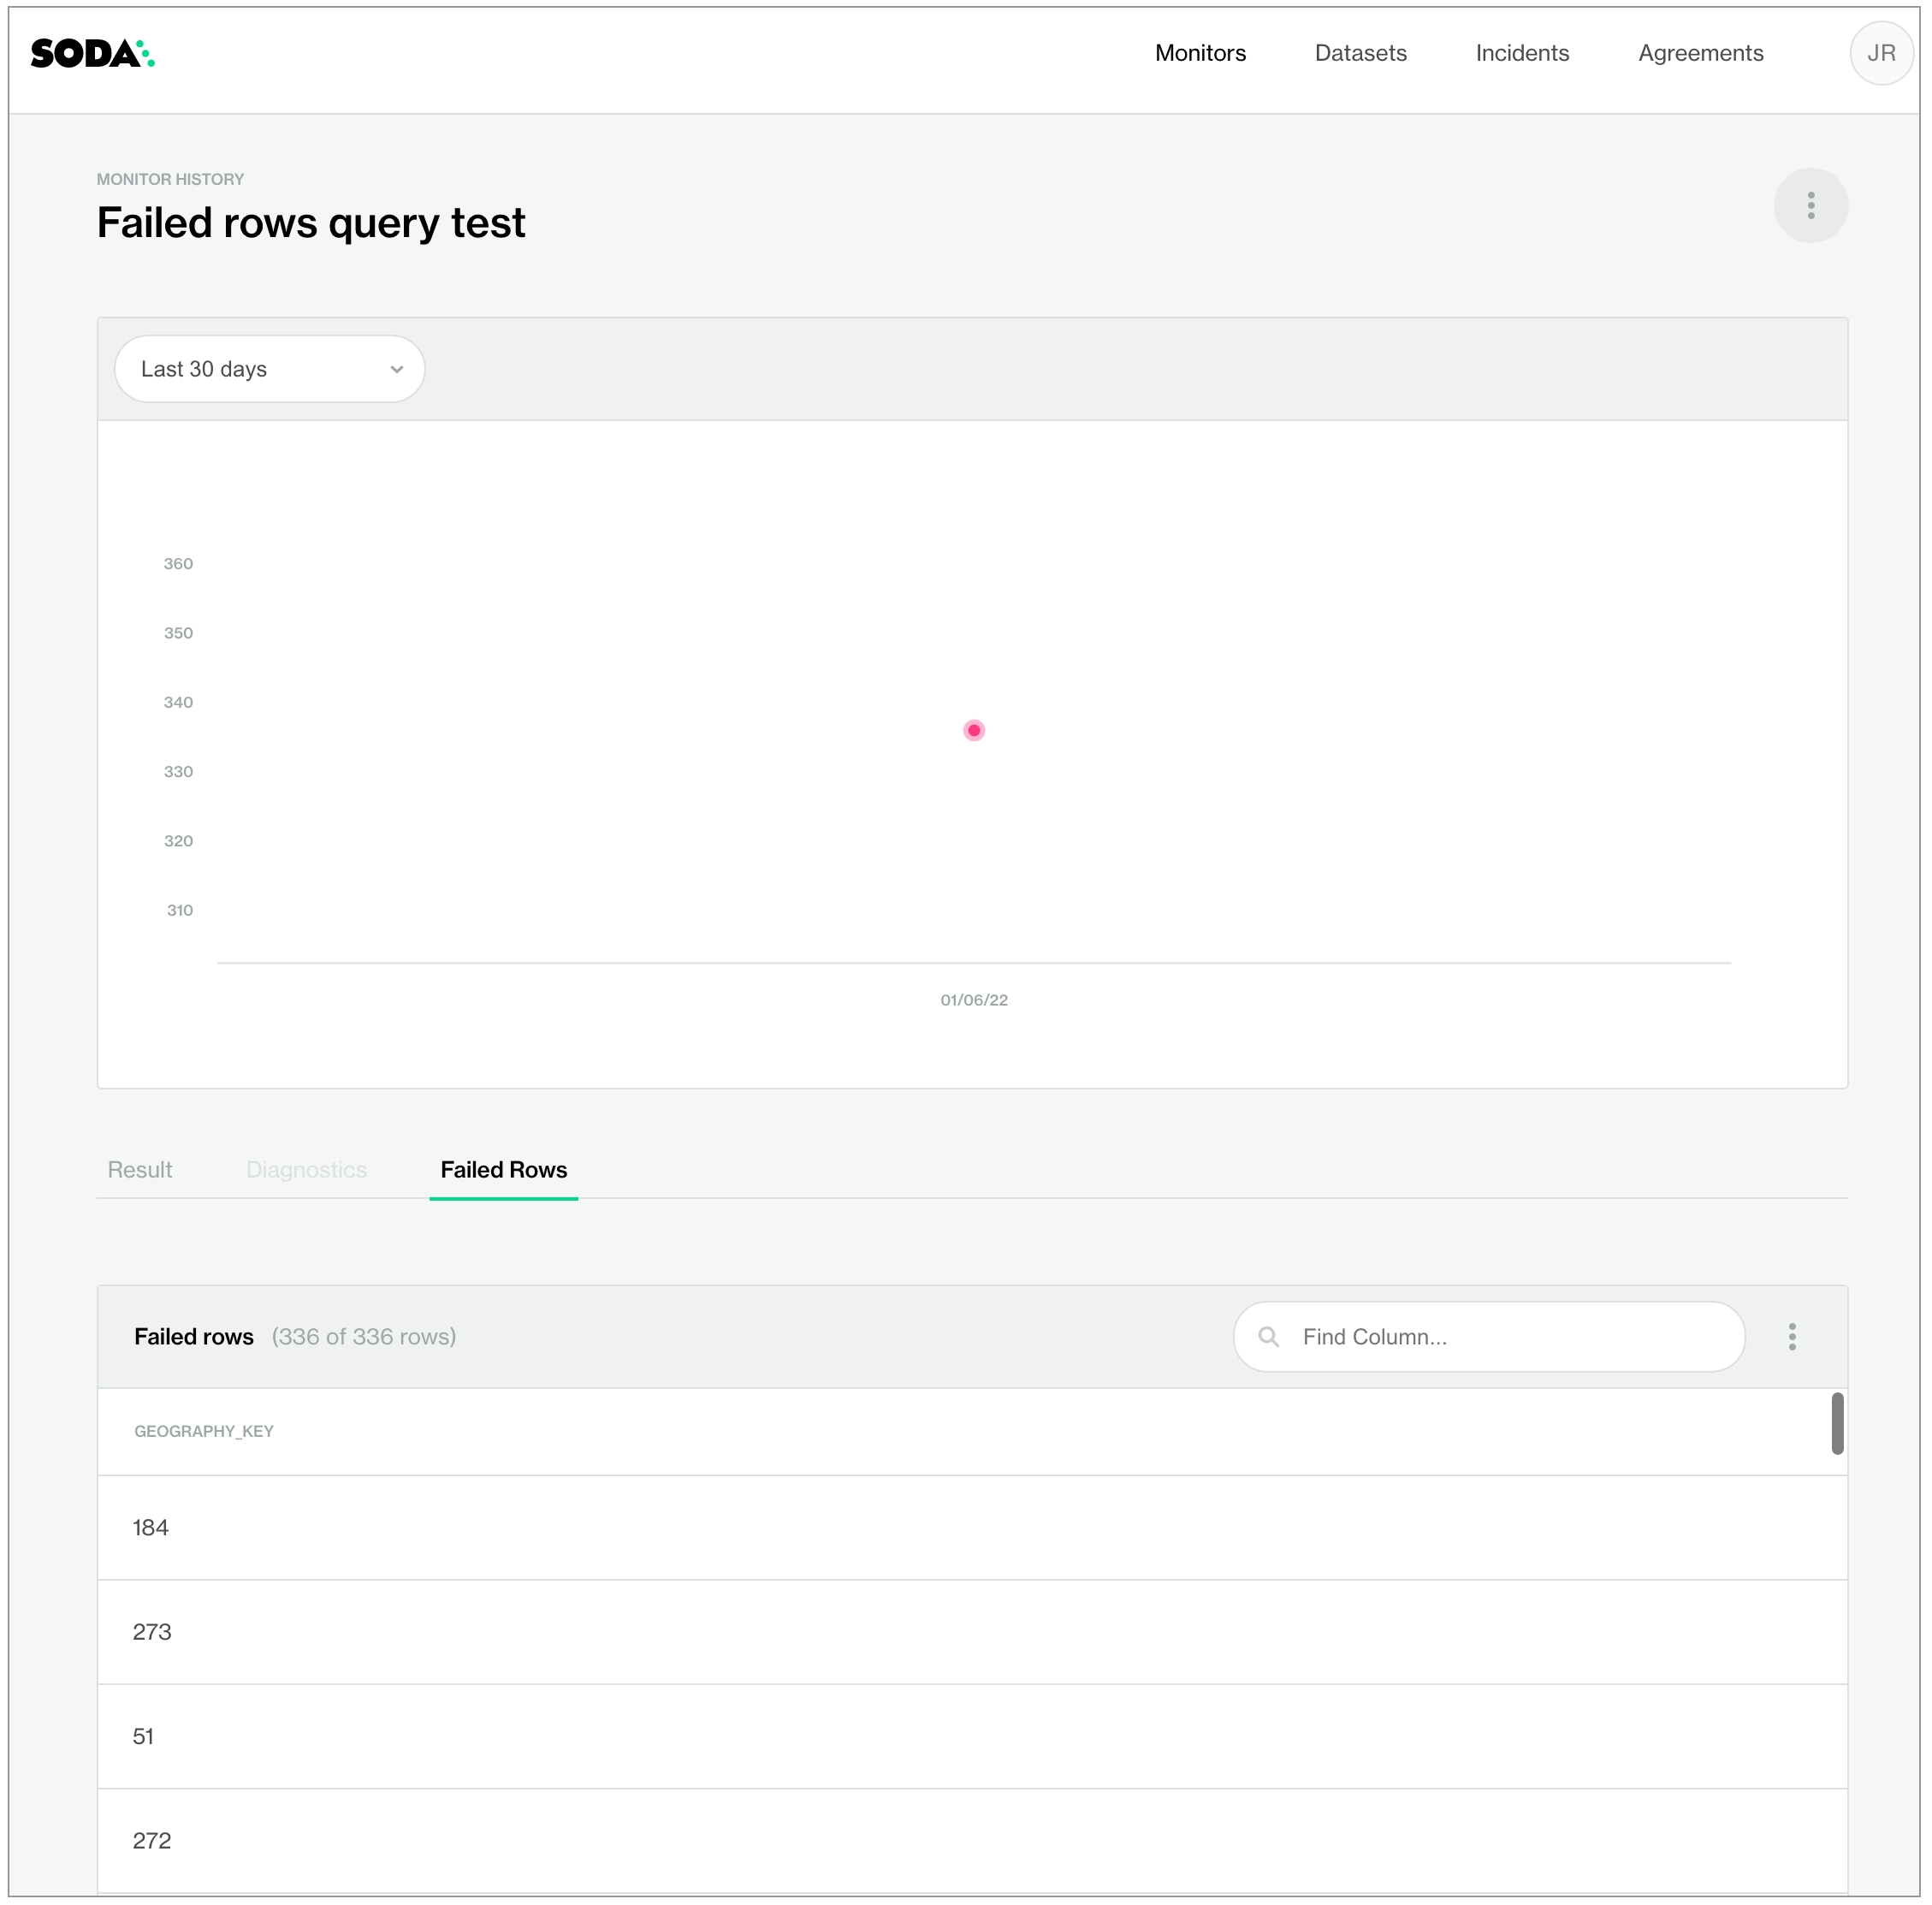
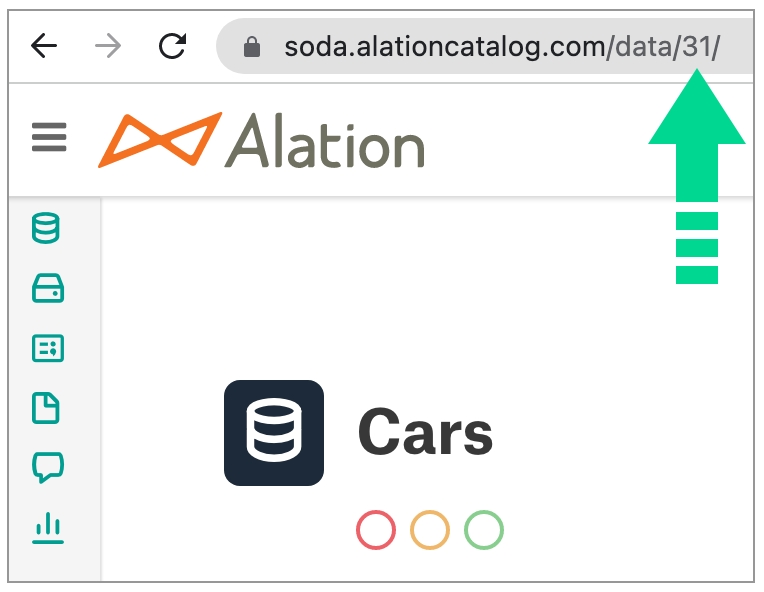
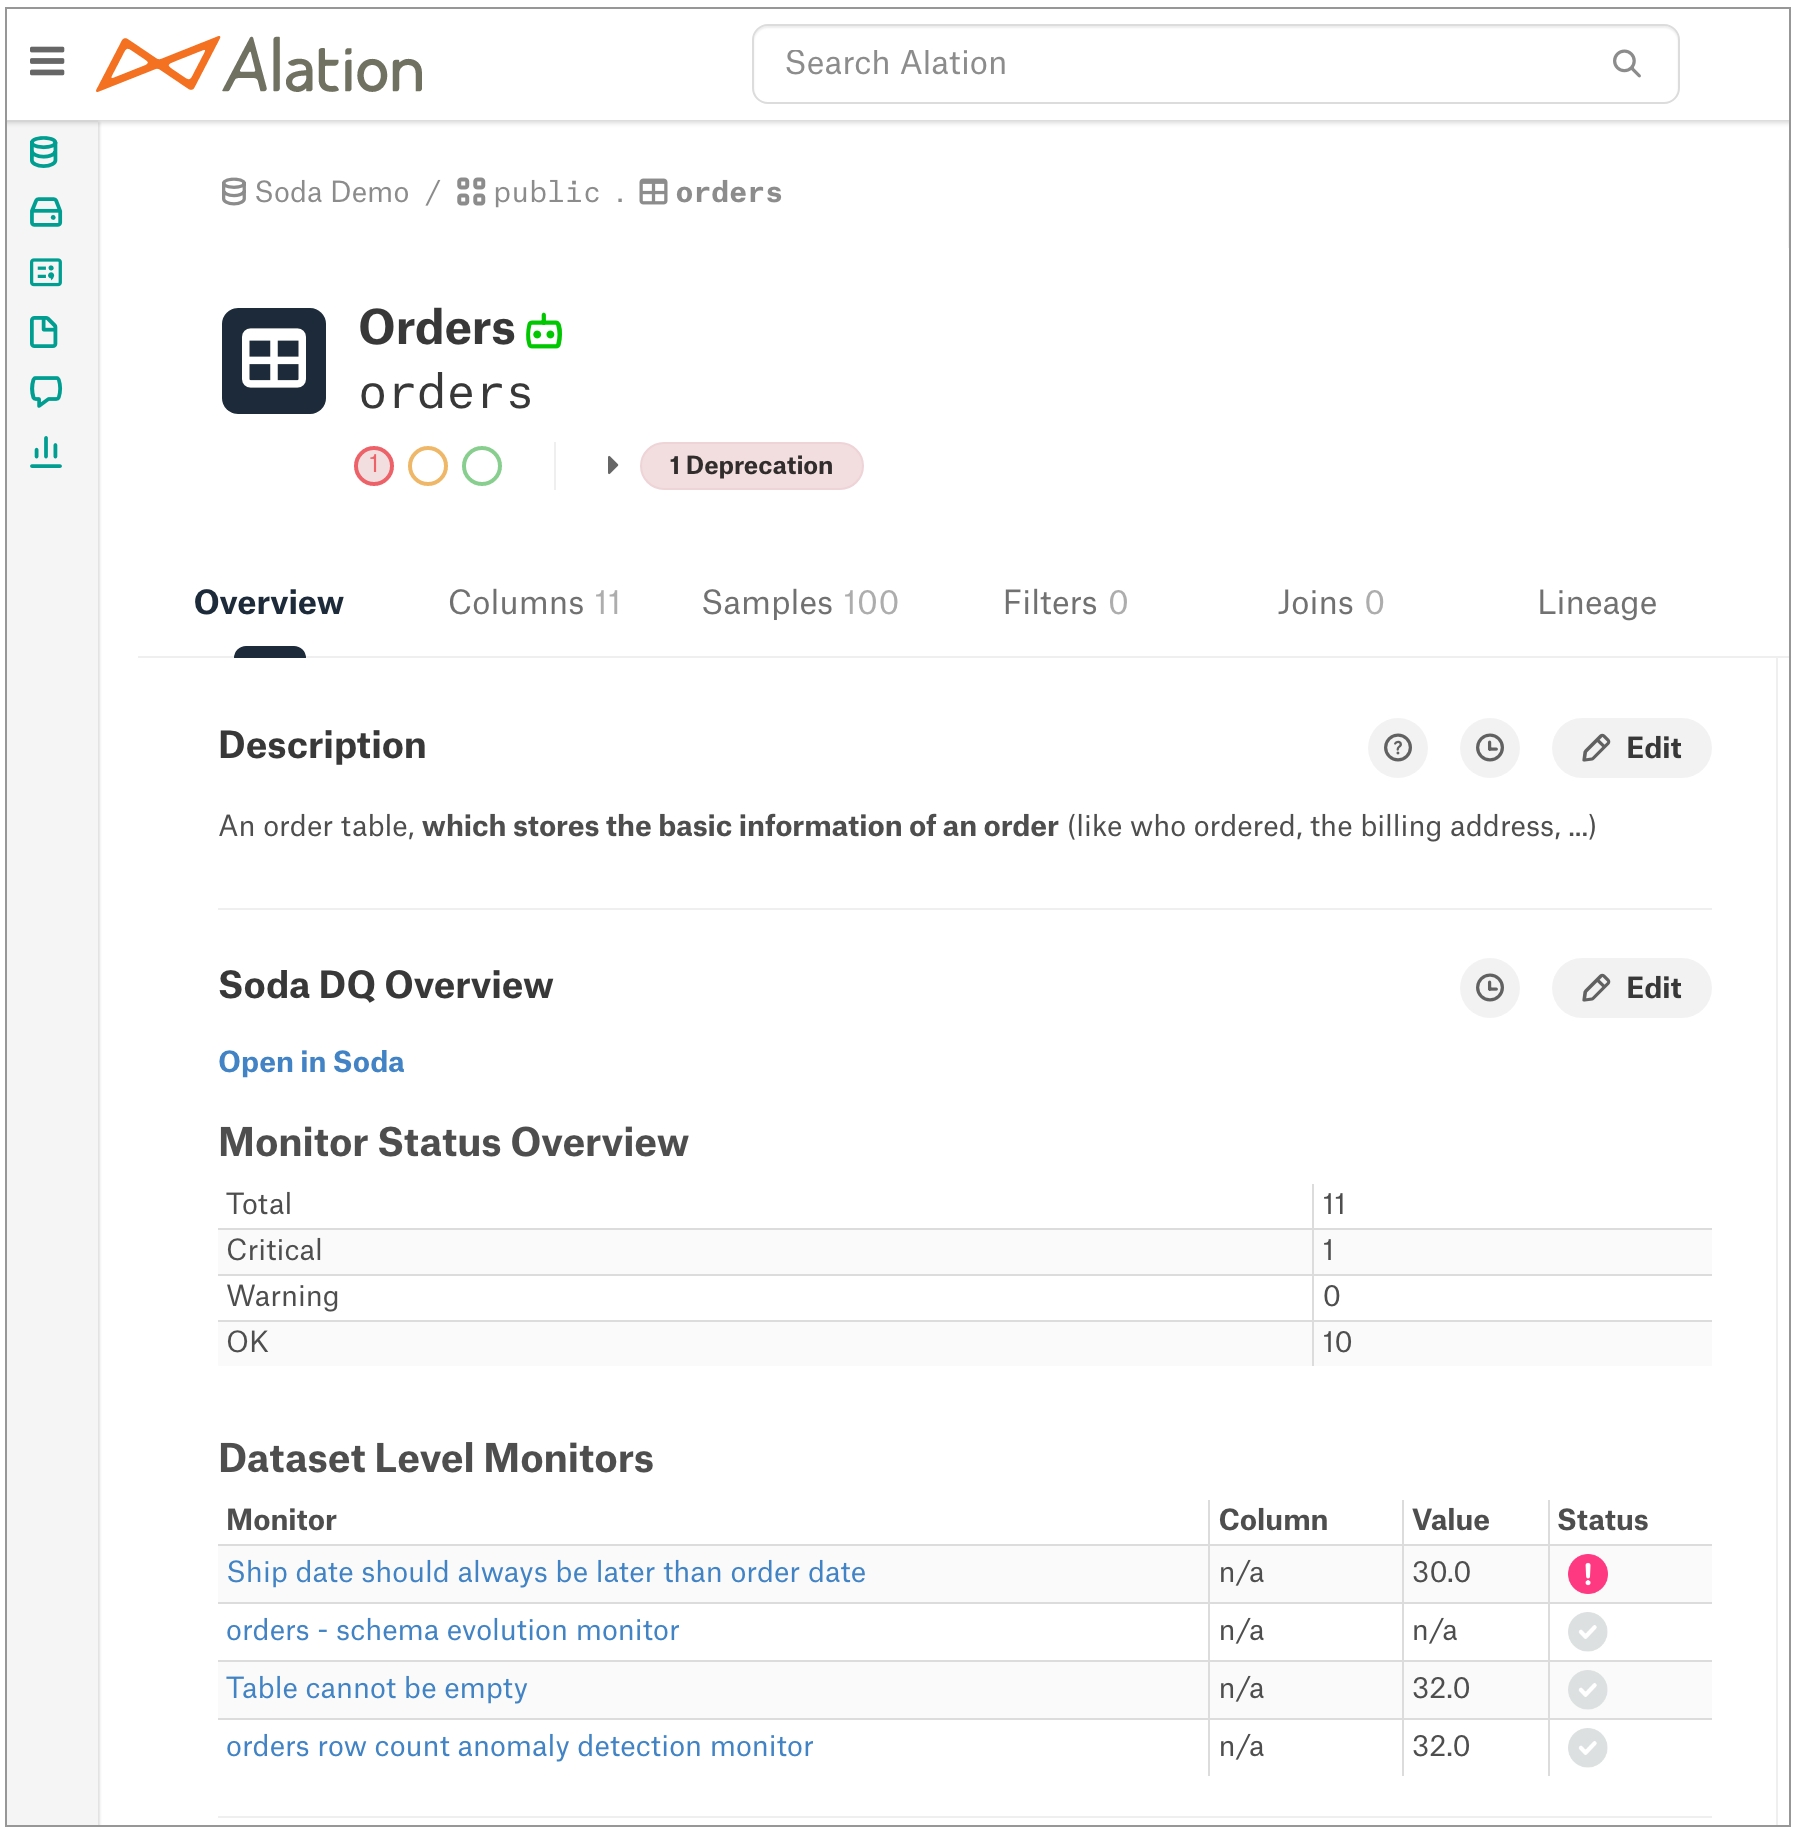
row_deltaLastly, it captures the value it calculated for row_delta to compare to the value you set for acceptance_threshold in the user-defined check, or the amount of row count inconsistency you are willing to accept between datasets. If you want the row count values to be equal, set the threshold to 0.0.
Holland
NL
Netherlands
NL
Britain
GB
United states
US
Need help? Join the Soda community on Slack.
checks for dim_product:
- row_delta > {{acceptance_threshold}}:
row_delta query: |
with table1 as (
select count(*) as table_1_rows from {{ table_1 }}
),
table2 as (
select count(*) as table_2_rows from {{ table_2 }}
),
intermediate as (
select
(select table_1_rows from table1) as table_1_rows,
(select table_2_rows from table2) as table_2_rows
),
difference_calculation as (
select
ABS( table_1_rows - table_2_rows)
as row_delta
from intermediate
)
select
row_delta
from difference_calculationchecks for dim_product:
- failed rows:
fail query: |
with duplicated_records as (
select
{{ column_a }},
{{ column_b }}
from {{ table }}
group by {{ column_a }}, {{ column_b }}
having count(*) > 1
)
select
q.*
from {{ table }} q
join duplicated_records dup
on q.{{ column_a }} = dup.{{ column_a }}
and q.{{ column_b }} = dup.{{ column_b }}checks for dim_product:
- failed rows:
fail condition: not({{ condition_logic }})checks for dim_product:
- failed rows:
fail condition: not(full_payment_deadline < dateadd(month, number_of_installments, first_payment_date))checks for dim_product:
- failed rows:
fail condition: not(full_payment_deadline < dateadd(month, number_of_installments, first_payment_date))checks for dim_product:
- failed rows:
fail query: |
//this query returns failed rows
select
*
from(
select
*,
count({{ column_2 }}) over (
partition by {{column_1}}
) as number_duplicated_records_per_key
from {{ table }}
) as mapping_aggregations
where number_duplicated_records_per_key > 1
order by {{ column_1 }}, {{ column_2 }}
;
// this query only returns the distinct failed mappings
select distinct
{{ column_1 }},
{{ column_2 }}
from(
select
*,
count({{ column_2 }}) over (
partition by {{ column_1 }}
) as number_duplicated_records_per_key
from {{ table }}
) as mapping_aggregations
where number_duplicated_records_per_key > 1
order by {{ column_1 }}, {{ column_2 }}
;checks for dim_product:
- failed rows:
fail query: |
//this query returns failed rows
select
*,
from {{ table }}
where 1 = 1
qualify count(*) over (partition by {{ column_1 }} order by {{ column_2 }}) > 1;
// this query only returns the distinct failed mappings
select distinct
{{ column_1 }},
{{ column_2 }}
from {{ table }}
where 1 = 1
qualify count(*) over (partition by {{ column_1 }} order by {{ column_2 }}) > 1;checks for dim_product:
- failed rows:
fail query: |
//this query returns failed rows
select
*
from {{ table }}
qualify count(*) over (partition by {{ column_1 }} order by {{ column_2 }}) > 1
// this query only returns the distinct failed mappings
select
distinct
{{ column_1 }},
{{ column_2 }}
from {{ table }}
qualify count(*) over (partition by {{ column_1 }} order by {{ column_2 }}) > 1index ; start_date ; end_date
1 ; 2020-01-01 ; 2021-03-13
2 ; 2022-01-01 ; 2019-03-13checks for exchange_operations:
- UpdatedDateOk = 1:
name: Verify that, if there is an update date, it is grater than the creation date
UpdatedDateOk query: |
SELECT
CASE
WHEN (updated_at_ts > '2017-10-01' AND updated_at_ts < current_timestamp AND updated_at_ts >= created_at_ts) OR updated_at_ts is NULL THEN 1
ELSE 0
END as rdo
FROM exchange_operationsA self-hosted Soda Agent is a tool that empowers Soda Cloud users to securely access data sources to scan for data quality. Create a Kubernetes cluster in a cloud services provider environment, then use Helm to deploy a self-hosted Soda Agent in the cluster.
For context, the instructions to deploy a self-hosted agent assume:
you have the appropriate access to a cloud services provider environment such as Azure, AWS, or Google Cloud that allows you to create and deploy applications to a cluster,
you, or someone on your team, has access to the login credentials that Soda needs to be able to access a data source such as MS SQL, BigQuery, or Athena so that it can run scans of the data.
Access the exhaustive deployment instructions for the cloud services provider you use.
Cloud services provider-agnostic instructions
Amazon Elastic Kubernetes Service (EKS)
Microsoft Azure Kubernetes Service (AKS)
Google Kubernetes Engine (GKE)
See also: Soda Agent basic concepts
Amazon Athena Amazon Redshift Azure Synapse ClickHouse Databricks SQL Denodo Dremio DuckDB GCP BigQuery Google CloudSQL
IBM DB2 MotherDuck MS SQL Server1 MySQL OracleDB PostgreSQL Presto Snowflake Trino Vertica


You have backed up the existing data in the PostgreSQL source data source, and created a staging environment which replicates the production PostgreSQL data source.
Use Airflow to execute the data migration from PostgreSQL to Snowflake in a staging environment.
In the staging environment, use Soda to run reconciliation checks on both the source and target data sources to validate that the data has been transformed and loaded as expected, and the quality of data in the target is sound.
Adjust your data transformations as needed in order to address any issues surfaced by Soda. Repeat the data migration in staging, checking for quality after each run, until you are satisfied with the outcome and the data that loads into the target Snowflake data source.
Prepare an Airflow DAG to execute the data migration in production. Execute the data migration in production, then use Soda to scan for data quality on the target data source for final validation.
(Optional) For regular migration events, consider invoking Soda scans for data quality after extraction and transformation(s) in the DAG.
Run a scan to execute the checks in the recon.yml file. When you run a scan against either the source or target data source, the Scan summary in the output indicates the check value, which is the calculated delta between measurements, the measurement value of each metric or check for both the source and target datasets, along with the diff value and percentage, and the absolute value and percentage. Review the results Soda Library produces in the command-line and/or in the Checks dashboard in Soda Cloud.
Need help? Join the Soda community on Slack.
In the right panel that appears, provide a name for your app, such as Soda Cloud, then select the (Non-gallery) option. Click Create.
After Azure AD creates your app, click Single sign-on in the left nav under the Manage heading, then select the SAML tile.
In the Basic SAML Configuration block that appears, click Edit.
In the Basic SAML Configuration panel, there are two fields to populate:
Identifier (Entity ID), which is the value of samlUrl from step 1.
Reply URL, which is the value of samlUrl from step 1.
Click Save, then close the confirmation message pop-up.
In the User Attributes & Claims panel, click Edit to add some attribute mappings.
Configure the claims as per the following example. Soda Cloud uses familyname and givenname, and maps emailaddress to user.userprincipalname.
(Optional) Follow the additional steps to enable one-way user group syncing to your SSO configuration; see Set up user group sync in Azure AD).
Scroll down to collect the values of three fields that Soda needs to complete the Azure AD SSO integration:
Azure AD Identifier (Section 4 in Azure). This is the IdP entity, ID, or Identity Provider Issuer that Soda needs
Login URL (Section 4 in Azure). This is the IdP SSO service URL, or Identity Provider Single Sign-On URL that Soda needs.
X.509 Certificate. Click the Download link next to Certificate (Base64).
Email the copied and downloaded values to [email protected]. With those values, Soda completes the SSO configuration for your organization in cloud.soda.io and notifies you of completion.
Soda Cloud supports both Identity Provider Initiated (IdP-initiated), and Service Provider Initiated (SP-initiated) single sign-on integrations; be sure to indicate which type of SSO your organization uses.
(Optional) Ask Soda to enable one-way user group syncing to your SSO configuration; see Set up user group sync in Azure AD.
Test the integration by assigning the Soda application in Azure AD to a single user, then requesting that they log in.
After a successful single-user test of the sign in, assign access to the Soda Azure AD app to users and/or user groups in your organization.
Provide a name for the application, Soda Cloud, and upload the Soda logo.
Click Next. In the Configure SAML tab, there are two fields to populate:
Single sign on URL, which is the value of samlUrl from step 1.
Audience URI (SP Entity ID), which is also the value of samlUrl from step 1.
The values for these fields are unique to your organization and are provided to you by Soda and they follow this pattern: https://cloud.soda.io/sso/<your-organization-identifier>/saml.
Be sure to use an email address as the application username.
Scroll down to Attribute Statements to map the following values, then click Next to continue.
map User.GivenName to user.firstName
map User.FamilyNameto user.lastName
map User.Email to user.email
(Optional) Follow the additional steps to enable one-way user group syncing to your SSO configuration; .
Select the following options, then click Finish.
I’m an Okta customer adding an internal app.
This is an internal app that we have created.
In the Sign On pane of the application, scroll down to click View Setup Instructions.
Collect the values of three fields that Soda needs to complete the Okta SSO integration:
Identity Provider Single Sign-On URL
Identity Provider Issuer
X.509 Certificate
Email the copied and downloaded values to [email protected]. With those values, Soda completes the SSO configuration for your organization in cloud.soda.io and notifies you of completion.
Soda Cloud supports both Identity Provider Initiated (IdP-initiated), and Service Provider Initiated (SP-initiated) single sign-on integrations; be sure to indicate which type of SSO your organization uses.
(Optional) Ask Soda to enable one-way user group syncing to your SSO configuration; see Set up user group sync in Okta.
Test the integration by assigning the Soda application in Okta to a single user, then requesting that they log in.
After a successful single-user test of the sign in, assign access to the Soda Okta app to users and/or user groups in your organization.
On the Google Identity Provider details page, be sure to copy or download the following values:
SSO URL
Entity ID
IDP metadata
Certificate
On the SAML Attribute mapping page, add two Google directory attributes and map as follows:
Last Name → User.FamilyName
First Name → User.GivenName
Email the copied and downloaded values to [email protected]. With those values, Soda completes the SSO configuration for your organization in cloud.soda.io and notifies you of completion. Soda Cloud supports both Identity Provider Initiated (IdP-initiated), and Service Provider Initiated (SP-initiated) single sign-on integrations; be sure to indicate which type of SSO your organization uses.
In the Google Workspace admin portal, use Google's instructions to Turn on your SAML app and verify that SSO works with the new custom app for Soda.
After saving the group claim, navigate to Users and Groups in the left menu, and follow Microsoft's instructions to Assign a user or group to an enterprise application. Add any existing groups to the Soda SAML Application that you wish to make available in Soda Cloud to manage access and permissions.
In your message to Soda Support or your Soda Customer Engineer, advise Soda that you wish to enable user group syncing. Soda adds a setting to your SSO configuration to enable it.
When the SSO integration is complete, you and your team can select your IdP user groups from the dropdown list of choices available when assigning ownership or permissions to resources.
Need help? Join the Soda community on Slack.
You cannot use variables in checks you write in an agreement in Soda Cloud as it is impossible to provide the variable values at scan time.
✓
Use quotes when identifying dataset or column names; see . Note that the type of quotes you use must match that which your data source uses. For example, BigQuery uses a backtick (`) as a quotation mark.
Use wildcard characters ( % or * ) in values in the check.
-
✓
Use for each to apply freshness checks to multiple datasets in one scan; see .
✓
Apply a dataset filter to partition data during a scan; see .
#h#m
1h30m
1 hour and 30 minutes
a timestamp column name
a variable to specify the value of “now” (optional)
a threshold
column name
start_date
threshold
3d
column name
end_date
variable to specify the value of “now” (optional)
NOW
threshold
1d
✓
Define a name for a freshness check; see example.
✓
Add an identity to a check.
✓
Define alert configurations to specify warn and fail thresholds; see example.
✓
Apply an in-check filter to return results for a specific portion of the data in your dataset; see example.
#d
3d
3 days
#h
1h
1 hour
#m
30m
30 minutes
#d#h
1d6h
1 day and 6 hours
Need help? Join the Soda community on Slack.
-
✓
Use quotes when identifying dataset or column names; see . Note that the type of quotes you use must match that which your data source uses. For example, BigQuery uses a backtick (`) as a quotation mark.
Use wildcard characters ( % or * ) in values in the check.
-
Use for each to apply reference checks to multiple datasets in one scan.
-
✓
Apply a dataset filter to partition data during a scan; see . If you encounter difficulties, see .
✓
Supports samples columns parameter to specify columns from which Soda draws failed row samples.
✓
Supports samples limit parameter to control the volume of failed row samples Soda collects.
✓
Supports collect failed rows parameter instruct Soda to collect, or not to collect, failed row samples for a check.
Reference tips and best practices for SodaCL.
✓
Define a name for a reference check; see example.
✓
Add an identity to a check.
Define alert configurations to specify warn and fail alert conditions.
-
Apply an in-check filter to return results for a specific portion of the data in your dataset.
Need help? Join the Soda community on Slack.
-
If you already use a self-hosted Soda Agent deployed in a Kubernetes cluster to connect to your data source(s), you have the option of migrating a connected data source to a Soda-hosted agent. Though you must reconfigure your data source connection to the new Soda agent, your checks, check history, and scan definition remain intact.
Be aware that Soda-hosted agents are only compatible with the following data sources: BigQuery, Databricks SQL, MS SQL Server, MySQL, PostgreSQL, Redshift, Snowflake.
🔴 When you migrate to a Soda-hosted agent, Soda Cloud resets all the connection configuration details for your data source. Be sure to capture all existing data source connection details before migrating so you can re-enter the details for the data source connection.
As a user with permission to do so in Soda Cloud, navigate to your avatar > Organization Settings. In the Organization tab, click the checkbox to Enable Soda-hosted Agent.
Navigate to your avatar > Data Sources, then access the Agents tab. Notice your out-of-the-box Soda-hosted agent that is up and running.
Navigate to the Data Sources tab, then click to select the data source you wish to migrate to the Soda-hosted agent.
In the 2. Connect the Data Source tab, copy+paste the contents of the editing panel to a temporary, secure, local place in your system. Switching agents resets all connection configuration parameters, so be sure to record existing parameter settings before proceeding.
In the 1. Attributes tab, use the dropdown for Default Scan Agent to select soda-hosted-agent.
Return to the 2. Connect the Data Source tab, then, using the configuration values you recorded in step 3, use the dropdowns to re-enter the values, then Test Data Source.
When the test completes successfully, Save your changes to the data source.
The Soda Agent is a tool that empowers Soda Cloud users to securely access data sources to scan for data quality. Create a Kubernetes cluster in a cloud services provider environment, then use Helm to deploy a sefl-hosted Soda Agent in the cluster. Read more.
When you delete the Soda Agent Helm chart from your cluster, you also delete all the agent resources on your cluster. However, if you wish to redeploy the previously-registered agent (use the same name), you need to specify the agent ID in your override values in your values YAML file.
In Soda Cloud, navigate to your avatar > Agents.
Click to select the agent you wish to redeploy, then copy the agent ID of the previously-registered agent from the URL.
For example, in the following URL, the agent ID is the long UUID at the end. https://cloud.soda.io/agents/842feab3-snip-87eb-06d2813a72c1.
Alternatively, if you use the base64 CLI tool, you can run the following command to obtain the agentID.
Open your values.yml file, then add the id key:value pair under agent, using the agent ID you copied from the URL as the value.
To redeploy the agent, you need to provide the values for the API keys the agent uses to connect to Soda Cloud in the values YAML file. Access the values by running the following command, replacing the soda-agent values with your own details, then paste the values into your values YAML file.
Alternatively, if you use the base64 CLI tool, you can run the following commands to obtain the API key and API secret, respectively.
In the same directory in which the values.yml file exists, use the following command to install the Soda Agent helm chart.
Validate the Soda Agent deployment by running the following command:
The Soda Agent is a Helm chart that you deploy on a Kubernetes cluster and connect to your Soda Cloud account using API keys.
To take advantage of new or improved features and functionality in the Soda Agent, including new features in the Soda Library, you can upgrade your agent when a new version becomes available in ArtifactHub.io.
Note that there is no downtime associated with the exercise of upgrading a self-hosted Soda Agent. Because Soda does not define the .spec.strategy in the deployment manifest of the Soda Agent Helm chart, Kubernetes uses the default RollingUpdate to upgrade; refer to Kubernetes documentation .
If you regularly access multiple clusters, you must ensure that are first accessing the cluster which contains your deployed Soda Agent. Use the following command to determine which cluster you are accessing.
If you must switch contexts to access a different cluster, copy the name of cluster you wish to use, then run the following command.
To upgrade the agent, you must know the values for:
namespace - the namespace you created, and into which you deployed the Soda Agent
release - the name of the instance of a helm chart that is running in your Kubernetes cluster
API keys - the values Soda Cloud created which you used to run the agent application in the cluster Access the first two values by running the following command.
Output:
Access the API key values by running the following command, replacing the placeholder values with your own details.
From the output above, the command to use is:
Use the following command to search ArifactHub for the most recent version of the Soda Agent Helm chart.
Use the following command to upgrade the Helm repository.
Upgrade the Soda Agent Helm chart. The value for the chart argument can be a chart reference such as example/agent, a path to a chart directory, a packaged chart, or a URL. To upgrade the agent, Soda uses a chart reference: soda-agent/soda-agent.
From the output above, the command to use is
OR, if you use a values YAML file,
Soda Agent 1.0.0 includes several key changes to the way the Soda Agent works. If you already use a Soda Agent, carefully consider the changes that Soda Agent 1.0.0 introduces and make appropriate changes to your configured parameters.
Soda Agent 1.0.0 favors manged or self-managed node groups over AWS Fargate, AKS Virtual Nodes, or GKE Autopilot profiles. Though this version of the agent still works with those profiles, the scan performance is slower because the profiles provision new nodes for each scan. To migrate your agent to a managed node group:
Add a managed node group to your Kubernetes cluster.
Check your cloud-services provider’s recommendations for node size and adapt it for your needs based on volume of scans you anticipate. Best practice dictates that you set your cluster to have at least 2 CPU and 2GB of RAM, which, in general is sufficient to run up to six scans in parallel.
Upgrade to Soda Agent 1.0.0, configuring the helm chart to not use Fargate, Virtual Nodes, or GKE Autopilot by:
removing the provider.eks.fargate.enabled property, or setting the value to false
removing the provider.aks.virtualNodes.enabled property, or setting the value to false
removing the provider.gke.autopilot.enabled property, or setting the value to false
removing the soda.agent.target property
Remove the Fargate profiles, and drain existing workloads from virtual nodes in the namespace in which you deployed the Soda Agent so that the agent uses the node group to execute scans, not the profiles.
Starting from version 1.2.0 all images required for the Soda Agent are distributed using a Soda-hosted image registry.
For more information, see .
Using your exising Soda API key and secret
By default we'll use your existing Soda API key and secret values to perform the authentication to the Soda image registry.
Ensure these values are still present in your values.yaml , no further action is required.
Using a separate Soda API key and secret
You might also opt to use a new, separate Soda API key and secret to perform the authentication to the Soda image registry.
In this case, ensure the imageCredentials.apikey.id and imageCredentials.apikey.secret values are set to these new values:
If you're providing your own imagePullSecrets on the cluster, e.g. when you're pulling images from your own mirroring image registry, you must modify your existing values file.
The imagePullSecrets property that was present in versions 1.1.x has been renamed to the more standard existingImagePullSecrets .
If applicable to you, please perform the following rename in your values file:
For more information on setting up image mirroring, see
If you are a customer using the US instance of Soda Cloud, you'll have to configure your Agent setup accordingly. Otherwise you can ignore this section.
In version 1.2.0 we're introducing a soda.cloud.region property, that will be used to determine which registry and Soda Cloud endpoint to use. Possible values are eu and us. When the soda.cloud.region property is not set explicitly, it defaults to the value of eu.
If applicable to you, please perform the following changes in your values file:
For more information about using the US region, see .
The scanlauncher section in the values file has been renamed to scanLauncher.
Please ensure the correct name is used in your values file if you have any configuration values there:
To upgrade your existing Soda Library tool to the latest version, use the following command, replacing redshift with the install package that matches the type of data source you are using.
(Optional) From the command-line, run the following command to determine which Soda packages exist in your environment.
(Optional) Run the following command to uninstall a specific Soda package from your environment.
Run the following command to uninstall all Soda packages from your environment, completely.
Soda Core, the free, open-source Python library and CLI tool upon which Soda Library is built, continues to exist as an OSS project in GitHub. To migrate from an existing Soda Core installation to Soda Library, simply uninstall the old and install the new from the command-line.
Uninstall your existing Soda Core packages using the following command.
Install a Soda Library package that corresponds to your data source. Your new package automatically comes with a 45-day free trial. Our Soda team will contact you with licensing options after the trial period.
If you had connected Soda Core to Soda Cloud, you do not need to change anything for Soda Library to work with your Soda Cloud account. If you had not connected Soda Core to Soda Cloud, you need to connect Soda Library to Soda Cloud. Soda Library requires API keys to validate licensing or trial status and run scans for data quality. See Configure Soda for instructions.
You do not need to adjust your existing configuration.yml or checks.yml files which will continue to work as before.
Learn more about the ways you can use Soda in Use case guides.
Write custom SQL checks for your own use cases.
Need help? Join the Soda community on Slack.
By default, Soda uses Kubernetes Secrets as part of the Soda Agent deployment. The agent automatically converts any sensitive values you add to a values YAML file, or directly via the CLI, into Kubernetes Secrets.
As these values are sensitive, you may wish to employ the following alternative strategies to keep them secure.
When you deploy a self-hosted Soda Agent from the command-line, you provide values for the API key id and API key secret which the agent uses to connect to your Soda Cloud account. You can provide these values during agent deployment in one of two ways:
directly in the helm install command that deploys the agent and stores the values as Kubernetes secrets in your cluster; see deploy using CLI only
OR
in a values.yml file which you store locally but reference in the helm install command as in the example below.
Refer to the exhaustive cloud service provider-specific instructions for more detail on how to deploy an agent using a values YAML file.
If you use private key with Snowflake or BigQuery, you can provide the required private key values in a values.yml file when you deploy or redeploy the agent.
When you, or someone in your organization, follows the guided steps to use a self-hosted Soda Agent to add a data source in Soda Cloud, one of the steps involves providing the connection details and credentials Soda needs to connect to the data source to run scans.
You can add those details directly in Soda Cloud, but because any user can then access these values, you may wish to store them securely in the values YAML file as environment variables.
Create or edit your local values YAML file to include the values for the environment variables you input into the connection configuration.
After adding the environment variables to the values YAML file, update the Soda Agent using the following command:
In step 2 of the add a data source guided steps, add data source connection configuration which look something like the following example for a PostgreSQL data source. Note the environment variable values for username and password.
Follow the remaining guided steps to add a new data source in Soda Cloud. When you save the data source and test the connection, Soda Cloud uses the values you stored as environment variables in the values YAML file you supplied during redeployment.
Use External Secrets Operator (ESO) to integrate your self-hosted Soda Agent with your secrets manager, such as a Hashicorp Vault, AWS Secrets Manager, or Azure Key Vault, and securely reconcile the login credentials that Soda Agent uses for your data sources.
For example, imagine you use a Hashicorp Vault to store data source login credentials and your security protocol demands frequent rotation of passwords. In this situation, the challenge is that apps running in your Kubernetes cluster, such as a Soda Agent, need access to the up-to-date passwords.
To address the challenge, you can set up and configure ESO in your Kubernetes cluster to regularly reconcile externally-stored password values so that your apps always have the credentials they need. Doing so obviates the need to manually redeploy a values YAML file with new passwords for apps running in the cluster each time your system refreshes the passwords.
The current integration of Soda Agent and a secrets manager does not yet support the configuration of the Soda Cloud credentials. For those credentials, use a tool such as helm-secrets or vals.
To integrate Soda Agent with a secret manager, you need the following:
External Secrets Operator (ESO) which is a Kubernetes operator that facilitates a connection between the Soda Agent and your secrets manager
a ClusterSecretStore resource which provides a central gateway with instructions on how to access your secret backend
an ExternalSecret resource which instructs the cluster on what values to fetch, and references the ClusterSecretStore
Read more about the ESO's Resource Model.
The following procedure outlines how to use ESO to integrate with a Hashicorp Vault that uses a KV Secrets Engine v2. Extrapolate from this procedure to integrate with another secrets manager such as:
You have set up a Kubernetes cluster in your cloud services environment and deployed a self-hosted Soda Agent in the cluster.
For the purpose of this example procedure, you have set up and are using a Hashicorp Vault which contains a key-value pair for POSTGRES_USERNAME and POSTGRES_PASSWORD at the path local/soda.
Consider referencing the use case guide for integrating an External Secrets Manager with a Soda Agent which offers step-by-step instructions to set everything up locally to see the integration in action.
Use helm to install the External Secrets Operator from the Helm chart repository into the same Kubernetes cluster in which you deployed your Soda Agent.
Verify the installation using the following command:
Create a cluster-secret-store.yml file for the ClusterSecretStore configuration. The details in this file instruct the Soda Agent how to access the external secrets manager vault.
This example uses Hashicorp Vault AppRole authentication. AppRole authenticates with Vault using the App Role auth mechanism to access the contents of the secret store. It uses the SecretID in the Kubernetes secret, referenced by secretRef and the roleID, to acquire a temporary access token so that it can fetch secrets.
Access external-secrets.io documentation for configuration examples for:
Deploy the ClusterSecretStore to your cluster.
Create an soda-secret.yml file for the ExternalSecret configuration. The details in this file instruct the Soda Agent which values to fetch from the external secrets manager vault.
This example identifies:
the namespace of the Soda Agent,
two remoteRef configurations, including the file path in the vault, one each for POSTGRES_USERNAME and POSTGRES_PASSWORD, to detail what the ExternalSecret must fetch from the Hashicorp Vault,
a refreshInterval to indicate how often the ESO must reconcile the remoteRef values; this ought to correspond to the frequency with which your passwords are reset,
the secretStoreRef to indicate the ClusterSecretStore through which to access the vault, and
a target template that creates a file called soda-agent.conf into which it adds the username and password values in the dotenv format that the Soda Agent expects.
Deploy the ExternalSecret to your cluster.
Use the following command to get the ExternalSecret to authenticate to the Hashicorp Vault using the ClusterSecretStore and fetch secrets.
Output:
Prepare a values.yml file to deploy the Soda Agent with the existingSecrets parameter that instructs it to access the ExternalSecret file to fetch data source login credentials. Refer to complete deploy instructions, or redeploy instructions if you already have an agent running in a cluster.
Deploy the Soda Agent using the following command:
Output:
By default, the Soda Agent creates a secret for storing the Soda Cloud API Key details securely in your cluster. If you want to use a different secret, you can point the Soda Agent to an existing Kubernetes Secret in your cluster using the soda.apikey.existingSecret property.
To use an existing Kubernetes secret for Soda Agent’s Cloud API credentials, add existingSecret and the secretKeys values to your agent's values YAML file, as in the following example.
The default Soda Agent settings balance performance and cost-efficiency. You can adjust these settings to better suit your needs, optimizing for larger datasets, faster scans, or improved resource management.
The hard query cursor limit setting controls how many rows Soda Library can store in memory during a scan. By default, this value is 10,000 rows, preventing Out-Of-Memory (OOM) errors by capping the number of rows Soda holds in memory at any given time.
If you need to work with larger sets of sample data or failed rows, you can raise the query_cursor_hard_limit. Be aware that if you increase or remove the limit, you must ensure that the Soda Agent has enough memory to prevent it from causing OOM errors.
To turn off the limit completely, set the value of query_cursor_hard_limit to null.
The example below demonstrates how you can clear the limit and increase the memory limit using settings in your values.yml file:
Consider referencing the use case guide for integrating an External Secrets Manager with a Soda Agent which offers step-by-step instructions to set everything up locally to see the integration in action.
Learn more about Soda Agent basic concepts.
Need help? Join the Soda community on Slack.
User
Refers to anyone with access to a Soda Cloud account, or organization. Users may belong to multiple Soda Cloud organizations, as when teams set up separate organizations for staging, development, and production environments; see . You can invite a person to join your Soda Cloud account as a user (your avatar > Invite Users), or you can use an to manage your team’s access to a Soda Cloud account.
User Group
Refers to a named collection of individual users in a Soda Cloud account. If you use an SSO integration to manage your team's access to Soda Cloud, you can optionally choose to synchronize the user groups you have defined in your identity provider (Okta, Azure AD, etc.) and assign roles to those synched user groups in Soda Cloud.
Role
Refers to a named set of permissions that, when assigned to a user or user group, define how the user or group may access or act upon resources or functionalities in Soda Cloud. Roles in Soda Cloud exist at either a global or dataset level.
Permission
Refers to a rule that governs an activity or access as it relates to a resource or functionality in Soda Cloud.
Permission group
Refers to a named set of permissions. When you create a new global or dataset role in Soda Cloud, you add permission groups, instead of individual, granular permissions. For example, you can assign the permission group , "Manage scan definitions" to a custom global role called "Engineers", giving users or user groups who are assigned this role the ability to create, edit, or delete scan definitions for a data source.
Responsibilities
Refers to a subset of role-based access controls for newly-onboarded datasets. These settings determine inclusion in the Everyone user group and the roles Dataset Owners get for newly-onboarded datasets; see .
License
Refers to a legacy billing model that encourages unlimited Viewers with read-only access to Soda Cloud, and some Authors with read-write access to resources and functionality.
There are two type of roles that regulate permissions in Soda Cloud: Global and Dataset. You can assign each type of role to users or user groups in Soda Cloud to organize role-based access control to resources and functionality in your account. You can also customize the permissions of the out-of-the-box roles Soda Cloud includes, or you can create new roles and assign permissions to roles as you wish.
Global
Regulates permissions to access account-level functionalities and resources such as notification rules, integrations, and scan definitions.
Admin User
Dataset
Regulates permissions to access, and act upon, individual datasets.
Manager Editor Viewer
By default, when a new user accepts an invitation to join an existing Soda Cloud organization, or when they gain access to an organization via SSO, Soda Cloud applies the the global role of User in the organization. If you are the first user in your organization to sign up for Soda Cloud, you become a global Admin for the account by default. Note, you can have more than one global Admin user in a Soda Cloud account.
The following table outlines the permission groups for each out-of-the-box global role.
Create agreements
• Create new agreements
✓
✓
Create new datasets and data sources with Soda Library
• Create datasets through Soda Library for an existing data source
✓
✓
Manage attributes
• Create, edit, or delete check attributes
✓
1 Global admin users have these permissions, but you cannot add this nameless permission group to a custom global role.
As a user with the permission to do so, login to your Soda Cloud account and navigate to your avatar > Organization Settings. Use the table below as reference for the tasks you can perform within each tab.
Organization
• Adjust the name of the organization. • Review the type of Soda Cloud Plan to which your organization subscribes. • Adjust enablement settings for data sampling, access to a Soda-hosted Agent, and access to Soda AI features in your account.
Users
• View a list of people who have access to the Soda Cloud account. • Review each user's License status as an Author or Viewer, their access to Admin permissions, and the user groups to which they belong. • Reset a user's password • Deactivate a user's account.
User Groups
Create and manage custom groups of users in your Soda Cloud organization; see .
Global Roles
• View create, edit, or delete out-of-the-box or custom global roles. • View the users or user groups assigned to each global role.
Dataset Roles
• View create, edit, or delete out-of-the-box or custom dataset roles. • View or edit the datasets that use each dataset role. • Review or edit Responsibilities for newly onboarded datasets; see [Assign dataset roles](#assign-dataset-roles).
Integrations
Connect Soda Cloud to your organization's Slack workspace, MS Team channel, or other third-party tool via webhook.
You may find it useful to set up multiple organizations in Soda Cloud so that each corresponds with a different environment in your network infrastructure, such as production, staging, and development. Such a setup makes it easy for you and your team to access multiple, independent Soda Cloud organizations using the same profile, or login credentials.
Note that Soda Cloud associates any API keys that you generate within an organization with both your profile and the organization in which you generated the keys. API keys are not interchangeable between organizations.
Contact [email protected] to request multiple organizations for Soda Cloud.
A few Soda Cloud legacy licensing models include a specific number of Author licenses for users of the Soda Cloud account. A user's license status controls whether they can make changes to any datasets, checks, and agreements in the Soda Cloud account.
Authors essentially have read-write access to Soda Cloud resources and functionalities, and maintain the dataset role of Admin, Manager, or Editor.
Viewers essentially have read-only access to Soda Cloud resources and maintain the dataset role of Viewer.
To review the licenses that your users have, as a user with permission to do so, login to your Soda Cloud account and navigate to your avatar > Organization Settings.
Access the Users tab to view a list of people who have access to your Soda Cloud account, including:
the license each user has, if relevant
the user groups they belong to
if they have global Admin permissions
Click a user's Author or Viewer label in the License column to access a Responsibilities window that lists the user's access to resources (datasets, agreements, and checks), the role they hold for each resource, and their license status relative to the resource.
Create or edit user groups in Soda Cloud to manage global and dataset role-based permissions to resources.
As a user with permission to do so, navigate to your avatar > Organization Settings, then access the User Groups tab. Click Create User Group, then follow the guided workflow to create a group and add individual members. Once created, assign the user group to any of the following resources.
In the User Groups tab, assign an out-of-the-box or custom global role to user groups instead of individually assigning global roles to users.
In Edit Dataset Responsibilities, add a user group as a member and assign it a dataset role to control the way users in the group access or act upon the dataset.
Assign user groups as alert notification rules recipients to make sure the right team, with the right permissions for the dataset(s), gets notified when checks warn or fail.
For redundancy, assign to user groups instead of individual users.
Add a user group to a in Soda Cloud so the whole team can review newly-proposed no-code checks.
Add user groups as in an agreement so that whole teams can collaborate on the expected state of data quality for one or more datasets.
If you use an SSO integration to manage your team’s access to Soda Cloud, you can optionally choose to synchronize the user groups you have defined in your identity provider (Okta, Azure AD, etc.) and assign roles to those synched user groups in Soda Cloud. See: Sync user groups from an IdP
Create or edit global and dataset roles to assign to users or user groups in Soda Cloud.
As a user with permission to do so, navigate to your avatar > Organization Settings, then access the Global Roles tab. Click Add Global Role, then follow the guided workflow to name a role and add permissions groups. Refer to the table above for a list of permissions groups, and their associated permissions, that you can assign to global roles.
To associate individual users or user groups with global roles, you can do so in one of two ways:
Add users or groups to role: Navigate to your avatar > Organization Settings. In the Global Roles tab, click the stacked dots next to the role to which you wish to assign to users or groups and select Assign Members.
Add role to user or group: Navigate to your avatar > Organization Settings. In the Users tab or User Groups, click the stacked dots next to the user or group to which you wish to assign a particular global role and select Assign Global Roles.
To meet your organization's regulatory and policy mandates, you can download a CSV file that contains an audit trail of activity on your Soda Cloud account for a date range you specify. The file contains details of each user's actions, their email and IP addresses, and a timestamp of the action. An Admin is the only account-level role that can access an audit trail for a Soda Cloud account.
As a user with the permission to do so, login to your Soda Cloud account and navigate to your avatar > Organization Settings. Only Admins can view Organization Settings.
Access the Audit Trail tab, then set the date range of usage details you wish to examine and click Download.
Alternatively, you can use the Audit Trail endpoint in Soda Cloud’s Reporting API to access audit trail data.
Learn more about the relationship between resources in Soda’s architecture.
Organize your datasets to facilitate your search for the right data.
Invite colleagues to join your organization’s Soda Cloud account.
Learn more about creating and tracking Soda Incidents.
Need help? Join the .
The validation key:value pairs in schema checks set the conditions for a warn or a fail check result. See a List of validation keys below.
For example, the following check uses the when required column missing validation key to validate that specific columns are present in a dataset; if any of columns in the list are absent, the check result is fail.
In the example above, the value for the validation key is in a nested list format, but you can use an inline list of comma-separated values inside square brackets instead. The following example yields identical check results to the example above.
You can define a schema check with both warn and fail alert conditions, each with multiple validation keys. Refer to Configure multiple alerts for details. Be aware, however, that a single schema check only ever produces a single check result. See Expect one check result below for details.
The following example is a single check; Soda executes each of its validations during a scan. Note that unlike the nested list of column names in the example above, the nested key:value pairs that form the value for these validation keys are indented, but do not use a -.
Add a schema_name parameter to a schema check to address a situation in which you need to explicitly identify or override a dataset's schema in the data source.
✖️ Requires Soda Core Scientific (included in a Soda Agent) ✖️ Supported in Soda Core ✔️ Supported in Soda Library + Soda Cloud ✔️ Supported in Soda Cloud Agreements + Soda Agent ✔️ Available as a no-code check with a self-hosted Soda Agent connected to any Soda-supported data source, except Spark, and Dask and Pandas ✔️ Available as a no-code check with a Soda-hosted Agent connected to a BigQuery, Databricks SQL, MS SQL Server, MySQL, PostgreSQL, Redshift, or Snowflake data source
Rather than specifying exact parameters for column changes, you can use the when schema changes validation key to warn or fail when indistinct changes occur in a dataset.
Soda Cloud must have at least two measurements to yield a check result. In other words, the first time you run a scan to execute a schema evolution check, Soda returns no results because it has nothing against which to compare; the second scan that executes the check yields a check result.
The output in Soda Cloud displays the output of all the alert states during the scan.
✓
Define a name for a schema check; see .
✓
Add an identity to a check.
✓
Define alert configurations to specify warn and fail alert conditions; see .
Apply an in-check filter to return results for a specific portion of the data in your dataset.
You can use * or % as wildcard characters in a list of column names. If the column name begins with a wildcard character, add single quotes as per the example below.
when required column missing
one or more column names in an inline list of comma-separated values, or a nested list
when forbidden column present
one or more column names in an inline list of comma-separated values, or a nested list
when wrong column type
nested key:value pair to identify column:expected_data_type
when wrong column index
nested key:value pair to identify column:expected_position_in_dataset_index
when schema changes
any as an inline value
column add as a nested list item
column delete as a nested list item
column index change as a nested list item
column type change as a nested list item
Be aware that a check that contains one or more alert configurations only ever yields a single check result; one check yields one check result. If your check triggers both a warn and a fail, the check result only displays the more severe, failed check result.
Using the following example, Soda Library, during a scan, discovers that the data in the dataset triggers both alerts, but the check result at the bottom is Oops! 1 failures. Nonetheless, the results in the Scan summary section of the CLI output still display both the warn and fail alerts as having been triggered.
To address a common use case, you may wish to use a schema check in combination with a for each configuration and wildcard characters to automatically detect columns that contain personally identifiable information (PII) in your datasets, as in the following example.
Learn more about SodaCL metrics and checks in general.
Use a reference check to validate matching contents between datasets.
Reference tips and best practices for SodaCL.
Need help? Join the .
A Soda Check is a test that Soda performs when it scans a dataset in your data source. A Soda scan executes the checks you defined and returns a result for each check: pass, fail, or error. Optionally, you can configure a check to warn instead of fail by setting an alert configuration.
With over 25 built-in SodaCL checks and metrics to choose from, it can be hard to know where to begin. This tutorial offers suggestions for some basic checks you can write to begin surfacing missing, invalid, unexpected data in your datasets.
All the example checks in this tutorial use placeholder values for dataset and column name identifiers, but you can copy+paste the examples into your own checks YAML file and adjust the details to correspond to your own data.
You do not need to follow the tutorial sequentially.
You have completed the Get started tutorial OR you have followed the instructions on the Roadmap on your own.
You have created a new YAML file in your code editor and named it checks.yml
OR
you are on step 2 in the guided flow to create a new Soda Agreement.
(Optional) You have read the first two sections in Metrics and checks as a primer for SodaCL.
One of the most basic checks you can write uses the row_count metric. When it executes the following check during a scan, Soda simply counts the rows in the dataset you identify in the checks for section header to confirm that the dataset is not empty. If it counts one or more rows, the check result is pass.
The check above is an example that use a numeric metric in a standard check pattern. By contrast, the following unique cross check compares row counts between datasets within the same data source without setting a threshold for volume, like > 50.
This type of check is useful when, for example, you want to compare row counts to validate that a transformed dataset contains the same volume of data as the source from which it came.
Run a scan to execute your checks:
For the nearly universal use case that demands uniqueness, you can use the duplicate_count or duplicate_percent metrics. In the following example, Soda counts the number of duplicate values in the column_name column, identified as the argument in parentheses appended to the metric. If there is even one value that is a duplicate of another, the check result is fail.
This type of check is useful when, for example, you need to make sure that values in an id column are unique, such customer_id or product_id.
If you wish, you can check for duplicate pairs in multiple columns. In the following example, Soda counts the number of duplicate values in both column_name1 and column_name2. Be sure to add a space between the comma-separated values in the list of column names.
Run a scan to execute your checks:
If your dataset contains a column that stores timestamp information, you can configure a freshness check. This type of check is useful when, for example, you need to validate that the data feeding a weekly report or dashboard is not stale. Timely data is reliable data!
In this example, the check fails if the most-recently added row (in other words, the youngest row) in the timestamp_column_name column is more than 24 hours old.
Run a scan to execute your checks:
SodaCL's missing metrics make it easy to find null values in a column. You don't even have to specify that NULL qualifies as a missing value because SodaCL registers null values as missing by default. The following check passes if there are no null values in column_name, identified as the value in parentheses.
If the type of data a dataset contains is TEXT (string, character varying, etc.), you can use an invalid metric to surface any rows that contain ill-formatted data. This type of check is useful when, for example, you need to validate that all values in an email address column are formatted as [email protected].
The following example fails if, during a scan, Soda discovers that more than 5% of the values in the email_column_name do not follow the email address format.
If you want to surface more than just null values as missing, you can specify a list of values that, in the context of your business rules, qualify as missing. In the example check below, Soda registers N/A, 0000, or none as missing values in addition to NULL; if it discovers more than 5% of the rows contain one of these values, the check fails.
Note that the missing value 0000 is wrapped in single quotes; all numeric values you include in such a list must be wrapped in single quotes.
Run a scan to execute your checks:
If you need to validate that data in one column of a dataset exists in a column in another dataset, you can use a reference check. The following unique check compares the values of state_code to confirm that those values exist in code in the iso_3166-2 dataset in the same data source. The check passes if the values in the state_code exist in code.
If you wish, you can compare the values of multiple columns in one check. Soda compares the column names respectively, so that in the following example, column_name1 compares to other_column1, and column_name2 compares to other_column2.
Run a scan to execute your checks:
To eliminate the frustration of the silently evolving dataset schema, use schema checks with alert configurations to notify you when column changes occur.
If you have set up a Soda Cloud account, you can use a catch-all schema check, also known as a schema evolution check, that results in a warning whenever a Soda scan reveals that a column has been added, removed, moved within the context of an index, or changed data type relative to the results of the previous scan.
If you wish to apply a more granular approach to monitoring schema changes, you can specify columns in a dataset that ought to be present or which should not exist in the dataset.
The following example warns you when, during a scan, Soda discovers that column_name is missing in the dataset; the check fails if either column_name1 or column_name2 exist in the dataset. This type of check is useful when, for example, you need to ensure that datasets do not contain columns of sensitive data such as credit card numbers or personally identifiable information (PII).
Be aware that a check that contains one or more alert configurations only ever yields a single check result; one check yields one check result. If your check triggers both a warn and a fail, the check result only displays the more severe, failed check result. Read more.
Run a scan to execute your checks:
Get your logic straight: your check defines a passing state, what you expect to see in your dataset. Do not define a failed state.
Take careful note of the data type of the column against which you run a check. For example, if numeric values are stored in a column as data type TEXT, a numeric check such as min or avg is incalculable.
A check that uses alert configurations only ever returns one check result. See Expect one check result.
The invalid format configuration key only works with data type TEXT. See .
Not all checks support in-check filters. See .
To avoid typos or spelling errors, best practice dictates that you copy + paste any dataset or column names into your checks.
It is good practice to add a custom name to your check. Establish a naming convention – word order, underscores, identifiers – and apply easily-digestible check names for any colleagues with whom you collaborate.
Be sure to add a colon to the end of a check whenever you add a second line to a check such as for a missing or invalid configuration key, or if you add a custom name for your check.
Indentations in the SodaCL syntax are critical. If you encounter an error, check your indentation first.
Spaces in the SodaCL syntax are critical. For example, be sure to add a space before and after your threshold symbol ( =, >, >= ); do not add a space between a metric and the column to which it applies, such as duplicate_count(column1).
All comma-separated values in lists in SodaCL use a comma + space syntax, such as duplicate_count(column1, column2); do not forget to add the space.
Note that multi-word checks such as missing_count use underscores, but configuration keys, such as missing regex, do not. See and .
If you use missing values or invalid values configuration keys, note that values in a comma-separated list must be enclosed in square brackets. For example, [US, BE, CN].
Column names that contain colons or periods can interfere with SodaCL’s YAML-based syntax. For any column names that contain these punctuation marks, to the column name in the check to prevent issues.
If you are using a failed row check with a CTE fail condition, however, the syntax checker does not accept an expression that begins with double-quotes. In that case, as a workaround, add a meaningless true and to the beginning of the CTE, as in the following example.
Learn more about SodaCL metrics and checks in general.
Read about the Optional configurations you can apply to SodaCL checks.
Get started to run a simple data quality scan on example data.
Need help? Join the .
Available in 2025: Activate an anomaly dashboard to automatically gain observability insight into data quality.
✔️ Requires Soda Core Scientific (included in a Soda Agent) ✖️ Supported in Soda Core ✔️ Supported in Soda Library + Soda Cloud ✔️ Supported in Soda Cloud + self-hosted Soda Agent connected to any Soda-supported data source, except Spark, and Dask and Pandas ✔️ Supported in Soda Cloud + Soda-hosted Agent connected to a BigQuery, Databricks SQL, MS SQL Server, MySQL, PostgreSQL, Redshift, or Snowflake data source
Dataset discovery captures basic information about each dataset, including a dataset's schema and the data type of each column. You add dataset discovery as part of the guided workflow to create a new data source. Navigate to your avatar > Data Sources > New Data Source to begin.
In step 3 of the guided workflow, you have the option of listing the datasets you wish to profile. Dataset discovery can be resource-heavy, so carefully consider the datasets about which you truly need profile information. Refer to Compute consumption and cost considerations for more detail.
SodaCL supports SQL wildcard characters such as %, *, or _. Refer to your data source's documentation to determine which SQL wildcard characters it supports and how to escape the characters, such as with a backslash \, if your dataset or column names use characters that SQL would consider wildcards.
The example configuration below uses a wildcard character (%) to specify that, during a scan, Soda Library discovers all the datasets the data source contains except those with names that begin with test.
The example configuration below uses a wildcard character (_). During a scan, Soda discovers all the datasets that start with customer and any single character after that, such as customer1, customer2, customer3. However, in the example below, Soda does not include dataset names that are exactly eight characters or are more than nine characters, as with customer or customermain.
The example configuration below uses both an escaped wildcard character (\_) and wildcard character(*). During a scan, Soda discovers all the datasets that start with north_ and any single or multiple character after that. For example, it includes north_star, north_end, north_pole. Note that your data source may not support backslashes to escape a character, so you may need to use a different escape character.
You can also specify individual datasets to include or exclude, as in the following example.
If your data source is very large, you may wish to disable dataset discovery completely. To do so, you can use the following configuration.
After you have added the data source in Soda Cloud and the first scan to profile your data is complete, you can review the discovered datasets in Soda Cloud.
Navigate to the Datasets dashboard, then click a dataset name to open the dataset's info page. Access the Columns tab to review the datasets that Soda Library discovered, including the type of data each column contains.
Column profile information includes details such as the calculated mean value of data in a column, the maximum and minimum values in a column, and the number of rows with missing data.
Depending on your deployment model, or flavor, of Soda, profiling a dataset produces one or two tabs' worth of data in a Dataset page in Soda Cloud.
✅
✅
Available in 2025
✅
Available in 2025
✅
In the Columns tab, you can see column profile information including details such as the calculated mean value of data in a column, the maximum and minimum values in a column, and the number of rows with missing data.
In the Anomalies tab, you can access an out-of-the-box anomaly dashboard that uses the column profile information to automatically begin detecting anomalies in your data relative to the patterns the machine learning algorithm learns over the course of approximately five days. Learn more (Available in 2025)
In Soda Cloud, you add column profiling as part of the guided workflow to create a new data source. Navigate to your avatar > Data Sources > New Data Source to begin.
For preview participants, only If you have already added a data source to your Soda Cloud account via a self-hosted or Soda-hosted agent and wish to activate an anomaly dashboard for one or more datasets, refer to the activation instructions.
If you are using a self-operated deployment model that leverages Soda Library, add the column profiling configuration outlined below to your checks YAML file.
In step 4 of the guided workflow, or in your checks YAML file, add configuration to list the columns of datasets you wish to profile.
Be aware that Soda can only profile columns that contain NUMBERS or TEXT type data; it cannot profile columns that contain TIME or DATE data except to create a freshness check for the anomaly dashboard.
Soda performs the Discover datasets and Profile datasets actions independently, relative to each other. If you define exclude or include rules in the Discover tab, the Profile configuration does not inherit the Discover rules. For example, if, for Discover, you exclude all datasets that begin with staging_, then configure Profile to include all datasets, Soda discovers and profiles all datasets.
Column profiling can be resource-heavy, so carefully consider the datasets for which you truly need column profile information. Refer to Compute consumption and cost considerations for more detail.
The example configuration below uses a wildcard character (%) to specify that, during a scan, Soda captures the column profile information for all the columns in the dataset named retail_orders. The . in the syntax separates the dataset name from the column name. Since _ is a wildcard character, the example escapes the character with a backslash \. Note that your data source may not support backslashes to escape a character, so you may need to use a different escape character.
You can also specify individual columns to profile, as in the following example.
Refer to the top of the page for more example configurations for column profiling.
If you wish to disable column profiling and any automated anomaly detection checks completely so that Soda Cloud profiles no columns at all, you can use the following configuration.
If you wish to disable column profiling at the organization level, you must possess Admin privileges in your Soda Cloud account. Once confirmed, follow these steps:
Navigate to your avatar.
Click on Organization settings.
Uncheck the box labeled Allow Soda to collect column profile information.
After you have added the data source in Soda Cloud and the first scan to profile your data is complete, you can review the profiled columns in Soda Cloud.
Navigate to the Datasets dashboard, then click a dataset name to open the dataset's info page.
Access the Columns tab to review the datasets that Soda Library discovered, including the column profile details you can expand to review as in the example below.
When available and activated for an anomaly dashboard for a dataset, access the Anomalies tab to review the automated anomaly detection checks that Soda applied to your data based on the profiling information it collected.
To add those necessary quotes to dataset names that Soda acts upon automatically – discovering, profiling, or sampling datasets, or creating automated monitoring checks – you can add a quote_tables configuration to your data source, as in the following example.
If your dataset names include white spaces or use special characters, you must wrap those dataset names in quotes whenever you identify them to Soda, such as in a checks YAML file.
Both column profiling and dataset discovery can lead to increased computation costs on your data sources. Consider adding these configurations to a select few datasets to keep costs low.
Dataset discovery gathers metadata to discover:
the datasets in a data source
the columns that datasets contain
the data type of columns
Column profiling aims to issue the most optimized queries for your data source, however, given the nature of the derived metrics, those queries can result in full dataset scans and can be slow and costly on large datasets. Column profiling derives the following metrics:
Numeric Columns
minimum value
maximum value
five smallest values
five largest values
five most frequent values
average
sum
standard deviation
variance
count of distinct values
count of missing values
histogram
Text Columns
five most frequent values
count of distinct values
count of missing values
average length
minimum length
maximum length
Date Time Columns
five smallest values
five largest values
five most frequent values
count of distinct values
count of missing values
minimum timestamp
maximum timestamp
If you configure discover datasets or profile columns to include specific datasets or columns, Soda implicitly excludes all other datasets or columns from discovery or profiling.
If you combine an include config and an exclude config and a dataset or column fits both patterns, Soda excludes the dataset or column from discovery or profiling.
Soda performs the Discover datasets and Profile datasets actions independently, relative to each other. If you configured discover datasets to exclude a dataset but do not explicitly also exclude its columns in profile columns, Soda discovers the dataset and profiles its columns. For example, if, for discover datasets, you exclude all datasets that begin with staging_, then configure profile columns to include all datasets, Soda discovers and profiles all datasets.
Known issue: Currently, SodaCL does not support column exclusion for the column profiling and dataset discovery configurations when connecting to a Spark DataFrame data source (soda-library-spark-df).
Known issue: SodaCL does not support using variables in column profiling and dataset discovery configurations.
Data type: Soda can only profile columns that contain NUMBERS, TEXT or DATE / TIMESTAMP type data and BOOLEANS.
Spark: Soda usually uses the profiling include/exclude pattern to build the query that retrieves a dataset’s metadata, but Spark does not support such profiling. Instead, Soda retrieves all the datasets in a schema, then filters the list based on the include/exclude pattern, changing all % wildcard values with .* to translate a SQL pattern into a regular expression pattern.
Performance: Both column profiling and dataset discovery can lead to increased computation costs on your data sources. Consider adding these configurations to a selected few datasets to keep costs low. See for more detail.
Workaround: If you wish, you can indicate to Soda to include all datasets in its dataset discovery or column profiling by using wildcard characters, as in %.%. Because YAML, upon which SodaCL is based, does not naturally recognize %.% as a string, you must wrap the value in quotes, as in the following example.
Learn about managing failed row samples for SodaCL checks that collect and dispaly failed rows in Soda Cloud to aid issue investigation.
Learn more about the anomaly dashboard for datasets.
Reference tips and best practices for SodaCL.
Use a freshness check to gauge how recently your data was captured.
Use to compare the values of one column to another.
Need help? Join the .
See also: Integrate with Jira
See also: Integrate with ServiceNow
Confirm that the third-party can provide an incoming webhook URL that meets the following technical specifications:
can return an HTTP status code between 200 and 400
can reply to a request within 10 seconds (otherwise the request from Soda Cloud times out)
provides an SSL-secured endpoint (https://) of TLS 1.2 or greater
In your Soda Cloud account, navigate to your avatar > Organization Settings, then select the Integrations tab.
Click the + at the upper right of the table of integrations to add a new integration.
In the Add Integration dialog box, select Webhook then follow the guided steps to configure the integration. Reference the following tables for guidance on the values to input in the guided steps.
Name
Provide a unique name for your webhook in Soda Cloud. Required
URL
Input the incoming webhook URL or API endpoint provided by your service provider. See sections below for details. Required
HTTP Headers, Name
For example, Authorization:
HTTP Headers, Value
For example, bearer [token]
Enable to send notifications to this webhook when a check result triggers an alert.
Check to allow users to select this webhook as a destination for alert notifications when check results warn or fail.
Use this webhook as the default notification channel for all check result alerts.
Check to automatically configure check results alert notifications to this webhook by default. Users can deselect the webhook as the notification destination in an individual check, but it is the prepopulated destination by default.
You can use a webhook to enable Soda Cloud to send alert notifications to a third-party provider, such as OpsGenie, to notify your team of warn and fail check results. With such an integration, Soda Cloud enables users to select the webhook as the destination for an individual check or checks that form a part of an agreement, or multiple checks.
To send notifications that apply to multiple checks, see Set notification rules.
Soda Cloud alert notifications make use of the following events:
Access a third-party service provider's documentation for details on how to set up an incoming webhook or API call, and obtain a URL to input into the Soda webhook configuration in step 4, above. The following links may be helpful starting points.
You can use a webhook to integrate with a third-party service provider, such as Jira, to track incidents. With such an integration, Soda Cloud displays an external link for the integration in the Incident Details.
Soda Cloud incident integrations make use of the following events:
When Soda Cloud sends an incidentCreated event to a webhook endpoint, the third-party service provider can respond with a link message. In such a case, Soda Cloud adds the link to the incident. The following is an example of the response payload.
For incident integrations with third-party service providers that do not provide a link message in the response, you can use a callback URL. In such a case, when Soda Cloud sends an incidentCreated event to the third-party, you can configure the third-party response to include an incidentLinkCallbackUrl property.
Configure the third-party response to make a POST request to this callback URL, including the text and url in the body of the JSON payload. Soda Cloud adds the callback URL as an integration link in the incident details.
The following is an example of the response payload with a callback URL.
You can use a webhook to enable Soda Cloud to send Soda agreement events to a third-party service provider. By integrating Soda with a third-party service provider for version control, such as GitHub, your team can maintain visibility into agreement changes, additions, and deletions
Soda Cloud agreement notifications make use of the following events:
Access a third-party service provider's documentation for details on how to set up an incoming webhook or API call, and obtain a URL to input into the Soda webhook configuration in step 4, above.
Soda Cloud expects the integration party to return an HTTP status code 200 success response; it ignores the body of the response.
The following list of event payloads outlines the information that Soda Cloud sends when an action triggers a webhook.
Soda Cloud sends this event payload to validate that the integration with the third-party service provider works. Soda Cloud sends this event during the guided workflow to set up an integration.
Soda Cloud sends this event payload when a user creates a new agreement in the Soda Cloud account.
Soda Cloud sends this even payload when a user adjusts the contents of an agreement. Soda Cloud does not send this event when an agreement's review status has changed.
Soda Cloud sends this event payload when a user deletes an agreement in the Soda Cloud account.
Soda Cloud sends this event payload when it receives new check results. If the check is part of an agreement, the payload includes the agreement identifier.
Soda Cloud sends this event payload when you create a new incident.
Soda Cloud sends this event payload when an incident has been updated with, for example, a status change, when a new Lead has been assigned, or when check results have been added to the incident.
As a business user, learn more about writing no-code checks in Soda Cloud.
Set notification rules that apply to multiple checks in your account.
Learn more about creating, tracking, and resolving data quality Incidents.
Access a list of all integrations that Soda Cloud supports.
Need help? Join the .
WHEREExcept with a NOW variable, you cannot use variables in checks you write in an agreement in Soda Cloud as it is impossible to provide the variable values at scan time.
Known issue: Dataset filters are not compatible with failed rows checks which use a SQL query. With such a check, Soda does not apply the dataset filter at scan time.
Use in-check filters to exclude rows from an individual check evaluation.
In-check filters provide the ability to create conditions, or business rules, that data in a column must meet before Soda includes a row in a check evaluation. In other words, Soda first finds rows that match the filter, then executes the check on those rows. As an example, you may wish to use an in-check filter to support a use case in which "Column X must be filled in for all rows that have value Y in column Z".
When you find yourself adding the same in-check filters to multiple checks, you may wish to promote an in-check filter to a dataset filter.
✖️ Requires Soda Core Scientific (included in a Soda Agent) ✔️ Supported in Soda Core ✔️ Supported in Soda Library + Soda Cloud ✔️ Supported in Soda Cloud Agreements + Soda Agent ✔️ Available as a no-code check with a self-hosted Soda Agent connected to any Soda-supported data source, except Spark, and Dask and Pandas OR with a Soda-hosted Agent connected to a BigQuery, Databricks SQL, MS SQL Server, MySQL, PostgreSQL, Redshift, or Snowflake data source
Add a filter to a check to apply conditions that specify a portion of the data against which Soda executes the check. For example, you may wish to use an in-check filter to support a use case in which “Column X must be filled in for all rows that have value Y in column Z”.
Add a filter as a nested key:value pair, as in the following example which filters the scan results to display only those rows with a value of 81 or greater and which contain 11 in the sales_territory_key column. You cannot use a variable to specify an in-check filter.
If your filter uses a string as a value, be sure to wrap the string in single quotes, as in the following example.
You can use AND or OR to add multiple filter conditions to a filter key:value pair to further refine your results, as in the following example.
To improve the readability of multiple filters in a check, consider adding filters as separate line items, as per the following example.
If your column names use quotes, these quotes produce invalid YAML syntax which results in an error message. Instead, write the check without the quotes or, if the quotes are mandatory for the filter to work, prepare the filter in a text block as in the following example.
Be aware that if no rows match the filter parameters you set, Soda does not evaluate the check. In other words, Soda first finds rows that match the filter, then executes the check on those rows.
If, in the example above, none of the rows contained a value of 11 in the sales_territory_key column, Soda does not evaluate the check and returns a NOT EVALUATED message in the CLI scan output, such as the following.
See also: Troubleshoot SodaCL.
all numeric metrics, except duplicate_count and duplicate_percent
both missing metrics
both validity metrics
✖️ Requires Soda Core Scientific (included in a Soda Agent) ✔️ Supported in Soda Core ✔️ Supported in Soda Library + Soda Cloud ✖️ Supported in Soda Cloud Agreements + Soda Agent ✖️ Available as a no-code check
It can be time-consuming to check exceptionally large datasets for data quality in their entirety. Instead of checking whole datasets, you can use a dataset filter to specify a portion of data in a dataset against which Soda Library executes a check.
Except with a NOW variable, you cannot use variables in checks you write in an agreement in Soda Cloud as it is impossible to provide the variable values at scan time.
Known issue: Dataset filters are not compatible with failed rows checks which use a SQL query. With such a check, Soda does not apply the dataset filter at scan time.
In your checks YAML file, add a section header called filter, then append a dataset name and, in square brackets, the name of the filter. The name of the filter cannot contain spaces. Refer to the example below.
Nested under the filter header, use a SQL expression to specify the portion of data in a dataset that Soda Library must check.
The SQL expression in the example references two variables: ts_start and ts_end.
Variables must use the following syntax: ${VAR_NAME}.
When you run the soda scan command, you must include these two variables as options in the command; see step 5.
Add a separate section for checks for your_dataset_name [filter name]. Any checks you nest under this header execute only against the portion of data that the expression in the filter section defines. Refer to the example below.
Write any checks you wish for the dataset and the columns in it.
When you wish to execute the checks, use Soda Library to run a scan of your data source and use the -v option to include each value for the variables you included in your filter expression, as in the example below.
If you wish to run checks on the same dataset without using a filter, add a separate section for checks for your_dataset_name without the appended filter name. Any checks you nest under this header execute against all the data in the dataset.
If your data source is partitioned, or if you wish to apply checks in your agreement to a specific interval of time, you can do so using a dataset filter.
Use the built-in NOW variable to specify a relative time partition. Reference the following example to add a dataset filter to either your checks YAML file, or to the Write Checks step in the agreement workflow in Soda Cloud. The where clause in the example defines the time partition to mean "now, less one day".
✖️ Requires Soda Core Scientific (included in a Soda Agent) ✔️ Supported in Soda Core ✔️ Supported in Soda Library + Soda Cloud ✖️ Supported in Soda Cloud Agreements + Soda Agent ✖️ Available as a no-code check
You can use variables in SodaCL to:
define dynamic dataset filters
customize dynamic check names
define dynamic in-check values; see examples below
define dynamic in-check filters; see example below
Except with a NOW variable, you cannot use variables in checks you write in an agreement in Soda Cloud as it is impossible to provide the variable values at scan time.
To provide a variable at scan time, as with dynamic dataset filters or with in-check values, add a -v option to the scan command and specify the key:value pair for the variable, as in the following example.
If you wish, you can provide the value more than one variable at scan time, as in the following example.
See also: Customize check names.
Scan command:
Scan command:
Scan command:
Read more about adding a check identity.
You can use variables to:
resolve credentials in configuration files using system variables; see Configure Soda
pass variables for values in configuration files; see instructions below
If you use Soda Library to execute Soda scans for data quality, you can pass variables at scan time to provide values for data source connection configuration keys in your configuration YAML file. For example, you may wish to pass a variable for the value of password in your configuration YAML. Except with a NOW variable, you cannot use variables in checks you write in an agreement in Soda Cloud as it is impossible to provide the variable values at scan time.
Adjust the data source connection configuration in your configuration YAML to include a variable.
Save then file, then run a scan that uses a -v option to include the value of the variable in the scan command.
You can provide the values for multiple variables in a single scan command.
Variables must use the following syntax: ${VAR_NAME}.
For consistency, best practice dictates that you use upper case for variable names, though you can use lower case if you wish.
If you do not explicitly specify a variable value at scan time to resolve credentials for a connection configuration, Soda uses environment variables.
You cannot use a variable to provide a scan-time value for a value, such as the value for valid length for an invalid_count check.
You may need to wrap date values for variables in single quotes for a check to execute properly. The use of single quotes is bound to the data source, so if your data source demands single quotes around date values for SQL queries, you must also include them when providing date values in SodaCL. Refer to the example at the top of this page.
Except for using the ${NOW} variable in a dataset filter to for checks, you cannot use variables when defining checks in an agreement in Soda Cloud. When using variables, you normally pass the values for those variables at scan time, adding them to the soda scan command with a -v option. However, because scans that execute checks defined in an agreement run according to a scan definition, there is no opportunity to add dynamic values for variables at scan time.
Known issue: SodaCL does not support using variables in [profiling configurations]().
Except with a NOW variable, you cannot use variables in checks you write in an agreement in Soda Cloud as it is impossible to provide the variable values at scan time.
Reference tips and best practices for SodaCL.
Use a for each configuration to execute checks on multiple datasets.
Learn more about Optional check configurations.
Need help? Join the .


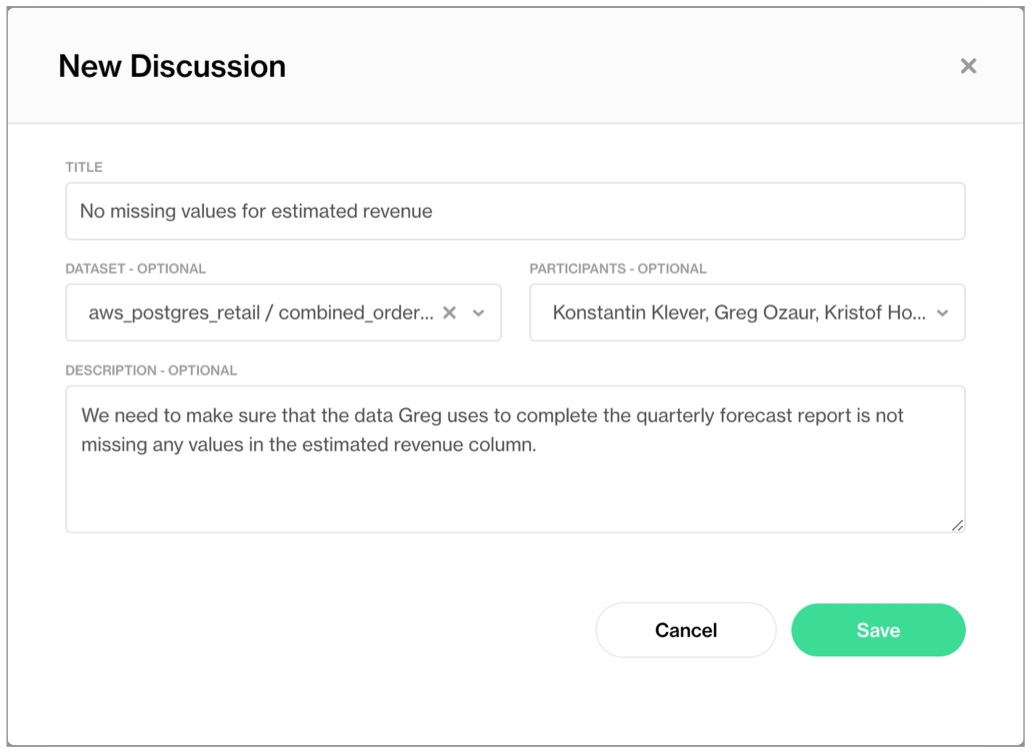
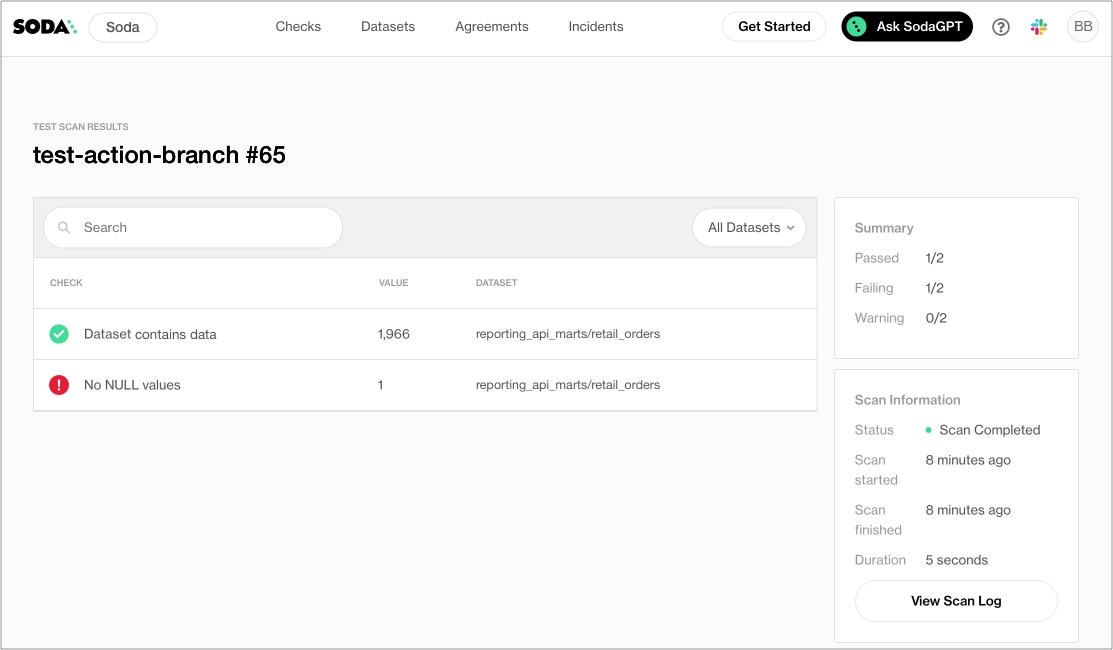
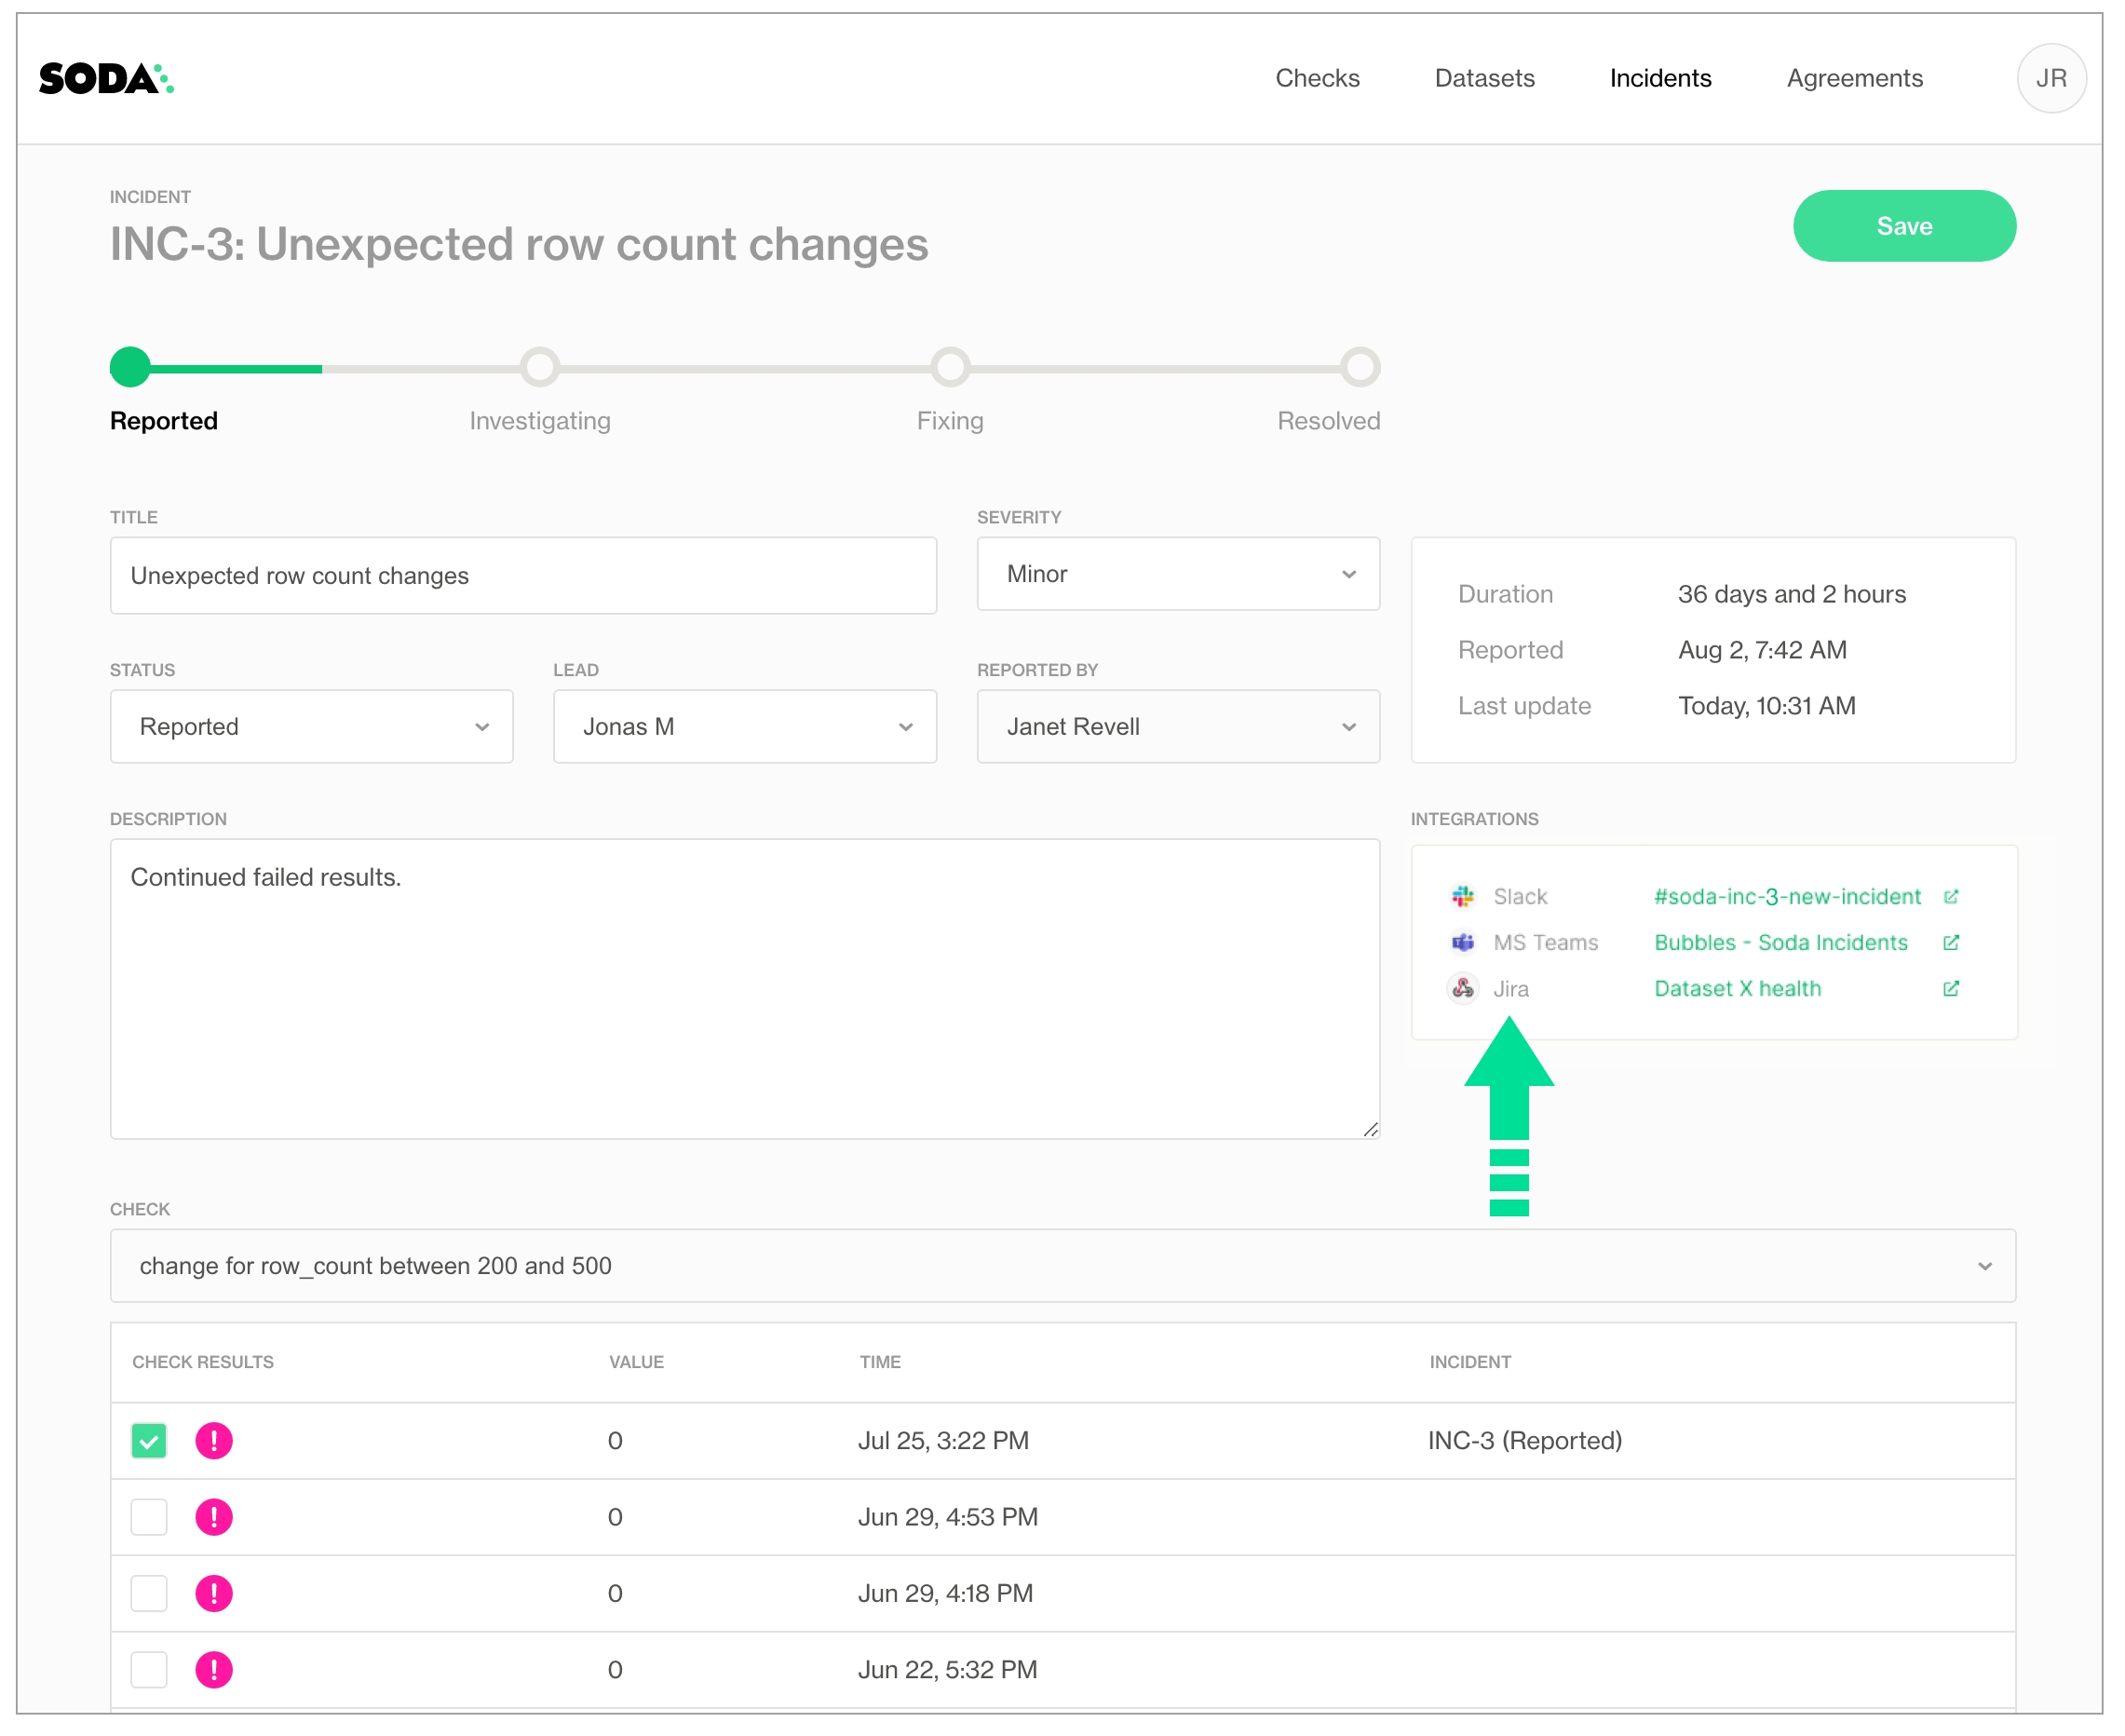
Use this guide to invoke Soda data quality tests in an Azure Data Factory pipeline.
Use this guide as an example of how to set up Soda to run data quality tests on data in an ETL pipeline in Azure Data Factory.
This guide offers an example of how to set up and trigger Soda to run data quality scans from an Azure Data Factory (ADF) pipeline.
The Data Engineer in this example has copied data from a PostgreSQL data source to an Azure SQL Server data source and uses Soda reconciliation checks in a Synapse notebook to validate that data copied from the source to the target is the same. Next, they create a second notebook to execute Soda checks to validate the completeness of the ingested data. Finally, the Engineer generates a visualized report of the data quality results.
This example uses a programmatic deployment model which invokes the Soda Python library, and uses Soda Cloud to validate a commercial usage license and display visualized data quality test results.
Read more: Read more: Read more:
The Data Engineer in this example has the following:
permission to configure Azure Cloud resources through the user interface
access to:
an Azure Data Factory pipeline
a Synapse workspace
To validate your account license or free trial, Soda Library must communicate with a Soda Cloud account via API keys. You create a set of API keys in your Soda Cloud account, then use them to configure the connection to Soda Library.
In a browser, the engineer navigated to to create a new Soda account, which is free for a 45-day trial.
They navigated to your avatar > Profile, then accessed the API keys tab and clicked the plus icon to generate new API keys.
They copy+pasted the API key values to their Azure Key Vault.
This example executes checks which, after a data migration, validate that the source and target data are matching. The first ADF Notebook Activity links to a notebook which contains the Soda connection details, the check definitions, and the script to run a Soda scan for data quality which executes the .
Download the notebook:
In the ADF pipeline, the Data Engineer for Synapse to a pipeline. In the Settings tab, they name the notebook Reconciliation Checks.
Next, in the Azure Synapse Analytics (Artifacts) tab, they create a that serves to execute the Notebook activity.
In the Settings tab, they and the base parameters to pass to it.
They in their Synapse workspace, then add the following contents that enable Soda to connect with the data sources, and with Soda Cloud. For the sensitive data source login credentials and Soda Cloud API key values, the example fetches the values from an Azure Key Vault. Read more: [Integrate Soda with a secrets manager](#integrate-with-a-secrets-manager)
They define the SodaCL reconciliation checks inside another YAML string. The checks include which they created in Soda Cloud. When added to checks, the Data Engineer can use the attributes to filter check results in Soda Cloud, build custom views (), and stay organized as they monitor data quality in the Soda Cloud user interface.
Finally, they define the script that runs the Soda scan for data quality, executing the reconcilation checks that validate the matching source and target data. If scan.assert_no_checks_fail() returns an AssertionError indicating that one or more checks have failed during the scan, then the Azure Data Factory pipeline halts.
Beyond reconciling the copied data, the Data Engineer uses SodaCL checks to gauge the completeness of data. In a new ADF Notebook Activity, they follow the same pattern as the reconciliation check notebook in which they configured connections to Soda Cloud and the data source, defined SodaCL checks, then prepared a script to run the scan and execute the checks.
Download the notebook:
The last activity in the pipeline is another Notebook Activity which runs a new Synapse notebook called Report. This notebook loads the data into a dataframe, creates a plot of the data, then saves the plot to an Azure Data Lake Storage location.
Download the notebook:
After running the ADF pipeline, the Data Engineer can access their Soda Cloud account to review the check results.
In the Checks page, they apply a filter to narrow the results to display only those associated with the Azure SQL Server data source against which Soda ran the data quality scans. Soda displays the results of the most recent scan.
Learn more about .
Learn more about in Soda Cloud.
Set to receive alerts when checks fail.
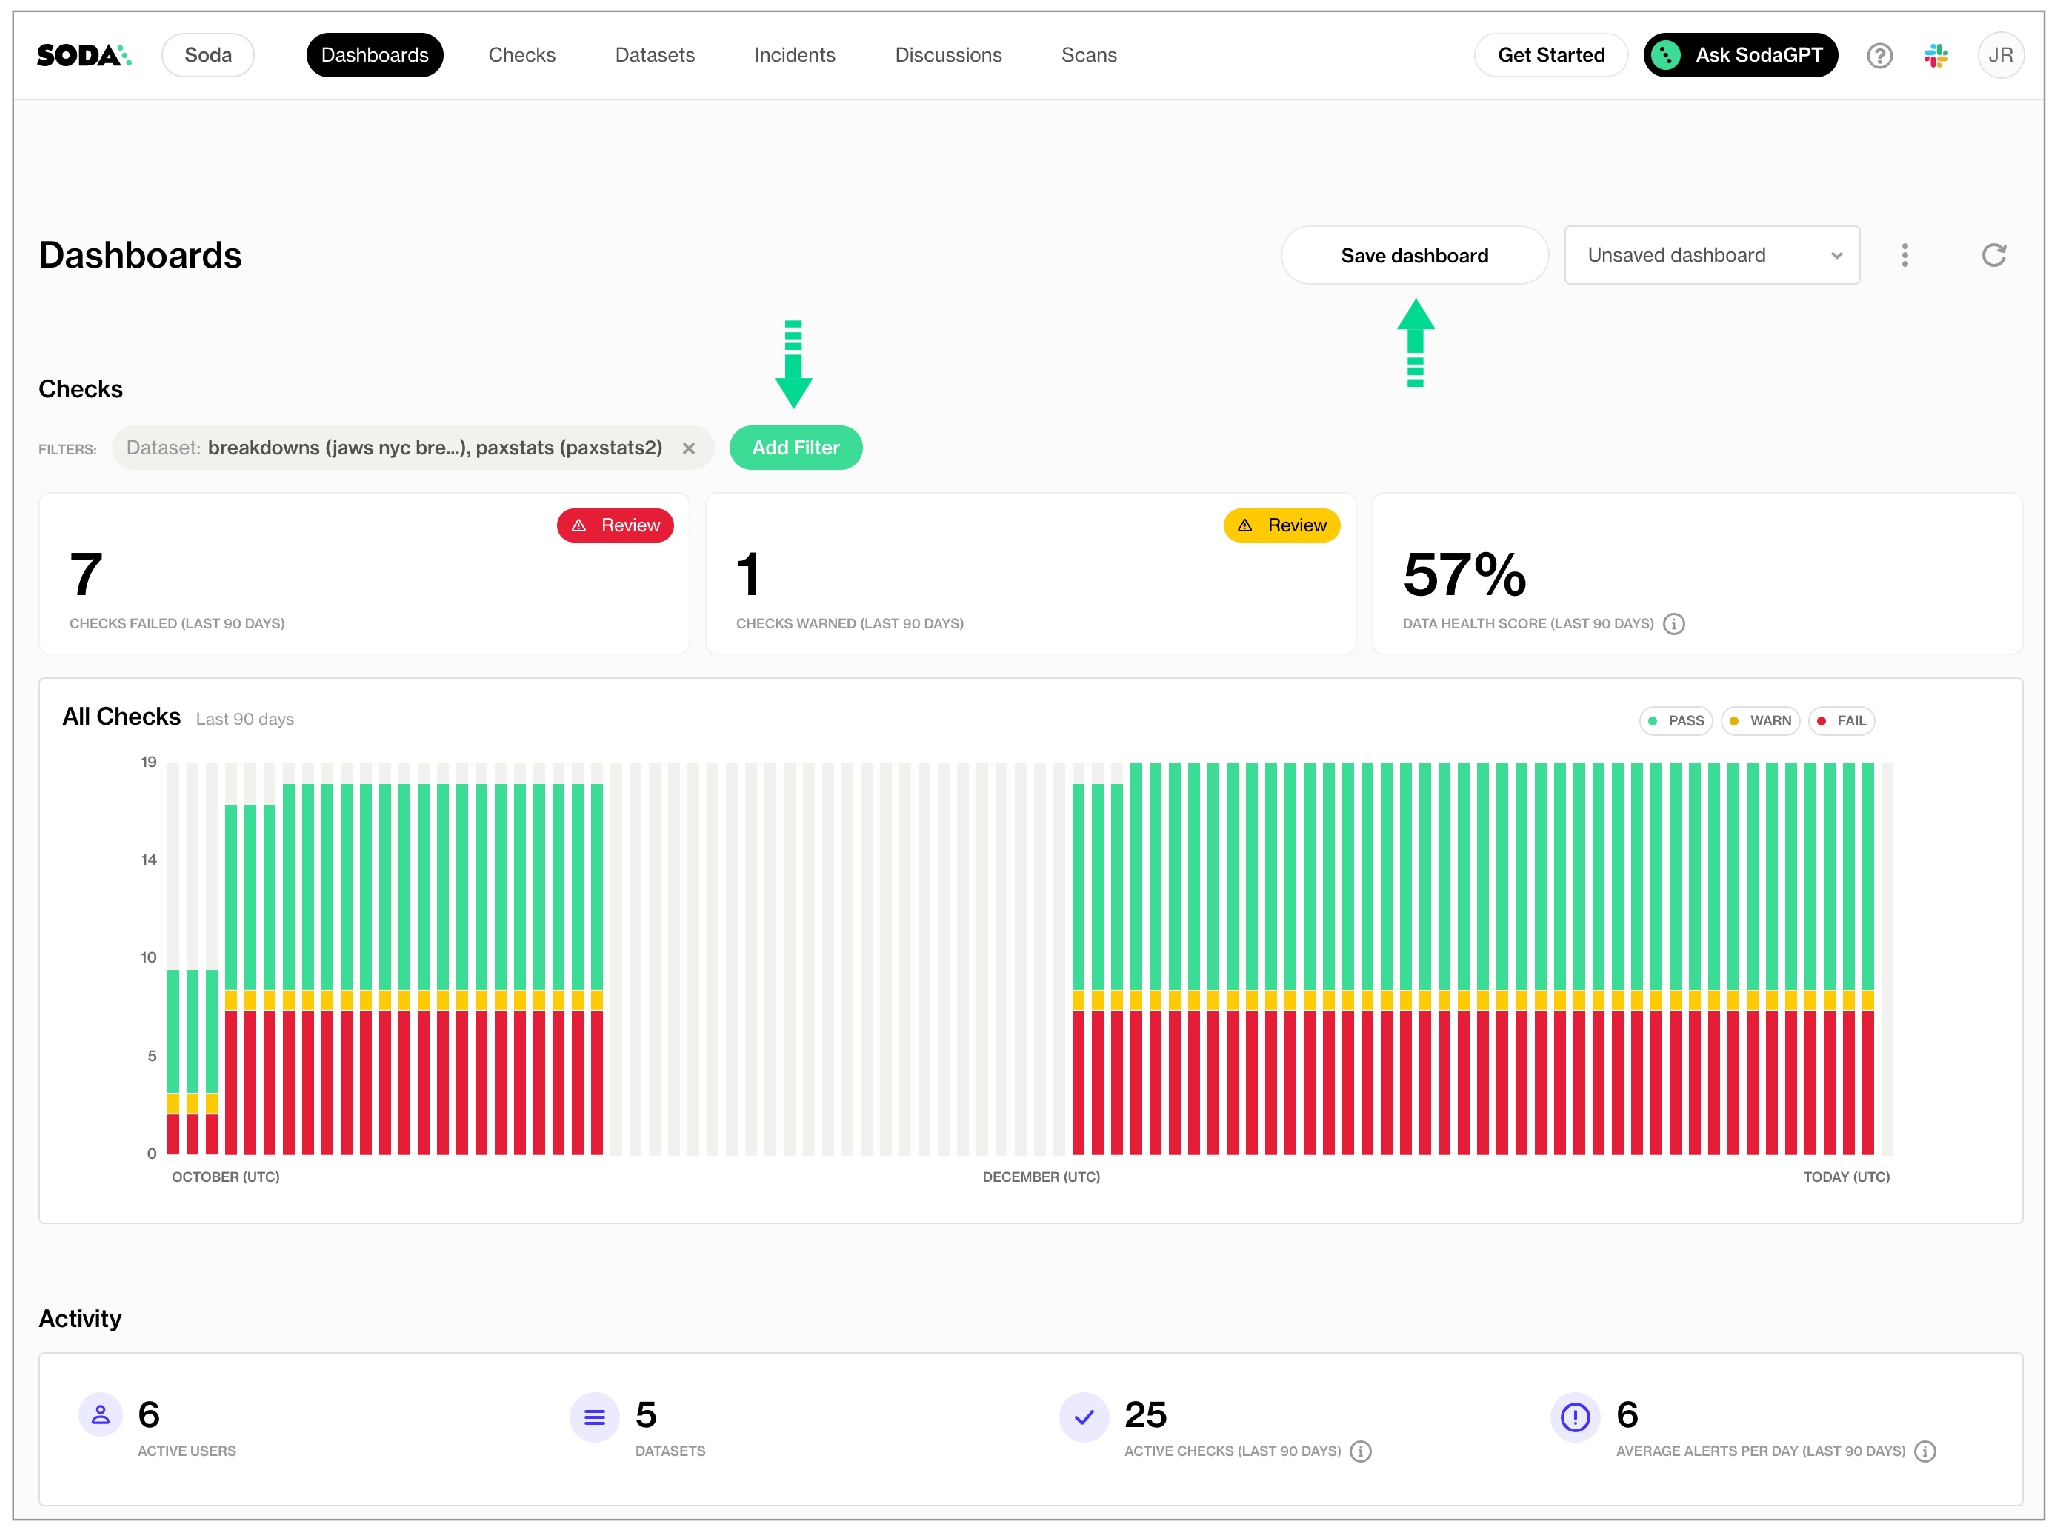
Use missing metrics in SodaCL checks to detect missing values in a dataset.
Use a missing metric in a check to surface missing values in the data in your dataset.
✖️ Requires Soda Core Scientific (included in a Soda Agent) ✔️ Supported in Soda Core ✔️ Supported in Soda Library + Soda Cloud ✔️ Supported in Soda Cloud Agreements + Soda Agent ✔️ Available as a no-code check
In the context of , you use missing metrics in standard checks. Refer to for exhaustive configuration details.
You can use both missing metrics in checks that apply to individual columns in a dataset; you cannot use missing metrics in checks that apply to entire datasets. Identify the column by adding a value in the argument between brackets in the check.
python3 -m venv .venv
source .venv/bin/activate
pip install -i https://pypi.cloud.soda.io soda-postgresdata_source my_database_name:
type: postgres
host:
port:
username:
password:
database:
schema:
soda_cloud:
# For US region, use cloud.us.soda.io
# For EU region, use cloud.soda.io
host: cloud.soda.io
api_key_id:
api_key_secret: soda test-connection -d my_datasource -c configuration.ymlsoda suggest -d my_datasource -c configuration.yml -ds your_dataset_namesoda scan -d my_datasource -c configuration.yml checks.ymldata_source fulfillment_apac_prod:
type: postgres
host: 127.0.0.1
port: '5432'
username: ${POSTGRES_USER}
password: ${POSTGRES_PASSWORD}
database: postgres
schema: public
data_source fulfillment_apac_staging:
type: postgres
host: localhost
port: '5432'
username: ${POSTGRES_USER}
password: ${POSTGRES_PASSWORD}
database: postgres
schema: public
data_source fulfillment_apac1_staging:
type: snowflake
username: ${SNOWFLAKE_USER}
password: ${SNOWFLAKE_USER}
account: my_account
database: snowflake_database
warehouse: snowflake_warehouse
connection_timeout: 240
role: PUBLIC
client_session_keep_alive: true
authenticator: externalbrowser
session_parameters:
QUERY_TAG: soda-queries
QUOTED_IDENTIFIERS_IGNORE_CASE: false
schema: public
```soda test-connection -d fulfillment_apac_staging -c configuration.yml
soda test-connection -d fulfillment_apac1_staging -c configuration.ymlreconciliation OrdersAPAC:
label: "Recon APAC orders"
datasets:
source:
dataset: orders_apac
datasource: fulfillment_apac_staging
target:
dataset: orders_apac
datasource: fulfillment_apac1_staging
checks:
- schema
- row_count diff = 0# checks.yml prepared by check suggestions
filter dim_product [daily]:
where: start_date > TIMESTAMP'${NOW}' - interval '1d'
checks for dim_product [daily]:
- schema:
name: Any schema changes
fail:
when schema changes:
- column delete
- column add
- column index change
- column type change
- row_count > 0
- anomaly detection for row_count
- freshness(start_date) < 398d
- missing_count(weight_unit_measure_code) = 0
- missing_count(color) = 0
- duplicate_count(safety_stock_level) = 0# recon.yml
reconciliation OrdersAPAC:
label: "Recon datasets"
...
checks:
- schema
- row_count diff = 0
- freshness(start_date) diff = 0
- missing_count(weight_unit_measure_code) diff = 0
- missing_count(color) diff = 0
- duplicate_count(safety_stock_level):
fail: when diff > 10
warn: when diff between 5 and 9soda scan -d fulfillment_apac_staging -c configuration.yml recon.yml reconciliation OrdersAPAC:
label: "Recon APAC orders"
datasets:
source:
dataset: orders_apac
datasource: fulfillment_apac_staging
target:
dataset: orders_apac
datasource: fulfillment_apac1_staging
checks:
- schema
- row_count diff = 0
reconciliation DiscountAPAC:
label: "Recon APAC discount"
datasets:
source:
dataset: discount_apac
datasource: fulfillment_apac_staging
target:
dataset: discount_apac
datasource: fulfillment_apac1_staging
checks:
- schema
- row_count diff = 0reconciliation CommissionAPAC:
label: "Recon APAC commission"
datasets:
source:
dataset: commission_apac
datasource: fulfillment_apac_staging
target:
dataset: commission_apac
datasource: fulfillment_apac1_staging
checks:
- rows diff = 0soda scan -d fulfillment_apac1_prod -c configuration.yml recon.ymlchecks for dim_product:
- freshness(start_date) < 3dchecks for dim_product:
- freshness using end_date with NOW < 1dsoda scan -d adventureworks -c configuration.yml -v NOW="2022-05-31 21:00:00" checks_test.ymlchecks for dim_product:
- freshness(createdat::datetime) < 1dInvalid staleness threshold "when < 3256d"
+-> line=2,col=5 in checks_test.yml
Invalid check "freshness(start_date) > 1d": no viable alternative at input ' >'Invalid check "freshness(end_date) ${NOW} < 1d": mismatched input '${NOW}' expecting {'between', 'not', '!=', '<>', '<=', '>=', '=', '<', '>'}checks for dim_product:
- freshness using end_date with NOW < 1dSoda Library 1.0.x
Soda Core 3.0.x
Scan summary:
1/1 checks FAILED:
Data is fresh [FAILED]
max_column_timestamp: 2013-07-01 00:00:00
max_column_timestamp_utc: 2013-07-01 00:00:00+00:00
now_variable_name: NOW
now_timestamp: 2022-09-13T16:40:39.196522+00:00
now_timestamp_utc: 2022-09-13 16:40:39.196522+00:00
freshness: 3361 days, 16:40:39.196522
Oops! 1 failures. 0 warnings. 0 errors. 0 pass.checks for dim_product:
- freshness(start_date) < 27h:
name: Data is freshchecks for dim_product:
- freshness(start_date):
warn: when > 3256d
fail: when > 3258dchecks for dim_product:
- freshness(start_date):
warn:
when > 3256d
fail:
when > 3258dchecks for dim_product:
- freshness(start_date) < 27h:
filter: weight = 10checks for dim_product:
- freshness("end_date") < 3dfor each dataset T:
datasets:
- dim_prod%
checks:
- freshness(end_date) < 3dfilter CUSTOMERS [daily]:
where: TIMESTAMP '{ts_start}' <= "ts" AND "ts" < TIMESTAMP '${ts_end}'
checks for CUSTOMERS [daily]:
- freshness(end_date) < 3d# If using without an alert configuration
<
# If using with an alert configuration
>checks for dim_department_group:
- values in (department_group_name) must exist in dim_employee (department_name)checks for dim_customer_staging:
- values in (birthdate) must not exist in dim_customer_prod (birthdate)# after adding your Spark session to the scan
df.createOrReplaceTempView("df")
df2.createOrReplaceTempView("df2")checks for dim_customers:
- values in (state_code, state_name) must exist in iso_3166-2 (code, subdivision_name):
samples limit: 20checks for dim_customers:
- values in (state_code, state_name) must exist in iso_3166-2 (code, subdivision_name):
samples limit: 0checks for dim_customers:
- values in (state_code, state_name) must exist in iso_3166-2 (code, subdivision_name):
samples columns: [state_code]checks for dim_department_group:
- values in (department_group_name) must exist in dim_employee (department_name):
name: Compare department datasetschecks for dim_department_group:
- values in ("department_group_name") must exist in dim_employee ("department_name")filter customers_c8d90f60 [daily]:
where: ts > TIMESTAMP '${NOW}' - interval '100y'
checks for customers_c8d90f60 [daily]:
- values in (cat) must exist in customers_europe (cat2) kubectl get secret/soda-agent-id -n soda-agent --template={{.data.SODA_AGENT_ID}} | base64 --decodesoda:
apikey:
id: "***"
secret: "***"
agent:
id: "842feab3-snip-87eb-06d2813a72c1"
name: "myuniqueagent"helm get values -n soda-agent soda-agentkubectl get secret/soda-agent-apikey -n soda-agent --template={{.data.SODA_API_KEY_ID}} | base64 --decodekubectl get secret/soda-agent-apikey -n soda-agent --template={{.data.SODA_API_KEY_SECRET}} | base64 --decodehelm install soda-agent soda-agent/soda-agent \
--values values.yml \
--namespace soda-agentkubectl describe podskubectl config get-contextskubectl config use-context <name of cluster>helm listNAME NAMESPACE REVISION UPDATED STATUS CHART APP VERSION
soda-agent soda-agent 5 2023-01-20 11:55:49.387634 -0800 PST deployed soda-agent-0.8.26 Soda_Library_1.0.0helm get values -n <namespace> <release name>helm get values -n soda-agent soda-agent helm search hub soda-agenthelm repo updatehelm upgrade <release> <chart>
--set soda.apikey.id=*** \
--set soda.apikey.secret=**** helm upgrade soda-agent soda-agent/soda-agent \
--set soda.apikey.id=*** \
--set soda.apikey.secret=**** helm upgrade soda-agent soda-agent/soda-agent \
--values values-local.yml --namespace soda-agentsoda:
# These values will also be used to authenticate to the Soda image registry
apikey:
id: existing-key-id
secret: existing-key-secretsoda:
apikey:
id: existing-key-id
secret: existing-key-secet
imageCredentials:
apikey:
id: my-new-key-id
secret: my-new-key-secretsoda:
apikey:
id: ***
secret: ***
# This is no longer supported
# imagePullSecrets
# - name: my-existing-secret
# Instead, use this!
existingImagePullSecrets
- name: my-existing-secretsoda:
apikey:
id: ***
secret: ***
cloud:
# This also sets the correct endpoint under the covers.
region: "us"
# This can be removed now, as the region property sets this up correctly.
# endpoint: https://cloud.us.soda.iosoda:
apikey:
id: ***
secret: ***
# Rename this ...
# scanLauncher:
# to become
scanLauncher:
existingSecrets:
- soda-agent-secrets pip install -i https://pypi.cloud.soda.io soda-redshift -Upip freeze | grep sodapip uninstall soda-postgrespip freeze | grep soda | xargs pip uninstall -ypip freeze | grep soda | xargs pip uninstall -ypip install -i https://pypi.cloud.soda.io soda-postgreshelm repo add external-secrets https://charts.external-secrets.io
helm install external-secrets \
external-secrets/external-secrets \
-n external-secrets \
--create-namespaceapiVersion: external-secrets.io/v1beta1
kind: ClusterSecretStore
metadata:
name: vault-app-role
spec:
provider:
vault:
auth:
appRole:
path: approle
roleId: 3e****54-****-936e-****-5c5a19a5eeeb
secretRef:
key: appRoleSecretId
name: external-secrets-vault-app-role-secret-id
namespace: external-secrets
path: kv
server: http://vault.vault.svc.cluster.local:8200
version: v2soda:
apikey:
id: "***"
secret: "***"
agent:
name: "myuniqueagent"helm install soda-agent soda-agent/soda-agent \
--values values.yml \
--namespace soda-agentsoda:
apikey:
id: "***"
secret: "***"
agent:
name: "myuniqueagent"
env:
POSTGRES_USER: "sodalibrary"
POSTGRES_PASS: "sodalibrary"helm upgrade soda-agent soda-agent/soda-agent \
--values values.yml \
--namespace soda-agentdata_source local_postgres_test:
type: postgres
host: 172.17.0.7
port: 5432
username: ${POSTGRES_USER}
password: ${POSTGRES_PASS}
database: postgres
schema: new_yorkkubectl -n external-secrets get allkubectl apply -f cluster-secret-store.yamlapiVersion: external-secrets.io/v1beta1
kind: ExternalSecret
metadata:
name: soda-agent
namespace: soda-agent
spec:
data:
- remoteRef:
key: local/soda
property: POSTGRES_USERNAME
secretKey: POSTGRES_USERNAME
- remoteRef:
key: local/soda
property: POSTGRES_PASSWORD
secretKey: POSTGRES_PASSWORD
refreshInterval: 1m
secretStoreRef:
kind: ClusterSecretStore
name: vault-app-role
target:
name: soda-agent-secrets
template:
data:
soda-agent.conf: |
POSTGRES_USERNAME={{ .POSTGRES_USERNAME }}
POSTGRES_PASSWORD={{ .POSTGRES_PASSWORD }}
engineVersion: v2kubectl apply -n soda-agent -f soda-secret.yamlkubectl get secret -n soda-agent soda-agent-secretsNAME TYPE DATA AGE
soda-agent-secrets Opaque 1 24hsoda:
apikey:
id: "154k***889"
secret: "9sfjf****ff4"
agent:
name: "my-soda-agent-external-secrets"
scanlauncher:
existingSecrets:
# from spec.target.name in the ExternalSecret file
- soda-agent-secrets
cloud:
# Use https://cloud.us.soda.io for US region
# Use https://cloud.soda.io for EU region
endpoint: "https://cloud.soda.io"helm install soda-agent soda-agent/soda-agent \
--values values.yml \
--namespace soda-agentNAME: soda-agent
LAST DEPLOYED: Tue Aug 29 13:08:51 2023
NAMESPACE: soda-agent
STATUS: deployed
REVISION: 1
TEST SUITE: None
NOTES:
Success, the Soda Agent is now running.
You can inspect the Orchestrators logs if you like, but if all was configured correctly, the Agent should show up in Soda Cloud.
Check the logs using:
kubectl logs -l agent.soda.io/component=orchestrator -n soda-agentsoda:
apikey:
existingSecret: "<existing-secret-name>"
secretKeys:
idKey: "<key-for-api-id>"
secretKey: "<key-for-api-secret>"soda:
scanlauncher:
config:
query_cursor_hard_limit: null
resources:
limits:
memory: 2Gichecks for dim_product:
- schema:
name: Confirm that required columns are present
warn:
when required column missing: [weight_unit_measure_code, product_subcategory_key, made_up_column]
fail:
when required column missing:
- product_key
- product_alternate_key
- schema:
warn:
when forbidden column present: [credit_card]
when wrong column type:
standard_cost: money
fail:
when forbidden column present: [pii*]
when wrong column type:
reorder_point: smallint
- schema:
name: Columns out of order
warn:
when wrong column index:
style: 1
fail:
when wrong column index:
model_name: 22
- schema:
name: Any schema changes
warn:
when schema changes: anychecks for dim_product:
- schema:
fail:
when required column missing:
- standard_cost
- list_price
- weightchecks for dim_product:
- schema:
fail:
when required column missing: [standard_cost, list_price, weight]
checks for dim_product:
- schema:
warn:
when forbidden column present: [standard_cost]
when wrong column type:
standard_cost: money
weight: double precision
fail:
when forbidden column present: [sombrero]
when wrong column type:
reorder_point: smallintchecks for dim_employee:
- schema:
schema_name: staff.pr
name: Required columns present
warn:
when required column missing: [last_name, birth_date]checks for dim_customer:
- schema:
warn:
when schema changes: any
fail:
when schema changes:
- column delete
- column add
- column index change
- column type changechecks for dim_product:
- schema:
name: Confirm that required columns are present
warn:
when required column missing: [weight_unit_measure_code, product_subcategory_key]checks for dim_product:
- schema:
warn:
when forbidden column present: [standard_cost]checks for dim_product:
- schema:
warn:
when wrong column type:
standard_cost: "money"checks for dim_product:
- schema:
fail:
when forbidden column present:
- credit_card
- obsolete_%
- '%SALARY%'
- pii*for each dataset T:
datasets:
- dim_product_%
checks:
- schema:
warn:
when schema changes: anyfilter CUSTOMERS [daily]:
where: TIMESTAMP '{ts_start}' <= "ts" AND "ts" < TIMESTAMP '${ts_end}'
checks for CUSTOMERS [daily]:
- schema:
fail:
when forbidden column present:
- credit_cardchecks for dim_product:
- schema:
name: Required columns all present
warn:
when required column missing: [weight_unit_measure_code, product_subcategory_key, made_up_column]
fail:
when required column missing: [pretend_column]Soda Library 1.0.x
Soda Core 3.0.x
Scan summary:
1/1 check FAILED:
dim_product in adventureworks
Required columns all present [FAILED]
fail_missing_column_names = [pretend_column]
warn_missing_column_names = [made_up_column]
schema_measured = [product_key integer, product_alternate_key character varying ...]
Oops! 1 failures. 0 warnings. 0 errors. 0 pass.
Sending results to Soda Cloud
Soda Cloud Trace: 7845***for each dataset R:
tables:
# Apply the check to any dataset that begins with retail.
- retail%
checks:
- schema:
fail:
when forbidden column present: ['*name*', '*address*', '*phone*', '*email*']# Check that a dataset contains rows
checks for dataset_name:
- row_count > 0# Compare row counts between datasets
checks for dataset_name:
- row_count same as other_dataset_namesoda scan -d datasource_name -c configuration.yml checks.yml# Check that a column does not contain any duplicate values
checks for dataset_name:
- duplicate_count(column_name) = 0# Check that duplicate pairs do not exist between columns
checks for dataset_name:
- duplicate_count(column_name1, column_name2) = 0soda scan -d datasource_name -c configuration.yml checks.yml# Check that data in dataset is less than one day old
checks for dataset_name:
- freshness(timestamp_column_name) < 1dsoda scan -d datasource_name -c configuration.yml checks.yml# Check that there are no null values in a column
checks for dataset_name:
- missing_count(column_name) = 0# Check an email column that all values are in email format
checks for dataset_name:
- invalid_percent(email_column_name) > 5%:
valid format: email# Check that fewer than 5% of values in column contain missing values
checks for dataset_name:
- missing_percent(column_name) < 5%:
missing values: [N/A, '0000', none]soda scan -d datasource_name -c configuration.yml checks.yml# Check that values in a column exist in another column in a different dataset
checks for dataset_name:
- values in (state_code) must exist in iso_3166-2 (code)# Check that values in two columns exist in two other columns in a different dataset
checks for dataset_name:
- values in (column_name1, column_name2) must exist in different_dataset_name (other_column1, other_column2)soda scan -d datasource_name -c configuration.yml checks.yml# Check for any schema changes to dataset
checks for dataset_name:
- schema:
warn:
when schema changes: any# Check for absent or forbidden columns in dataset
checks for dataset_name:
- schema:
warn:
when required column missing: [column_name]
fail:
when forbidden column present: [column_name1, column_name2]soda scan -d datasource_name -c configuration.yml checks.ymlchecks for corp_value:
- failed rows:
fail condition: true and "column.name.PX" IS NOT nulldiscover datasets:
datasets:
- prod% # all datasets starting with prod
- include prod% # same as above
- exclude dev% # exclude all datasets starting with devprofile columns:
columns:
- datasetA.columnA # columnA of datasetA
- datasetA.% # all columns of datasetA
- dataset%.columnA # columnA of all datasets starting with dataset
- dataset%.% # all columns of datasets starting with dataset
- "%.%" # all datasets and all columns
- include datasetA.% # same as datasetA.%
- exclude datasetA.prod% # exclude all columns starting with prod in datasetA
- exclude dimgeography.% # exclude all columns of dimgeography dataset discover datasets:
datasets:
- include %
- exclude test%discover datasets:
datasets:
- include customer_discover datasets:
datasets:
- include north\_*discover datasets:
datasets:
- include retailordersdiscover datasets:
datasets:
- exclude %profile columns:
columns:
- retail\_orders.%profile columns:
columns:
- retail\_orders.billing\_address
- fulfillment.discountprofile columns:
columns:
- exclude %.%data_source soda_demo:
type: sqlserver
host: localhost
username: ${SQL_USERNAME}
password: ${SQL_PASSWORD}
quote_tables: true// > POST [webhook URL]
{
"event": "incidentCreated",
// ...
}
// < 200 OK
{
"link": {
"url": "https://sodadata.atlassian.net/browse/SODA-69",
"text": "[SODA-69] Notification & Incident Webhook"
}
}// > POST [webhook URL]
{
"event": "incidentCreated",
"incident": { ... },
"incidentLinkCallbackUrl": "https://cloud.soda.io/integrations/webhook/8224bbc2-2c80-4c6d-a*****/incident-link/510fad8c-dc43-419a-a122-712a***/uLYosxWNwVGHSdR-_noJjlNAA--WyQwe1ygqGBg*****Q"
}
// < 200 OK
{ }
Followed by a POST request to incidentLinkCallbackUrl:
// > POST https://cloud.soda.io/integrations/webhook/8224bbc2-2c80-4c6d-a002-16***4e/incident-link/510fad8c-dc43-419a-a122-7***97/uLYosxWNwVGHSdR-_noJjlNAA--WyQwe1ygqGBg****IrQ
{
"url": "https://sodadata.atlassian.net/browse/SODA-69",
"text": "[SODA-69] Notification & Incident Webhook"
}{
"event": "validate",
"sentAt": "2022-10-01T09:12:10.042323Z"
}{
"event": "agreementCreated",
"agreement": {
"id": "string",
"sodaCloudUrl": "string",
"label": "string",
"testsFile": {
"path": "string",
"contents": "string"
},
"createdBy": {
"email": "[email protected]"
}
}
}{
"event": "agreementContentsUpdated",
"agreement": {
"id": "string",
"sodaCloudUrl": "string",
"label": "string",
"testsFile": {
"path": "string",
"contents": "string"
},
"updatedBy": {
"email": "[email protected]"
}
}
}{
"event": "agreementDeleted",
"agreement": {
"id": "string",
"label": "string",
"testsFile": {
"path": "string",
},
"deletedBy": {
"email": "[email protected]"
}
}
}{
"event": "checkEvaluation",
"checkResults": [
{
"id": "39d706c3-5a48-4f4b***",
"sodaCloudUrl": "https://cloud.soda.io/checks/39d706c3-5a48-b",
"definition": "checks for SODATEST_Customers_6f90f4ad:\ncount same as SODATEST_RAWCUSTOMERS_7275c02c in postgres2",
"datasets": [
{
"id": "e8f1fe55-ae3c-44bd-",
"sodaCloudUrl": "https://cloud.soda.io/datasets/e8f1fe55-ae3c",
"name": "bnm_orders",
"label": "bnm_orders",
"tags": [],
"owner": {
"id": "31781df5-93cf-***",
"email": "[email protected]"
},
"datasource": {
"id": "5a152025-26f6-",
"name": "sodaspark",
"label": "sodaspark"
},
"attributes": [
{
"id": "f0cd7b0f-4ac6-42a1-",
"label": "Data Domain",
"name": "data_domain",
"value": "Product"
},
{
"id": "32986775-3c7a-4a81-bfdb-5f9853746c39",
"label": "Origin",
"name": "origin",
"value": "Pipeline"
}
]
}
],
"column": "columnName",
// pass, warn or fail
"outcome": "pass",
"dataTimestamp": "2022-01-04T09:49:48.060897Z",
"diagnostics": {
"value": 0.0,
},
// included when a check belongs to an agreement
"agreement": {
"id": "AGREEMENT-001-0000-0000-0",
"sodaCloudUrl": "https://cloud.soda.io/agreements/AGREEMEN-T001-0000-0000-0",
"label": "My new agreement pending",
"approvalState": "pending",
"evaluationResult": "warning"
}
}
]
}{
"event": "incidentCreated",
"incident": {
"id": "e1f399a3-09ea-***",
"sodaCloudUrl": "https://cloud.soda.io/incidents/e1f399a3-******-1992d2744ef6",
"number": 196,
"title": "Invalid customer ids",
"description": "Invalid customer ids",
"severity": "major",
"status": "opened",
"createdTimestamp": "2022-05-18T06:07:34Z",
"lastUpdatedTimestamp": "2022-05-18T06:08:23Z",
"resolutionNotes": "Stan is fixing the issue",
"resolutionTimestamp": "2022-05-18T06:08:22.620196441Z",
"links": [
{
"integrationType": "slack",
"name": "soda-inc-196-2022-05-18-invalid-customer-ids",
"url": "https://example.slack.com/channels/C03FU9GR7P7"
}
],
"lead": {
"id": "31781df5-93cf-***",
"email": "[email protected]"
},
"reporter": {
"id": "31781df5-***",
"email": "[email protected]"
},
"checkResults": [
// Contains the same payload as
// event checkEvaluation
]
},
"incidentLinkCallbackUrl": "https://cloud.soda.io/integrations/webhook/8224bbc2-******-16907465484e/incident-link/510fad8c-******-712a23f27197/uL******Kr6rvMcIrQ*"
}{
"event": "incidentUpdated",
"incident": {
// Contains the same payload as
// event incidentCreated
}
}# In-check filter
checks for dim_employee:
- max(vacation_hours) < 80:
name: Too many vacation hours for US Sales
filter: sales_territory_key = 11# Dataset filter with variables
filter CUSTOMERS [daily]:
where: TIMESTAMP '${ts_start}' <= "ts" AND "ts" < TIMESTAMP '${ts_end}'
checks for CUSTOMERS [daily]:
- row_count = 6
- missing(cat) = 2# In-check variable
checks for ${DATASET}:
- invalid_count(last_name) = 0:
valid length: 10 checks for dim_employee:
- max(vacation_hours) < 80:
name: Too many vacation hours for US Sales
filter: sales_territory_key = 11checks for dim_employee:
- max(vacation_hours) < 80:
name: Too many vacation hours for US Sales
filter: middle_name = 'Henry'checks for dim_employee:
- max(vacation_hours) < 80:
name: Too many vacation hours for US Sales
filter: sales_territory_key = 11 AND salaried_flag = 1checks for dim_employee:
- max(vacation_hours) < 80:
name: Too many vacation hours for US Sales
filter: sales_territory_key = 11 AND
sick_leave_hours > 0 OR
pay_frequency > 1checks for my_dataset:
- missing_count("Email") = 0:
name: missing email
filter: |
"Status" = 'Client' Soda Library 1.0.x
Soda Core 3.0.x
Scan summary:
1/1 check NOT EVALUATED:
dim_employee in adventureworks
Too many vacation hours for US Sales [NOT EVALUATED]
check_value: None
1 checks not evaluated.
Apart from the checks that have not been evaluated, no failures, no warnings and no errors.filter sodatest_dataset [daily]:
where: ts > TIMESTAMP '${NOW}' - interval '1d'
checks for sodatest_dataset [daily]:
- duplicate_count(email_address) < 5soda scan -d aws_postgres_retail -c configuration.yml -v TODAY=2022-03-31 checks.ymlsoda scan -d aws_postgres_retail duplicate_count_filter.yml -v date=2022-07-25 -v name='rowcount check'variables:
name: Customers UK
checks for dim_customer:
- row_count > 1:
name: Row count in ${name}checks for ${DATASET}:
- invalid_count(last_name) = 0:
valid length: 10 soda scan -d my_datasource_name -c configuration.yml -v DATASET=dim_customer checks.ymlchecks for dim_customer:
- invalid_count(${COLUMN}) = 0:
valid length: 10 soda scan -d my_datasource_name -c configuration.yml -v COLUMN=last_name checks.ymlchecks for dim_customer:
- invalid_count(last_name) = ${LENGTH}:
valid length: 10 soda scan -d my_datasource_name -c configuration.yml -v LENGTH=0 checks.ymlchecks for dim_employee:
- max(vacation_hours) < 80:
name: Too many vacation hours for US Sales
filter: sales_territory_key = ${SALES_TER}checks for dim_product:
- row_count > 0:
identity: ${IDENTITY}data_source adventureworks:
type: postgres
host: localhost
username: noname
password: ${PASSWORD}
database: sodacore
schema: publicsoda scan -d adventureworks -c configuration.yml -v PASSWORD=123abc checks.ymlsoda scan -d adventureworks -c configuration.yml -v USERNAME=sodacore -v PASSWORD=123abc -v FRESH_NOW=2022-05-31 21:00:00 checks.ymlprofile columns:
columns:
- "%.%" # Includes all your datasets
- prod% # Includes all datasets that begin with 'prod'Manage data sources and agents
• Add, edit, or delete a new data source in Soda Cloud • Add, edit, or delete a new data source via Soda Library • Add, edit, or delete a self-hosted Soda agent
✓
Manage notification rules
• Create, edit, or delete notification rules
✓
✓
Manage organization settings Read more
• Manage organization settings • Deactivate users • Create, edit, or delete user groups • Create, edit, or delete dataset roles • Create, edit, or delete global roles • Assign global roles to users or user groups • Add, edit, or delete integrations • Access and download the audit trail
✓
Manage scan definitions
• Create, edit, or delete scan definitions.
✓
✓
n/a 1
• Read-write access to all agreements • Read-write access to all datasets
✓
Audit Trail
Download a CSV file that contains user audit trail information.

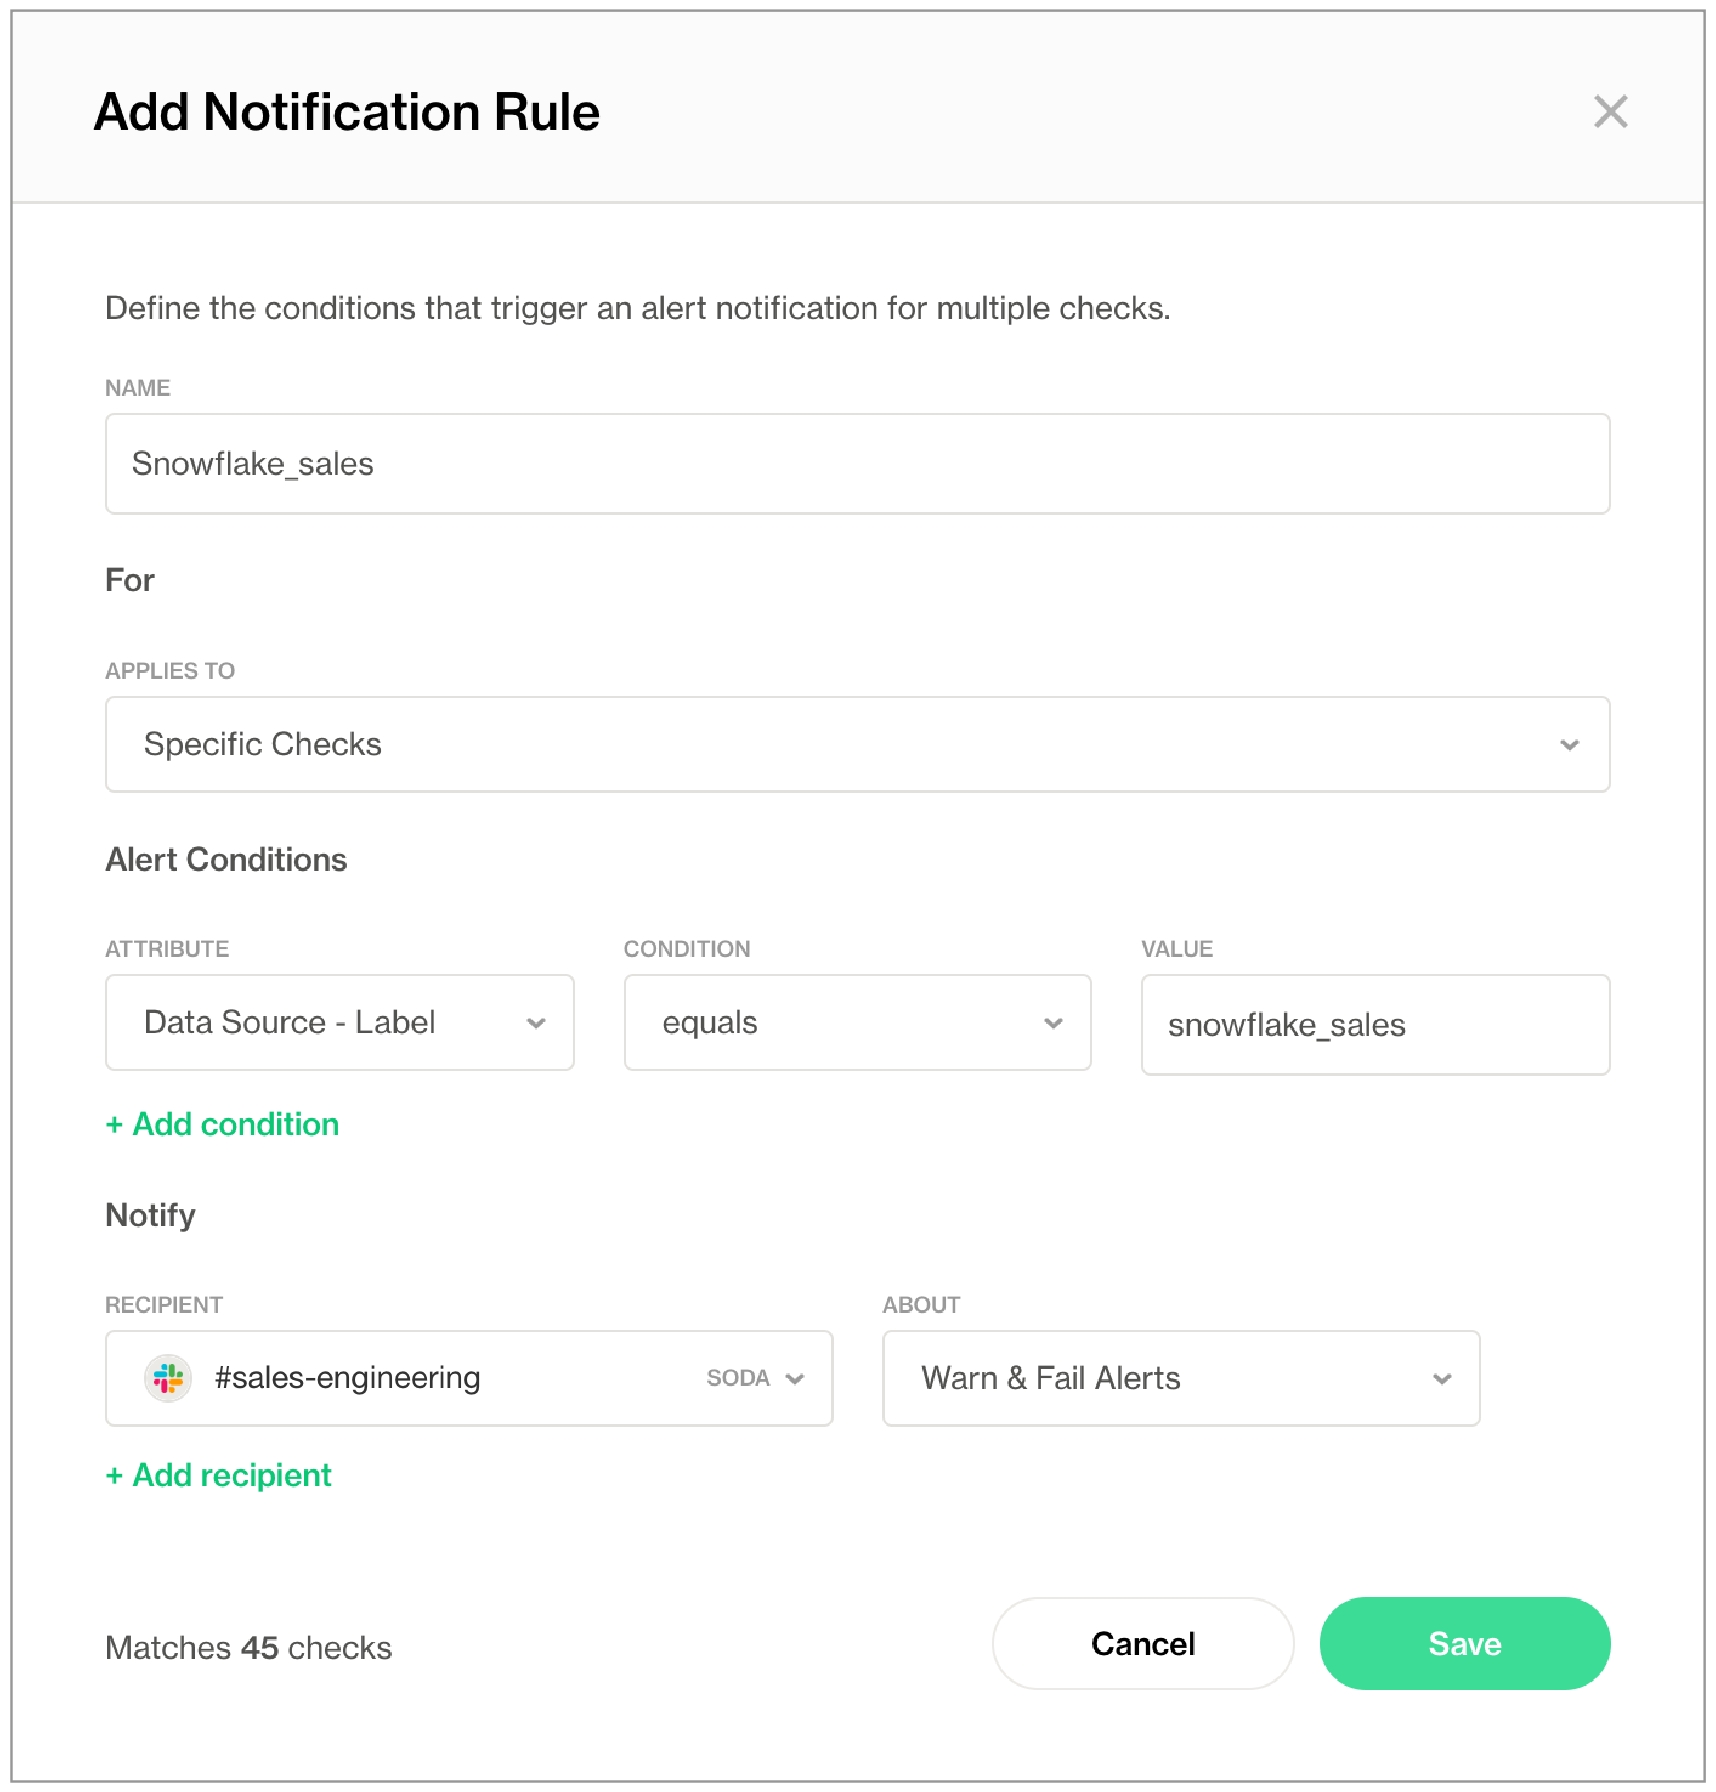

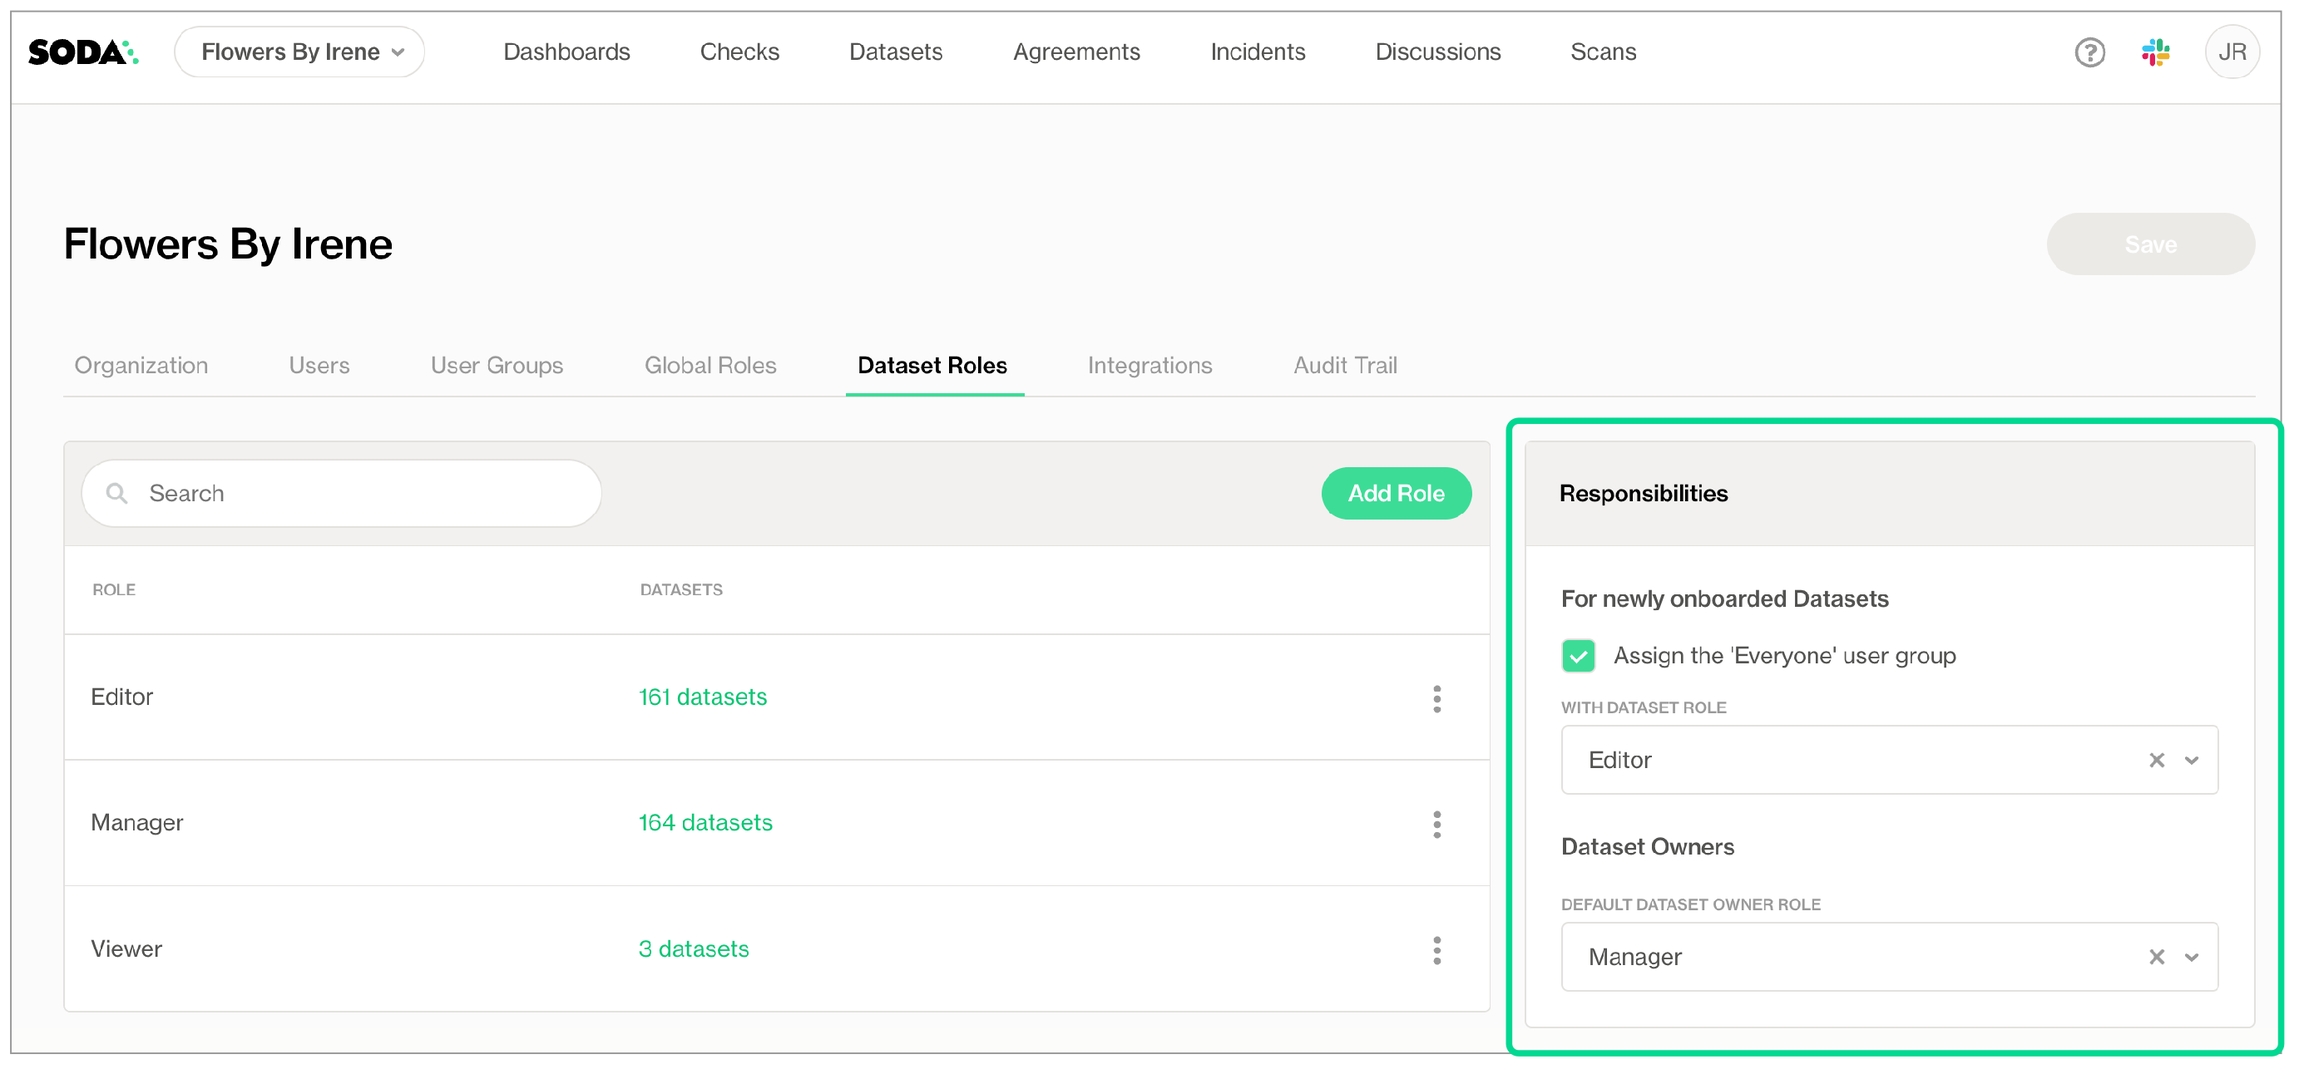
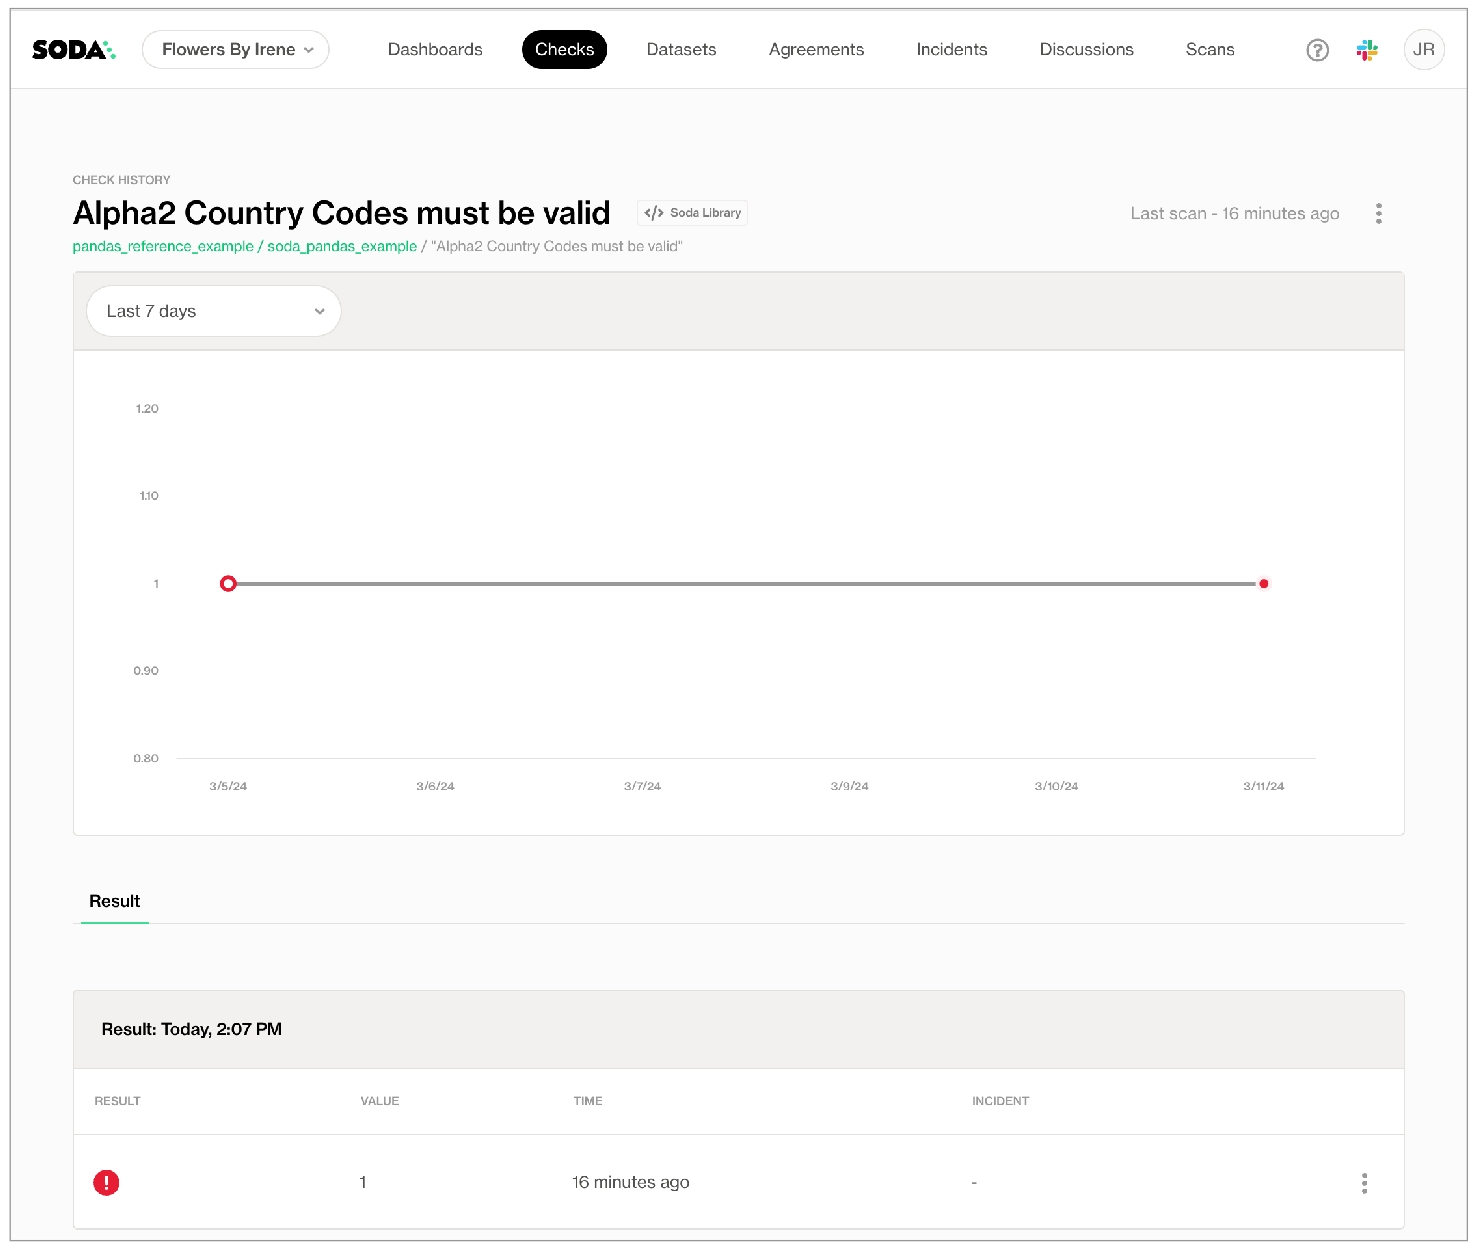
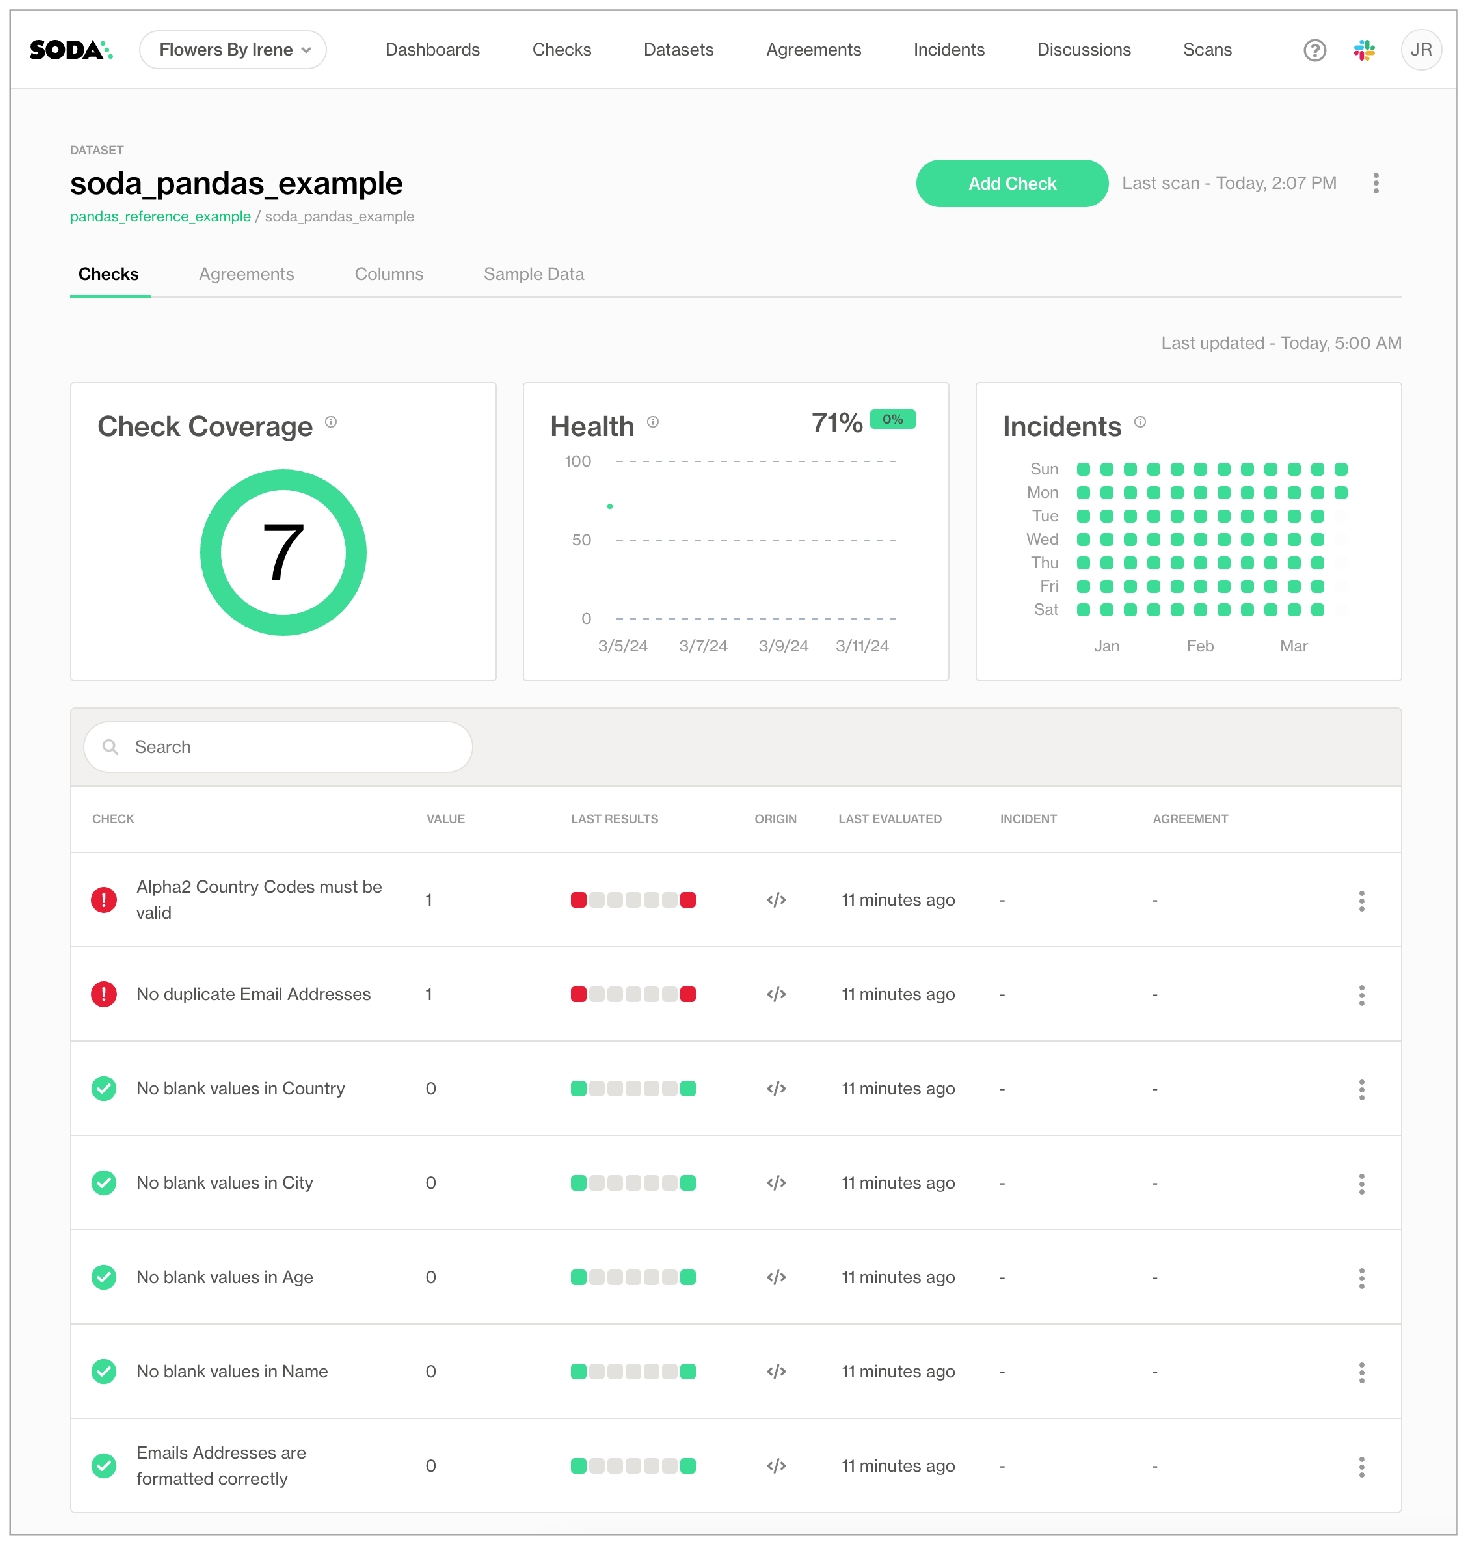

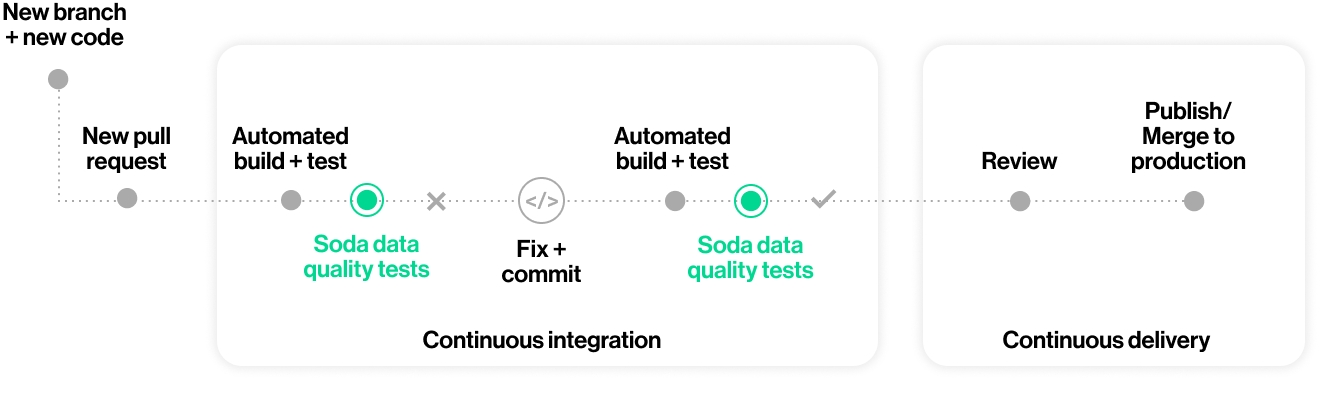
filter CUSTOMERS [daily]:
where: TIMESTAMP '${ts_start}' <= "ts" AND "ts" < TIMESTAMP '${ts_end}'checks for CUSTOMERS [daily]:
- row_count = 6
- missing(cat) = 2soda scan -d snowflake_customer_data -v ts_start=2022-03-11 -v ts_end=2022-03-15 checks.ymla dedicated SQL pool in Synapse
a dedicated Apache Spark pool in Synapse
an external source SQL database such as PostgreSQL
an Azure Data Lake Storage account
an Azure Key Vault
The above-listed resources have permissions to interact with each other; for example the Synapse workspace has permission to fetch secrets from the Key Vault.
Python 3.8, 3.9, or 3.10
Pip 21.0 or greater
requirement.txt file to the Spark Pool and include the following contents. Access Spark Pool instructions.
Because this example runs scans on both the source (PostgreSQL) and target (SQL server) data sources, it requires two Soda Library packages.Need help? Join the Soda community on Slack.
SodaCL considers NULL as the default value for "missing".
If you wish, you can add a % character to the threshold for a missing_percent metric for improved readability.
You can use missing metrics in checks with fixed thresholds, or relative thresholds, but not change-over-time thresholds. See Checks with fixed thresholds for more detail.
SodaCL considers NULL as the default value for "missing". In the two check examples above, Soda executes the checks to count the number or values which are NULL, or the percent of values which are NULL relative to the total row count of the column.
However, you can use a nested configuration key:value pair to provide your own definition of a missing value. See List of configuration keys below.
A check that uses a missing metric has four or six mutable parts:
a metric
an argument
a comparison symbol or phrase
a threshold
a configuration key (optional)
a configuration value (optional)
The example below defines two checks. The first check applies to the column last_name. The missing values configuration key specifies that any of the three values in the list exist in a row in that column, Soda recognizes those values as missing values. The check fails if Soda discovers more than five values that match NA, n/a, or 0.
Values in a list must be enclosed in square brackets.
Known issue: Do not wrap numeric values in single quotes if you are scanning data in a BigQuery data source.
The second check uses a regular expression to define what qualifies as a missing value in the first_name column so that any values that are N/A qualify as missing. This check passes if Soda discovers no values that match the pattern defined by the regex.
First check:
metric
missing_count
argument
last_name
comparison symbol
<
threshold
5
configuration key
missing values
configuration value(s)
NA, n/a, 0
Second check:
metric
missing_count
argument
first_name
comparison symbol or phrase
=
threshold
0
configuration key
missing regex
configuration value(s)
(?:N/A)
Checks with missing metrics automatically collect samples of any failed rows to display Soda Cloud. The default number of failed row samples that Soda collects and displays is 100.
If you wish to limit or broaden the sample size, you can use the samples limit configuration in a check with a missing metric. You can add this configuration to your checks YAML file for Soda Library, or when writing checks as part of an agreement in Soda Cloud. See: Set a sample limit.
For security, you can add a configuration to your data source connection details to prevent Soda from collecting failed rows samples from specific columns that contain sensitive data. See: Disable failed row samples.
Alternatively, you can set the samples limit to 0 to prevent Soda from collecting and sending failed rows samples for an individual check, as in the following example.
You can also use a samples columns or a collect failed rows configuration to a check to specify the columns for which Soda must implicitly collect failed row sample values, as in the following example with the former. Soda only collects this check’s failed row samples for the columns you specify in the list. See: Customize sampling for checks.
Note that the comma-separated list of samples columns does not support wildcard characters (%).
To review the failed rows in Soda Cloud, navigate to the Checks dashboard, then click the row for a check for missing values. Examine failed rows in the Failed Rows Analysis tab; see Manage failed row samples for further details.
✓
Define a name for a check with missing metrics; see .
✓
Add an identity to a check.
✓
Define alert configurations to specify warn and fail thresholds; see .
✓
Apply an in-check filter to return results for a specific portion of the data in your dataset; see .
missing_count
missing values
The number of rows in a column that contain NULL values and any other user-defined values that qualify as missing.
number text time
missing regex
The number of rows in a column that contain NULL values and any other user-defined values that qualify as missing.
text
missing_percent
missing values
The percentage of rows in a column, relative to the total row count, that contain NULL values and any other user-defined values that qualify as missing.
The column configuration key:value pair defines what SodaCL ought to consider as missing values.
missing regex
Specifies a regular expression to define your own custom missing values.
regex, no forward slash delimiters, string only
missing values
Specifies the values that Soda is to consider missing.
values in a list
Use missing metrics in checks with alert configurations to establish warn and fail zones
Use missing metrics in checks to define ranges of acceptable thresholds using boundary thresholds.
Reference tips and best practices for SodaCL.
Need help? Join the .
-
✓
Use quotes when identifying dataset or column names; see example. Note that the type of quotes you use must match that which your data source uses. For example, BigQuery uses a backtick (`) as a quotation mark.
✓
Use wildcard characters ( % or * ) in values in the check; see example.
See note in example below.
✓
Use for each to apply schema checks to multiple datasets in one scan; see example.
✓
Apply a dataset filter to partition data during a scan; see example.
pear
3.
banana
pear
4.
apple
banana
Enable to use this webhook to track and resolve incidents in Soda Cloud.
Check to allow users to send incident information to a destination. For example, a user creating a new incident can choose to use this webhook to create a new issue in Jira.
Send events to this webhook when an agreement is created, updated, or removed.
Check to automatically send notifications to a third-party service provider whenever a user adds, changes, or removes an agreement.


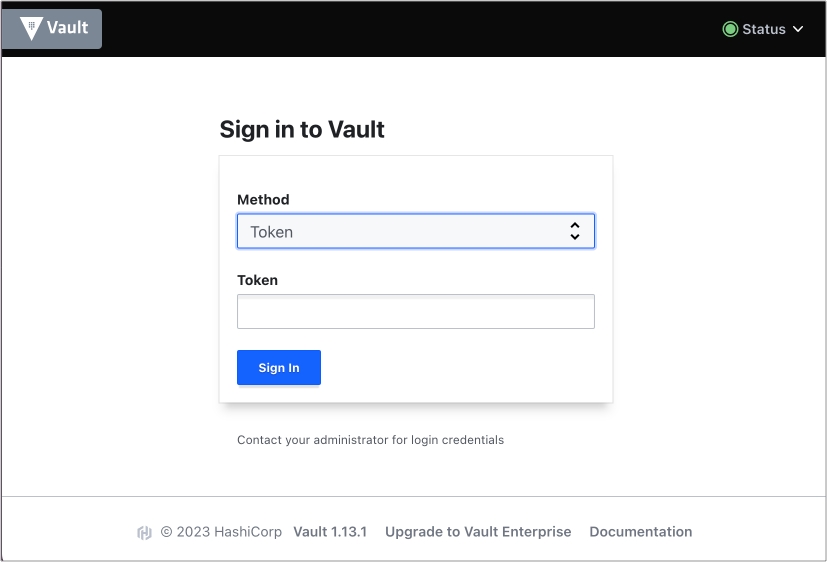
Use a SodaCL user-defined check to define elements of a check using SQL expressions or queries.
If the built-in set of metrics and checks that SodaCL offers do not quite give you the information you need from a scan, you can define your own metrics to customize your checks. User-defined checks essentially enable you to create common-table expressions (CTE) or SQL queries that Soda Library runs during a scan, or you can reference a file that contains your CTE or SQL query.
✖️ Requires Soda Core Scientific (included in a Soda Agent) ✔️ Supported in Soda Core ✔️ Supported in Soda Library + Soda Cloud ✔️ Supported in Soda Cloud Agreements + Soda Agent ✔️ SQL-defined metric available as a no-code check with a self-hosted Soda Agent connected to any Soda-supported data source, except Spark, and Dask and Pandas OR with a Soda-hosted Agent connected to a BigQuery, Databricks SQL, MS SQL Server, MySQL, PostgreSQL, Redshift, or Snowflake data source
In the context of SodaCL check types, these are user-defined checks. Truly, it is the metric that you define yourself, then use in a check.
The example below uses to define the metric that is then used in the check. The check itself follows the simple pattern of a that uses a metric, a comparison symbol or phrase, and a threshold.
You specify the CTE value for the custom metric using a nested expression key which also defines the name of the new custom metric. The name you provide for a custom metric must not contain spaces.
Instead of using CTE to define a custom metric, you can use a SQL query. The example check below follows the same standard check pattern, but includes a nested query key to define the custom metric and its name.
The name you provide for a custom metric must not contain spaces.
Though you specify the dataset against which to run the query in the SQL query, you must also provide the dataset identifier in the checks for section header. Without the dataset identifier, Soda cannot send the check results to Soda Cloud.
Instead of embedding an expression or a query directly in the check definition, you can direct Soda to use a query or expression you have defined in a different file. The example check below follow the same pattern as the metrics that use CTE or SQL queries, but this nested key identifies the file path of your query file.
The name you provide for a custom metric must not contain spaces.
Though you specify the dataset against which to run the query in the SQL query, you must also provide the dataset identifier in the checks for section header. Without the dataset identifier, Soda cannot send the check results to Soda Cloud.
You can also use a user-defined metric with an anomaly detection metric by defining the check, then nesting the query for the custom metric in the check, as in the following example.
Learn more about in general.
Borrow user-defined check syntax to define a reusable .
Use a to discover missing or forbidden columns in a dataset.
Reference .
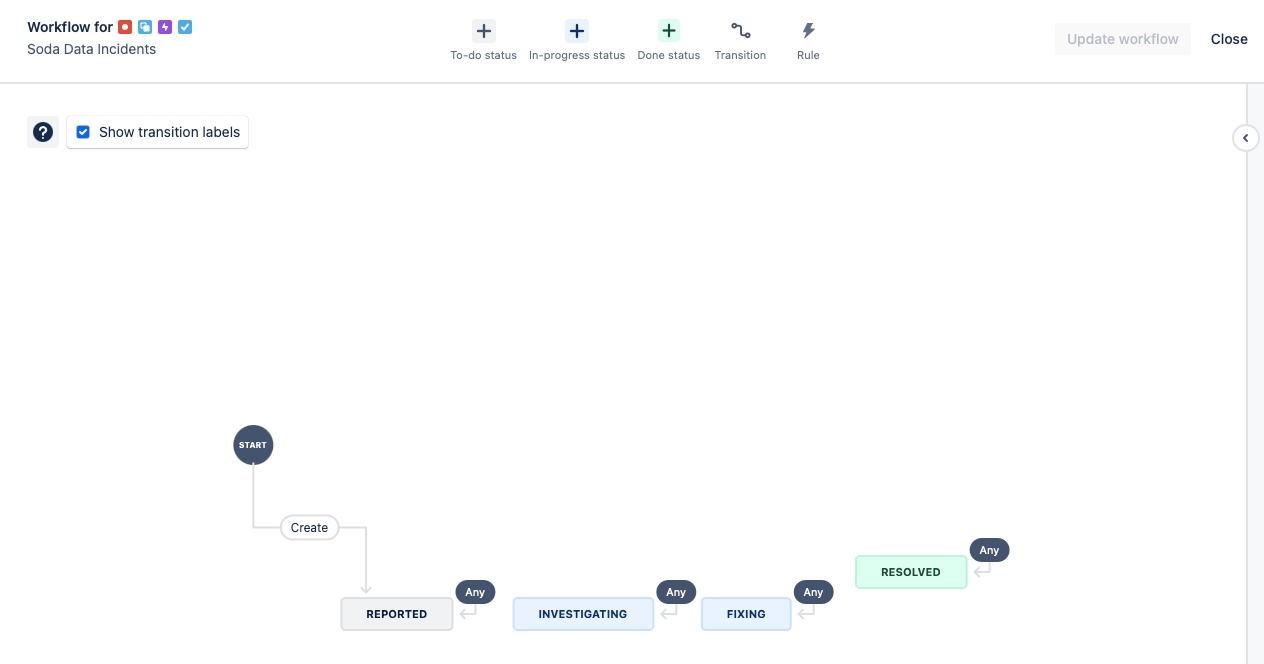
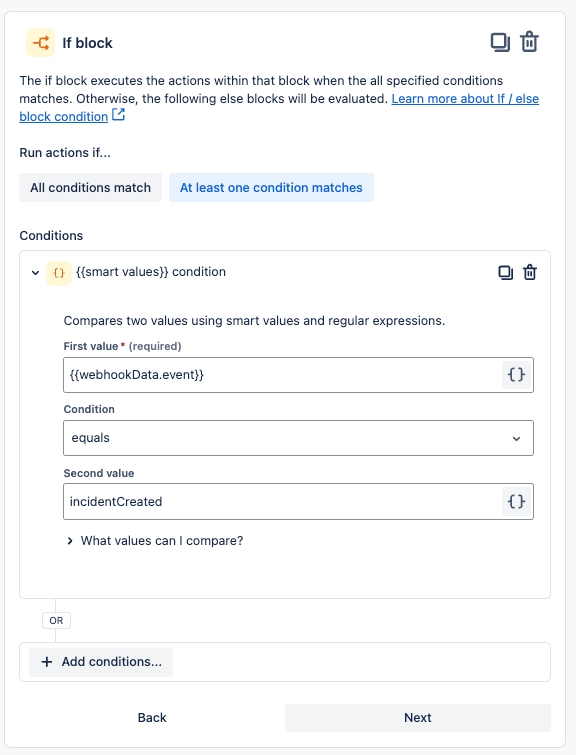
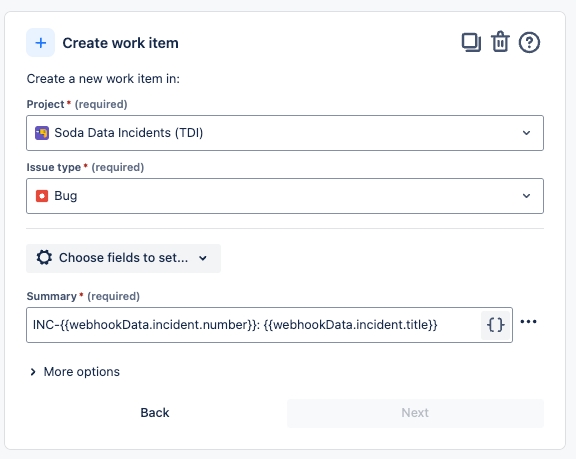
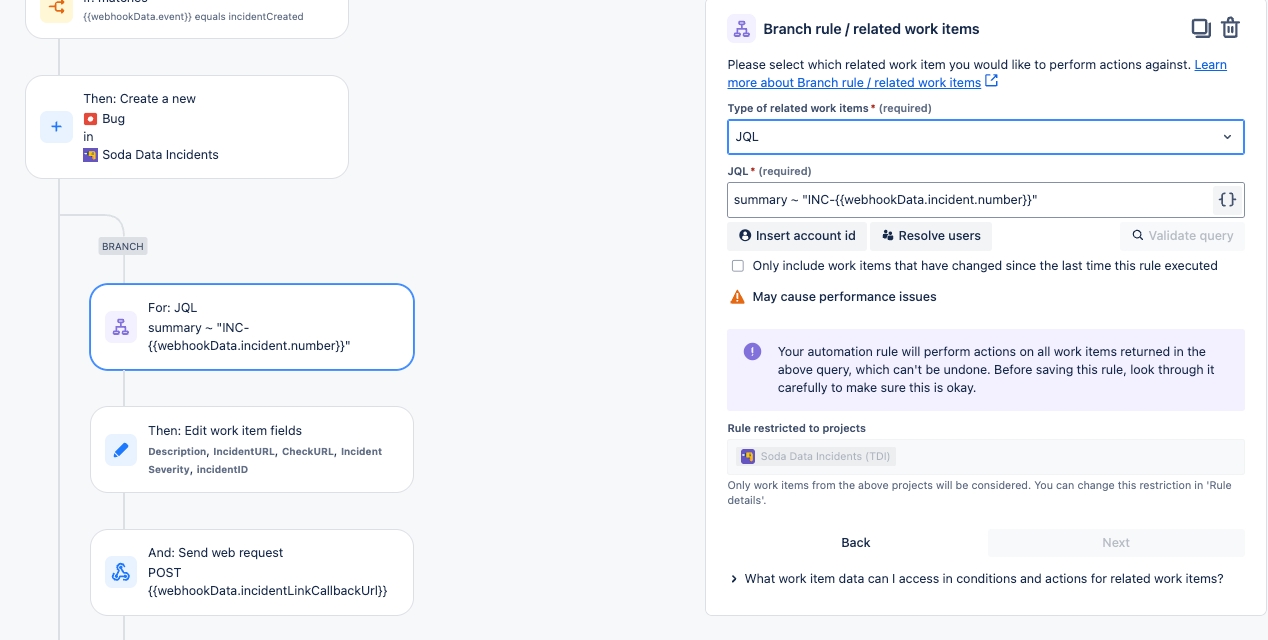
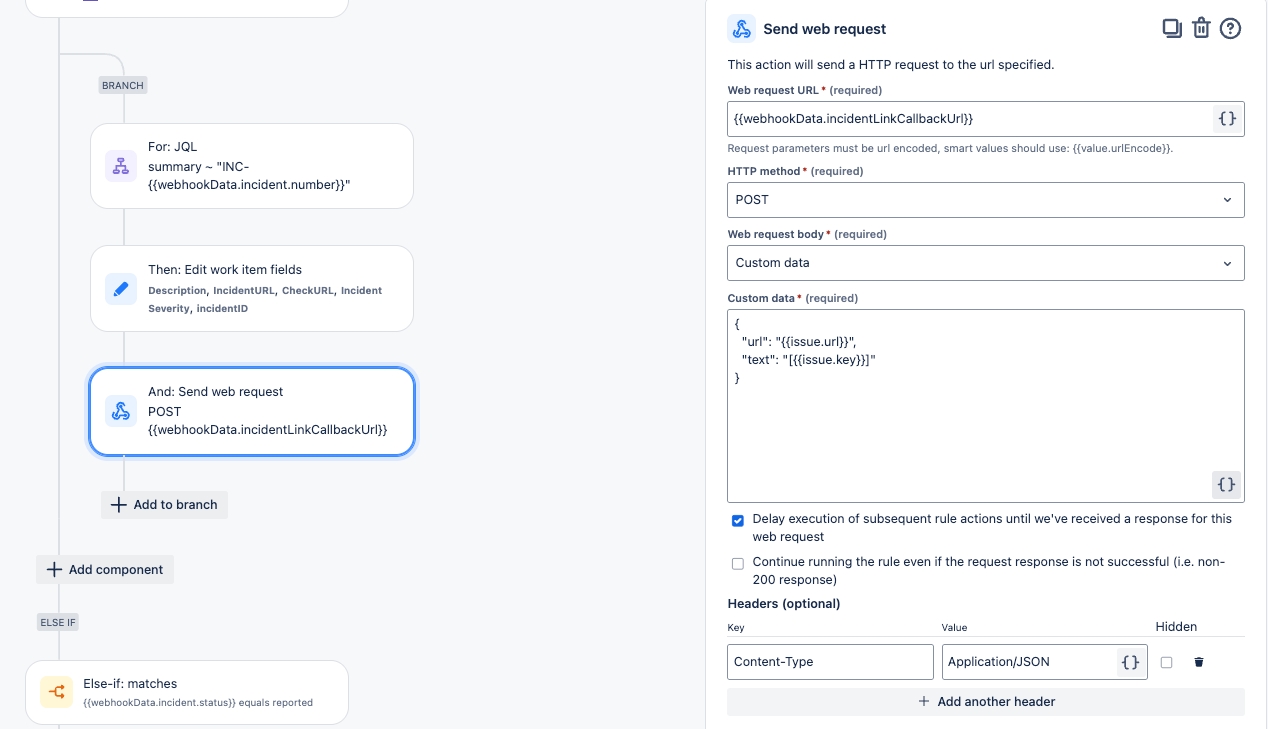
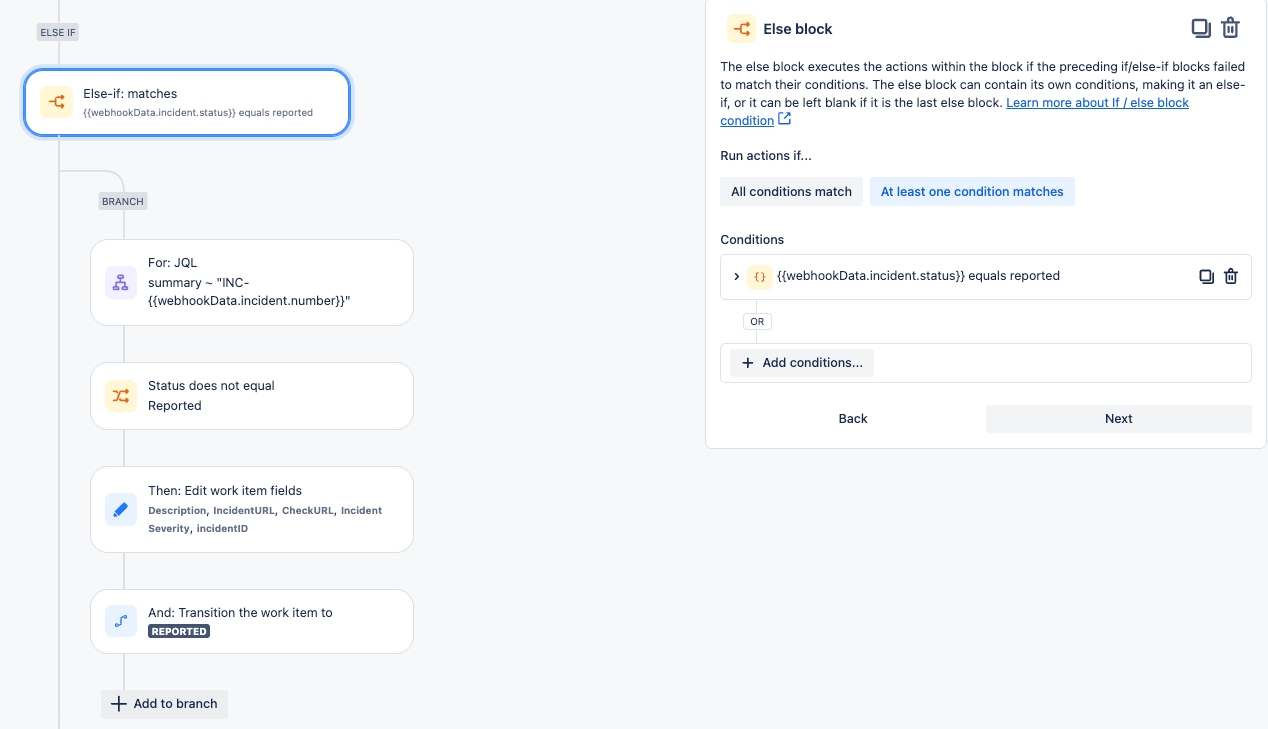


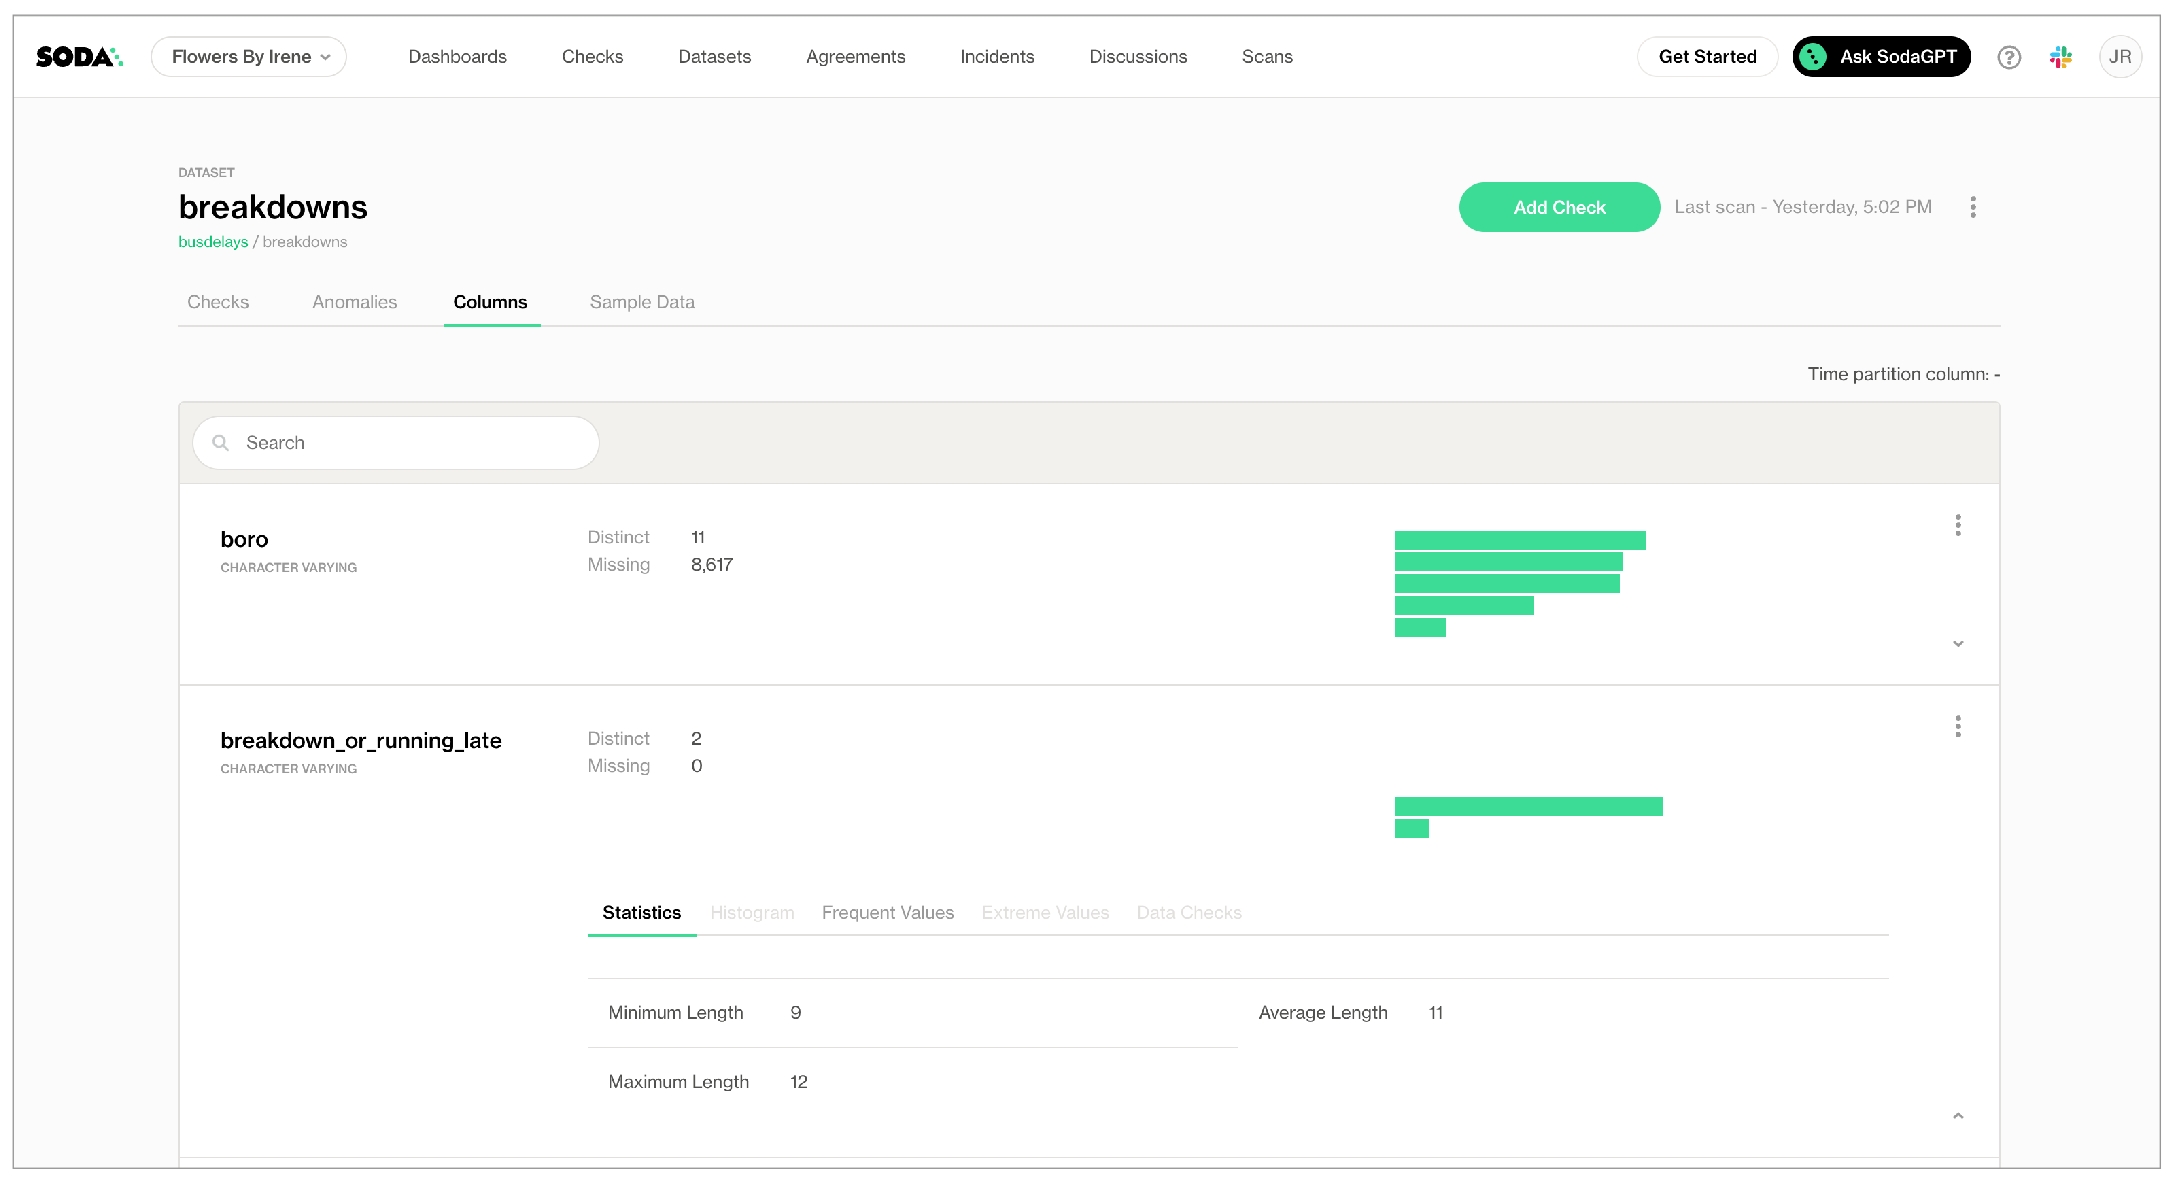
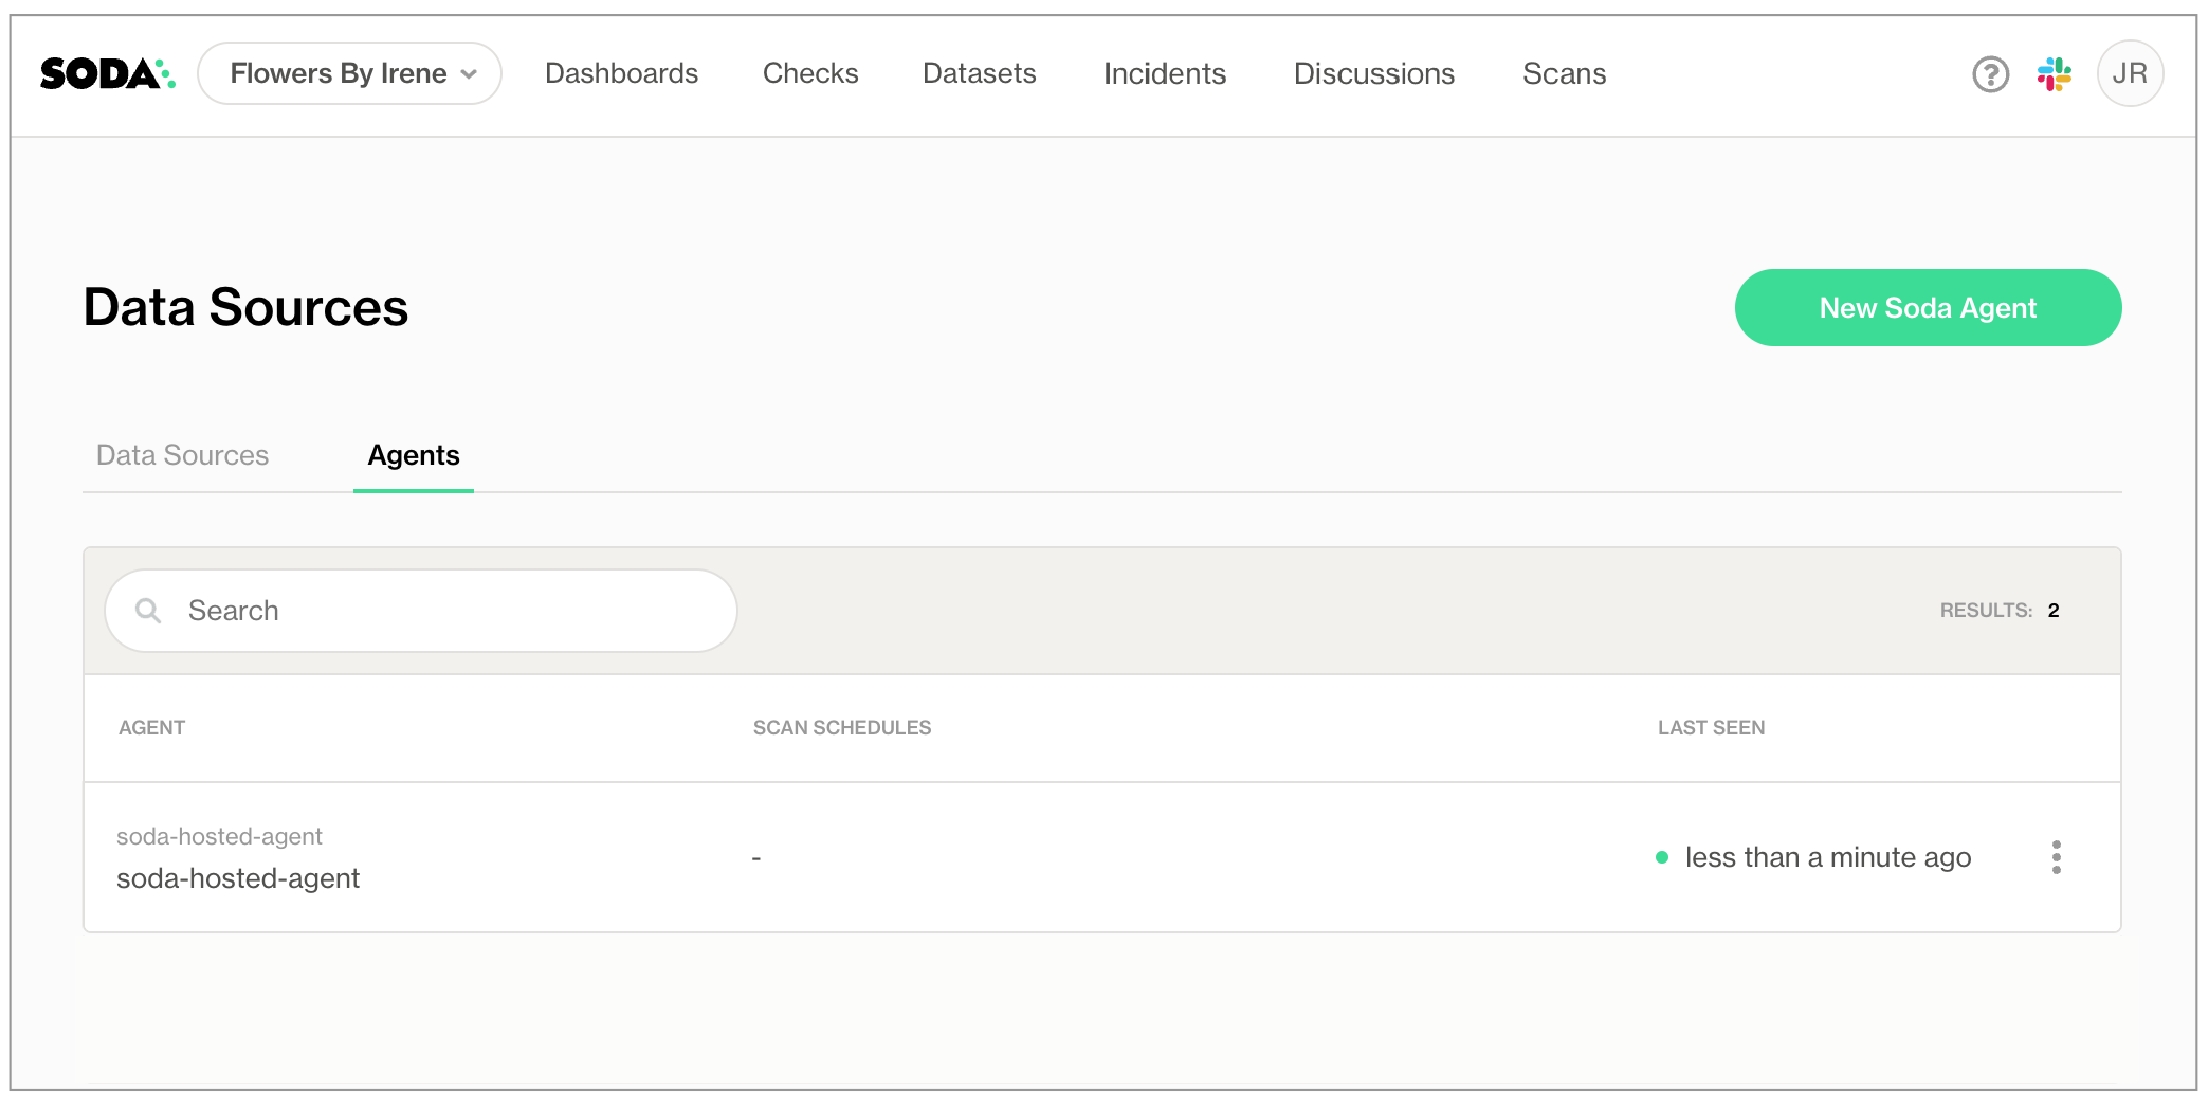
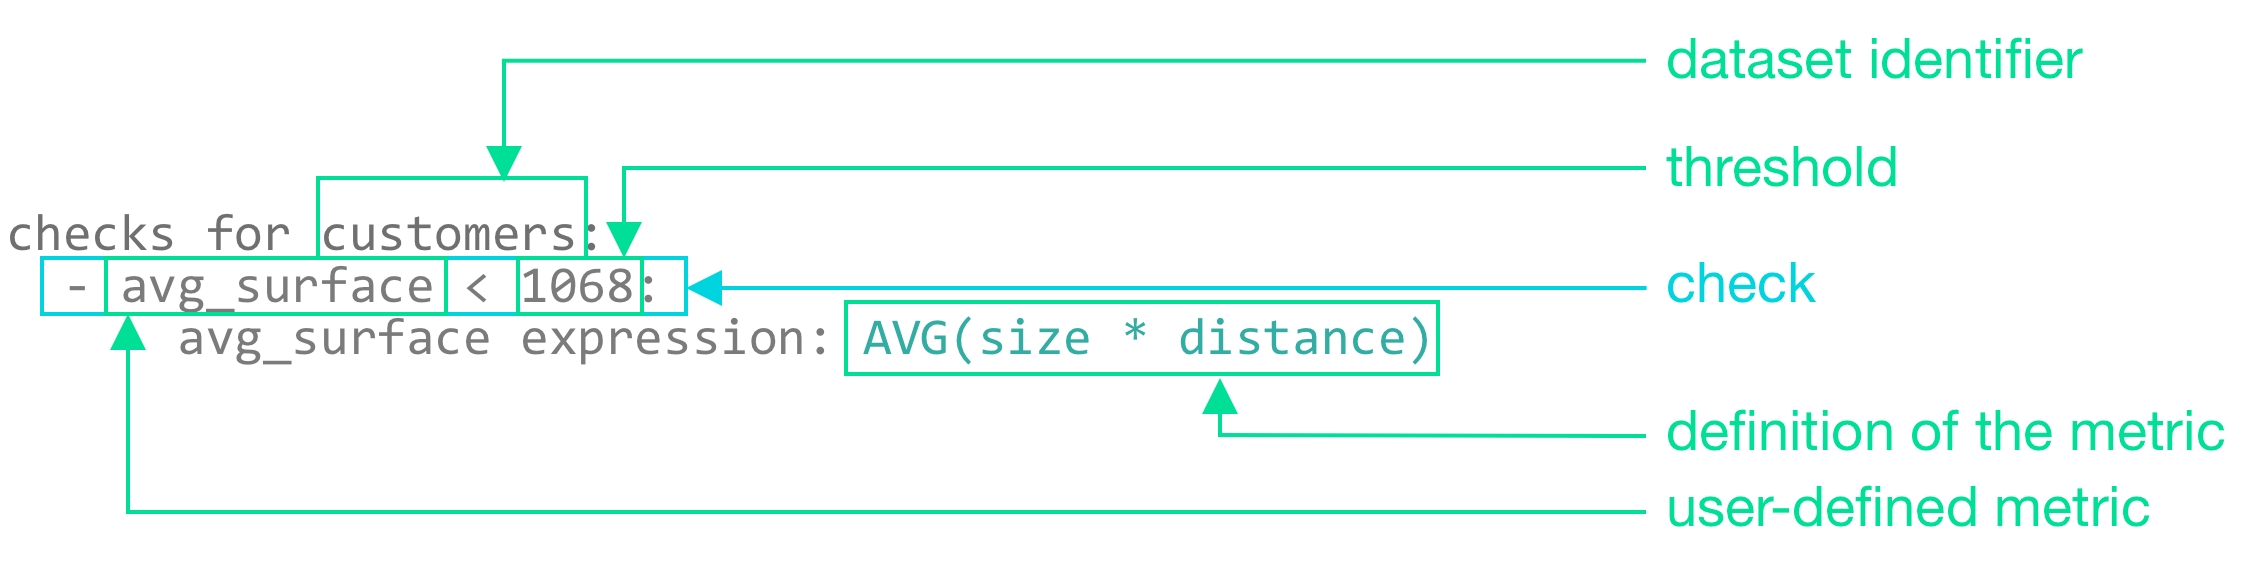
--extra-index-url https://pypi.cloud.soda.io
soda-postgres
soda-sqlserverfrom notebookutils import mssparkutils
config_str = f"""
data_source postgres_data:
type: postgres
host: soda-demo.xxx.eu-west-1.rds.amazonaws.com
port: 5432
username: my_user
password: {mssparkutils.credentials.getSecret('soda-vault' , 'postgres-pw')}
database: postgres
schema: soda_demo_data_testing
data_source azure_sql_data:
type: sqlserver
driver: ODBC Driver 18 for SQL Server
host: soda.sql.azuresynapse.net
port: xxxx
username: my_sql_user
password: {mssparkutils.credentials.getSecret('soda-vault' , 'sql-pw')}
database: soda_sqlserver
schema: soda_demo_data_testing
soda_cloud:
host: cloud.us.soda.io
api_key_id: {mssparkutils.credentials.getSecret('soda-vault' , 'soda-api-key-id')}
api_key_secret: {mssparkutils.credentials.getSecret('soda-vault' , 'soda-api-key-secret')}
"""check_str = """reconciliation retail_customers:
label: 'Reconcile Postgres source and Azure SQL target'
datasets:
source:
dataset: retail_customers
datasource: postgres_data
target:
dataset: retail_customers
datasource: azure_sql_data
checks:
- row_count diff = 0
attributes:
data_quality_dimension: [Reconciliation, Volume]
pipeline: ADF_pipeline_demo
pipeline_stage: Migration
data_domain: Sales
- duplicate_count(customer_id):
fail: when diff > 0
attributes:
data_quality_dimension: [Reconciliation, Uniqueness]
pipeline: ADF_pipeline_demo
pipeline_stage: Migration
data_domain: Sales
- missing_count(customer_id):
fail: when diff > 0
attributes:
data_quality_dimension: [Reconciliation, Completeness]
pipeline: ADF_pipeline_demo
pipeline_stage: Migration
data_domain: Sales
- missing_count(country_code):
fail: when diff > 0
attributes:
data_quality_dimension: [Reconciliation, Completeness]
pipeline: ADF_pipeline_demo
pipeline_stage: Migration
data_domain: Sales
"""from soda.scan import Scan
scan = Scan()
scan.set_data_source_name('azure_sql_data')
scan.add_configuration_yaml_str(config_str)
scan.set_scan_definition_name('reconciliation')
scan.set_verbose(True)
scan.add_sodacl_yaml_str(check_str)
scan.execute()
scan.assert_no_checks_fail()## Configure connections to the data source and Soda Cloud
config_str = f"""
data_source azure_sql_data:
type: sqlserver
driver: ODBC Driver 18 for SQL Server
host: soda.sql.azuresynapse.net
port: xxxx
username: my_sql_user
password: {mssparkutils.credentials.getSecret('soda-vault' , 'sql-pw')}
database: soda_sqlserver
schema: soda_demo_data_testing
soda_cloud:
host: cloud.us.soda.io
api_key_id: {mssparkutils.credentials.getSecret('soda-vault' , 'soda-api-key-id')}
api_key_secret: {mssparkutils.credentials.getSecret('soda-vault' , 'soda-api-key-secret')}
"""
## Define data quality checks using Soda Checks Language (SodaCL)
check_str = """checks for retail_customers:
- missing_percent(customer_id):
name: check completeness of customer_id
fail: when > 5%
- duplicate_percent(customer_id):
name: check uniqueness of customer_id
fail: when > 5%
- missing_percent(country_code):
name: check completeness of country_code
fail: when > 5%
"""
## Run the Soda scan
from soda.scan import Scan
scan = Scan()
scan.set_verbose(True)
scan.set_data_source_name('azure_sql_data')
scan.add_configuration_yaml_str(config_str)
scan.set_scan_definition_name('retail_customers_scan')
scan.add_sodacl_yaml_str(check_str)
scan.execute()
scan.assert_no_checks_fail()# Visualize the number of customers per country
# The first step loads the data from the Azure SQL database.
import pandas as pd
import pyodbc
from notebookutils import mssparkutils
server = 'soda.sql.azuresynapse.net'
database = 'soda'
username = 'my_sql_user'
password = mssparkutils.credentials.getSecret("soda-vault" , "sql-pw")
connection_string = f'DRIVER={{ODBC Driver 18 for SQL Server}};SERVER={server};DATABASE={database};UID={username};PWD={password}'
conn = pyodbc.connect(connection_string)
query = 'SELECT * FROM soda_demo_data_testing.retail_customer_count_by_country_code'
df = pd.read_sql(query, con=conn)
df.head()
# The second step makes the plot.
import pandas as pd
import plotly.express as px
fig = px.bar(
df.sort_values(by=['customer_count', 'country_code'], ascending=True),
x='country_code',
y='customer_count',
color='customer_count',
title='Customer Count by Country Code',
labels={'country_code': 'Country Code', 'customer_count': 'Number of Customers'}
)
fig.show()
# Lastly, save the plot.
fig.write_html("/tmp/retail_customer_count_by_country_code_hist.html")
mssparkutils.fs.cp(
"file:/tmp/retail_customer_count_by_country_code_hist.html",
"abfss://[email protected]/Soda-in-ADF-pipeline/fig/retail_customer_count_by_country_code_hist.html"
)checks for dim_customer
- missing_count(birthday) = 0
- missing_percent(gender) < 5%
- missing_count(first_name) = 0:
missing regex: (?:N/A)
- missing_count(last_name) < 5:
missing values: [n/a, NA, none]
- missing_percent(email_address) = 0%checks for dim_customer:
- missing_count(birthday) = 0checks for dim_reseller:
# a check with a fixed threshold
- missing_count(phone) < 5
# a check with a relative threshold
- missing_percent(number_employees) < 5%checks for dim_customer:
- missing_count(last_name) < 5:
missing values: [NA, n/a, 0]
- missing_count(first_name) = 0:
missing regex: (?:N/A)checks for dim_customer:
- missing_percent(email_address) < 50:
samples limit: 2checks for dim_customer:
- missing_percent(email_address) < 50:
samples limit: 0checks for dim_employee:
- missing_count(gender) = 0:
missing values: ["M", "Q"]
samples columns: [employee_key, first_name]checks for dim_customer:
- missing_count(first_name) = 0:
missing regex: (?:N/A)
name: First names validchecks for dim_customer:
- missing_percent(marital_status):
valid length: 1
warn: when < 5
fail: when >= 5 checks for dim_customer:
- missing_count(first_name) < 5:
missing values: [NA, none]
filter: number_children_at_home > 2checks for dim_reseller:
- missing_percent("phone") = 0for each dataset T:
datasets:
- dim_product
- dim_product_%
checks:
- missing_count(product_line) = 0filter CUSTOMERS [daily]:
where: TIMESTAMP '{ts_start}' <= "ts" AND "ts" < TIMESTAMP '${ts_end}'
checks for CUSTOMERS [daily]:
- missing_count(user_id) = 0 =
<
>
<=
>=
!=
<>
between
not between profile columns:
columns:
- "%.%"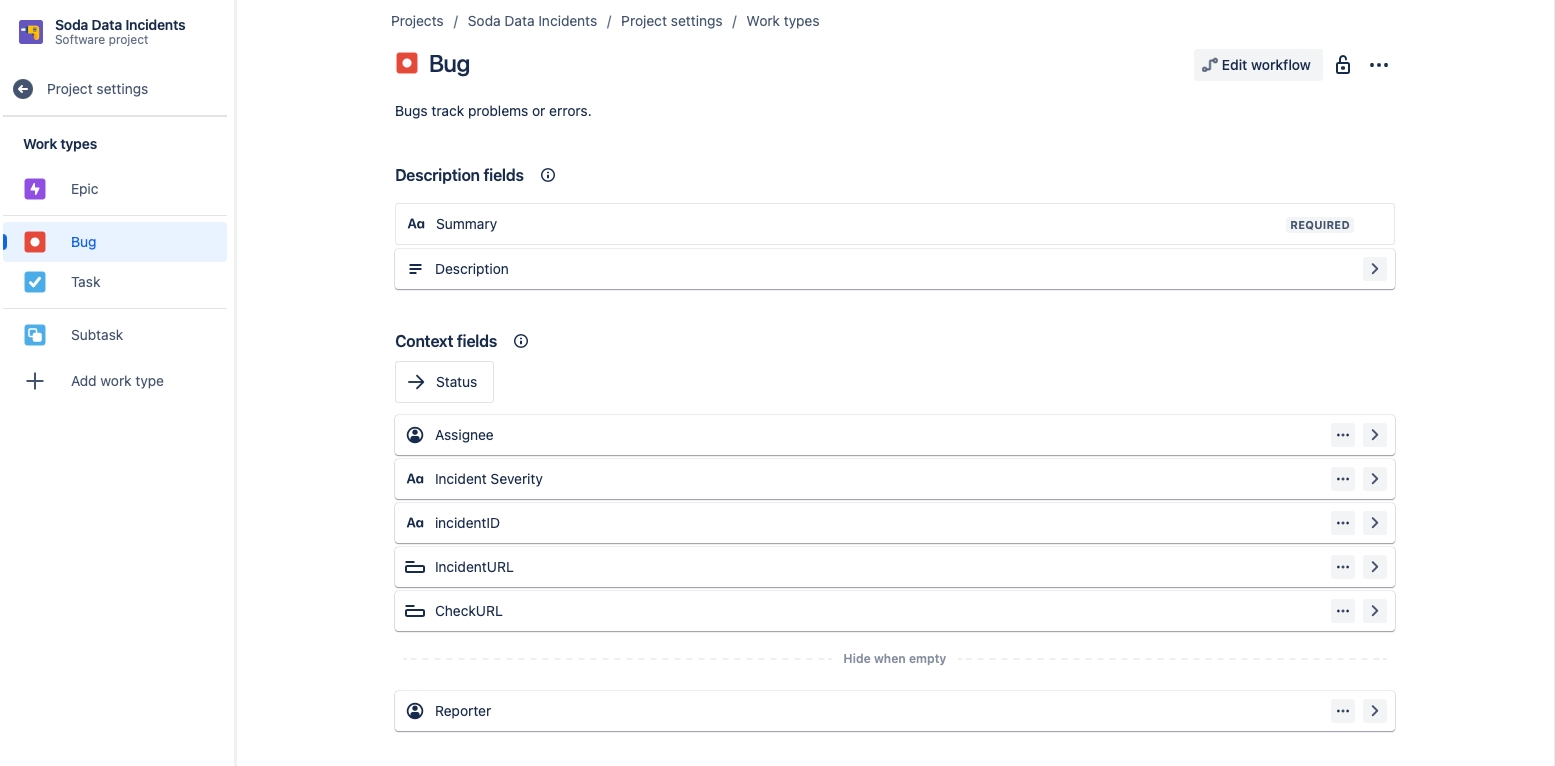
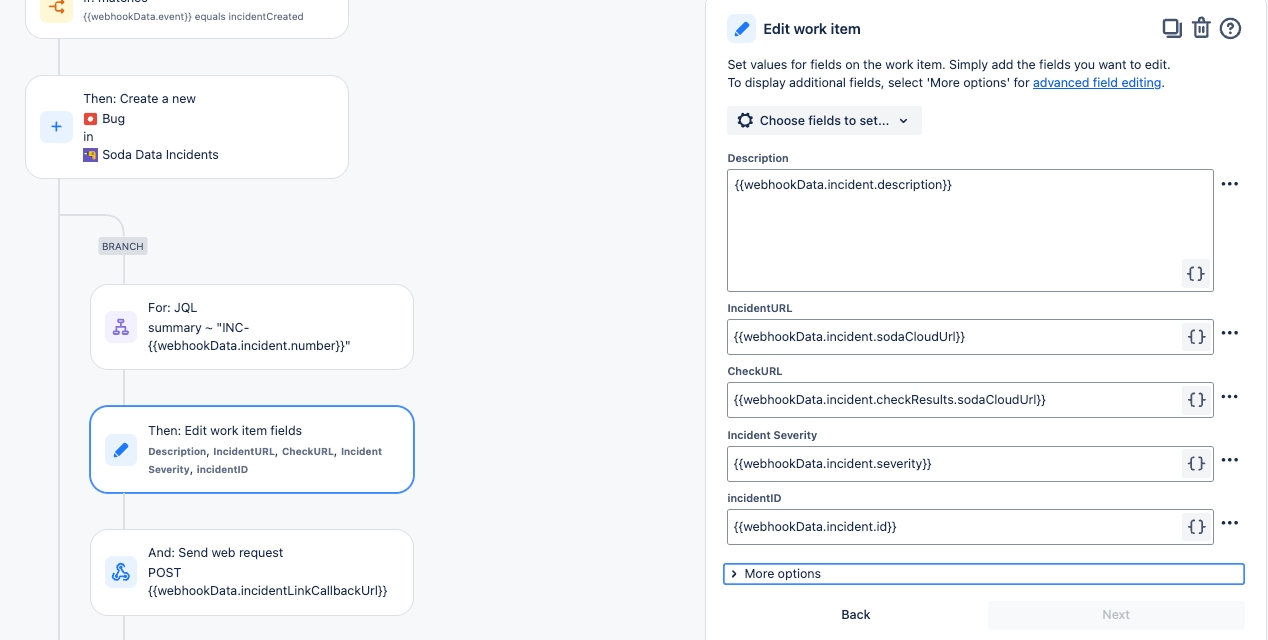
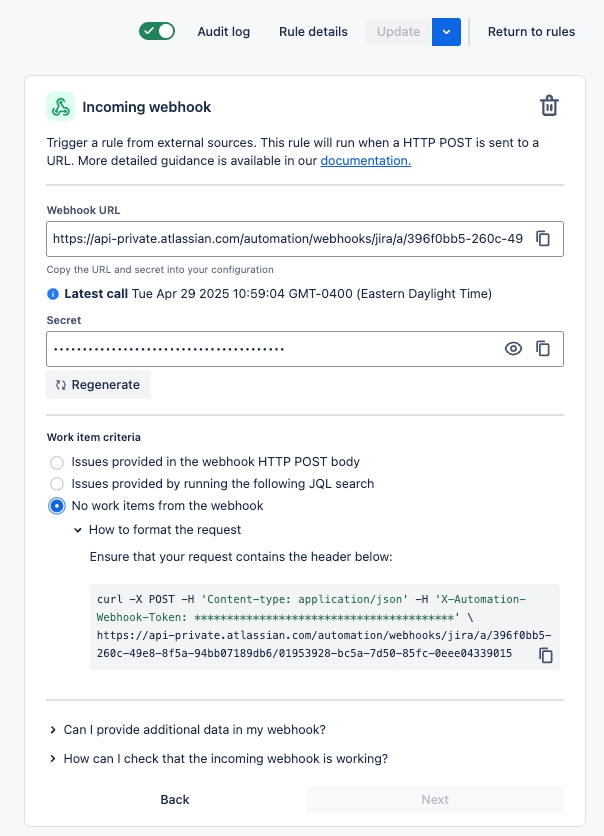
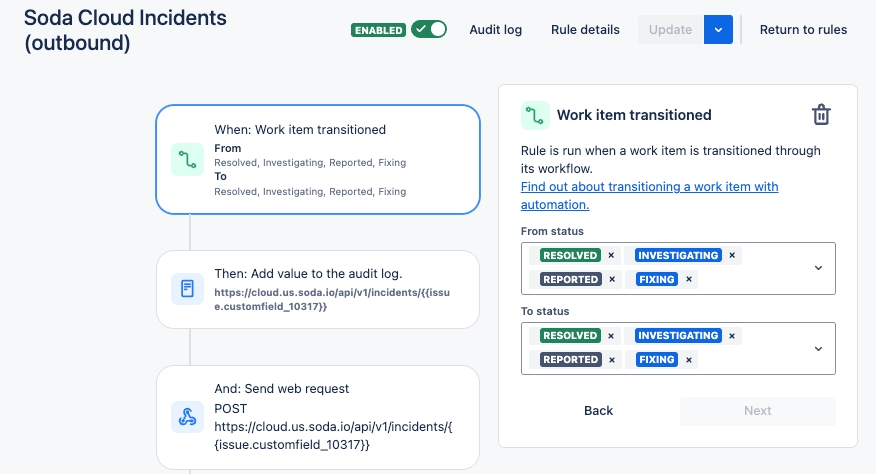
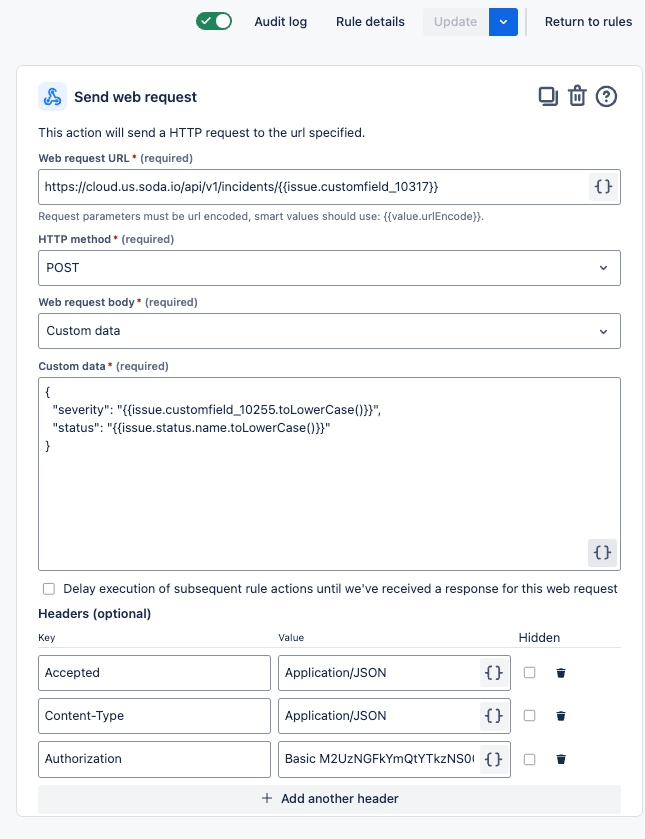
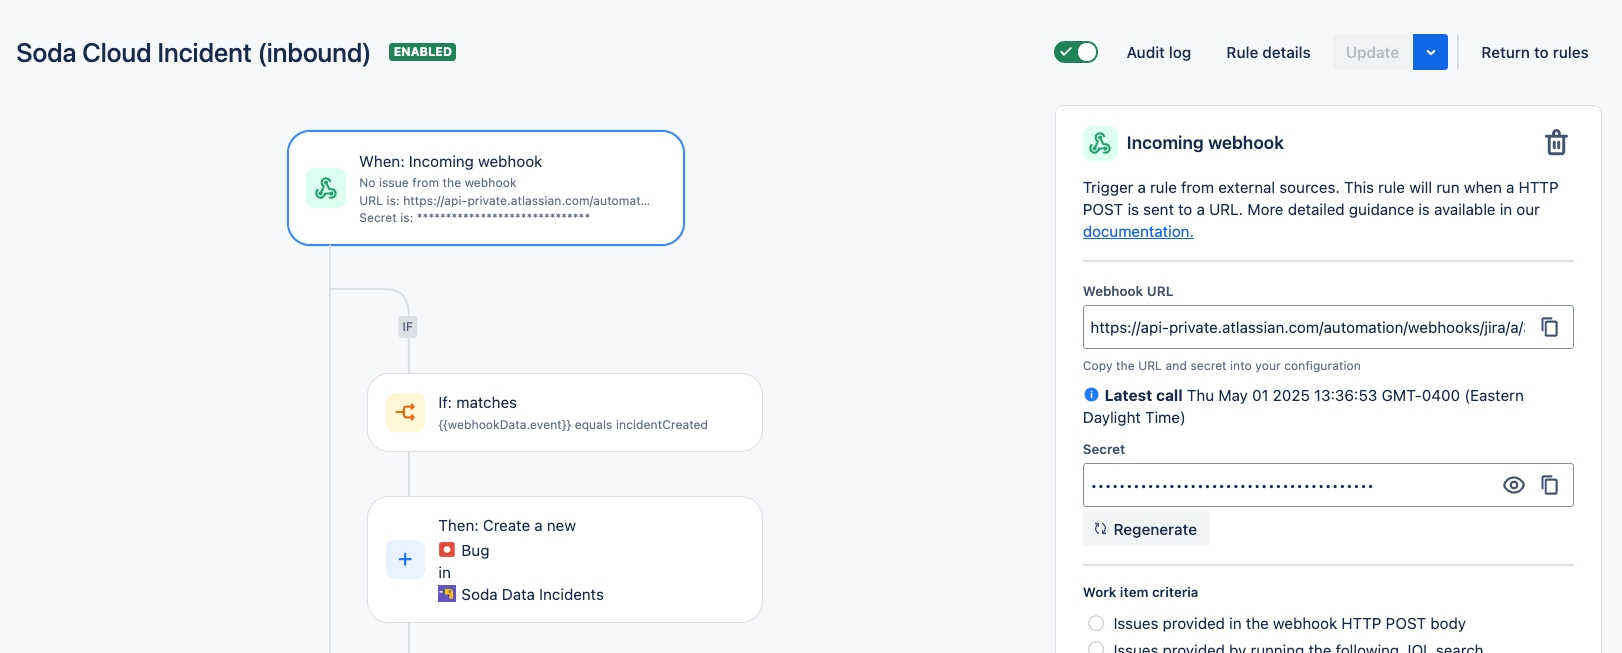
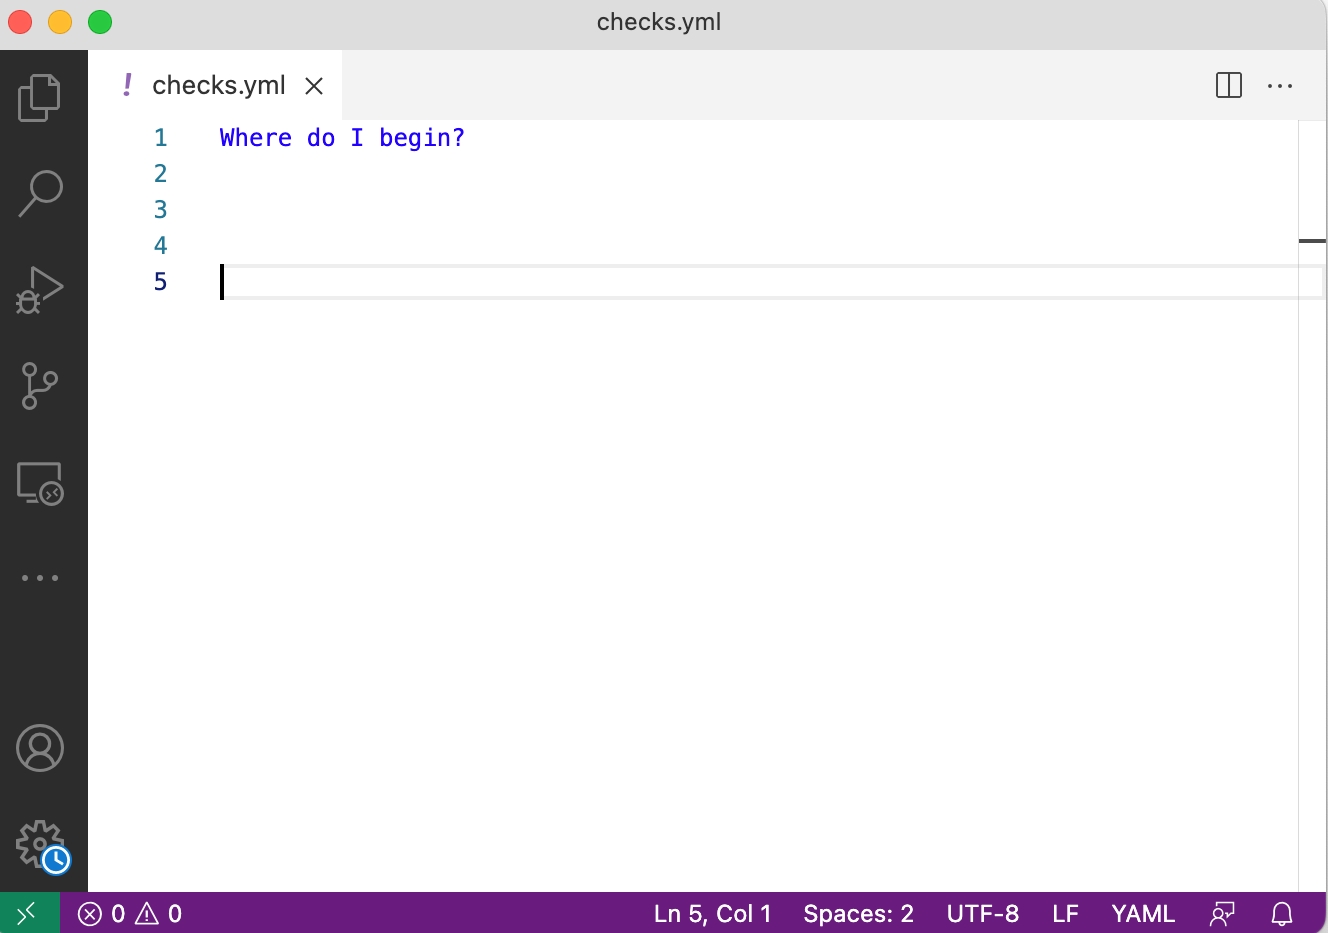

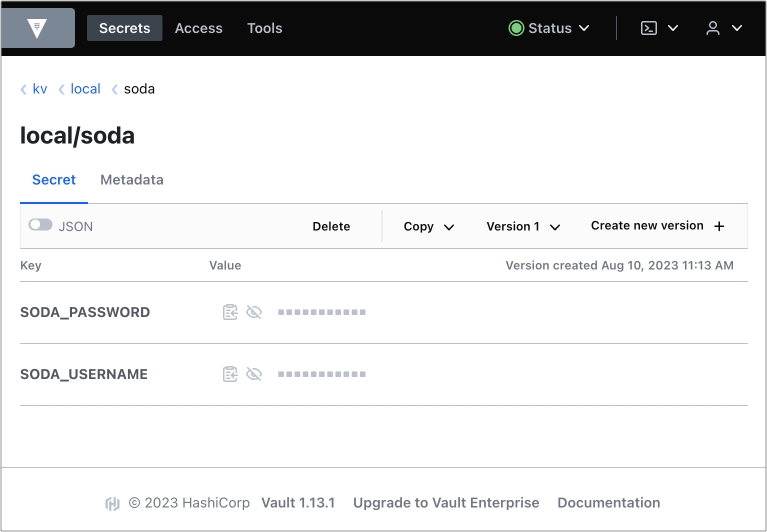
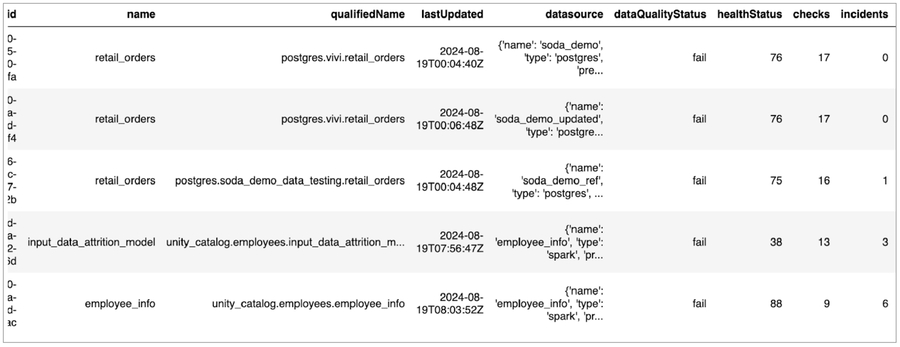
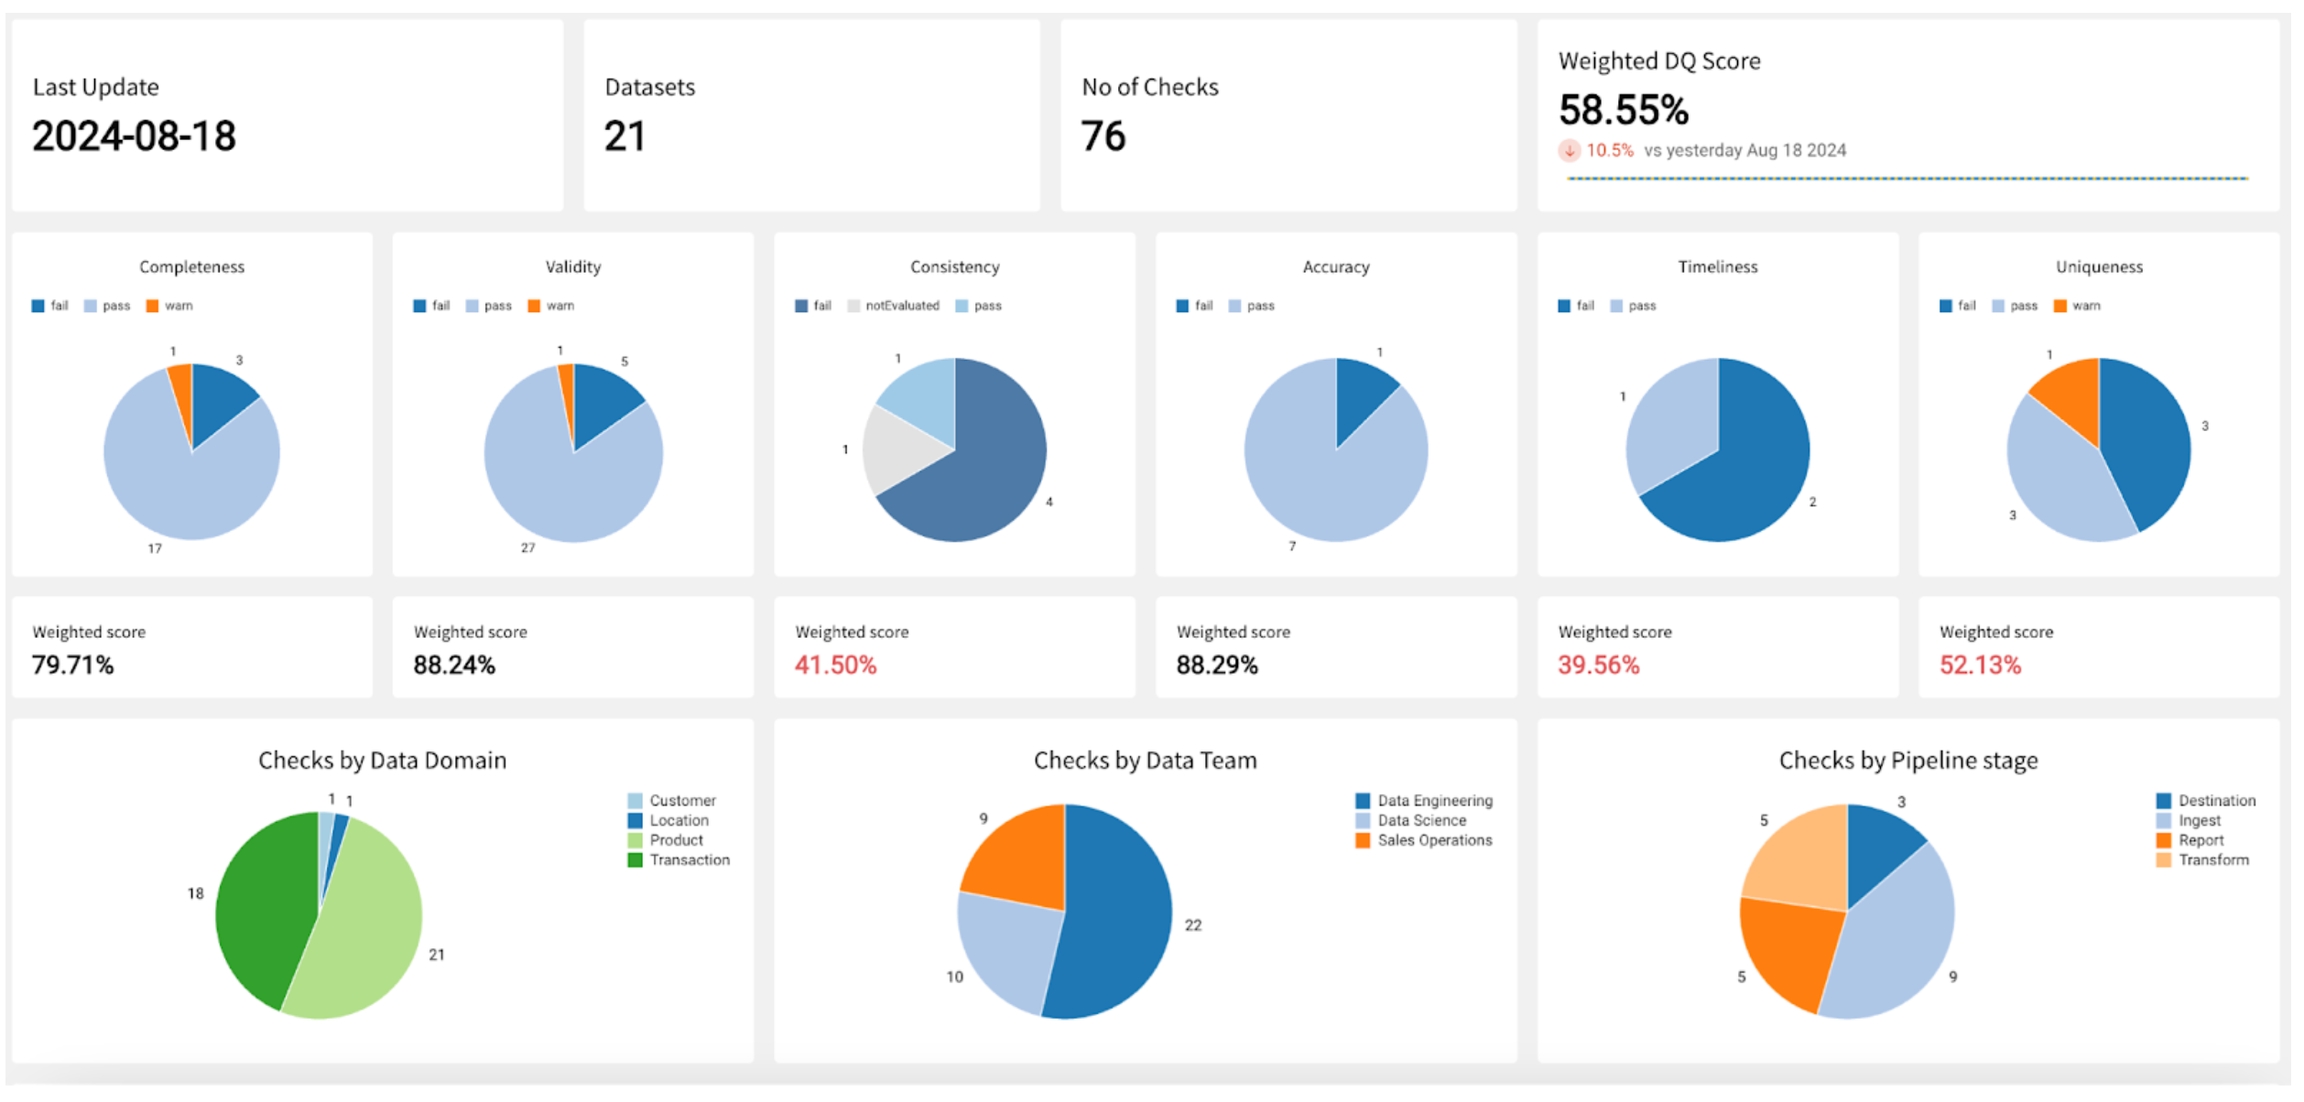
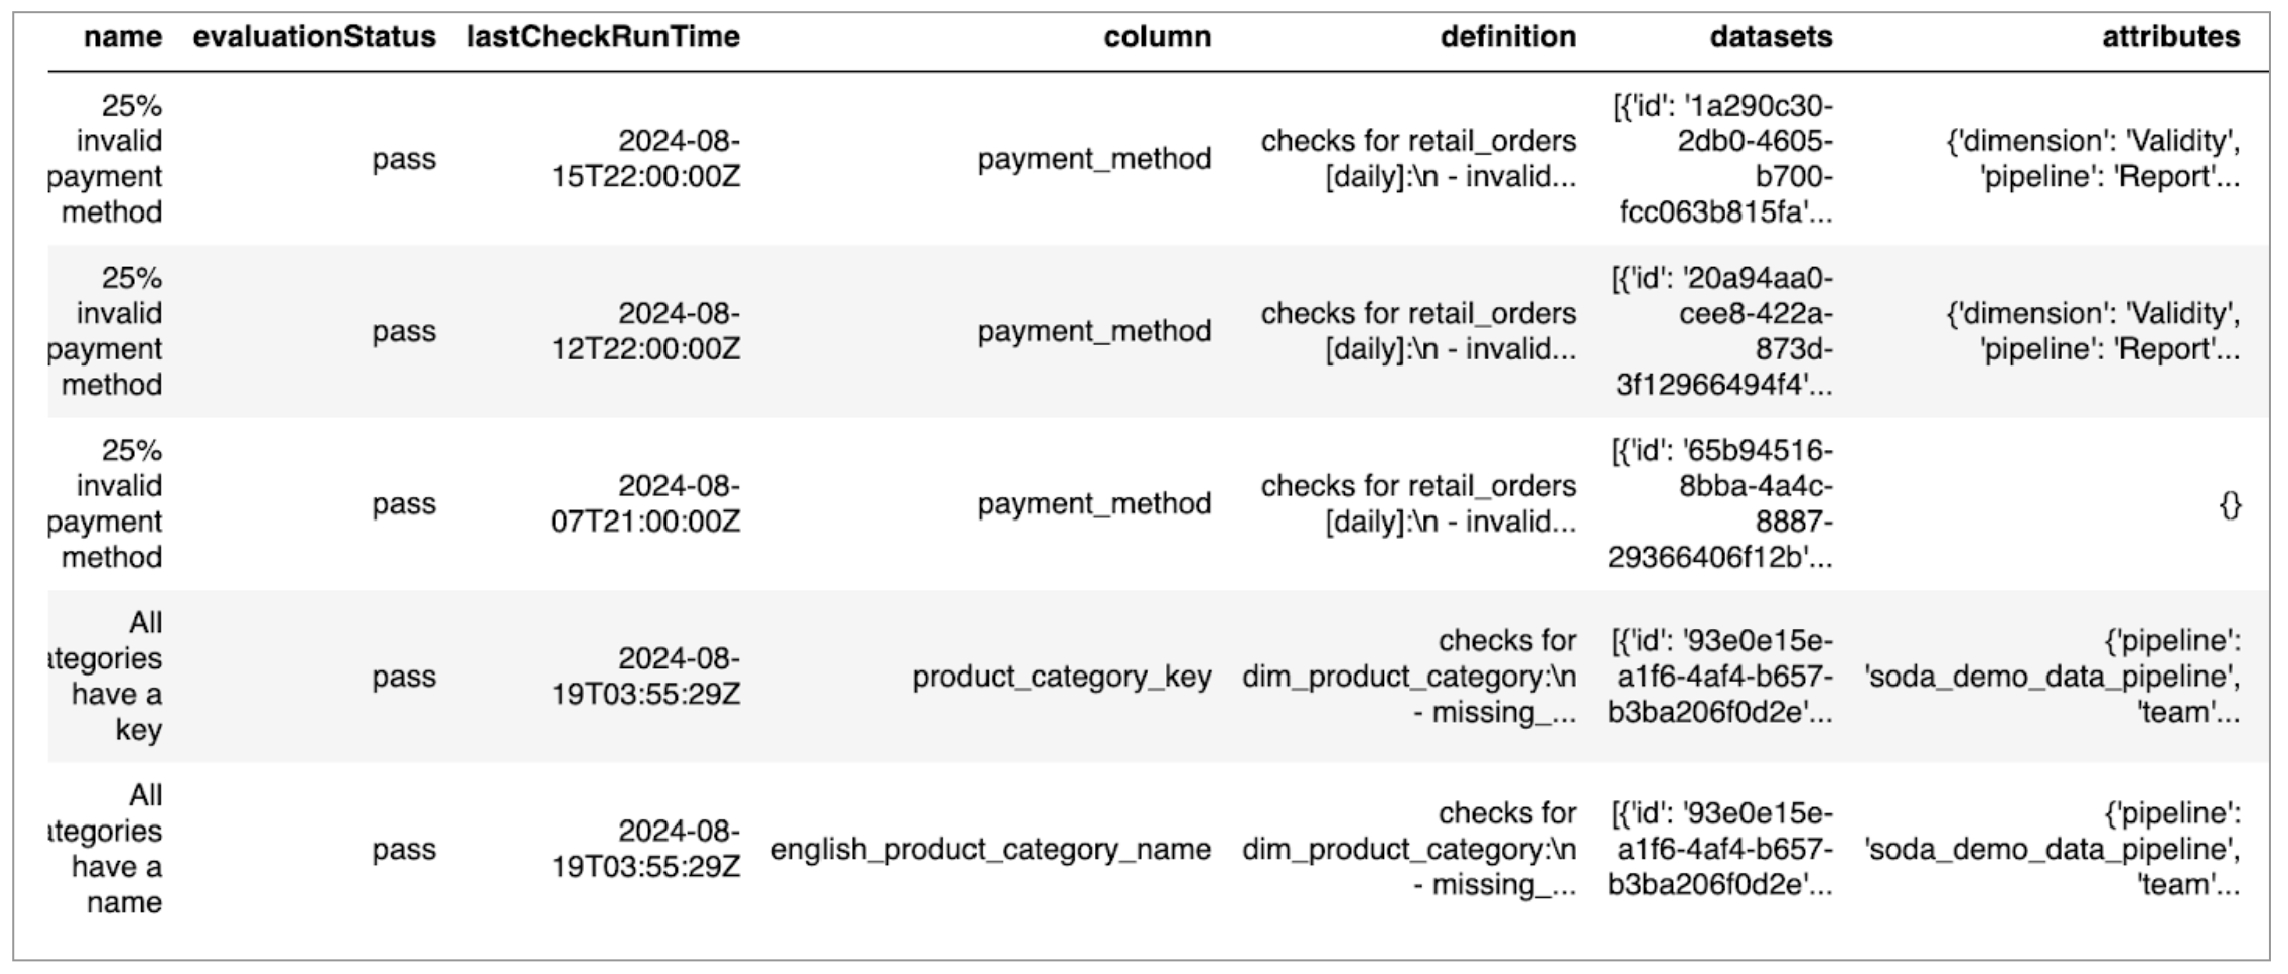
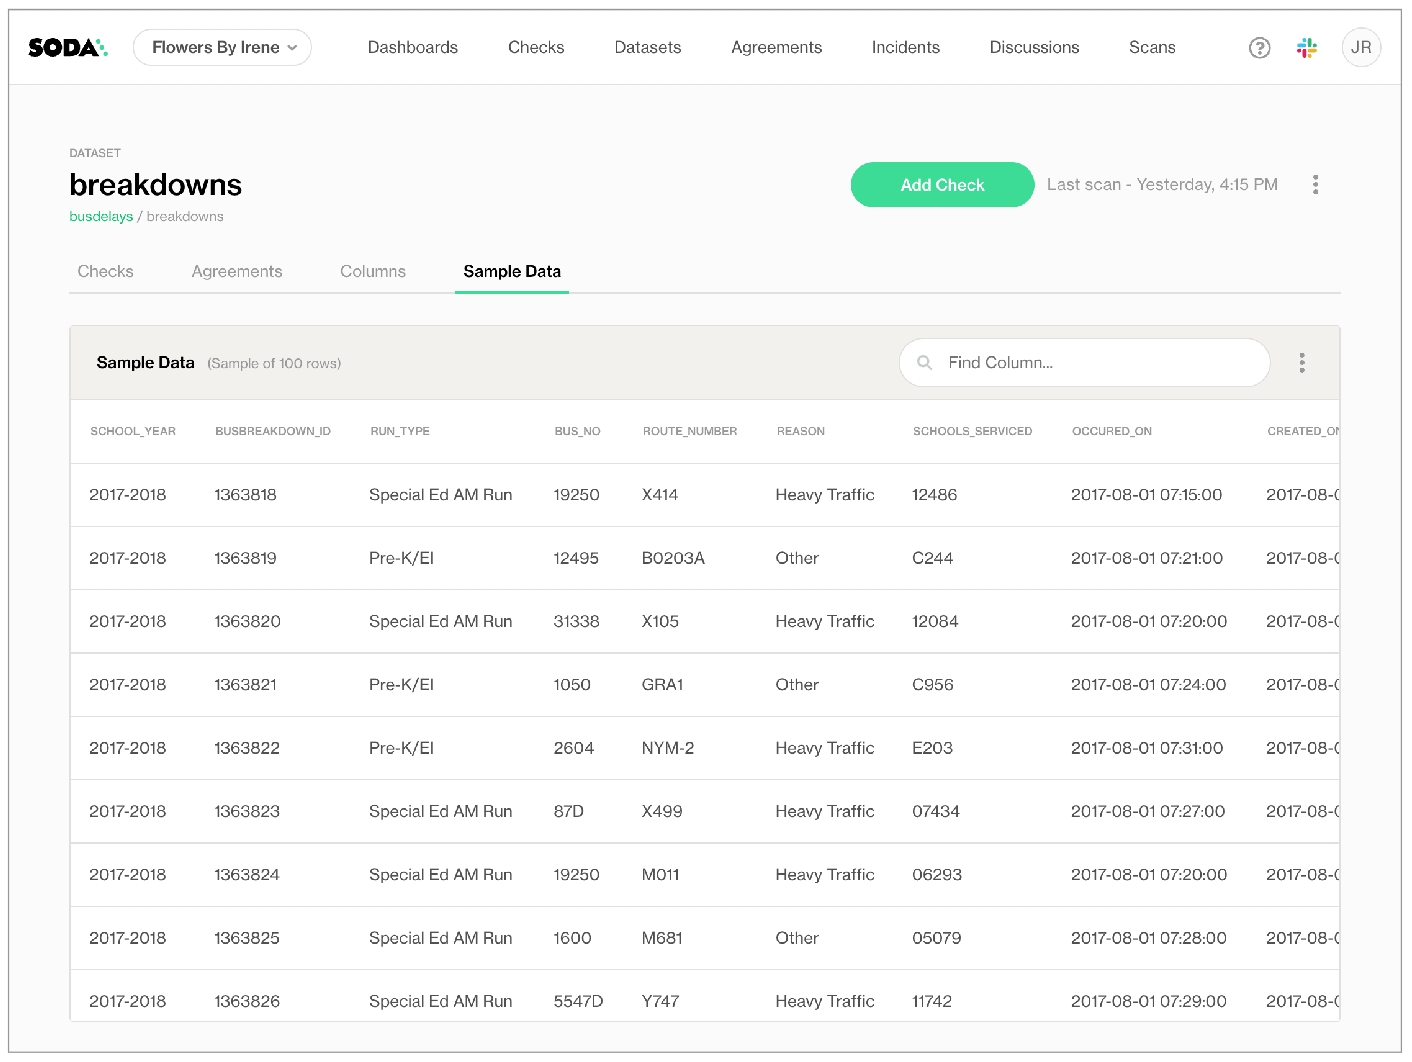
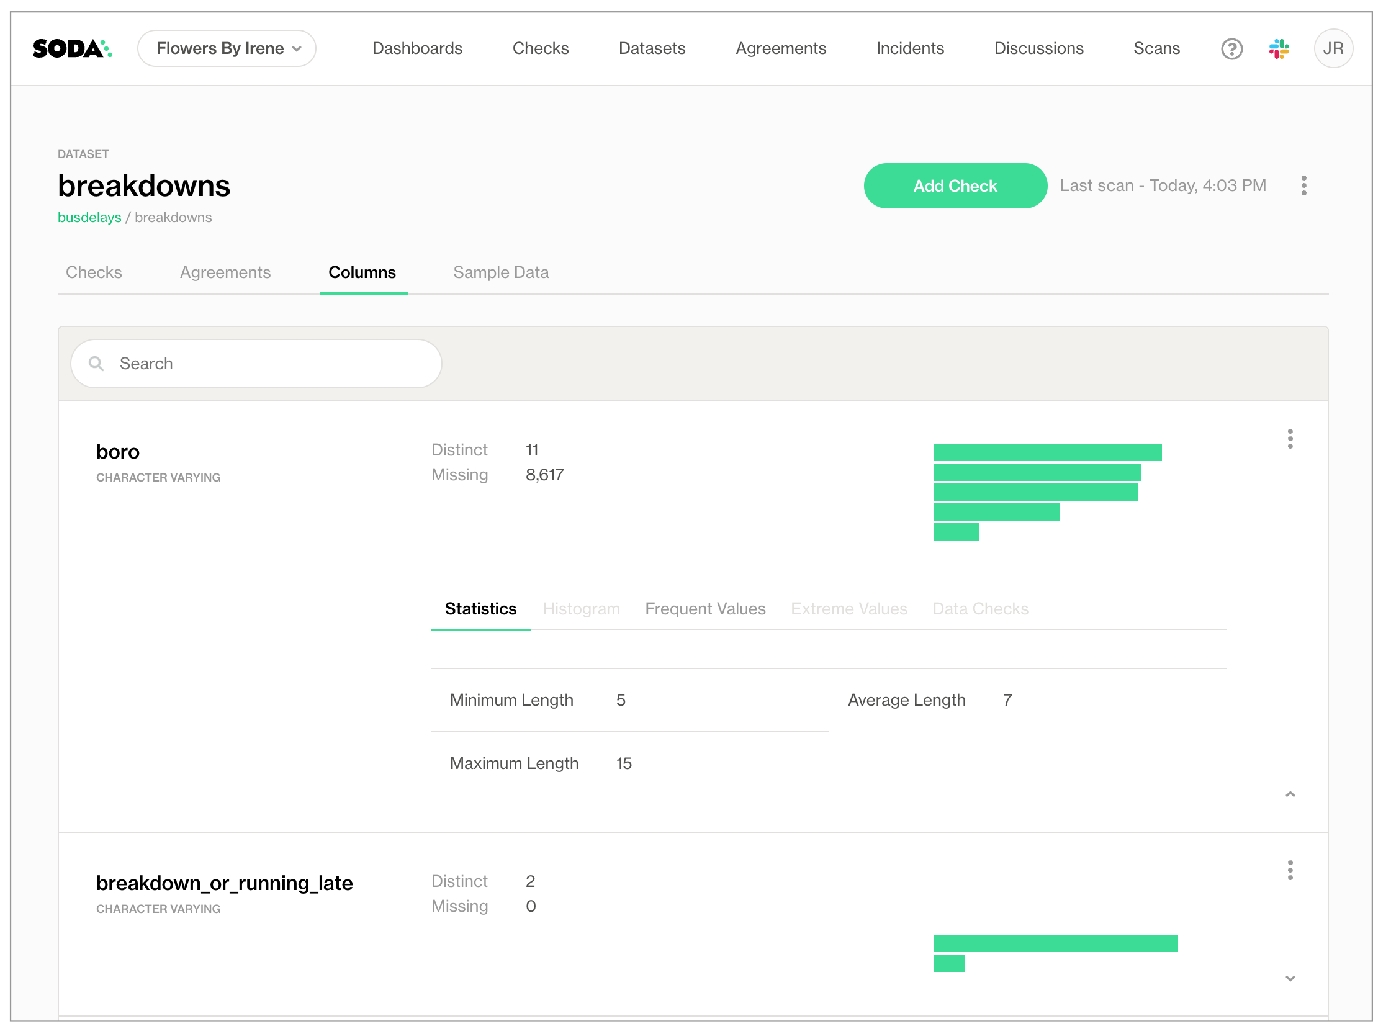
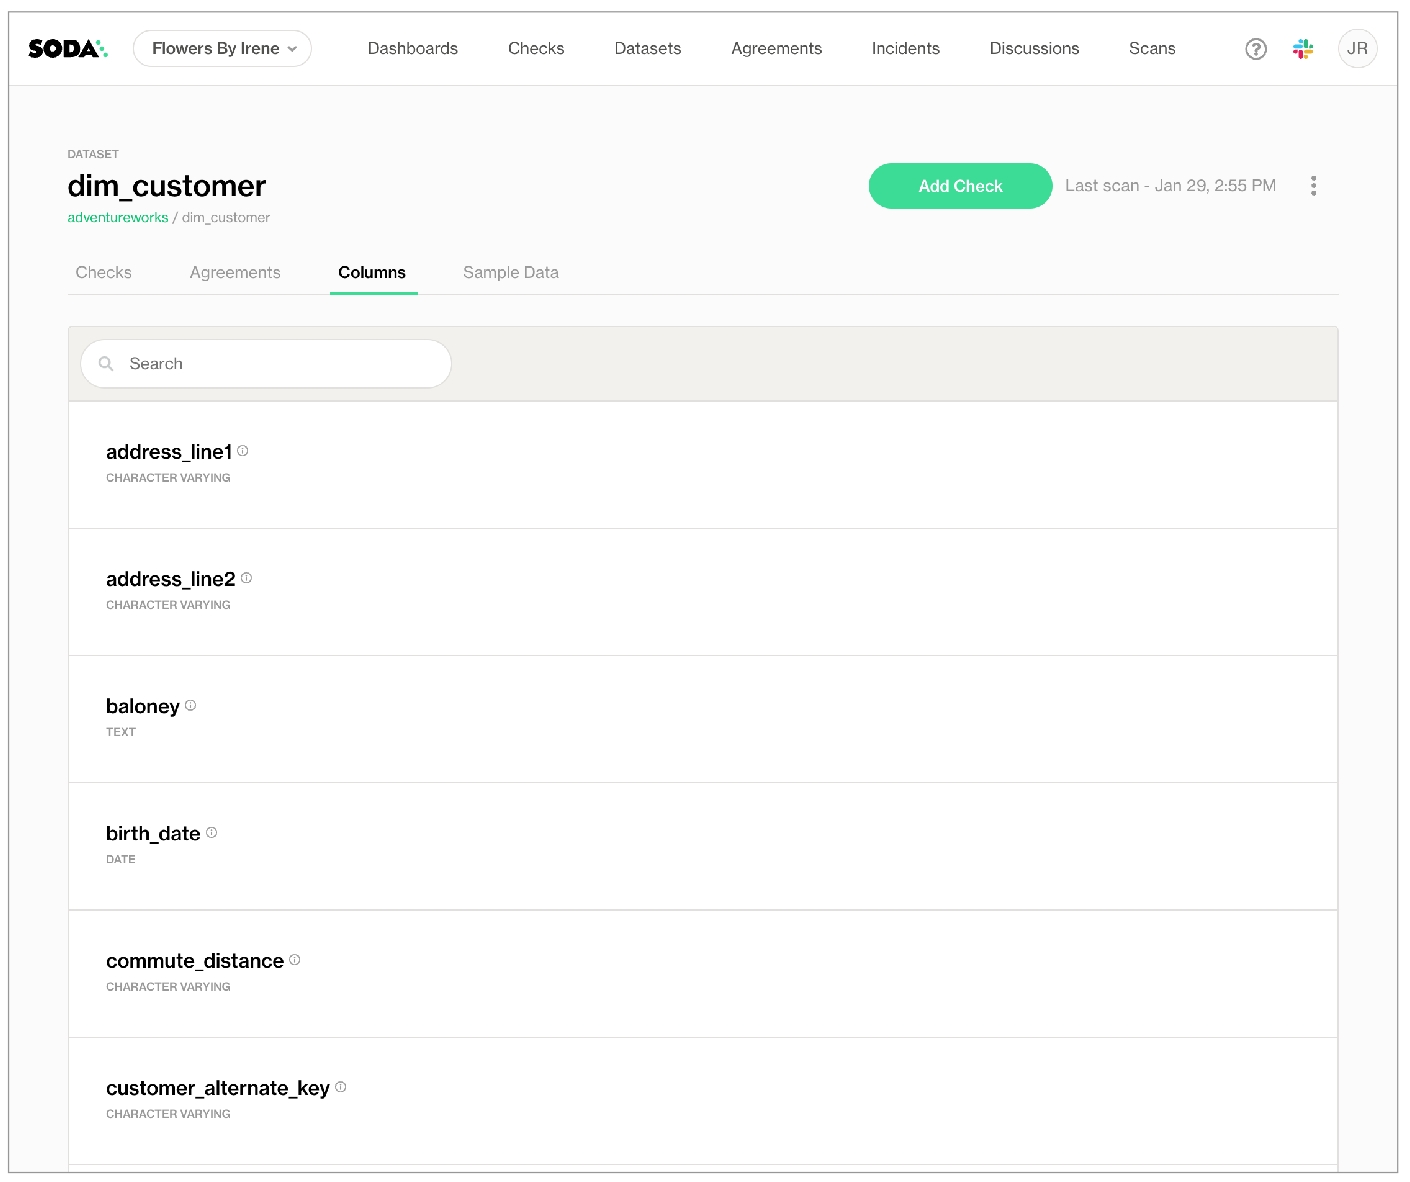
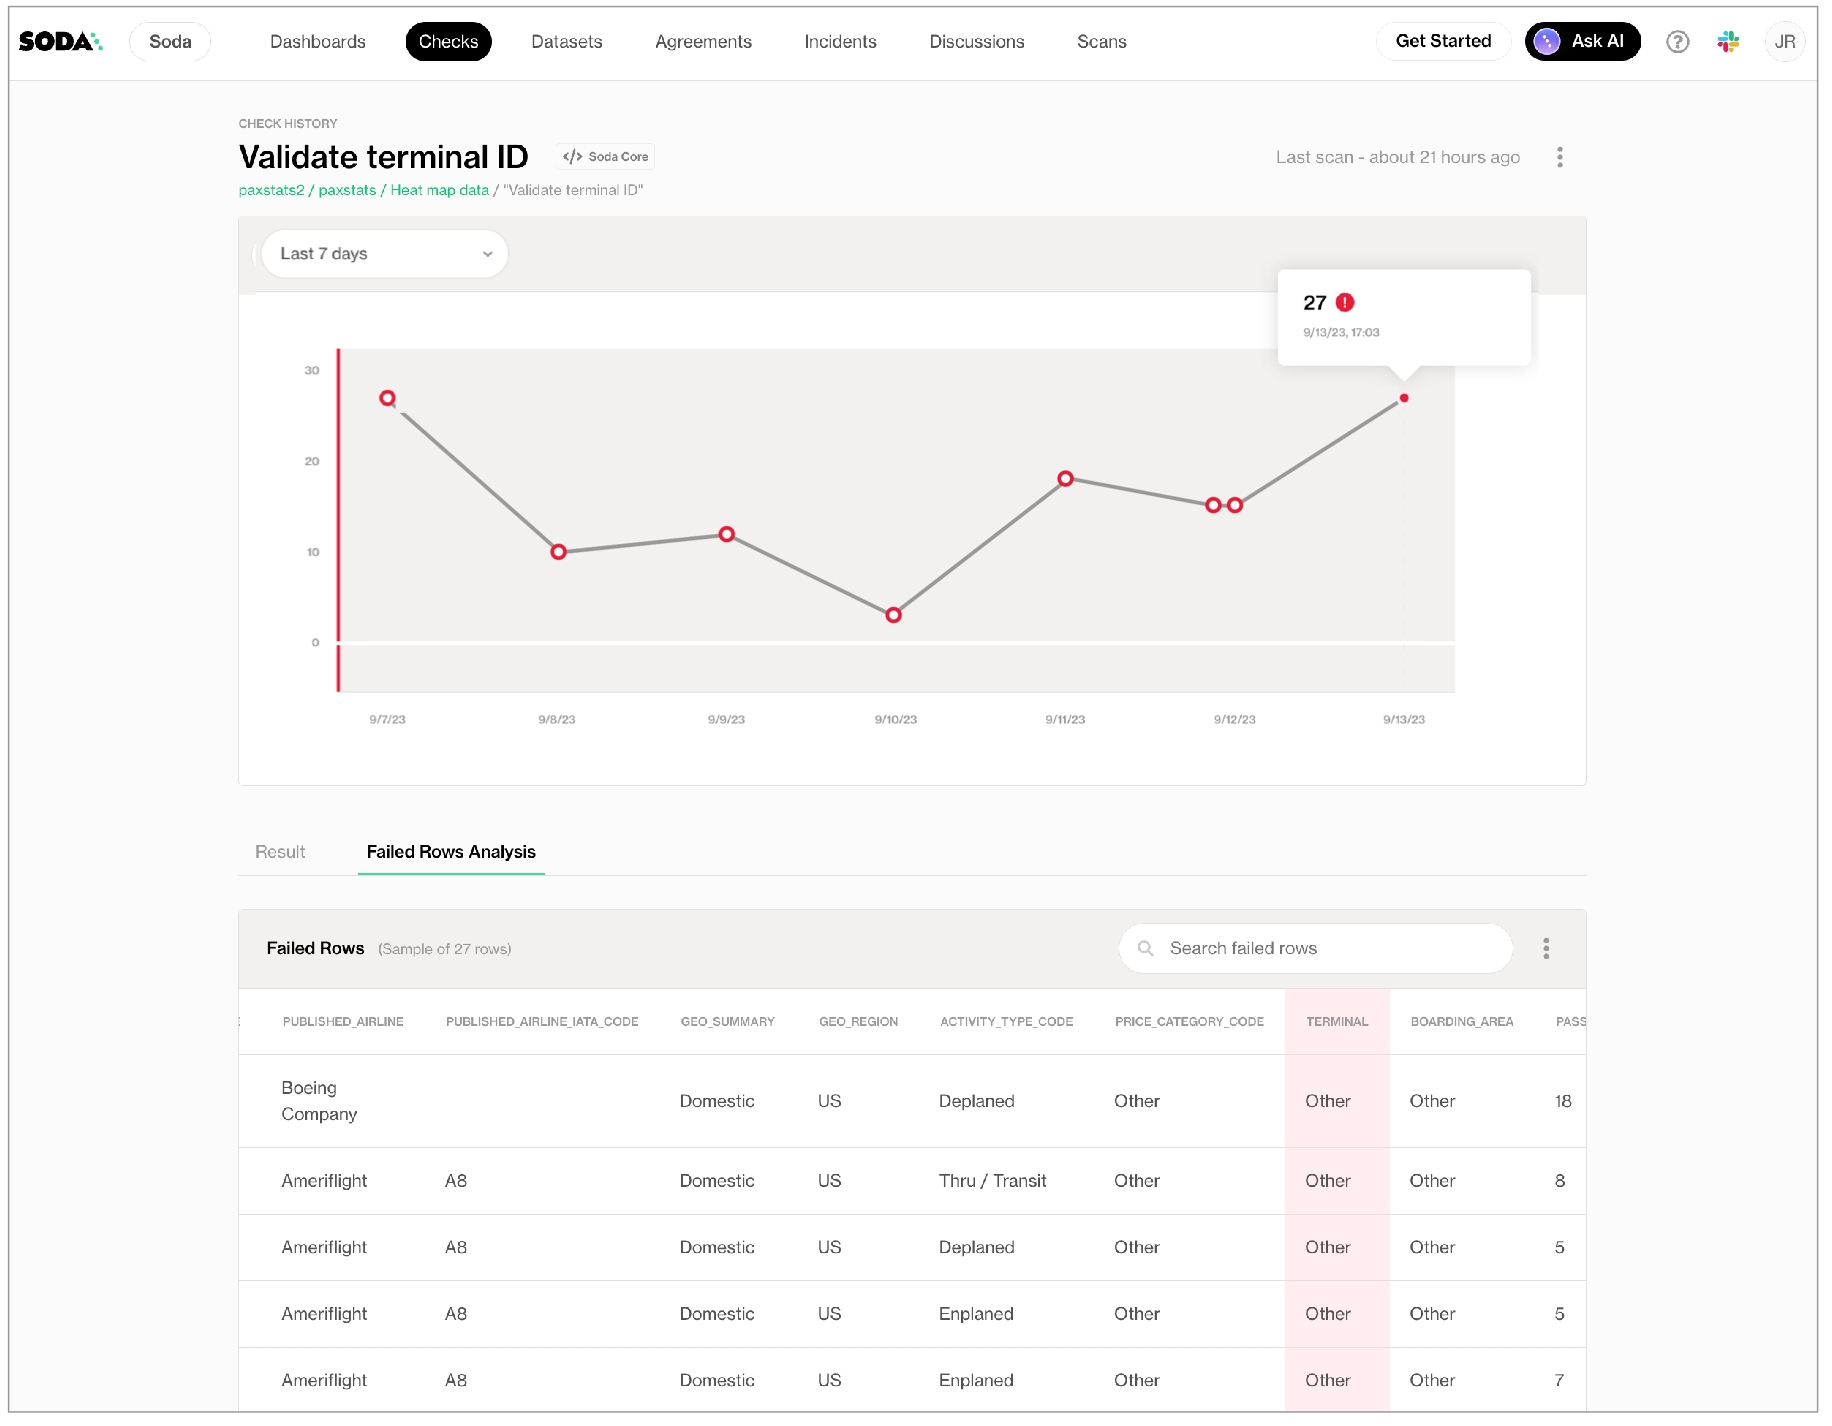
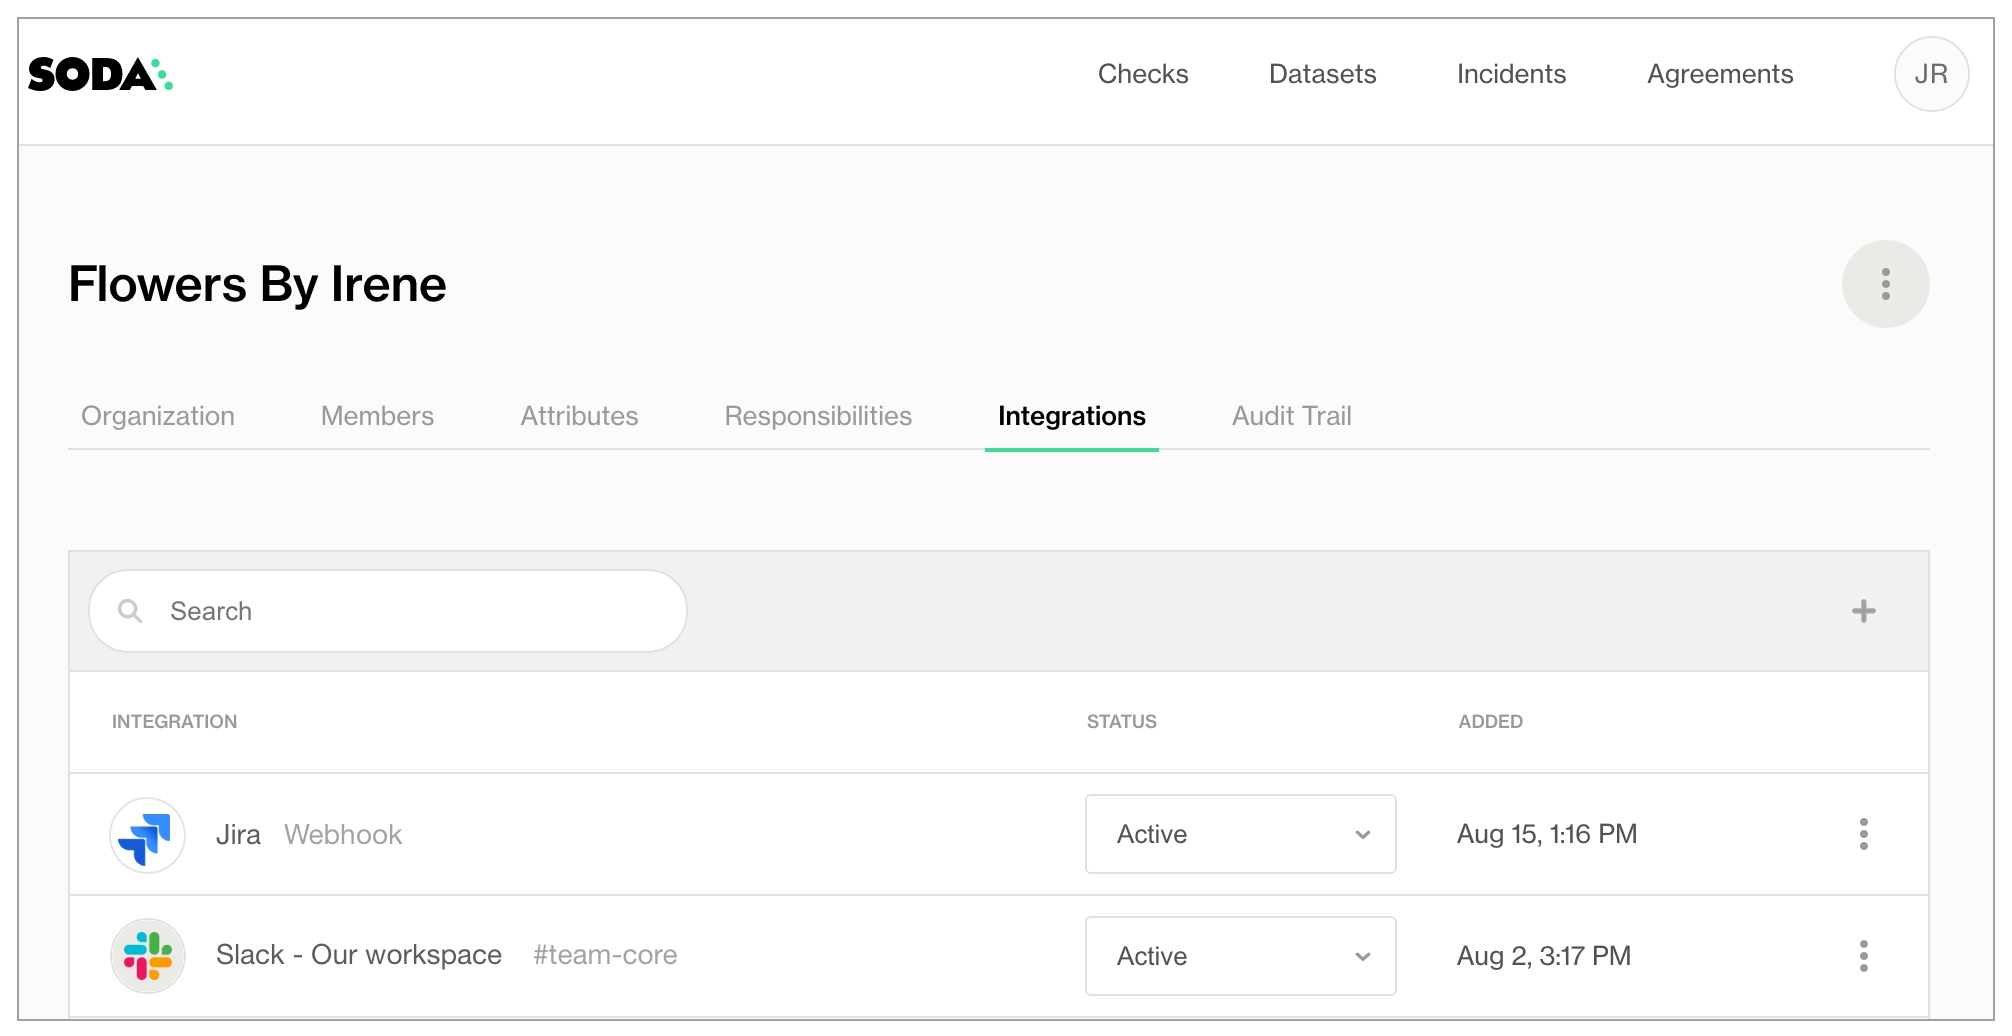
✓
Use quotes when identifying dataset or column names; see . Note that the type of quotes you use must match that which your data source uses. For example, BigQuery uses a backtick (`) as a quotation mark.
✓
Use wildcard characters in the value in the check.
Use wildcard values as you would with CTE or SQL.
✓
Use for each to apply user-defined checks to multiple datasets in one scan; see .
✓
Apply a dataset filter to partition data during a scan; see . Known issue: Dataset filters are not compatible with user-defined checks which use a SQL query. With such a check, Soda does not apply the dataset filter at scan time.
✓
Include a failed row sample query inside a SQL or CTE user-defined metric configuration to send failed row samples to Soda Cloud; see example.
✓
Specify a single column against which to run a check that uses a user-defined metric; see .
-
Supports samples columns parameter to specify columns from which Soda draws failed row samples.
Supports samples limit parameter to control the volume of failed row samples Soda collects.
Supports collect failed rows parameter instruct Soda to collect, or not to collect, failed row samples for a check.
custom metric
avg_order_span
comparison symbol or phrase
between
threshold
5 and 10
expression key
avg_order_span expression
expression value
AVG(last_order_year - first_order_year)
custom metric
product_stock
comparison symbol or phrase
>=
threshold
50
query key
product_stock query
query value
SELECT COUNT(safety_stock_level - days_to_manufacture) FROM dim_product
✓
Define a name for a user-defined check; see example.
✓
Add an identity to a check.
✓
Define alert configurations to specify warn and fail alert conditions; see example.
Apply an in-check filter to return results for a specific portion of the data in your dataset.
Need help? Join the Soda community on Slack.
-
✓
Use quotes when identifying dataset or column names; see example. Note that the type of quotes you use must match that which your data source uses. For example, BigQuery uses a backtick (`) as a quotation mark.
Use wildcard characters ( % or * ) in values in the check.
-
✓
Use for each to apply checks with missing metrics to multiple datasets in one scan; see example.
✓
Apply a dataset filter to partition data during a scan; see example.
✓
Supports samples columns parameter to specify columns from which Soda draws failed row samples.
✓
Supports samples limit parameter to control the volume of failed row samples Soda collects.
✓
Supports collect failed rows parameter instruct Soda to collect, or not to collect, failed row samples for a check.
number text
missing regex
The percentage of rows in a column, relative to the total row count, that contain NULL values and any other user-defined values that qualify as missing.
text
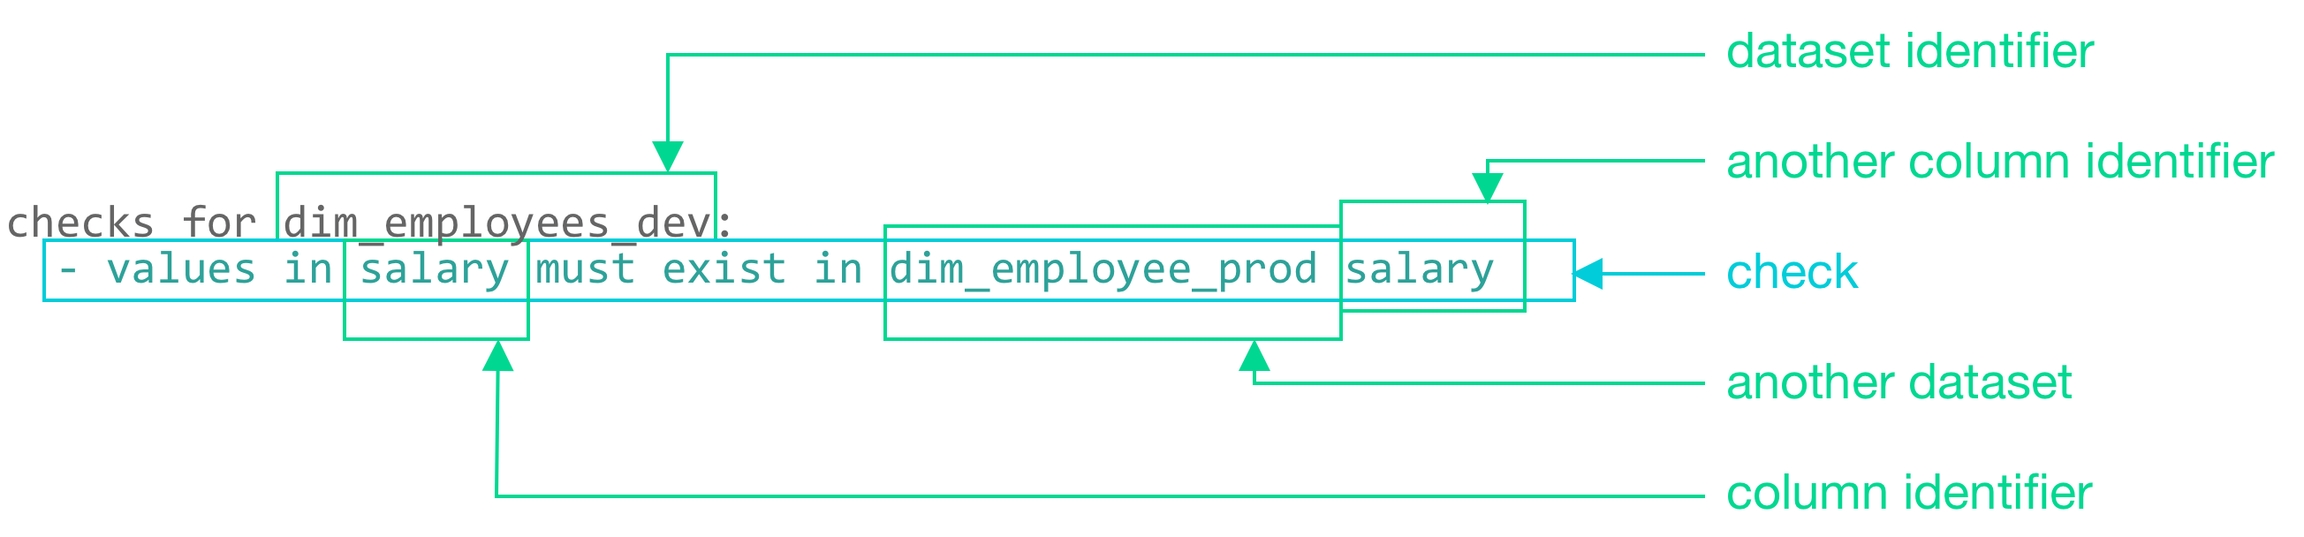
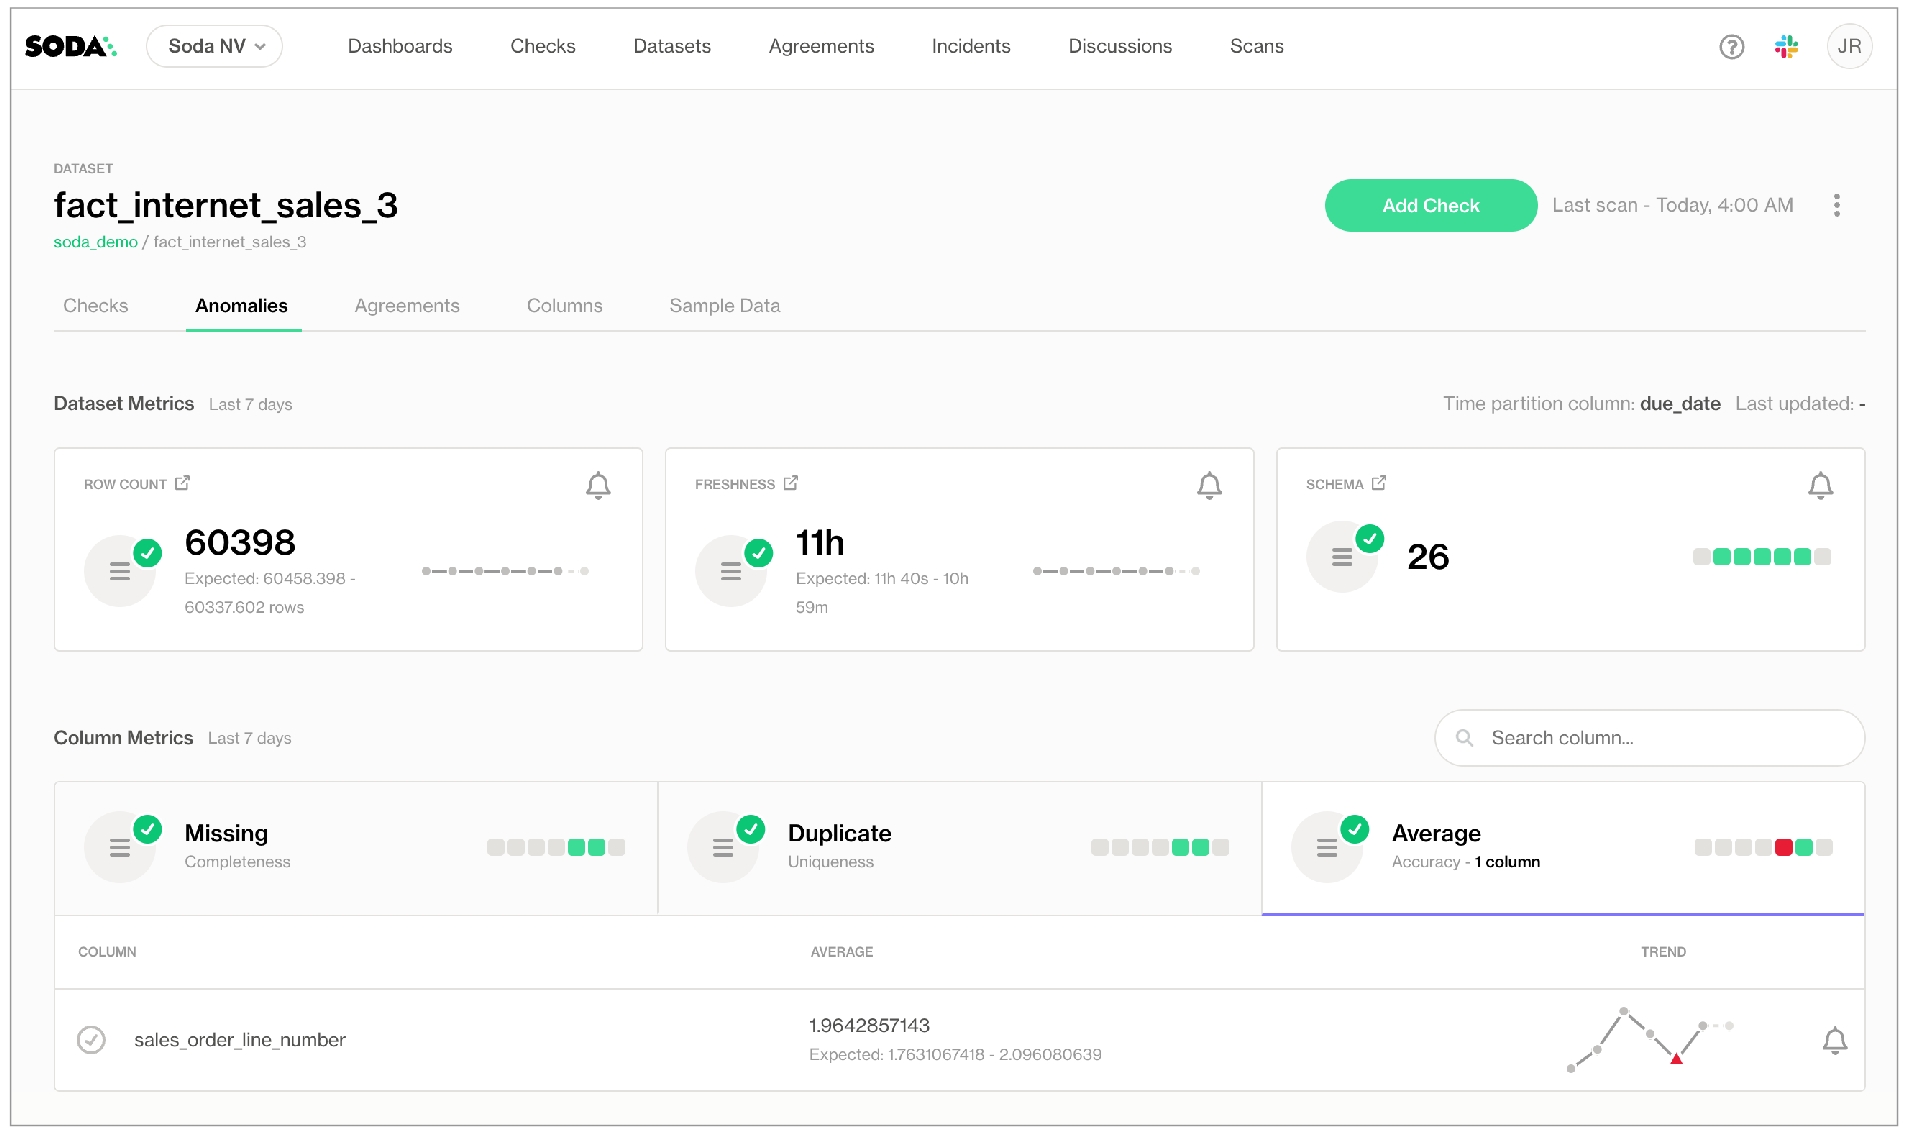
Follow this guide to set up and run scheduled Soda scans for data quality in your Airflow data pipeline.
Use this guide as an example for how to set up and use Soda to test the quality of your data in an Airflow pipeline. Automatically catch data quality issues after ingestion or transformation to prevent negative downstream impact.
Not quite ready for this big gulp of Soda? 🥤Try , first.
The instructions below offer Data Engineers an example of how to execute SodaCL checks for data quality on data in an Apache Airflow pipeline.
For context, this guide presents an example of a Data Engineer at a small firm who was tasked with building a simple products report of sales by category for AdventureWorks data. This Engineer uses dbt to build a simple model transformation to gather data, then builds more models to transform and push gathered information to a reporting and visualization tool. The Engineer uses Airflow for scheduling and monitoring workflows, including data ingestion and transformation events.
The Engineer's goal in this example is to make sure that after such events, and before pushing information into a reporting tool, they run scans to check the quality of the data. Where the scan results indicate an issue with data quality, Soda notifies the Engineer so that they can potentially stop the pipeline and investigate and address any issues before the issue causes problems in the report.
Access the folder to review the dbt models and Soda checks files that the Data Engineer uses.
Borrow from this guide to connect to your own data source, set up scan points in your pipeline, and execute your own relevant tests for data quality.
With Python 3.8, 3.9, or 3.10 installed, the Engineer creates a virtual environment in Terminal, then installs the Soda package for PostgreSQL using the following command.
Refer to for all supported data sources, if you wish.
To connect to a data source such as Snowflake, PostgreSQL, Amazon Athena, or BigQuery, you use a configuration.yml file which stores access details for your data source.
This guide also includes instructions for how to connect to a Soda Cloud account using API keys that you create and add to the same configuration.yml file. Available for free as a 45-day trial, a Soda Cloud account gives you access to visualized scan results, tracks trends in data quality over time, enables you to set alert notifications, and much more.
In the directory in which they work with their dbt models, the Data Engineer creates a soda directory to contain the Soda configuration and check YAML files.
In the new directory, they create a new file called configuration.yml.
In the configuration.yml file, they add the data source connection configuration for the PostgreSQL data source that contains the AdventureWorks data. The example below is the connection configuration for a PostgreSQL data source. Access the . See a complete list of supported .
In a browser, they navigate to to create a free, 45-day trial Soda account.
They navigate to avatar > Profile, then navigate to the API Keys tab and click the plus icon to generate new API keys.
They copy the syntax for the soda_cloud configuration, including the values API Key ID and API Key Secret, and paste it into the configuration.yml.
They are careful not to nest the soda_cloud configuration in the data_source configuration.
They save the configuration.yml file and close the API modal in the Soda account.
In Terminal, they run the following command to test Soda's connection to the data source.
A check is a test that Soda executes when it scans a dataset in your data source. The checks.yml file stores the checks you write using the Soda Checks Language (SodaCL). You can create multiple checks.yml files to organize your data quality checks and run all, or some of them, at scan time.
In this example, the Data Engineer creates multiple checks after ingestion, after initial transformation, and before pushing the information to a visualization or reporting tool.
After building a simple dbt model transformation that creates a new fact table which gathers data about products, product categories, and subcategories (), the Engineer realizes that some of the products in the dataset do not have an assigned category or subcategory, which means those values would erroneously be excluded from the report.
To mitigate the issue and get a warning when these values are missing, they create a new checks YAML file and write the following checks to execute after the transformation produces the fact_product_category dataset.
Because the Engineer does not have the ability or access to fix upstream data themselves, they create another checks YAML file write checks to apply to each dataset they use in the transformation, after the data is ingested, but before it is transformed.
For any checks that fail, the Engineer can notify upstream Data Engineers or Data Product Owners to address the issue of missing categories and subcategories.
Finally, the Engineer builds category and subcategory sales report models using dbt.
The checks files they create to run on the new transform models contain similiar user-defined checks. Ultimately, the Engineer wants data quality checks to fail if the sales of uncategorized products rises above normal (0.85%), and if the sum of sales orders in the model that prepares the report differs greatly from the sum of raw sales order number.
The Engineer creates an Airflow DAG and . Note that the value for scan-name must be unique to every programmatic scan you define. In other words, it cannot be the same as a programmatic scan in another pipeline.
in the repo.
Without using an Airflow DAG, the Engineer can use Soda locally to run scans for data quality using the checks YAML files they created.
They use the soda scan command to run the ingest checks on the raw data, pointing Soda to the checks YAML files in the ingest-checks folder.
If the ingest check results pass, they run dbt to create the new fact_product_category dataset.
Accordingly, they run a scan on the new dataset, pointing Soda to the checks YAML file in the transform-checks folder.
If the transform check results pass, they run dbt to create the reports.
Lastely, they run a scan on the reports data, pointing Soda to the checks YAML file in the reports-checks folder.
If the reports check results pass, the data is reliable enough to push to the reporting or visualization tool for consumers.
Learn more about .
In their Soda Cloud account, the Engineer clicks Checks to access the Checks dashboard. The checks from the scan that Soda performed during the scan appear in the table where they can click each line item to learn more about the results, as in the example below.
To more easily retrieve Soda scan results by dbt model, the Engineer navigates to Datasets, then clicks the stacked dots at the right of the dim_product dataset and selects Edit Dataset.
In the Tags
✨Hey, hey!✨ Now you know what it's like to add data quality checks to your production data pipeline. Huzzah!
in Soda!
. Hey, what can Soda do for you?
Join the .
Add optional configurations to your SodaCL checks to optimize and clarify.
When you define SodaCL checks for data quality in your checks YAML file, you have the option of adding one or more extra configurations or syntax variations. Read more about SodaCL metrics and checks in general.
The following optional configurations are available to use with most, though not all, check types. The detailed documentation for metrics and individual check types indicate specifically which optional configurations are compatible.
Add a customized, plain-language name to your check so that anyone reviewing the check results can easily grasp the intent of the check.
Add the name to the check as a nested key:value pair, as per the example below.
Be sure to add the : to the end of your check, before the nested content.
If name is configured, Soda Library sends the value of name to Soda Cloud as the check identifier.
Avoid applying the same customized check names in multiple agreements. Soda Cloud associates check results with agreements according to name so if you reuse custom names, Soda Cloud may become confused about which agreement to which to link check results.
If you wish, you can use a variable to customize a dynamic check name. Read more about .
When you run a scan with Soda Library, it uses the value you specified for your variable in the scan results, as in the example below.
Soda Cloud identifies a check using details such as the check definition, the check YAML file name, and the file's location. When you modify an individual check, the check identity changes, which results in a new check in Soda Cloud. For example, the following check sends one check result to Soda Cloud after a scan.
If you changed the threshold from 0 to 99, then after the next scan, Soda Cloud considers this as a new check and discards the previous check result's history; it would appear as though the original check and its results had disappeared. Note that this behaviour does not apply to changing values that use an in-check variable, as in the example below.
If you anticipate modifying a check, you can explicitly specify a check identity so that Soda Cloud can correctly accumulate the results of a single check and retain its history even if the check has been modified. Be sure to complete the steps below before making any changes to the check so that you do not lose the existing check result history.
Add an identity property to your check using the identifier you copied as the identity's value.
Choosing a Value for identity
The most important rule is that the identity value must be unique across all your checks.
Here are some recommended approaches:
Generate a UUID yourself.
Use the generated check ID from Soda Cloud (available in the check details).
Follow a naming pattern, for example:
Example:
This ensures no accidental collisions between checks and preserves a clear mapping over time.
Save your changes, then run a scan to push new results to Soda Cloud that include the check identity.
With the check identity now associated with the check in Soda Cloud, you may proceed to make changes to the check.
See also:
It’s important to note that check identity is not the same as check ID in Soda Cloud.
Check ID
Generated automatically by Soda Cloud as a UUID when a check is first created.
Used to uniquely reference that check.
Check Identity
Think of check identity as the link between old and new versions of your check, while the check ID is simply the identifier inside Soda Cloud.
When Soda runs a scan of your data, it returns a check result for each check. Each check results in one of three default states:
pass: the values in the dataset match or fall within the thresholds you specified
fail: the values in the dataset do not match or fall within the thresholds you specified
error: the syntax of the check is invalid
However, you can add alert configurations to a check to explicitly specify the conditions that warrant a warn result. Setting more granular conditions for a warn, or fail, state of a check result gives you more insight into the severity of a data quality issue.
For example, perhaps 50 missing values in a column is acceptable, but more than 50 is cause for concern; you can use alert configurations to warn you when there are 0 - 50 missing values, but fail when there are 51 or more missing values.
Add alert configurations as nested key:value pairs, as in the following example which adds a single alert configuration. It produces a warn check result when the volume of duplicate phone numbers in the dataset exceeds five. Refer to the CLI output below.
Add multiple nested key:value pairs to define both warn alert conditions and fail alert conditions.
The following example defines the conditions for both a warn and a fail state. After a scan, the check result is warn when there are between one and ten duplicate phone numbers in the dataset, but if Soda Library discovers more than ten duplicates, as it does in the example, the check fails. If there are no duplicate phone numbers, the check passes.
Be sure to add the : to the end of your check, before the nested content.
Be aware that a check that contains one or more alert configurations only ever yields a .
Be aware that a check that contains one or more alert configurations only ever yields a single check result; one check yields one check result. If your check triggers both a warn and a fail, the check result only displays the more severe, failed check result. (Schema checks behave slightly differently; see .)
Using the following example, Soda Library, during a scan, discovers that the data in the dataset triggers both alerts, but the check result is still Only 1 warning. Nonetheless, the results in the CLI still display both alerts as having both triggered a [WARNED] state.
The check in the example below data triggers both warn alerts and the fail alert, but only returns a single check result, the more severe Oops! 1 failures.
Use alert configurations to write checks that define fail or warn zones. By establishing these zones, the check results register as more severe the further a measured value falls outside the threshold parameters you specify as acceptable for your data quality.
The example that follows defines split warning and failure zones in which inner is good, and outer is bad. The chart below illustrates the pass (white), warn (yellow), and fail (red) zones. Note that an individual check only ever yields one check result. If your check triggers both a warn and a fail, the check result only displays the more serious, failed check result. See for details.
The next example defines a different kind of zone in which inner is bad, and outer is good. The chart below illustrates the fail (red), warn (yellow), and pass (white) zones.
Add a filter to a check to apply conditions that specify a portion of the data against which Soda executes the check. For example, you may wish to use an in-check filter to support a use case in which “Column X must be filled in for all rows that have value Y in column Z”.
Add a filter as a nested key:value pair, as in the following example which filters the scan results to display only those rows with a value of 81 or greater and which contain 11 in the sales_territory_key column. You cannot use a variable to specify an in-check filter.
If your filter uses a string as a value, be sure to wrap the string in single quotes, as in the following example.
You can use AND or OR to add multiple filter conditions to a filter key:value pair to further refine your results, as in the following example.
To improve the readability of multiple filters in a check, consider adding filters as separate line items, as per the following example.
If your column names use quotes, these quotes produce invalid YAML syntax which results in an error message. Instead, write the check without the quotes or, if the quotes are mandatory for the filter to work, prepare the filter in a text block as in the following example.
Be aware that if no rows match the filter parameters you set, Soda does not evaluate the check. In other words, Soda first finds rows that match the filter, then executes the check on those rows.
If, in the example above, none of the rows contained a value of 11 in the sales_territory_key column, Soda does not evaluate the check and returns a NOT EVALUATED message in the CLI scan output, such as the following.
See for further details.
See also: .
In the checks you write with SodaCL, you can apply the quoting style that your data source uses for dataset or column names. Soda Library uses the quoting style you specify in the aggregated SQL queries it prepares, then executes during a scan.
Note that the type of quotes you use must match that which your data source uses. For example, BigQuery uses a backtick (`) as a quotation mark.
Soda does not support quotes in the dataset name identifier, as in checks for "CUSTOMERS":
Check:
Resulting SQL query:
Add a for each section to your checks configuration to specify a list of checks you wish to execute on multiple datasets.
Add a for each dataset T section header anywhere in your YAML file. The purpose of the T is only to ensure that every for each configuration has a unique name.
Nested under the section header, add two nested keys, one for datasets and one for checks.
For each is not compatible with dataset filters.
Soda dataset names matching is case insensitive.
You cannot use quotes around dataset names in a for each configuration.
If any of your checks specify column names as arguments, make sure the column exists in all datasets listed under the datasets heading.
See for further details.
It can be time-consuming to check exceptionally large datasets for data quality in their entirety. Instead of checking whole datasets, you can use a dataset filter to specify a portion of data in a dataset against which Soda Library executes a check.
Except with a NOW variable, you cannot use variables in checks you write in an agreement in Soda Cloud as it is impossible to provide the variable values at scan time.
Known issue: Dataset filters are not compatible with . With such a check, Soda does not apply the dataset filter at scan time.
In your checks YAML file, add a section header called filter, then append a dataset name and, in square brackets, the name of the filter. The name of the filter cannot contain spaces. Refer to the example below.
Nested under the filter header, use a SQL expression to specify the portion of data in a dataset that Soda Library must check.
The SQL expression in the example references two variables: ts_start
If you wish to run checks on the same dataset without using a filter, add a separate section for checks for your_dataset_name without the appended filter name. Any checks you nest under this header execute against all the data in the dataset.
See for further details.
Soda collects failed rows samples explicitly and implicitly.
To explicitly collect failed row samples, you can add a check to explicitly collect samples of failed rows.
Explicitly, Soda automatically collects 100 failed row samples for the following explicitly-configured checks:
that use the failed rows query configuration
Implicitly, Soda automatically collects 100 failed row samples for the following checks:
checks that use a
checks that use a
checks that use a
Beyond the default behavior of collecting and sending 100 failed row samples to Soda Cloud when a check fails, you can:
customize the sample size
customize columns from which to collect samples
disable failed row collection
reroute failed row samples to a non-Soda Cloud destination, such as an S3 bucket.
Learn how to .
Reference .
Anomaly score checks use a machine learning algorithm to automatically detect anomalies in your time-series data.
This check is being deprecated. Soda recommends using the new features, rebuilt from the ground up, 70% more accurate and significantly faster.
Use an anomaly score check to automatically discover anomalies in your time-series data.
✔️ Requires Soda Core Scientific (included in a Soda Agent) ✖️ Supported in Soda Core ✔️ Supported in Soda Library + Soda Cloud ✔️ Supported in Soda Cloud Agreements + Soda Agent ✖️ Available as a no-code check
The anomaly score check is powered by a machine learning algorithm that works with measured values for a metric that occur over time. The algorithm learns the patterns of your data – its trends and seasonality – to identify and flag anomalies in time-series data.
To use an anomaly score check, you must install Soda Scientific in the same directory or virtual environment in which you installed Soda Library. Soda Scientific is included in Soda Agent deployment. Best practice recommends installing Soda Library and Soda Scientific in a virtual environment to avoid library conflicts, but you can if you prefer.
Set up a virtual environment, and install Soda Library in your new virtual environment.
Use the following command to install Soda Scientific.
Refer to for help with issues during installation.
The following example demonstrates how to use the anomaly score for the row_count metric in a check. You can use any , , or metric in lieu of row_count.
Currently, you can only use < default to define the threshold in an anomaly score check.
By default, anomaly score checks yield warn check results, not fails.
You can use any , , or metric in anomaly score checks. The following example detects anomalies for the average of order_price in an orders dataset.
The following example detects anomalies for the count of missing values in the id column.
Because the anomaly score check requires at least four data points before it can start detecting what counts as an anomalous measurement, the first few scans yield a check result that indicates that Soda does not have enough data.
Though your first instinct may be to run several scans in a row to product the four measurments that the anomaly score needs, the measurements don’t “count” if the frequency of occurrence is too random, or rather, the measurements don't represent enough of a stable frequency.
If, for example, you attempt to run eight back-to-back scans in five minutes, the anomaly score does not register the measurements resulting from those scans as a reliable pattern against which to evaluate an anomaly.
Consider using the Soda library to set up a that produces a check result for an anomaly score check on a regular schedule.
By default, an anomaly score check yields either a pass or fail result; pass if Soda does not detect an anomaly, fail if it does.
If you wish, you can instruct Soda to issue warn check results instead of fails by adding a warn_only configuration, as in the following example.
If you wish, you can reset an anomaly score's history, effectively recalibrating what Soda considers anomalous on a dataset.
In Soda Cloud, navigate to the Check History page of the anomaly check you wish to reset.
Click to select a node in the graph that represents a measurement, then click Feedback.
In the modal that appears, you can choose to exclude the individual measurement, or all previous data up to that measurement, the latter of which resets the anomaly score's history.
You can use a group by configuration to detect anomalies by category, and monitor relative changes over time in each category.
✔️ Requires Soda Core Scientific for anomaly check (included in a Soda Agent) ✖️ Supported in Soda Core ✔️ Supported in Soda Library 1.1.27 or greater + Soda Cloud ✔️ Supported in Soda Cloud Agreements + Soda Agent 0.8.57 or greater ✖️ Available as a no-code check
The following example includes three checks grouped by gender.
The first check uses the custom metric average_children to collect measurements and gauge them against an absolute threshold of 2.
Soda Cloud displays the check results grouped by gender.
The second check uses the same custom metric to detect anomalous measurements relative to previous measurements. Soda must collect a minimum of four, regular-cadence, measurements to have enough data from which to gauge an anomolous measurement. Until it has enough measurements, Soda returns a check result of [NOT EVALUATED].
Soda Cloud displays any detected anomalies grouped by gender.
While installing Soda Scientific works on Linux, you may encounter issues if you install Soda Scientific on Mac OS (particularly, machines with the M1 ARM-based processor) or any other operating system. If that is the case, consider using one of the following alternative installation procedures.
Need help? Ask the team in the .
Set up a virtual environment, and install Soda Library in your new virtual environment.
Use the following command to install Soda Scientific.
Use Soda’s Docker image in which Soda Scientific is pre-installed. You need Soda Scientific to be able to use SodaCL or .
If you have not already done so, in your local environment.
From Terminal, run the following command to pull Soda Library’s official Docker image; adjust the version to reflect the most .
Verify the pull by running the following command.
Output:
When you run the Docker image on a non-Linux/amd64 platform, you may see the following warning from Docker, which you can ignore.
If you encounter the following error, follow the procedure below.
You need to give Docker permission to acccess your configuration.yml and checks.yml files in your environment. To do so:
Access your Docker Dashboard, then select Preferences (gear symbol).
Select Resources, then follow the to add your Soda project directory – the one you use to store your configuration.yml and checks.yml files – to the list of directories that can be bind-mounted into Docker containers.
Click Apply & Restart, then repeat steps 2 - 4 above.
If you encounter the following error, double check the syntax of the scan command in step 4 above.
Be sure to prepend /sodacl/ to both the congifuration.yml filepath and the checks.yml filepath.
Be sure to mount your files into the container by including the -v option. For example, -v /Users/MyName/soda_project:/sodacl.
If you have defined an anomaly detection check and you use an M1 MacOS machine, you may get aLibrary not loaded: @rpath/libtbb.dylib error. This is a known issue in the MacOS community and is caused by issues during the installation of the . There currently are no official workarounds or releases to fix the problem, but the following adjustments may address the issue.
Install soda-scientific as per the local environment installation instructions and activate the virtual environment.
Use the following command to navigate to the directory in which the stan_model of the prophet package is installed in your virtual environment.
For example, if you have created a python virtual environment in a /venvs directory in your home directory and you use Python 3.9, you would use the following command.
Reference .
This example helps you build a customized data quality reporting dashboard in Grafana using the Soda Cloud API.
This guide offers an example of how to create a data quality reporting dashboard using the Soda Cloud API and Grafana. Such a dashboard enables data engineers to monitor the status of Soda scans and capture and display check results.
Use the Soda Cloud API to trigger data quality scans and extract metadata from your Soda Cloud account, then store the metadata in PostgreSQL and use it to customize visualized data quality results in Grafana.
access to a
Python 3.8, 3.9, or 3.10
familiarity with Python, with Python library interactions with APIs
access to a PostgreSQL data source
a Soda Cloud account:
permission in Soda Cloud to access dataset metadata; see
at least one agreement or no-code check associated with a scan definition in Soda Cloud; see
Because this guide uses the Soda Cloud API to trigger a scan execution, you must first choose an existing check in Soda Cloud to identify its associated , which you will use to identify which checks to execute during the triggered scan.
See also:
Log in to your Soda Cloud account and navigate to the Checks page. Choose a check that originated in Soda Cloud, identifiable by the cloud icon, that you can use to complete this exercise. Use the action menu (stacked dots) next to the check to select Edit Check.
In the dialog that opens, copy the scan definition name from the Add to Scan Definition field. Under Scans, above the scan definition name, copy the scan definition ID that uses undescores to represent spaces. Paste the scan definition ID in a temporary local file; you will use it in the next steps to trigger a scan via the Soda Cloud API.
As per best practice, set up a new Python virtual environment so that you can keep your projects isolated and avoid library clashes. The example below uses the built-in venv module to create, then navigate to and activate, a virtual environment named soda-grafana. Run deactivate to close the virtual environment when you wish.
Run the following command to install the requests libraries in your virtual environment that you need to connect to Soda Cloud API endpoints.
Because this exercise moves the data it extracts from your Soda Cloud account into a PostgreSQL data source, it requires the psycopg2 library. Alternatively, you can list and save all the requirements in a requirements.txt file, then install them from the command-line using pip install -r requirements.txt. If you use a different type of data source, find a corresponding plugin, or check SQLAlchemy's built-in database compatibility.
In the same directory, create a new file named apiscan.py. Paste the following contents into the file to define an ApiScan class, which you will use to interact with the Soda Cloud API.
From the command-line, create the following environment variables to facilitate a connection to your Soda Cloud account and your PostgreSQL data source.
SODA_URL: use https://cloud.soda.io/api/v1/ or https://cloud.us.soda.io/api/v1/ as the value, according to the region in which you created your Soda Cloud account.
API_KEY and API_SECRET: see
Problem: You get an error that reads, "psycopg2 installation fails with error: metadata-generation-failed" and the suggestion "If you prefer to avoid building psycopg2 from source, please install the PyPI 'psycopg2-binary' package instead."
Solution: As suggested, install the binary package instead, using pip install psycopg2-binary.
In the same directory in which you created the apiscan.py file, create a new file named main.py.
To the file, add the following code which:
imports necessary libraries, as well as the ApiScan class from apiscan.py
initializes an ApiScan object as ascan, uses the object to trigger a scan with scan_definition as a parameter which, in this case, is grafanascan0; replace grafanascan0 with the scan definition ID you copied to a local file earlier.
To the main.py file, add the following code which:
extracts Soda scan details, from the scan results stored in variable r
extracts dataset details, using Soda Cloud API's datasets endpoint
extracts checks details, using Soda Cloud API's checks endpoint
combines scan, dataset and checks details into one dictionary per check, and appends the dictionary to a list of checks
The following example code serves as reference for adding data to a PostgreSQL data source. Replace it if you intend to store scan results in another type of data source.
To the main.py file, add the code below which:
connects to a PostgreSQL data source, using the psycopg2 library
creates a table in the data source in which to store scan results, if one does not already exist
processes the list of dicts, and inserts them into table of scan results
From the command-line, run python3 main.py.
Log into your Grafana account, select My Account, then launch Grafana Cloud.
Follow Grafana's instructions to add your data source which contains the Soda check results.
Follow Grafana's instructions to create a new dashboard. Use the following details for reference in the Edit panel for Visualizations.
In the Queries tab, configure a Query using Builder or Code, then Run query on the data source. Toggle the Table view at the top to see Query results.
In the Transformations tab, create, edit, or delete Transformations that transform Query results into the data and format that Visualization needs.
Access Grafana's Visualizations documentation for .
The example code included in this guide produces the following visualizations.
Access full and documentation.
Learn more about .
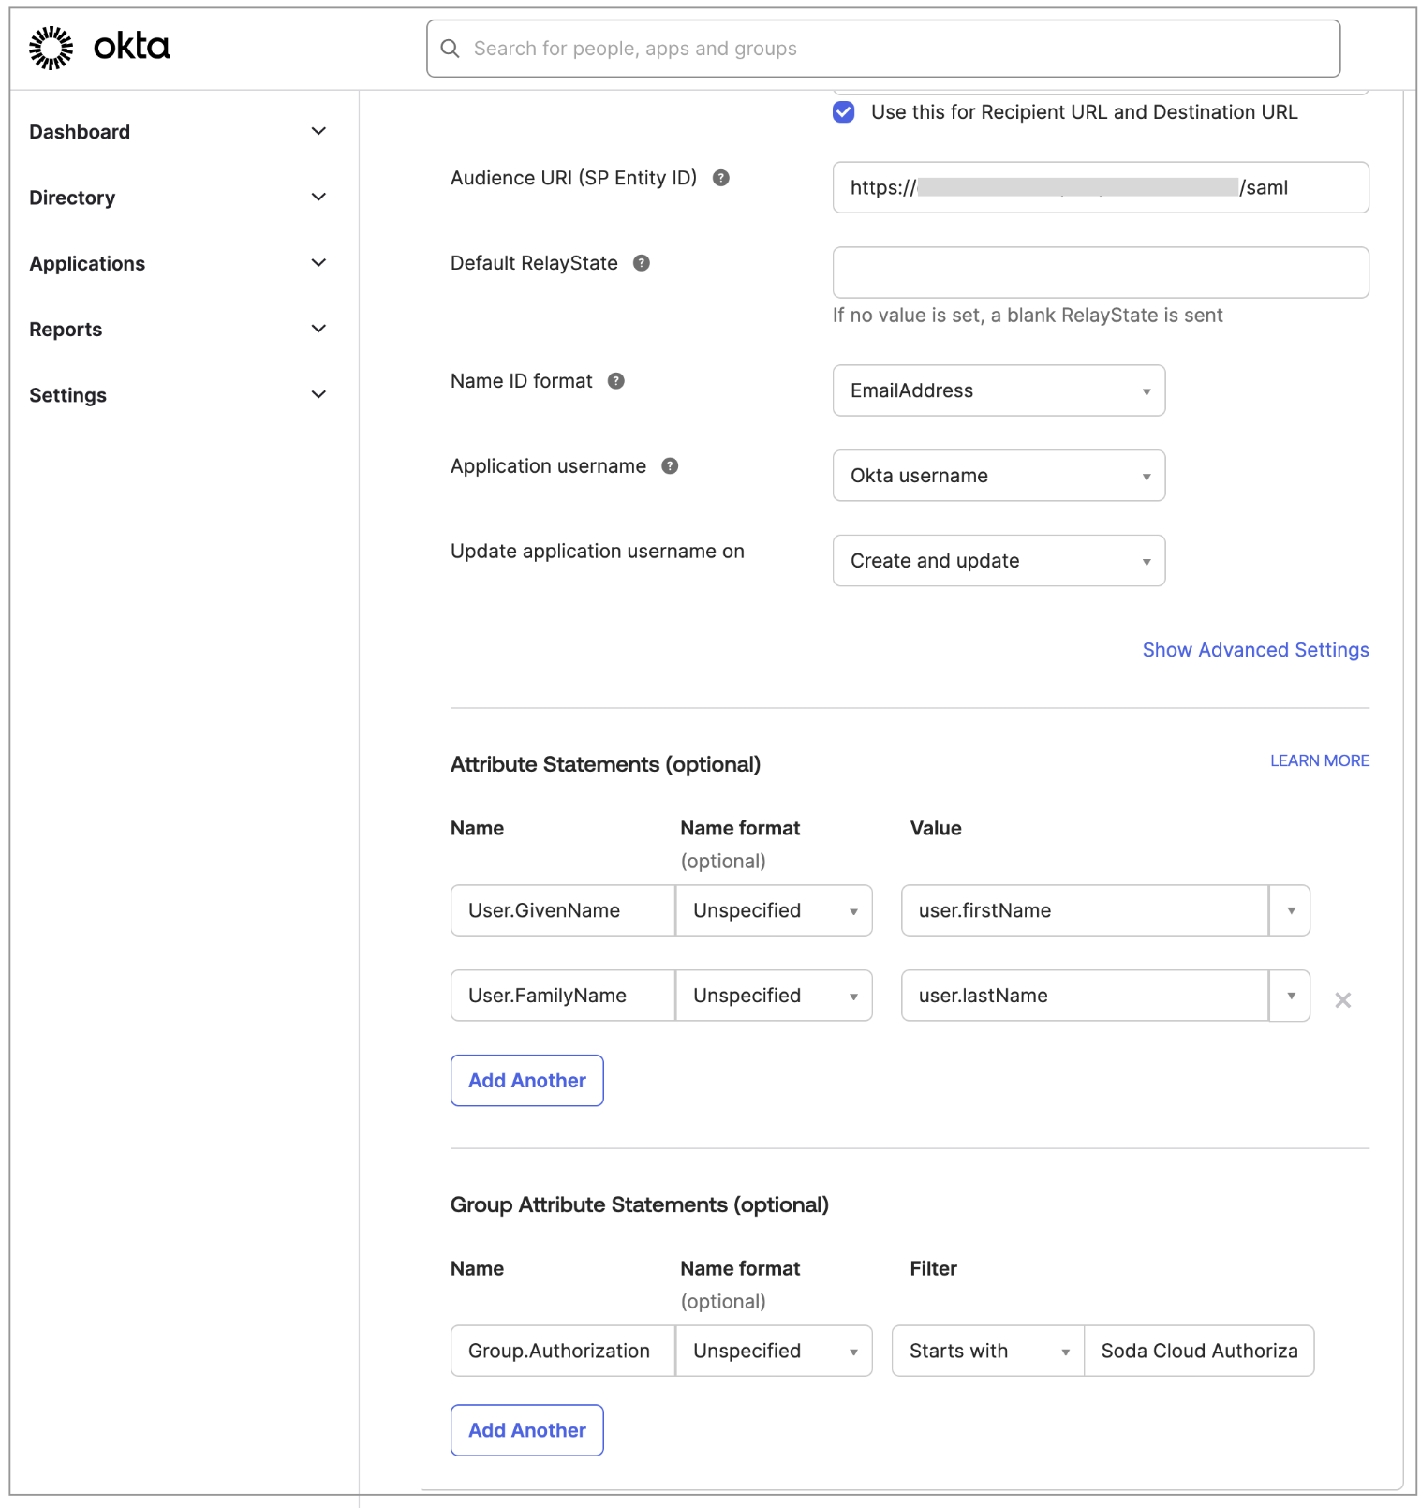
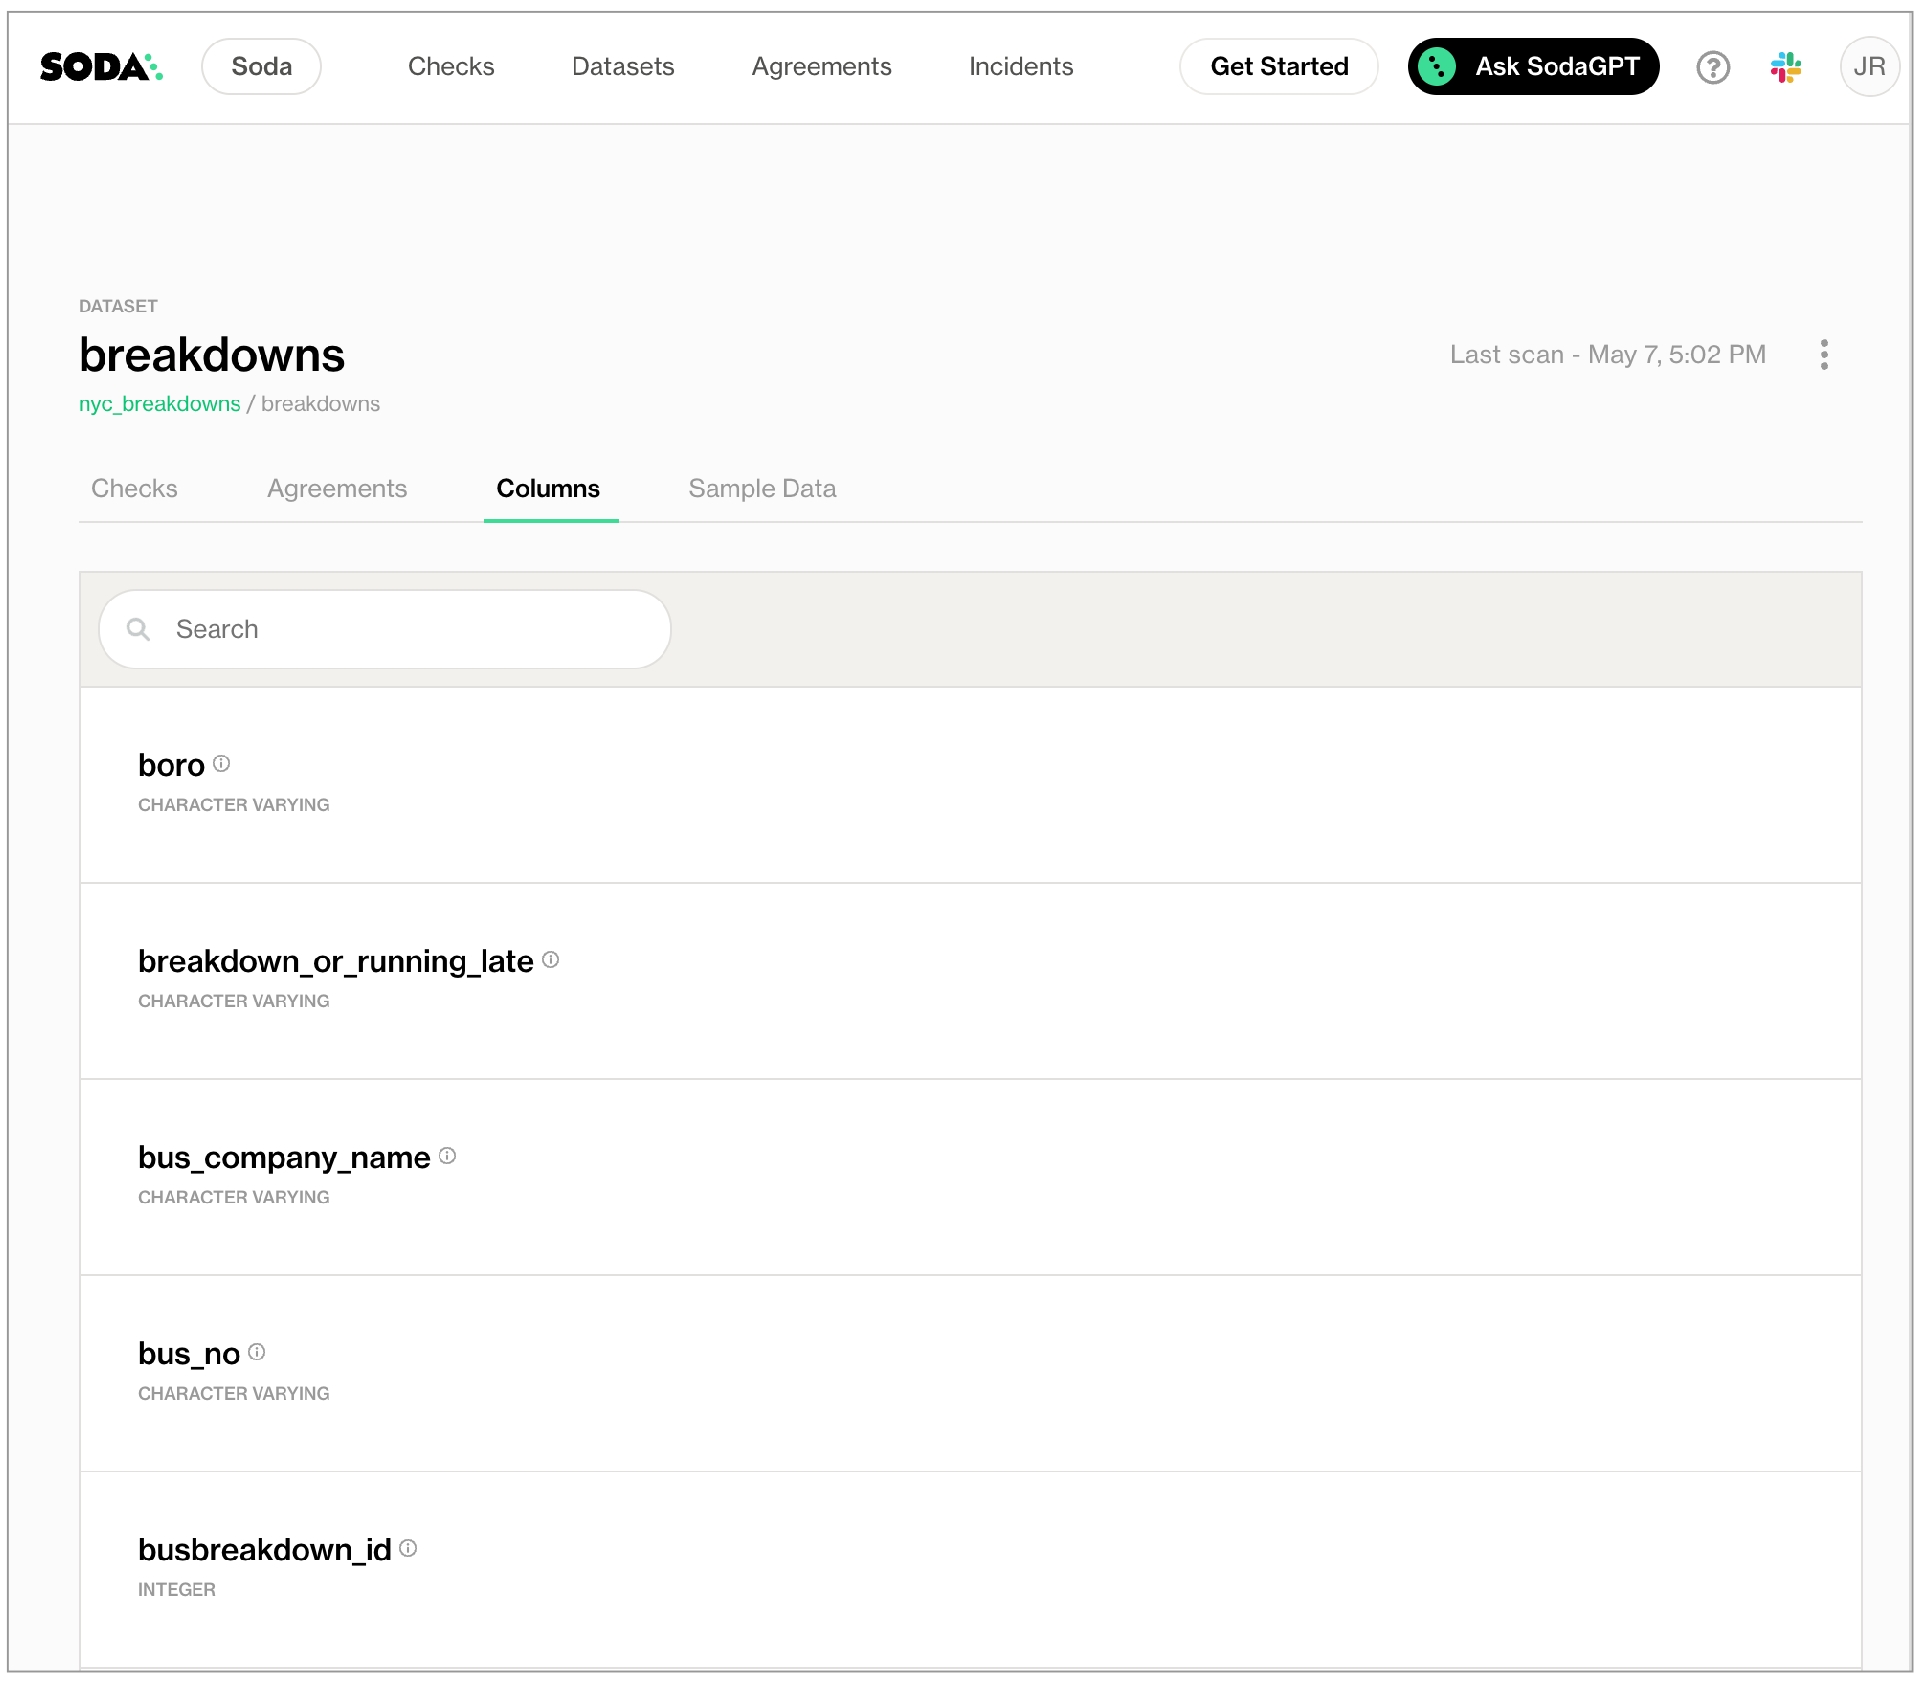
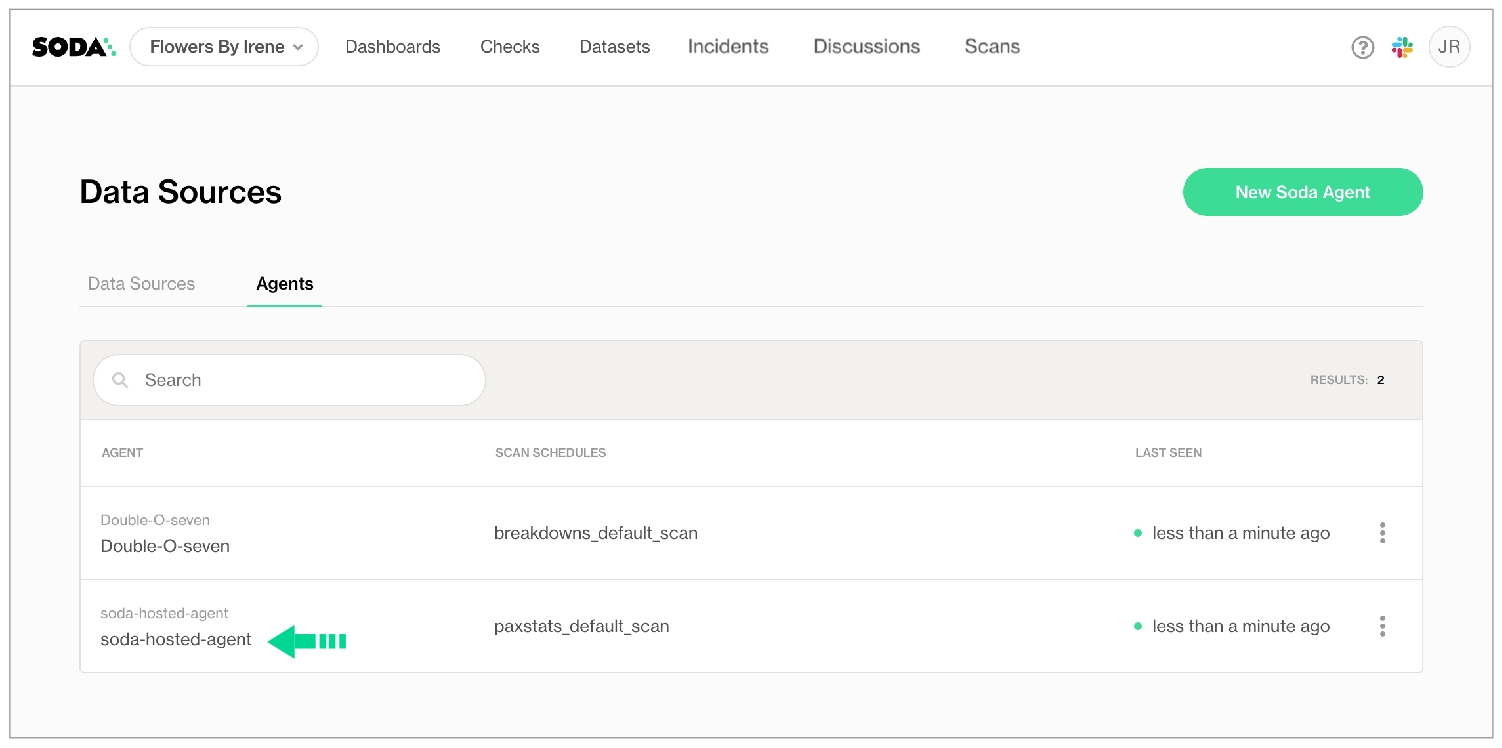
checks for dim_reseller:
- avg_order_span between 5 and 10:
avg_order_span expression: AVG(last_order_year - first_order_year)checks for dim_product:
- product_stock >= 50:
product_stock query: |
SELECT COUNT(safety_stock_level - days_to_manufacture)
FROM dim_productchecks for product_desc:
- avg_surface between 1068 and 1069:
avg_surface sql_file: "filepath/filename.sql"checks for dim_product:
- anomaly detection for product_stock:
product_stock query: |
SELECT COUNT(safety_stock_level - days_to_manufacture)
FROM dim_productchecks for dim_product:
- product_stock >= 50:
name: Product stock
product_stock query: |
SELECT COUNT(safety_stock_level - days_to_manufacture)
FROM dim_product - avg_order_span:
avg_order_span expression: AVG(last_order_year - first_order_year)
warn: when > 50
fail: when > 200checks for dim_product:
- product_stock >= 50:
product_stock query: |
SELECT COUNT("safety_stock_level" - "days_to_manufacture")
FROM dim_productfor each dataset T:
datasets:
- dim_reseller
checks:
- avg_order_span between 5 and 10:
avg_order_span expression: AVG(last_order_year - first_order_year)filter FULFILLMENT [daily]:
where: TIMESTAMP '{ts_start}' <= "ts" AND "ts" < TIMESTAMP '${ts_end}'
checks for FULFILLMENT [daily]:
- avg_order_span between 5 and 10:
avg_order_span expression: AVG(last_order_day - first_order_day)checks for CUSTOMERS:
- belgium_customers < 6:
belgium_customers query: |
SELECT count(*) as belgium_customers
FROM CUSTOMERS
WHERE country = 'BE'
failed rows query: |
SELECT *
FROM CUSTOMERS
WHERE country != 'BE'checks for product_b:
- id_for_belgium:
id_for_belgium query: SELECT count(*) FROM product_b
failed rows query: SELECT id FROM product_b WHERE id IS NULL
name: ID in Belgium is empty
column: id
fail: when > 62 =
<
>
<=
>=
!=
<>
between
not between checks for dim_employee:
- max(vacation_hours) < 80:
name: Too many vacation hourschecks for dim_customer:
- anomaly score for row_count < default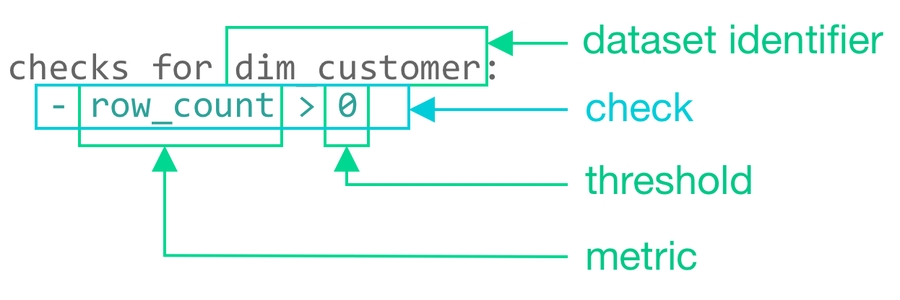
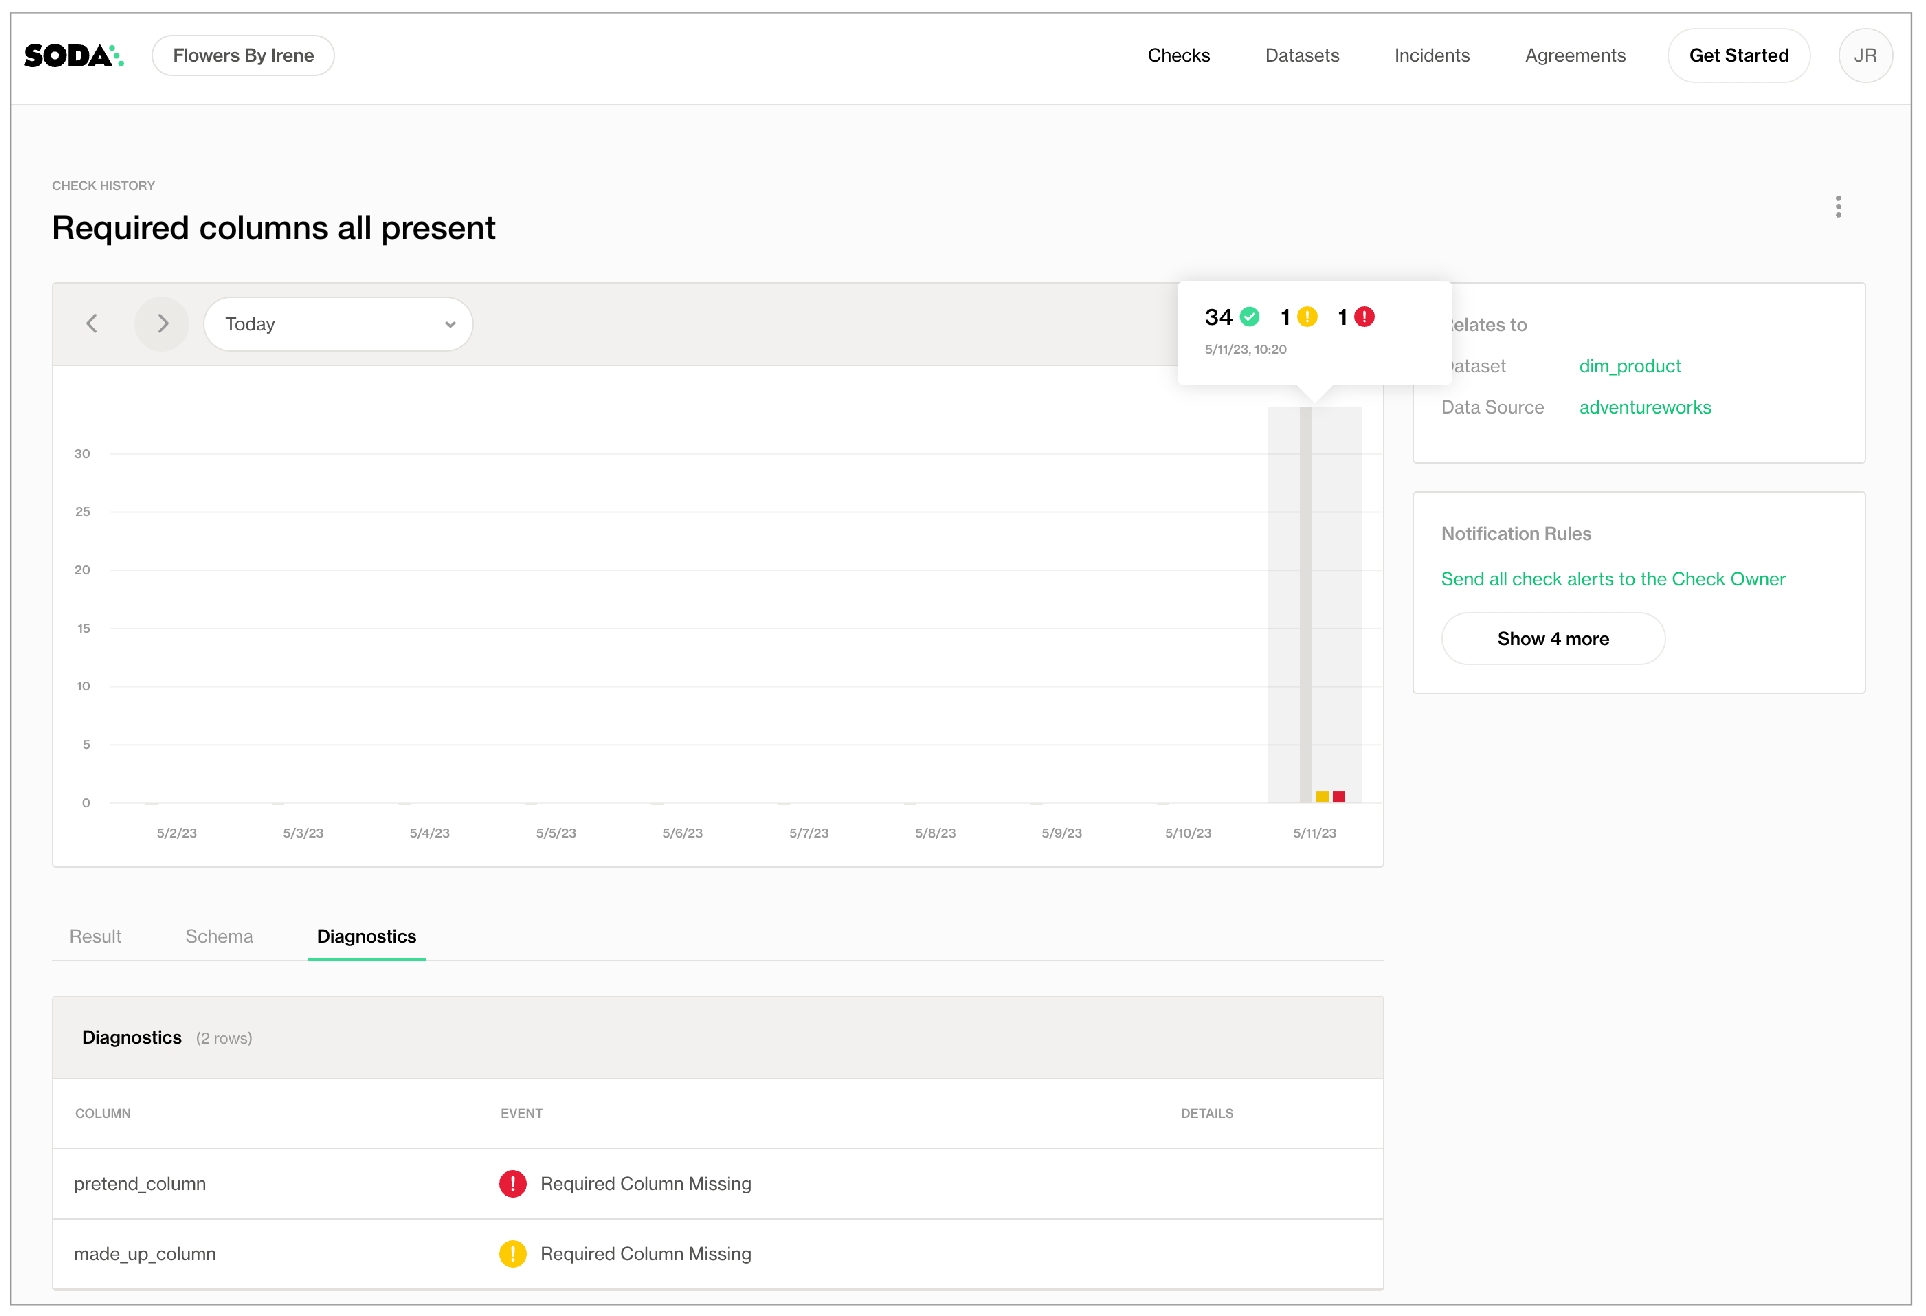
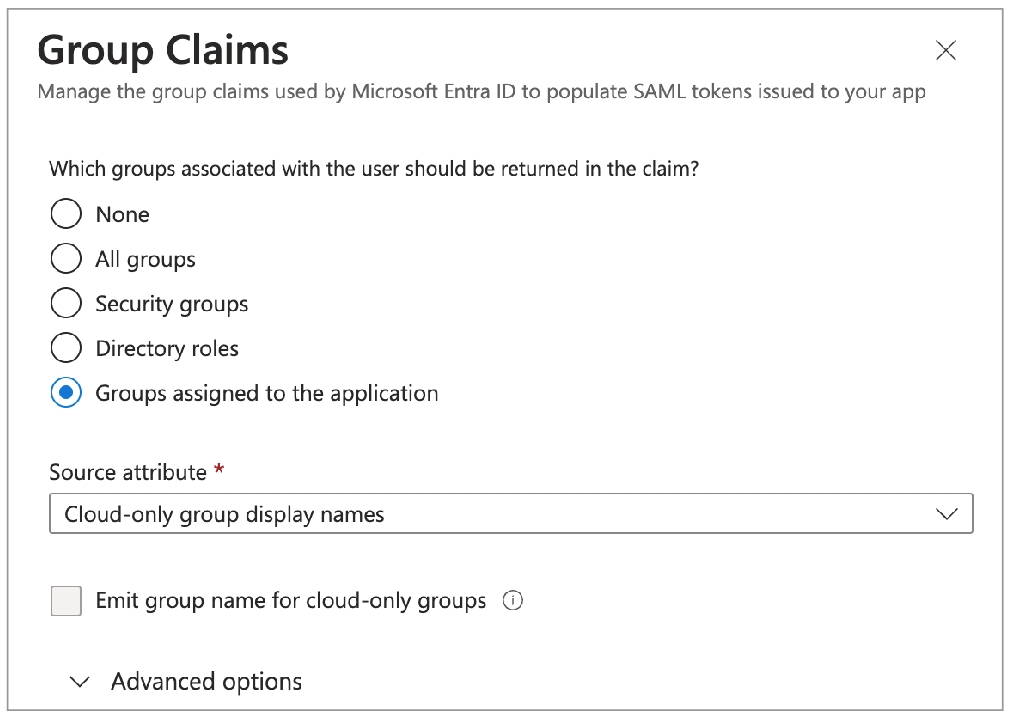
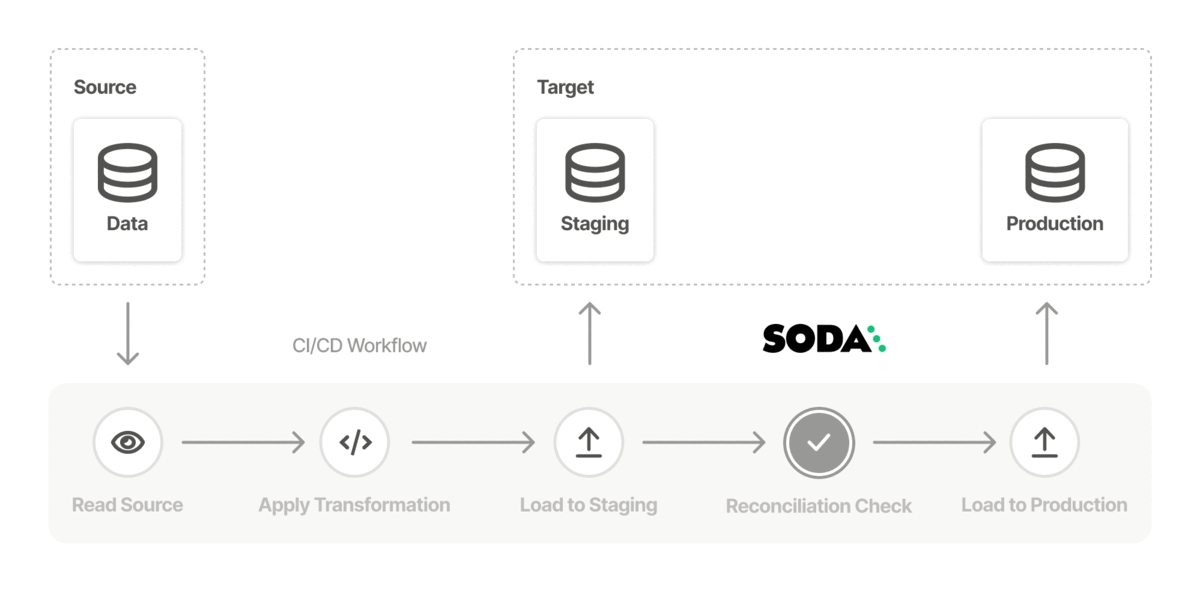
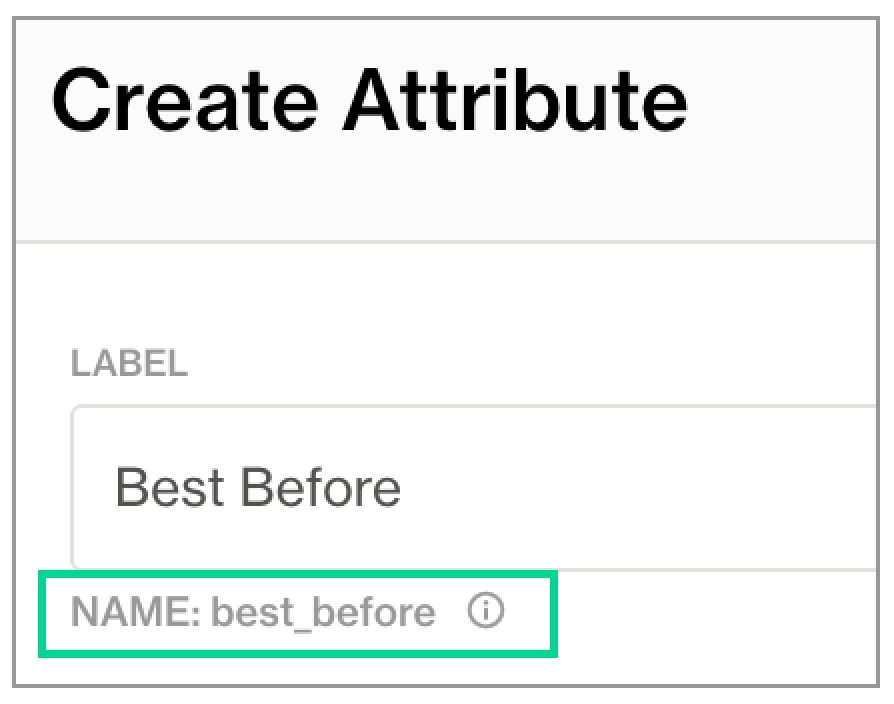
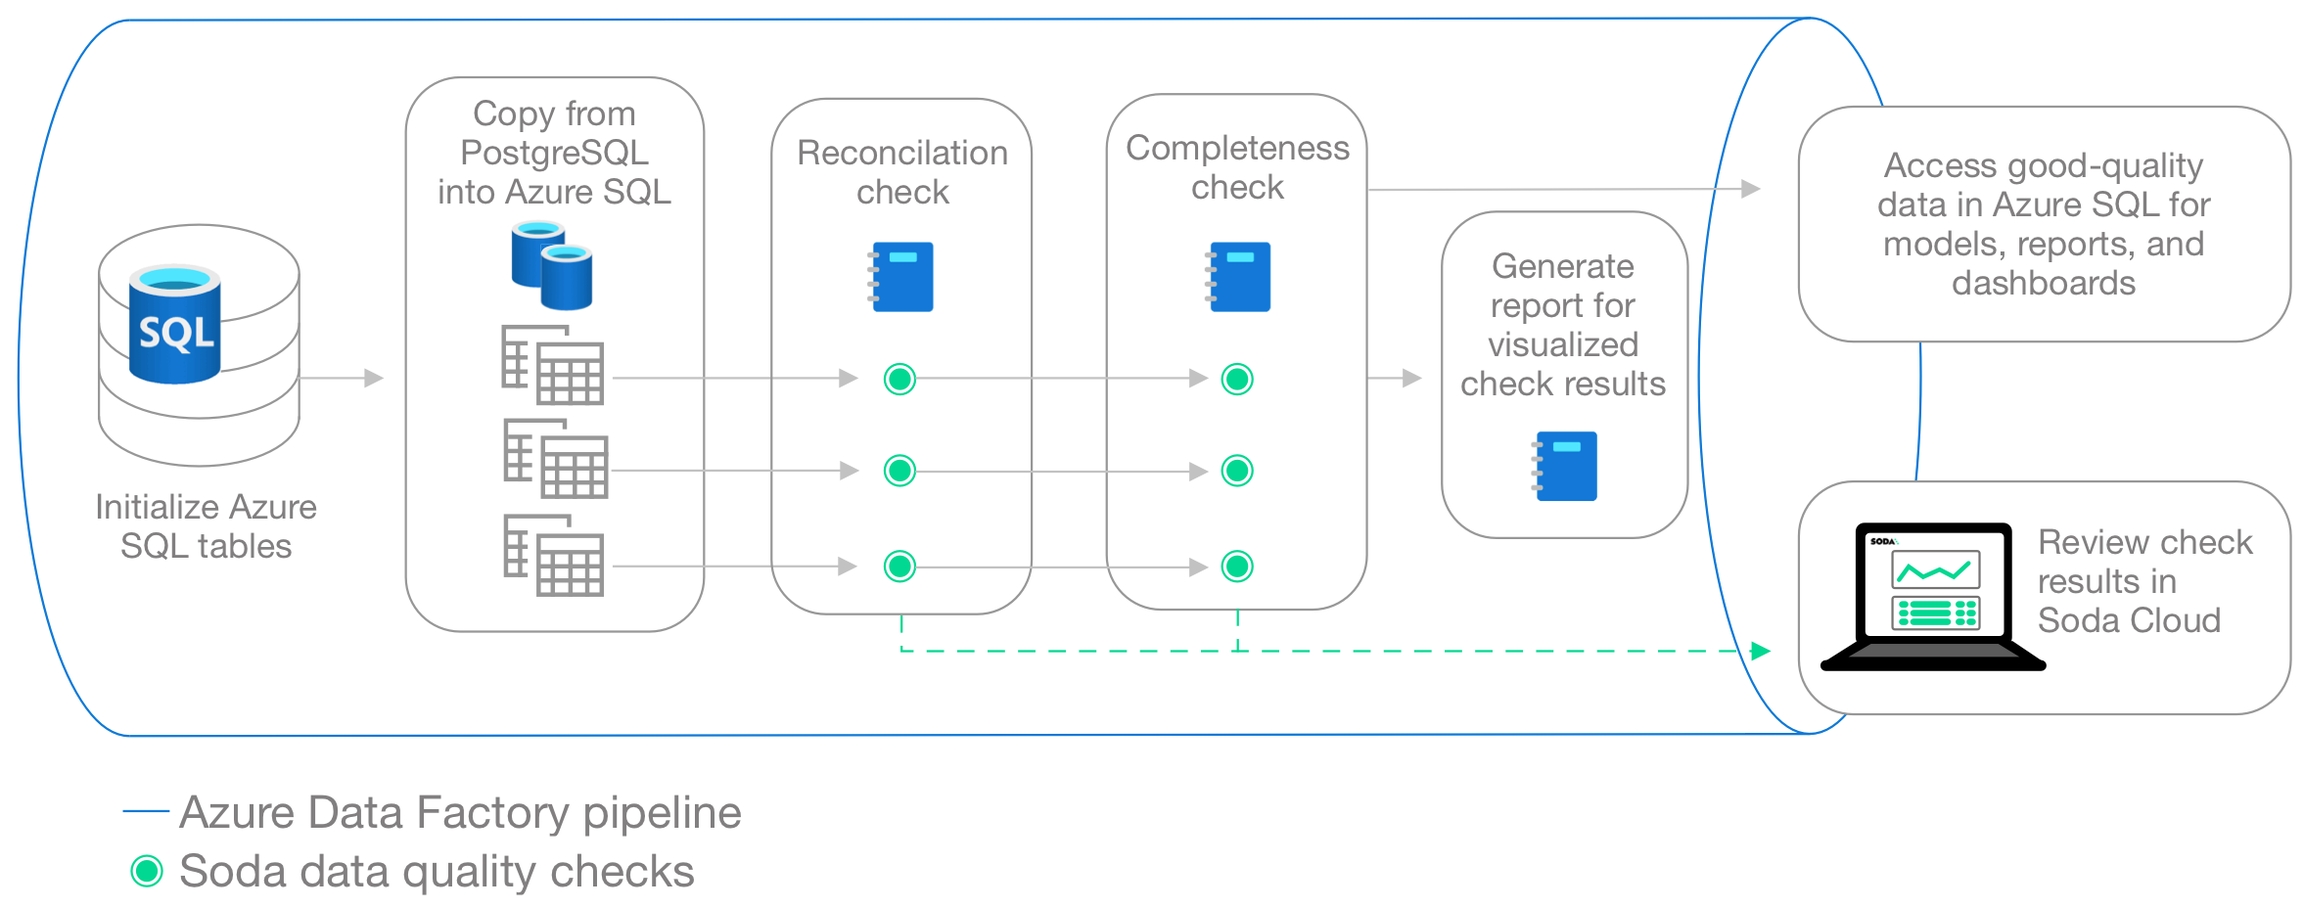
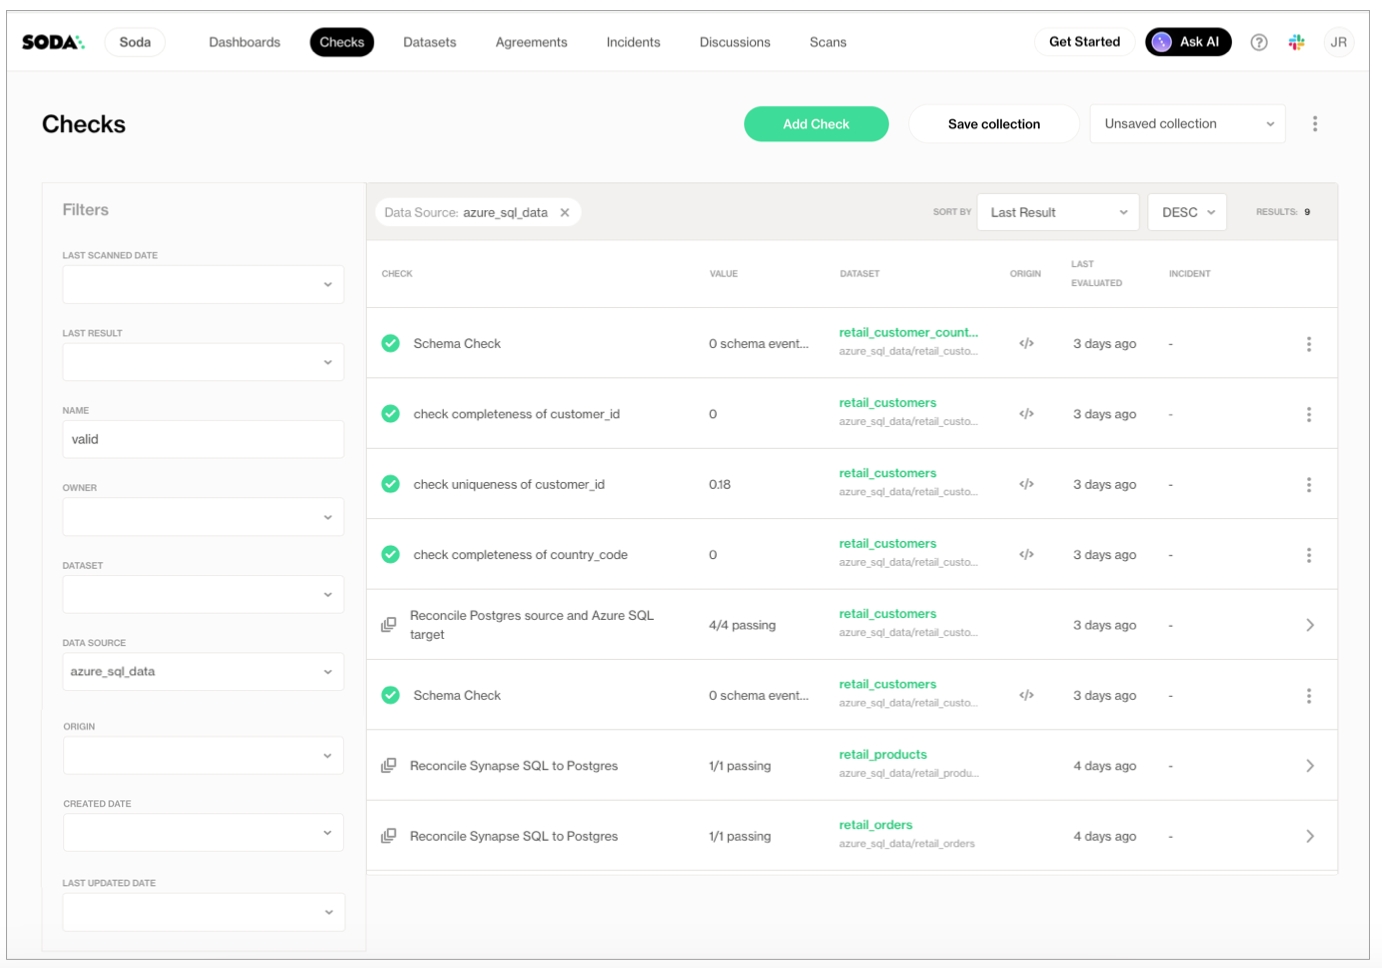

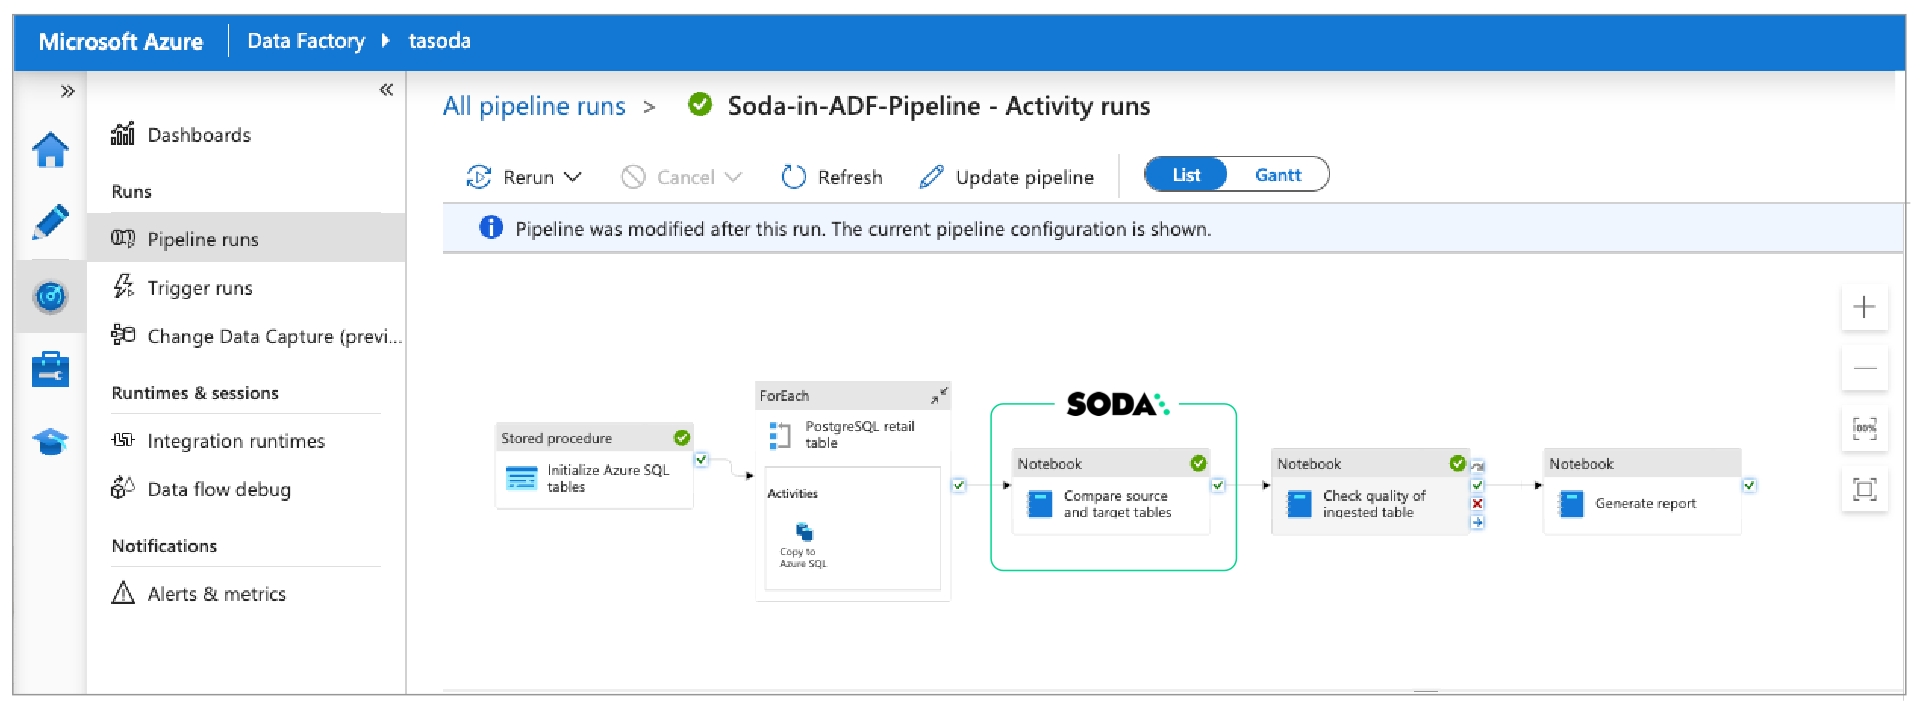

fact_product_categoryrawtransformedreportingNavigating again to the Datasets page, they use the filters to display datasets according to Tags and Arrival Time to narrow the search for the most recent quality checks associated with their models which have failed or warned.
After filtering the datasets according to the tags, the Engineer saves the filter setup as a Collection that they can revisit daily.
If you were in the Data Engineer's shoes, you may further wish to set up [Slack notifications]() for any checks that warn or fail during scans.
Provided by Soda Core, Soda Library, or Soda Agent.
Acts as a correlation key so Soda Cloud can associate results with the correct check even if the check definition changes.
datasets, add a list of datasets against which to run the checks. Refer to the example below that illustrates how to use include and exclude configurations and wildcard characters (%) .Nested under checks, write the checks you wish to execute against all the datasets listed under datasets.
To add multiple for each configurations, configure another for each section header with a different letter identifier, such as for each dataset R.
ts_endVariables must use the following syntax: ${VAR_NAME}.
When you run the soda scan command, you must include these two variables as options in the command; see step 5.
Add a separate section for checks for your_dataset_name [filter name]. Any checks you nest under this header execute only against the portion of data that the expression in the filter section defines. Refer to the example below.
Write any checks you wish for the dataset and the columns in it.
When you wish to execute the checks, use Soda Library to run a scan of your data source and use the -v option to include each value for the variables you included in your filter expression, as in the example below.
metric reconciliation check that include missing, validity, or duplicate metrics, or reference checks
Need help? Join the Soda community on Slack.
✓
Use quotes when identifying dataset names; see . Note that the type of quotes you use must match that which your data source uses. For example, BigQuery uses a backtick (`) as a quotation mark.
Use wildcard characters ( % or * ) in values in the check.
-
✓
Use for each to apply anomaly score checks to multiple datasets in one scan; see .
✓
Apply a dataset filter to partition data during a scan.
between -5 and 5 relative to the previously-recorded measurement. See Change-over-time thresholds for supported syntax variations for change-over-time checks.
Soda Cloud displays any detected changes grouped by gender.scipy>=1.8.0
numpy>=1.23.3, <2.0.0
inflection==0.5.1
httpx>=0.18.1,<2.0.0
PyYAML>=5.4.1,<7.0.0
cython>=0.22
prophet>=1.1.0,<2.0.0
When you are ready to run a Soda scan, use the following command to run the scan via the docker image. Replace the placeholder values with your own file paths and names.
Optionally, you can specify the version of Soda Library to use to execute the scan. This may be useful when you do not wish to use the latest released version of Soda Library to run your scans. The example scan command below specifies Soda Library version 1.0.0.
Use the ls command to determine the version number of cmndstan that prophet installed. The cmndstan directory name includes the version number.
Add the rpath of the tbb library to your prophet installation using the following command.
With cmdstan version 2.26.1, you would use the following command.
✓
Define a name for an anomaly score check.
-
✓
Add an identity to a check.
Define alert configurations to specify warn and fail thresholds.
-
✓
Apply an in-check filter to return results for a specific portion of the data in your dataset; see example.

Need help? Join the Soda community on Slack.
stores the scan id as a variable
checks the state of the scan every 10 seconds, then only when it is in a completion state (completedWithErrors, completedWithFailures, completedWithWarnings, or completed), stores the scan results as variable r.
Need help? Join the Soda community on Slack.
pip install -i https://pypi.cloud.soda.io soda-postgresdata_source soda-demo:
type: postgres
host: localhost
username: postgres
password: secret
database: postgres
schema: publicsoda test-connection -d adventureworks -c configuration.ymlchecks for fact_product_category:
# Check warns when any NULL values exist in the column
- missing_count(category_key):
name: All products have a category
warn: when > 0
# Check warns when any NULL values exist in the column
- missing_count(subcategory_key):
name: All products have a subcategory
warn: when > 0
# Check warns when any NULL values exist in the column
- missing_count(product_key) = 0:
name: All products have a keychecks for dim_product:
# Check fails when product_key or english_product_name is missing, OR
# when the data type of those columns is other than specified
- schema:
fail:
when required column missing: [product_key, english_product_name]
when wrong column type:
product_key: integer
english_product_name: varchar
# Check fails when any NULL values exist in the column
- missing_count(product_key) = 0:
name: All products have a key
# Check fails when any NULL values exist in the column
- missing_count(english_product_name) = 0:
name: All products have a name
# Check fails when any NULL values exist in the column
- missing_count(product_subcategory_key):
name: All products have a subcategory
warn: when > 0
# Check fails when the number of products, relative to the
# previous scan, changes by 10 or more
- change for row_count < 10:
name: Products are stablechecks for dim_product_category:
# Check fails when product_category_key or english_product_category name
# is missing, OR
# when the data type of those columns is other than specified
- schema:
fail:
when required column missing:
[product_category_key, english_product_category_name]
when wrong column type:
product_category_key: integer
english_product_category_name: varchar
# Check fails when any NULL values exist in the column
- missing_count(product_category_key) = 0:
name: All categories have a key
# Check fails when any NULL values exist in the column
- missing_count(english_product_category_name) = 0:
name: All categories have a name
# Check fails when the number of categories, relative to the
# previous scan, changes by 5 or more
- change for row_count < 5:
name: Categories are stablechecks for dim_product_subcategory:
# Check fails when product_subcategory_key or english_product_subcategory_name
# is missing, OR
# when the data type of those columns is other than specified
- schema:
fail:
when required column missing:
[product_subcategory_key, english_product_subcategory_name]
when wrong column type:
product_subcategory_key: integer
english_product_subcategory_name: varchar
# Check fails when any NULL values exist in the column
- missing_count(product_subcategory_key) = 0:
name: All subcategories have a key
# Check fails when any NULL values exist in the column
- missing_count(english_product_subcategory_name) = 0:
name: All subcategories have a name
# Check fails when the number of categories, relative to the
# previous scan, changes by 5 or more
- change for row_count < 5:
name: Subcategories are stablechecks for fact_internet_sales:
# Check fails when product_key, order_quantity, or sales_amount
# is missing, OR
# when the data type of those columns is other than specified
- schema:
fail:
when required column missing:
[product_key, order_quantity, sales_amount]
when wrong column type:
product_key: integer
order_quantity: smallint
sales_amount: money
# Check fails when any NULL values exist in the column
- missing_count(product_key) = 0:
name: All sales have a product associated
# Check fails when any order contains no items
- min(order_quantity) > 0:
name: All sales have a non-zero order quantity
# Check fails when the amount of any sales order is zero
- failed rows:
name: All sales have a non-zero order amount
fail query: |
SELECT sales_order_number, sales_amount::NUMERIC
FROM fact_internet_sales
WHERE sales_amount::NUMERIC <= 0
# Check warns when there are fewer than 5 new internet sales
# relative to the previous scan resuls
# Check fails when there are more than 500 new internet sales
# relative to the previous scan resuls
- change for row_count:
warn: when < 5
fail: when > 500
name: Sales are within expected range
# Check fails when the average of the column is abnormal
# relative to previous measurements for average sales amount
# sales_amount is cast from data type MONEY to enable calculation
- anomaly detection for avg(sales_amount::NUMERIC)checks for report_category_sales:
# Check fails if the percentage of sales of products with no
# catgory exceeds 0.90%
- uncategorized_sales_percent < 0.9:
uncategorized_sales_percent query: >
select ROUND(CAST((sales_total * 100) / (select sum(sales_total) from report_category_sales) AS numeric), 2) as uncategorized_sales_percent from report_category_sales where category_key is NULL
name: Most sales are categorized
# Check fails if the sum of sales produced by the model is different
# than the sum of sales in the fact_internet_sales dataset
- sales_diff = 0:
name: Category sales total matches
sales_diff query: >
SELECT CAST((SELECT SUM(fact_internet_sales.sales_amount) FROM fact_internet_sales)
- (SELECT SUM(report_category_sales.sales_total) FROM report_category_sales) as numeric) AS sales_diffchecks for report_subcategory_sales:
# Check fails if the percentage of sales of products with no
# subcategory exceeds 0.90%
- uncategorized_sales_percent < 0.9:
uncategorized_sales_percent query: >
select ROUND(CAST((sales_total * 100) / (select sum(sales_total) from report_subcategory_sales) AS numeric), 2) as uncategorized_sales_percent from report_subcategory_sales where category_key is NULL OR subcategory_key is NULL
name: Most sales are categorized
# Check fails if the sum of sales produced by the model is different
# than the sum of sales in the fact_internet_sales dataset
- sales_diff = 0:
name: Subcategory sales total matches
sales_diff query: >
SELECT CAST((SELECT SUM(fact_internet_sales.sales_amount) FROM fact_internet_sales)
- (SELECT SUM(report_subcategory_sales.sales_total) FROM report_subcategory_sales) as numeric) AS sales_difffrom airflow import DAG
from airflow.models.variable import Variable
from airflow.operators.bash import BashOperator
from airflow.operators.python import PythonVirtualenvOperator
from airflow.operators.dummy import DummyOperator
from airflow.utils.dates import days_ago
from datetime import timedelta
default_args = {
"owner": "soda",
"retries": 1,
"retry_delay": timedelta(minutes=5),
}
PROJECT_ROOT = "<this_project_full_path_root>"
def run_soda_scan(project_root, scan_name, checks_subpath = None):
from soda.scan import Scan
print("Running Soda Scan ...")
config_file = f"{project_root}/soda/configuration.yml"
checks_path = f"{project_root}/soda/checks"
if checks_subpath:
checks_path += f"/{checks_subpath}"
data_source = "soda_demo"
scan = Scan()
scan.set_verbose()
scan.add_configuration_yaml_file(config_file)
scan.set_data_source_name(data_source)
scan.add_sodacl_yaml_files(checks_path)
scan.set_scan_definition_name(scan_name)
result = scan.execute()
print(scan.get_logs_text())
if result != 0:
raise ValueError('Soda Scan failed')
return result
with DAG(
"model_adventureworks_sales_category",
default_args=default_args,
description="A simple Soda Library scan DAG",
schedule_interval=timedelta(days=1),
start_date=days_ago(1),
):
ingest_raw_data = DummyOperator(task_id="ingest_raw_data")
checks_ingest = PythonVirtualenvOperator(
task_id="checks_ingest",
python_callable=run_soda_scan,
requirements=[ "-i https://pypi.cloud.soda.io", "soda-postgres", "soda-scientific"],
system_site_packages=False,
op_kwargs={
"project_root": PROJECT_ROOT,
"scan_name": "model_adventureworks_sales_category_ingest",
"checks_subpath": "ingest/dim_product_category.yml"
},
)
dbt_transform = BashOperator(
task_id="dbt_transform",
bash_command=f"dbt run --project-dir {PROJECT_ROOT}/dbt --select transform",
)
checks_transform = PythonVirtualenvOperator(
task_id="checks_transform",
python_callable=run_soda_scan,
requirements=["-i https://pypi.cloud.soda.io", "soda-postgres", "soda-scientific"],
system_site_packages=False,
op_kwargs={
"project_root": PROJECT_ROOT,
"scan_name": "model_adventureworks_sales_category_transform",
"checks_subpath": "transform"
},
)
dbt_report = BashOperator(
task_id="dbt_report",
bash_command=f"dbt run --project-dir {PROJECT_ROOT}/dbt --select report",
)
checks_report = PythonVirtualenvOperator(
task_id="checks_report",
python_callable=run_soda_scan,
requirements=["-i https://pypi.cloud.soda.io", "soda-postgres", "soda-scientific"],
system_site_packages=False,
op_kwargs={
"project_root": PROJECT_ROOT,
"scan_name": "model_adventureworks_sales_category_report",
"checks_subpath": "report"
},
)
publish_data = DummyOperator(task_id="publish_data")
ingest_raw_data >> checks_ingest >> dbt_transform >> checks_transform >> dbt_report >> checks_report >> publish_datasoda scan -d soda_demo -c soda/configuration.yml soda/ingest-checks/dbt run --project-dir dbt --select transformsoda scan -d soda_demo -c soda/configuration.yml soda/transform-checks/dbt run --project-dir dbt --select reportsoda scan -d soda_demo -c soda/configuration.yml soda/resports-checks/filter CUSTOMERS [daily]:
where: TIMESTAMP '${ts_start}' <= "ts" AND "ts" < TIMESTAMP '${ts_end}'checks for CUSTOMERS [daily]:
- row_count = 6
- missing(cat) = 2soda scan -d snowflake_customer_data -v ts_start=2022-03-11 -v ts_end=2022-03-15 checks.ymlvariables:
name: Customers UK
checks for dim_customer:
- row_count > 1:
name: Row count in ${name}Soda Library 1.0.x
Soda Core 3.0.x
Scan summary:
1/1 check PASSED:
dim_customer in adventureworks
Row count in Customers UK [PASSED]
All is good. No failures. No warnings. No errors.checks for dim_customer:
- missing_count(last_name) > 0checks for dataset_1:
- row_count > ${VAR}
checks for dim_customer:
- missing_count(last_name) > 99:
identity: aa457447-60f6-4b09-4h8t-02fbb78f9587{data_source}-{dataset}-{column}-{5 random characters}sales_db-dim_customer-last_name-a8k4zchecks for dim_reseller:
- duplicate_count(phone):
warn: when > 5Soda Library 1.0.x
Soda Core 3.0.x
Scan summary:
1/1 check WARNED:
dim_reseller in adventureworks
duplicate_count(phone) [WARNED]
check_value: 48
Only 1 warning. 0 failure. 0 errors. 0 pass.
Sending results to Soda Cloudchecks for dim_reseller:
- duplicate_count(phone):
warn: when between 1 and 10
fail: when > 10Soda Library 1.0.x
Soda Core 3.0.x
Scan summary:
1/1 check FAILED:
dim_reseller in adventureworks
duplicate_count(phone) [FAILED]
check_value: 48
Oops! 1 failures. 0 warnings. 0 errors. 0 pass.
Sending results to Soda Cloudchecks for dim_customer:
- row_count:
warn:
when > 2
when < 0Soda Library 1.0.x
Soda Core 3.0.x
Scan summary:
1/1 check WARNED:
dim_customer in adventureworks
row_count warn when > 2 when > 3 [WARNED]
check_value: 18484
Only 1 warning. 0 failure. 0 errors. 0 pass.
Sending results to Soda Cloud
Soda Cloud Trace: 42812***checks for dim_product:
- sum(safety_stock_level):
name: Stock levels are safe
warn:
when > 0
fail:
when > 0Soda Library 1.0.x
Soda Core 3.0.x
Scan summary:
1/1 check FAILED:
dim_product in adventureworks
Stock levels are safe [FAILED]
check_value: 275936
Oops! 1 failures. 0 warnings. 0 errors. 0 pass.
Sending results to Soda Cloud
Soda Cloud Trace: 6016***checks for CUSTOMERS:
- row_count:
warn: when not between -10 and 10
fail: when not between -20 and 20checks for CUSTOMERS:
- row_count:
warn: when between -20 and 20
fail: when between -10 and 10checks for dim_employee:
- max(vacation_hours) < 80:
name: Too many vacation hours for US Sales
filter: sales_territory_key = 11checks for dim_employee:
- max(vacation_hours) < 80:
name: Too many vacation hours for US Sales
filter: middle_name = 'Henry'checks for dim_employee:
- max(vacation_hours) < 80:
name: Too many vacation hours for US Sales
filter: sales_territory_key = 11 AND salaried_flag = 1checks for dim_employee:
- max(vacation_hours) < 80:
name: Too many vacation hours for US Sales
filter: sales_territory_key = 11 AND
sick_leave_hours > 0 OR
pay_frequency > 1checks for my_dataset:
- missing_count("Email") = 0:
name: missing email
filter: |
"Status" = 'Client' Soda Library 1.0.x
Soda Core 3.0.x
Scan summary:
1/1 check NOT EVALUATED:
dim_employee in adventureworks
Too many vacation hours for US Sales [NOT EVALUATED]
check_value: None
1 checks not evaluated.
Apart from the checks that have not been evaluated, no failures, no warnings and no errors.checks for CUSTOMERS:
- missing("id") = 0SELECT
COUNT(CASE WHEN "id" IS NULL THEN 1 END)
FROM CUSTOMERSfor each dataset T:
datasets:
# include the dataset
- dim_customers
# include all datasets matching the wildcard expression
- dim_products%
# (optional) explicitly add the word include to make the list more readable
- include dim_employee
# exclude a specific dataset
- exclude fact_survey_response
# exclude any datasets matching the wildcard expression
- exclude prospective_%
checks:
- row_count > 0docker run -v /path/to/your_soda_directory:/sodacl sodadata/soda-library scan -d your_data_source -c /sodacl/your_configuration.yml /sodacl/your_checks.ymldocker run -v /path/to/your_soda_directory:/sodacl sodadata/soda-library:v1.0.0 scan -d your_data_source -c /sodacl/your_configuration.yml /sodacl/your_checks.ymlls
cmdstan-2.26.1 prophet_model.bininstall_name_tool -add_rpath @executable_path/cmdstanyour_cmdstan_version/stan/lib/stan_math/lib/tbb prophet_model.bininstall_name_tool -add_rpath @executable_path/cmdstan-2.26.1/stan/lib/stan_math/lib/tbb prophet_model.binpip install -i https://pypi.cloud.soda.io soda-scientificchecks for dim_customer:
- anomaly score for row_count < defaultchecks for orders:
- anomaly score for avg(order_price) < defaultchecks for orders:
- anomaly score for missing_count(id) < default:
missing_values: [None, No Value]Soda Library 1.0.x
Soda Core 3.0.0x
Anomaly Detection Frequency Warning: Coerced into daily dataset with last daily time point kept
Data frame must have at least 4 measurements
Skipping anomaly metric check eval because there is not enough historic data yet
Scan summary:
1/1 check NOT EVALUATED:
dim_customer in adventureworks
anomaly score for missing_count(last_name) < default [NOT EVALUATED]
check_value: None
1 checks not evaluated.
Apart from the checks that have not been evaluated, no failures, no warnings and no errors.
Sending results to Soda Cloudchecks for dim_customer:
- anomaly score for row_count < default:
warn_only: Truechecks for dim_product:
- anomaly score for avg("order_price") < defaultfor each dataset T:
datasets:
- dim_customer
checks:
- anomaly score for row_count < defaultchecks for dim_customer:
- group by:
name: Group by gender
query: |
SELECT gender, AVG(total_children) as average_children
FROM dim_customer
GROUP BY gender
fields:
- gender
checks:
- average_children > 2:
name: Average children per gender should be more than 2
- anomaly detection for average_children:
name: Detect anomaly for average children
- change for average_children between -5 and 5:
name: Detect unexpected changes for average childrenpip install -i https://pypi.cloud.soda.io soda-scientificdocker pull sodadata/soda-library:v1.0.3docker run sodadata/soda-library:v1.0.3 --help Usage: soda [OPTIONS] COMMAND [ARGS]...
Soda Library CLI version 1.0.x, Soda Core CLI version 3.0.xx
Options:
--version Show the version and exit.
--help Show this message and exit.
Commands:
ingest Ingests test results from a different tool
scan Runs a scan
suggest Generates suggestions for a dataset
test-connection Tests a connection
update-dro Updates contents of a distribution reference fileWARNING: The requested image's platform (linux/amd64) does not match the detected host platform (linux/arm64/v8) and no specific platform was requesteddocker: Error response from daemon: Mounts denied:
The path /soda-library-test/files is not shared from the host and is not known to Docker.
You can configure shared paths from Docker -> Preferences... -> Resources -> File Sharing.
See https://docs.docker.com/desktop/mac for more info.Soda Library 1.0.x
Configuration path 'configuration.yml' does not exist
Path "checks.yml" does not exist
Scan summary:
No checks found, 0 checks evaluated.
2 errors.
Oops! 2 errors. 0 failures. 0 warnings. 0 pass.
ERRORS:
Configuration path 'configuration.yml' does not exist
Path "checks.yml" does not existcd path_to_your_python_virtual_env/lib/pythonyour_version/site_packages/prophet/stan_model/cd ~/venvs/soda-library-prophet11/lib/python3.9/site-packages/prophet/stan_model/ =
<
>
<=
>=
!=
<>
between
not between python3 -m venv ~/venvs/soda-grafana
cd venvs
source soda-grafana/bin/activatepip install requests psycopg2import os
import requests
class ApiScan():
def __init__(self):
self.url = os.environ.get("SODA_URL")
self.auth = (os.environ.get("API_KEY"), os.environ.get("API_SECRET"))
def _get(self, endpt: str, headers: dict = None):
r = requests.get(url=self.url + endpt, auth=self.auth,
headers=headers)
print(f"_get result for endpoint {endpt}: {r}")
r = r.json()
return r
def _post(self, endpt: str, headers: dict = None, data: dict = None):
r = requests.post(url=self.url + endpt, auth=self.auth,
headers=headers, data=data)
return r
def test(self): # expect response 200
return self._get(endpt="test-login")
def checks(self, datasetID: str, size: int = 100):
headers = {"Accept": "application/json"}
params = f"?size={size}&datasetID={datasetID}"
return self._get(endpt=f"checks{params}", headers=headers)
def datasets(self, from_ts: str, size: int = 100):
headers = {"Accept": "application/json"}
params = f"?size={size}&from={from_ts}"
return self._get(endpt=f"datasets{params}", headers=headers)
def trigger(self, scan: str):
headers = {"Accept": "application/json",
"Content-Type": "application/x-www-form-urlencoded"}
data = {"scanDefinition": scan}
return self._post(endpt="scans", headers=headers, data=data)
def state(self, scan_id: str):
return self._get(endpt=f"scans/{scan_id}") # Soda Cloud API keys, used in apiscan.py
SODA_URL = https://cloud.soda.io/api/v1/
API_KEY = xxx
API_SECRET = xxx
# PostgreSQL access credentials, used in main.py
HOST = host_name
PG_USER = user_login
PG_PASSWORD = user_pass
```from apiscan import ApiScan
import os
import psycopg2
import time
scan_definition = "grafanascan0"
ascan = ApiScan()
sc = ascan.trigger(scan=scan_definition)
id = sc.headers["X-Soda-Scan-Id"]
state = "" # do not get logs until scan completed
while "completed" not in state:
r = ascan.state(scan_id=id)
state = r["state"]
print(f"Scan state: {state}", end="\r")
time.sleep(10)
r = ascan.state(scan_id=id)
print(f"Scan done!")# EXTRACT SCAN DETAILS
s = {}
s["definitionName"] = r["scanDefinition"]["name"]
s["scanStartTimestamp"] = r["started"]
s["scanEndTimestamp"] = r["ended"]
s["hasErrors"] = (False if r["errors"] == 0 else True)
# EXTRACT DATASETS DETAILS
### get only the datasets just scanned
d_api = ascan.datasets(from_ts=r["started"])
d_all = [{"datasetName": d["name"],
"datasetID": d["id"],
"dataSource": d["datasource"]["name"]}
for d in d_api["content"]]
# EXTRACT CHECKS DETAILS
c_all = [] ### get only the checks for datasets just scanned
for d in d_all:
d_checks = ascan.checks(datasetID=d["datasetID"])
c_all = c_all + d_checks["content"]
c_cols = ["id", "name", "evaluationStatus", "column"]
checks = [] # list of rows, each row has both scan and check details
for check in r["checks"]: ### find scanned check in all checks from api
c_single = next(c for c in c_all if c["id"] == check["id"])
c = {col:c_single[col] for col in c_cols}
# rename keys to standardize and avoid SQL special words
c["identity"] = c.pop("id")
c["outcome"] = c.pop("evaluationStatus")
c["columnName"] = c.pop("column")
# add dataset details - datasetName, dataSource
c["datasetName"] = c_single["datasets"][0]["name"]
d_full = next(d for d in d_all if d["datasetName"] == c["datasetName"])
c["dataSource"] = d_full["dataSource"]
checks.append({**s, **c}) # combine scan, dataset and check details in one row# POSTGRES / SQL
target = "my_schema.api_results" # <schema>.<table>
try:
print("postgres.py trying to connect to database...")
conn = psycopg2.connect(database="postgres",
user=os.environ.get("PG_USER"),
password=os.environ.get("PG_PASSWORD"),
host=os.environ.get("HOST"),
port="5432")
print("postgres.py connected to database!")
curs = conn.cursor()
except Exception as e:
print(f"postgres.py failed to connect to database: {e}")
# Create a table if one does not exist
schema = []
for col in checks[0].keys():
if "Timestamp" in col:
schema.append(f"{col} TIMESTAMP")
elif col[0:3] == "has":
schema.append(f"{col} BOOLEAN")
else:
schema.append(f"{col} VARCHAR")
schema = "(" + ", ".join(schema) + ")"
curs.execute(f"""
create table if not exists {target} {schema}
"""
)
curs.connection.commit()
# Insert into table
# Create list of cols without quotation marks " "
cols = "(%s)" % ", ".join(map(str, checks[0].keys()))
# create tuples of values to be appended
values = [tuple(str(v) for v in check.values()) for check in checks]
values = str(values).strip('[]')
curs.execute(f"""
insert into {target} {cols} values {values}
""")
curs.connection.commit()
print(f"Scan processed to PostgreSQL# !")Use numeric metrics in SodaCL checks for data quality.
Use a numeric metric in a check to perform basic calculations on the data in your dataset.
✖️ Requires Soda Core Scientific (included in a Soda Agent) ✔️ Supported in Soda Core ✔️ Supported in Soda Library + Soda Cloud ✔️ Supported in Soda Cloud Agreements + Soda Agent ✔️ Some available as a no-code check with a self-hosted Soda Agent connected to any Soda-supported data source, except Spark, and Dask and Pandas OR with a Soda-hosted Agent connected to a BigQuery, Databricks SQL, MS SQL Server, MySQL, PostgreSQL, Redshift, or Snowflake data source
In the context of Soda check types, you use numeric metrics in Standard checks. Refer to Standard check types for exhaustive configuration details.
You can use the row_count metric in checks that apply to entire datasets.
You can use all numeric metrics in checks that apply to individual columns in a dataset. Identify the column by adding a value in the argument between brackets in the check.
You can use some numeric metrics in checks with either fixed or change-over-time thresholds. See for more detail.
Checks that use the duplicate_count or duplicate_percent metrics automatically collect samples of any failed rows to display in Soda Cloud. The default number of failed row samples that Soda collects and displays is 100.
If you wish to limit or broaden the sample size, you can use the samples limit configuration in a check with a validity metric. You can add this configuration to your checks YAML file for Soda Library, or when writing checks as part of an agreement in Soda Cloud. See: .
For security, you can add a configuration to your data source connection details to prevent Soda from collecting failed rows samples from specific columns that contain sensitive data. See: .
Alternatively, you can set the samples limit to 0 to prevent Soda from collecting and sending failed rows samples for an individual check, as in the following example.
You can also use a samples columns or a collect failed rows configuration to a check to specify the columns for which Soda must implicitly collect failed row sample values, as in the following example with the former. Soda only collects this check’s failed row samples for the columns you specify in the list. See: .
Note that the comma-separated list of samples columns does not support wildcard characters (%).
To review the failed rows in Soda Cloud, navigate to the Checks dashboard, then click the row for a check for duplicate values. Examine failed rows in the Failed Rows Analysis tab; see for further details.
Numeric metrics can specify a fixed threshold which is not relative to any other threshold. row_count > 0 is an example of a check with a fixed threshold as the threshold value, 0, is absolute. Refer to for details.
Only checks that use numeric metrics can specify a change-over-time threshold, a value that is relative to a previously-measured, or historic, value. Sometimes referred to as a dynamic threshold or historic metrics, you use these change-over-time thresholds to gauge changes to the same metric over time. Most of the examples below use the row_count metric, but you can use any numeric metric in checks that use change-over-time thresholds.
The most basic of change-over-time threshold checks has three or four mutable parts:
The example below defines a check that applies to the entire dataset and counts the rows in the dataset, then compares that value to the preceding value contained in the Cloud Metric Store. If the row_count at present is greater than the previously-recorded historic value for row_count by more than 50 or less than -20, the check fails.
Use between for checks with change-over-time thresholds as much as possible to trigger check failures when the measurement falls outside of a range of acceptable values. This practice ensures that you get visibility into changes that either exceed or fall short of threshold expectations.
You can also use use a change-over-time threshold to compare check results relative to the same day in the previous week. The example below uses change-over-time to compare today's value with the same check result from last week to confirm that the delta is greater than 10.
The example below defines a check that applies to the entire dataset and counts the rows in the dataset, then compares that value to the preceding value contained in the Cloud Metric Store. If the row_count at present is greater than the previously-recorded historic value for row_count by more than 50%, the check fails.
For example, the previously-recorded historic measurement for row count is 80, and the newly-recorded value is 100, the relative change is 25%, which is less than the 50% specified in the threshold, so the check passes.
Percentage thresholds are between 0 and 100, not between 0 and 1.
If you wish, you can add a % character to the threshold for a change-over-time threshold for improved readability.
If the previous measurement value is 0 and the new value is 0, Soda calculates the relative change as 0%. However, if the previous measurement value is 0 and the new value is not 0, then Soda indicates the check as NOT EVALUATED because the calculation is a division by zero.
The example below applies to only the phone column in the dataset and counts the rows that contain duplicate values, then compares that value to the preceding value contained in the Cloud Metric Store. If the number of duplicate phone numbers at present is greater than the preceding historic values for duplicate_count by more than 20, the check fails.
A more complex change-over-time threshold check includes two more optional mutable parts:
The example above defines three checks, one for each type of calculation available to use, avg, min, and max, all of which apply to the entire dataset.
The first check counts the rows in the dataset, then compares that value to the calculated average of the preceding seven measurement values for that metric contained in the Cloud Metric Store. If the row_count at present is greater than the average of the seven preceding historic values by more than 50, the check fails. The only valid historical value definition you can use is seven.
The second check in the example determines the minimum value of the preceding seven historic values, then uses that value to compare to the present measurement value.
The third check in the example determines the maximum value of the preceding seven historic values, then uses that value and the present measurement value to calculate the percentage of change.
Use numeric metrics in checks with alert configurations to establish
Use numeric metrics in checks to define ranges of acceptable thresholds using .
Reference .
Use this guide as an example of how to invoke Soda data quality tests in a Databricks pipeline.
Use this guide as an example for how to set up and use Soda to test the quality of data in a Databricks pipeline. Automatically catch data quality issues after ingestion or transformation, and before using the data to train a machine learning model.
The instructions below offers an example of how to execute Soda Checks Language (SodaCL) checks for data quality within a Databricks pipeline that handles data which trains a machine learning (ML) model.
For context, this guide demonstrates a Data Scientist and Data Engineer working with Human Resources data to build a forecast model for employee attrition. The Data Engineer, working with a Data Scientist, uses a Databricks notebook to gather data from SQL-accessible dataset, transforms the data into the correct format for their ML model, then uses the data to train the model.
Though they do not have direct access to the data to be able to resolve issues themselves, the Data Engineer can use Soda to detect data quality issues before the data model trains on poor-quality data. The pipeline the Data Engineer creates includes various SodaCL checks embedded at two stages in the pipeline: after data ingestion and after data transformation. At the end of the process, the pipeline stores the checks' metadata in a Databricks table which feeds into a data quality dashboard. The Data Engineer utilizes Databricks workflows to schedule this process on a daily basis.
The Data Engineer in this example uses the following:
Python 3.8, 3.9, or 3.10
Pip 21.0 or greater
a Databricks account
access to a Unity catalog
To validate an account license or free trial, Soda Library must communicate with a Soda Cloud account via API keys. You create a set of API keys in your Soda Cloud account, then use them to configure the connection to Soda Library.
In a browser, the Data Engineer navigates to to create a new Soda account, which is free for a 45-day trial.
They navigate to your avatar > Profile, access the API keys tab, then click the plus icon to generate new API keys.
They copy+paste the API key values to a temporary, secure place in their local environment.
Within Databricks, the Data Engineer creates two notebooks:
Data Ingestion Checks, which runs scans for data quality after data is ingested into a Unity catalog
Input Data Checks, which prepares data for training a machine learning model and runs data quality scans before submitting to the model for training
In the same directory as the Databricks notebooks, the Data Engineer creates a soda_settings directory to contain this configuration file, and, later, the check YAML files that Soda needs to run scans. To connect Soda to the Unity catalog, the Data Engineer prepares a soda_conf.yml file which stores the data source connection details.
To the file, they add the data source connection configuration to the Unity catalog that contains the Human Resources data the Data Engineer uses, and the Soda Cloud API key connection configuration, then they save the file.
Read more:
Read more:
A check is a test that Soda executes when it scans a dataset in your data source. The checks.yml file stores the checks you write using the Soda Checks Language. You can create multiple checks files to organize your data quality checks and run all, or some of them, at scan time.
In this example, the Data Engineer creates two checks files in the soda_settings directory in Databricks:
ingestion_checks.yml to execute quality checks after data ingestion into the Unity catalog in the Data Ingestion Checks notebook
input_data_checks.yml to execute quality checks after transformation, and before using it to train their ML model in the Input Data Checks notebook.
output_data_checks.yml to execute quality checks after training the model and monitor the performance of your model.
The raw data in this example is divided into two main categories.
The first category is Human Resources data, which the Unity catalog contains in three datasets: basic employee information, results of manager surveys, and results of employee surveys. The survey datasets are updated on a frequent basis.
The second category is application login data, which is a file in the Databricks file system; it is updated daily.
Download:
Read more:
The Data Engineer creates a checks YAML file to write checks that apply to the datasets they use to train their ML model. The Data Ingestion Checks notebook runs these checks after the data is ingested into the Unity catalog. For any checks that fail, the Data Engineer can notify upstream Data Engineers or Data Product Owners to address issues such as missing data or invalid entries.
Many of the checks that the Data Engineer prepares include which they created in Soda Cloud; see image below. When added to checks, the Data Engineer can use the attributes to filter check results in Soda Cloud, build custom views (), and stay organized as they monitor data quality in the Soda Cloud user interface. Skip to to see an example.
The Data Engineer also added a to the quality checks that apply to the application login data. The filter serves to partition the data against which Soda executes the checks; instead of checking for quality on the entire dataset, the filter limits the scan to the previous day’s data.
ingestion_checks.yml
The Data Engineer also prepared a second set of SodaCL checks in a separate file to run after transformation in the Input Data Checks notebook. Curious readers can download the to review transformations and the resulting input_data_attrition_model output into a DataFrame.
Two of the checks the Data Engineer prepares involve checking groups of data. The validates the presence or absence of a group in a dataset, or to check for changes to groups in a dataset relative to their previous state; in this case, it confirms the presence of the Married group in the data, and when any group changes. Further, the collects and presents check results by category; in this case, it groups the results according to JobLevel.
input_data_checks.yml
At the of this exercise, the Data Engineer created two notebooks in their Databricks workflow:
Data Ingestion Checks to run after data is ingested into the Unity catalog
Input Data Check to run after transformation, and before using the data to train the ML model
The following outlines the contents of each notebook and the steps included to install Soda and invoke it to run scans for data quality, thereby executing the data quality checks in the checks YAMLfiles. Beyond invoking Soda to scan for data quality, the notebooks also save the checks' metadata for further analysis.
Download:
Download:
Using the same structure the data scientists define some extra checks to validate and monitor the performance of their model after training. They define a ratio between the categories and apply an anomaly detection to make sure that there are no spikes or unexpected swifts in the label distribution. Furthermore, they add a check to ensure that they will notified when the model accuracy is below 60% and/or when the dataset is incomplete.
model_output_checks.yml
After running the notebooks, the Data Engineer accesses Soda Cloud to review the check results.
In the Checks page, they apply filters to narrow the results to the datasets involved in the Employee Attrition ML model, and distill the results even further by selecting to display only those results with the Pipeline attribute of Ingest. They save the results as a Collection labeled Employee Attrition - Ingestion to easily access the relevant quality results in the future.
After the Data Engineer trains the model to forecast employee attrition, they decide to devise an extra step in the process to use the export all the Soda check results and dataset metadata back into the Unity catalog, then build a dashboard to display the results.
Learn more about .
Learn more about in Soda Cloud.
Set to receive alerts when checks fail.
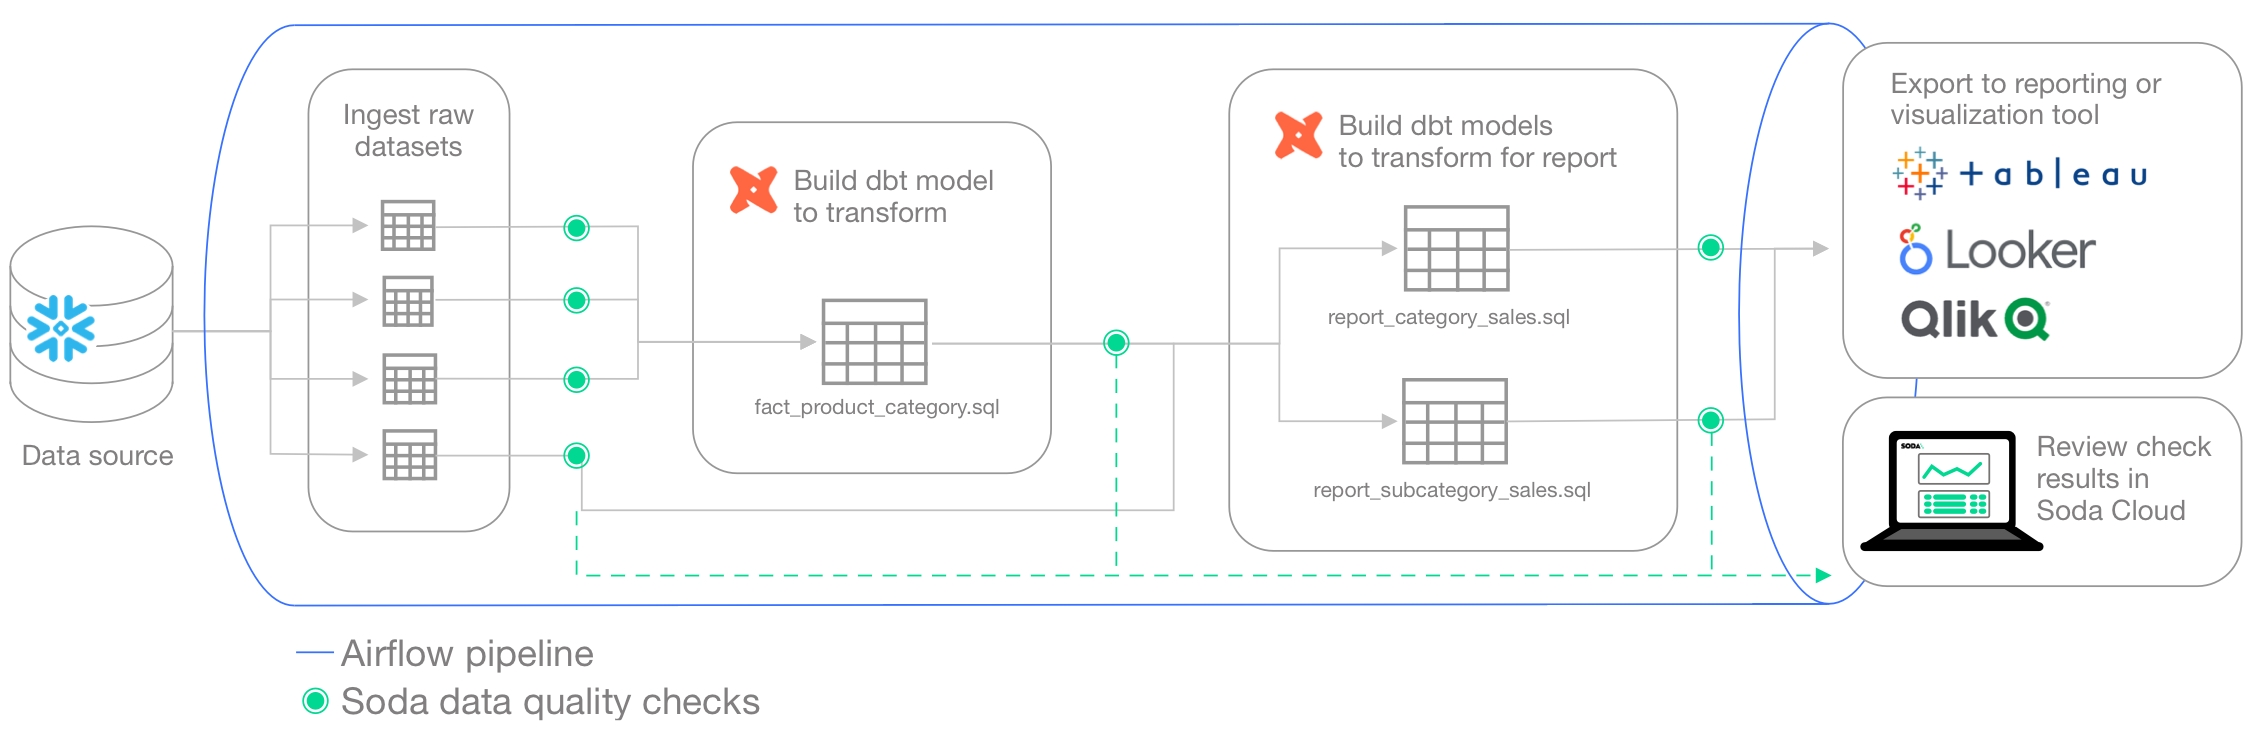
Use a SodaCL group by configuration to customize the group of data quality check results by category.
Use a group by configuration to collect and present check results by category.
✖️ Requires Soda Core Scientific (included in a Soda Agent) ✖️ Supported in Soda Core ✔️ Supported in Soda Library + Soda Cloud ✔️ Supported in Soda Cloud Agreements + Soda Agent ✖️ Available as a no-code check
checks for retail_products:
- avg(size) between 100 and 300
- avg_length(manufacturer) > 10
- duplicate_count(product_id) = 0
- duplicate_percent(user_id) < 2%
- max(size) <= 500
- max_length(manufacturer) = 25
- min(size) >= 50
- min_length(manufacturer) = 5
- row_count > 0
- percentile(size, 0.95) > 50checks for retail_orders_postgres:
- stddev(order_quantity) > 0
- stddev_pop(order_quantity) between 3 and 4
- stddev_samp(order_quantity) not between 3 and 4
- sum(discount) < 120
- variance(discount) > 0
- var_pop(discount) between 0 and 5
- var_samp(discount) not between 0 and 5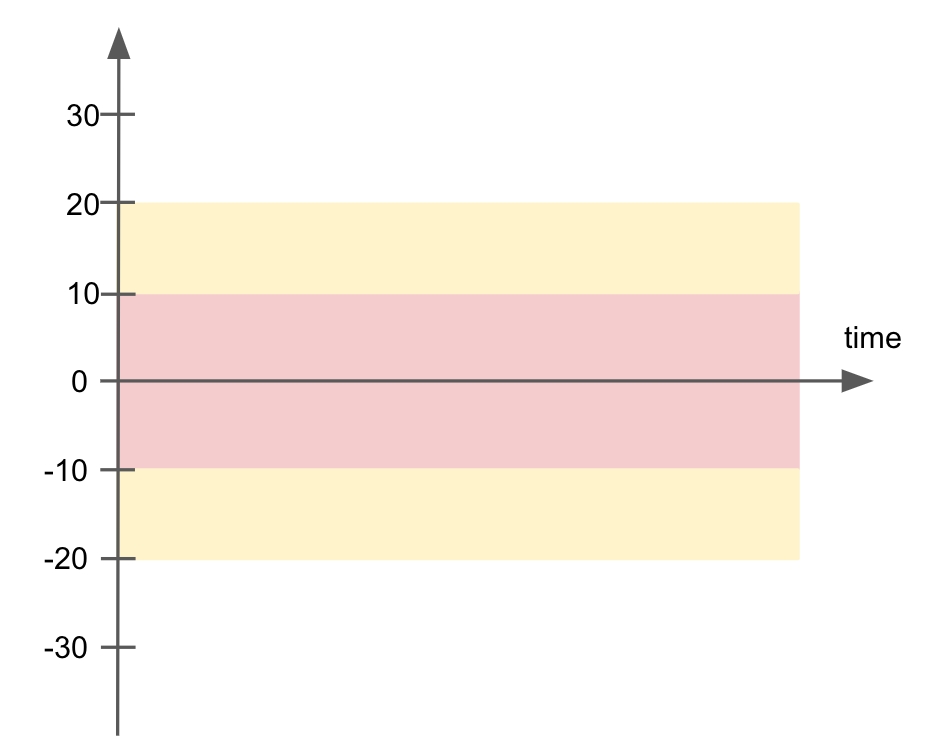
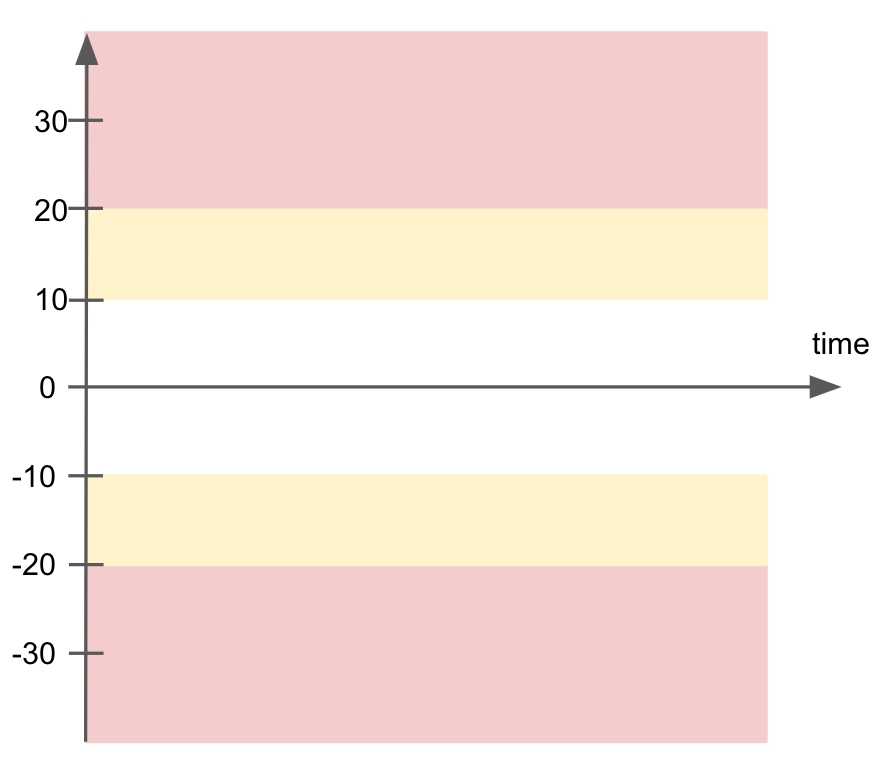
✓
Use quotes when identifying dataset or column names; see . Note that the type of quotes you use must match that which your data source uses. For example, BigQuery uses a backtick (`) as a quotation mark.
Use wildcard characters ( % or * ) in values in the check.
-
✓
Use for each to apply checks with numeric metrics to multiple datasets in one scan; see .
✓
Apply a dataset filter to partition data during a scan; see .
duplicate_percent
duplicate_count (as defined above) over the total row count, expressed as a percentage.
See also:
number text time
all
max
The greatest value in a numeric column.
number
all
max_length
The greatest length in a text column.
text
all
min
The smallest value in a numeric column.
number
all
min_length
The smallest length in a text column.
text
all
percentile
The value below which a percentage of observations fall within a group of observations.
For example, percentile(distance, 0.7).
number
PostgreSQL Snowflake
row_count
The number of rows in a dataset or column, if specified.
number text time
all
stddev
The calculated standard deviation of values in a numeric column.
number
Athena BigQuery PostgreSQL Redshift Snowflake
stddev_pop
The calculated population standard deviation of values in a numeric column.
number
Athena BigQuery PostgreSQL Redshift Snowflake
stddev_samp
The calculated sample standard deviation of values in a numeric column.
number
Athena BigQuery PostgreSQL Redshift Snowflake
sum
The calculated sum of the values in a numeric column.
number
all
variance
The calculated variance of the values in a numeric column.
number time
Athena BigQuery PostgreSQL Redshift Snowflake
var_pop
The calculated population variance of the values in a numeric column.
number time
Athena BigQuery PostgreSQL Redshift Snowflake
var_samp
The calculated sample variance of the values in a numeric column.
number time
Athena BigQuery PostgreSQL Redshift Snowflake
✓
Define a name for a check with numeric metrics; see example.
✓
Add an identity to a check.
✓
Define alert configurations to specify warn and fail thresholds; see example.
✓
Apply an in-check filter to return results for a specific portion of the data in your dataset; see example.
avg
The average value in a numeric column.
number
all
avg_length
The average length in a text column.
text
all
duplicate_count
The count of distinct values that have duplicates.
Multiple column names can be specified to count duplicate sets of values, as in duplicate_count(a, b)
See also: Duplicate check
number text time
a metric
an argument (optional)
a comparison symbol or phrase
a threshold
metric
row_count
threshold
between -20 and +50
metric
row_count
threshold
> 10
metric
row_count
comparison symbol
<
threshold
50 %
metric
duplicate_count
argument
(phone)
comparison symbol
<
threshold
20
a calculation type (optional) avg, min, max
a historical value definition (optional) 7
percent (optional)
a metric
an argument (optional)
a comparison symbol or phrase
a threshold
calculation type (optional)
avg
a historical value definition (optional)
last 7
percent (optional)
-
metric
row_count
argument (optional)
-
comparison symbol or phrase
<
a threshold
50
calculation type (optional)
min
historical value definition (optional)
last 7
percent (optional)
-
metric
row_count
argument (optional)
-
comparison symbol or phrase
<
a threshold
50
calculation type (optional)
max
historical value definition (optional)
last 7
percent (optional)
percent
metric
row_count
argument (optional)
-
comparison symbol or phrase
<
a threshold
50
Need help? Join the Soda community on Slack.
all
For an individual dataset, add a group by configuration to specify the categories into which Soda must group the check results.
The example below uses a SQL query to define a custom metric for the fact_internet_sales dataset. It calculates the average order discount based on the contents of the discount_amount column, then groups the results according to the value in the sales_territory_key. This check supports up to a maximum of 1000 groups.
The check itself uses the custom metric average_discount and an alert configuration to determine if the measurement for each group passes, warns, or fails. In this case, any calculated measurement for average that exceeds 40 results in a fail.
group by
required
configuration section label
group_limit
optional
the maximum number of groups, or column values, into which Soda must categorize the results. This value must correspond with the number of unique values in the column you identify in the fields section; see example below. This check supports up to a maximum of 1000 groups.
group_name
optional
specify a name for the group; Soda does not evaluate this parameter
query
required
custom query subsection label. The nested SQL query defines the custom metric average_discount
fields
required
column subsection label
You can also use multi-column groups in a group by check, as in the example below that groups results both by gender and english_education.
When you run a scan that includes checks nested in a group by configuration, the output in Soda Library CLI groups the results according to the unique values in the column you identified in the fields subsection. The number of unique values in the column must match the value you provided for group_limit.
In the example results below, the calculated average of average_discount for each sales territory is less than 40%, so the check for each group passed. The value in the square brackets next to the custom check name identifies the group which, in this case, is a number that corresponds to a territory.
In Soda Cloud, the check results appear by territory.
Be aware that a check that contains one or more alert configurations only ever yields a single check result; one check yields one check result. If your check triggers both a warn and a fail, the check result only displays the more severe, failed check result. (Schema checks behave slightly differently; see Schema checks.)
Using the following example, Soda Library, during a scan, discovers that the data in the dataset triggers both alerts, but the check result is still Only 1 warning. Nonetheless, the results in the CLI still display both alerts as having both triggered a [WARNED] state.
The check in the example below data triggers both warn alerts and the fail alert, but only returns a single check result, the more severe Oops! 1 failures.
✓
Define a name for a group by; see .
✓
Add an identity to a check.
✓
Define alert configurations to specify warn and fail alert conditions; see
Apply an in-check filter to return results for a specific portion of the data in your dataset.
When the check results appear in Soda Cloud, the checks use the name you define for the check or, if you do not specify a name parameter, the syntax of the check itself.
Be aware that Soda only ever returns a single check result per check. See Expect one check result for details.
Note that the type of quotes you use must match that which your data source uses. For example, BigQuery uses a backtick (`) as a quotation mark.
You can add multiple group by configurations to the same dataset in the same checks YAML file and produce separately grouped check results. To do so, you must include an identifier in the group by configuration key of the extra group configurations you add, as in the example below.
The first group by in the example requires no identifier, though for readability and completeness, you have the option of adding one.
The second group by includes title as an identifier to differentiate it from the first.
When the check results appear in Soda Cloud, the checks use the name you define for each check or, if you do not specify a name parameter, the syntax of the checks themselves. The group by identifiers appear in the CLI output, but do not appear the the check results in Soda Cloud.
When you make changes to your group by configuration, some changes result in a resetting of the check history in Soda Cloud.
The following changes result in a reset of a group by check's history; all historical measurements disappear.
change the list of fields, either adding, removing, or changing an existing field
change the group by identifier when more than one group by configurations exist; see Add multiple group configurations
change the syntax of a group by check such as, a change to the threshold value; see Configure variables in SodaCL to mitigate disruption using dynamic threshold values
The following changes result in no changes to the check's history; Soda preserves all historical measurements to a maximum of 90 days.
change the SQL query that forms part of the group by configuration
add a check to the group by configuration
Further, you can add an identity parameter to a group by check to be able to make changes to the check and still preserve its historical measurements, as in the example below. See also: Add a check identity.
You can use a group by configuration to detect anomalies by category, and monitor relative changes over time in each category.
✔️ Requires Soda Core Scientific for anomaly check (included in a Soda Agent) ✖️ Supported in Soda Core ✔️ Supported in Soda Library 1.1.27 or greater + Soda Cloud ✔️ Supported in Soda Cloud Agreements + Soda Agent 0.8.57 or greater ✖️ Available as a no-code check
The following example includes three checks grouped by gender.
The first check uses the custom metric average_children to collect measurements and gauge them against an absolute threshold of 2.
Soda Cloud displays the check results grouped by gender.
The second check uses the same custom metric to detect anomalous measurements relative to previous measurements. Soda must collect a minimum of four, regular-cadence, measurements to have enough data from which to gauge an anomolous measurement. Until it has enough measurements, Soda returns a check result of [NOT EVALUATED].
Soda Cloud displays any detected anomalies grouped by gender.
The third check uses the same custom metric to detect changes over time in the calculated average measurement, and gauge the measurement against a threshold of between -5 and 5 relative to the previously-recorded measurement. See for supported syntax variations for change-over-time checks.
Soda Cloud displays any detected changes grouped by gender.
If you use an optional group_limit parameter, you must always match the number of unique values in the group by column to the value you provide for the parameter.
In the following example, the number of unique values in the sales_territory_key column is greater than the group_limit: 2 so Soda does not evaluate the check.
Resolve the issue by increasing the group limit value, or by removing the parameter entirely.
Use a group evolution check to surface changes in groups in a dataset.
Learn more about alert configurations.
Learn more about SodaCL metrics and checks in general.
Need help? Join the .
sodadata/soda-library refers to the image that docker run must use.
scan instructs Soda Library to execute a scan of your data.
-d indicates the name of the data source to scan.
-c specifies the filepath and name of the configuration YAML file.
scipy>=1.8.0
numpy>=1.23.3, <2.0.0
inflection==0.5.1
httpx>=0.18.1,<2.0.0
PyYAML>=5.4.1,<7.0.0
cython>=0.22
prophet>=1.1.0,<2.0.0
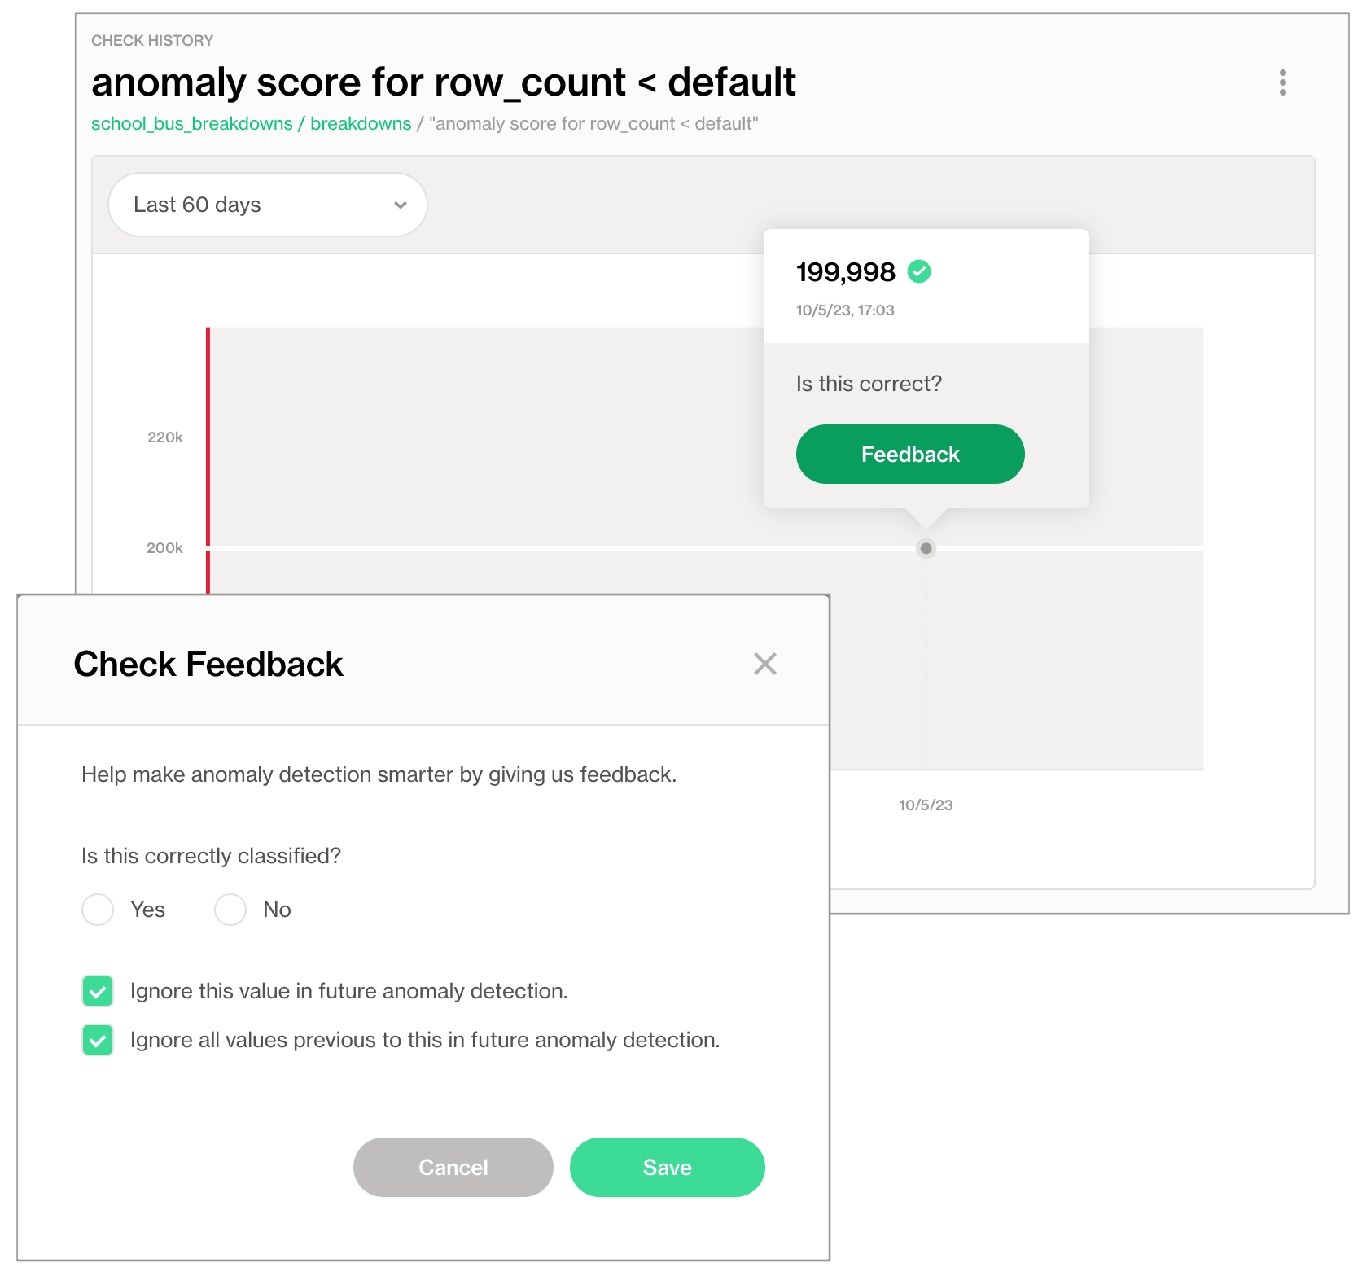
Need help? Join the Soda community on Slack.

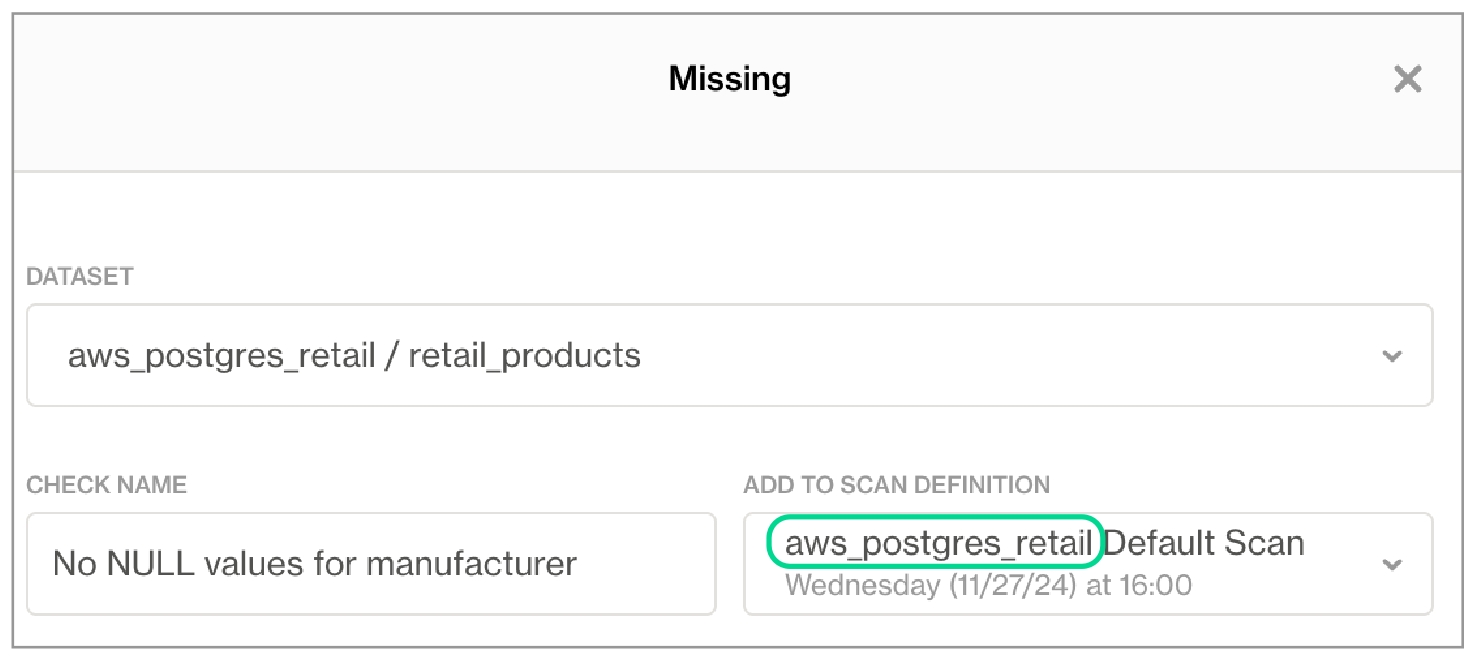
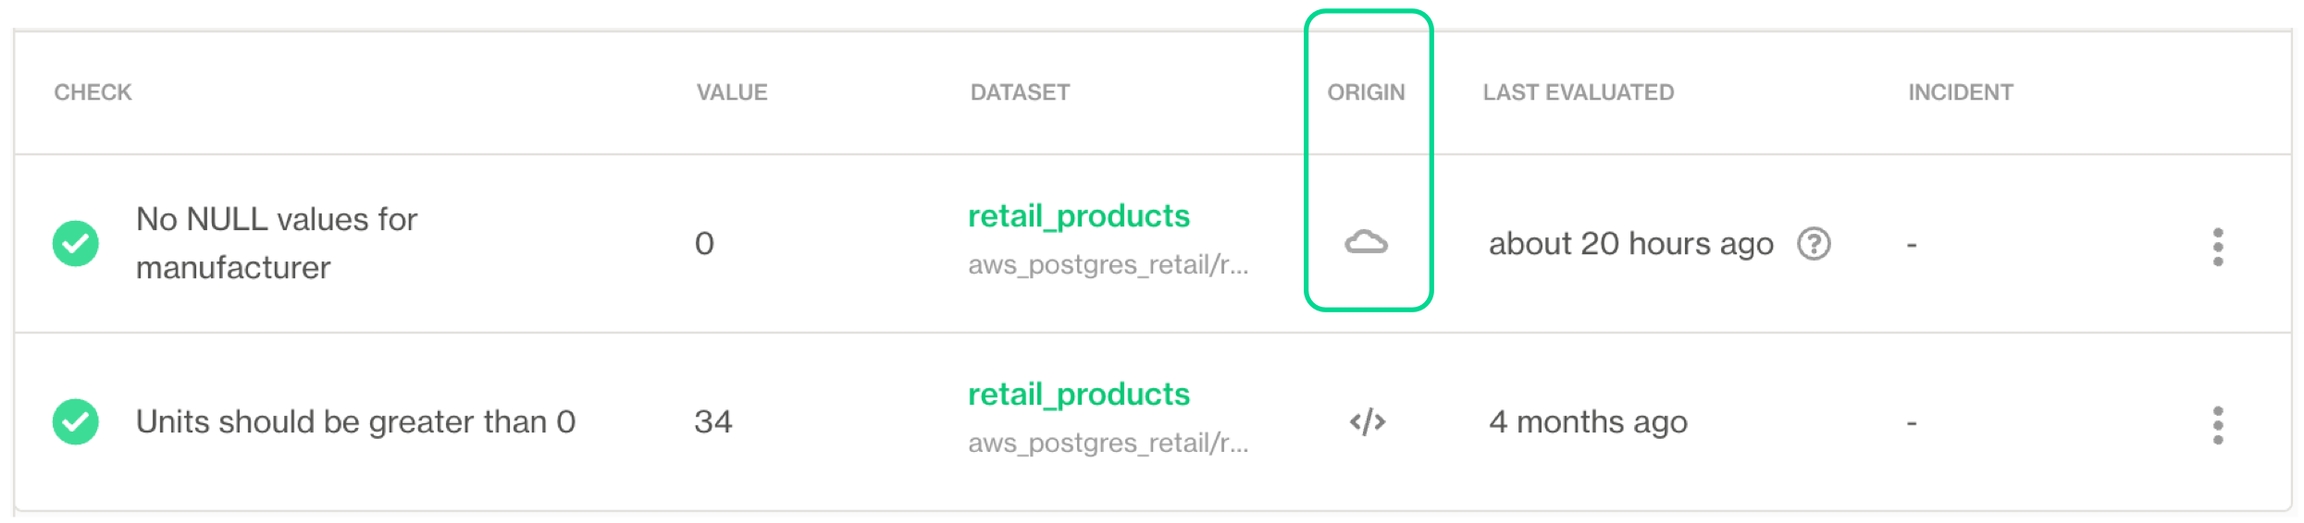
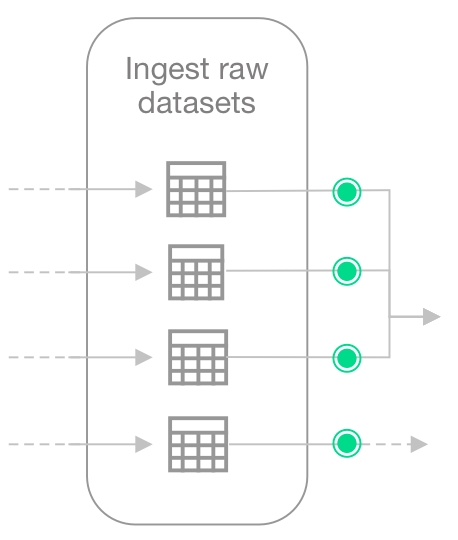
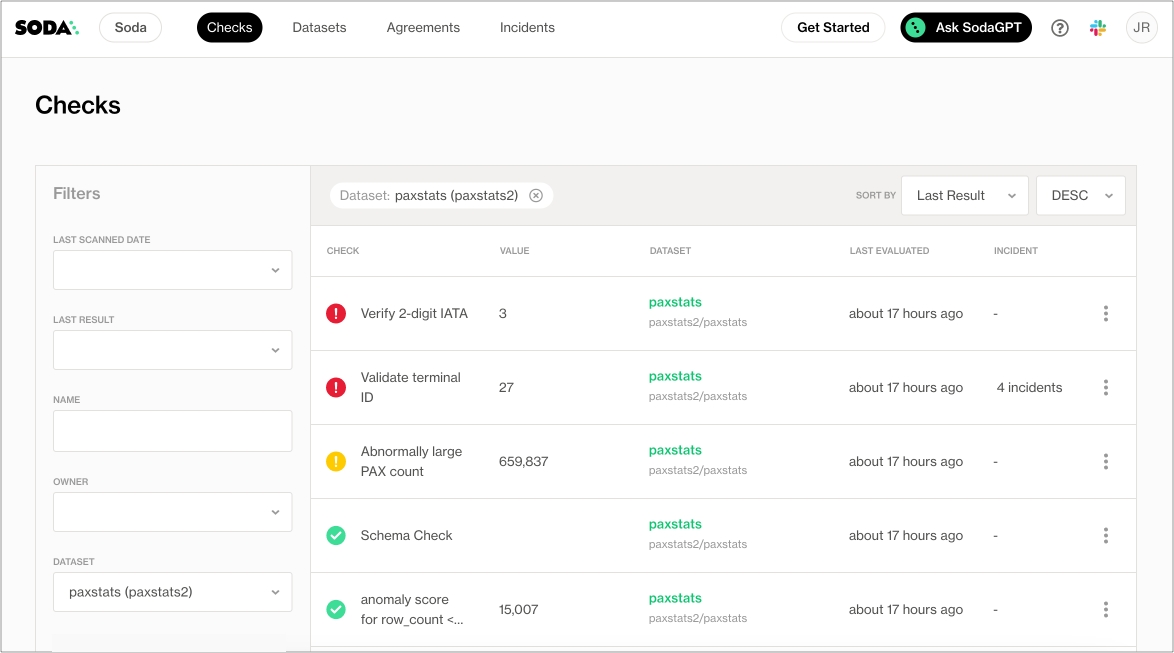
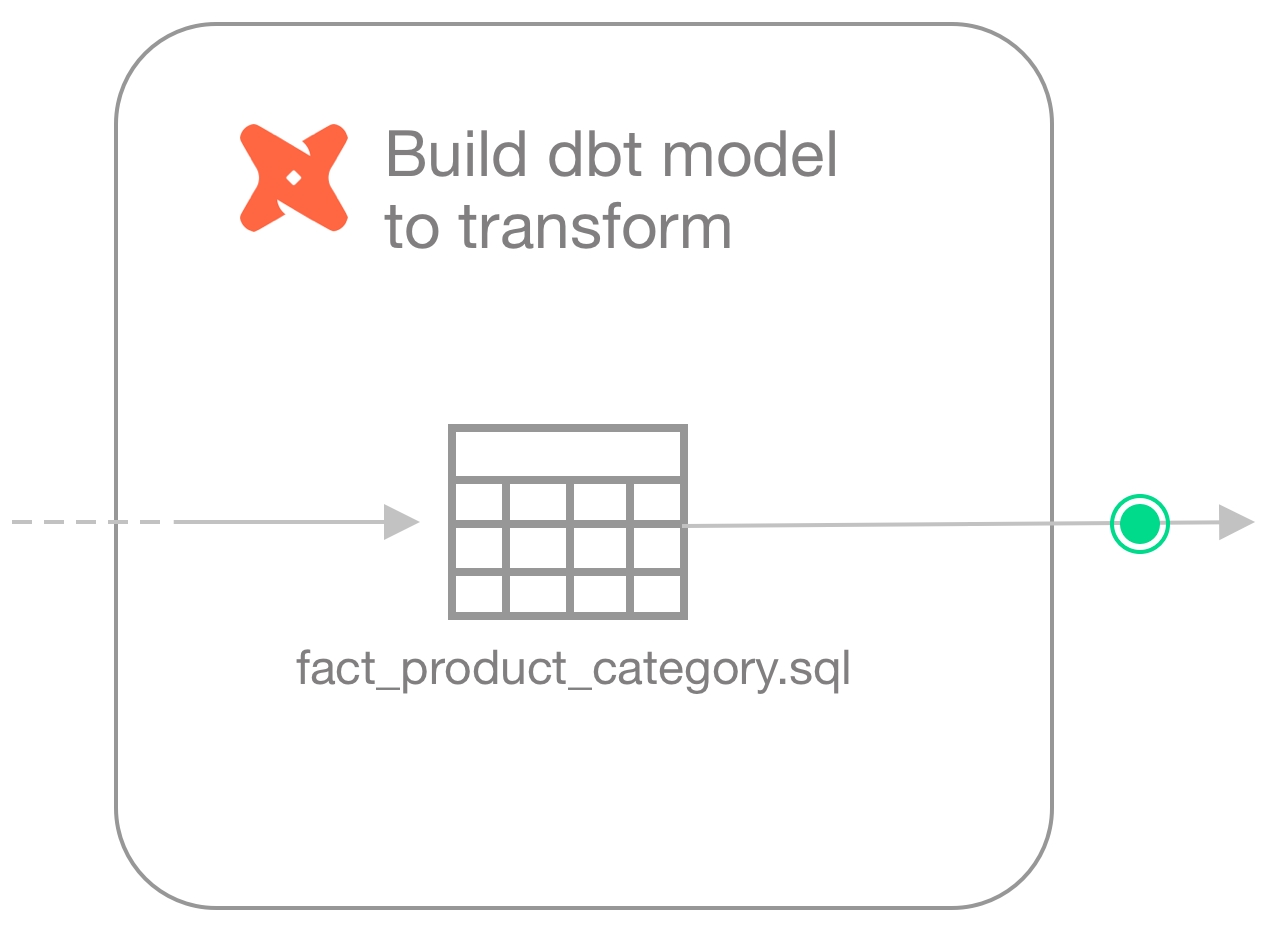
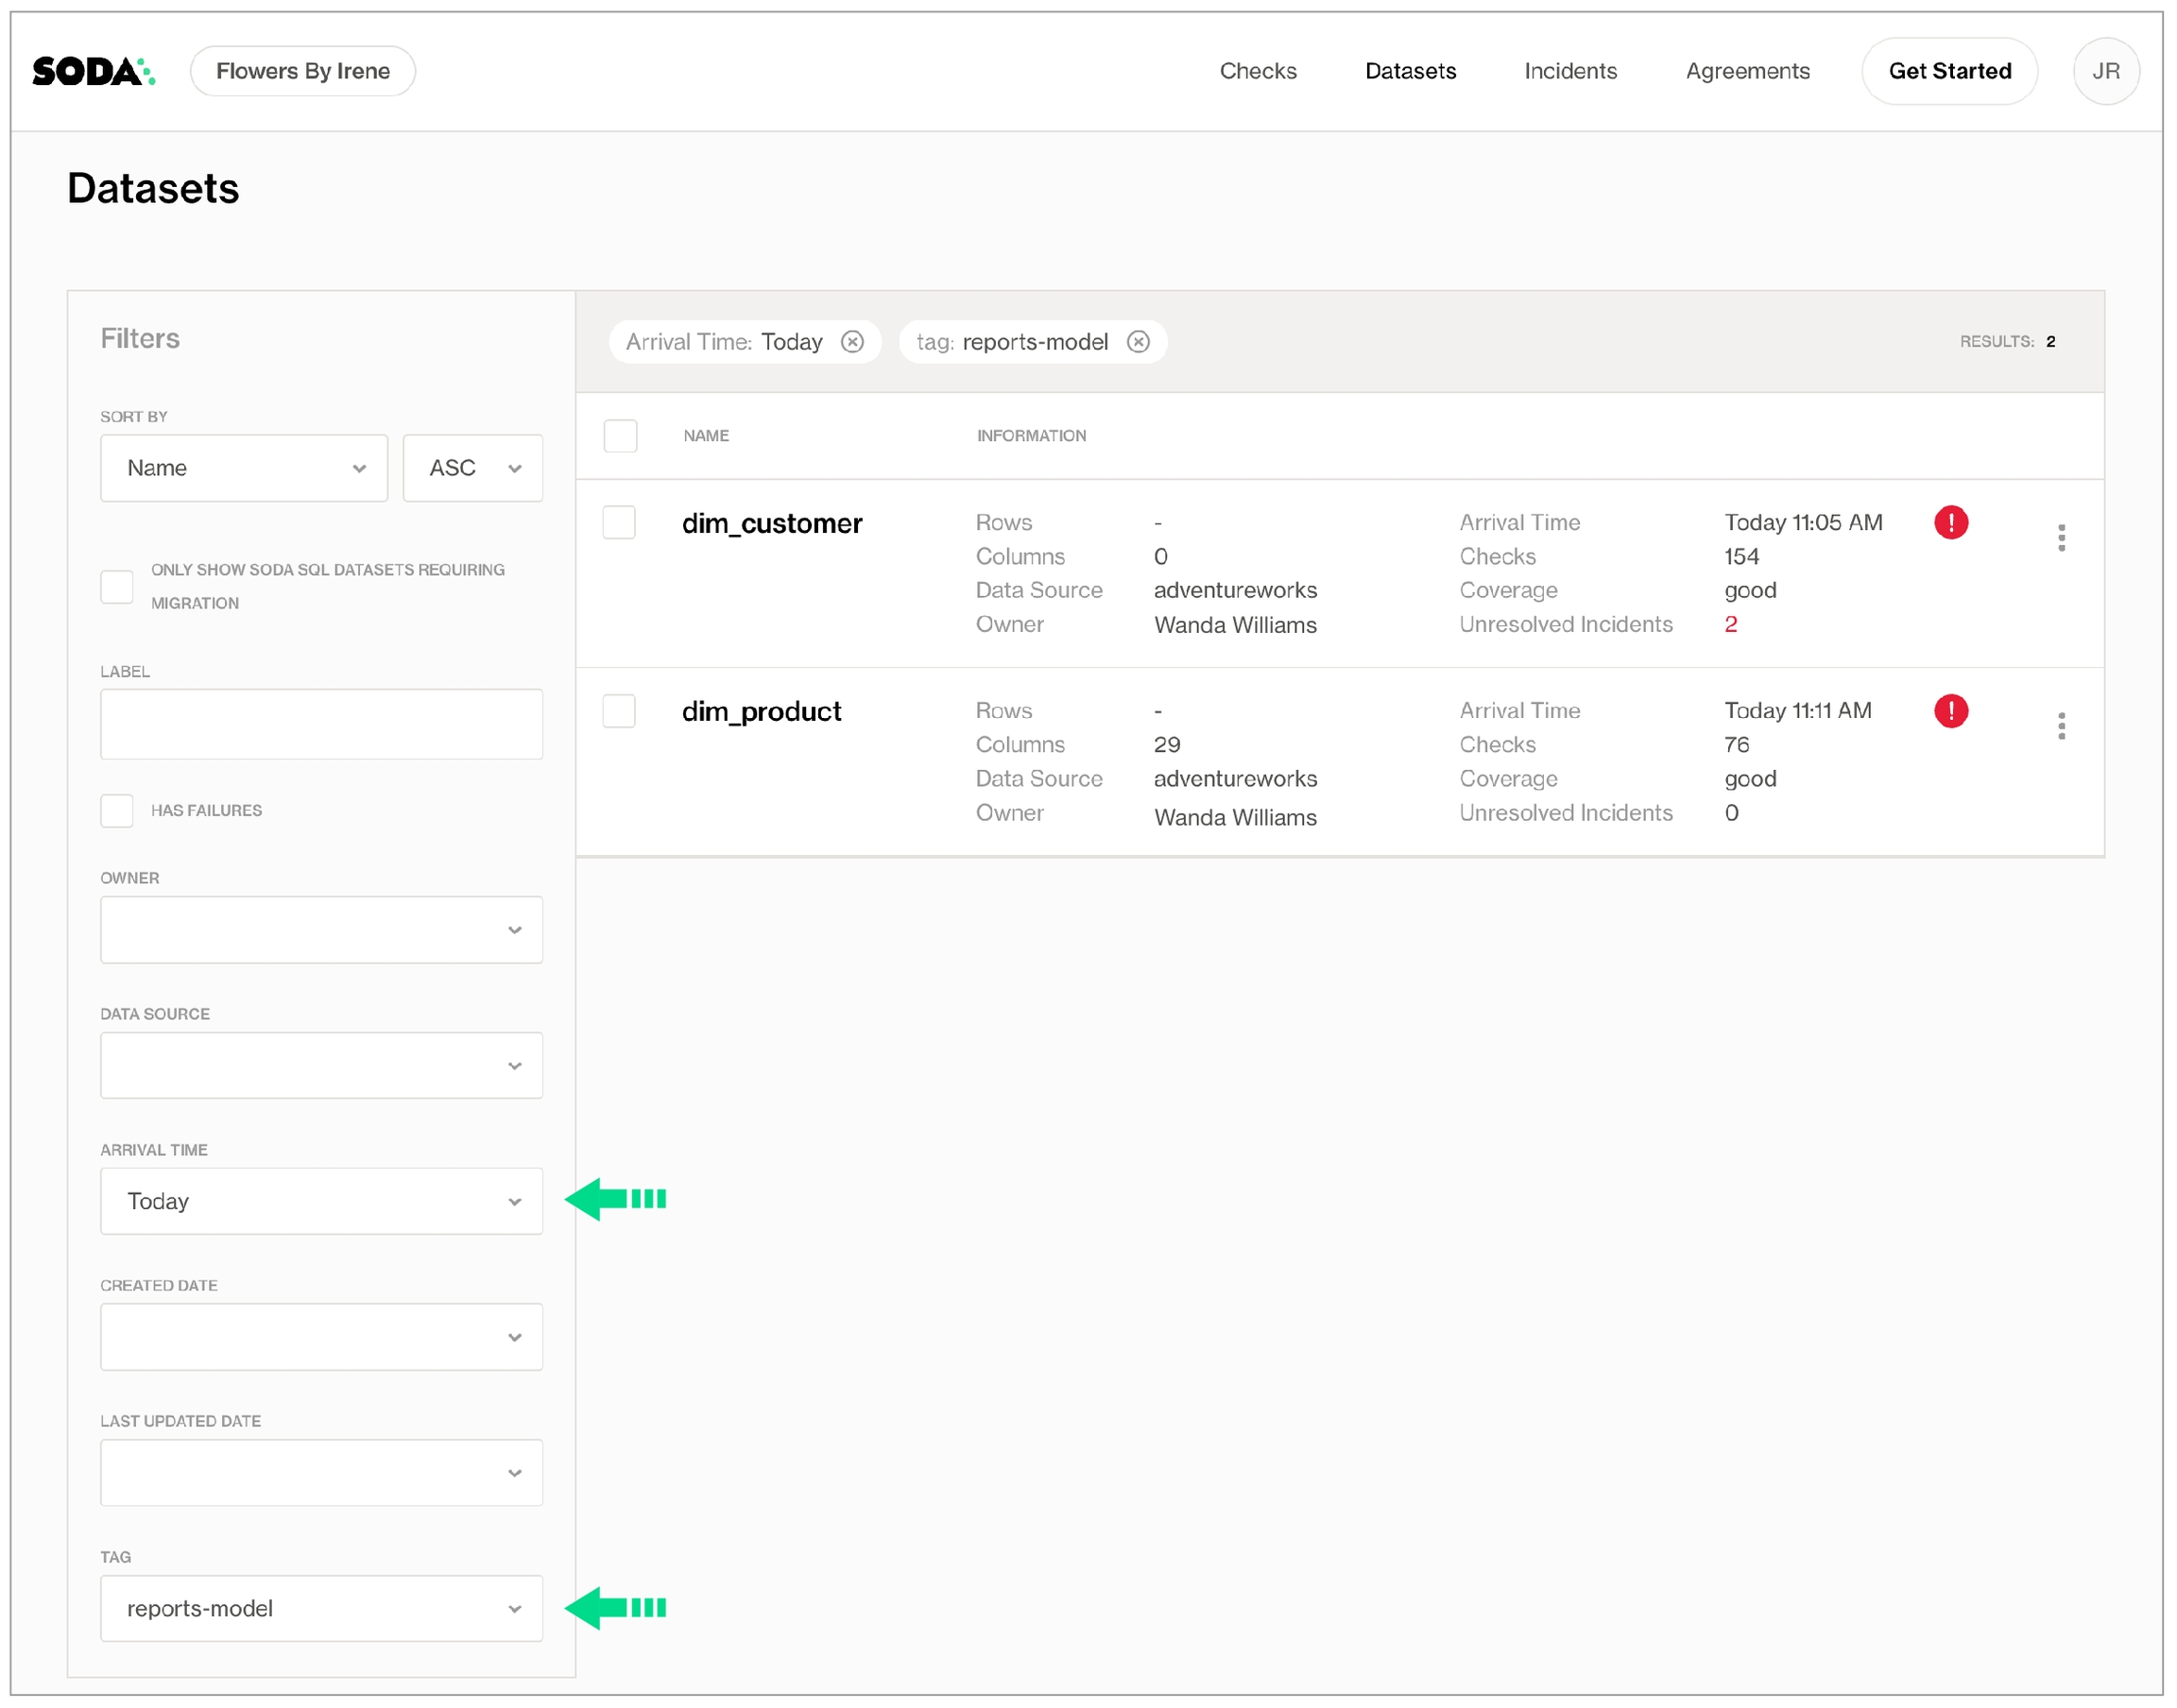
Soda Checks Language is a human-readable, domain-specific language for data reliability. You use SodaCL to define Soda Checks in a checks YAML file.
Soda Checks Language (SodaCL) is a YAML-based, domain-specific language for data reliability. Used in conjunction with Soda tools, you use SodaCL to write checks for data quality, then run a scan of the data in your data source to execute those checks. A Soda Check is a test that Soda performs when it scans a dataset in your data source.
A Soda scan executes the checks you write in an agreement, in a checks YAML file, or inline in a programmatic invocation, and returns a result for each check: pass, fail, or error. Optionally, you can configure a check to warn instead of fail by setting an .
As a step in the Get started roadmap, this guide offers instructions to define your first SodaCL checks in the Soda Cloud UI as no-code checks or in agreements, in a checks YAML file, or within a programmatic invocation of Soda.
checks for dim_reseller:
- row_count > 0checks for dim_reseller:
- duplicate_count(phone) = 0checks for dim_reseller:
# a check with a fixed threshold
- duplicate_count(phone) = 0
# a check with a dynamic threshold
- change avg last 7 for row_count < 50checks for dim_customer:
- duplicate_count(email_address) < 50:
samples limit: 2checks for dim_customer:
- duplicate_count(email_address) < 50:
samples limit: 0checks for dim_customer:
- duplicate_count(email_address) < 50:
samples columns: [last_name, first_name]checks for dim_reseller:
- duplicate_count(phone):
warn: when > 5
fail: when >= 10 checks for dim_reseller:
- duplicate_count(phone) = 0:
name: Duplicate phone numberschecks for dim_employee:
- max(vacation_hours) < 80:
name: Too many vacation hours for sales territory US
filter: sales_territory_key = 11checks for dim_reseller:
- duplicate_count("phone") = 0filter CUSTOMERS [daily]:
where: TIMESTAMP '{ts_start}' <= "ts" AND "ts" < TIMESTAMP '${ts_end}'
checks for CUSTOMERS [daily]:
- duplicate_count(phone) > 10for each dataset T:
datasets:
- dim_product
- dim_customer
- dim reseller
checks:
- row_count > 0 =
<
>
<=
>=
!=
<>
between
not between checks for dim_customer:
- change for row_count between -20 and +50checks for dim_customer:
- change same day last week for row_count > 10checks for dim_customer:
- change percent for row_count < 50%checks for dim_customer:
- change for duplicate_count(phone) < 20checks for dim_customer:
- change avg last 7 for row_count < 50
- change min last 7 for row_count < 50
- change max last 7 percent for row_count < 50checks for fact_internet_sales:
- group by: # Not supported in Soda Core
query: |
SELECT sales_territory_key, AVG(discount_amount) as average_discount
FROM fact_internet_sales
GROUP BY sales_territory_key
fields:
- sales_territory_key
checks:
- average_discount:
fail: when > 40
name: Average discount percentage is less than 40% (grouped by sales territory)checks for fact_internet_sales:
- group by:
group_limit: 10
name: average discount
query: |
SELECT sales_territory_key, AVG(discount_amount) as average_discount
FROM fact_internet_sales
GROUP BY sales_territory_key
fields:
- sales_territory_key
checks:
- average_discount:
fail: when > 40
name: Average discount percentage is less than 40% (grouped-by sales territory)checks for dim_customer:
- group by:
query: |
SELECT
gender,
english_education,
sum(total_children) as sum_total_children
FROM dim_customer
GROUP BY gender, english_education
fields:
- gender
- english_education
checks:
- sum_total_children:
fail: when < 100000
name: Total number of childrenSoda 1.0.x
Soda Core 3.0.x
Scan summary:
11/11 checks PASSED:
fact_internet_sales in adventureworks
group by [PASSED]
Average discount percentage is less than 40% (grouped-by sales territory) [8] [PASSED]
Average discount percentage is less than 40% (grouped-by sales territory) [10] [PASSED]
Average discount percentage is less than 40% (grouped-by sales territory) [9] [PASSED]
Average discount percentage is less than 40% (grouped-by sales territory) [7] [PASSED]
Average discount percentage is less than 40% (grouped-by sales territory) [1] [PASSED]
Average discount percentage is less than 40% (grouped-by sales territory) [5] [PASSED]
Average discount percentage is less than 40% (grouped-by sales territory) [2] [PASSED]
Average discount percentage is less than 40% (grouped-by sales territory) [4] [PASSED]
Average discount percentage is less than 40% (grouped-by sales territory) [6] [PASSED]
Average discount percentage is less than 40% (grouped-by sales territory) [3] [PASSED]
All is good. No failures. No warnings. No errors.
Sending results to Soda Cloud
Soda Cloud Trace: 14733***37checks for dim_customer:
- row_count:
warn:
when > 2
when < 0Soda Library 1.0.x
Soda Core 3.0.x
Scan summary:
1/1 check WARNED:
dim_customer in adventureworks
row_count warn when > 2 when > 3 [WARNED]
check_value: 18484
Only 1 warning. 0 failure. 0 errors. 0 pass.
Sending results to Soda Cloud
Soda Cloud Trace: 42812***checks for dim_product:
- sum(safety_stock_level):
name: Stock levels are safe
warn:
when > 0
fail:
when > 0Soda Library 1.0.x
Soda Core 3.0.x
Scan summary:
1/1 check FAILED:
dim_product in adventureworks
Stock levels are safe [FAILED]
check_value: 275936
Oops! 1 failures. 0 warnings. 0 errors. 0 pass.
Sending results to Soda Cloud
Soda Cloud Trace: 6016***checks for dim_employee:
- group by:
name: Grouped vacation hours
group_limit: 2
query: |
SELECT marital_status, AVG(vacation_hours) as vacation_hours
FROM dim_employee
GROUP BY marital_status
fields:
- marital_status
checks:
- vacation_hours > 60:
name: Too many vacation hourschecks for dim_employee:
- group by:
...
checks:
- vacation_hours > 0:
identity: custom_identitychecks for dim_employee:
- group by:
group_limit: 2
query: |
SELECT marital_status, AVG(vacation_hours) as vacation_hours
FROM dim_employee
GROUP BY marital_status
fields:
- marital_status
checks:
- vacation_hours:
fail: when > 65
warn: when between 50 and 65
name: Too many vacation hourschecks for dim_employee:
- group by:
group_limit: 2
query: |
SELECT "marital_status", AVG("vacation_hours") as vacation_hours
FROM "dim_employee"
GROUP BY marital_status
fields:
- marital_status
checks:
- vacation_hours > 60:
name: Too many vacation hourschecks for dim_employee:
- group by:
query: |
SELECT marital_status, AVG(vacation_hours) as vacation_hours, MAX(vacation_hours) as max_vacation_hours
FROM dim_employee
GROUP BY marital_status
fields:
- marital_status
checks:
- vacation_hours > 0
- max_vacation_hours < 100:
name: MAX vacation hours less than 100 [marital_status]
- group by title:
query: |
SELECT title, AVG(vacation_hours) as vacation_hours, MAX(vacation_hours) as max_vacation_hours
FROM dim_employee
GROUP BY title
fields:
- title
checks:
- vacation_hours > 0:
- max_vacation_hours < 100:
name: MAX vacation hours less than 100 [title]Soda Library 1.3.1
Soda Core 3.0.47
By downloading and using Soda Library, you agree to Sodas Terms & Conditions (https://go.soda.io/t&c) and Privacy Policy (https://go.soda.io/privacy).
Scan summary:
138/140 checks PASSED:
dim_employee in adventureworks
group by [PASSED]
vacation_hours > 0 [M] [PASSED]
MAX vacation hours less than 100 [marital_status] [M] [PASSED]
vacation_hours > 0 [S] [PASSED]
MAX vacation hours less than 100 [marital_status] [S] [PASSED]
vacation_hours > 0 [Database Administrator] [PASSED]
MAX vacation hours less than 100 [title] [Database Administrator] [PASSED]
vacation_hours > 0 [Design Engineer] [PASSED]
MAX vacation hours less than 100 [title] [Design Engineer] [PASSED]
vacation_hours > 0 [Production Supervisor - WC20] [PASSED]
MAX vacation hours less than 100 [title] [Production Supervisor - WC20] [PASSED]
vacation_hours > 0 [Research and Development Engineer] [PASSED]
MAX vacation hours less than 100 [title] [Research and Development Engineer] [PASSED]
vacation_hours > 0 [Research and Development Manager] [PASSED]
...
2/140 checks FAILED:
dim_employee in adventureworks
group by title [FAILED]
vacation_hours > 0 [Chief Financial Officer] [FAILED]
check_value: 0E-20
Oops! 2 failures. 0 warnings. 0 errors. 138 pass.
Sending results to Soda Cloud
Soda Cloud Trace: 693****checks for dim_employee:
- group by:
...
checks:
- vacation_hours > 0:
identity: custom_identitychecks for dim_customer:
- group by:
name: Group by gender
query: |
SELECT gender, AVG(total_children) as average_children
FROM dim_customer
GROUP BY gender
fields:
- gender
checks:
- average_children > 2:
name: Average children per gender should be more than 2
- anomaly detection for average_children:
name: Detect anomaly for average children
- change for average_children between -5 and 5:
name: Detect unexpected changes for average childrenchecks for dim_employee:
- group by:
group_limit: 2
query: |
SELECT sales_territory_key, AVG(vacation_hours) as vacation_calc
FROM dim_employee
GROUP BY sales_territory_key
fields:
- sales_territory_key
checks:
- vacation_calc > 60:
name: Reasonable vacation hoursSoda Library 1.0.x
Soda Core 3.0.x
Evaluation of check group by failed: Total number of groups 11 exceeds configured group limit: 2
| Total number of groups 11 exceeds configured group limit: 2
+-> line=2,col=5 in checks_groupby.yml
Scan summary:
1/1 check NOT EVALUATED:
dim_employee in adventureworks
group by [NOT EVALUATED]
1 checks not evaluated.
1 errors.
Oops! 1 error. 0 failures. 0 warnings. 0 pass.
ERRORS:
Evaluation of check group by failed: Total number of groups 11 exceeds configured group limit: 2
| Total number of groups 11 exceeds configured group limit: 2
+-> line=2,col=5 in checks_groupby.ymlchecks for dim_employee:
- group by:
group_limit: 11
query: |
SELECT sales_territory_key, AVG(vacation_hours) as vacation_calc
FROM dim_employee
GROUP BY sales_territory_key
fields:
- sales_territory_key
checks:
- vacation_calc > 20:
name: Too much vacationSoda Library 1.0.x
Soda Core 3.0.x
Scan summary:
12/12 checks FAILED:
dim_employee in adventureworks
group by [FAILED]
Too much vacation [3] [FAILED]
check_value: 24.0000000000000000
Too much vacation [8] [FAILED]
check_value: 35.0000000000000000
Too much vacation [11] [FAILED]
check_value: 51.3297872340425532
Too much vacation [9] [FAILED]
check_value: 36.0000000000000000
Too much vacation [7] [FAILED]
check_value: 34.0000000000000000
Too much vacation [10] [FAILED]
check_value: 37.0000000000000000
Too much vacation [1] [FAILED]
check_value: 28.0000000000000000
Too much vacation [5] [FAILED]
check_value: 29.0000000000000000
Too much vacation [4] [FAILED]
check_value: 26.5000000000000000
Too much vacation [2] [FAILED]
check_value: 38.0000000000000000
Too much vacation [6] [FAILED]
check_value: 32.0000000000000000
Oops! 12 failures. 0 warnings. 0 errors. 0 pass.data_source employees:
type: spark
method: databricks
catalog: unity_catalog
schema: employees
host: hostname_from_Databricks_SQL_settings
http_path: http_path_from_Databricks_SQL_settings
token: my_access_token
soda_cloud:
# Use cloud.soda.io for EU region
# Use cloud.us.soda.io for US region
host: https://cloud.soda.io
api_key_id: soda-api-key-id
api_key_secret: soda-api-key-secretchecks for employee_info:
- invalid_count(Department) = 0:
valid values: ['Sales', 'Research & Development', 'Human Resources']
name: Only correct departments are present in the dataset
attributes:
dimension: [Validity]
pipeline_stage: Ingest
team: Data Engineering
- missing_count(EmployeeID) = 0:
name: No null values in the Employee ID column
attributes:
dimension: [Completeness]
pipeline_stage: Ingest
team: Data Engineering
- duplicate_count(EmployeeID) = 0:
name: No duplicate IDs
attributes:
dimension: [Uniqueness]
pipeline_stage: Ingest
team: Data Engineering
- invalid_count(Gender) = 0:
valid values: ['Female', 'Male', 'Non-binary']
name: Value for gender is valid
attributes:
dimension: [Validity]
pipeline_stage: Ingest
team: Data Engineering
- invalid_count(Age) = 0:
valid min: 18
name: All employees are over 18
attributes:
dimension: [Validity]
pipeline_stage: Ingest
team: Data Engineering
- missing_count(MonthlyIncome) = 0:
name: No null values in MonthlyIncome
attributes:
dimension: [Completeness]
pipeline_stage: Ingest
team: Data Engineering
- failed rows:
name: Monthly Salary equals or exceeds legally required salary
fail condition: MonthlyIncome < 11000
- schema:
warn:
when schema changes: any
name: Columns have not been added, removed, or changed
attributes:
dimension: [Consistency]
pipeline_stage: Ingest
team: Data Engineering
checks for employee_survey:
- invalid_count(EnvironmentSatisfaction) = 0:
valid min: 1
valid max: 5
name: Values are formatted in range 1-5
attributes:
dimension: [Validity]
pipeline_stage: Ingest
team: Data Engineering
- missing_count(EmployeeID) = 0:
name: No null values in Employee ID
attributes:
dimension: [Completeness]
pipeline_stage: Ingest
team: Data Engineering
- duplicate_count(EmployeeID) = 0:
name: No duplicate IDs
attributes:
dimension: [Uniqueness]
pipeline_stage: Ingest
team: Data Engineering
- invalid_count(WorkLifeBalance) = 0:
valid min: 1
valid max: 5
name: Values are formatted in range 1-5
attributes:
dimension: [Validity]
pipeline_stage: Ingest
team: Data Engineering
- schema:
warn:
when schema changes: any
name: Columns have not been added, removed, or changed
- values in EmployeeID must exist in employee_info EmployeeID:
name: EmployeeID Integrity Check for employee survey
checks for manager_survey:
- invalid_count(PerformanceRating) = 0:
valid min: 1
valid max: 5
name: Values are formatted in range 1-5
attributes:
dimension: [Validity]
pipeline_stage: Ingest
team: Data Engineering
- schema:
warn:
when schema changes: any
name: Columns have not been added, removed, or changed
attributes:
dimension: [Consistency]
pipeline_stage: Ingest
team: Data Engineering
- values in EmployeeID must exist in employee_info EmployeeID:
name: EmployeeID integrity check for manager survey
# This filter partitions data included in the quality scan
# because the data in the dataset lags by one day
filter login_logout [daily]:
where: LogoutTime < CAST(current_date() AS TIMESTAMP) - INTERVAL 1 DAY AND LoginTime > CAST(current_date() AS TIMESTAMP) - INTERVAL 2 DAY
checks for login_logout [daily]:
- invalid_count(LoginTime):
valid regex: "^\\d{4}-\\d{2}-\\d{2}T\\d{2}:\\d{2}:\\d{2}(\\.\\d+)?(Z|[+-]\\\
d{2}:\\d{2})$"
name: Login time format
fail: when > 0
attributes:
dimension: [Validity]
pipeline_stage: Ingest
team: Data Engineering
- missing_count(LogoutTime) = 0:
name: No nulls in LogoutTime
attributes:
dimension: [Completeness]
pipeline_stage: Ingest
team: Data Engineering
- values in EmployeeID must exist in employee_info EmployeeID:
name: EmployeeID Integrity Check for login times
- freshness(LogoutTime) < 2d:
name: Data is updated
attributes:
dimension: [Timeliness]
pipeline_stage: Ingest
team: Data Engineeringfilter input_data_attrition_model [daily]:
where: PartitionDate < CAST(current_date() AS TIMESTAMP) - INTERVAL 1 DAY AND PartitionDate > CAST(current_date() AS TIMESTAMP) - INTERVAL 2 DAY
checks for input_data_attrition_model [daily]:
- missing_count(Attrition)=0::
name: Target value is not missing
attributes:
pipeline: Transform
team: Data Science
dimension: [Completeness]
- invalid_percent(TotalWorkingYears):
valid min: 0
name: Working years can't be negative
warn: when > 0%
fail: when > 10%
attributes:
pipeline: Transform
team: Data Science
attribute: [Validity]
- values in EmployeeID must exist in employee_info EmployeeID:
name: EmployeeID Integrity Check
- failed rows:
name: Overtime detected
fail query: |
SELECT *
FROM input_data_attrition_model
WHERE WorkingMinutes > 750
attributes:
pipeline: Transform
team: Data Science
- freshness(PartitionDate) < 2d:
name: Data is fresh
attributes:
pipeline: Transform
team: Data Science
dimension: [Timeliness]
- group evolution:
name: Marital status
query: |
SELECT MaritalStatus FROM input_data_attrition_model GROUP BY 1
fail:
when required group missing: [Married]
warn:
when groups change: any
attributes:
pipeline: Transform
team: Data Science
dimension: [Consistency]
- group by:
query: |
SELECT JobLevel, min(MonthlyIncome) AS salary
FROM input_data_attrition_model
GROUP BY 1
fields:
- JobLevel
checks:
- salary:
warn: when < 0
fail: when < -1
name: Min Salary Normalised cannot be below -1
attributes:
pipeline: Transform
team: Data Science
dimension: [Accuracy]# Install to run checks contained in files
pip install -i https://pypi.cloud.soda.io soda-spark-df
# Import Scan from Soda Library
from soda.scan import Scan
import yaml
from io import StringIO
from pathlib import Path
from datetime import datetime, timedelta
# Define file directory
settings_path = Path('/Workspace/Users/my_user_id/employee_attrition/soda_settings')
# Define results file directory
result_path = Path('/Workspace/Users/my_user_id/employee_attrition/checks_output')
# Define the file partition
partition = (datetime.today().date() - timedelta(days=1)).strftime("%Y-%m-%d")
# Create a scan object
scan = Scan()
# Set scan name and data source name
scan.set_scan_definition_name("Employee Attrition Scan")
scan.set_data_source_name("employees")
# Add file to be scanned
df = spark.read.option("header", True).csv(f"dbfs:/Workspace/Users/my_user_id/employee_attrition/soda_settings/login_logout/PartitionDate={partition}")
# Create temporary View to run the checks
df.createOrReplaceTempView("login_logout")
# Function to create temporary views of the tables to be included in the same scan
def create_temp_views(spark, schema, table_names):
for table in table_names:
full_table_name = f"{schema}.{table}"
df = spark.table(full_table_name)
df.createOrReplaceTempView(table)
# Create the temp view from the table list
schema = "unity_catalog.employees"
table_names = ["employee_info", "employee_survey", "manager_survey"]
create_temp_views(spark, schema, table_names)
# Add Views to the scan object
scan.add_spark_session(spark, data_source_name="employees")
# Access the checks YAML file
with open(settings_path/"ingestion_checks.yml") as ing_checks:
ingestion = ing_checks.read()
# Create a file-like object from the YAML content
ingestion_checks = StringIO(ingestion)
# Use the scan.add_sodacl_yaml method to retrieve the checks
scan.add_sodacl_yaml_str(ingestion_checks)
# Retrieve the configuration file and use the scan.add_sodacl_yaml method
with open(settings_path/"soda_conf.yml") as cfg:
cfg_content = cfg.read()
# Create a file-like object from the YAML content
conf = StringIO(cfg_content)
# Add the data source connection configuration to the scan
scan.add_configuration_yaml_str(conf)
# Execute the scan
scan.execute()
# Check the Scan object for methods to inspect the scan result; print all logs to console
print(scan.get_logs_text())
# Save the checks metadata for further analysis
metadata = scan.build_scan_results()
scan_date = datetime.now().date().strftime("%Y-%m-%d")
scan.save_scan_result_to_file(result_path/f"ingestion_result_{scan_date}.json", metadata['checks'])# Install to run checks on data in Unity datasets
pip install -i https://pypi.cloud.soda.io soda-spark[databricks]
#restart to use updated packages
%restart_python
# Import Scan from Soda Library
from soda.scan import Scan
import yaml
from io import StringIO
from pathlib import Path
# Define file directory
settings_path = Path('/Workspace/Users/my_user_id/employee_attrition/soda_settings')
# Create a scan object
scan = Scan()
# Set scan name and data source name
scan.set_scan_definition_name("Attrition Model - Input Data Checks")
scan.set_data_source_name("employee_info")
# Attach a Spark session
scan.add_spark_session(spark)
# Access the checks YAML file
with open(settings_path/"input_data_checks.yml") as input_checks:
input_data = input_checks.read()
# Create a file-like object from the YAML content
input_data_checks = StringIO(input_data)
# Use the scan.add_sodacl_yaml method to retrieve the checks
scan.add_sodacl_yaml_str(input_data_checks)
# Retrieve the configuration file and use the scan.add_sodacl_yaml method
with open(settings_path/"soda_conf.yml") as cfg:
cfg_content = cfg.read()
# Create a file-like object from the YAML content
conf = StringIO(cfg_content)
# Add the connection configuration to the scan
scan.add_configuration_yaml_str(conf)
scan.execute()
# Check the Scan object for methods to inspect the scan result; print all logs to console
print(scan.get_logs_text())discover datasets:
datasets:
- attrition_model_output
profile columns:
columns:
- include attrition_model_output.%
filter attrition_model_output [daily]:
where: PartitionDate < CAST(current_date() AS TIMESTAMP) - INTERVAL 1 DAY AND PartitionDate > CAST(current_date() AS TIMESTAMP) - INTERVAL 2 DAY
checks for attrition_model_output [daily]:
- row_count > 0:
name: Dataset cannot be empty
attributes:
pipeline_stage: Training
team: Data Science
dimension: [Completeness]
- missing_count(Attrition) = 0:
name: Attrition field is not completed
attributes:
pipeline_stage: Training
team: Data Science
dimension: [Completeness]
- avg(Accuracy):
name: Accuracy is not below 60%
fail: when < 0.60
warn: when < 0.70
attributes:
pipeline_stage: Training
team: Data Science
dimension: [Accuracy]
- anomaly detection for attrition_ratio:
name: Attrition ratio anomaly detection
attrition_ratio query: |
SELECT (COUNT(CASE WHEN Attrition = true THEN 1 END) * 1.0) / COUNT(*) AS attrition_ratio
FROM attrition_model_output
attributes:
pipeline_stage: Training
team: Data Science
dimension: [Accuracy]
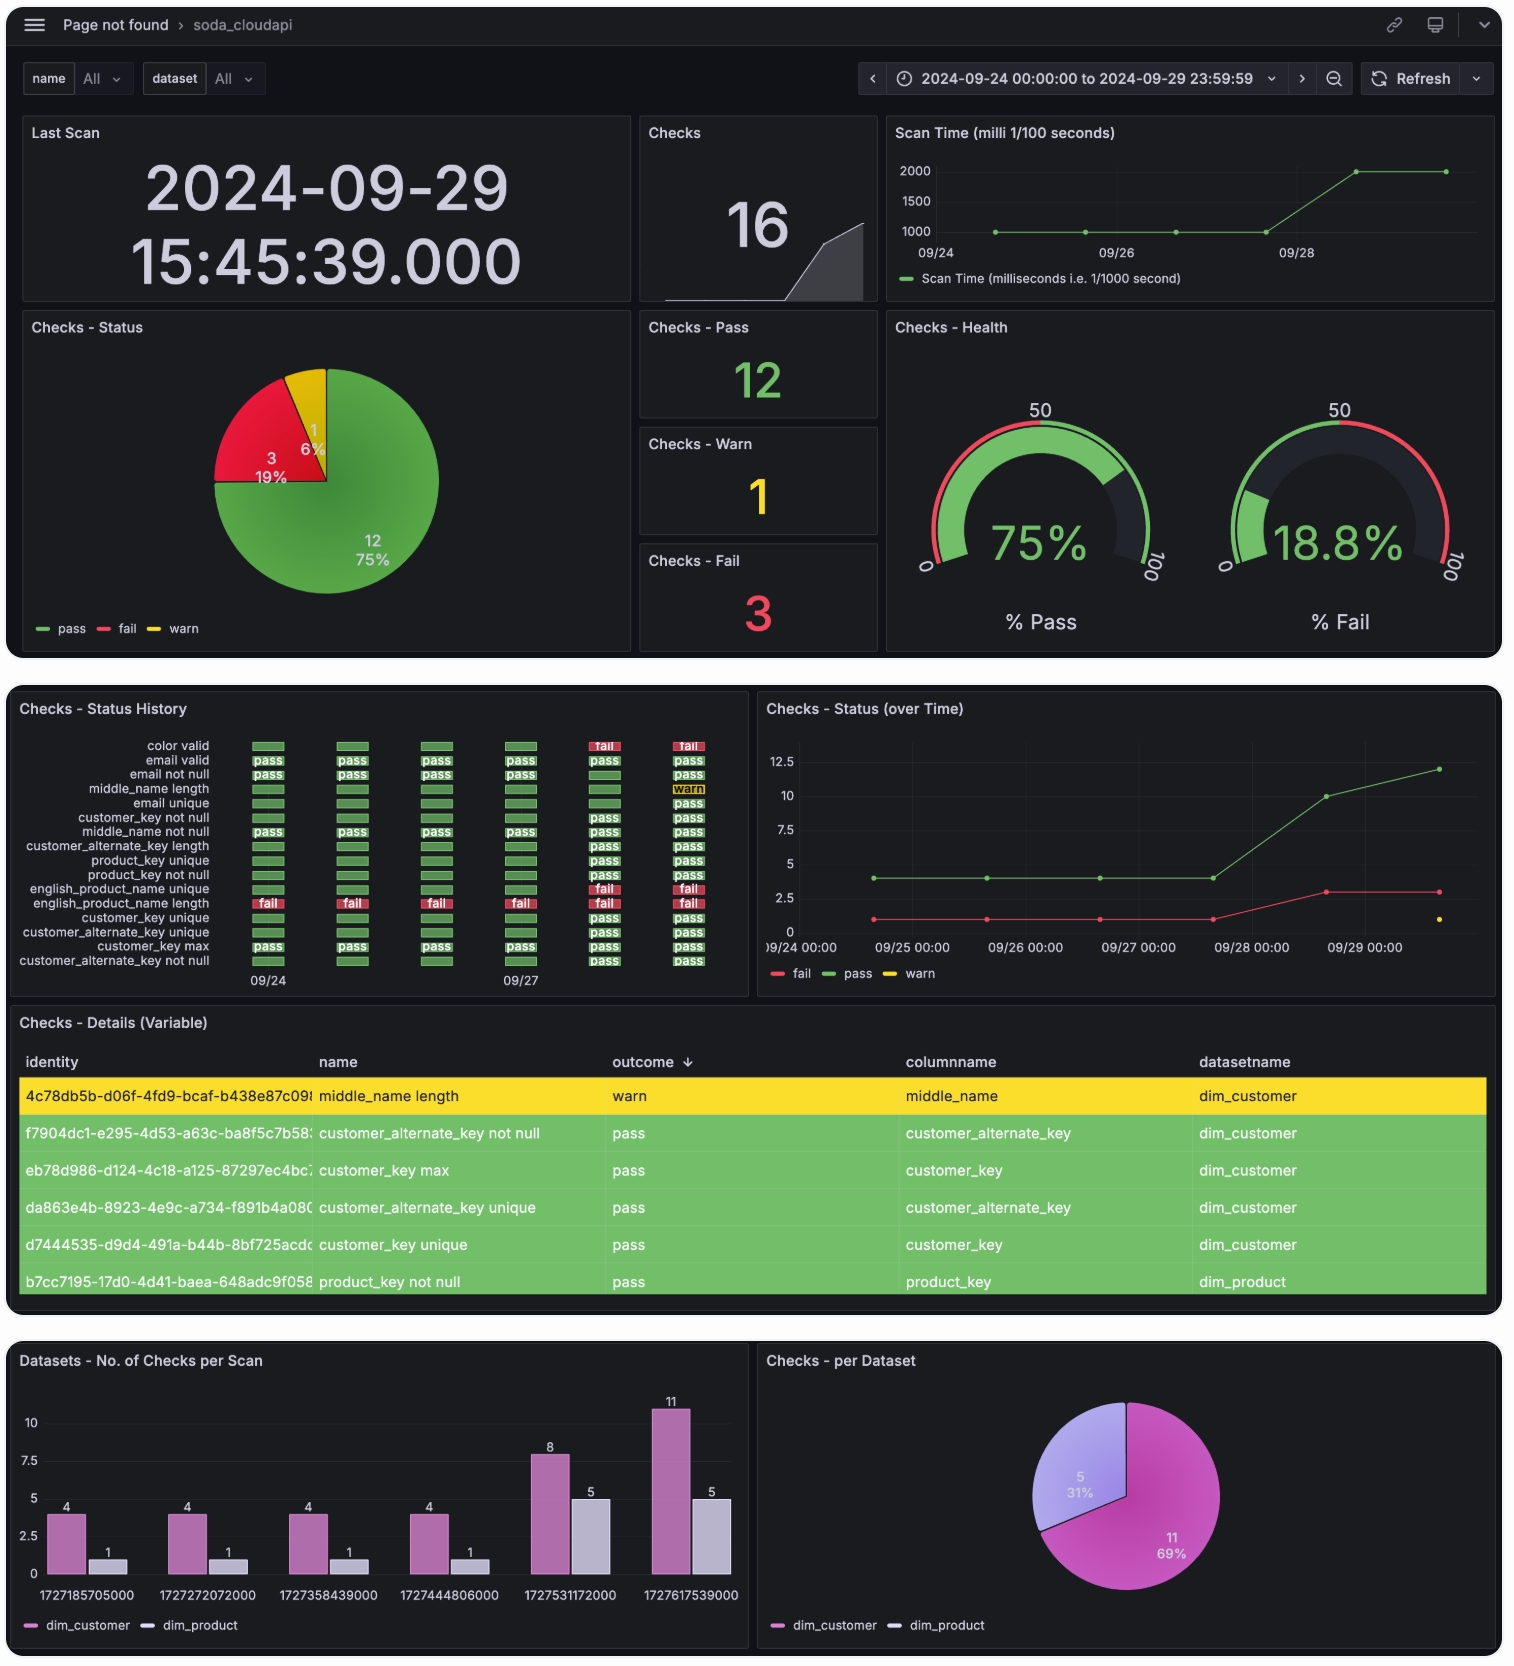
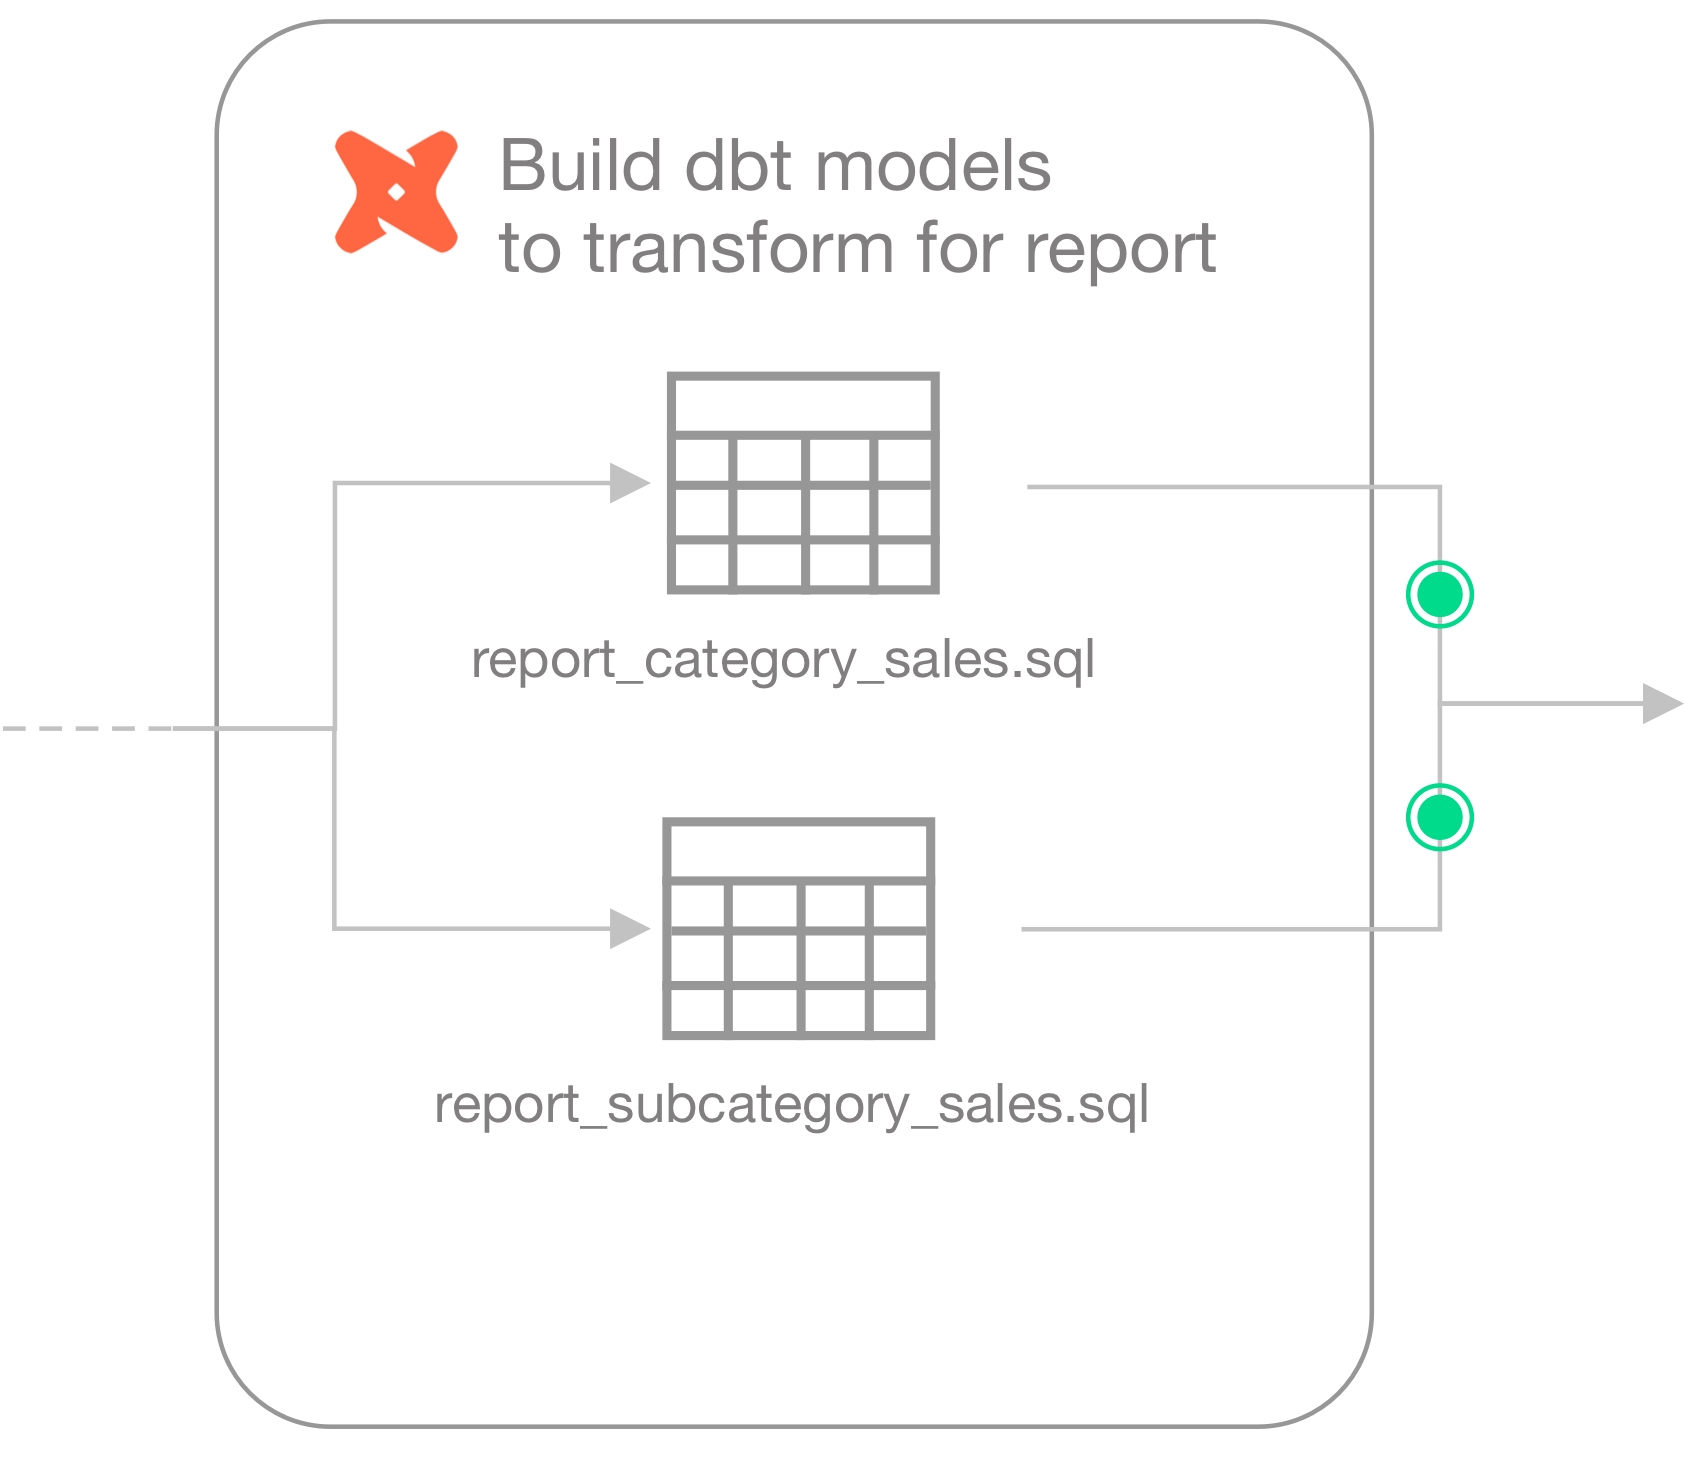
Choose a flavor of Soda
Set up Soda: install, deploy, or invoke
Write SodaCL checks 📍 You are here!
Run scans and review results
Organize, alert, investigate
🎥 Watch a 5-minute video for no-code checks and discussions, if you like!
✖️ Requires Soda Core Scientific ✖️ Requires Soda Core ✖️ Requires Soda Library + Soda Cloud ✔️ Requires Soda Agent + Soda Cloud
You, or an Admin on your Soda Cloud account, has version 0.8.52 or greater, and connected it to your Soda Cloud account.
You, or an Admin on your Soda Cloud account, has via the Soda Agent in your Soda Cloud account and configured the data source to in the data source for which you want to write no-code checks. (Soda must have access to dataset names and column names to present those values in dropdown menus during no-code check creation.)
You must have permission to edit the dataset; see .
SodaCL includes over 25 built-in metrics that you can use to write checks, a subset of which are accessible via no-codecheck creation. The table below lists the checks available to create via the no-code interface; access for detailed information about each metric or check.
As a user with to do so of a dataset to which you wish to add checks, navigate to the dataset, then click Add Check. You can only create a check via the no-code interface for datasets in data sources connected via a Soda Agent.
Select the type of check you wish to create, then complete the form to create the check. Refer to table below for guidance on the values to enter.
Optionally, Test your check, then click Propose check to initiate a with colleagues. Soda executes the check during the next scan according to the schedule you selected, or whenever a Soda Cloud user runs the schedule scan manually. Be aware that a schema check requires a minimum of two measurements before it yields a useful check result because it needs at least one historical measurement of the existing schema against which to compare a new measurement to look for changes. Thus, the first time Soda executes this check, the result is
Powered by OpenAI's GPT-3.5 & GPT-4, the generative SQL and regular expression assistants available in Soda Cloud's no-code checks helps you write the queries and expressions you can add to validity, missing, SQL failed rows, and SQL metric checks.
When creating a Missing or Validity check in the no-code user interface in Soda Cloud, you can click for help from the Soda AI Regex Assistant to translate an English request into a regular expression you can use to define missing or valid values. Similarly, access the Soda AI SQL Assistant in SQL Failed Rows or SQL Metric checks to generate SQL queries based on requests in plain English.
Soda AI SQL and Regex Assistants are enabled for new Soda Cloud accounts by default. If you do not wish to use them, navigate to your avatar > Organization Settings, then click to remove the check from the box for Enable SQL and Regex Assistants Powered By Powered by OpenAI.
Existing Soda customers can review and accept the revised , then .
Soda acknowledges that the output of the assistants may not be fully accurate or reliable. Leverage the assistants’ output, but be sure to carefully review all queries and expressions you add to your checks. Refer to in the Use of AI for further details.
Be aware that Soda shares the content of all SQL and Regex assistant prompts/input and output with OpenAI to perform the processing that yields the output. Following OpenAI’s suggestion, Soda also sends metadata, such as schema information, to OpenAI along with the prompts/input in order to improve the quality of the output. Read more about OpenAI at .
The Ask AI Assistant is powered by kapa.ai and replaces SodaGPT. While Soda collaborates with third parties to develop certain AI features, it’s important to note that Soda does not disclose any primary data with our partners, such as data samples or data profiling details. We only share prompts and some schema information with OpenAI and kapa.ai to enhance the accuracy of the assistants.
Refer to in the Use of AI section for further details.
By default, alert notifications for your no-code check go to the Dataset Owner and Check Owner. If you wish to send alerts elsewhere, in addition to the owner, create a notification rule.
For a new rule, you define conditions for sending notifications including the severity of a check result and whom to notify when bad data triggers an alert.
In Soda Cloud, navigate to your avatar > Notification Rules, then click New Notification Rule. Follow the guided steps to complete the new rule. Use the table below for insight into the values to enter in the fields and editing panels.
As a user with permission to do so, navigate to the dataset in which the no-code check exists.
To the right of the check you wish to edit, click the stacked dots, then select Edit Check. You can only edit a check via the no-code interface if it was first created as a no-code check, as indicated by the cloud icon in the Origin column of the table of checks.
Adjust the check as needed, test your check, then save. Soda executes the check during the next scan according to the scan definition you selected.
You can write SodaCL checks directly in the Soda Cloud user interface within an agreement. An agreement is a contract between stakeholders that stipulates the expected and agreed-upon state of data quality in a data source.
In an agreement, use SodaCL checks to define the state of “good quality” for data in this data source, then identify and get approval from stakeholders in your organization. Define whom Soda Cloud will notify when a check in the agreement fails, then set a schedule to regularly execute the Soda Checks to uphold the tenets of the agreement.
✖️ Requires Soda Core Scientific ✖️ Requires Soda Core ✖️ Requires Soda Library + Soda Cloud ✔️ Requires Soda Agent + Soda Cloud
As a Data Engineer, you can write SodaCL checks directly in a checks.yml file, or leverage check suggestions in the Soda Library CLI to prepare a basic set of data quality checks for you. Alternatively, you can add SodaCL checks to a programmatic invocation of Soda Library.
✔️ Some checks require Soda Core Scientific ✔️ Supported in Soda Core ✔️ Supported in Soda Library + Soda Cloud ✔️ Supported in Soda Cloud Agreements + Soda Agent
The checks YAML file stores the Soda Checks you write using SodaCL. Use this file to manually write your own SodaCL checks.
Choose a flavor of Soda
Set up Soda: install, deploy, or invoke
Write SodaCL checks
Organize, alert, investigate
Need help? Join the .
sales_territory_key
required
column identifier; the values in this column identify how Soda groups the results.
checks
required
check subsection label
average_discount
required
custom metric identifier
fail: when > 40
required
fail condition and threshold
warn: when between 50 and 60
only one alert condition is required
warn condition and threshold
name
optional
custom name for the check; it not defined, Soda derives the name of the check in Soda Cloud from the check syntax
-
✓
Use quotes when identifying dataset or column names; see example. Note that the type of quotes you use must match that which your data source uses. For example, BigQuery uses a backtick (`) as a quotation mark.
✓
Use wildcard characters in the value in the check.
Use wildcard values as you would with SQL.
Use for each to apply group by checks to multiple datasets in one scan.
-
Apply a dataset filter to partition data during a scan.
-

Use this guide as an example of how to invoke Soda data quality tests in a Dagster pipeline.
Use this guide as an example for how to use Soda to test for data quality in an ETL pipeline in Dagster.
The instructions below offer an example of how to execute several Soda Checks Language (SodaCL) tests for data quality at multiple points within a Dagster pipeline.
For context, the example follows a fictional organization called Bikes 4 All that operates several bicycle retail stores in different regions. The Data Analysts at the company are struggling with their sales forecasts and reporting dashboards. The company has tasked the Data Engineering team to automate the ETL pipeline that uses Dagster and dbt to orchestrate the ingestion and transformation of data before exporting it for use by Data Analysts in their business intelligence tools.
The pipeline built in an assets.py file in the Dagster project automates a flow which:
Tests data before ingestion: Uploaded from various stores into S3, the Data Engineers run Soda data quality checks before copying the data to a Redshift data source. To do so, they use Soda Library to load the files into DataFrames, then run a Soda scan for data quality to catch any issues with incomplete, missing, or invalid data early in the pipeline. For any Soda checks that fail, the team routes failed row samples, which contain sensitive data, back to their own S3 bucket to use to investigate data quality issues.
Loads data: After addressing any data quality issues in the retail data in S3, they load the data into Redshift in a staging environment.
Transforms data in staging: Using dbt, the Data Engineers build the models in a staging environment which transform the data for efficient use by the Data Analysts.
As a final step, outside the Dagster pipeline, the Data Engineers also design a dashboard in Tableau to monitor data quality status.
The Data Engineers in this example uses the following:
Python 3.8, 3.9, or 3.10
Pip 21.0 or greater
dbt-core and the required database adapter (dbt-redshift)
a Dagster account
Though listed as prerequisites, the following instructions include details for installing and initializing dbt-core and Dagster.
From the command-line, a Data Engineer installs dbt-core and the required database adapter for Redshift, and initializes a dbt project directory. Consult for details.
In the same directory that contains the dbt_project.yml, they install and initialize the Dagster project inside the dbt project. Consult the Dagster and documentation for details.cd project-namepip install dagster-dbt dagster-webserver dagster-awsdagster-dbt project scaffold --project-name my-dagster-projectcd my-dagster-project
They install the Soda Library packages they need to run data quality scans in both Redshift and on data in DataFrames using Dask and Pandas.pip install -i https://pypi.cloud.soda.io soda-redshiftpip install -i https://pypi.cloud.soda.io soda-pandas-dask
To validate an account license or free trial, Soda Library must communicate with a Soda Cloud account via API keys. You create a set of API keys in your Soda Cloud account, then use them to configure the connection to Soda Library.
In a browser, a Data Engineer navigates to to create a new Soda account, which is free for a 45-day trial.
They navigate to your avatar > Profile, access the API keys tab, then click the plus icon to generate new API keys.
They create a new file called configuration.yml in the same directory in which they installed the Soda Library packages, then copy+paste the API key values into the file according to the following configuration. This config enables Soda Library to connect to Soda Cloud via API.
To empower their Data Analyst colleagues to write their own no-code checks for data quality, a Data Engineer volunteers to set up Soda to:
connect to the Redshift data source that will contain the ingested data in a staging environment
discover the datasets and make them accessible by others in the Soda Cloud user interface
create check attributes to keep data quality check results organized
Logged in to Soda Cloud, the Data Engineer, who, as the initiator of the Soda Cloud account for the organization is automatically the Soda Admin, decides to use the out-of-the-box Soda-hosted agent made available for every Soda Cloud organization to securely connect to their Redshift data source.
The Data Engineer follows the guided workflow to to the Soda Cloud account to connect to their Redshift data source, making sure to include all datasets during , and exclude datasets from to avoid exposing any customer information in the Soda Cloud UI.
Lastly, they follow the instructions to create , which serve to label and sort check results by pipeline stage, data domain, etc.
Before the Data Engineer loads the existing retail data from S3 to Redshift, they prepare several data quality tests using the Soda Checks Language (SodaCL), a YAML-based, domain-specific language for data reliability.
Read more:
After creating a new checks.yaml file in the same directory in which they installed the Soda Library packages, the Data Engineer consults with their colleagues and defines the following checks for four datasets—stores, stocks, customers, and orders—being sure to add attributes to each to keep the check results organized.
In the assets.py file of their Dagster project, the Data Engineer begins defining the first asset under the @asset decorator. Consult the for details.
The first definition loads the S3 data into a DataFrame, then runs the pre-ingestion checks on the data. Because the data contains sensitive customer information, the Data Engineer also includes a which sends failed row samples for checks that fail to an S3 bucket instead of automatically pushing them to Soda Cloud. To execute the scan programmatically, the script references two files that Soda uses:
the configuration.yml file which contains the Soda Cloud API key values that Soda Library need to validate the user license before executing a scan, and
the checks.yml file which contains all the pre-ingestion SodaCL checks that the Data Engineer prepared.
After all SodaCL checks pass, indicating that the data quality is good, the next step in the Dagster pipeline loads the data from the S3 bucket into Amazon Redshift. As the Redshift data source is connected to Soda Cloud, both Data Engineers and Data Analysts in the Soda Cloud account can access the data and prepare no-code SodaCL checks to test data for quality.
The Data Engineer then defines the dbt models that transform the data and which run under the @dbt_assets decorator in the staging environment.
With the transformed data available in Redshift in a staging environment, the Data Engineer invites their Data Analyst colleagues to define their own for data quality.
The Data Analysts in the organization know their data the best, particularly the data feeding their reports and dashboards. However, as they prefer not to write code—SQL, Python, or SodaCL—Soda Cloud offers them a UI-based experience to define the data quality tests they know are required.
When they create a check for a dataset in Soda Cloud, they also make two selections that help gather and analyze check results later:
a scan definition in which to include their check
one or more check attributes
The is what Soda uses to run regularly-scheduled scans of data. For example, a scan definition may instruct Soda to use the Soda-hosted agent connected to a Redshift data source to execute the checks associated with it every day at 07:00 UTC. Additionally, a Data Engineer can programmatically trigger a scheduled scan in Soda Cloud using the scanDefinition identifier; see the next step!
The creator of a no-code check can select an existing scan definition, or choose to create a new one to define a schedule that runs at a different time of day, or at a different frequency. In this example, the Data Analysts creating the checks are following the Data Engineer's instruction that they use the same scan definition for their checks, dagsterredshift_default_scan, to facilitate running a single remote scan in the pipeline, later.
The check attributes that the Data Engineer defined when they are available in the Soda Cloud user interface for Data Analysts to select when they are creating a check. For example, a missing check on the store_id column validates that there are no NULL values in the column. By adding four attributes to the check, the Data Analyst makes it easier for themselves and their colleagues to filter and analyze check results in Soda Cloud, and other BI tools, according to these custom attributes.
After the Data Analysts have added the data quality checks they need to the datasets in Soda Cloud, the next step in the pipeline triggers a Soda scan of the data remotely, via the . To do this, a Data Engineer uses the scan definition that the Data Analysts assigned to checks as they created them.
In the Dagster pipeline, the Data Engineer adds a script to first call the Soda Cloud API to trigger a scan via the endpoint.
Then, using the scanID from the response of the first call, they send a request to the endpoint which continues to call the endpoint as the scan executes until the scan status reaches an end state that indicates that the scan completed, issued a warning, or failed to complete. If the scan completes successfully, the pipeline continues to the next step; otherwise, it trips a “circuit breaker”, halting the pipeline.
When all the Data Analysts' checks have been executed and the results indicate that the data is sound in staging, the Data Engineer adds a step in the pipeline to perform the same transformations on data in the production environment. The production data in Redshift feeds the reports and dashboards that the Data Analysts use, who now with more confidence in the reliability of the data.
As a last step in the Dagster pipeline, the Data Engineer goes the extra mile to export data quality check results to tables in Redshift. The script again accesses the Soda Cloud API to gather results, then transforms the API data quality responses into DataFrames and writes them to Redshift.
In this example, the check attributes that both the Data Engineers and Data Analysts applied to the checks they created prove useful: during export, the script adds separate columns to the tables in Redshift for the attributes' keys and values so that anyone using the data to create, say, a dashboard in Tableau, can organize the data according to attributes like Data Quality Dimension, Pipeline Stage, or Data Domain.
Download this asset definition:
After defining all the assets for the Dagster pipeline, the Data Engineer must define the asset jobs, schedules, and resources for the Dagster and dbt assets. The definitions.py in the Dagster project wires everything together. Consult for more information.
To review check results from the latest Soda scan for data quality, along with the historical measurements for each check, both Data Analysts and Data Engineers can use Soda Cloud.
They navigate to the Datasets page, then select a dataset from those listed to access a dataset overview page which offers info about check coverage, the dataset's health, and a list of its latest check results.
To keep sensitive customer data secure, the Data Engineers in this example chose to reroute any failed row samples that Soda implicitly collected for missing, validity, reference checks, and *explicitly* collected for failed row checks to an S3 bucket. Those with access to the bucket can review the CSV files which contain the failed row samples which can help Data Engineers investigate the cause of data quality issues.
Further, because the Data Engineer went the extra mile to export data quality check results via the Soda Cloud API to tables in Redshift, they are able to prepare a Tableau dashboard using the check attributes to present data according to Domain, Dimension, etc.
To do so in Tableau, they added their data source, selected the Redshift connector, and entered the database connection configuration details. Consult for details.
Learn more about to review Soda check results from within the catalog.
Learn more about to set up for data quality checks that fail.
From your command-line interface, execute a pip install command to install Soda Library in your environment.
The Soda environment has been updated since this tutorial.
Refer to for updated tutorials.
Soda Library is a Python library and command-line interface (CLI) tool that enables Data Engineers to test the data in a data source to surface invalid, missing, or unexpected data.
As a step in the Get started roadmap, this guide offers instructions to set up, install, and configure Soda in a self-operated deployment model.
Choose a flavor of Soda
Set up Soda: self-operated 📍 You are here! a. b. c.
Write SodaCL checks
Run scans and review results
💡 TL;DR: Follow a to set up and run Soda with example data.
To use Soda Library, you must have installed the following on your system.
Python 3.8, 3.9, or 3.10. To check your existing version, use the CLI command: python --version or python3 --version
If you have not already installed Python, consider using to manage multiple versions of Python in your environment.
Pip 21.0 or greater. To check your existing version, use the CLI command: pip --version
A Soda Cloud account; see next section.
In a browser, navigate to to create a new Soda account, which is free for a 45-day trial. If you already have a Soda account, log in.
Navigate to your avatar > Profile, then access the API keys tab. Click the plus icon to generate new API keys.
Copy+paste the API key values to a temporary, secure place in your local environment.
Best practice dictates that you install the Soda Library CLI using a virtual environment. In your command-line interface tool, create a virtual environment in the .venv directory using the commands below. Depending on your version of Python, you may need to replace python with python3 in the first command.
Upgrade pip inside your new virtual environment.
Soda Library connects with Spark DataFrames in a unique way, using programmtic scans.
If you are using Spark DataFrames, follow the configuration details in .
If you are not using Spark DataFrames, continue to step 2.
In the same directory and environment in which you installed Soda Library, use a code editor to create a new
If you wish, you can provide data source login credentials or any of the properties in the configuration YAML file as system variables instead of storing the values directly in the file. System variables persist only for as long as you have the terminal session open in which you created the variable. For a longer-term solution, consider using permanent environment variables stored in your ~/.bash_profile or ~/.zprofile files.
From your command-line interface, set a system variable to store the value of a property that the configuration YAML file uses. For example, you can use the following command to define a system variable for your password.
Test that the system retrieves the value that you set by running an echo command.
In the configuration YAML file, set the value of the property to reference the environment variable, as in the following example.
Save the configuration YAML file, then run a scan to confirm that Soda Library connects to your data source without issue.
From your command-line interface, set a system variable to store the value of a property that the configuration YAML file uses. For example, you can use the following command to define a system variable for your password.
Test that the system retrieves the value that you set by running an echo command.
In the configuration YAML file, set the value of the property to reference the environment variable, as in the following example.
Save the configuration YAML file, then run a scan to confirm that Soda Library connects to Soda Cloud without issue.
Choose a flavor of Soda
Set up Soda: self-operated
Run scans and review results
Need help? Join the .
Use a SodaCL distribution check to monitor the consistency of a column over time.
Distribution checks will no longer be supported in Soda v4; they will deprecated and replaced by MAD.
In the short term, v3 users can use summary statistics instead.
Use a distribution check to determine whether the distribution of a column has changed between two points in time. For example, if you trained a model at a particular moment in time, you can use a distribution check to find out how much the data in the column has changed over time, or if it has changed all.
✔️ Requires Soda Core Scientific (included in a Soda Agent) ✔️ Supported in Soda Core ✔️ Supported in Soda Library + Soda Cloud ✖️ Supported in Soda Cloud Agreements + Soda Agent ✖️ Available as a no-code check
To detect changes in the distribution of a column between different points in time, Soda uses approaches based on and based on metrics that quantify the distance between samples.
When using hypothesis testing, a distribution check allows you to determine whether enough evidence exists to conclude that the distribution of a column has changed. It returns the probability that the difference between samples taken at two points in time would have occurred if they came from the same distribution (see ). If this probability is smaller than a threshold that you define, the check warns you that the column's distribution has changed.
You can use the following statistical tests for hypothesis testing in your distribution checks.
for continuous data
for categorical data
When using a metric to measure distance between samples, a distribution check returns the value of the distance metric that you chose based on samples taken at two points in time. If the value of the distance metric is larger than a threshold that you define, the check warns that the column's distribution has changed.
You can use the following distance metrics in your distribution checks.
for continuous or categorical data
(standardized using the sample standard deviation) for continuous or categorical data
(standardized using the sample standard deviation, this metric is equal to the SWD) for continuous or categorical data
To use a distribution check, you must install Soda Scientific in the same directory or virtual environment in which you installed Soda Library. Best practice recommends installing Soda Library and Soda Scientific in a virtual environment to avoid library conflicts, but you can if you prefer.
Set up a virtual environment, and install Soda Library in your new virtual environment.
Use the following command to install Soda Scientific.
Refer to for help with issues during installation.
Not yet supported in Soda Cloud
Before defining a distribution check, you must generate a distribution reference object (DRO).
When you run a distribution check, Soda compares the data in a column of your dataset with a snapshot of the same column at a different point in time. This snapshot exists in the DRO, which serves as a point of reference. The distribution check result indicates whether the difference between the distributions of the snapshot and the actual datasets is statistically significant.
To create a DRO, you use the CLI command soda update-dro. When you execute the command, Soda stores the entire contents of the column(s) you specified in local memory. Before executing the command, examine the volume of data the column(s) contains and ensure that your system can accommodate storing it in local memory.
If you have not already done so, create a directory to contain the files that Soda uses for a distribution check.
Use a code editor to create a file called distribution_reference.yml (though, you can name it anything you wish) in your Soda project directory, then add the following example content to the file.
Optionally, you can define multiple DROs in your distribution_reference.yml file by naming them. The following example defines two DROs.
Change the values for dataset
about
binsandweights, and how Soda computes the number of bins for a DRO.
If you have not already done so, create a checks.yml file in your Soda project directory. The checks YAML file stores the Soda Checks you write, including distribution checks; Soda Library executes the checks in the file when it runs a scan of your data.
In your new file, add the following example content.
Replace the following values with your own dataset and threshold details.
For continuous columns, When you execute the soda scan command, Soda stores up to one million records in local memory. If the column has more than one million records, then Soda applies limit SQL clause to make sure that your system can accommodate storing it in local memory.
For continuous columns, as explained in , Soda uses bins and weights to take random samples from your DRO. Therefore, it is possible that the original dataset that you used to create the DRO resembles a different underlying distribution than the dataset that Soda creates by sampling from the DRO. To limit the impact of this possibility, Soda runs the tests in each distribution check ten times and returns the median of the results, either as a p-value or a distance metric). For example, if you use the Kolmogorov-Smirnov test and a threshold of 0.05, the distribution check uses the Kolmogorov-Smirnov test to compare ten different samples from your DRO to the data in your column. If the median of the returned p-values is smaller than 0.05, the check issues a warning. This approach does change the interpretation of the distribution check results. For example, the probability of a type I error is multiple orders of magnitude smaller than the significance level that you choose.
Soda uses the bins and weights to generate a sample from the reference distribution when it executes the distribution check during a scan. By creating a sample using the DRO's bins and weights, you do not have to save the entire – potentially very large - sample. The distribution_type value impacts how the weights and bins will be used to generate a sample, so make sure your choice reflects the nature of your data (continuous or categorical).
To compute the number of bins for a DRO, Soda uses different strategies based on whether outlier values are present in the dataset.
By default Soda automatically computes the number of bins for each DRO by taking the maximum of and methods. also applies this practice by default.
For datasets with outliers, such as in the example below, the default strategy does not work well. When taking the maximum of and methods, it produces a great number of bins, 3466808, while there are only nine elements in the array. The outlier value 10e6 result in a misleading bin size.
If the number of bins is greater than the size of data, Soda uses to detect and filter the outliers. Basically, for data that is greater than Q3 + 1.5 IQR and less than Q1 - 1.5 IQR Soda removes the datasets, then recomputes the number of bins with the same method by taking the maximum of and .
After removing the outliers, if the number of bins still exceeds the size of the filtered data, Soda takes the square root of the dataset size to set the number of bins. To cover edge cases, if the square root of the dataset size exceeds one million, then Soda sets the number of bins to one million to prevent it from generating too many bins.
You can add a sample parameter for both a distribution check and DRO to include a sample SQL clause that Soda passes when it executes the check during a scan.
If the data to which you wish to apply distribution check does not fit in memory or involves a time constraint, use a sample to specify a SQL query that returns a sample of the data. The SQL query that you provide is specific to the type of data source you use. In the example below, the SQL query for a PostgreSQL data source randomly samples 50% of the data with seed 61. You can customize the sample SQL query to meet your needs.
Use sample for continuous values, only. For categorical values refer to .
Some data sources do not have a built-in sampling function. For example, BigQuery does not support TABLESAMPLE BERNOULLI. In such a case, add a filter parameter to randomly obtain a sample of the data. The filter parameter applies a data source-specific SQL WHERE clause to the data. In the example below, the SQL query for a BigQuery data source randomly samples 50% of the data.
Distribution Check
DRO
You can define multiple distribution checks in a single checks.yml file. If you create a new DRO for another dataset and column in sales_dist_ref.yml for example, you can define two distribution checks in the same checks.yml file, as per the following.
Alternatively you can define two DROs in distribution_reference.yml, naming them cars_owned_dro and calendar_quarter_dro, and use both in a single checks.yml file
You can also define multiple checks for different columns in the same dataset by generating multiple DROs for those columns. Refer to the following example.
The following example works for PostgreSQL data sources. It randomly samples 50% of the dataset with seed value 61.
While installing Soda Scientific works on Linux, you may encounter issues if you install Soda Scientific on Mac OS (particularly, machines with the M1 ARM-based processor) or any other operating system. If that is the case, consider using one of the following alternative installation procedures.
Need help? Ask the team in the .
Set up a virtual environment, and install Soda Library in your new virtual environment.
Use the following command to install Soda Scientific.
Refer to for help with issues during installation.
Use Soda’s Docker image in which Soda Scientific is pre-installed. You need Soda Scientific to be able to use SodaCL or .
If you have not already done so, in your local environment.
From Terminal, run the following command to pull Soda Library’s official Docker image; adjust the version to reflect the most .
Verify the pull by running the following command.
Output:
When you run the Docker image on a non-Linux/amd64 platform, you may see the following warning from Docker, which you can ignore.
If you encounter the following error, follow the procedure below.
You need to give Docker permission to acccess your configuration.yml and checks.yml files in your environment. To do so:
Access your Docker Dashboard, then select Preferences (gear symbol).
Select Resources, then follow the to add your Soda project directory – the one you use to store your configuration.yml and checks.yml files – to the list of directories that can be bind-mounted into Docker containers.
Click Apply & Restart, then repeat steps 2 - 4 above.
If you encounter the following error, double check the syntax of the scan command in step 4 above.
Be sure to prepend /sodacl/ to both the congifuration.yml filepath and the checks.yml filepath.
Be sure to mount your files into the container by including the -v option. For example, -v /Users/MyName/soda_project:/sodacl.
Reference .
Use a to gauge how recently your data was captured.
Use to compare the values of one column to another.
# Checks for basic validations
checks for dim_customer:
- row_count between 10 and 1000
- missing_count(birth_date) = 0
- invalid_percent(phone) < 1 %:
valid format: phone number
- invalid_count(number_cars_owned) = 0:
valid min: 1
valid max: 6
- duplicate_count(phone) = 0
checks for dim_product:
- avg(safety_stock_level) > 50
# Checks for schema changes
- schema:
name: Find forbidden, missing, or wrong type
warn:
when required column missing: [dealer_price, list_price]
when forbidden column present: [credit_card]
when wrong column type:
standard_cost: money
fail:
when forbidden column present: [pii*]
when wrong column index:
model_name: 22
# Check for freshness
- freshness (start_date) < 1d
# Check for referential integrity
checks for dim_department_group:
- values in (department_group_name) must exist in dim_employee (department_name)checks for dim_customer:
- distribution_difference(number_cars_owned) > 0.05:
distribution reference file: ./cars_owned_dist_ref.yml
method: chi_square
# (optional) filter to a specific point in time or any other dimension
filter: purchase_date > 2022-10-01 and purchase_date < 2022-12-01
# (optional) database specific sampling query for continuous columns. For
# example, for PostgreSQL the following query randomly samples 50% of the data
# with seed 61.
sample: TABLESAMPLE BERNOULLI (50) REPEATABLE (61)
[NOT EVALUATED]Click Add Check to include the new, no-code check in the next scheduled scan of the dataset. Note that a user with Viewer permissions cannot add a check, they can only propose checks.
Optionally, you can manually execute your check immediately. From the dataset’s page, locate the check you just created and click the stacked dots, then select Execute Check. Soda executes only your check.
Fail Condition, Value, and Value Type
Set the values of these fields to specify the threshold that constitutes a fail or warn check result.
For example, if you are creating a Duplicate Check and you want to make sure that less than 5% of the rows in the column you identified contain duplicates, set:
• Fail Condition to >
• Value to 5
• Value Type to Percent
Attribute fields
Select from among the list of existing attributes to apply to your check so as to organize your checks and alert notifications in Soda Cloud. Refer to for details.
You, or an Admin on your Soda Cloud account, has deployed a Soda Agent and connected it to your Soda Cloud account.
You, or an Admin on your Soda Cloud account, has added a new datasource via the Soda Agent in your Soda Cloud account.
For a new agreement, you define several details including which data to check, what checks to execute during a scan, and whom to notify when bad data triggers an alert.
In Soda Cloud, navigate to the Agreements dashboard, then click New Agreement. Follow the guided steps to complete the new agreement. Use the sections below for insight into the values to enter in the fields and editing panels in the guided steps.
You can only create an agreement that uses a data source that has been added to Soda Cloud via a Soda Agent.
Agreement Label
Provide a name for your agreement.
Data Source
Select the data source that contains the datasets to which your agreement applies. If you have no options to select in the dropdown, it is because you have not added a data source via a Soda Agent. You can only create agreements on datasets that are in a data source that has been onboarded into Soda Cloud via a Soda Agent.
Use SodaCL to define the checks that Soda Cloud executes on a regular schedule to uphold the tenets of this agreement. If any of these checks fail during a regularly-scheduled scan, Soda Cloud notifies the stakeholders you specify in the Notifications section.
Be sure to click Test checks to validate that the SodaCL syntax you have written is valid, and that Soda can execute the checks against your datasets without errors.
For help writing your first checks:
browse the library of SodaCL snippets that insert correctly-formatted syntax for the most commonly-used checks for basic data quality
use Ask AI, a generative AI assistant that turns natural-language requests into production-ready SodaCL checks. Read more
consider following the Quick start for SodaCL, including the Tips and best practices section
refer to for exhaustive details on every type of metric and check
Add Stakeholders to this agreement who have an interest in maintaining or using the good-quality data in this data source. Consider adding a co-owner to your agreement for redundancy should you, as the agreement author, be absent.
Soda Cloud sends emails to request review and approval from all stakeholders, and waits to run scans which execute checks in the agreement until all stakeholders have approved the agreement.
By default, Soda Cloud includes an out-of-the-box email notification to all the agreement’s stakeholders when a check in your agreement fails. You can remove or adjust this notification, or use the search bar to add more. Access View scan results to learn more about pass, warn, and fail check results.
(Optional) If you have integrated your Soda Cloud account with Slack or another third-party service provider via a webhook, use the search field to type a channel name to add the channel as a notification recipient. Alternatively, use the field to enter names of individual teammates with whom you collaborate in Soda Cloud.
After you have set up a new agreement, Soda Cloud sends approval requests to the stakeholders you identified in step 3. When stakeholders approve or reject your agreement, Soda Cloud sends you an email notification.
Regardless of the approval status of the agreement, however, Soda Cloud begins running scans of your data according to the scan definition you set. Soda Cloud sends notifications after each scan according to the settings you defined in step 4.
(Optional) You can click the link provided to create a new scan definition if you wish to run a scan to execute the checks in this agreement more or less frequently, or a different time of day, relative to the default scan definition for the data source.
To review existing scan definitions, navigate to the Scans menu item.
Further, take into account the following tips and best practices when writing SodaCL checks in an agreement.
Avoid applying the same customized check names in multiple agreements. Soda Cloud associates check results with agreements according to name so if you reuse custom names, Soda Cloud may become confused about which agreement to which to link check results.
If you use an anomaly detection check, be aware that when you Test Checks, this type of checks results in [NOT EVALUATED]. The ML algorithm that anomaly detection checks use requires a minimum of four, regular-frequency scans before it has collected enough historic measurements against which to gauge an anomaly. Therefore, until it has collected enough historical measurements to use to gauge anomolies, Soda does not evaluate the check.
Note that any checks you test in the context of this step in the agreements workflow do not appear as “real” checks in the Checks dashboard.
Except with a NOW variable with freshness checks, you cannot use variables in checks you write in an agreement in Soda Cloud as it is impossible to provide the variable values at scan time.
See also: Tips and best practices for SodaCL
Using a code editor, create a new file called checks.yml.
Copy+paste the following basic check syntax in your file, then adjust the value for dataset_name to correspond with the name of one of the datasets in your data source.
Save the changes to the checks.yml file.
To test the check and confirm the syntax is valid and error-free, use the following command to run a scan of the data in your data source. Replace the value for my_datasource with the name of the data source you added to your configuration.yml file. Read more about [scans]().
Command-line Output:
Add more checks to the checks.yml file to test for multiple data quality metrics. Consult the [SodaCL tutorial]() for advice and the [Use case guides]() for example checks. Refer to [SodaCL reference]() for exhaustive details on every type of metric and check.
This type of check validates the schema, or structure, of your data. It ensures that the columns you expect to exist are present in the dataset, and that they have the correct data type and index location.
Refer to Schema checks for more information.
This step adds two checks: one to confirm that the dataset is not empty, and one to ensure that the current row count is not significantly different from the expected row count. Soda determines the expected row count relative to the previous row count value using a time series-based anomaly detection model.
Refer to Anomaly detection checks for more information.
Also referred to as dataset filtering, this step prompts you to specify a time range on which to apply the data quality checks.
By default, check suggestions sets the time-based partition to one day if the column contains DATE type data, and the preceding 24 hours if the column contains DATETIME data. When generating a list of candidate columns to which to apply the time-based partition, the assisstant uses heuristic methods to automatically identify and rank column names.
Refer to Configure dataset filters for more information.
A freshness check ensures that the data in the dataset is up-to-date according to the latest value entered in a column containing date or timestamp values. Check suggestions uses the same heuristic methods with the time based partitioning to rank the columns. After ranking the columns, the CLI estimates the threshold by using the standard error of date differences. It then prompts you to select the column and threshold to use for the freshness check.
Refer to Freshness checks for more information.
A validity check compares the data in text columns to a specific format (see the list that follows) to determine whether the content is valid. For example, such a check can validate that all rows in an id column contain UUID-formatted values.
Check suggestions prompts you to select the columns that are candidates for validity checks, which must contain text type data such as CHAR, VARCHAR, or TEXT.
Valid formats:
UUID
phone number
credit card number
IP address (IPv4 and IPv6)
money
timestamp
date
time
Refer to Validity metrics for more information.
A missing check automatically identifies any NULL values within your dataset. Check suggestions prompts you to select the columns to which you want to apply a missing check. By default, it sets each check threshold to 0, which means that a check fails if there are any NULL values in the column.
Refer to Missing metrics for more information.
A duplicate check identifies duplicate records or entries within your dataset. By default, it sets each check threshold to 0, which means that a check fails if there are any duplicate values in the column.
Refer to Numeric metrics for more information.
✔️ Some checks require Soda Core Scientific ✔️ Some checks supported in Soda Core ✔️ Supported in Soda Library + Soda Cloud ✖️ Supported in Soda Cloud Agreements + Soda Agent
Follow the steps above to create a checks.yml file to define your checks for data quality. Then, add the file(s) to your Python program as in the example below.
Be sure to include any variables in your programmatic scan before the check YAML files. Soda requires the variable input for any variables defined in the check YAML files.
Missing Validity Numeric Duplicate Row count
Freshness Schema SQL Failed rows SQL Metric
Dataset
Select the dataset to which you want the check to apply.
Check Name
Provide a unique name for your check.
Add to Scan Definition
Select the scan definition to which you wish to add your check. Optionally, you can click create a new Scan Definition if you want Soda to execute the check more or less frequently, or at a different time of day than existing scan definitions dictate. See Manage scheduled scans for details.
Filter fields
Optionally, add an in-check filter to apply conditions that specify a portion of the data against which Soda executes the check.
Define Metric/Values/Column/SQL
As each metric or check requires different values, refer to SodaCL reference for detailed information about each metric or check. Learn more about how Soda uses OpenAI to process the input for SQL and Regex assistants in no-code checks.
Alert Level
Select the check result state(s) for which you wish to be notified: Fail, Warn, or Fail and Warn. See View scan results for details. By default, alert notifications for your check go to the Dataset Owner. See Define alert notification rules to set up more alert notifications.
Name
Provide a unique identifier for your notification.
For
Select All Checks, or select Selected Checks to use conditions to identify specific checks to which you want the rule to apply. You can identify checks according to several attributes such as Data Source Name, Dataset Name, or Check Name.
Notify Recipient
Select the destination to which this rule sends its notifications. For example, you can send the rule’s notifications to a channel in Slack.
Notify About
Identify the notifications this rule sends based on the severity of the check result: warn, fail, or both.

Tests transformed data: In a Soda Cloud staging environment, Data Analysts can prepare no-code checks for data quality based on their knowledge of the reports and dashboards that the data feeds. The Data Engineers use the Soda Cloud API to execute remote Soda scans for data quality that include the checks the Data Analysts defined.
Transforms data in production: After addressing any data quality issues after transformation in staging, the Data Engineers build the dbt models in the production environment.
Exports data quality results: The Data Engineers use the Soda Cloud API to load the data quality results into tables Redshift from which other BI tools can fetch data quality results.
access permission and connection credentials and details for an Amazon S3 bucket
access to a Tableau account
They create a file in the ~/.dbt/ directory named profiles.yml, then add the following configuration to use dbt with Dagster. Consult the Dagster documentation.
Lastly, they make sure that Dagster can read the dbt project directories in project.py.
Need help? Join the Soda community on Slack.
Organize, alert, investigate
soda-postgres with the install package that matches the type of data source you use to store data.Amazon Athena
soda-athena
Amazon Redshift
soda-redshift
Apache Spark DataFrames (For use with programmatic Soda scans, only.)
soda-spark-df
Azure Synapse
soda-sqlserver
ClickHouse
soda-mysql
Dask and Pandas
soda-pandas-dask
To deactivate the virtual environment, use the following command:
As of version 1.7.0, Soda Library packages include Pydantic version 2 for data validation. If your systems require the use of Pydantic version 1, you can install an extra package that uses Pydantic version 1. To do so, use the following command, adjusting the type of library to correspond with your data source.
Best practice dictates that you install the Soda Library CLI using a virtual environment. In your command-line interface tool, create a virtual environment in the .venv directory using the commands below. Depending on your version of Python, you may need to replace python with python3 in the first command. Reference the virtualenv documentation for activating a Windows script.
Upgrade pip inside your new virtual environment.
Execute the following command, replacing soda-postgres with the install package that matches the type of data source you use to store data.
To deactivate the virtual environment, use the following command:
Reference the for activating a Windows script.
As of version 1.7.0, Soda Library packages include Pydantic version 2 for data validation. If your systems require the use of Pydantic version 1, you can install an extra package that uses Pydantic version 1. To do so, use the following command, adjusting the type of library to correspond with your data source.
Use Soda’s Docker image in which Soda Scientific is pre-installed. You need Soda Scientific to be able to use SodaCL distribution checks or anomaly detection checks.
If you have not already done so, install Docker in your local environment.
From Terminal, run the following command to pull Soda Library’s official Docker image; adjust the version to reflect the most recent release.
Verify the pull by running the following command.
Output:
When you run the Docker image on a non-Linux/amd64 platform, you may see the following warning from Docker, which you can ignore.
When you are ready to run a Soda scan, use the following command to run the scan via the docker image. Replace the placeholder values with your own file paths and names.
Optionally, you can specify the version of Soda Library to use to execute the scan. This may be useful when you do not wish to use the latest released version of Soda Library to run your scans. The example scan command below specifies Soda Library version 1.0.0.
Error: Mounts denied
If you encounter the following error, follow the procedure below.
You need to give Docker permission to acccess your configuration.yml and checks.yml files in your environment. To do so:
Access your Docker Dashboard, then select Preferences (gear symbol).
Select Resources, then follow the to add your Soda project directory —the one you use to store your configuration.yml and checks.yml files— to the list of directories that can be bind-mounted into Docker containers.
Click Apply & Restart, then repeat steps 2 - 4 above.
Error: Configuration path does not exist
If you encounter the following error, double check the syntax of the scan command in step 4 above.
Be sure to prepend /sodacl/ to both the congifuration.yml filepath and the checks.yml filepath.
Be sure to mount your files into the container by including the -v option. For example, -v /Users/MyName/soda_project:/sodacl.
Install Soda Scientific to be able to use SodaCL distribution checks or anomaly detection checks.
You have two installation options to choose from:
Set up a virtual environment, and install Soda Library in your new virtual environment.
Use the following command to install Soda Scientific.
Error: Library not loaded
If you have defined an anomaly detection check and you use an M1 MacOS machine, you may get aLibrary not loaded: @rpath/libtbb.dylib error. This is a known issue in the MacOS community and is caused by issues during the installation of the . There currently are no official workarounds or releases to fix the problem, but the following adjustments may address the issue.
Install soda-scientific as per the local environment installation instructions and activate the virtual environment.
Use the following command to navigate to the directory in which the stan_model of the prophet package is installed in your virtual environment.
For example, if you have created a python virtual environment in a /venvs directory in your home directory and you use Python 3.9, you would use the following command.
Use Soda’s Docker image in which Soda Scientific is pre-installed. You need Soda Scientific to be able to use SodaCL or .
If you have not already done so, in your local environment.
From Terminal, run the following command to pull Soda Library’s official Docker image; adjust the version to reflect the most .
Verify the pull by running the following command.
Output:
When you run the Docker image on a non-Linux/amd64 platform, you may see the following warning from Docker, which you can ignore.
Error: Mounts denied
If you encounter the following error, follow the procedure below.
You need to give Docker permission to acccess your configuration.yml and checks.yml files in your environment. To do so:
Access your Docker Dashboard, then select Preferences (gear symbol).
Select Resources, then follow the to add your Soda project directory—the one you use to store your configuration.yml and checks.yml files—to the list of directories that can be bind-mounted into Docker containers.
Click Apply & Restart, then repeat steps 2 - 4 above.
Error: Configuration path does not exist
If you encounter the following error, double check the syntax of the scan command in step 4 above.
Be sure to prepend /sodacl/ to both the congifuration.yml filepath and the checks.yml filepath.
Be sure to mount your files into the container by including the -v option. For example, -v /Users/MyName/soda_project:/sodacl.
configuration.ymlYou can use system variables to pass sensitive values, if you wish.
If you want to run scans on multiple schemas in the data source, add one data source config block per schema.
Copy+paste the following soda_cloud configuration syntax into the configuration.yml file, as in the example below. Input the API key values you created in Soda CLoud.
Do not nest the soda_cloud configuration under the datasource configuration.
For host, use cloud.soda.io for EU region; use cloud.us.soda.io for USA region, according to your selection when you created your Soda Cloud account.
Optionally, provide a value for the scheme property to indicate which scheme to use to initialize the URI instance. If you do not explicitly include a scheme property, Soda uses the default https.
Save the configuration.yml file. Run the following scan to confirm that Soda can successfully connect with your data source.
PSI >= 0.2: significant distribution change
During simulations, for a difference in mean between distributions of size relative to 10% of their standard deviation, the SWD value converged to approximately 0.1.
column(Optional) Change the value for distribution_type to capture categorical or continuous data.
(Optional) Define the value of filter to specify the portion of the data in your dataset for which you are creating a DRO. If you trained a model on data in which the date_first_customer column contained values between 2010-01-01 and 2020-01-01, you can use a filter based on that period to test whether the distribution of the column has changed since then.
If you do not wish to define a filter, remove the key-value pair from the file.
(Optional) If you wish to define multiple DROs in a single distribution_reference.yml file, change the names dro_name1 and dro_name2.
Save the file, then, while still in your Soda project directory, run the soda update-dro command to create a distribution reference object. For a list of options available to use with the command, run soda update-dro --help.
If you defined multiple DROs in your distribution_reference.yml file, specify which DRO you want to update using the -n argument. -n indicates name. When multiple DROs are defined in a single distribution_reference.yml file, Soda requires all of them to be named. Thus, you must provide the DRO name with the -n argument when using the soda update-dro command.
Review the changed contents of your distribution_reference.yml file. The following is an example of the information that Soda added to the file.
Soda appended a new key called distribution reference to the file, together with an array of bins and a corresponding array of weights.
your_dataset_name - the name of your datasetcolumn_name - the column against which to compare the DRO
dro_name - the name of the DRO (optional, required if distribution_reference.yml contains named DROs)
> your_threshold - the threshold for the distribution check that you specify as acceptable
Replace the value of your_method_of_choice with the type of test you want to use in the distribution check. If you do not specify a method, the distribution check defaults to ks for continuous data, or chi_square for categorical data.
ks for the Kolmogorov-Smirnov test
chi_square for the Chi-square test
psi for the Population Stability Index metric
swd for the Standardized Wasserstein Distance (SWD) metric
semd for the Standardized Earth Mover's Distance (SEMD) metric
SWD and the SEMD are the same metric.
(Optional), to filter the data in the distribution check, replace the value of filter with a filter that specifies the portion of the data in your dataset for which you are checking the distribution.
(Optional), to sample the data in the distribution check for continuous columns only, replace the value of sample with a query that specifies the portion of the data in your dataset for which you are checking the distribution. The data source you are using must support the query you write.
For example, for PostgreSQL, you can use the TABLESAMPLE clause to randomly sample 50% of the data with seed 61. Best practice dictates that you use sampling for large datasets that might not fit in memory. Refer to the define the sample size for details. If you do not use sample or filter in a distribution check for continuous columns, Soda fetches up to 1 million records by applying a limit clause for better memory management. For categorical columns, Soda does not support sample.
Run a soda scan of your data source to execute the distribution check(s) you defined.
When Soda Library executes the distribution check above, it compares the values in column_name to a sample that Soda creates based on the bins, weights, and data_type in dro_name defined in the distribution_reference.yml file. Specifically, it checks whether the value of your_method_of_choice is larger than 0.05.
For categorical columns, Soda fetches the aggregated calculated value counts of each category. If there are more than one million distinct categories, Soda skips the distribution check and issues a warning.
✓
Use quotes when identifying dataset or column names; see . Note that the type of quotes you use must match that which your data source uses. For example, BigQuery uses a backtick (`) as a quotation mark.
Use wildcard characters ( % or * ) in values in the check.
-
✓
Use for each to apply distribution checks to multiple datasets in one scan; see .
✓
Apply a dataset filter to partition data during a scan; see .
✓
Instruct Soda to collect random samples. Because sampling SQL clauses vary significantly between data sources, consult your data source’s documentation; see .
-
When you are ready to run a Soda scan, use the following command to run the scan via the docker image. Replace the placeholder values with your own file paths and names.
Optionally, you can specify the version of Soda Library to use to execute the scan. This may be useful when you do not wish to use the latest released version of Soda Library to run your scans. The example scan command below specifies Soda Library version 1.0.0.
✓
Define a name for a distribution check; see example.
✓
Add an identity to a check.
Define alert configurations to specify warn and fail thresholds.
-
✓
Apply an in-check filter to return results for a specific portion of the data in your dataset; see example.
Need help? Join the Soda community on Slack.
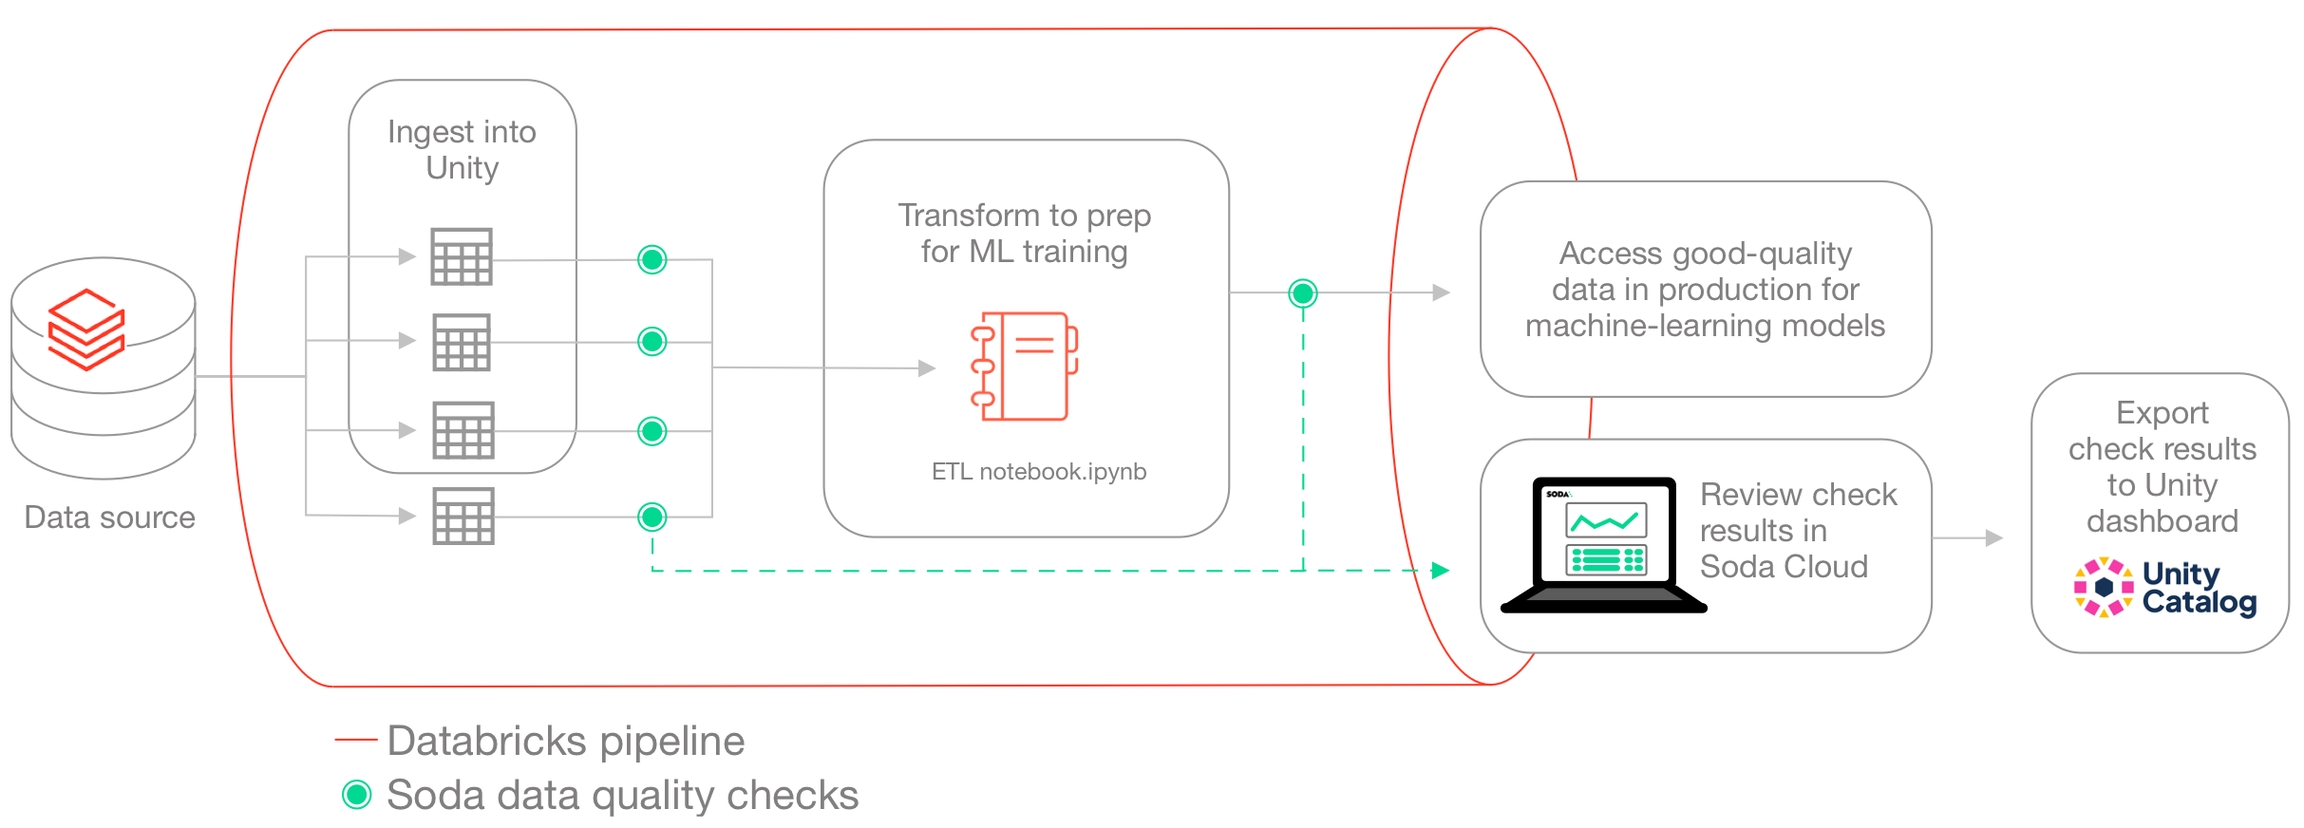
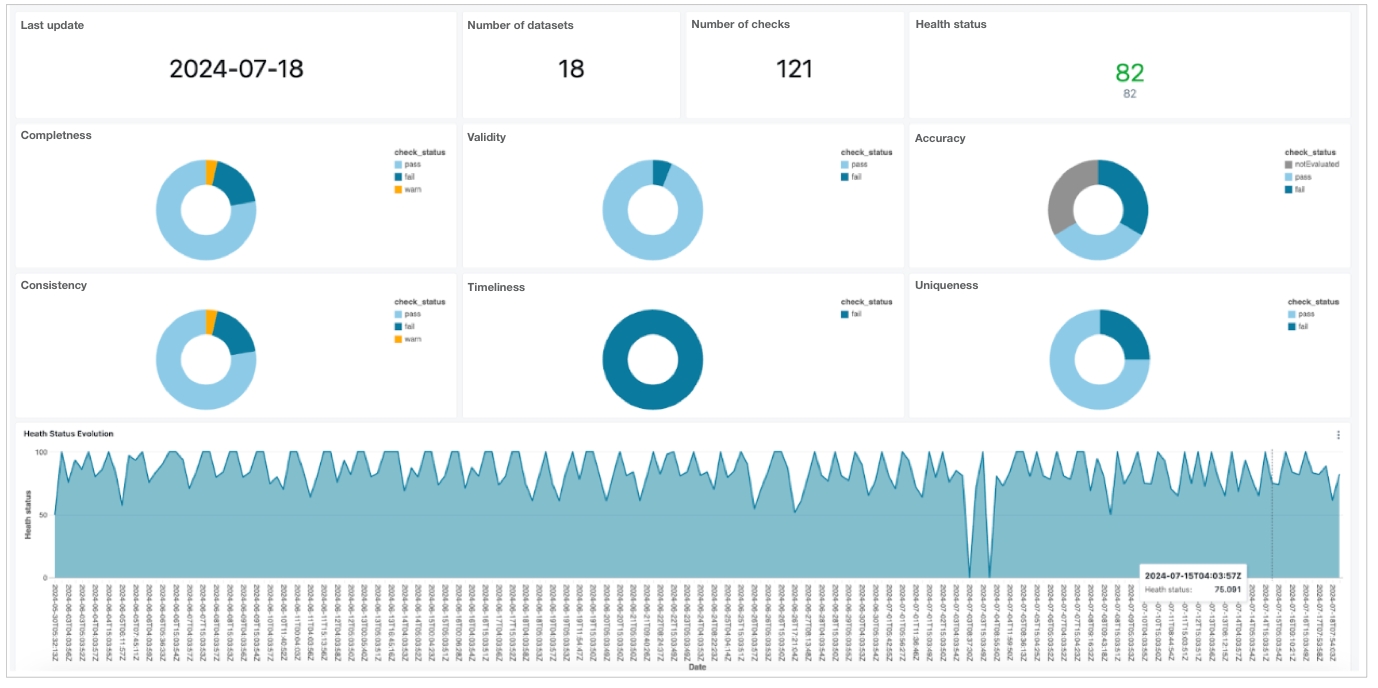
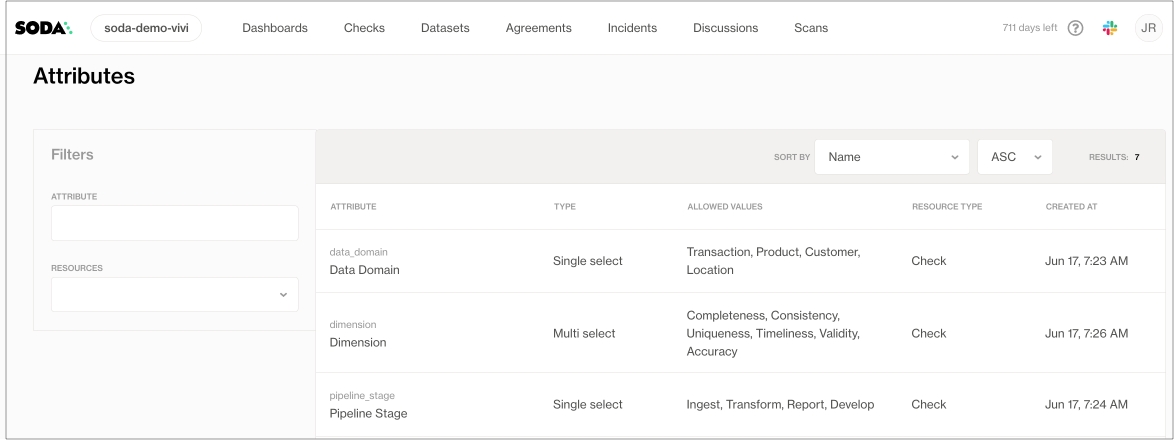
Use validity metrics in SodaCL checks to detect invalid values in a dataset.
Use a validity metric in a check to surface invalid or unexpected values in your dataset.
✖️ Requires Soda Core Scientific (included in a Soda Agent) ✔️ Supported in Soda Core ✔️ Supported in Soda Library + Soda Cloud ✔️ Supported in Soda Cloud Agreements + Soda Agent ✔️ Available as a no-code check with a self-hosted Soda Agent connected to any Soda-supported data source, except Spark, and Dask and Pandas OR with a Soda-hosted Agent connected to a BigQuery, Databricks SQL, MS SQL Server, MySQL, PostgreSQL, Redshift, or Snowflake data source
In the context of SodaCL check types, you use validity metrics in standard checks. Refer to Standard check types for exhaustive configuration details.
You can use all validity metrics in checks that apply to individual columns in a dataset; you cannot use validity metrics in checks that apply to entire datasets. Identify the column by adding a value in the argument between brackets in the check.
You must use a to define what qualifies as an valid value or invalid value.
If you wish, you can add a % character to the threshold for a invalid_percent metric for improved readability. This character does not behave as a wildard in this context.
You can use validity metrics in checks with fixed thresholds, or relative thresholds, but not change-over-time thresholds. See for more detail.
Use a nested configuration key:value pair to provide your own definition of a valid or invalid value. There are several configuration keys that you can use to define what qualifies as valid; the examples below illustrate the use of just a few config keys. See a complete below.
A check that uses a validity metric has six mutable parts:
The example below defines two checks. The first check applies to the column house_owner_flag. The valid values configuration key specifies that if a row in that column contains anything other than the two valid values in the list, Soda registers them as invalid. The check fails if Soda discovers any values that are not 0 or 1.
Values in a list must be enclosed in square brackets.
Known issue: Do not wrap numeric values in single quotes if you are scanning data in a BigQuery data source.
The second check uses a regular expression to define what qualifies as an invalid value in the last_name column so that any values that match the pattern defined by the regex qualify as invalid.
First check:
Second check:
The invalid values configuration key specifies that if a row in that column contains the invalid values in the list, Soda registers them as invalid. In the example below, the check fails if Soda discovers any values that are Antonio.
Values in a list must be enclosed in square brackets.
If the data type of the column you are checking is TEXT (such as character, character varying, or string) then you can use the valid format configuration key. This config key uses built-in values that test the data in the column for specific formats, such as email address format, date format, or uuid format. See below.
The check below validates that all values in the email_address column conform to an email address format.
Problem: You are using a valid format to test the format of values in a column and the CLI returns the following error message when you run a scan.
Solution: The error indicates that the data type of the column is not TEXT. Adjust your check to use a different configuration key, instead.
Checks with validity metrics automatically collect samples of any failed rows to display Soda Cloud. The default number of failed row samples that Soda collects and displays is 100.
If you wish to limit or broaden the sample size, you can use the samples limit configuration in a check with a validity metric. You can add this configuration to your checks YAML file for Soda Library, or when writing checks as part of an agreement in Soda Cloud. See: .
For security, you can add a configuration to your data source connection details to prevent Soda from collecting failed rows samples from specific columns that contain sensitive data. See: .
Alternatively, you can set the samples limit to 0 to prevent Soda from collecting and sending failed rows samples for an individual check, as in the following example.
You can also use a samples columns or a collect failed rows configuration to a check to specify the columns for which Soda must implicitly collect failed row sample values, as in the following example with the former. Soda only collects this check’s failed row samples for the columns you specify in the list. See: .
Note that the comma-separated list of samples columns does not support wildcard characters (%).
To review the failed rows in Soda Cloud, navigate to the Checks dashboard, then click the row for a check for validity values. Examine failed rows in the Failed Rows Analysis tab; see for further details.
The column configuration key:value pair defines what SodaCL ought to consider as valid values.
Though table below lists valid formats, the same apply for invalid formats.
Valid formats apply only to columns using data type TEXT, not DATE or NUMBER.
The Soda Library package for MS SQL Server has limited support for valid formats. See the of formats supported for MS SQL Server.
Use validity metrics in checks with alert configurations to establish
Use validity metrics in checks to define ranges of acceptable thresholds using .
Reference .
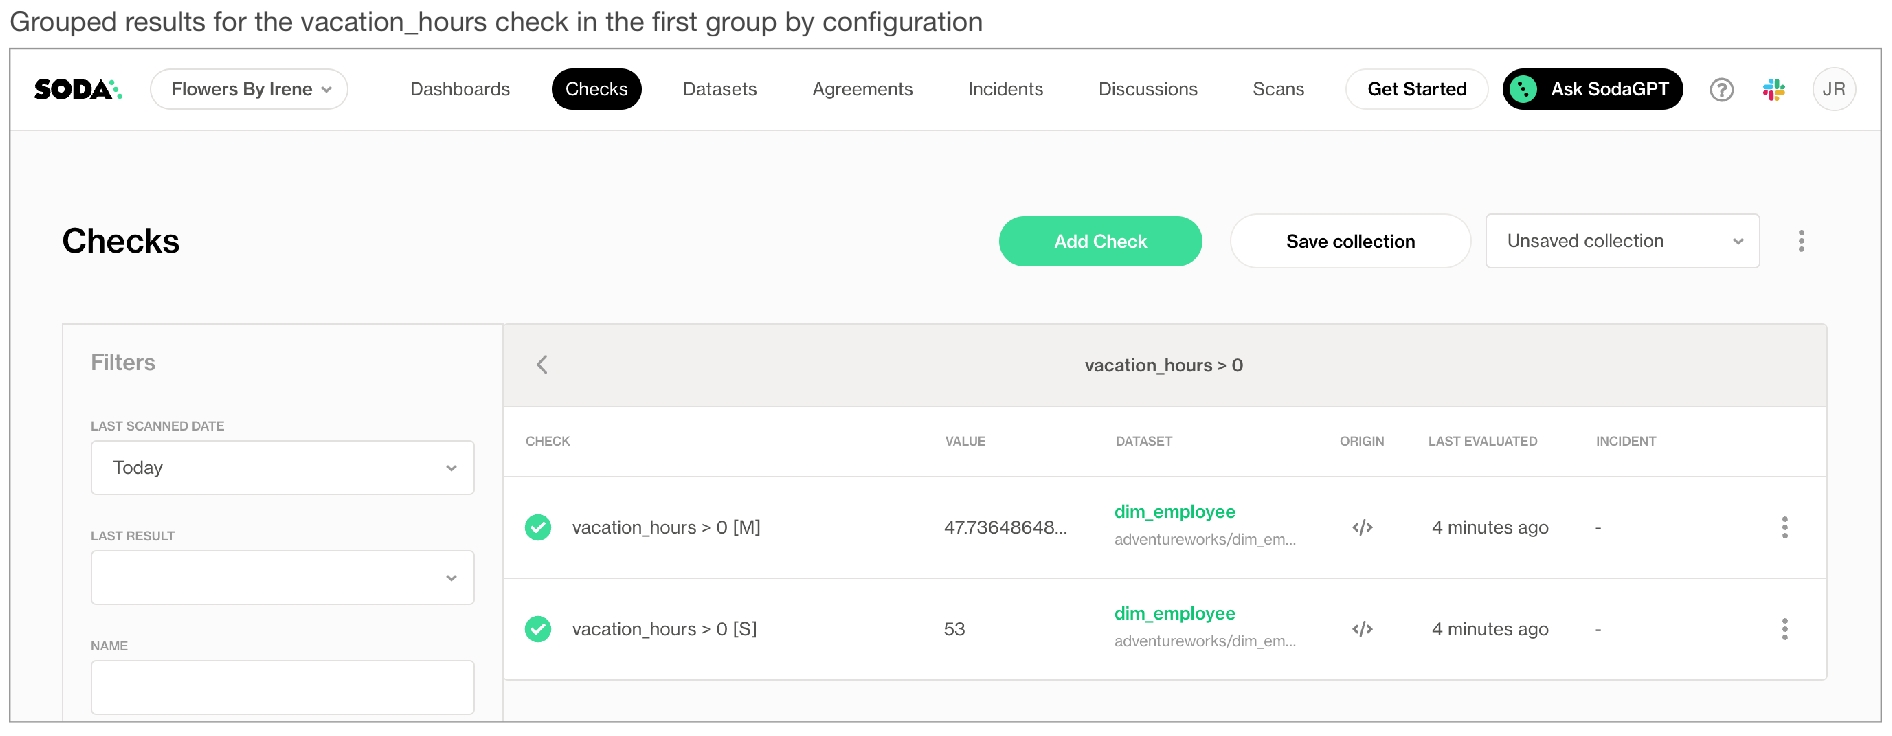
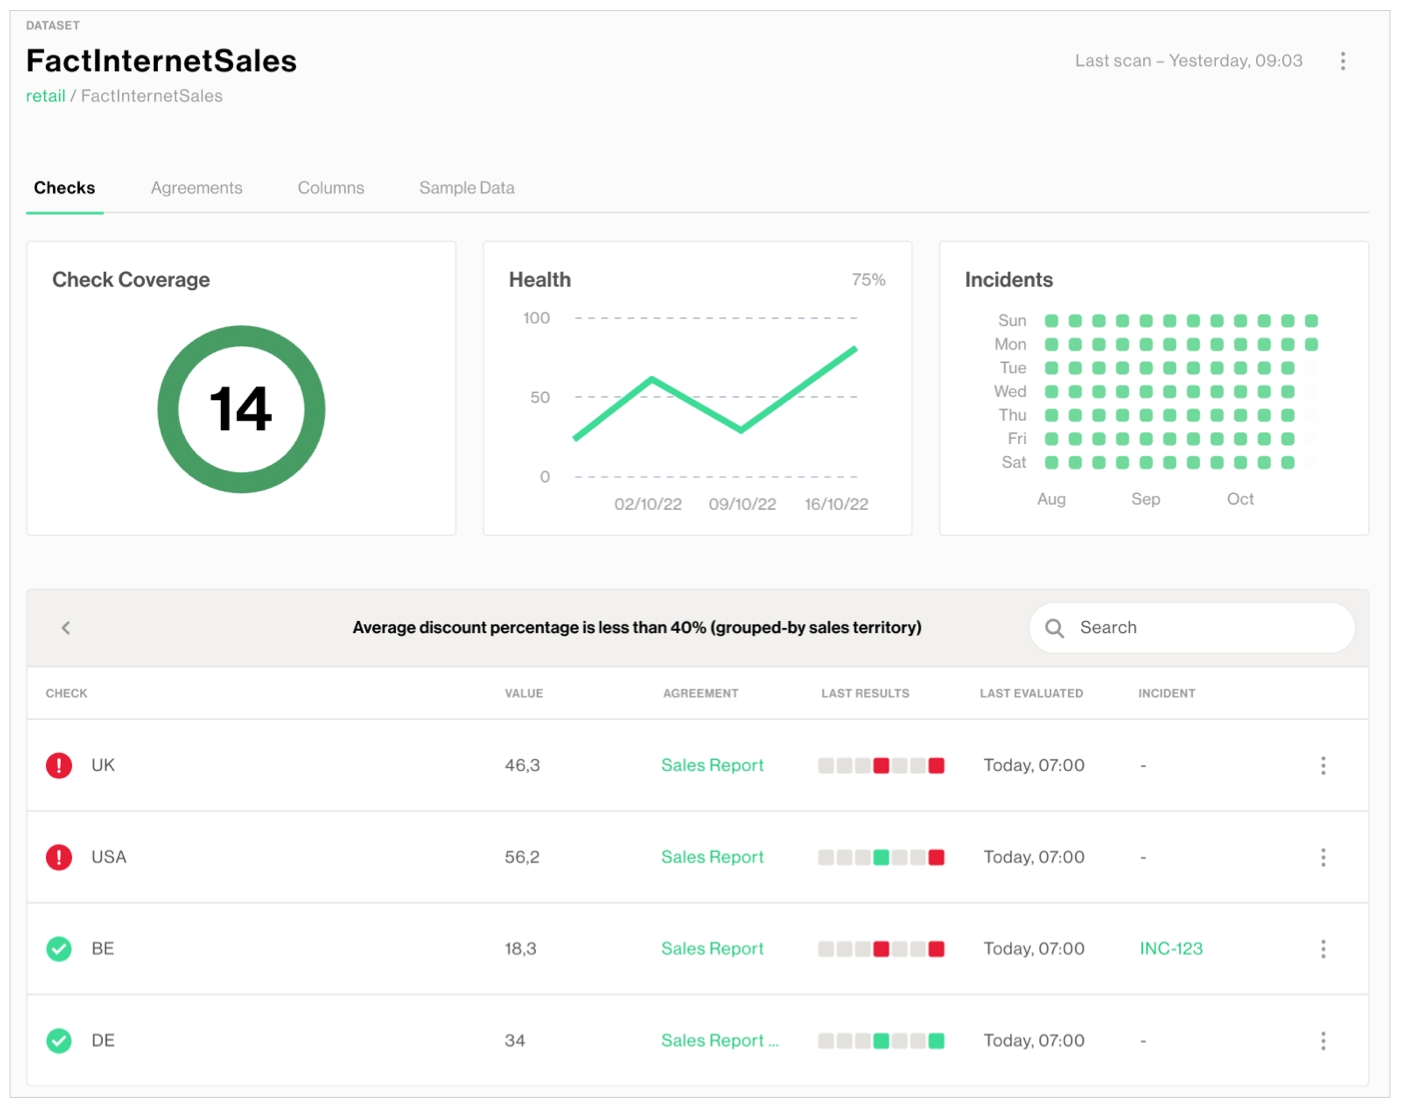
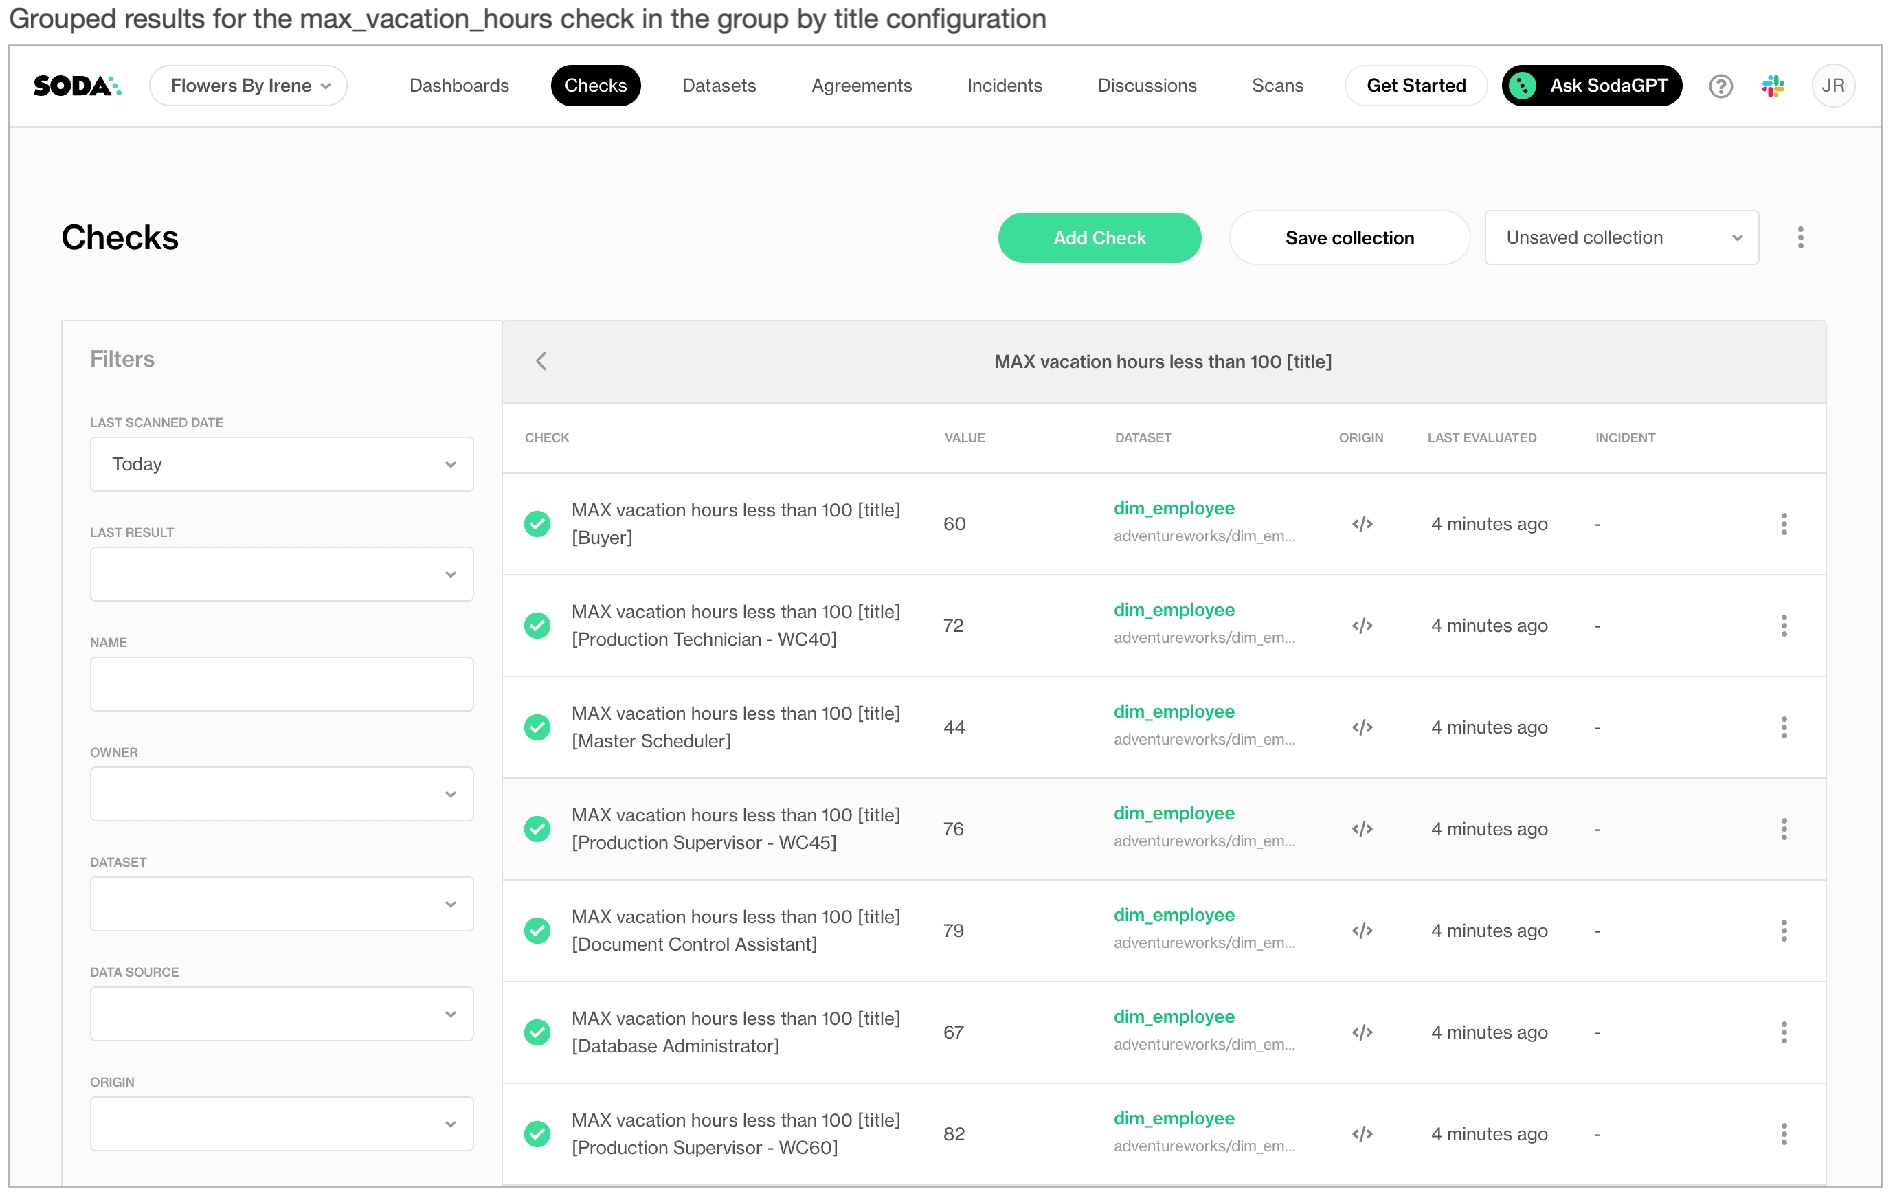
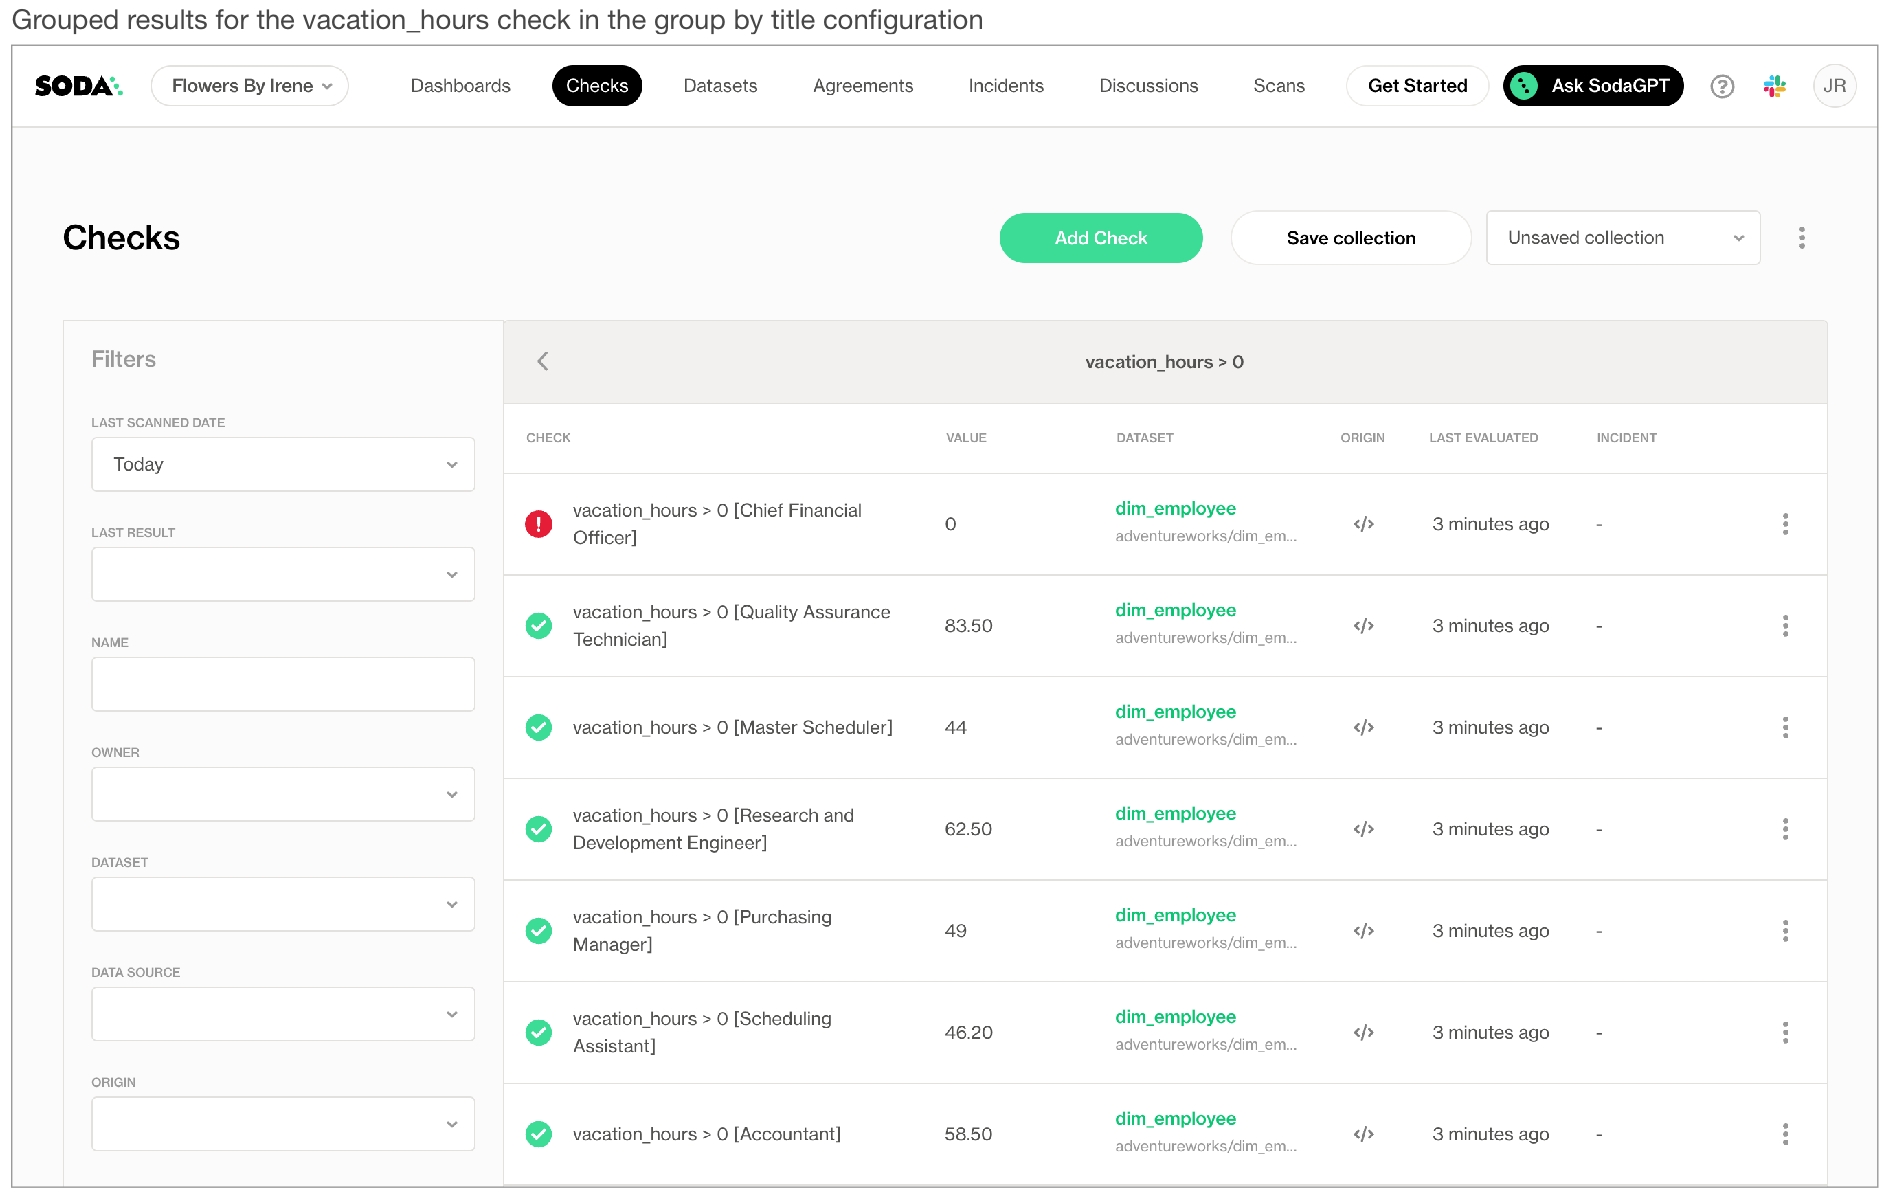
Soda uses the input in the checks and data source connection configurations to prepare a scan that it runs against the data in a dataset.
Soda uses checks and the data source connection configurations to prepare a scan that it runs against datasets to extract metadata and gauge data quality.
A check is a test that Soda performs when it scans a dataset in your data source. Soda uses the checks you defined as no-code checks in Soda Cloud, or wrote in a checks YAML file, to prepare SQL queries that it runs against the data in a dataset. Soda can execute multiple checks against one or more datasets in a single scan.
As a step in the Get started roadmap, this guide offers instructions to schedule a Soda scan, run a scan, or invoke a scan programmatically.
checks for dataset_name:
- row_count > 0soda scan -d my_datasource -c configuration.yml checks.ymlSoda Library 1.0.x
Scan summary:
1/1 check PASSED:
dim_customer in adventureworks
row_count > 0 [PASSED]
All is good. No failures. No warnings. No errors.
Sending results to Soda Cloud
Soda Cloud Trace: 67592***474checks for dataset_A:
- schema:
name: Any schema changes
fail:
when schema changes:
- column delete
- column add
- column index change
- column type changechecks for dataset_A:
- row_count > 0
- anomaly detection for row_countfilter customer [daily]:
where: created_at > TIMESTAMP '${NOW}' - interval '1d'
checks for customer [daily]:
- missing_count(name) < 5
- duplicate_count(phone) = 0checks for dataset_A:
- freshness(date_first_purchase) < 24hchecks for dataset_A:
- invalid_count(email_address) = 0:
valid format: emailchecks for dataset_A:
- missing_count(customer_key) = 0
- missing_count(geography_key) = 0
- missing_count(customer_alternate_key) = 0
- missing_count(title) = 0
- missing_count(first_name) = 0
- missing_count(middle_name) = 0
- missing_count(last_name) = 0
- missing_count(name_style) = 0
- missing_count(birth_date) = 0
- missing_count(marital_status) = 0
- missing_count(suffix) = 0
- missing_count(gender) = 0checks for dataset_A:
- duplicate_count(customer_key) = 0
- duplicate_count(geography_key) = 0
- duplicate_count(customer_alternate_key) = 0
- duplicate_count(title) = 0
- duplicate_count(first_name) = 0
- duplicate_count(middle_name) = 0
- duplicate_count(last_name) = 0
- duplicate_count(name_style) = 0
- duplicate_count(birth_date) = 0
- duplicate_count(marital_status) = 0
- duplicate_count(suffix) = 0
- duplicate_count(gender) = 0from soda.scan import Scan
scan = Scan()
scan.set_data_source_name("events")
scan.add_configuration_yaml_file(file_path="~/.soda/my_local_soda_environment.yml")
# Add variables
###############
scan.add_variables({"date": "2022-01-01"})
# Add check YAML files
##################
scan.add_sodacl_yaml_file("./my_programmatic_test_scan/sodacl_file_one.yml")
scan.add_sodacl_yaml_file("./my_programmatic_test_scan/sodacl_file_two.yml")
scan.add_sodacl_yaml_files("./my_scan_dir")
scan.add_sodacl_yaml_files("./my_scan_dir/sodacl_file_three.yml")project-name: bike_retail
target: dev
outputs:
dev:
host: # DB host
method: database
port: 5439
schema: demo # schema name
threads: 2 # threads in the concurrency of dbt tasks
type: redshift # DB source connection
dbname: # the target db name
user: # username
password: # passwordfrom pathlib import Path
from dagster_dbt import DbtProject
dbt_project = DbtProject(
project_dir=Path(__file__).joinpath("..", "..", "..").resolve(),
packaged_project_dir=Path(__file__).joinpath("..", "..", "dbt-project").resolve(),
)
dbt_project.prepare_if_dev()pip install \
dbt-core \
dbt-redshift \
cd project-directory
dbt init project-namesoda_cloud:
# For host, use cloud.us.soda.io for US regions; use cloud.soda.io for European region
host: cloud.soda.io
api_key_id: 5r-xxxx-t6
api_key_secret: Lvv8-xxx-xxx-sd0mchecks for stores:
- row_count > 0:
name: Invalid row count
attributes:
pipeline_stage: Pre-ingestion
data_quality_dimension:
- Completeness
data_domain: Location
weight: 3
- missing_count(store_id) = 0:
name: Store must have ID
attributes:
pipeline_stage: Pre-ingestion
data_quality_dimension:
- Completeness
data_domain: Location
weight: 2
- invalid_count(email) = 0:
valid format: email
attributes:
pipeline_stage: Pre-ingestion
data_quality_dimension:
- Validity
data_domain: Location
weight: 1
- invalid_count(phone) = 0:
valid format: phone number
attributes:
pipeline_stage: Pre-ingestion
data_quality_dimension:
- Validity
data_domain: Location
weight: 1
checks for stocks:
- row_count > 0:
attributes:
pipeline_stage: Pre-ingestion
data_quality_dimension:
- Completeness
data_domain: Product
weight: 3
- values in (store_id) must exist in stores (store_id):
attributes:
pipeline_stage: Pre-ingestion
data_quality_dimension:
- Consistency
data_domain: Product
weight: 2
- values in (product_id) must exist in products (product_id):
attributes:
pipeline_stage: Pre-ingestion
data_quality_dimension:
- Consistency
data_domain: Product
weight: 2
- min(quantity) >= 0:
name: No negative quantities
attributes:
pipeline_stage: Pre-ingestion
data_quality_dimension:
- Validity
data_domain: Product
weight: 2
checks for customers:
- missing_count(phone) < 5% :
name: Missing phone number
attributes:
pipeline_stage: Pre-ingestion
data_quality_dimension:
- Completeness
data_domain: Product
weight: 1
- missing_count(email) < 5% :
name: Missing email address
attributes:
pipeline_stage: Pre-ingestion
data_quality_dimension:
- Completeness
data_domain: Product
weight: 1
- invalid_count(email) = 0:
valid format: email
attributes:
pipeline_stage: Pre-ingestion
data_quality_dimension:
- Validity
data_domain: Location
weight: 1
- invalid_count(phone) = 0:
valid format: phone number
attributes:
pipeline_stage: Pre-ingestion
data_quality_dimension:
- Validity
data_domain: Location
weight: 1
checks for orders:
- failed rows:
name: Shipment Late
fail query: |
select order_id as failed_orders
from orders
where shipped_date < required_date;
attributes:
pipeline_stage: Pre-ingestion
data_quality_dimension:
- Timeliness
data_domain: Transaction
weight: 3import s3fs
import boto3
import pandas as pd
from soda.scan import Scan
from soda.sampler import Sampler
from soda.sampler.sample_contex import SampleContext
from dagster import asset, Output, get_dagster_logger, MetaDataValue
# Create a class for a Soda Custom Sampler
class CustomSampler(Sampler):
def store_sample(self, sample_context: SampleContext):
rows = sample_context.sample.get_rows()
json_data = json.dumps(rows) # Convert failed row samples to JSON
exceptions_df = pd.read_json(json_data) # Create a DataFrame with failed rows samples
# Define exceptions DataFrame
exceptions_schema = sample_context.sample.get_schema().get_dict()
exception_df_schema = []
for n in exceptions_schema:
exception_df_schema.append(n["name"])
exceptions_df.columns = exception_df_schema
check_name = sample_context.check_name
exceptions_df['failed_check'] = check_name
exceptions_df['created_at'] = datetime.now()
exceptions_df.to_csv(check_name+".csv", sep=",", index=False, encoding="utf-8")
bytestowrite = exceptions_df.to_csv(None).encode()
# Write the failed row samples CSV file to S3
fs = s3fs.S3FileSystem(key=AWS_ACCESS_KEY, secret=AWS_SECRET_KEY)
with fs.open(f's3://BUCKET-NAME/PATH/{check_name}.csv', 'wb') as f:
f.write(bytestowrite)
get_dagster_logger().info(f'Successfuly sent failed rows to {check_name}.csv ')
@asset(compute_kind='python')
def ingestion_checks(context):
# Initiate the client
s3 = boto3.client('s3')
dataframes = {}
for i, file_key in enumerate(FILE_KEYS, start=1):
try:
# Read the file from S3
response = s3.get_object(Bucket=BUCKET_NAME, Key=file_key)
file_content = response['Body']
# Load CSV into DataFrame
df = pd.read_csv(file_content)
dataframes[i] = df
get_dagster_logger().info(f"Successfully loaded DataFrame for {file_key} with {len(df)} rows.")
except Exception as e:
get_dagster_logger().error(f"Error loading {file_key}: {e}")
failed_rows_cloud= 'false'
# Execute a Soda scan
scan = Scan()
scan.set_scan_definition_name('Soda Dagster Demo')
scan.set_data_source_name('soda-dagster')
dataset_names = [
'customers', 'orders',
'stocks', 'stores'
]
# Add DataFrames to Soda scan in a loop
try:
for i, dataset_name in enumerate(dataset_names, start=1):
scan.add_pandas_dataframe(
dataset_name=dataset_name,
pandas_df=dataframes[i],
data_source_name='soda-dagster'
)
except KeyError as e:
get_dagster_logger().error(f"DataFrame missing for index {e}. Check if all files are loaded correctly.")
# Add the configuration YAML file
scan.add_configuration_yaml_file('path/config.yml')
# Add the SodaCL checks YAML file
scan.add_sodacl_yaml_str('path/checks.yml')
if failed_rows_cloud == 'false':
scan.sampler= CustomSampler()
scan.execute() # Runs the scan
logs = scan.get_logs_text()
scan_results = scan.get_scan_results()
context.log.info("Scan executed successfully.")
get_dagster_logger().info(scan_results)
get_dagster_logger().info(logs)
scan.assert_no_checks_fail() # Terminate the pipeline if any checks fail
return Output(
value=scan_results,
metadata={
"scan_results": MetadataValue.json(scan_results),
'logs':MetadataValue.json(logs) # Save the results as JSON
},
)from dagster_dbt import DbtCliResource, dbt_assets
from dagster import AssetExecutionContext
from .project import dbt_project
# Select argument selects only models in the models/staging/ directory
@dbt_assets(select='staging', manifest=dbt_project.manifest_path)
def dbt_staging(context: AssetExecutionContext, dbt: DbtCliResource):
yield from dbt.cli(["build"],context=context, manifest=dbt_project.manifest_path).stream()import base64
import requests
from dagster import asset, get_dagster_logger, Failure
url = 'https://cloud.soda.io/api/v1/scans' # cloud.us.soda.io for US region
api_key_id = 'soda_api_key_id'
api_key_secret = 'soda_api_key_secret'
credentials = f"{api_key_id}:{api_key_secret}"
encoded_credentials = base64.b64encode(credentials.encode('utf-8')).decode('utf-8')
# Headers, including the authorization token
headers = {
'Accept': 'application/json',
'Content-Type': 'application/x-www-form-urlencoded',
'Authorization': f'Basic {encoded_credentials}'
}
# Data for the POST request
payload = {
"scanDefinition": "dagsterredshift_default_scan"
}
def trigger_scan():
response = requests.post(url, headers=headers, data=payload)
# Check the response status code
if response.status_code == 201:
get_dagster_logger().info('Request successful')
# Print the response content
scan_id = response.headers.get('X-Soda-Scan-Id')
if not scan_id:
get_dagster_logger().info('X-Soda-Scan-Id header not found')
raise Failure('Scan ID not found')
else:
get_dagster_logger().error(f'Request failed with status code {response.status_code}')
raise Failure(f'Request Failed: {response.status_code}')
# Check the scan status in a loop
while scan_id:
get_response = requests.get(f'{url}/{scan_id}', headers=headers)
if get_response.status_code == 200:
scan_status = get_response.json()
state = scan_status.get('state')
if state in ['queuing', 'executing']:
# Wait for a few seconds before checking again
time.sleep(5)
get_dagster_logger().info(f'Scan state: {state}')
# The pipeline terminates when the scan either warns or fails
elif state == 'completed':
get_dagster_logger().info(f'Scan: {state} successfully')
break
else:
get_dagster_logger().info(f'Scan failed with status: {state}')
raise Failure('Soda Cloud Check Failed')
else:
get_dagster_logger().info(f'GET request failed with status code {get_response.status_code}')
raise Failure(f'Request failed: {get_response.status_code}')
@asset(deps=[dbt_staging], compute_kind='python')
def soda_UI_check():
trigger_scan()from dagster_dbt import DbtCliResource, dbt_assets
from dagster import AssetExecutionContext
from .project import dbt_project
@dbt_assets(select='prod', manifest=dagsteretl_project.manifest_path)
def dbt_prod(context: AssetExecutionContext, dbt: DbtCliResource):
yield from dbt.cli(["build"], context=context, manifest=dagsteretl_project.manifest_path).stream()
from dagster import Definitions
from dagster_dbt import DbtCliResource
from .project import dbt_project
from dagster import Definitions, load_assets_from_modules, define_asset_job, AssetSelection, ScheduleDefinition
from . import assets
from dagster_aws.s3 import S3Resource
# Load the assets defined in the module
all_assets = load_assets_from_modules([assets])
# Define one asset job with all the assets
dagster_pipeline = define_asset_job("dagster_pipeline", selection=AssetSelection.all())
# Create a schedule
daily_schedule = ScheduleDefinition(
name="Bikes_Pipeline",
cron_schedule="0 9 * * *",
job=dagster_pipeline,
run_config={}, # Provide run configuration if needed
execution_timezone="UTC"
)
# Wire it all together, along with resources
defs = Definitions(
assets=[*all_assets],
jobs=[dagster_pipeline],
schedules=[daily_schedule],
resources={
"dbt": DbtCliResource(project_dir=dbt_project),
"s3": S3Resource(
region_name="your-region",
aws_access_key_id="your-aws-key",
aws_secret_access_key="your-aws-secret",
)
}
)python -m venv .venv
.venv\Scripts\activatepip install --upgrade pipdocker pull sodadata/soda-library:v1.0.3docker run sodadata/soda-library:v1.0.3 --help Usage: soda [OPTIONS] COMMAND [ARGS]...
Soda Library CLI version 1.0.x, Soda Core CLI version 3.0.xx
Options:
--version Show the version and exit.
--help Show this message and exit.
Commands:
ingest Ingests test results from a different tool
scan Runs a scan
suggest Generates suggestions for a dataset
test-connection Tests a connection
update-dro Updates contents of a distribution reference file data_source my_datasource:
type: postgres
host: localhost
username: postgres
password: secret
database: postgres
schema: publipython -m venv .venv
source .venv/bin/activatepip install --upgrade pipexport POSTGRES_PASSWORD=1234echo $POSTGRES_PASSWORDdata_source my_database_name:
type: postgres
host: soda-temp-demo
port: '5432'
username: sodademo
password: ${POSTGRES_PASSWORD}
database: postgres
schema: publicsoda test-connection -d my_datasource -c configuration.ymlexport API_KEY=1234echo $API_KEYdata_source my_database_name:
type: postgres
host: soda-temp-demo
port: '5432'
username: sodademo
password: ${POSTGRES_PASSWORD}
database: postgres
schema: public
soda_cloud:
host: cloud.soda.io
api_key_id: ${API_KEY}
api_key_secret: ${API_SECRET}soda test-connection -d my_datasource -c configuration.yml# For bash interactive shell
pip install -i https://pypi.cloud.soda.io soda-postgres
# For zsh interactive shell
pip install -i https://pypi.cloud.soda.io "soda-postgres"deactivate#bash
pip install -i https://pypi.cloud.soda.io soda-postgres[pydanticv1]
#zsh
pip install -i https://pypi.cloud.soda.io "soda-spark-df[pydanticv1]"soda update-dro -d your_datasource_name -c your_configuration_file.yml ./distribution_reference.yml soda update-dro -n dro_name1 -d your_datasource_name -c your_configuration_file.yml ./distribution_reference.yml dataset: dim_customer
column: number_cars_owned
distribution_type: categorical
filter: date_first_purchase between '2010-01-01' and '2020-01-01'
distribution reference:
weights:
- 0.34932914953473276
- 0.2641744211209695
- 0.22927937675827742
- 0.08899588833585804
- 0.06822116425016231
bins:
- 2
- 1
- 0
- 3
- 4soda scan -d your_datasource_name checks.yml -c /path/to/your_configuration_file.yml your_check_file.ymldocker run -v /path/to/your_soda_directory:/sodacl sodadata/soda-library scan -d your_data_source -c /sodacl/your_configuration.yml /sodacl/your_checks.ymldocker run -v /path/to/your_soda_directory:/sodacl sodadata/soda-library:v1.0.0 scan -d your_data_source -c /sodacl/your_configuration.yml /sodacl/your_checks.ymlpip install -i https://pypi.cloud.soda.io soda-scientificdataset: your_dataset_name
column: column_name_in_dataset
distribution_type: categorical
# (optional) filter to a specific point in time or any other dimension
filter: "column_name between '2010-01-01' and '2020-01-01'"
# (optional) database specific sampling query, for example for postgres\
# the following query randomly samples 50% of the data with seed 61dro_name1:
dataset: your_dataset_name
column: column_name_in_dataset
distribution_type: categorical
dro_name2:
dataset: your_dataset_name
column: column_name2_in_dataset
distribution_type: continuouschecks for your_dataset_name:
- distribution_difference(column_name, dro_name) > your_threshold:
method: your_method_of_choice
distribution reference file: ./distribution_reference.yml
# (optional) filter to a specific point in time, or any other dimension
filter: column_name > min_allowed_column_value and column_name < max_allowed_value
# (optional) database specific sampling query for continuous columns. For
# example, for PostgreSQL, the following query randomly samples 50% of the data
# with seed 61
sample: TABLESAMPLE BERNOULLI (50) REPEATABLE (61)import numpy as np
arr = np.array([0, 0, 0, 1, 2, 3, 3, 4, 10e6])
number_of_bins = np.histogram_bin_edges(arr, bins='auto').size # return 3466808checks for dim_customer:
- distribution_difference(budget) < 0.05:
distribution reference file: ./dro_dim_customer.yml
method: ks
# (optional) data source-specific sampling query; for example for postgres\
# the following query randomly samples 50% of the data with seed 61
sample: TABLESAMPLE BERNOULLI (50) REPEATABLE (61)checks for dim_customer:
- distribution_difference(number_cars_owned) > 0.05:
distribution reference file: ./cars_owned_dist_ref.yml
method: chi_square
# (optional) data source-specific sampling query, for example for postgres\
# the following query randomly samples 50% of the data
filter: rand() < 0.5dataset: your_dataset_name
column: column_name_in_dataset
distribution_type: categorical
# (optional) data source-specific sampling query; for example for postgres\
# the following query randomly samples 50% of the data
filter: rand() < 0.5checks for dim_customer:
- distribution_difference(number_cars_owned) > 0.05:
method: chi_square
distribution reference file: ./cars_owned_dist_ref.yml
checks for fact_sales_quota:
- distribution_difference(calendar_quarter) < 0.2:
method: psi
distribution reference file: ./sales_dist_ref.ymlchecks for dim_customer:
- distribution_difference(number_cars_owned, cars_owned_dro) > 0.05:
method: chi_square
distribution reference file: ./distribution_reference.yml
checks for fact_sales_quota:
- distribution_difference(calendar_quarter, calendar_quarter_dro) < 0.2:
method: psi
distribution reference file: ./distribution_reference.ymlchecks for dim_customer:
- distribution_difference(number_cars_owned, cars_owned_dro) > 0.05:
method: chi_square
distribution reference file: ./distribution_reference.yml
- distribution_difference(total_children, total_children_dro) < 0.2:
method: psi
distribution reference file: ./distribution_reference.yml
checks for fact_sales_quota:
- distribution_difference(calendar_quarter, calendar_quarter_dro) < 0.2:
method: psi
distribution reference file: ./distribution_reference.ymlchecks for dim_customer:
- distribution_difference(number_cars_owned) > 0.05:
method: chi_square
distribution reference file: dist_ref.yml
name: Distribution checkchecks for dim_customer:
- distribution_difference("number_cars_owned") < 0.2:
method: psi
distribution reference file: dist_ref.yml
name: Distribution checkfor each dataset T:
dataset:
- dim_customer
checks:
- distribution_difference(number_cars_owned) < 0.15:
method: swd
distribution reference file: dist_ref.ymlchecks for dim_customer:
- distribution_difference(number_cars_owned) < 0.05:
method: swd
distribution reference file: dist_ref.yml
filter: date_first_purchase between '2010-01-01' and '2022-01-01'filter dim_customer [first_purchase]:
where: date_first_purchase between '2010-01-01' and '2022-01-01'
checks for dim_customer [first_purchase]:
- distribution_difference(number_cars_owned) < 0.05:
method: swd
distribution reference file: dist_ref.ymlchecks for dim_customer:
- distribution_difference(number_cars_owned) > 0.05:
distribution reference file: ./cars_owned_dist_ref.yml
method: chi_square
sample: TABLESAMPLE BERNOULLI (50) REPEATABLE (61) =
<
>
<=
>=
!=
<>
between
not between pip install -i https://pypi.cloud.soda.io soda-scientificdocker pull sodadata/soda-library:v1.0.3docker run sodadata/soda-library:v1.0.3 --help Usage: soda [OPTIONS] COMMAND [ARGS]...
Soda Library CLI version 1.0.x, Soda Core CLI version 3.0.xx
Options:
--version Show the version and exit.
--help Show this message and exit.
Commands:
ingest Ingests test results from a different tool
scan Runs a scan
suggest Generates suggestions for a dataset
test-connection Tests a connection
update-dro Updates contents of a distribution reference fileWARNING: The requested image's platform (linux/amd64) does not match the detected host platform (linux/arm64/v8) and no specific platform was requesteddocker: Error response from daemon: Mounts denied:
The path /soda-library-test/files is not shared from the host and is not known to Docker.
You can configure shared paths from Docker -> Preferences... -> Resources -> File Sharing.
See https://docs.docker.com/desktop/mac for more info.Soda Library 1.0.x
Configuration path 'configuration.yml' does not exist
Path "checks.yml" does not exist
Scan summary:
No checks found, 0 checks evaluated.
2 errors.
Oops! 2 errors. 0 failures. 0 warnings. 0 pass.
ERRORS:
Configuration path 'configuration.yml' does not exist
Path "checks.yml" does not existchecks for dim_customer:
# Check for valid values
- invalid_count(customer_id) = 0:
invalid regex: ^(?!\d{8}$).+$
- invalid_count(email_address) = 0:
valid format: email
- invalid_percent(english_education) = 0:
valid length: 100
- invalid_percent(total_children) <= 2:
valid max: 6
- invalid_percent(marital_status) = 0:
valid max length: 10
- invalid_count(number_cars_owned) = 0:
valid min: 1
- invalid_percent(marital_status) = 0:
valid min length: 1
- invalid_count(house_owner_flag) = 0:
valid values: [0, 1]checks for dim_customer:
# Check for invalid values
- invalid_count(first_name) = 0:
invalid values: [Antonio]
- invalid_count(number_cars_owned) = 0:
invalid values: [0, 3] 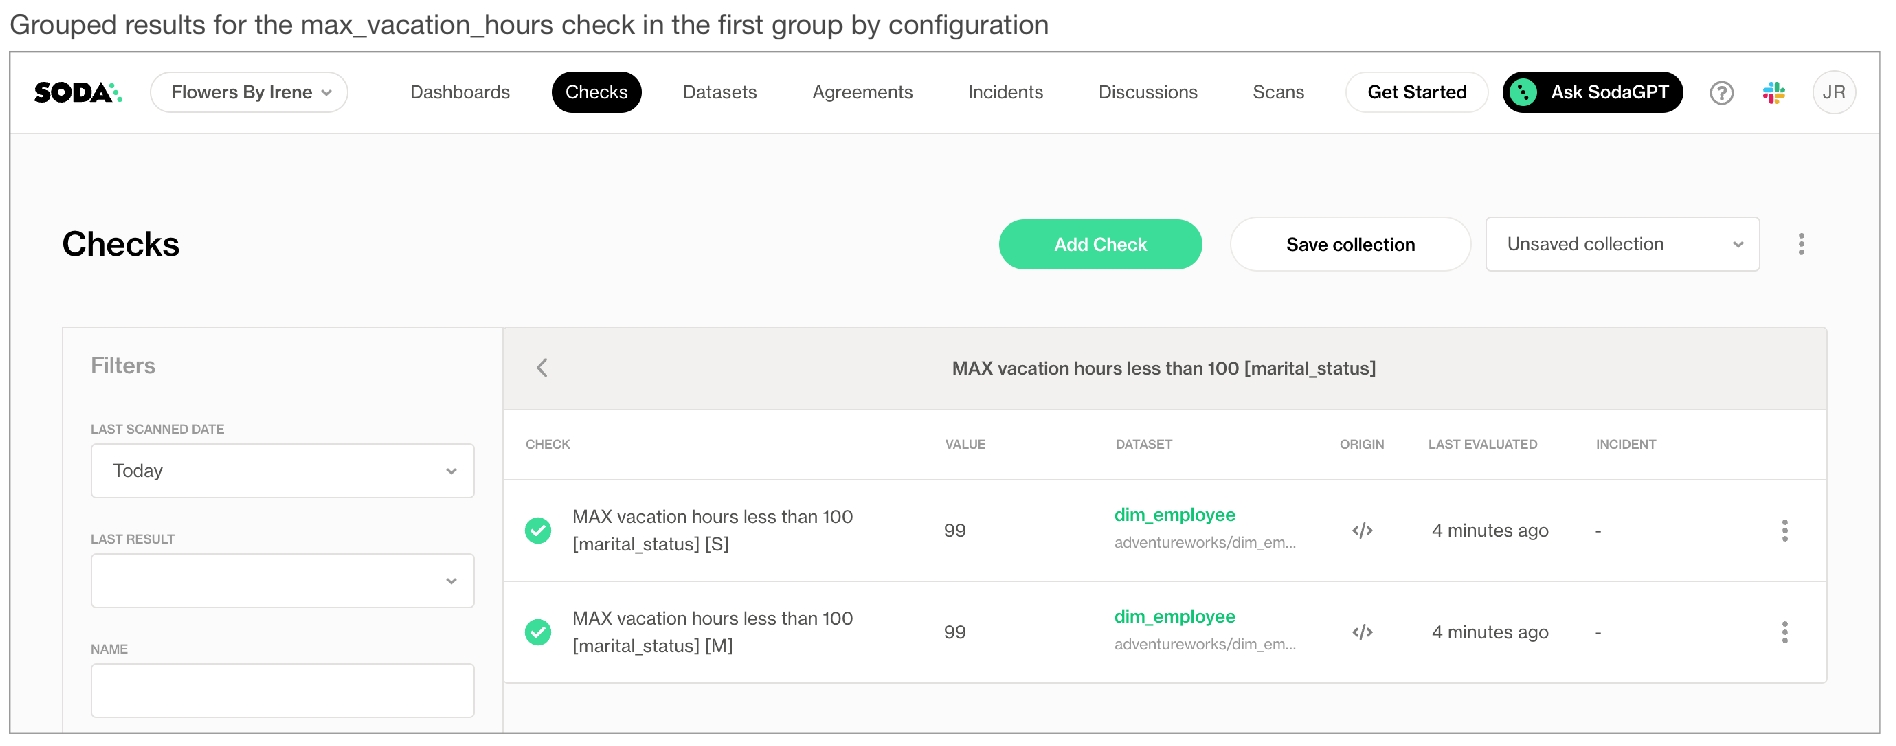
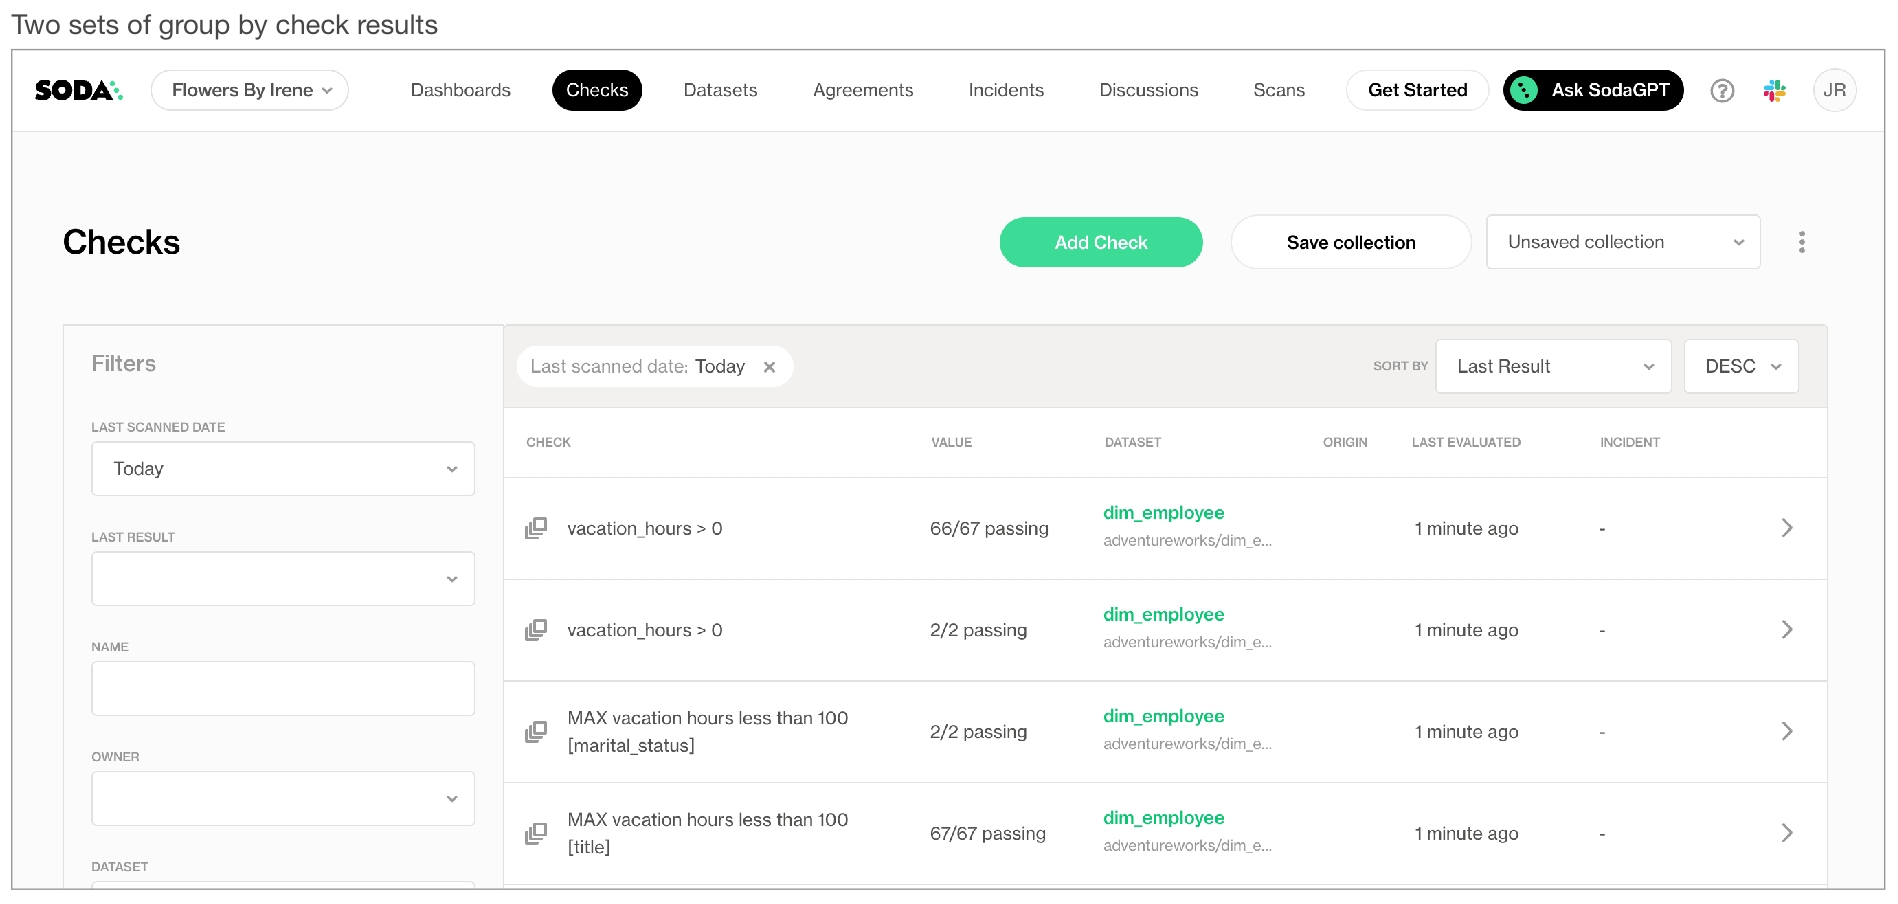
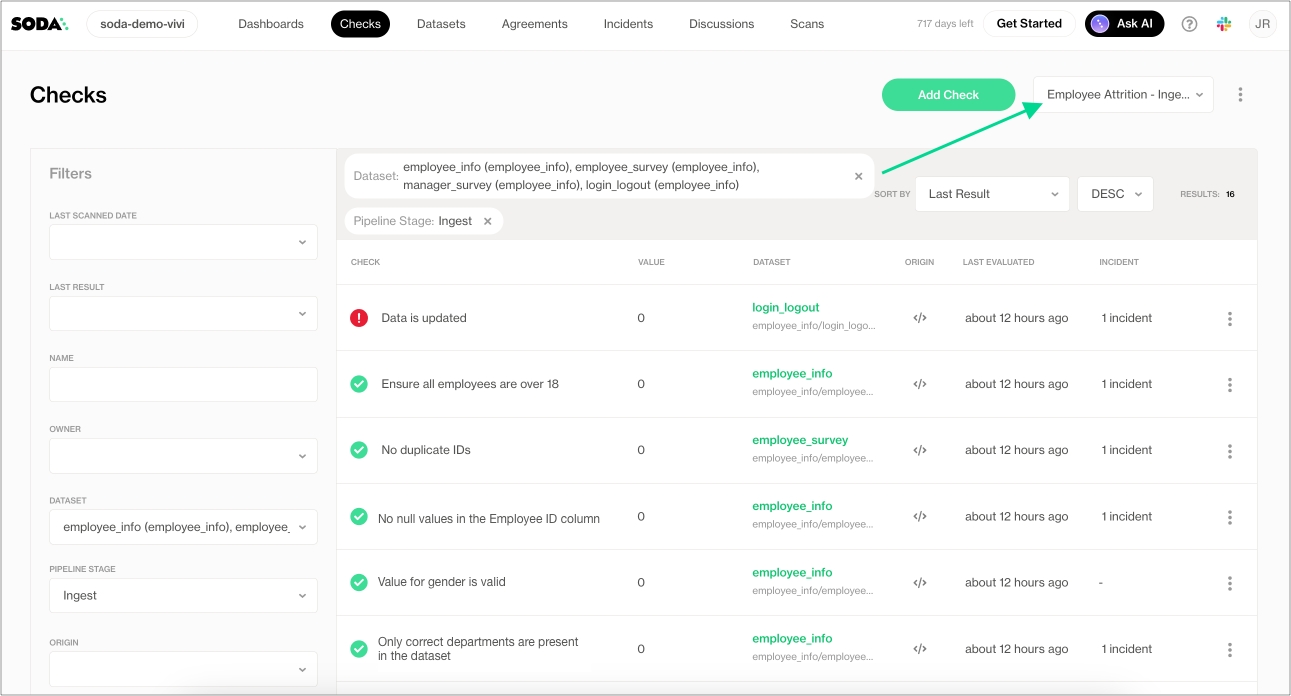
Databricks
soda-spark[databricks]
Denodo
soda-denodo
Dremio
soda-dremio
DuckDB
soda-duckdb
GCP BigQuery
soda-bigquery
Google CloudSQL
soda-postgres
IBM DB2
soda-db2
MS SQL Server
soda-sqlserver
MySQL
soda-mysql
OracleDB
soda-oracle
PostgreSQL
soda-postgres
Snowflake
soda-snowflake
Trino
soda-trino
Vertica
soda-vertica
sodadata/soda-library refers to the image that docker run must use.
scan instructs Soda Library to execute a scan of your data.
-d indicates the name of the data source to scan.
-c specifies the filepath and name of the configuration YAML file.
scipy>=1.8.0
numpy>=1.23.3, <2.0.0
inflection==0.5.1
httpx>=0.18.1,<2.0.0
PyYAML>=5.4.1,<7.0.0
cython>=0.22
prophet>=1.1.0,<2.0.0
Use the ls command to determine the version number of cmndstan that prophet installed. The cmndstan directory name includes the version number.
Add the rpath of the tbb library to your prophet installation using the following command.
With cmdstan version 2.26.1, you would use the following command.
When you are ready to run a Soda scan, use the following command to run the scan via the docker image. Replace the placeholder values with your own file paths and names.
Optionally, you can specify the version of Soda Library to use to execute the scan. This may be useful when you do not wish to use the latest released version of Soda Library to run your scans. The example scan command below specifies Soda Library version 1.0.0.
sodadata/soda-library refers to the image that docker run must use.
scan instructs Soda Library to execute a scan of your data.
-d indicates the name of the data source to scan.
-c specifies the filepath and name of the configuration YAML file.
Databricks
soda-spark[databricks]
Denodo
soda-denodo
Dremio
soda-dremio
DuckDB
soda-duckdb
GCP BigQuery
soda-bigquery
Google CloudSQL
soda-postgres
IBM DB2
soda-db2
Local file
Use Dask.
MotherDuck
soda-duckdb
MS SQL Server
soda-sqlserver
MySQL
soda-mysql
OracleDB
soda-oracle
PostgreSQL
soda-postgres
Presto
soda-presto
Snowflake
soda-snowflake
Trino
soda-trino
Vertica
soda-vertica
Amazon Athena
soda-athena
Amazon Redshift
soda-redshift
Apache Spark DataFrame (For use with programmatic Soda scans, only.)
soda-spark-df
Azure Synapse
soda-sqlserver
ClickHouse
soda-mysql
Dask and Pandas
soda-pandas-dask
Soda then performs two calculations. The sum of the count for all categories in a column is always equal to the total row count for the dataset.
missing_count(column_name) + invalid_count(column_name) + valid_count(column_name) = row_count
Similarly, a calculation that uses percentage always adds up to a total of 100 for the column.
missing_percent(name) + invalid_percent(name) + valid_percent(name) = 100
These calculations enable you to write checks that use relative thresholds.
In the example above, the invalid values of the english_education column must be less than three percent of the total row count, or the check fails.
Percentage thresholds are between 0 and 100, not between 0 and 1.
✓
Use quotes when identifying dataset or column names; see . Note that the type of quotes you use must match that which your data source uses. For example, BigQuery uses a backtick (`) as a quotation mark.
Use wildcard characters ( % or * ) in values in the check.
-
✓
Use for each to apply checks with validity metrics to multiple datasets in one scan; see .
✓
Apply a dataset filter to partition data during a scan; see .
✓
Supports samples columns parameter to specify columns from which Soda draws failed row samples.
✓
Supports samples limit parameter to control the volume of failed row samples Soda collects.
✓
Supports collect failed rows parameter instruct Soda to collect, or not to collect, failed row samples for a check.
invalid regex
valid regex
text
valid length
Specifies a valid length for a string. Works with columns that contain data type TEXT, and also with INTEGER on most databases, where implicit casting from string to integer is supported. Note: PostgreSQL does not support this behavior, as it does not implicitly cast strings to integers for this use case.
integer
valid max
Specifies a maximum numerical value for valid values.
integer or float
valid max length
Specifies a valid maximum length for a string. Only works with columns that contain data type TEXT.
integer
valid min
Specifies a minimum numerical value for valid values.
integer or float
valid min length
Specifies a valid minimum length for a string. Only works with columns that contain data type TEXT.
integer
valid regex
Specifies a regular expression to define your own custom valid values.
regex, no forward slash delimiters
valid values
Specifies the values that Soda ought to consider valid.
values in a list
decimal comma
Number uses , as decimal indicator.
decimal point
Number uses . as decimal indicator.
email
integer
Number is whole.
ip address
Four whole numbers separated by .
ipv4 address
Four whole numbers separated by .
ipv6 address
Eight values separated by :
money
A money pattern with currency symbol + decimal point or comma + currency abbreviation.
money comma
A money pattern with currency symbol + decimal comma + currency abbreviation.
money point
A money pattern with currency symbol + decimal point + currency abbreviation.
negative decimal
Negative number uses a , or . as a decimal indicator.
negative decimal comma
Negative number uses , as decimal indicator.
negative decimal point
Negative number uses . as decimal indicator.
negative integer
Number is negative and whole.
negative percentage
Negative number is a percentage.
negative percentage comma
Negative number is a percentage with a , decimal indicator.
negative percentage point
Negative number is a percentage with a . decimal indicator.
percentage comma
Number is a percentage with a , decimal indicator.
percentage point
Number is a percentage with a . decimal indicator.
percentage
Number is a percentage.
phone number
+12 123 123 1234 123 123 1234 +1 123-123-1234 +12 123-123-1234 +12 123 123-1234 555-2368 555-ABCD
positive decimal
Postive number uses a , or . as a decimal indicator.
positive decimal comma
Positive number uses , as decimal indicator.
positive decimal point
Positive number uses . as decimal indicator.
positive integer
Number is positive and whole.
positive percentage
Positive number is a percentage.
positive percentage comma
Positive number is a percentage with a , decimal indicator.
positive percentage point
Positive number is a percentage with a . decimal indicator.
time 12h
Validates against the 12-hour clock. hh:mm:ss
time 12h nosec
Validates against the 12-hour clock. hh:mm
time 24h
Validates against the 244-hour clock. hh:mm:ss
time 24h nosec
Validates against the 24-hour clock. hh:mm
timestamp 12h
Validates against the 12-hour clock. hh:mm:ss
timestamp 24h
Validates against the 24-hour clock. hh:mm:ss
uuid
Universally unique identifier.
negative integer
Number is negative and whole.
phone number
+12 123 123 1234 123 123 1234 +1 123-123-1234 +12 123-123-1234 +12 123 123-1234 555-2368 555-ABCD
positive integer
Number is positive and whole.
uuid
Universally unique identifier.
a metric
an argument
a comparison symbol or phrase
a threshold
a configuration key
a configuration value
metric
invalid_count
argument
house_owner_flag
comparison symbol
=
threshold
0
configuration key
valid values
configuration value(s)
0, 1
metric
invalid_count
argument
last_name
comparison symbol or phrase
=
threshold
0
configuration key
invalid regex
configuration value(s)
(?:XX)
metric
invalid_percent
argument
email_address
comparison symbol or phrase
=
threshold
0
configuration key
valid format
configuration value(s)
email
✓
Define a name for a check with validity metrics; see example.
✓
Add an identity to a check.
✓
Define alert configurations to specify warn and fail thresholds; see example.
✓
Apply an in-check filter to return results for a specific portion of the data in your dataset; see example.
invalid_count
invalid format
invalid values
valid format
valid length
valid max
valid max length
valid min
valid min length
valid values
The number of rows in a column that contain values that are not valid.
number text time
invalid regex
valid regex
text
invalid_percent
invalid format
invalid values
valid format
valid length
valid max
valid max length
valid min
valid min length
valid values
The percentage of rows in a column, relative to the total row count, that contain values that are not valid.
invalid format
Defines the format of a value that Soda ought to register as invalid. Only works with columns that contain data type TEXT.
invalid regex
Specifies a regular expression to define your own custom invalid values.
regex, no forward slash delimiters
invalid values
Specifies the values that Soda ought to consider invalid.
valid format
Defines the format of a value that Soda ought to register as valid. Only works with columns that contain data type TEXT.
credit card number
Four four-digit numbers separated by spaces. Four four-digit numbers separated by dashes. Sixteen-digit number. Four five-digit numbers separated by spaces.
date eu
Validates date only, not time. dd/mm/yyyy
date inverse
Validates date only, not time. yyyy/mm/dd
date iso 8601
Validates date and/or time according to ISO 8601 format . 2021-04-28T09:00:00+02:00
date us
Validates date only, not time. mm/dd/yyyy
decimal
Number uses a , or . as a decimal indicator.
date eu
Validates date only, not time. dd/mm/yyyy
date inverse
Validates date only, not time. yyyy/mm/dd
date us
Validates date only, not time. mm/dd/yyyy
decimal
Number uses a , or . as a decimal indicator.
integer
Number is whole.
ip address
Four whole numbers separated by .
Need help? Join the Soda community on Slack.
number text time
See .
Choose a flavor of Soda
Set up Soda: install, deploy, or invoke
Write SodaCL checks
Run scans and review results 📍 You are here! a. Scan for data quality b. View scan results
Organize, alert, investigate
✖️ Requires Soda Core Scientific ✖️ Requires Soda Core ✖️ Requires Soda Library + Soda Cloud ✔️ Requires Soda Agent + Soda Cloud
When you create a no-code check in Soda Cloud, one of the required fields asks that you associate the check with an existing scan definition, or that you create a new scan definition.
If you wish to change a no-code check's existing scan definition:
As a user with permission to do so, navigate to the dataset in which the no-code check exists.
From the dataset's page, locate the check you wish to adjust, and click the stacked dots at right, then select Edit Check. You can only edit a check via the no-code interface if it was first created as a no-code check, as indicated by the cloud icon in the Origin column of the table of checks.
Adjust the value in the Add to Scan Definition field as needed, then save. Soda executes the check during the next scan according to the definition you selected.
If you wish to schedule a new scan to execute a no-code check more or less frequently, or at a different time of day:
From the dataset's page, locate the check you wish to adjust and click the stacked dots at right, then select Edit Check. You can only edit a check via the no-code interface if it was first created as a no-code check, as indicated by the cloud icon in the Origin column of the table of checks.
Use the dropdown in the Add to Scan Definition field to access the create a new Scan Definition link.
Fill out the form to define your new scan definition, then save it. Save the change to your no-code check. Soda executes the check during the next scan according to your new definition.
✖️ Requires Soda Core Scientific ✖️ Requires Soda Core ✖️ Requires Soda Library + Soda Cloud ✔️ Requires Soda Agent + Soda Cloud
When you create a Soda Agreement in Soda Cloud, the last step in the flow demands that you select a scan definition. The scan definition indicates which Soda Agent to use to execute the scan, on which data source, and when. Effectively, a scan definition defines the what, when, and where to run a scheduled scan.
If you wish to change an agreement's existing scan definition:
Navigate to Agreements, then click the stacked dots next to the agreement you wish to change and select Edit Agreement.
In the Set a Scan schedule tab, then use the dropdown menu to select a different scan definition.
Save your change. The agreement edit triggers a new stakeholder approval request to all stakeholders. Your revised agreement does not run again until all stakehoders have approved it.
If you wish to schedule a new scan to execute the checks in an agreement more or less frequently, or at a different time of day:
Navigate to Agreements, then click the stacked dots next to the agreement you wish to change and select Edit Agreement.
In the Set a Scan schedule tab, then click the new Scan Definition link and populate the fields as in the example below.
Save your change. The agreement edit triggers a new stakeholder approval request to all stakeholders. Your revised agreement does not run again until all stakehoders have approved it.
✖️ Requires Soda Core Scientific ✖️ Requires Soda Core ✖️ Requires Soda Library + Soda Cloud ✔️ Requires Soda Agent + Soda Cloud
If you wish to run a scan immediately to see the scan results for a no-code check, you can execute an ad hoc scan for a single check.
As a user with the permission to do so, navigate to the dataset associated with the no-code check you wish to execute.
✖️ Requires Soda Core Scientific ✔️ Supported in Soda Core ✔️ Supported in Soda Library + Soda Cloud ✖️ Requires Soda Agent + Soda Cloud
Based on a set of conditions or a specific event schedule, you can programmatically invoke Soda Library to automatically scan a data source. For example, you may wish to scan your data at several points along your data pipeline, perhaps when new data enters a data source, after it is transformed, and before it is exported to another data source.
Refer to for more information.
✖️ Requires Soda Core Scientific ✖️ Requires Soda Core ✖️ Requires Soda Library + Soda Cloud ✔️ Requires Soda Agent + Soda Cloud
You can programmatically initiate a scan your team defined in Soda Cloud using the Soda Cloud API.
If you have defined a in Soda Cloud, and the scan definition executes on a schedule via a self-hosted or Soda-hosted agent, and you have the to do so in your Soda Cloud account, you can use the API to:
Problem: When running a programmatic scan or a scan from the command-line, I get an error that reads Error while executing Soda Cloud command response code: 400.
Solution: While there may be several reasons Soda returns a 400 error, you can address the following which may resolve the issue:
Upgrade to the latest version of Soda Library.
Confirm that all the checks in your checks YAML file identify a dataset against which to execute. For example, the following syntax yields a 400 error because the checks: does not identify a dataset.
Soda Cloud displays the latest status of all of your checks in the Checks dashboard. There two methods through which a check and its latest result appears on the dashboard.
When you define checks in a checks YAML file and use Soda Library to run a scan, the checks and their latest results manifest in the Checks dashboard in Soda Cloud.
Any time Soda Cloud runs a scheduled scan of your data as part of an agreement, it displays the checks and their latest results in the Checks dashboard.
As a result of a scan, each check results in one of three default states:
pass: the values in the dataset match or fall within the thresholds you specified
fail: the values in the dataset do not match or fall within the thresholds you specified
error: the syntax of the check is invalid
A fourth state, warn, is something you can explicitly configure for individual checks. See Add alert configurations.
The scan results appear in your Soda Library command-line interface (CLI) and the latest result appears in the Checks dashboard in the Soda Cloud web application; examples follow.
Optionally, you can add --local option to the scan command to prevent Soda Library from sending check results and any other metadata to Soda Cloud.
Check results indicate whether check passed, warned, or failed during the scan. However, if a scan itself failed to complete successfully, Soda Cloud displays a warning in the Datasets dashboard to indicate the dataset for which a scheuled scan has failed.
See Manage scheduled scans for instructions on how to set up scan failure alerts.
When you notice or receive a notification about a scan failure or delay, you can access the scan’s logs to investigate what is causing the issue.
Log in to your Soda Cloud account, then navigate to Scans, and access the Agents tab.
From the list of scan definitions, select the one that failed or timed out.
On the scan definitions’s page, in the list of scan results, locate the one that failed or timed out, then click the stacked dots to its right and select Scan Logs.
Review the scan log, using the filter to show only warning or errors if you wish, or downloading the log file for external analysis.
Alternatively, you can access the scan logs from within an agreement.
To examine a detailed scan log of the lastest scan for an agreement, navigate to Agreements, then click to select an agreement.
In the Agreement dashboard, click See results in the Last scan tile, then click the Scan Logs tabs.
To examine the SQL queries that Soda Library prepares and executes as part of a scan, you can add the -V option to your soda scan command. This option prints the queries as part of the scan results.
Optionally, you can insert the output of Soda Library scans into your data orchestration tool such as Dagster, or Apache Airflow.
You can save Soda Library scan results anywhere in your system; the scan_result object contains all the scan result information. To import the Soda Library library in Python so you can utilize the Scan() object, install a Soda Library package, then use from soda.scan import Scan. Refer to Define programmatic scans and Test data in an Airflow pipeline for details.
Choose a flavor of Soda
Set up Soda: install, deploy, or invoke
Write SodaCL checks
Run scans and review results
Need help? Join the .

ls
cmdstan-2.26.1 prophet_model.bininstall_name_tool -add_rpath @executable_path/cmdstanyour_cmdstan_version/stan/lib/stan_math/lib/tbb prophet_model.bininstall_name_tool -add_rpath @executable_path/cmdstan-2.26.1/stan/lib/stan_math/lib/tbb prophet_model.bindocker run -v /path/to/your_soda_directory:/sodacl sodadata/soda-library scan -d your_data_source -c /sodacl/your_configuration.yml /sodacl/your_checks.ymldocker run -v /path/to/your_soda_directory:/sodacl sodadata/soda-library:v1.0.0 scan -d your_data_source -c /sodacl/your_configuration.yml /sodacl/your_checks.ymlpip install -i https://pypi.cloud.soda.io soda-postgresdeactivate#bash
pip install -i https://pypi.cloud.soda.io soda-postgres[pydanticv1]
#zsh
pip install -i https://pypi.cloud.soda.io "soda-spark-df[pydanticv1]"WARNING: The requested image's platform (linux/amd64) does not match the detected host platform (linux/arm64/v8) and no specific platform was requesteddocker run -v /path/to/your_soda_directory:/sodacl sodadata/soda-library scan -d your_data_source -c /sodacl/your_configuration.yml /sodacl/your_checks.ymldocker run -v /path/to/your_soda_directory:/sodacl sodadata/soda-library:v1.0.0 scan -d your_data_source -c /sodacl/your_configuration.yml /sodacl/your_checks.ymldocker: Error response from daemon: Mounts denied:
The path /soda-library-test/files is not shared from the host and is not known to Docker.
You can configure shared paths from Docker -> Preferences... -> Resources -> File Sharing.
See https://docs.docker.com/desktop/mac for more info.Soda Library 1.0.x
Configuration path 'configuration.yml' does not exist
Path "checks.yml" does not exist
Scan summary:
No checks found, 0 checks evaluated.
2 errors.
Oops! 2 errors. 0 failures. 0 warnings. 0 pass.
ERRORS:
Configuration path 'configuration.yml' does not exist
Path "checks.yml" does not existpip install -i https://pypi.cloud.soda.io soda-scientificcd path_to_your_python_virtual_env/lib/pythonyour_version/site_packages/prophet/stan_model/cd ~/venvs/soda-library-prophet11/lib/python3.9/site-packages/prophet/stan_model/docker pull sodadata/soda-library:v1.0.3docker run sodadata/soda-library:v1.0.3 --help Usage: soda [OPTIONS] COMMAND [ARGS]...
Soda Library CLI version 1.0.x, Soda Core CLI version 3.0.xx
Options:
--version Show the version and exit.
--help Show this message and exit.
Commands:
ingest Ingests test results from a different tool
scan Runs a scan
suggest Generates suggestions for a dataset
test-connection Tests a connection
update-dro Updates contents of a distribution reference fileWARNING: The requested image's platform (linux/amd64) does not match the detected host platform (linux/arm64/v8) and no specific platform was requesteddocker: Error response from daemon: Mounts denied:
The path /soda-library-test/files is not shared from the host and is not known to Docker.
You can configure shared paths from Docker -> Preferences... -> Resources -> File Sharing.
See https://docs.docker.com/desktop/mac for more info.Soda Library 1.0.x
Configuration path 'configuration.yml' does not exist
Path "checks.yml" does not exist
Scan summary:
No checks found, 0 checks evaluated.
2 errors.
Oops! 2 errors. 0 failures. 0 warnings. 0 pass.
ERRORS:
Configuration path 'configuration.yml' does not exist
Path "checks.yml" does not exist soda_cloud:
# Use cloud.soda.io for EU region
# Use cloud.us.soda.io for US region
host: https://cloud.soda.io
api_key_id: 2e0ba0cb-your-api-key-7b
api_key_secret: 5wd-your-api-key-secret-aGuRg
scheme:soda test-connection -d my_datasource -c configuration.ymlchecks for dim_customer
- invalid_count(number_cars_owned) = 0:
valid min: 1checks for dim_reseller:
# a check with a fixed threshold
- invalid_count(email_address) = 0:
valid format: email
# a check with a relative threshold
- invalid_percent(english_education) < 3%:
valid max length: 100checks for dim_customer:
- invalid_count(house_owner_flag) = 0:
valid values: [0, 1]
- invalid_count(last_name) = 0:
invalid regex: (?:XX)checks for dim_customer:
- invalid_count(first_name) = 0:
invalid values: [Antonio]checks for dim_customer:
- invalid_percent(email_address) = 0:
valid format: email | HINT: No operator matches the given name and argument types. You might need to add explicit type casts.
Error occurred while executing scan.
| unsupported operand type(s) for *: 'Undefined' and 'int'
checks for dim_customer:
- invalid_percent(email_address) < 50:
samples limit: 2checks for dim_customer:
- invalid_percent(email_address) < 50:
samples limit: 0checks for dim_employee:
- invalid_count(gender) = 0:
valid values: ["M", "Q"]
samples columns: [employee_key, first_name]checks for dim_customer:
- invalid_count(first_name) = 0 :
valid min length: 2
name: First name has 2 or more characters - invalid_count(house_owner_flag):
valid values: [0, 1]
warn: when between 1 and 5
fail: when > 6 checks for dim_customer:
- invalid_percent(marital_status) = 0:
valid max length: 1
filter: total_children = 0checks for dim_customer:
- invalid_count("number_cars_owned") = 0:
valid min: 1for each dataset T:
datasets:
- dim_customer
- dim_customer_%
checks:
- invalid_count(email_address) = 0:
valid format: emailfilter CUSTOMERS [daily]:
where: TIMESTAMP '{ts_start}' <= "ts" AND "ts" < TIMESTAMP '${ts_end}'
checks for CUSTOMERS [daily]:
- invalid_count(email_address) = 0:
valid format: email =
<
>
<=
>=
!=
<>
between
not between checks:
- schema:
warn:
when schema changes: anySoda Library 1.0.x
Soda Core 3.0.x
Sending failed row samples to Soda Cloud
Scan summary:
6/9 checks PASSED:
paxstats in paxstats2
row_count > 0 [PASSED]
check_value: 15007
Look for PII [PASSED]
duplicate_percent(id) = 0 [PASSED]
check_value: 0.0
row_count: 15007
duplicate_count: 0
missing_count(adjusted_passenger_count) = 0 [PASSED]
check_value: 0
anomaly detection for row_count [PASSED]
check_value: 0.0
Schema Check [PASSED]
1/9 checks WARNED:
paxstats in paxstats2
Abnormally large PAX count [WARNED]
check_value: 659837
2/9 checks FAILED:
paxstats in paxstats2
Validate terminal ID [FAILED]
check_value: 27
Verify 2-digit IATA [FAILED]
check_value: 3
Oops! 2 failure. 1 warning. 0 errors. 6 pass.
Sending results to Soda Cloud
Soda Cloud Trace: 4774***8soda scan -d postgres_retail -c configuration.yml -V checks.yml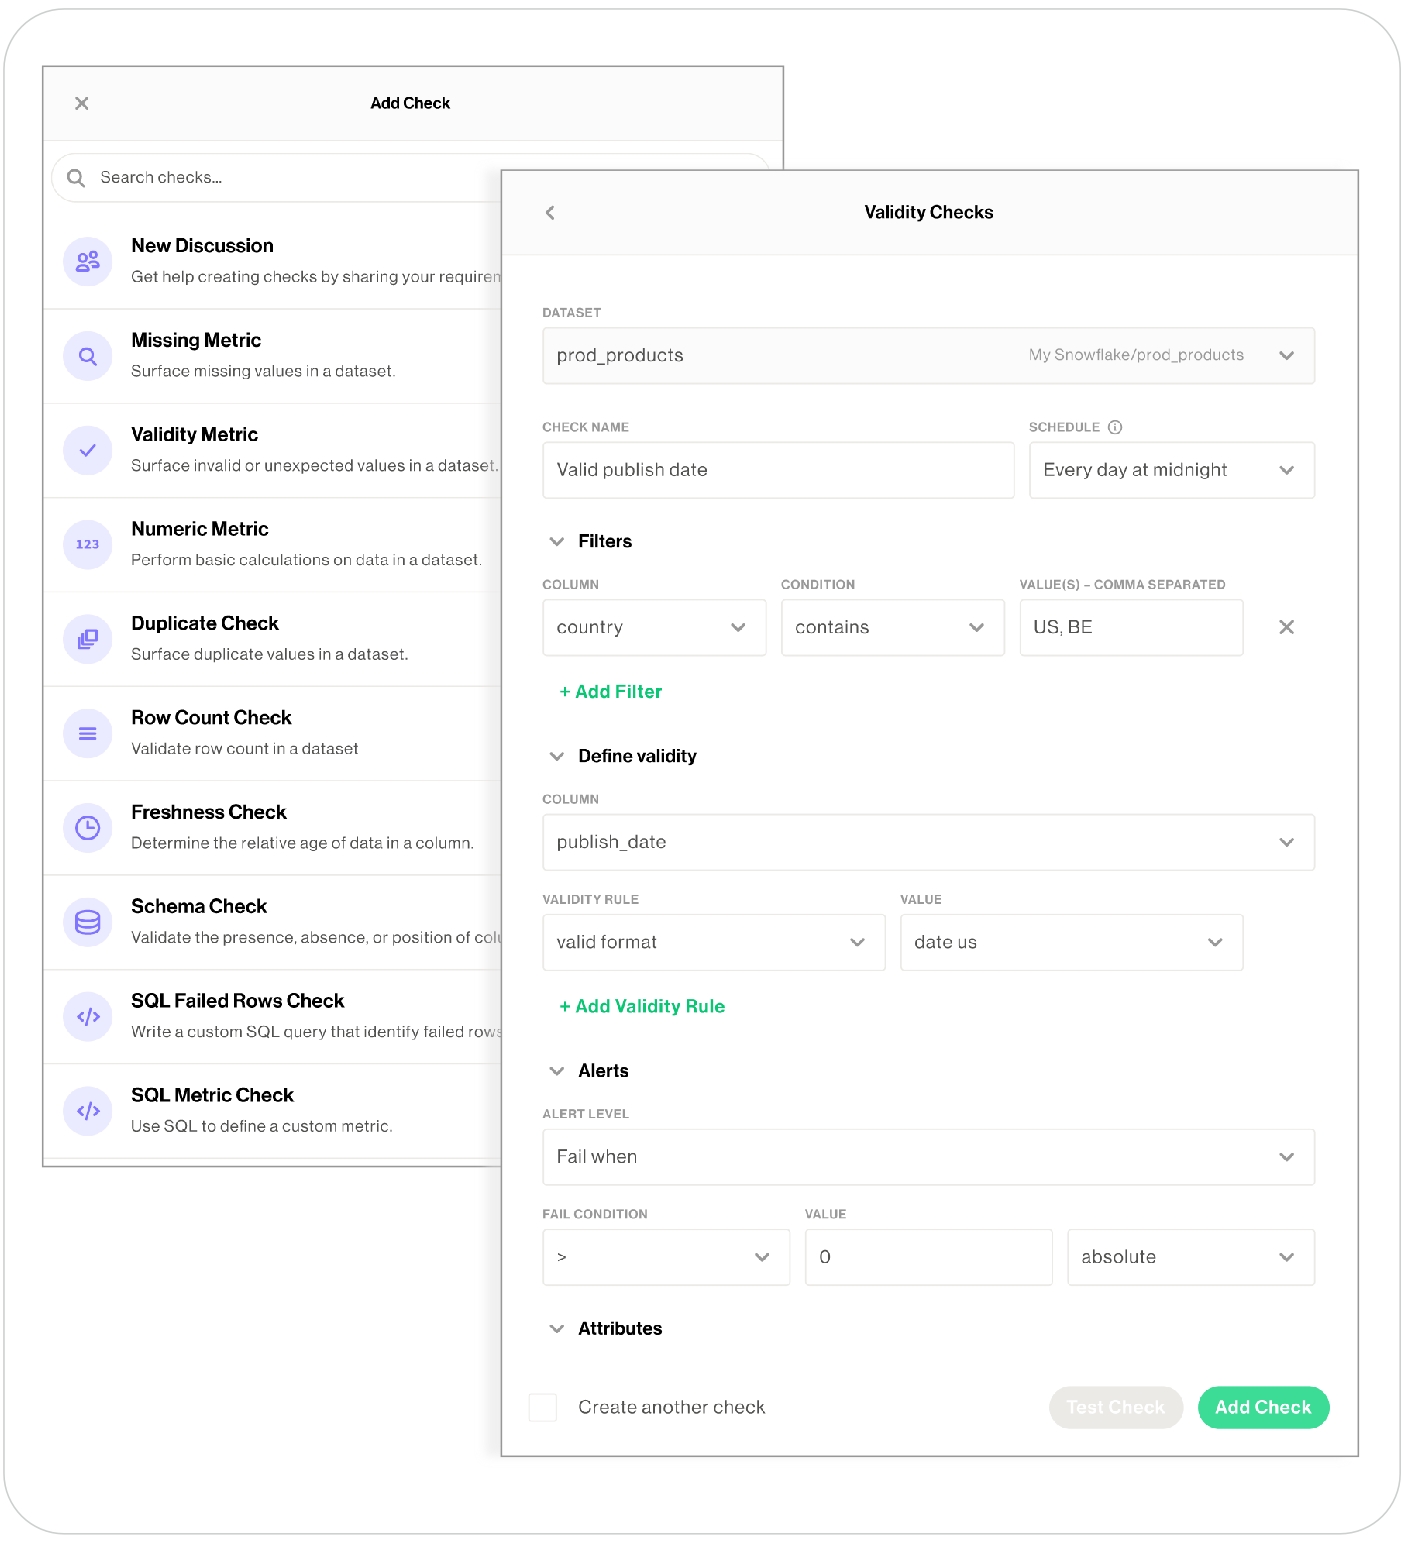
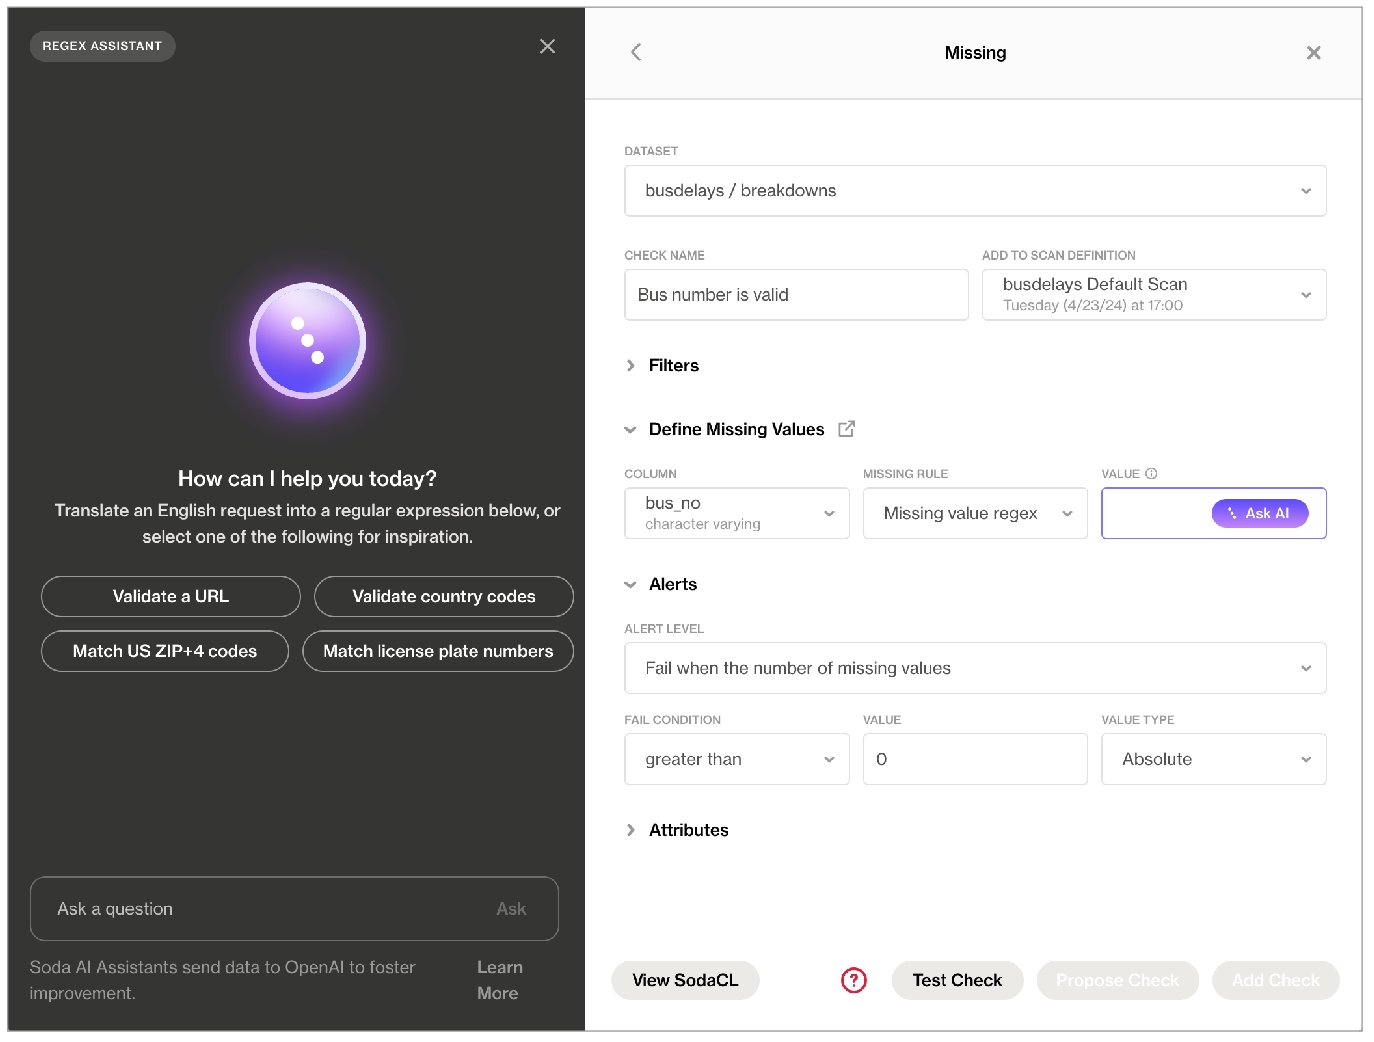
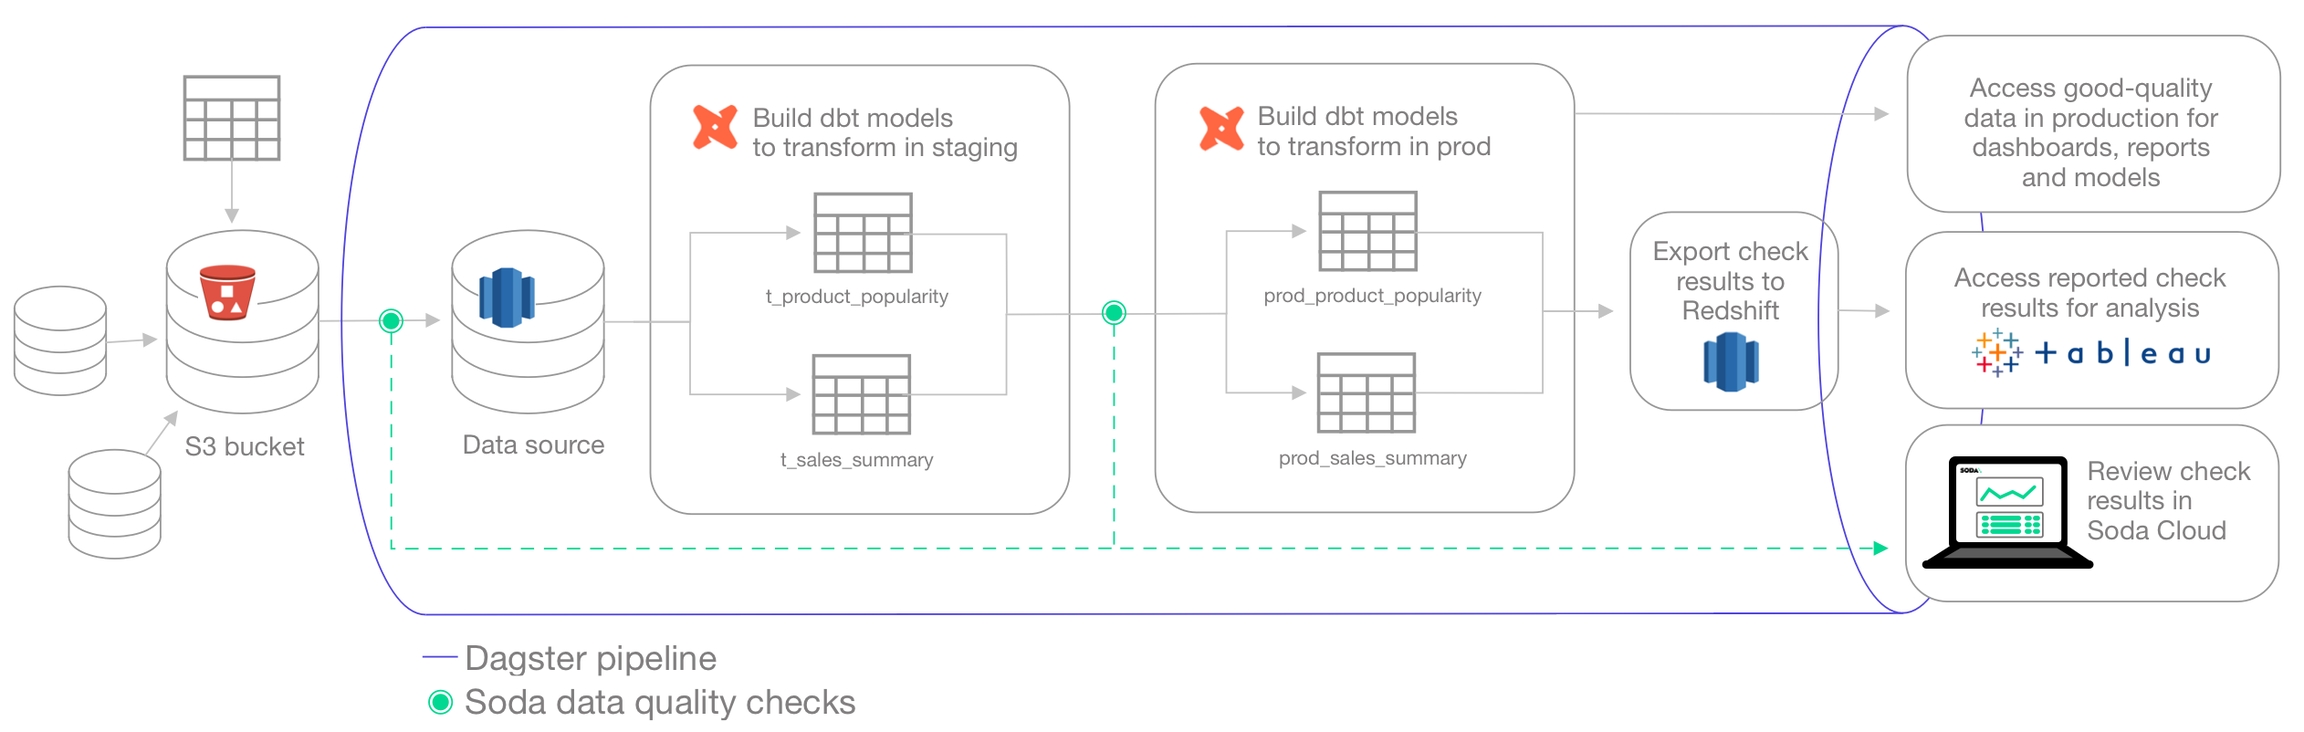
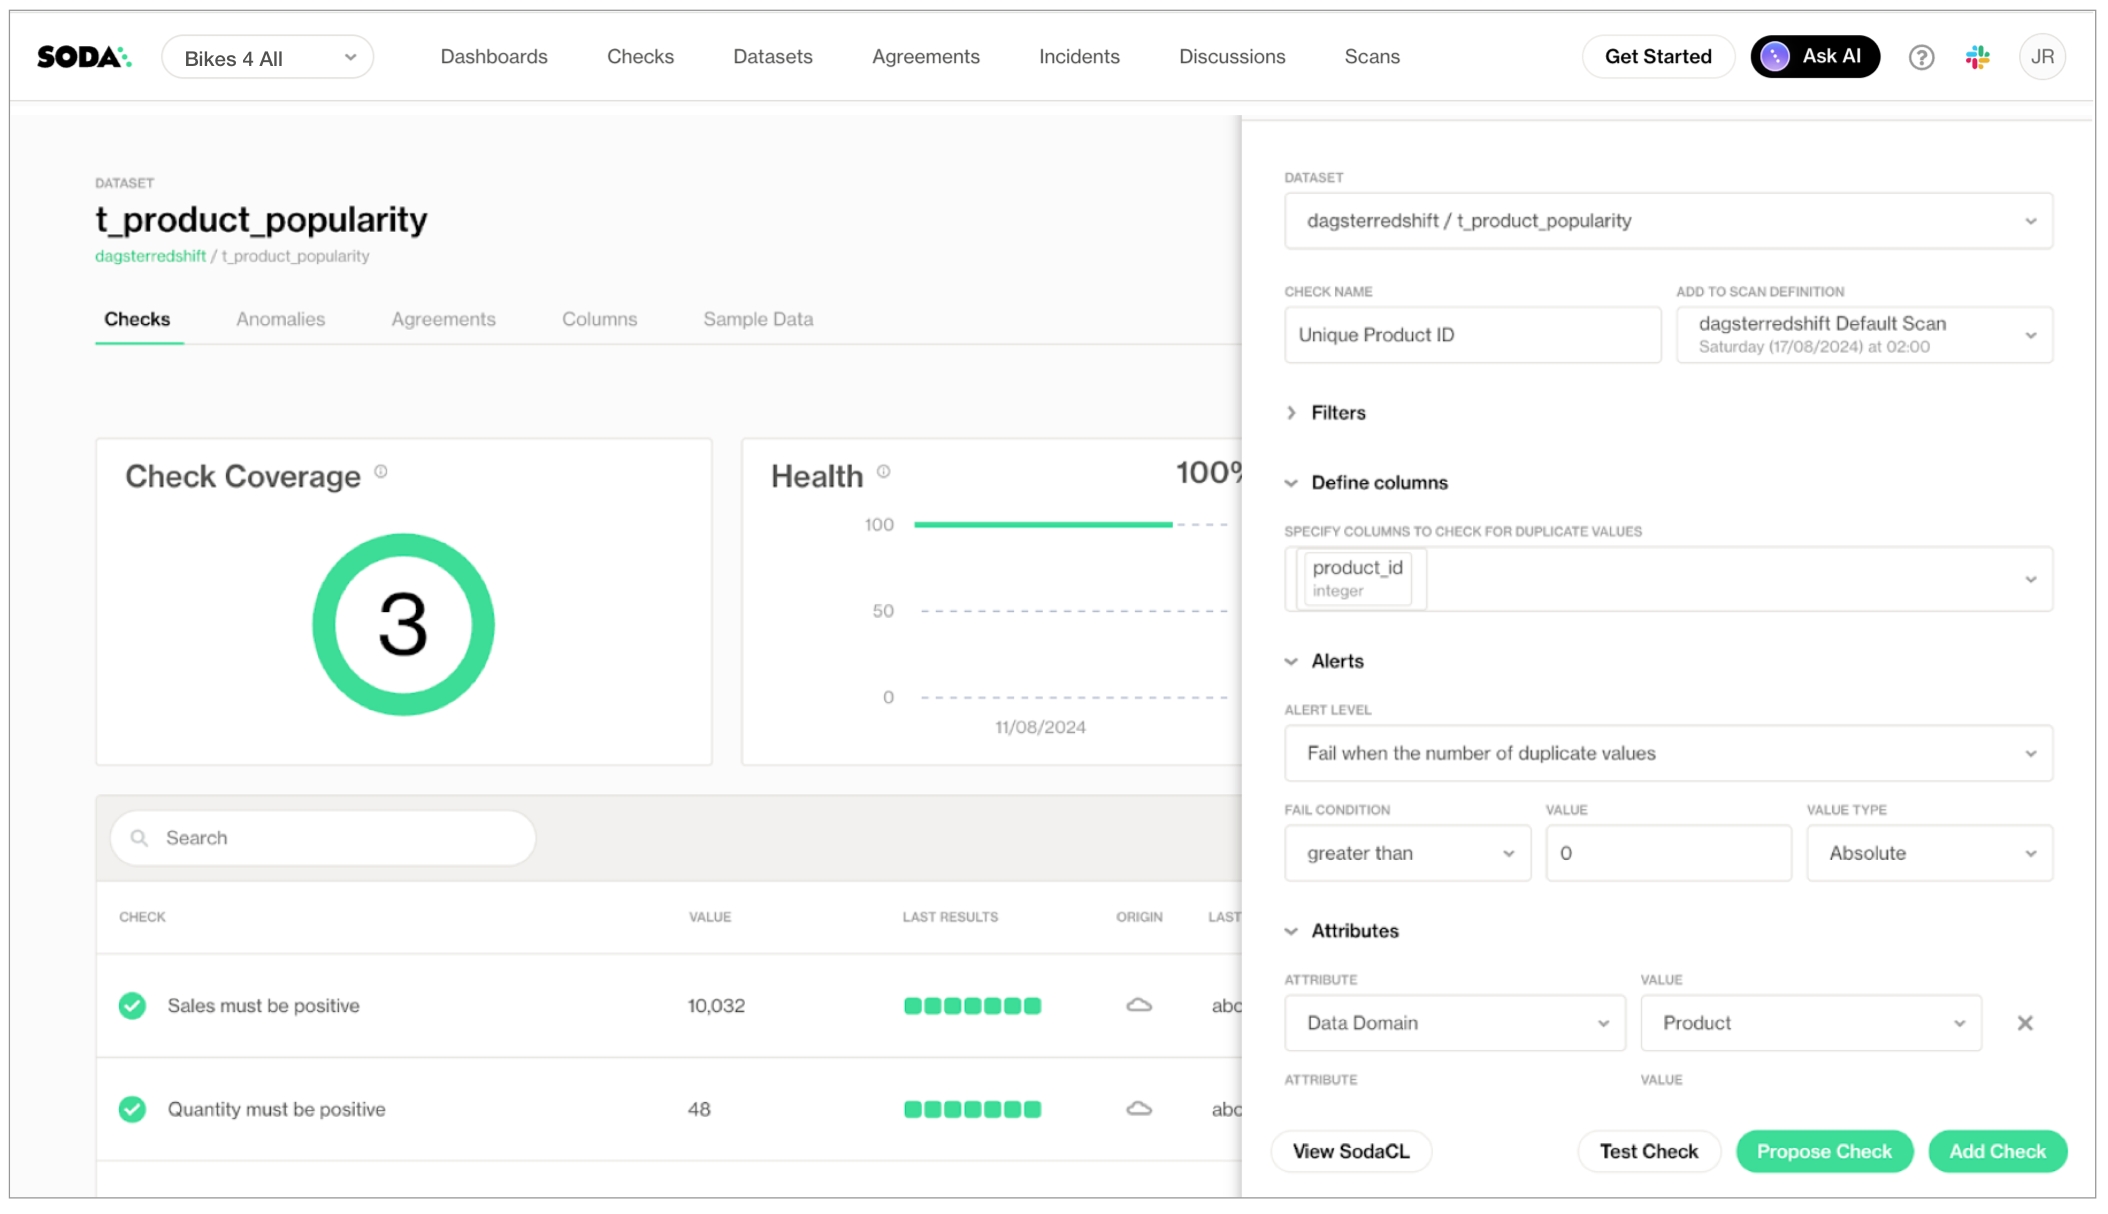
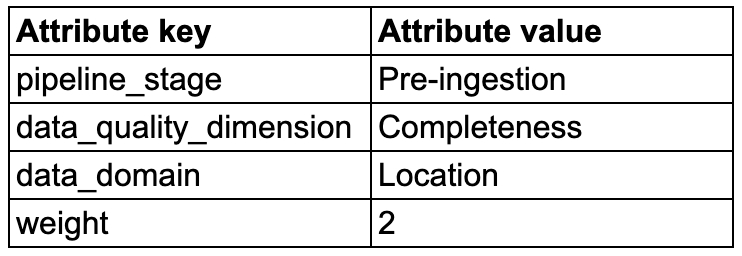
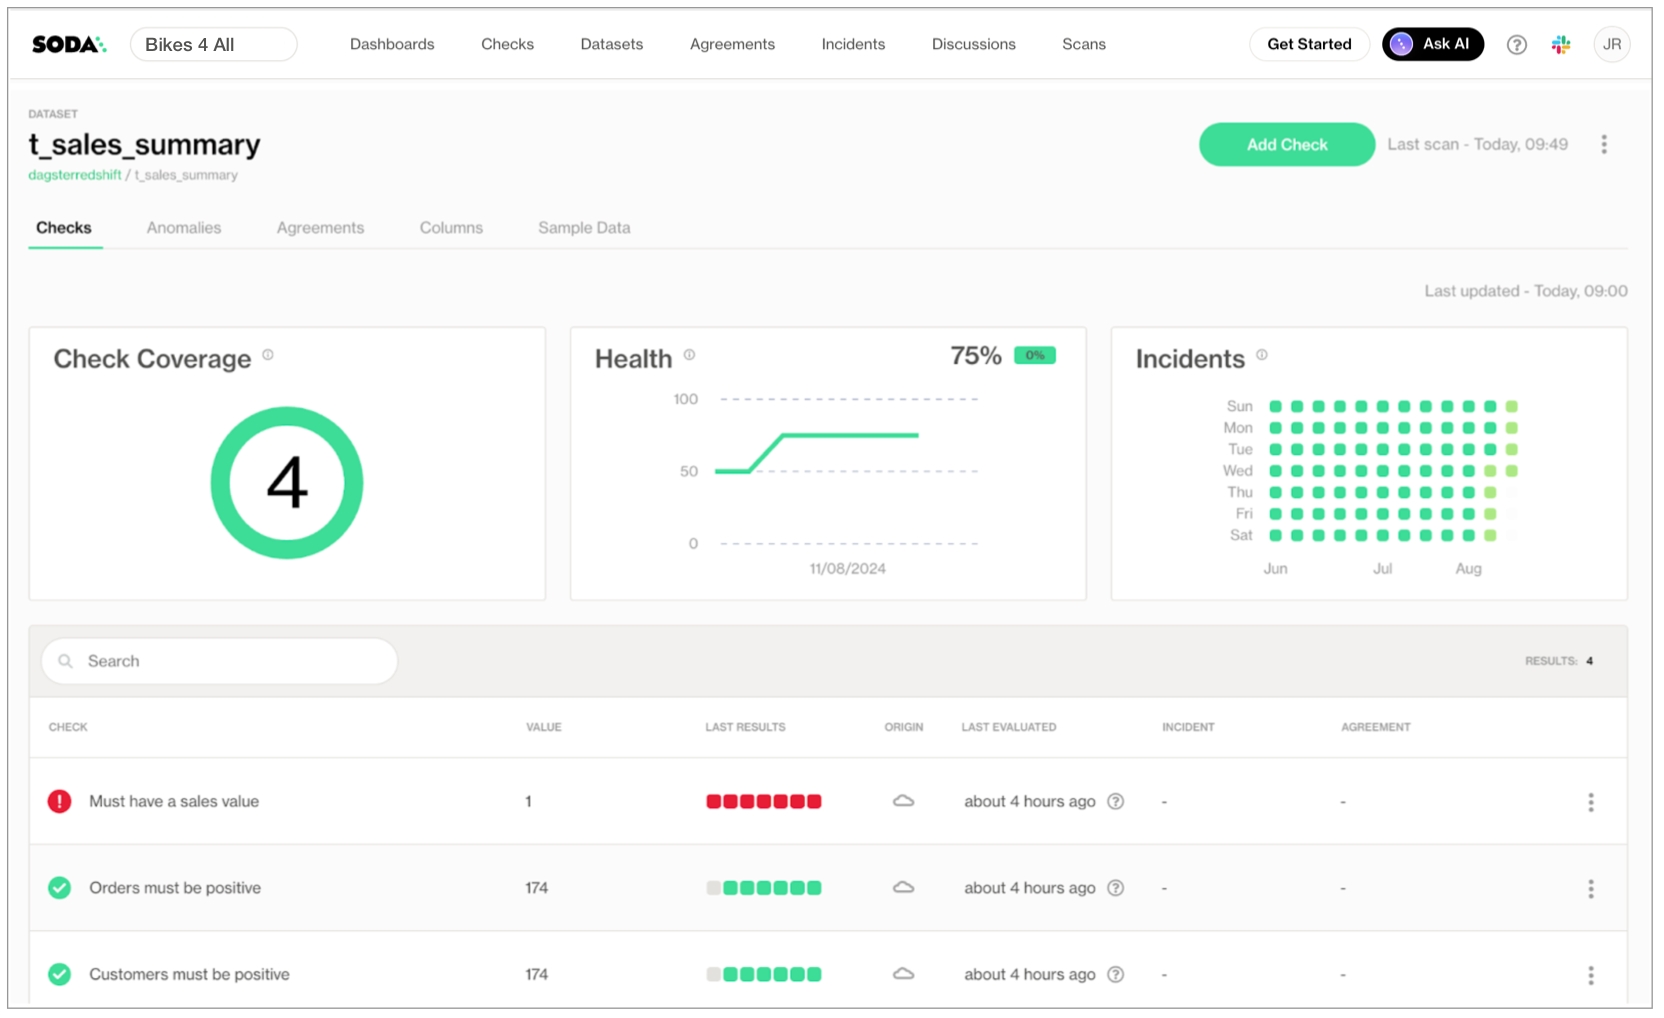
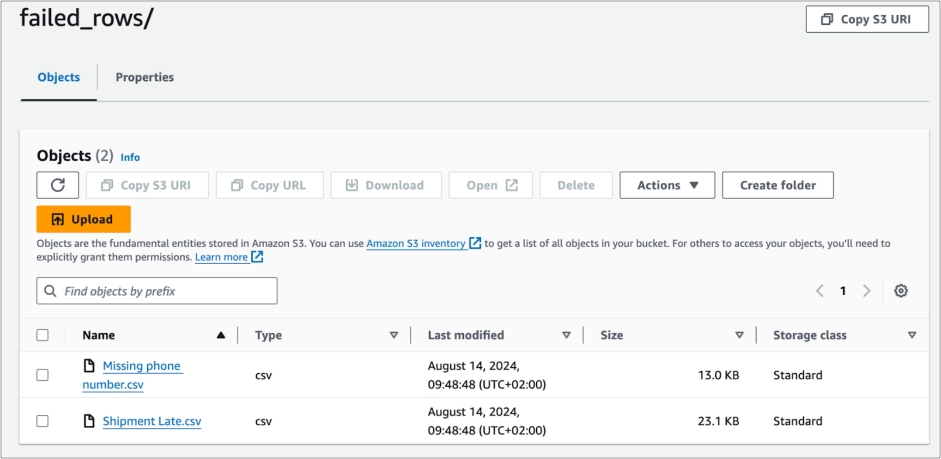
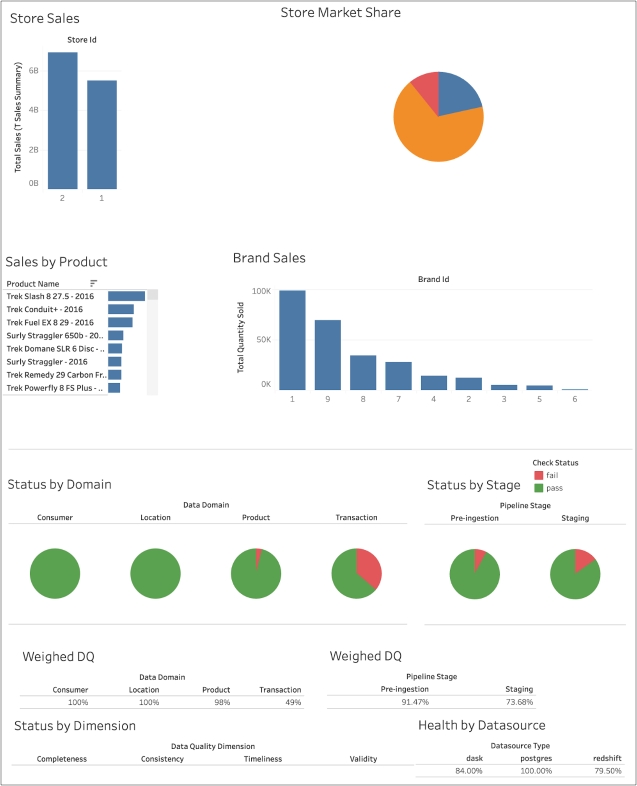
In the table of checks, locate the check you wish to execute and click the stacked dots, then select Execute Check. Alternatively, click the check and in the check's page, click Execute. You can only execute an individual check if it was first created as a no-code check, as indicated by the cloud icon in the Origin column of the table of checks.
Soda executes only your check.
You can also run an ad hoc scan to execute all checks associated with a scan definition.
In Soda Cloud, navigate to Scans.
In the list of scan definitions, click the one that is associated with the checks you wish to execute.
In the scan definition page, click Run Scan to immediately execute all checks that use this scan definition.
✖️ Requires Soda Core Scientific ✖️ Requires Soda Core ✖️ Requires Soda Library + Soda Cloud ✔️ Requires Soda Agent + Soda Cloud
If you wish to run a scan immediately to see the scan results for the checks you included in your agreement, you can run an ad hoc scan from the scan definition.
As a user with the permission to do so in your Soda Cloud account, navigate to Scans.
In the list of scan definitions, click the one that is associated with your agreement. If you don’t know which scan definition your agreement uses, navigate to Agreements, select your agreement, then find the name of the scan definition in the upper-left tile.
In the scan definition page, click Run Scan to immediately execute all agreements and checks that use this scan definition.
✖️ Requires Soda Core Scientific ✔️ Supported in Soda Core ✔️ Supported in Soda Library + Soda Cloud ✖️ Requires Soda Agent + Soda Cloud
Each scan requires the following as input:
the name of the data source that contains the dataset you wish to scan, identified using the -d option
a configuration.yml file, which contains details about how Soda Library can connect to your data source, identified using the -c option
a checks.yml file which contains the checks you write using SodaCL
Scan command:
Note that you can use the -c option to include multiple configuration YAML files in one scan execution. Include the filepath of each YAML file if you stored them in a directory other than the one in which you installed Soda Library.
You can also include multiple checks YAML files in one scan execution. Use multiple checks YAML files to execute different sets of checks during a single scan.
Use the soda soda scan --help command to review options you can include to customize the scan. See also: Add scan options.
✖️ Requires Soda Core Scientific ✔️ Supported in Soda Core ✔️ Supported in Soda Library + Soda Cloud ✖️ Requires Soda Agent + Soda Cloud
There are several ways you can use variables in checks, filters, and in your data source configuration to pass values at scan time; a few examples follow.
Refer to the comprehensive Filters and variables documentation for details.
To provide a variable at scan time, as with dynamic dataset filters or with in-check values, add a -v option to the scan command and specify the key:value pair for the variable, as in the following example.
If you wish, you can provide the value more than one variable at scan time, as in the following example.
If you wish, you can execute a scan using the Soda Library CLI and avoid sending any scan results to Soda Cloud. This is useful if, for example, you are testing checks locally and do not wish to muddy the measurements in your Soda Cloud account with test run metadata.
To do so, add a --local option to your scan command in the CLI, as in the following example.
When you want to run a scan that executes the same checks on different environments or schemas, such as development, production, and staging, you must apply the following configurations to ensure that Soda Cloud does not incomprehensibly merge the checks results from scans of multiple environments.
In your configuration.yml file, provide separate connection configurations for each environment, as in the following example.
Provide a scan definition name at scan time using the -s option. The scan definition helps Soda Cloud to distinguish different scan contexts and therefore plays a crucial role when the checks.yml file names and the checks themselves are the same.
See also: Troubleshoot missing check results
See also: Add a check identity
When you run a scan in Soda Library, you can specify some options that modify the scan actions or output. Add one or more of the following options to a soda scan command.
-c TEXT or
--configuration TEXT
✓
Use this option to specify the file path and file name for the configuration YAML file.
-d TEXT or
--data-source TEXT
✓
Use this option to specify the data source that contains the datasets you wish to scan.
-l or
--local
Use this local option to prevent Soda Library from pushing check results or any other metadata to Soda Cloud.
-s TEXT or
--scan-definition TEXT
Problem: When you run a scan, you get an error that reads, Exception while exporting Span batch.
Solution: Without an internet connection, Soda Library is unable to communicate with soda.connect.io to transmit anonymous usage statistics about the software.
If you are using Soda Library offline, you can resolve the issue by setting send_anonymous_usage_stats: false in your configuration.yml file. Refer to Soda Library usage statistics for further details.
Problem: Check results to be missing in Soda Cloud.
Solution: Because Soda Library pushes scan results to Soda Cloud, you may not want to change the scan definition name with each scan. Soda Cloud uses the scan definition name to correlate subsequent scan results, thus retaining a historical record of the measurements over time. Sometimes, changing the name is useful, like when you wish to Configure a single scan to run in multiple environments. Be aware, however, that if you change the scan definition name with each scan for the same environment, Soda Cloud recognizes each set of scan results as independent from previous scan results, thereby making it appear as though it records a new, separate check result with each scan and archives or "disappears" previous results. See also: Missing check results in Soda Cloud
Problem: In a Windows environment, you see an error that reads [SSL: CERTIFICATE_VERIFY_FAILED] certificate verify failed: unable to get local issuer certificate (ssl_c:997).
Solution: Use pip install pip-system-certs to potentially resolve the issue. This install works to resolve the issue only on Windows machines where the Ops team installs all the certificates needed through Group Policy Objects, or similar.
You can save Soda Library scan results anywhere in your system; the scan_result object contains all the scan result information. To import Soda Library in Python so you can utilize the Scan() object, install a Soda Library package, then use from soda.scan import Scan.
If you provide a name for the scan definition to identify inline checks in a programmatic scan as independent of other inline checks in a different programmatic scan or pipeline, be sure to set a unique scan definition name for each programmatic scan. Using the same scan definition name in multiple programmatic scans results in confused check results in Soda Cloud.
If you wish to collect samples of failed rows when a check fails, you can employ a custom sampler; see Configure a failed row sampler.
Be sure to include any variables in your programmatic scan before the check YAML files. Soda requires the variable input for any variables defined in the check YAML files.
retrieve information about checks and datasets in your Soda Cloud account
execute scans
retrieve information about the state of a scan during execution
access the scan logs of an executed scan
Access the Soda Cloud API documentation to get details about how to programmatically get info and execute Soda Cloud scans.
✖️ Requires Soda Core Scientific ✖️ Requires Soda Core ✔️ Requires Soda Library + Soda Cloud ✔️ Requires Soda Agent + Soda Cloud
You can initiate a scan your team defined in Soda Cloud using the Soda Library CLI.
If you have defined a scan definition in Soda Cloud, and the scan definition executes on a schedule via a self-hosted or Soda-hosted agent, and you have the permission to do so in your Soda Cloud account, you can use Soda Library CLI to:
execute a remote scan and synchronously receive logs of the scan execution result
execute a remote scan and asynchronously retrieve status and logs of the scan during, and after its execution
To execute a remote scan and synchonously receive scan results:
In Soda Cloud, navigate to Scans, then, from the list of scans, click to open the one which you wish to execute remotely.
To retrieve the scan definition ID that you need for the remote scan command, copy the scan definition identifier; see image below.
Run the following command to execute the Soda Cloud scan remotely, where the value of the -s option is the scan definition identifier you copied from the URL.
The Soda Agent that executes your scan definition proceeds to run the scan and returns the result of the scan in the CLI output. A truncated example follows. Notice that the version of Soda Library that you use to execute the remote scan command may be different from the version of Soda Library that is deployed as an Agent in your environment and which performs the actual scan execution. This does not present any issues for remote scan execution.
In your Soda Cloud account, refresh the scan definition page to display the results of the scan you ran remotely.
To execute a remote scan and asynchonously retrieve the status and results of the scan:
In Soda Cloud, navigate to Scans, then, from the list of scans, click to open the one which you wish to execute remotely.
To retrieve the scan definition ID that you need for the remote scan command, copy the scan definition identifier; see image below.
Run the following command to execute the Soda Cloud scan remotely, where the value of the -s option is the scan definition identifier you copied from the URL.
The Soda Agent that executes your scan definition proceeds to run the scan. The agent does not automatically return scan status or logs to the CLI output. Instead, it returns a unique value for Status URL. Copy the last part of the URL that identifies the scan you started.
To retrieve the status of the scan as it executes and completes, use the following command, pasting the value you copied from the Status URL as the scan identifier. Refer to the Soda Cloud API documentation for the possible status messages the Soda Agent can return.
Notice that the version of Soda Library that you use to execute the remote scan command may be different from the version of Soda Library that is deployed as an Agent in your environment and which performs the actual scan execution. This does not present any issues for remote scan execution.
Truncated output:
In your Soda Cloud account, refresh the scan definition page to display the results of the scan you ran remotely.

soda scan -d postgres_retail -c configuration.yml checks.ymlsoda scan -d postgres_retail -c other-directory/configuration.yml other-directory/checks.ymlsoda scan -d postgres_retail -c configuration.yml checks_stats1.yml checks_stats2.yml# Dataset filter with variables
filter CUSTOMERS [daily]:
where: TIMESTAMP '${ts_start}' <= "ts" AND "ts" < TIMESTAMP '${ts_end}'
checks for CUSTOMERS [daily]:
- row_count = 6
- missing(cat) = 2
# In-check variable
checks for ${DATASET}:
- invalid_count(last_name) = 0:
valid length: 10soda scan -d aws_postgres_retail -c configuration.yml -v TODAY=2022-03-31 checks.ymlsoda scan -d aws_postgres_retail duplicate_count_filter.yml -c configuration.yml -v date=2022-07-25 -v name='rowcount check'soda scan -d aws_postgres_retail -c configuration.yml checks.yml --localdata_source nyc_dev:
type: postgres
host: host
port: '5432'
username: ${POSTGRES_USER}
password: ${POSTGRES_PASSWORD}
database: postgres
schema: staging
data_source nyc_prod:
type: postgres
host: host
port: '5432'
username: ${POSTGRES_USER}
password: ${POSTGRES_PASSWORD}
database: postgres
schema: public# for NYC data source for dev
soda scan -d nyc_dev -c configuration.yml -s nyc_a checks.yml
# for NYC data source for prod
soda scan -d nyc_prod -c configuration.yml -s nyc_b checks.ymlfrom soda.scan import Scan
scan = Scan()
scan.set_data_source_name("events")
# Add configuration YAML files
#########################
# Choose one of the following to specify data source connection configurations :
# 1) From a file
scan.add_configuration_yaml_file(file_path="~/.soda/my_local_soda_environment.yml")
# 2) Inline in the code
scan.add_configuration_yaml_str(
"""
data_source events:
type: snowflake
host: ${SNOWFLAKE_HOST}
username: ${SNOWFLAKE_USERNAME}
password: ${SNOWFLAKE_PASSWORD}
database: events
schema: public
"""
)
# Add variables
###############
scan.add_variables({"date": "2022-01-01"})
# Add check YAML files
##################
scan.add_sodacl_yaml_file("./my_programmatic_test_scan/sodacl_file_one.yml")
scan.add_sodacl_yaml_file("./my_programmatic_test_scan/sodacl_file_two.yml")
scan.add_sodacl_yaml_files("./my_scan_dir")
scan.add_sodacl_yaml_files("./my_scan_dir/sodacl_file_three.yml")
# OR
# Define checks using SodaCL
##################
checks = """
checks for cities:
- row_count > 0
"""
# Add template YAML files, if used
##################
scan.add_template_files(template_path)
# Execute the scan
##################
scan.execute()
# Set logs to verbose mode, equivalent to CLI -V option
##################
scan.set_verbose(True)
# Set scan definition name, equivalent to CLI -s option
# The scan definition name MUST be unique to this scan, and
# not duplicated in any other programmatic scan
##################
scan.set_scan_definition_name("YOUR_SCHEDULE_NAME")
# Do not send results to Soda Cloud, equivalent to CLI -l option;
##################
scan.set_is_local(True)
# Inspect the scan result
#########################
scan.get_scan_results()
# Inspect the scan logs
#######################
scan.get_logs_text()
# Typical log inspection
##################
scan.assert_no_error_logs()
scan.assert_no_checks_fail()
# Advanced methods to inspect scan execution logs
#################################################
scan.has_error_logs()
scan.get_error_logs_text()
# Advanced methods to review check results details
########################################
scan.get_checks_fail()
scan.has_check_fails()
scan.get_checks_fail_text()
scan.assert_no_checks_warn_or_fail()
scan.get_checks_warn_or_fail()
scan.has_checks_warn_or_fail()
scan.get_checks_warn_or_fail_text()
scan.get_all_checks_text()soda scan -c configuration.yml --remote -s paxstats_default_scanSoda Library 1.3.x
Soda Core 3.0.x
By downloading and using Soda Library, you agree to Sodas Terms & Conditions (https://go.soda.io/t&c) and Privacy Policy (https://go.soda.io/privacy).
Remote scan sync mode
Remote Scan started.
Status URL: https://dev.sodadata.io/api/v1/scans/14b38f00-bc69-47dc-801b-676e676e676
Waiting for remote scan to complete.
Remote scan completed.
Fetching scan logs.
Scan logs fetched.
Soda Library 1.2.4
Soda Core 3.0.47
Reading configuration file "datasources/soda_cloud_configuration.yml"
Reading configuration file "datasources/configuration_paxstats.yml"
...
Scan summary:
48/48 queries OK
paxstats.discover-tables-find-tables-and-row-counts [OK] 0:00:00.156126
...
2/2 checks PASSED:
paxstats in paxstats
anomaly score for row_count < default [scan_definitions/paxstats_default_scan/automated_monitoring_paxstats.yml] [PASSED]
check_value: None
Schema Check [scan_definitions/paxstats_default_scan/automated_monitoring_paxstats.yml] [PASSED]
schema_measured = [id integer, index integer, activity_period character varying, operating_airline character varying, ...]
All is good. No failures. No warnings. No errors.
Sending results to Soda Cloud
Soda Cloud Trace: 3015***soda scan -c configuration.yml --remote -s paxstats_default_scan -rm async[10:38:36] Soda Library 1.3.3
[10:38:36] Soda Core 3.0.47
[10:38:36] By downloading and using Soda Library, you agree to Sodas Terms & Conditions (https://go.soda.io/t&c) and Privacy Policy (https://go.soda.io/privacy).
[10:38:38] Remote scan async mode
[10:38:39] Remote Scan started.
[10:38:39] Status URL: https://cloud.soda.io/api/v1/scans/4651ba64-04ae-4b21-9fad-552314552314
[10:38:39] Remote scan started in async mode.soda scan-status -c configuration.yml -s 4651ba64-04ae-4b21-9fad-552314552314Soda Library 1.3.3
Soda Core 3.0.47
Retrieving state of the scan '4651ba64-04ae-4b21-9fad-552314552314'.
Current state of the scan: 'completed'.
Fetching scan logs.
Parsing scan logs.
Soda Library 1.2.4
Soda Core 3.0.47
Reading configuration file "datasources/soda_cloud_configuration.yml"
Reading configuration file "datasources/configuration_paxstats.yml"
...
Scan summary:
48/48 queries OK
paxstats.discover-tables-find-tables-and-row-counts [OK] 0:00:00.156002
...
2/2 checks PASSED:
paxstats in paxstats
anomaly score for row_count < default [scan_definitions/paxstats_default_scan/automated_monitoring_paxstats.yml] [PASSED]
check_value: None
Schema Check [scan_definitions/paxstats_default_scan/automated_monitoring_paxstats.yml] [PASSED]
schema_measured = [id integer, index integer, activity_period character varying, ...]
All is good. No failures. No warnings. No errors.
Sending results to Soda Cloud
Soda Cloud Trace: 6974126***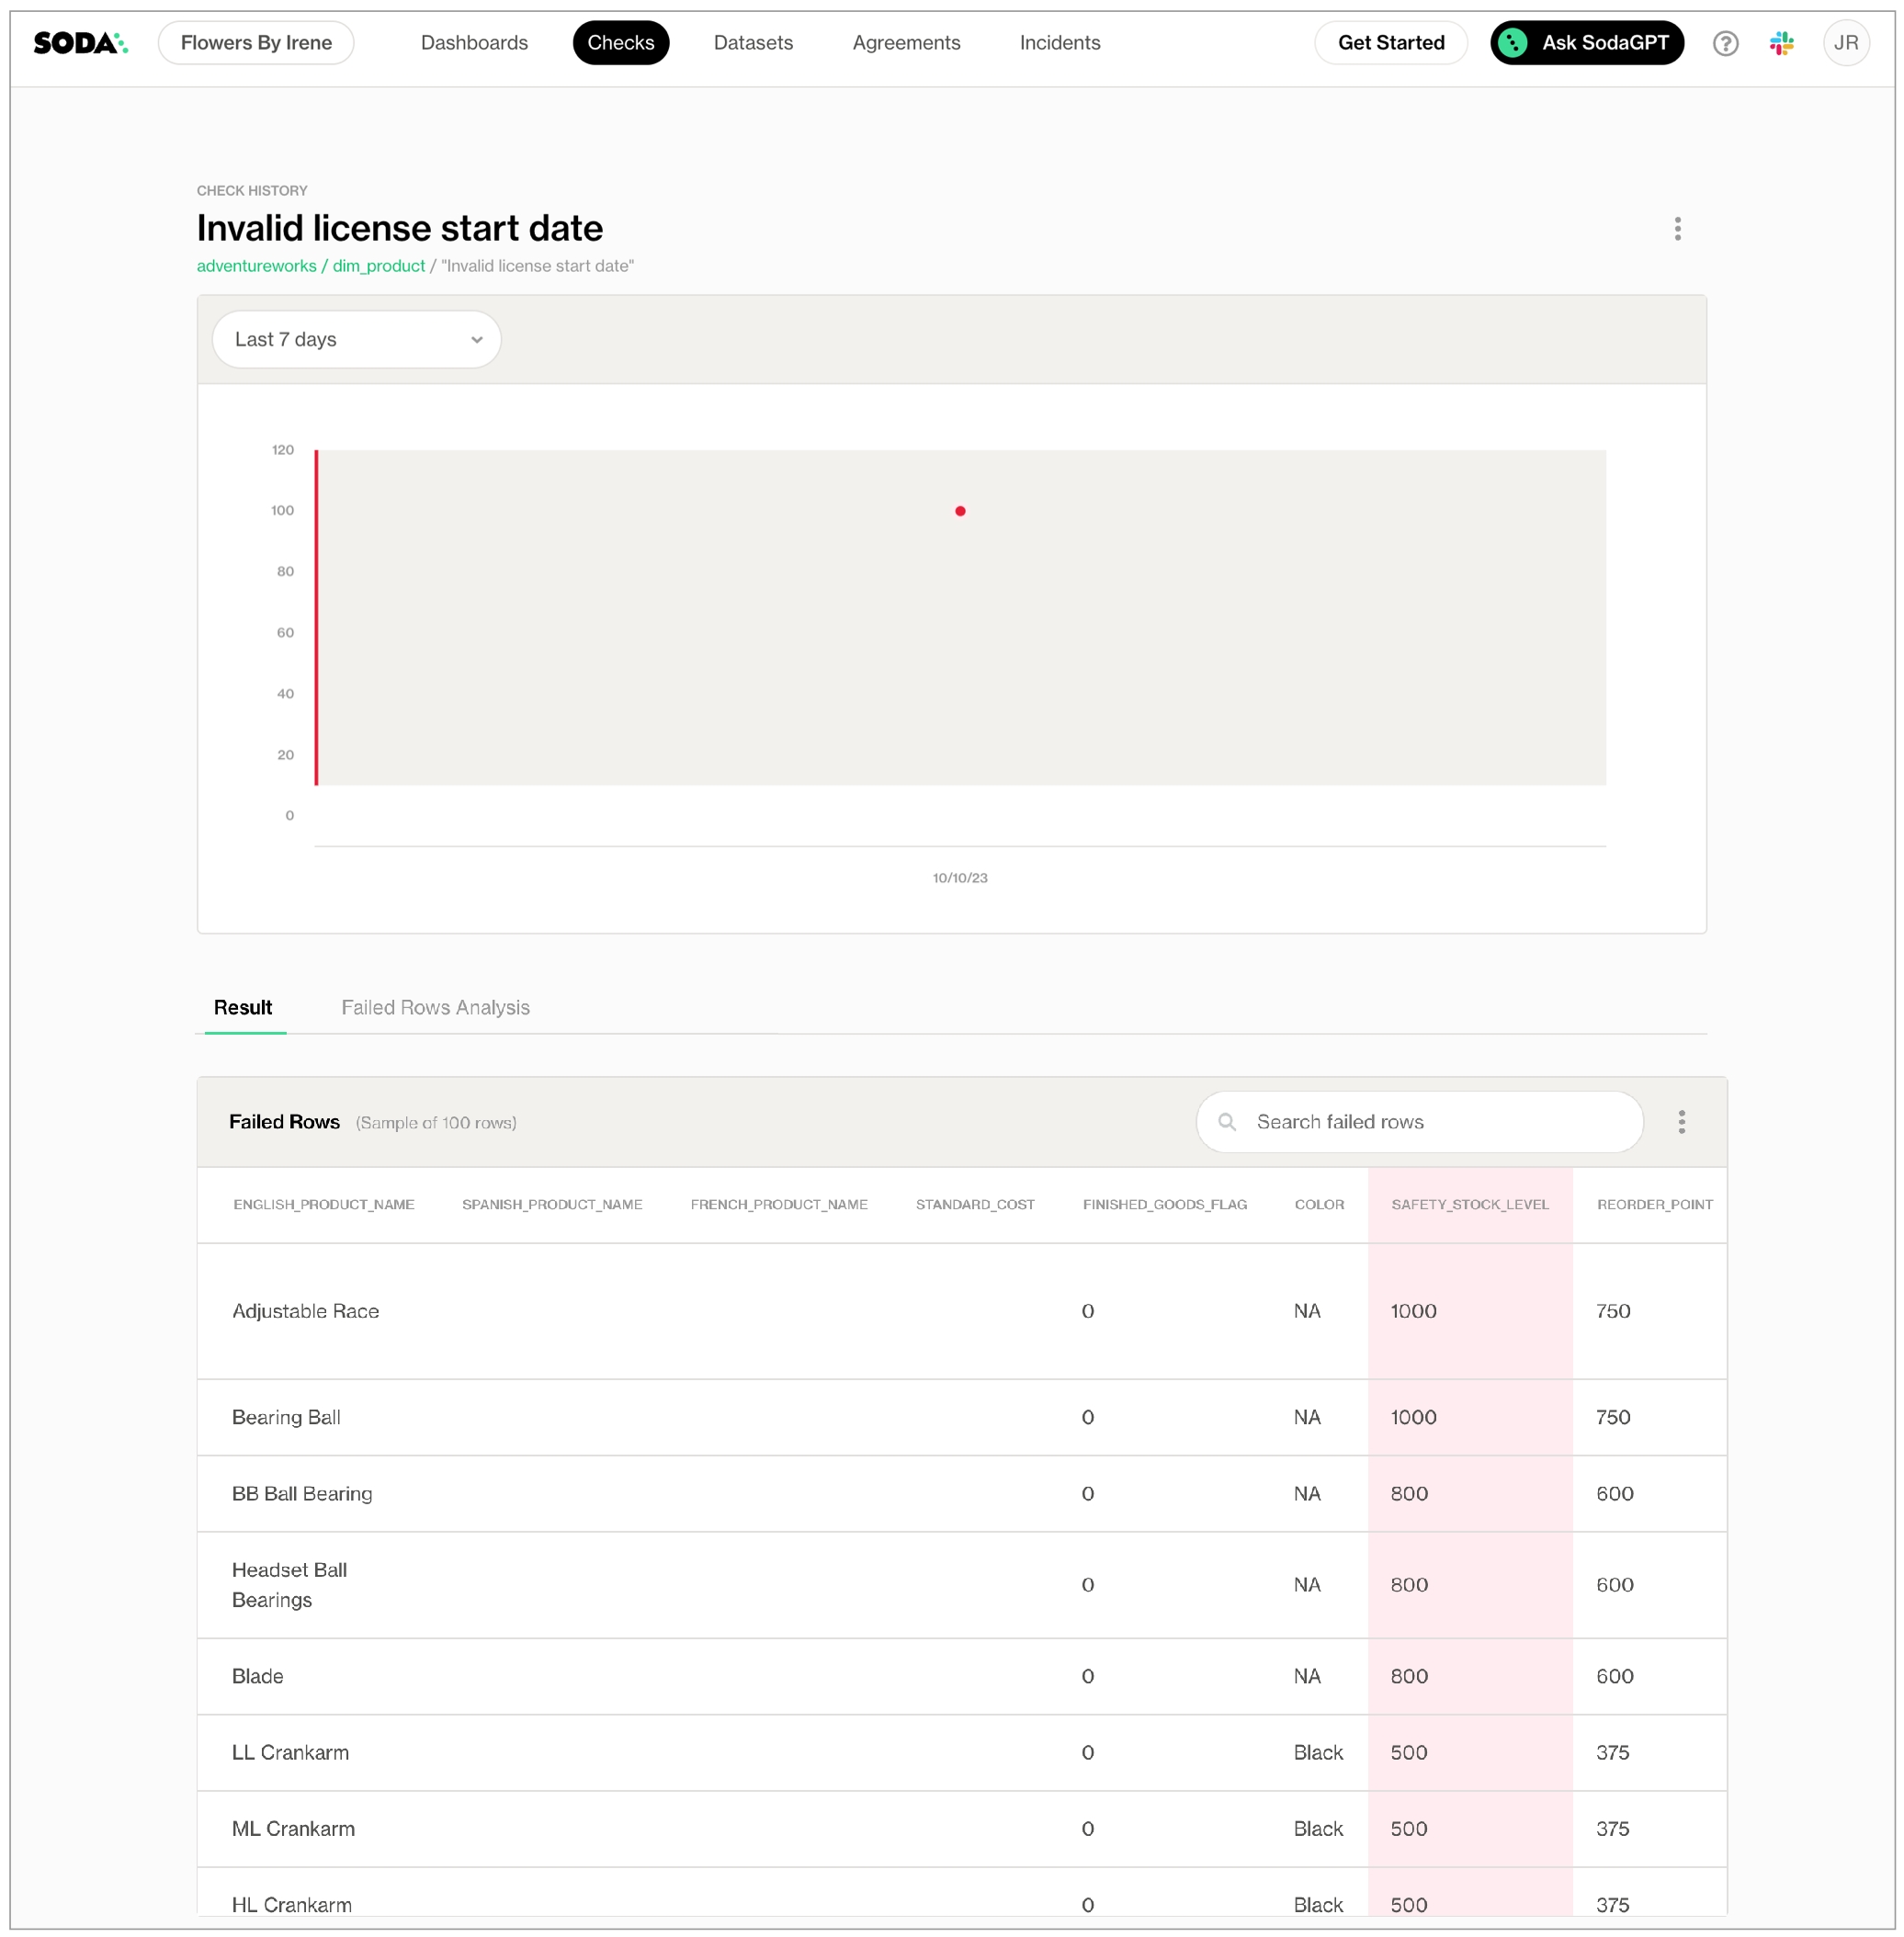
Use this option to provide a scan definition name so that Soda Cloud keeps check results from different environments (dev, prod, staging) separate. See Configure a single scan to run in multiple environments.
-srf or
--scan-results-file TEXT
Specify the file name and file path to which Soda Library sends a JSON file of the scan results. You can use this in addition to, or instead of, sending results to Soda Cloud.
soda scan -d adventureworks -c configuration.yml -srf test.json checks.yml
-t TEXT or
--data-timestamp TEXT
Specify the logical time associated with the data being validated. It should be provided in ISO 8601 format with UTC timezone (e.g., 2025-08-12T14:30:00Z). By default, Soda uses the current execution time as the data timestamp.
-T TEXT or
--template TEXT
Use this option to specify the file path and file name for a templates YAML file.
-v TEXT or
--variable TEXT
Replace TEXT with variables you wish to apply to the scan, such as a filter for a date. Put single or double quotes around any value with spaces.
soda scan -d my_datasource -v start=2020-04-12 -c configuration.yml checks.yml
V or
--verbose
Return scan output in verbose mode to review query details.
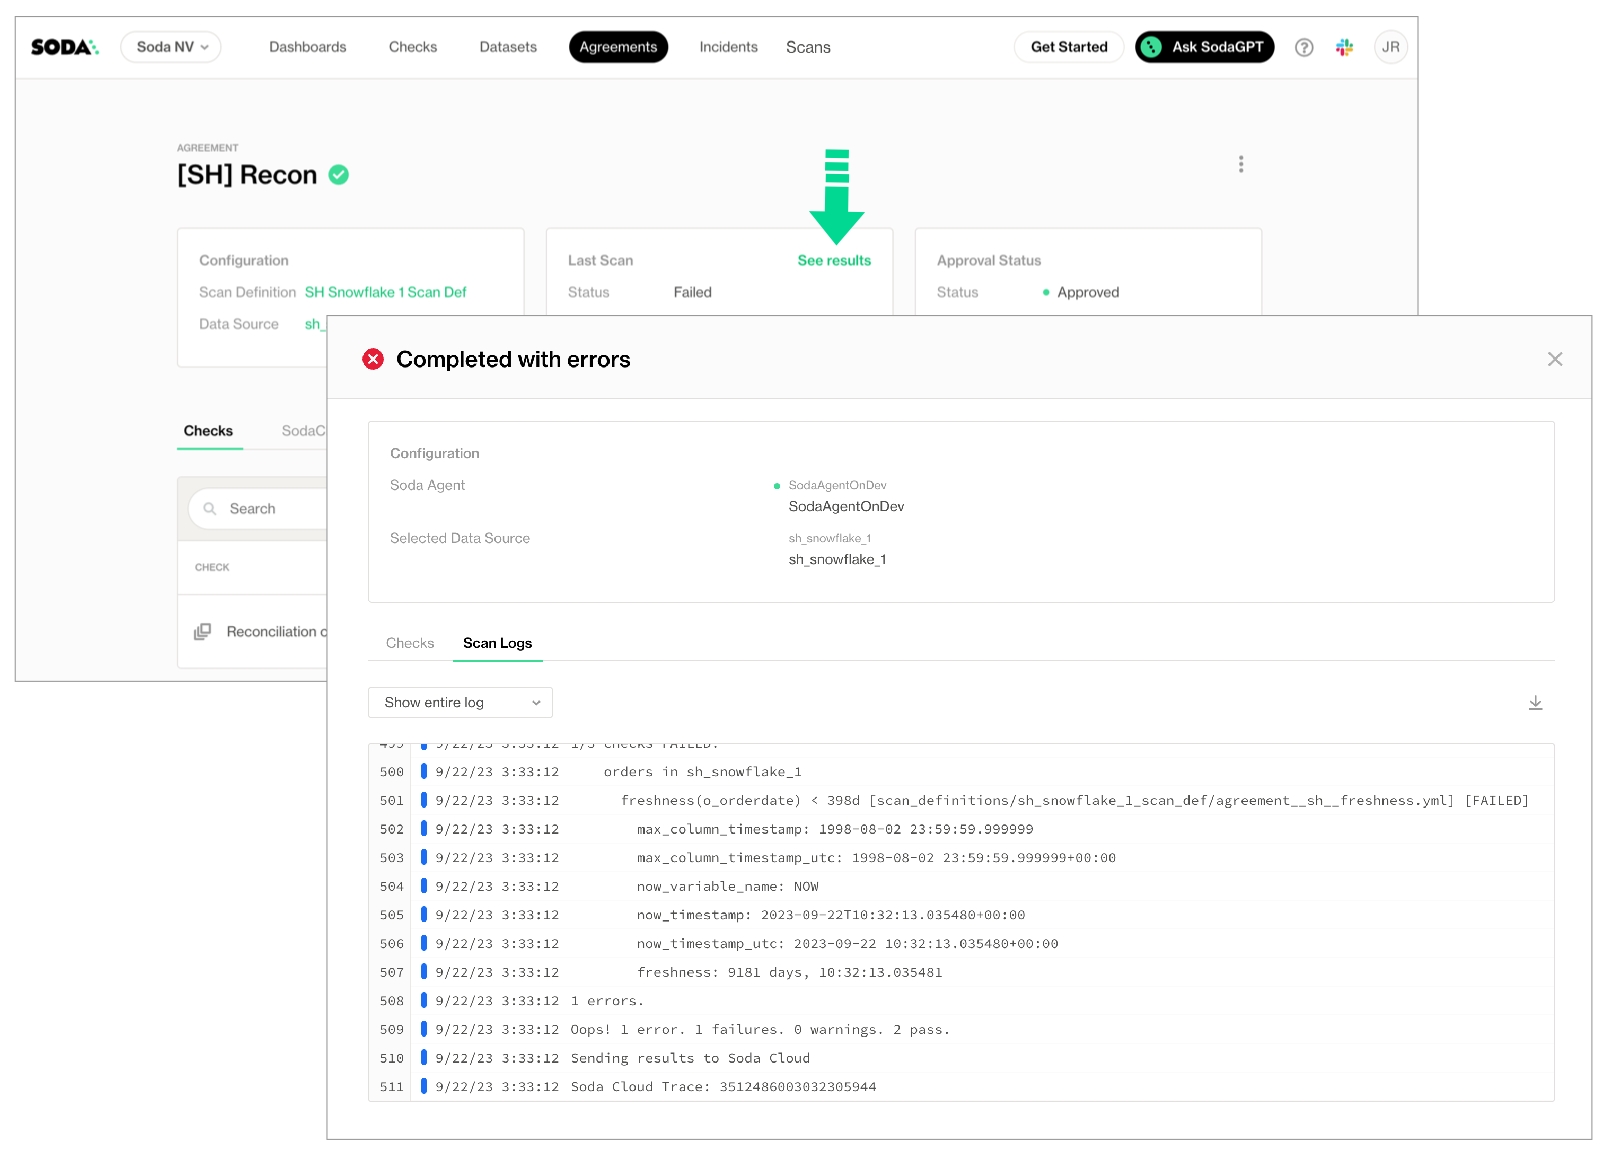

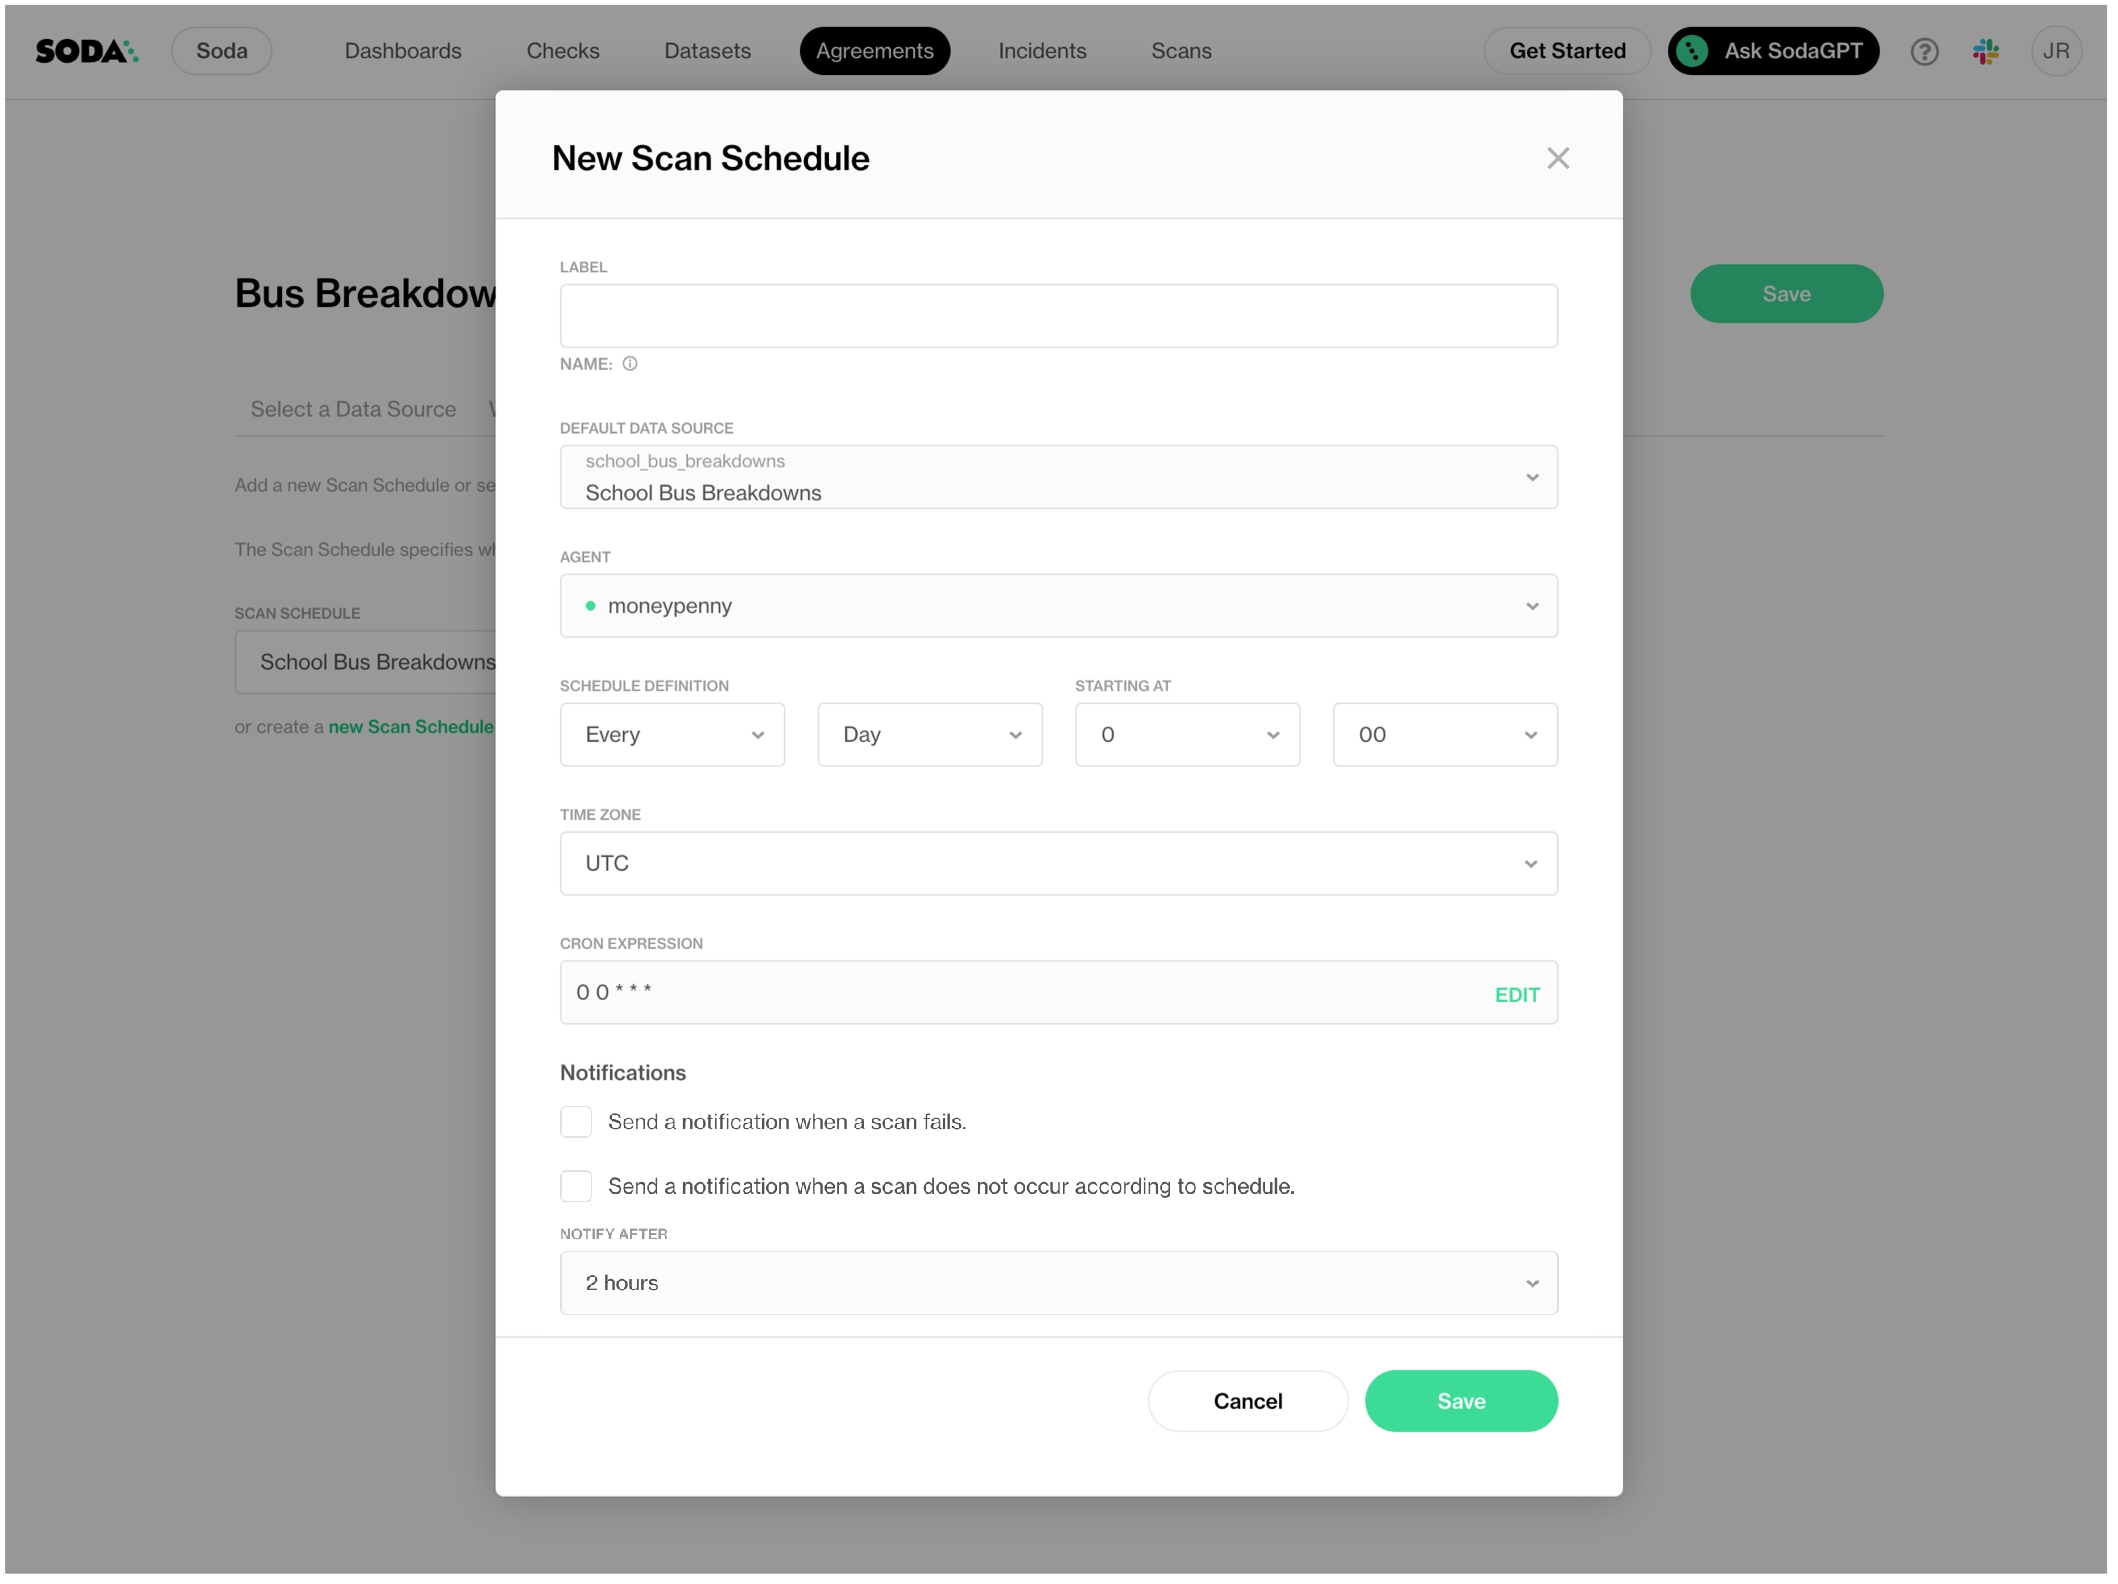
Use SodaCL reconciliation checks to validate target and source data before conducting a data migration in production.
Use a reconciliation check to validate that target data matches source data before and/or after migrating between data sources.
For example, if you must migrate data from a MySQL data source to a Snowflake data source, you can use reconciliation checks to make sure the MySQL data appears intact in Snowflake in staging before conducting the migration in production.
✖️ Requires Soda Core Scientific (included in a Soda Agent) ✖️ Supported in Soda Core ✔️ Supported in Soda Library + Soda Cloud ✔️ Supported in Soda Cloud Agreements + Soda Agent ✖️ Available as a no-code check
Python version 3.9.x or greater.
A Soda Cloud account connected to Soda Library via API keys. See .
Soda Library; one Soda Library package for each of the source and target data sources involved in your migration. See , below.
Soda supports four types of reconciliation checks:
metric reconciliation checks
record reconciliation checks
schema reconciliation checks
reference reconciliation checks
A metric reconciliation check calculates the measurement of a metric such as sum or avg on data in the same dataset in two different data sources; where the delta between calculated measurements differs to the extent that it exceeds the threshold you set in the check, the check fails. Note, you can also compare data between datasets within the same data source.
In other words, the check validates the delta between calculated measurements of a metric in multiple datasets.
In the following example, the metric reconciliation check calculates the sum of column 1 in dataset X in both data source A and data source B. The calculated value of each is the measurement for the sum metric. It then compares the calculated measurements and gauges the difference between them. In this example, the difference between measurements is 4, so the check passes.
Read more about in general.
A record reconciliation check performs a row-to-row comparison of the contents of each column, or specific columns, in datasets in two different data sources; where the values do not match exactly, the check fails. The numeric value the check result produces represents the number of rows with different, additional, or missing contents.
For example, the following check compares the entire contents of dataset Y in data source A and dataset Y in data source B. Though the contents of the rows match exactly, one dataset contains additional rows, so it is not an exact match and the reconciliation check fails with a numeric value of 2.
Read more about the strategies and optional configurations you can add to a .
A schema reconciliation check compares the columns of two datasets to reveal any differences between target and source; where the columns names differ, or the data type has changed, Soda registers a mismatch and the check fails.
A reference reconciliation check verifies that all target values exist in the source. It performs the same comparison as a standard reference check but uses a different mechanism, allowing you to validate referential integrity across different data sources.
To efficiently use resources at scan time, best practice dictates that you first configure and run metric reconciliation checks, then use the output to write refined record reconciliation checks to fine-tune the comparison.
Depending on the volume of data on which you must perform reconciliation checks, metric recon checks run considerably faster and use much fewer resources. Start by defining metric reconciliation checks that test grouping, filters, and joins to get meaningful insight into whether your ingestion or transformation works as expected. Where these checks do not surface all the details you need, or does not provide enough confidence in the output, then proceed with record reconciliation checks.
For running record reconciliation checks, if primary keys exist in your dataset, best practice recommends that you use a simple strategy for executing a record-by-record comparison. This strategy loads rows into memory in batches, thereby reducing the risk of system overload and increasing the speed with which Soda can execute the comparison. See for details about strategies.
Read more about .
The following outlines the basic steps to configure and execute reconciliation checks.
a Soda Library package for both the migration source and target data sources. For the very first example above, you would install both soda-mysql and soda-snowflake. If you use a Soda Agent and connect data sources via Soda Cloud, add both data sources to your account.
both data sources in a configuration YAML file, and add your soda_cloud configuration. For the very first example above, you would add both and connection configuration details to a configuration YAML file.
To define reconciliation checks, best practice dictates that you prepare a separate agreement or a recon.yml file separate from your checks YAML file which contains regular, non-reconciliation checks for data quality in your data source. Technically, you can use one YAML file or agreement to contain all recon and regular SodaCL checks, but troubleshooting and issue investigation is easier if you use separate files.
In a recon.yml file, you must first provide reconciliation metadata for the checks, as per the configuration in the example and table below.
The syntax of metric reconciliation checks follows the basic patterns of standard SodaCL metrics and checks with the addition of diff in the syntax. Metric reconciliation checks do not support all SodaCL metrics and checks; see below.
For example, you define a regular SodaCL check for data quality that checks for duplicate values in a last_name column as follows:
For a metric reconciliation check, you add the word diff to indicate that it ought to compare the count of duplicate values between the source dataset and the target dataset to confirm that the delta between those counts is zero. Refer to examples below.
Note that with reconciliation checks, there is no need to identify the dataset as you specified both source and target datasets in the project metadata configuration.
When you against either the source or target data source, the Scan summary in the output indicates the check value, which is the calculated delta between measurements, the measurement value of each metric or check for both the source and target datasets, along with the diff value and percentage, and the absolute value and percentage.
To customize your metric reconciliation checks, you can borrow from the syntax of to execute SQL queries on the source and target datasets. You can also write a to define a SQL query or a common table expression (CTE) that Soda executes on both datasets to reconcile data; see examples below.
Learn about reconciliation check .
Requires Soda Library 1.2.0 or greater
The syntax of record reconciliation checks expects a rows diff input to perform a record-by-record comparison of data between datasets. Choose between two strategies to refine how this type of check executes during a Soda scan:
simple
deepdiff
The simple strategy works by processing record comparisons according to one or more primary key identifiers in batches and pages. This type of processing serves to temper large-scale comparisons by loading rows into memory in batches so that a system is not overloaded; it is typically faster than the deepdiff strategy.
If you do not specify a strategy, Soda executes the record reconciliation check using the simple strategy.
If you do not specify batch size and/or page size, Soda applies default values of 1 and 100000, respectively.
The deepdiff strategy works by processing record comparisons of entire datasets by loading all rows into memory at once. This type of processing is more memory-heavy but allows you to work without primary key identifiers, or without specifying any other details about the data to be compared; it is typically slower than the simple strategy.
Beyond choosing a strategy, you can configure a number of granular details for Soda to refine its execution of a record reconciliation check.
To customize your record reconciliation checks, you can borrow from the syntax of to execute SQL queries on the source and target datasets. You can also write a to define a SQL query or a common table expression (CTE) that Soda executes record-by-record on both datasets to reconcile data; see example below.
If you use programmatic Soda scans to execute reconciliation checks, you may wish to use a custom value comparator, an example of which follows.
The syntax of schema reconciliation checks is simple, and without configuration details beyond the check identifier.
Optionally, you can add a mapping configuration to a schema check to properly compare columns that use different data types. For example, you can use this configuration to map the comparison of a Snowflake column that uses Boolean and an MSSQL Server column that uses bit.
Requires Soda Library 1.11.2 or greater
A reference reconciliation check assesses whether all target values are present in the source. It validates referential integrity across data sources by checking that each value in the target column(s) has a corresponding match in the source column(s).
The check is performed on the target dataset, which is treated as the dataset under test. If it contains missing values from the source, those discrepancies will be flagged. To configure this check, you must specify the column(s) in the source and target to compare
This check supports two primary use cases:
Downstream-upstream consistency: Verify that records in a downstream dataset (target dataset) also exist in an upstream dataset (source dataset).
Reference table validation: Validate that values in a dataset (target dataset) exist in a reference or lookup table (source dataset), such as ensuring all country codes in your data are part of a standardized country code list.
Add attributes to reconciliation checks to organize your checks and alert notifications in Soda Cloud. For example, you can apply attributes to checks to label and sort check results by department, priority, location, etc.
You can add custom attributes to reconciliation checks in two ways:
in bulk, so that Soda adds the attribute to all checks in the reconciliation project
individually, so that Soda adds the attribute to individual reconciliation checks in the project
After following the instructions to in Soda Cloud, you can add the attribute to a reconciliation project, and/or to individual checks, as in the following example.
Where attribute values for the project and the individual check conflict or overlap, Soda uses the value for the individual check.
You can add a filter to a reconciliation project's configuration to constrain the data on which Soda executes the reconciliation checks. Refer to the example below.
Best practice dictates that you add filters when using record reconciliation checks to mitigate heavy memory usage and long scan times when performing record-to-record comparisons of data. See .
Output:
Record reconciliation checks and metric reconcilication checks that borrow from failed rows check syntax such as the name_combo check in the example above, explicitly collect samples of any failed rows to display in Soda Cloud. The default number of failed row samples that Soda collects and displays is 100.
Read more .
If you wish to limit or broaden the sample size, you can add the samples limit configuration to a check. Read more about .
Alternatively, you can set the samples limit to 0 to prevent Soda from collecting and sending failed rows samples for an individual check, as in the following example.
To review the failed rows in Soda Cloud, navigate to the Checks dashboard, then click the row for a the grouped reference checks. Examine failed rows in the Failed Rows Analysis tab; see for further details.
The Python environment in which deepdiff record reconciliation checks run consumes more time/CPU/memory because this type of check loads all data into memory to execute a comparison. Because record-to-record comparison is dense, exercise caution when executing scans with record reconciliation checks as they can cause usage spikes in the data source, and cost spikes in case of cloud-managed data sources. Best practice dictates that you and use record reconciliation checks whenever possible to mitigate cost and performance issues. See also: .
Reconciliation checks on TEXT type columns are case sensitive.
Record reconciliation checks do not support samples columns configuration.
Learn more about in general.
Learn more about .
Use a to discover missing or forbidden columns in a dataset.
Reference .
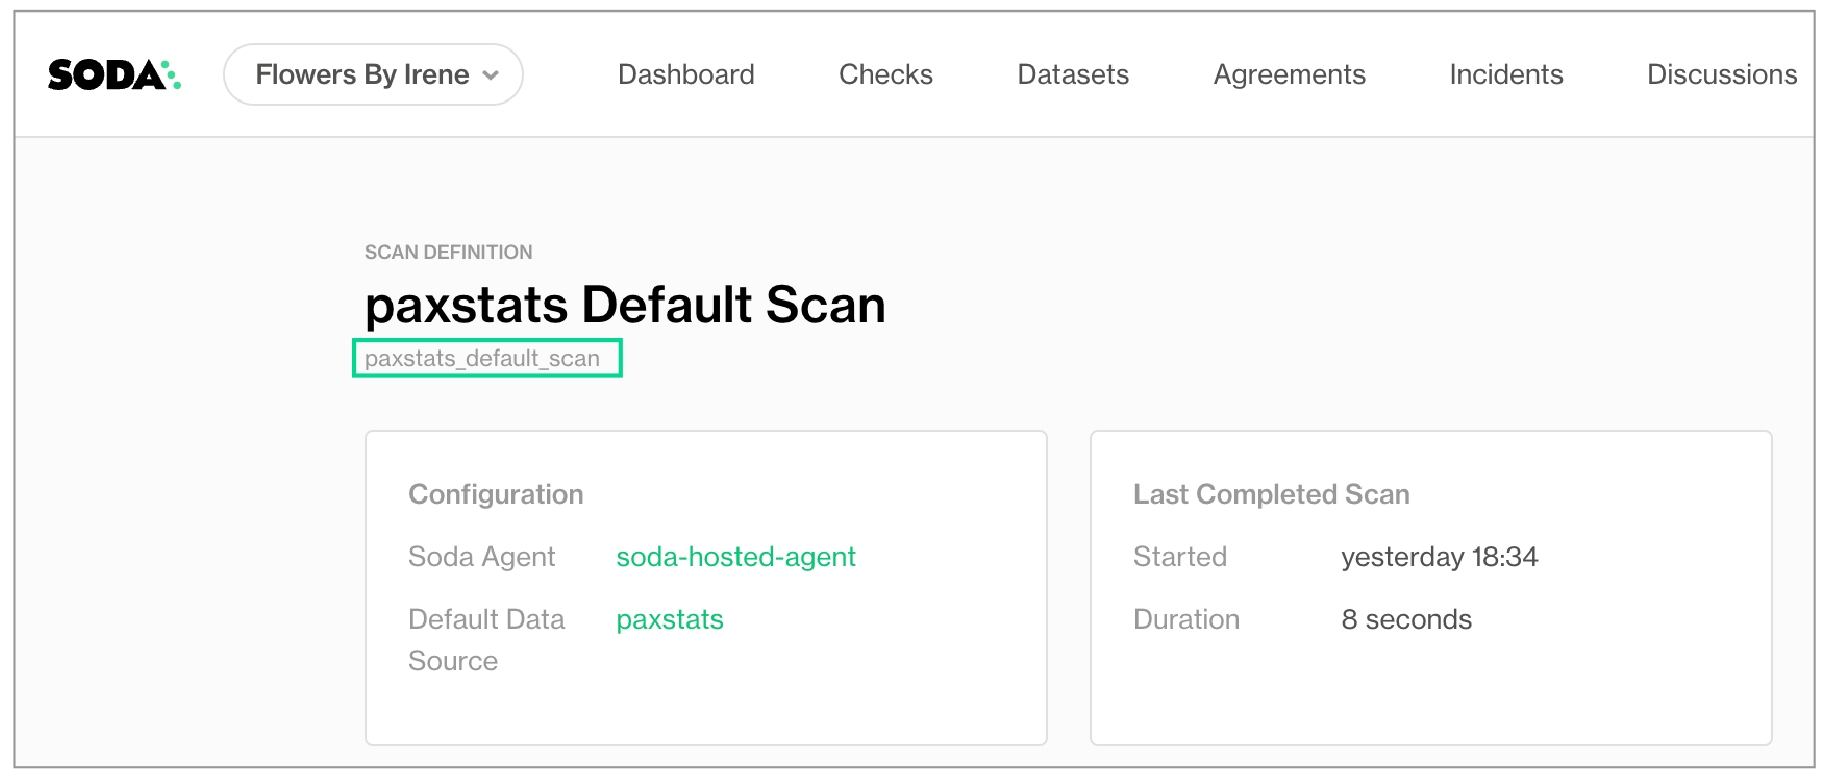
reconciliation Production:
label: "Reconcile MySQL to Snowflake"
attributes:
priority: 3
datasets:
source:
dataset: dim_customer
datasource: mysql_adventureworks
target:
dataset: dim_customer
datasource: snowflake_retail
checks:
# Metric reconciliation checks
- row_count diff = 0
- duplicate_count(last_name):
fail: when diff > 10%
warn: when diff < 5%
- avg(total_children) diff < 10
- name_combo diff = 0:
name: Name Combo
source query: |
SELECT count(*)
FROM dim_customer
WHERE first_name = 'Rob' or last_name = 'Walters'
target query: |
SELECT count(*)
FROM dim_customer
WHERE last_name = 'Walters'
# Record reconciliation checks
- rows diff < 5:
key columns: [customer_key]
- rows diff = 0:
strategy: deepdiff
source columns: [customer_key, region_id]
target columns: [customer_base_key, region]
# Schema reconciliation check
- schemarecon.ymlDefine reconciliation checks to compare data between data sources; see details below.
Run a Soda scan against either the source or target data source to execute the reconciliation checks and review results in the command-line output and in Soda Cloud. Note that check results are associated with the target dataset in Soda Cloud.
required
Key-value pairs to identify the dataset and data source of the target, or destination location of the data to be migrated.
checks
required
A subheading to contain the checks that reconcile the data between source and target. In this section, you can define any number of both metric and record reconciliation checks; see details below.
If you want to use simple strategy for comparing datasets with different numbers of columns, you must define the key columns that order the data and match rows between the two datasets. Additionally, you must map the source columns to the target columns that you wish to compare.
Specify column-constrained comparisons
Optional
Optional
Best for
Standard comparisons in which a primary key exists in the data
Comparisons in which no primary key exists in the data
Benchmark: 10 columns 1% changes in target 500K rows
<80MB RAM 9s to execute diff
8GB RAM 136s to execute diff
Benchmark: 360 columns 1% changes in target 100K rows
<80MB RAM 1m to execute diff
8GB RAM ~6m to execute diff
Benchmark: 360 columns 1% changes in target 1M rows
<80MB RAM 35m to execute diff
does not compute on 16GB RAM machine
invalid_count
Athena BigQuery DB2 SQL Server PostgreSQL Redshift Snowflake Spark DataFrames
invalid_percent
Athena BigQuery DB2 SQL Server PostgreSQL Redshift Snowflake Spark DataFrames
max
all
max_length
all
min
all
min_length
all
missing_count
Athena BigQuery DB2 SQL Server PostgreSQL Redshift Snowflake Spark DataFrames
missing_percent
Athena BigQuery DB2 SQL Server PostgreSQL Redshift Snowflake Spark DataFrames
percentile
PostgreSQL Snowflake
row_count
all
stddev
Athena BigQuery PostgreSQL Redshift Snowflake
stddev_pop
Athena BigQuery PostgreSQL Redshift Snowflake
stddev_samp
Athena BigQuery PostgreSQL Redshift Snowflake
sum
all
user-defined
all
variance
Athena BigQuery PostgreSQL Redshift Snowflake
var_pop
Athena BigQuery PostgreSQL Redshift Snowflake
var_samp
Athena BigQuery PostgreSQL Redshift Snowflake
✓
Use quotes when identifying dataset or column names; see . Note that the type of quotes you use must match that which your data source uses. For example, BigQuery uses a backtick (`) as a quotation mark.
Use wildcard characters ( % or * ) in values in the check.
-
Use for each to apply reconciliation checks to multiple datasets in one scan.
-
Apply a dataset filter to partition data during a scan.
-
Supports samples columns parameter to specify columns from which Soda draws failed row samples.
✓
Supports samples limit parameter to control the volume of failed row samples Soda collects.
✓
Supports collect failed rows parameter instruct Soda to collect, or not to collect, failed row samples for a check.
Reconciliation checks do not support exclude columns in the data source configuration in a configuration YAML file; see Disable failed rows sampling for specific columns.
* ***Known issue***: Do not define a threshold as a percentage `%` if you expect the measurement of a metric to equal `0`. Using a percentage for a threshold causes an error for an absolute check; the check evaluates correctly but the error persists with a non-zero exit command.
reconciliation my_project_name
required
An identifier for the reconciliation project.
label
required
An identifier that prepends check result name identifiers in Soda Cloud.
attributes
optional
A list of attributes that Soda applies to the reconciliation project’s check results in Soda Cloud so that you can filter and find the project’s results. See: Add attributes
datasets
required
A subheading to contain the list of datasets to apply your reconciliation checks.
source
required
Key-value pairs to identify the dataset and data source of the source, or origin location of the data to be migrated.
Default strategy
✓
Processing
Loads rows into memory one by one, or by batch for comparison
Loads all rows into memory for comparison
Specify key columns
Required; can be one or more keys
Optional
Specify batch and page sizes
Optional
Column-constrained
Only the data in a specified list of columns.
In the example below, the first check applies a deepdiff strategy and compares only the contents of the listed columns, mapping the columns according to the order in which they appear in the list– Planet to Planet, Hotness to Relative Temp. This check passes because the values of the mapped columns are the same.
With composite primary key
The entire contents of the datasets, specifying columns to define a primary key in the source.
In the example below, the second check applies a simple strategy by default and uses the key columns you identify to form a primary key in the source that defines a single record. Soda uses the key to map records between datasets. Note that you can list column names as comma-separated values in square brackets, or as an unordered list as in the example. This check fails because of the mismatched value for Jupiter's size.
With different primary keys in source and target
The entire contents of the datasets, specifying columns to define mutiple primary keys in both the source and target. This is useful when the column names in your datasets are different.
In the example below, the third check applies a simple strategy by default and enables you to define the primary keys in both the source and target datasets. Soda uses the key to map records between datasets. This check passes because with only one failed row, it does not exceed the threshold of 5 that the check sets.
avg
all
avg_length
all
duplicate_count
all
duplicate_percent
all
failed rows
all
freshness
all
✓
Define a name for a reconciliation check; see example.
✓
Add an identity to a check; see example.
✓
Define alert configurations to specify warn and fail alert conditions; see example. Exception: schema reconciliation checks do not support alert configurations.
Apply an in-check filter to return results for a specific portion of the data in your dataset.
Need help? Join the Soda community on Slack.
target
N/A
-
When a Soda scan results in a failed check, Soda Cloud displays details of the scan results in each check's Check History page. To offer more insight into the data that failed a check during a scan, you can enable Soda Cloud to display failed rows samples in a check's history.
After a scan has completed, from the Checks dashboard, select an individual check to access its Check History page, then click the Failed Rows Analysis tab (pictured below) to see the failed rows samples associated with a failed check result.
There are two ways Soda collects and displays failed row samples in your Soda Cloud account.
reconciliation Production:
label: "Recon metric check"
datasets:
source:
dataset: dataset X
datasource: Data source A
target:
dataset: dataset X
datasource: Data source B
checks:
- sum(column1) < 5reconciliation Production:
label: "Recon diff check"
datasets:
source:
dataset: dataset Y
datasource: Data source A
target:
dataset: dataset Y
datasource: Data source B
checks:
- rows diff = 0:
key columns: [Planet]reconciliation Production:
label: "Recon diff check"
datasets:
source:
dataset: dataset Y
datasource: Data source A
target:
dataset: dataset Y
datasource: Data source B
checks:
- schemareconciliation Production:
label: "Recon diff check"
datasets:
source:
dataset: dataset Y
datasource: Data source A
target:
dataset: dataset Y
datasource: Data source B
checks:
- values in target must exist in source:
source columns: [first_name, last_name]
target columns: [fname, lname]soda scan -d mysql_adventureworks -c configuration.yml recon.yml
reconciliation my_project_name:
label: "Reconcile MySQL to Snowflake"
attributes:
priority: 3
datasets:
source:
dataset: dim_customer
datasource: mysql_adventureworks
target:
dataset: dim_customer
datasource: snowflake_retail
checks:
- row_count diff = 0checks for dim_customer:
- duplicate_count(last_name) = 0reconciliation Production:
...
checks:
- duplicate_count(last_name) diff = 0
- avg(total_children) diff < 10
- freshness(date_first_purchase) diff < 100h
- row_count:
fail: when diff > 10%
warn: when diff between 5% and 9%
- missing_count(middle_name) diff = 0:
samples columns: [last_name, first_name]soda scan -d adventureworks -c configuration.yml recon2.yml
Soda Library 1.x.x
Soda Core 3.0.xx
xxx
Sending failed row samples to Soda Cloud
Sending failed row samples to Soda Cloud
Sending failed row samples to Soda Cloud
Scan summary:
3/5 checks PASSED:
dim_customer in aws_postgres_retail
Recon Test: duplicate_count(last_name) diff = 0 [PASSED]
Recon Test: avg(total_children) diff < 10 [PASSED]
freshness(date_first_purchase) diff < 100h [PASSED]
1/5 checks WARNED:
dim_customer in aws_postgres_retail
Recon Test: row_count warn when diff < 5% fail when diff > 10% [WARNED]
check_value: 0.0
source_row_count: 18484
target_row_count: 18484
diff_value: 0
diff_percentage: 0.0%
1/5 checks FAILED:
dim_customer in aws_postgres_retail
Recon Test: missing_count(middle_name) diff = 0 [FAILED]
check_value: 7830
source_missing_count: 7830
target_missing_count: 0
diff_value: 7830
diff_percentage: 100.0%
Oops! 1 failure. 1 warning. 0 errors. 3 pass.
Sending results to Soda Cloud
Soda Cloud Trace: 6925***98reconciliation Production:
...
checks:
- name_combo diff = 0:
name: Name Combo
source query: |
SELECT count(*)
FROM dim_customer
WHERE first_name = 'Rob' or last_name = 'Walters'
target query: |
SELECT count(*)
FROM dim_customer
WHERE last_name = 'Walters'
- average_children diff = 0:
average_children expression: avg(total_children)reconciliation Production:
label: "Reconcile Planet Info"
datasets:
source:
dataset: dataset_Y
datasource: datasource_A
target:
dataset: dataset_Y
datasource: datasource_B
checks:
# simple strategy with default page and batch sizes
# If not explicitly defined, Soda defaults to simple strategy
- rows diff = 0:
key columns: [Planet, Size]
# simple strategy with custom page and batch sizes
- rows diff = 0:
key columns: [Planet, Size]
batch size: 100
page size: 1000
# simple strategy with different primary key column names
- rows diff < 5:
source key columns: [Planet, Hotness]
target key columns: [Planet, Relative Temp]
# simple strategy with different primary key column names and different number of columns
- rows diff < 5:
source key columns: [City] # Key columns to match rows between source and target
target key columns: [Town]
source columns: [City, Hotness] # Columns Soda compares in the source table
target columns: [Town, Relative Temp] # Columns Soda compares in the target table
# deepdiff strategy
- rows diff = 0:
strategy: deepdiffreconciliation Production:
...
checks:
# Column-constrained
- rows diff = 0:
strategy: deepdiff
source columns: [Planet, Hotness]
target columns: [Planet, Relative Temp]
# With composite primary key
- rows diff = 0:
key columns:
- Planet
- Size
# With different primary keys in source and target
- rows diff < 5:
source key columns: [Planet, Hotness]
target key columns: [Planet, Relative Temp]reconciliation records_recon_check:
datasets:
source:
dataset: retail_customers
datasource: postgres_soda_demo_data_testing
target:
dataset: retail_customers_sfdc
datasource: postgres_soda_demo_data_testing
checks:
- rows diff = 0:
strategy: deepdiff
source query: |
SELECT DISTINCT salary
FROM retail_customers
target query: |
SELECT DISTINCT annual_pay
FROM retail_sfdc_customersfrom soda.scan import Scan
from soda.execution.compare.value_comparator import ValueComparator
from datetime import datetime
class CustomValueComparator(ValueComparator):
def equals(self, x, y):
# Ignore microsecond difference less than 4ms in datetimes
if isinstance(x, datetime) and isinstance(y, datetime):
xms = x.microsecond
yms = y.microsecond
ms_diff = abs(xms - yms)
if ms_diff > 0 and ms_diff <= 4000:
x = x.replace(microsecond=0)
y = y.replace(microsecond=0)
return x == y
if __name__ == "__main__":
s = Scan()
s.value_comparator = CustomValueComparator()
s.set_scan_definition_name("test_scan")
s.set_verbose(True)
s.set_data_source_name("soda_demo")
s.add_configuration_yaml_file("configuration.yml")
s.add_sodacl_yaml_file("perf.yml")
s.execute()
print(s.get_logs_text())
print(s.build_scan_results())reconciliation Production:
...
checks:
- schemareconciliation Production:
label: "Reconcile MS SQL to Snowflake"
datasets:
source:
dataset: opt-in-campaign
datasource: sqlserver1
target:
dataset: optin-campaign
datasource: snowflake_retail
checks:
- schema:
types:
- source: bit
target: boolean
- source: enum
target: stringreconciliation Production:
label: "Reference check"
datasets:
source:
dataset: dataset Y
datasource: Data source A
target:
dataset: dataset Y
datasource: Data source B
checks:
- values in target must exist in source:
source columns: [first_name, last_name]
target columns: [fname, lname]reconciliation Production:
label: "Reconcile MySQL to Snowflake"
# Soda adds this attribute to each check in the reconciliation project
attributes:
priority: 3
datasets:
source:
dataset: dim_customer
datasource: mysql_adventureworks
target:
dataset: dim_customer
datasource: snowflake_retail
checks:
- row_count diff = 0:
# Soda adds this attribute to this check, only.
attributes:
department: [Marketing]
- rows diff:
# Soda adds this attribute to this check, only.
name: Row diff check
attributes:
department: [Development]
fail: when > 10
warn: when between 5 and 9reconciliation Production:
label: "Recon Test"
datasets:
source:
dataset: dim_customer
datasource: adventureworks
filter: total_children > 3
target:
dataset: dim_customer
datasource: aws_postgres_retail
checks:
- row_count diff = 0soda scan -d adventureworks -c configuration.yml recon2.yml
Soda Library 1.x.x
Soda Core 3.0.x
...
Scan summary:
1/1 check FAILED:
dim_customer in aws_postgres_retail
row_count diff = 0 [FAILED]
check_value: 14757
source_row_count: 3727
target_row_count: 18484
diff_value: 14757
diff_percentage: 395.95%
Oops! 1 failures. 0 warnings. 0 errors. 0 pass.
Sending results to Soda Cloud
Soda Cloud Trace: 4380***10checks:
- rows diff = 0:
samples limit: 20checks:
- rows diff = 0:
samples limit: 0 checks:
- rows diff between 35000 and 36000:
name: Simple row diff checks:
- duplicate_count(last_name) diff < 1:
identity: 05229d67-e3f0-***-a327-b2***84 checks:
- row_count:
fail: when diff > 10%
warn: when diff between 5% and 9% checks:
- duplicate_count("last_name") diff = 0Implicitly: Soda automatically collects 100 failed row samples for the following checks:
checks that use a missing metric
checks that use a validity metric
checks that use a
that include missing, validity, or duplicate metrics, or reference checks
Explicitly: Soda automatically collects 100 failed row samples for the following explicitly-configured checks:
that use the failed rows query configuration
By default, implicit and explicit collection of failed row samples is enabled in Soda Cloud. If you wish, you can adjust this setting as follows.
As a user with permission to do so, navigate to your avatar > Organization Settings.
Check, or uncheck, the box to Allow Soda to collect sample data and failed row samples for all datasets. A checked box means default sampling is enabled.
(Optional) Soda Library 1.6.1 or Soda Agent 1.1.27 or greater Check the nested box to Allow Soda to collect sample data and failed row samples only for datasets and checks with the explicit configuration to do so to limit both dataset sampling and implicit failed row collection to only those checks which have configured sample columns or collect failed rows parameters, or to datasets configured to collect failed row samples in the Dataset Settings. This setting does not apply to checks that explicitly collect failed row samples.
Save the settings.
While the following tables may be useful in deciding how to configure failed row sample collection for your organization, be aware that you can use combinations of configurations to achieve your sampling objectives.
Some configurations apply only to no-code checks, or only to checks defined using SodaCL in an agreement in Soda Cloud or in a YAML file for use with Soda Library; refer to individual configuration instructions for details.
Method:
Soda Cloud sampler
Description:
Enabled by default in Soda Cloud. By default, Soda collects up to 100 failed row samples for any check that implicitly or explicitly and displays them in a check’s Check History page in Soda Cloud.
Appropriate for:
• Some or none of the data being scanned by Soda is sensitive; it is okay for users to view samples in Soda Cloud. • Data is allowed to be stored outside your internal network infrastructure. • Teams would find failed row samples useful in investigating data quality issues.
Method:
HTTP custom sampler
Description:
By default, Soda collects up to 100 failed row samples for any check that implicitly or explicitly and routes them to the storage destination you specify in your customer sampler; see .
Appropriate for:
• Teams define both no-code checks and checks in agreements in the Soda Cloud user interface, and may use SodaCL to define checks for use with CLI or programmatic scans. • Some or all data scanned by Soda is very sensitive. • Sample data is allowed to be stored outside your internal network infrastructure. • Teams would find it useful to have samples of failed rows to aid in data quality issue investigation. • Teams wish to use failed row samples to prepare other reports or dashboards outside of Soda Cloud. • Team wish to collect and store most or all failed row samples.
Method:
Python custom sampler
Description:
By default, Soda collects up to 100 failed row samples for any check that implicitly or explicitly and routes them to the storage destination you specify in your customer sampler; see .
Appropriate for:
• Teams only define checks using SodaCL for use with CLI or programmatic scan; teams do not use no-code checks or agreements. • Some or all data scanned by Soda is very sensitive. • Sample data is allowed to be stored outside your internal network infrastructure. • Teams would find it useful to have samples of failed rows to aid in data quality issue investigation. • Teams wish to use failed row samples to prepare other reports or dashboards outside of Soda Cloud.
Method:
No sampler
Description:
Soda does not collect any failed row samples for any checks.
Appropriate for:
• All data scanned by Soda is very sensitive. • No sample data is allowed to be stored outside your internal network infrastructure. • Teams do not need samples of failed rows to aid in data quality issue investigation.
Where some of your data is sensitive, you can either disable the Soda Cloud sampler completely for individual data sources, or use one of several ways to customize the Soda Cloud sampler to restrict failed row sample collection to only those datasets and columns you wish.
See also: Manage sensitive data
See also: Configuration and setting hierarchy
Applies to: ✔️ implicit collection of failed row samples ✖️ explicit collection of failed row samples
For checks defined as: ✔️ no-code checks in Soda Cloud ✔️ in an agreement in Soda Cloud ✔️ in a checks YAML file ✔️ inline in a programmatic scan
Where datasets in a data source contain sensitive or private information, you may not want to collect failed row samples. In such a circumstance, you can disable the collection of failed row samples for checks that implicitly do so.
Adjust your data source connection configuration in Soda Cloud or in a configuration YAML file to disable all samples for an individual data source, as in the following example.
Applies to: ✔️ implicit collection of failed row samples ✖️ explicit collection of failed row samples
For checks defined as: ✔️ no-code checks in Soda Cloud ✔️ in an agreement in Soda Cloud ✔️ in a checks YAML file ✔️ inline in a programmatic scan
For checks which implicitly collect failed rows samples, you can add a configuration to the data source connection configuration to prevent Soda from collecting failed rows samples from specific datasets that contain sensitive data.
To do so, add the sampler configuration to your data source connection configuration in Soda Cloud or in a configuration YAML file to specify exclusion of all the columns in datasets you list, as per the following example which disables all failed row sample collection from the customer_info and payment_methods datasets.
Rather than disabling failed row collection for all the columns in a dataset, you can add a configuration to prevent Soda from collecting failed rows samples from specific columns that contain sensitive data. For example, you may wish to exclude a column that contains personal identifiable information (PII) such as credit card numbers from the Soda query that collects samples.
To do so, use the sampler configuration to your data source connection configuration in Soda Cloud or in a configuration YAML file to specify the columns you wish to exclude, as per the following examples. Note that the dataset names and the lists of samples columns support wildcard characters (% or *).
OR
Optionally, you can use wildcard characters in the sampler configuration to design the sampling exclusion you wish.
If you wish to set a limit on the samples that Soda implicitly collects for an entire data source, you can do so by adjusting the configuration YAML file, or editing the Data Source connection details in Soda Cloud, as per the following syntax. This configuration also applies to checks defined as no-code checks.
Alternatively, you can set a samples limit for a datasource using the Soda Library by modifying the value of an attribute of the Scan class object:
Soda executes the exclude_columns values cumulatively. For example, for the following configuration, Soda excludes the columns password, last_name and any columns that begin with pii_ from the retail_customers dataset.
The exclude_columns configuration also applies to any custom sampler, in addition to the Soda Cloud sampler.
The exclude_columns configuration does not apply to sample data collection.
A samples columns or collect failed rows configuration for an individual check does not override an exclude_columns setting in a data source. For example, if you configured a data source to exclude any columns in a customer dataset from collecting failed row samples, but included a last name column in a samples columns configuration on an individual check for the customer dataset, Soda obeys the exclue_columns config and does not collect or display failed row samples for last name. See: .
Checks in which you provide a complete SQL query, such as failed rows checks or user-defined checks that use a failed rows query, do not honor the exclude_column configuration. Instead, a gatekeeper component parses all queries that Soda runs to collect samples and ensures that none of columns listed in an exclude_column configuration slip through when generating the sample queries. In such a case, the Soda Library CLI provides a message to indicate the gatekeeper’s behavior:
Where some of your data is sensitive, you can either disable the Soda Cloud sampler completely, or use one of several ways to customize the Soda Cloud sampler in the user interface to restrict failed row sample collection to only those datasets and columns you wish.
The configurations described below correspond with the optional Soda Cloud setting in Organization Settings (see image below) which limits failed row sample collection to only those checks which implicitly collect failed row samples and which include the samples columns or collect failed rows configuration, and/or to checks in datasets that are set to inherit organization settings for failed row samples, or for which failed row samples is disabled. The Allow Soda to collect sample data and failed row samples only for datasets and checks with the explicit configuration to do so setting is compatible with Soda Library 1.6.1 or Soda Agent 1.1.27 or greater.
See also: Manage sensitive data
See also: Configuration and setting hierarchy
Applies to: ✔️ implicit collection of failed row samples ✔️ explicit collection of failed row samples
For checks defined as: ✔️ no-code checks in Soda Cloud ✔️ in an agreement in Soda Cloud ✔️ in a checks YAML file ✔️ inline in a programmatic scan
If your data contains sensitive or private information, you may not want to collect any failed row samples, whatsoever. In such a circumstance, you can disable the collection of failed row samples completely. To prevent Soda Cloud from receiving any sample data or failed row samples for any datasets in any data sources to which you have connected your Soda Cloud account, proceed as follows:
As a user with permission to do so, log in to your Soda Cloud account and navigate to your avatar > Organization Settings.
In the Organization tab, uncheck the box to Allow Soda to collect sample data and failed row samples for all datasets, then Save.
If disabled for a dataset, Soda executes the check during a scan and does not display any failed rows in the Check History page. Instead, it displays an explanatory message and offers the failed rows SQL query that a user with direct access to the data can copy and run elsewhere to retrieve failed row samples for the check.
Applies to: ✔️ implicit collection of failed row samples ✖️ explicit collection of failed row samples
For checks defined as: ✔️ no-code checks in Soda Cloud ✔️ in an agreement in Soda Cloud ✔️ in a checks YAML file ✔️ inline in a programmatic scan
Rather than adjusting the data source connection configuration, you can adjust an individual dataset's settings in the Soda Cloud user interface so that it collects no failed row samples for checks which implicitly collect them.
Note, however, that users with the permission to add checks to a dataset can add the collect failed rows or samples columns parameters to a check in an agreement, or a checks YAML filed, or inline in a programmatic scan to override the Dataset's Disabled setting. See Customize sampling for checks.
As a user with permission to edit a dataset, log in to Soda Cloud, then navigate to the Dataset for which you never want Soda to collect failed row samples.
Click the stacked dots at the upper-right, then select Edit Dataset.
In the Failed Row Samples tab, use the Failed Rows Sample Collection dropdown to select Disabled. Alternatively, if you have checked the box in Organization Settings to Allow Soda to collect sample data and failed row samples for all datasets, you can select Inherited from organization in this dropdown to apply the Soda Cloud account-level rule that applies to all datasets.
Save your settings.
If disabled for a dataset, Soda executes the check during a scan and does not display any failed rows in the Check History page. Instead, it displays an explanatory message and offers the failed rows SQL query that a user with direct access to the data can copy and run elsewhere to retrieve failed row samples for the check.
Alternatively, you can adjust a dataset's settings in Soda Cloud so that it collects failed row samples only for specific columns.
As a user with permission to edit a dataset, log in to Soda Cloud, then navigate to the Dataset for which you never want Soda to collect failed row samples.
Click the stacked dots at the upper-right, then select Edit Dataset.
In the Failed Row Samples tab, use the dropdown to select Specific Columns, further selecting the columns from which to gather failed row samples.
Save your settings.
Applies to: ✔️ implicit collection of failed row samples ✖️ explicit collection of failed row samples
For checks defined as: ✖️ no-code checks in Soda Cloud ✔️ in an agreement in Soda Cloud ✔️ in a checks YAML file ✔️ inline in a programmatic scan
💡 Consider customizing sampling for checks via Soda Cloud settings; see Customize failed row samples for datasets.
When you add sampling parameters to checks—collect failed rows or samples columns—the check level configurations override other settings or configurations according to the following table. See also: Configuration and setting hierarchy.
Setting or Configuration
Sampling parameters override settings or config
Sampling parameters DO NOT override settings or config
UNCHECKED Organization Settings > Allow Soda to collect sample data and failed row samples for all datasets
✔️
CHECKED Organization Settings > Allow Soda to collect sample data and failed row samples for all datasets AND CHECKED Allow Soda to collect sample data and failed row samples only for datasets and checks with the explicit configuration to do so
✔️
CHECKED Dataset Settings > Failed Row Samples > Disable all failed row sample collection
✔️
CHECKED Dataset Settings > Failed Row Samples > Enable failed row collection for specific columns AND The check's column is not selected for enablement.
✔️
Add a collect failed rows parameter to a check that implicitly collects failed row samples to instruct the Soda Cloud sampler to collect failed rows samples for an individual check. Provide a boolean value for the configuration key, either true or false.
You can also use a samples columns configuration to an individual check to specify the columns for which Soda implicitly collects failed row sample values. At the check level, Soda only collects the check's failed row samples for the columns you specify in the list, as in the duplicate_count example below. The comma-separated list of samples columns supports wildcard characters (% or *).
Note that reconciliation checks do not support the sample columns parameter. Instead, Soda dynamically generates failed rows samples based on the recon check’s diagnostic, and displays only the columns that are relevant to the data being compared.
Alternatively, you can specify sample collection and/or the columns from which Soda must draw failed row samples for multiple checks using a dataset-level configuration, as in the following example. Note that if you specify a different samples columns or collect failed rows value for an individual check than is defined in the configurations for block, Soda obeys the individual check's instructions.
Applies to: ✔️ implicit collection of failed row samples ✖️ explicit collection of failed row samples
For checks defined as: ✖️ no-code checks in Soda Cloud ✔️ in an agreement in Soda Cloud ✔️ in a checks YAML file ✔️ inline in a programmatic scan
By default, Soda collects 100 failed row samples. You can limit the number of sample rows that Soda sends using the samples limit key:value pair configuration, as in the following missing check example.
If you wish to collect a larger volume of failed row checks, you can set the limit to a larger number. Be aware, however, that collecting large volumes of failed row samples comes with the compute cost that requires enough memory for Soda Library or a Soda Agent to process the request; see: About failed row sampling queries.
If you wish to prevent Soda from collecting and sending failed row samples to Soda Cloud for an individual check, you can set the samples limit to 0. To achieve the same objective, you can use a collect failed rows: false parameter, instead.
Applies to: ✖️ implicit collection of failed row samples ✔️ explicit collection of failed row samples for a user-defined check, only
For checks defined as: ✔️ no-code checks in Soda Cloud ✔️ in an agreement in Soda Cloud ✔️ in a checks YAML file ✔️ inline in a programmatic scan
At times, you may find it useful to customize a SQL query that Soda can use to collect failed row samples for a user-defined check. To do so, you can add an independent failed row samples query.
For example, you may wish to limit the columns from which Soda draws failed row samples, or limit the volume of samples. Further, you could customize a query to run an aggregate metric such as avg on a discount column, for example, and return failed row samples that you can compare to an anomaly such as rows with a discount greater than 50%.
To add a custom failed row sample query to a user-defined check using SodaCL, add a failed rows query configuration as in the following example.
In Soda Cloud, you can add an optional failed rows query to a no-code SQL Metric check in the user interface, as in the image below. No-code SQL Metric checks are supported in Soda Cloud with Soda-hosted Agent or self-hosted Agent.
With many different options available to configure failed row sampling in various formats and at various levels (data source, dataset, check) with Soda, some combinations of customization may be complex. Generally speaking, configurations you define in configuration YAML or checks YAML files override settings defined in Soda Cloud, with the exception of the top-most setting that allows, or disallows, failed row sample collection entirely.
What follows is a hierarchy of configurations and settings to help you determine how Soda enforces failed row sample collection and display, in descending order of obedience.
Disabling failed row samples in Soda Cloud prevents Soda from displaying any failed row samples for any checks as part of a Soda Library scan or Soda Cloud scheduled scan definition.
Disabling failed row samples via data source disable_samples configuration prevents Soda from displaying any failed row samples for checks that implicitly collect samples and which are applied to datasets in the data source. If set to false while the above Sample Data setting in Soda Cloud is unchecked, Soda obeys the setting and does not display any failed rows samples for any checks.
Seting a sample limit to 0 via data source samples limit configuration prevents Soda from displaying any failed row samples for checks that implicitly collect samples and which are applied to datasets in the data source. If set to 10, for example, while the above disable_samples setting is set to true, Soda obeys the disable_samples setting and does not display failed row samples for checks for the data source.
Disabling failed row samples for datasets and columns via data source exclude_columns configuration prevents Soda from displaying any failed row samples for checks that implicitly collect samples and which are applied to datasets in the data source. If specified for a data source while the above data source samples limit configuration is set to 0, Soda objeys the samples limit and does not display failed row samples for checks for the data source.
Disabling sampling for checks via sampling parameters (samples columns or collect failed rows) in a SodaCL check configuration specifies sampling instructions, or prevents/allows sampling for individual checks that implicitly collect samples. If any of the above configurations conflict with the individual check settings, Soda obeys the above configurations. For example, if a duplicate_count check includes the configuration collect failed rows: true but the samples limit configuration in the data source configuration is set to 0, Soda objeys the samples limit and does not display failed row samples for the duplicate_count check.
However, if you specify a different samples columns or collect failed rows value for an individual check than is defined in the configurations for block for a dataset, Soda obeys the individual check’s instructions.
Customize sampling via user interface to Allow Soda to collect sample data and failed row samples only for datasets and checks with the explicit configuration to do so setting in Organization Settings in Soda Cloud limits failed row sample collection to only those checks which implicitly collect failed row samples and which include a samples columns or collect failed rows configuration, and/or to checks in datasets that are set to inherit organization settings for failed row samples, or for which failed row samples is disabled. If any of the above configurations conflict with this setting, Soda obeys the above configurations.
Disabling failed row samples for datasets via Soda Cloud Edit Dataset > Failed Row Samples prevents Soda from displaying any failed row samples for checks that implicitly collect samples and which are applied the individual dataset. If any of the above configurations conflict with the dataset's Failed Row Samples settings, Soda obeys the above configurations. For example, if you set the value of Failed Rows Sample Collection for to Disabled for a dataset, then use SodaCL to configure an individual check to collect failed rows, Soda obeys the check configuration and displays the failed row samples for the individual check.
Customizing failed row samples for datasets via Soda Cloud to collect samples only for columns you specify in the Collect Failed Row Samples For instructs Soda to display failed row samples for your specified columns for checks that implicitly collect samples and which are applied the individual dataset. If any of the above configurations conflict with the dataset's Collect Failed Row Samples For settings, Soda obeys the above configurations.
If the data you are checking contains sensitive information, you may wish to send any failed rows samples that Soda collects to a secure, internal location rather than Soda Cloud. These configurations apply to checks defined as no-code checks, in an agreement, or in a checks YAML file.
To do so, you have two options:
HTTP sampler: Create a function, such as a lambda function, available at a specific URL within your environment that Soda can invoke for every check result in a data source that fails and includes failed row samples. Use the function to perform any necessary parsing from JSON to your desired format (CSV, Parquet, etc.) and store the failed row samples in a location of your choice.
Python CustomSampler: If you run programmatic Soda scans of your data, add a custom sampler to your Python script to collect samples of rows with a fail check result. Once collected, you can print the failed row samples in the CLI, for example, or save them to an alternate destination.
Only usable with a programmatic Soda scan
🟢
Displays failed row sample storage location in a message in Soda Cloud
🟢
🟢
Can pass a DataFrame into the scan to store the failed row samples, then access failed row samples after scan completion
🟢
🟢
Requires corresponding configuration in the datasource connection configuration
🟢
Soda sends the failed rows samples as a JSON event payload and includes the following, as in the example below.
data source name
dataset name
scan definition name
check name
Configure an HTTP failed row sampler; see example below.
In Soda Cloud, in the Data Sources tab, select the data source for which you wish to reroute failed rows samples, then navigate to its Connect the Data Source tab. If you use a configuration.yml file to store data source connection configuration details, open the file.
To the connection configuration, add the sampler and storage configuration as outlined below, then save.
type
http
Provide an HTTP endpoint such as a Lambda function, or a custom Python HTTP service.
url
any URL
Provide a valid URL that accepts JSON payloads.
message
any string
(Optional) Provide a customized message that Soda Cloud displays in the failed rows tab, prepended to the sampler response, to instruct your fellow Soda Cloud users how to find where the failed rows samples are stored in your environment. For example, if you wish the complete message to read: "Failed rows have been sent to dir/file.json", configure the syntax as in the example above and return the file location path in the sampler's response.
link
any URL
(Optional) Provide a link to a web application through which users can access the stored sample.
The following is an example of a custom failed row sampler that gets the failed rows from the Soda event object (JSON payload, see example below) and prints the failed rows in CSV format.
Borrow from this example to create your own custom sampler that you can use to reroute failed row samples.
Example CSV output:
If you are running Soda scans programmatically, you can add a custom sampler to collect samples of rows with a fail check result.
The contents of the tabs below offer examples of how you can implement a custom sampler.
The Simple Example prints failed rows in the CLI.
The Example with Dataframes uses a scan context to read data from a scan and build a Dataframe with the results.
The Example with Sample Reference uses SampleRef to reroute failed rows and customize the message that appears in Soda Cloud to direct users to the alternate storage location, including using a variable to dynamically populate the message.
💡 To see this sampler in action, copy+paste and run an example script locally to print failed row samples in the CLI scan output.
This simple example prints the failed rows samples in the CLI. If you prefer to send the output of the failed row sampler to a destination other than Soda Cloud, you can do so by customizing the sampler as above, then using the Python API to save the rows to a JSON file. Refer to Python docs for Reading and writing files for details.
This example uses a scan context to read data from, or write data to a scan. This enables users to build some data structure in the custom sampler, then use it after scan execution.
For example, you can use scan context to build a DataFrame that contains unique failed row samples (as opposed to standard failed row samples Soda collects per check and which can contain the same sample rows in different checks). You can also use scan context to pass data to a scan and make it available during execution so as to provide additional context that helps to build meaningful results using filters, for example.
Optionally, you can include SampleRef, as in the example below, to display a message in Soda Cloud that directs users to the alternate location to find the rerouted failed row samples for a check.
In the message parameter, you can use one or more of the following variables to customize the details of the message that Soda presents to users when directing them to the alternate location.
{scan_time}
{check_label}
{data_source_label}
For the most part, when you exclude a column from failed rows sampling, Soda does not include the column in its query to collect samples. In other words, it does not collect the samples then prevent them from sending to Soda Cloud, Soda does not query the column for samples, period. (There are some edge cases in which this is not the case and for those instances, a gatekeeper component ensures that no excluded columns are included in failed rows samples.)
As an example, imagine a check that looks for NULL values in a column that you included in your exclude_columns configuration. (A missing metric in a check implicitly collects failed rows samples.)
If the cat column were not an excluded column, Soda would generate two queries:
a query that executes the check
another query to collect failed rows samples for checks that failed
But because the cat column is excluded, Soda must generate three queries:
a query that executes the check
a query to gather the schema of the dataset to identify all columns
another query to collect failed rows samples for checks that failed, only on columns identified on the list returned by the preceding query
Follow a hands-on How-to guide to reroute failed rows using a Python CustomSampler.
Learn more about sampling data in Soda Cloud.
Learn how to discover and profile datasets.
Organize datasets in Soda CLoud using attributes.
in a Dagster pipeline and reroute failed rows to Redshift.
Need help? Join the .
from soda.scan import Scan
from soda.sampler.sampler import Sampler
from soda.sampler.sample_context import SampleContext
# Create a custom sampler by extending the Sampler class
class CustomSampler(Sampler):
def store_sample(self, sample_context: SampleContext):
# Retrieve the rows from the sample for a check.
rows = sample_context.sample.get_rows()
# Check SampleContext for more details that you can extract.
# This example simply prints the failed row samples.
print(sample_context.query)
print(sample_context.sample.get_schema())
print(rows)
if __name__ == '__main__':
# Create a Scan object.
s = Scan()
# Configure an instance of custom sampler.
s.sampler = CustomSampler()
s.set_scan_definition_name("test_scan")
s.set_data_source_name("aa_vk")
s.add_configuration_yaml_str(f"""
data_source test:
type: postgres
schema: public
host: localhost
port: 5433
username: postgres
password: secret
database: postgres
""")
s.add_sodacl_yaml_str(f"""
checks for dim_account:
- invalid_percent(account_type) = 0:
valid format: email
""")
s.execute()
print(s.get_logs_text())from soda.scan import Scan
from soda.sampler.sampler import Sampler
from soda.sampler.sample_context import SampleContext
import pandas as pd
class CustomSampler(Sampler):
def store_sample(self, sample_context: SampleContext):
# Read data from scan context and use it in the sampler.
# This example uses a list of unique ids from the scan context to filter the failed row sample DataFrame by ID.
unique_ids = sample_context.scan_context_get("unique_ids")
rows = sample_context.sample.get_rows()
filtered_rows = [row for row in rows if row[0] in unique_ids]
columns = [col.name for col in sample_context.sample.get_schema().columns]
df = pd.DataFrame(filtered_rows, columns=columns)
# scan_context_set takes both a string and a list of strings to set a nested value
# This example stores the sample DataFrame in the scan_context in a nested dictionary "samples.soda_demo.public.dim_employee.duplicate_count(gender) = 0": df
sample_context.scan_context_set(
[
"samples",
sample_context.data_source.data_source_name,
sample_context.data_source.schema,
sample_context.partition.table.table_name,
sample_context.check_name,
],
df,
)
if __name__ == "__main__":
s = Scan()
s.sampler = CustomSampler()
s.set_scan_definition_name("test_scan")
s.set_verbose(True)
s.set_data_source_name("soda_demo")
s.scan_context_set("unique_ids", [1, 2, 3, 4, 5])
s.add_configuration_yaml_str(
f"""
data_source soda_demo:
type: postgres
schema: public
host: localhost
username: ******
password: ******
database: postgres
"""
)
s.add_sodacl_yaml_str(
f"""
checks for dim_employee:
- missing_count(status) = 0
- failed rows:
fail condition: employee_key = 1
# The following check does not collect failed rows samples; it does not invoke the CustomSampler.
- duplicate_count(gender) = 0:
samples limit: 0
"""
)
s.execute()
# DataFrames created in CustomSampler are available in the scan context.
print(s.scan_context["samples"])
# Prints:
# {
# 'soda_demo': {
# 'public': {
# 'dim_employee': {
# 'missing_count(status) = 0': [df]
# 'failed rows': [df]
# }
# }
# }
# }
# This simple example collects all queries that end with ".failing_sql", which you can use to execute failed rows queries manually.
failed_rows_queries = [
query["sql"] for query in s.scan_results["queries"] if query["name"].endswith(".failing_sql")
]
print(failed_rows_queries)
# Prints two queries:
# [
# 'SELECT * FROM public.dim_employee \n WHERE (status IS NULL)',
# '\nWITH frequencies AS (\n SELECT gender\n FROM public.dim_employee\n WHERE gender IS NOT NULL\n GROUP BY gender\n HAVING COUNT(*) > 1)\nSELECT main.*\nFROM public.dim_employee main\nJOIN frequencies ON main.gender = frequencies.gender\n'
# ]data_source my_datasource:
type: postgres
...
sampler:
disable_samples: Truedata_source my_datasource_name:
type: postgres
...
sampler:
exclude_columns:
customer_info: ['*']
payment_methods: ['*']data_source my_datasource_name:
type: postgres
host: localhost
port: '5432'
username: ***
password: ***
database: postgres
schema: public
sampler:
exclude_columns:
dataset_sales:
- commission_percent
- salary
customer_%:
- birthdate
- credit%data_source my_datasource_name:
type: postgres
...
sampler:
exclude_columns:
dataset_sales: [commission_percent, salary]
customer_%: [birthdate, credit%]# disable all failed rows samples on all datasets
sampler:
exclude_columns:
'*': ['*']
# disable failed rows samples on all columns named "password" in all datasets
sampler:
exclude_columns:
'*': [password]
# disable failed rows samples on the "last_name" column and all columns that begin with "pii_" from all datasets that begin with "customer_"
sampler:
exclude_columns:
customer_*: [last_name, pii_*]data_source soda_test:
type: postgres
host: xyz.xya.com
port: 5432
...
sampler:
samples_limit: 50from soda.scan import Scan
scan = Scan()
scan._configuration.samples_limit = 50sampler:
exclude_columns:
retail_*: [password]
retail_customers: [last_name, pii_*]checks for dim_customer:
- duplicate_count(first_name) < 5:
collect failed rows: truechecks for dim_customer:
- duplicate_count(email_address) < 50:
samples columns: [last_name, first_name]configurations for dim_product:
samples columns: [product_line]
collect failed rows: true
checks for dim_product:
- duplicate_count(product_line) = 0
- missing_percent(standard_cost) < 3%checks for dim_customer:
- missing_count(number_cars_owned) >= 3
samples limit: 50checks for dim_customer:
- missing_percent(email_address) < 50:
samples limit: 99999checks for dim_customer:
- missing_percent(email_address) < 50:
samples limit: 0checks for retail_orders:
- test_sql:
test_sql query: SELECT count(*) FROM retail_orders
failed rows query: SELECT id FROM retail_orders WHERE id IS NULL
name: With failed row samples
fail: when > 0{
"check_name": "String",
"count": "Integer",
"dataset": "String",
"datasource": "String",
"rows": [
{
"column1": "String|Number|Boolean",
"column2": "String|Number|Boolean"
...
}
],
"schema": [
{
"name": "String",
"type": "String"
}
]
}data_source my_datasource_name:
type: postgres
host: localhost
port: '5432'
username: ***
password: ***
database: postgres
schema: public
sampler:
storage:
type: http
url: http://failedrows.example.com
message: Failed rows have been sent to
link: https://www.example-S3.url
link_text: S3import csv
import io
# Function to put failed row samples in a AWS Lambda function / Azure function / Google Cloud function
def lambda_handler(event):
check_name = event['check_name']
count = event['count']
dataset = event['dataset']
datasource = event['datasource']
rows = event['rows']
schema = event['schema']
csv_buffer = io.StringIO()
# Write data to CSV buffer
csv_writer = csv.writer(csv_buffer)
# Write row header
header_row = [column['name'] for column in schema]
csv_writer.writerow(header_row)
# Write each row of data
for row in rows:
csv_writer.writerow(row)
# Move to the beginning of the buffer
csv_buffer.seek(0)
# Read the content of the buffer
csv_content = csv_buffer.getvalue()
# Print the content
print(csv_content) column_1_name,column_2_name
row_1_column_1_value,row_1_column_2_value
row_2_column_1_value,row_2_column_2_valuechecks for retail_orders:
- missing_count(cat) = 0SELECT * FROM dev_m1n0.sodatest_customers_6c2f3574
WHERE cat IS NULL
Query soda_test.cat.failed_rows[missing_count]:
SELECT * FROM dev_m1n0.sodatest_customers_6c2f3574
WHERE cat IS NULLSELECT
COUNT(CASE WHEN cat IS NULL THEN 1 END)
FROM sodatest_customers
Query soda_test.get_table_columns_sodatest_customers:
SELECT column_name, data_type, is_nullable
FROM information_schema.columns
WHERE lower(table_name) = 'sodatest_customers'
AND lower(table_catalog) = 'soda'
AND lower(table_schema) = 'dev_1'
ORDER BY ORDINAL_POSITION
Skipping columns ['cat'] from table 'sodatest_customers' when selecting all columns data.
Query soda_test.cat.failed_rows[missing_count]:
SELECT id, cst_size, cst_size_txt, distance, pct, country, zip, email, date_updated, ts, ts_with_tz FROM sodatest_customers
WHERE cat IS NULL{dataset_label}Data source connection sampler configuration uses exclude columns to prevent failed row sample collection on all, or some, of its datasets and columns
✔️
Data source connection sampler configuration uses disable_samples: True to prevent failed row sample collection on all dataset in the data source
✔️
link_text
any string
(Optional) Provide text for the link button. For example, "View Failed Samples".
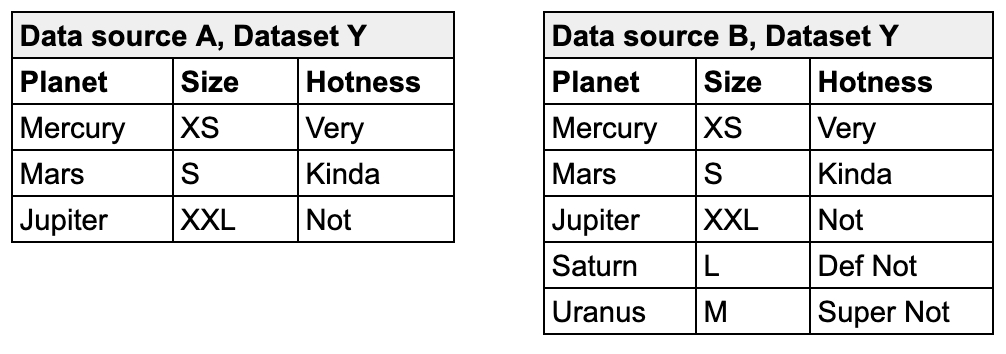
Skipping samples from query 'retail_orders.last_name.failed_rows[missing_count]'. Excluded column(s) present: ['*'].from soda.scan import Scan
from soda.sampler.sampler import Sampler
from soda.sampler.sample_context import SampleContext
# import SampleRef
from soda.sampler.sample_ref import SampleRef
# Create a custom sampler by extending the Sampler class
class CustomSampler(Sampler):
def store_sample(self, sample_context: SampleContext):
rows = sample_context.sample.get_rows()
sample_schema = sample_context.sample.get_schema()
# Provide details about where to access failed row samples
return SampleRef(
name=sample_context.sample_name,
schema=sample_schema,
total_row_count=row_count,
stored_row_count=row_count,
type=SampleRef.TYPE_PYTHON_CUSTOM_SAMPLER,
link="https://www.example.com",
message="Access failed row samples for {dataset_label} in external file storage.",
link_text="File storage",
)
if __name__ == '__main__':
# Create a Scan object.
s = Scan()
...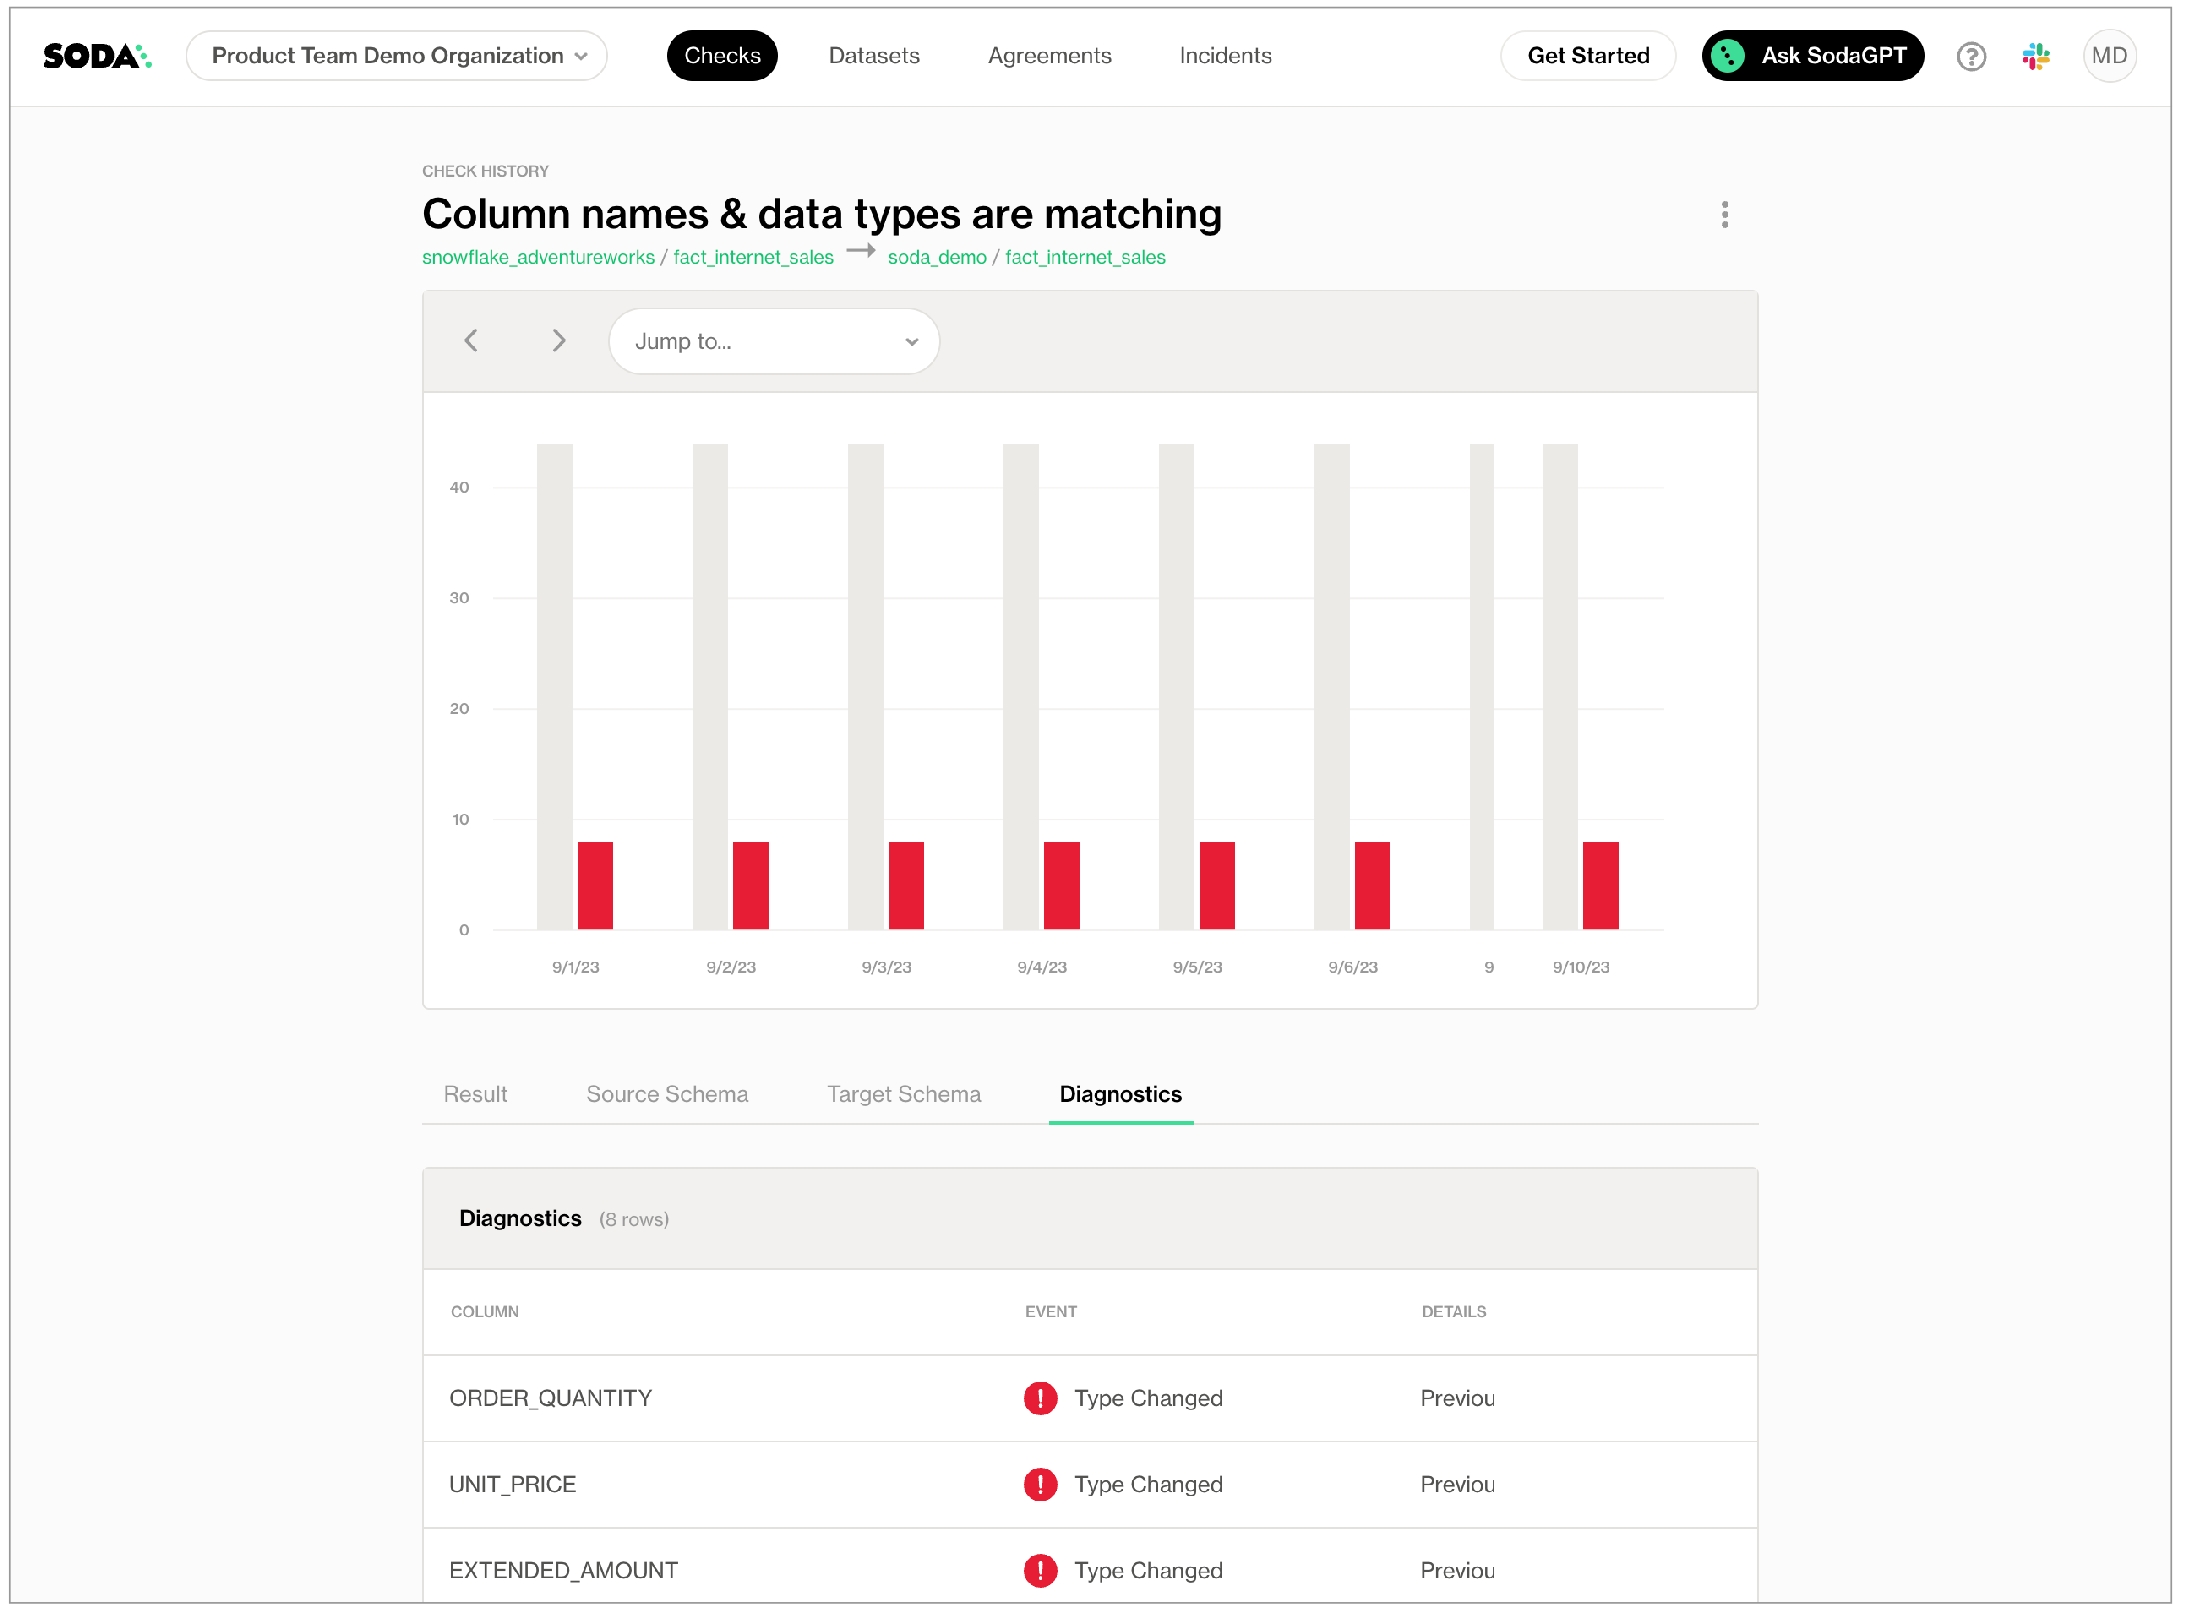
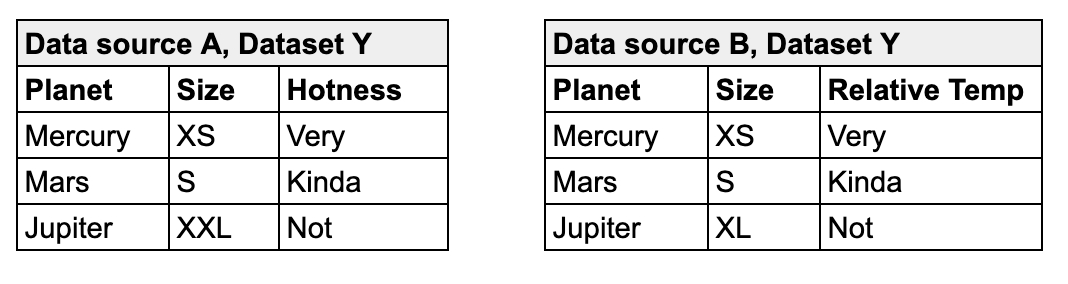
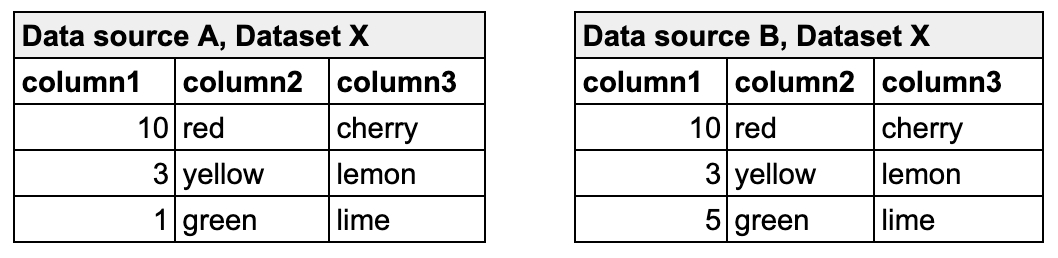
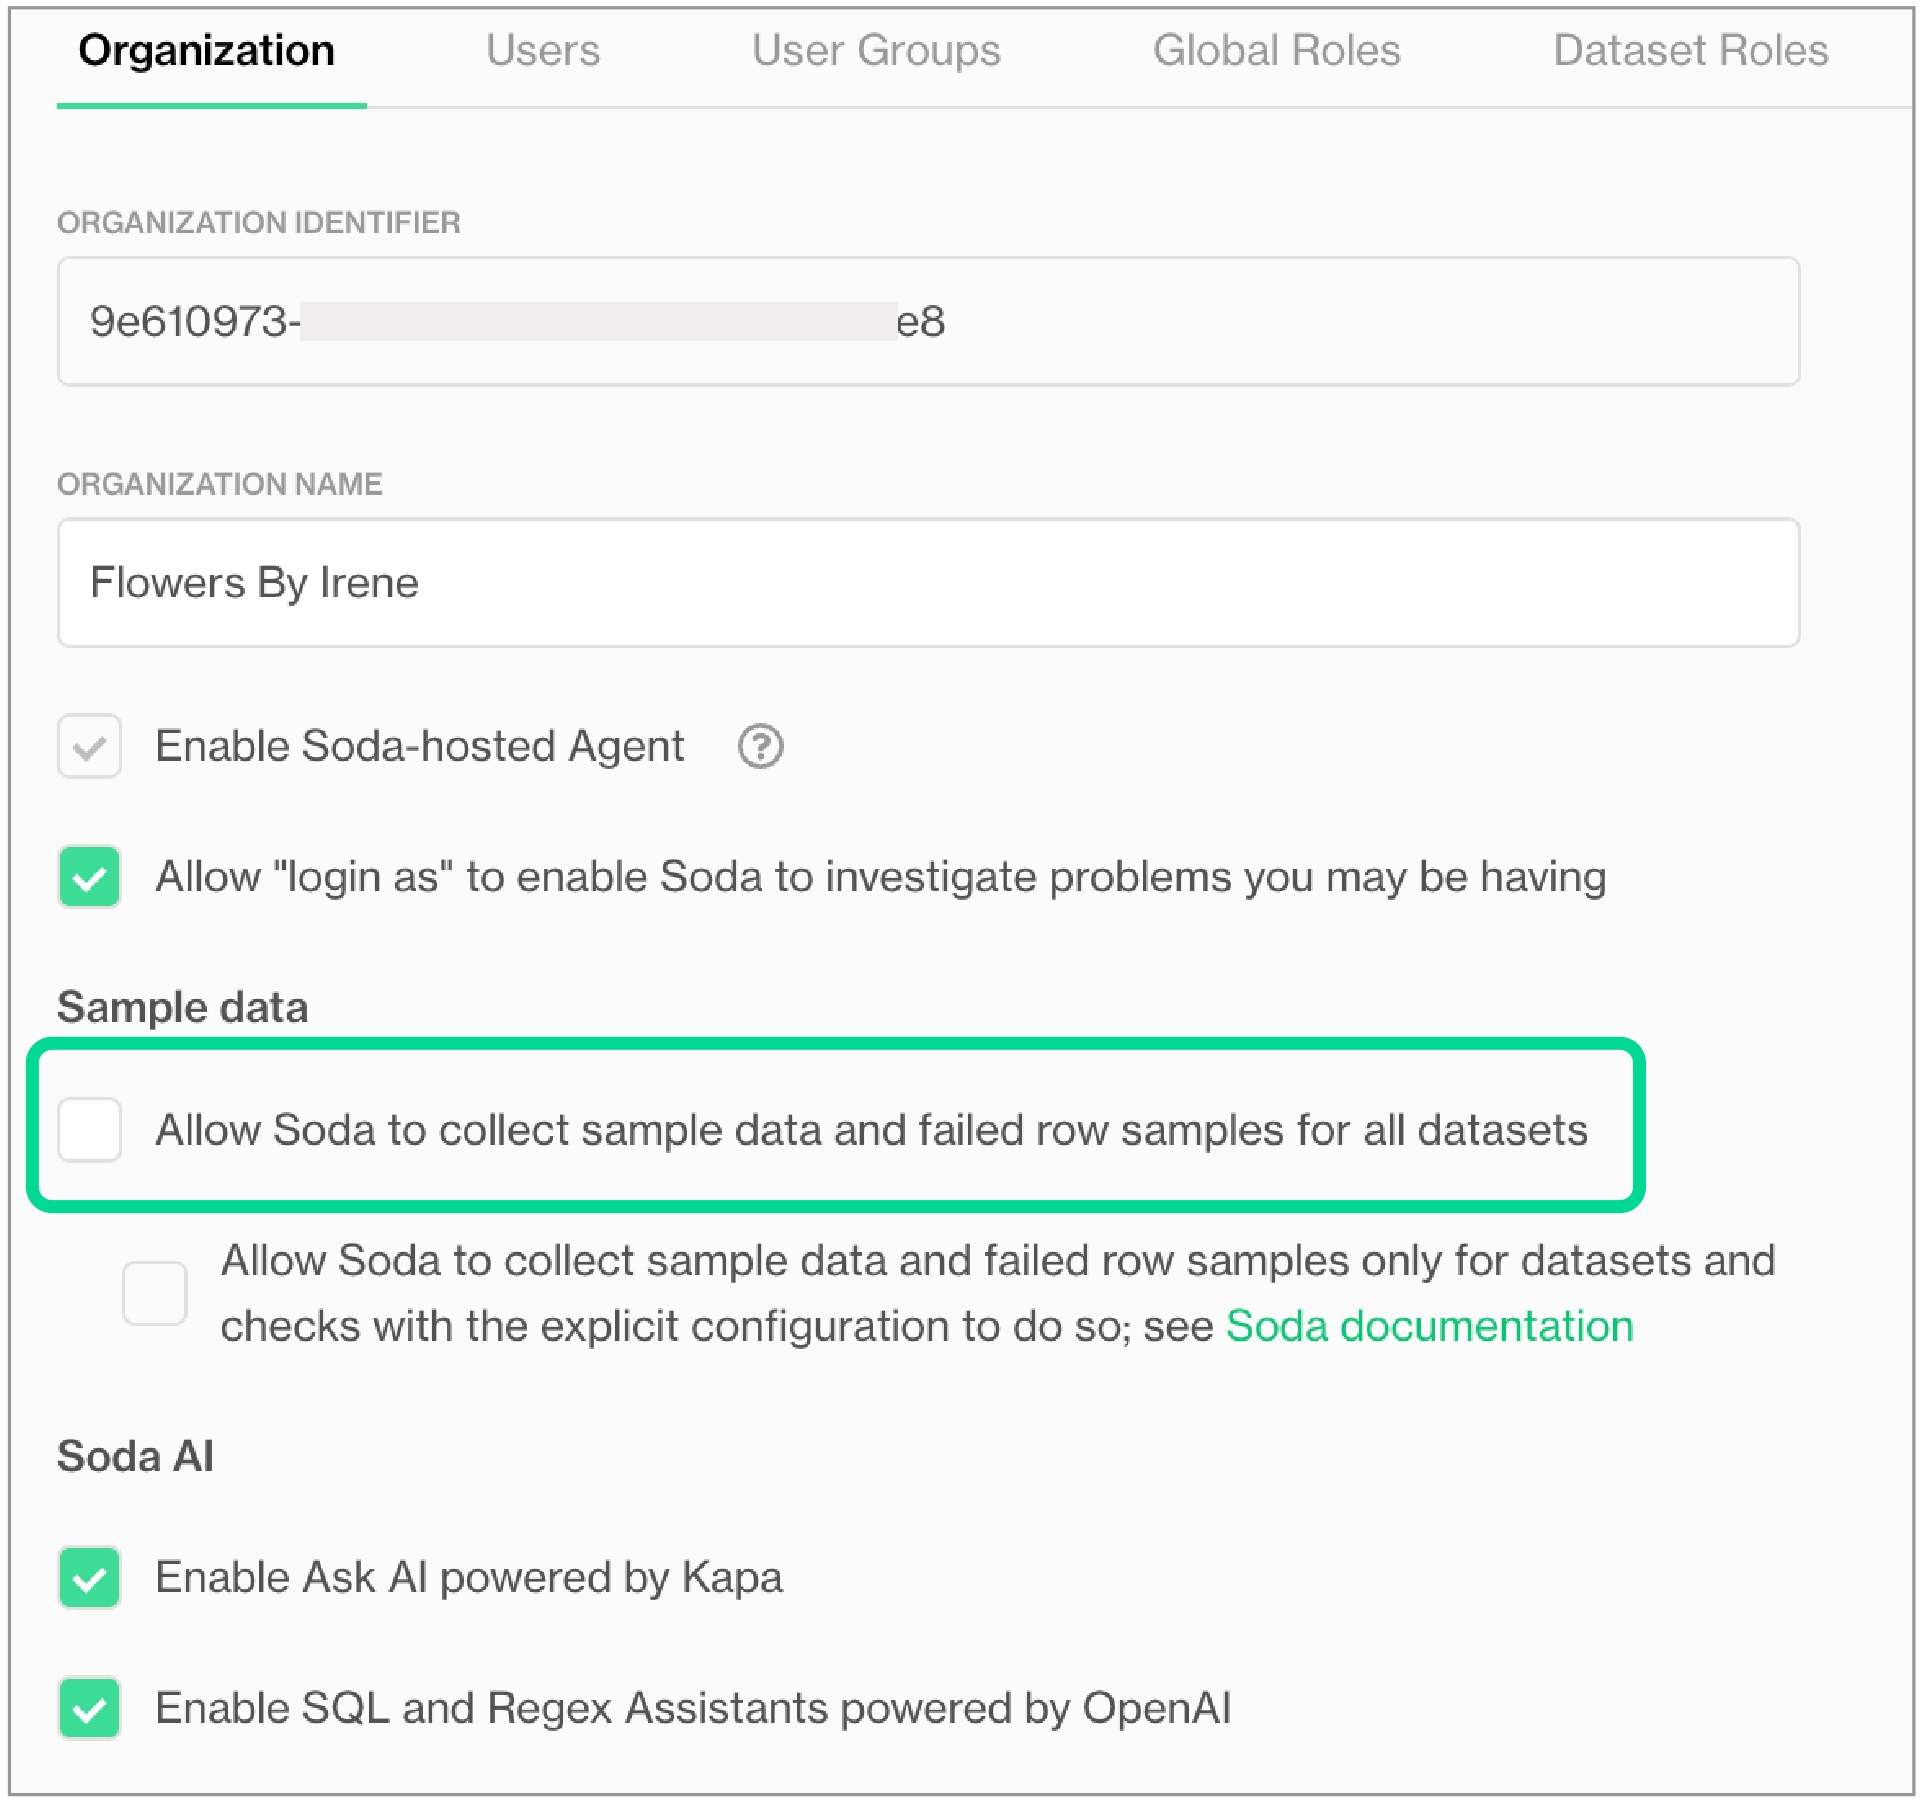
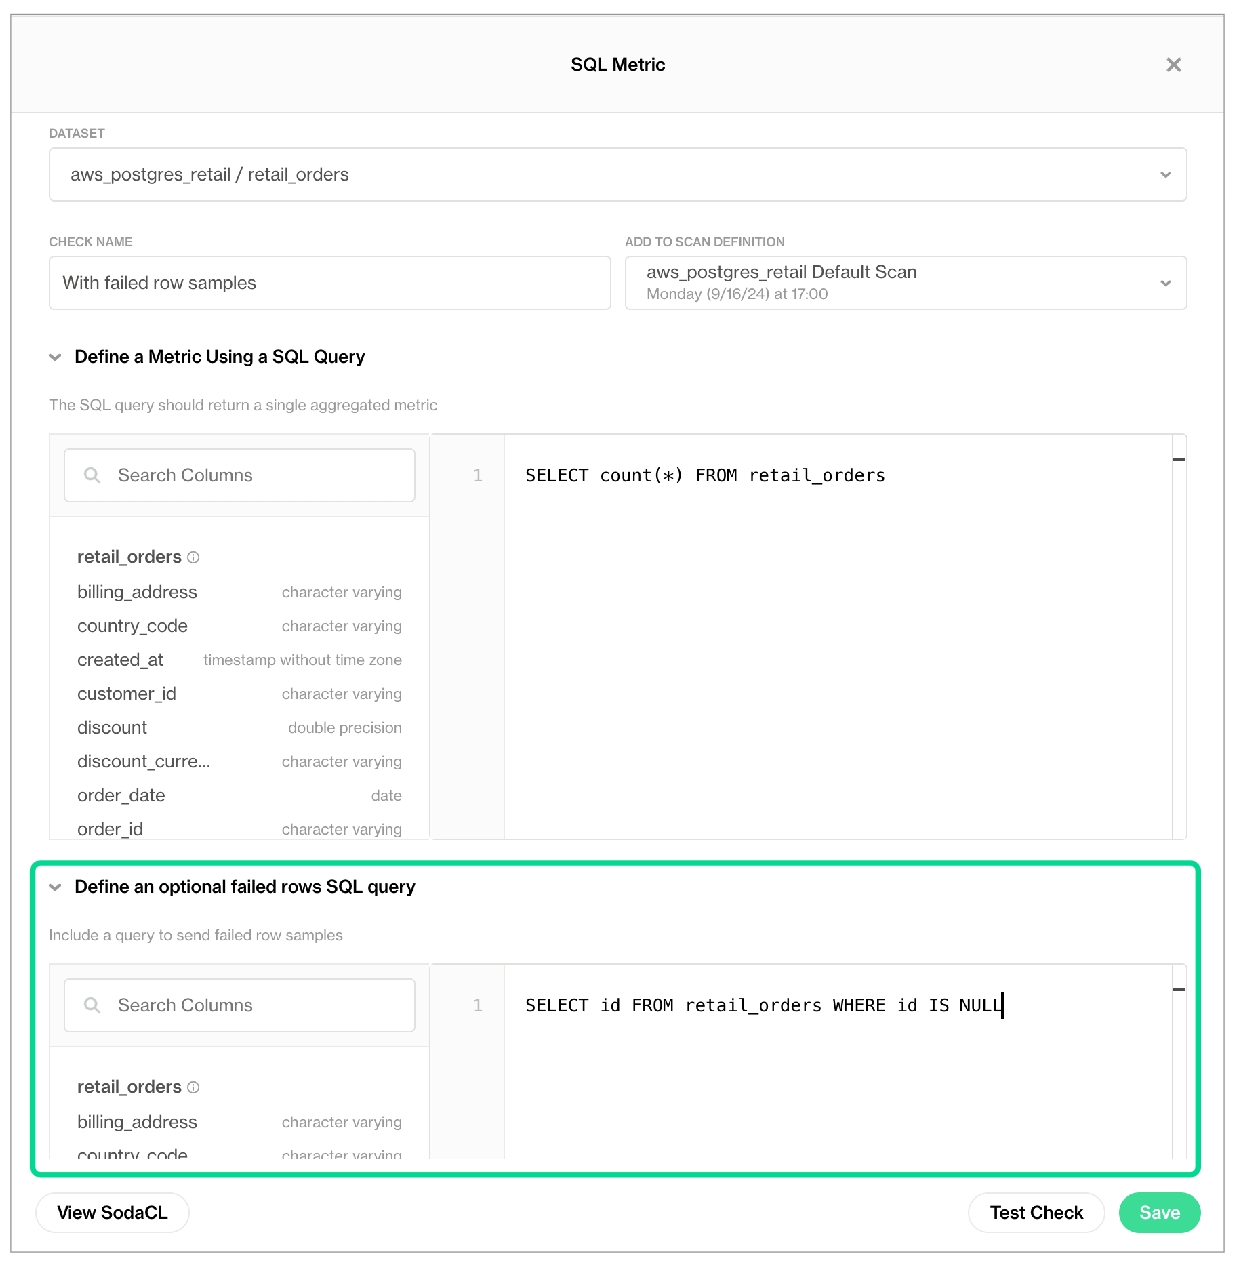
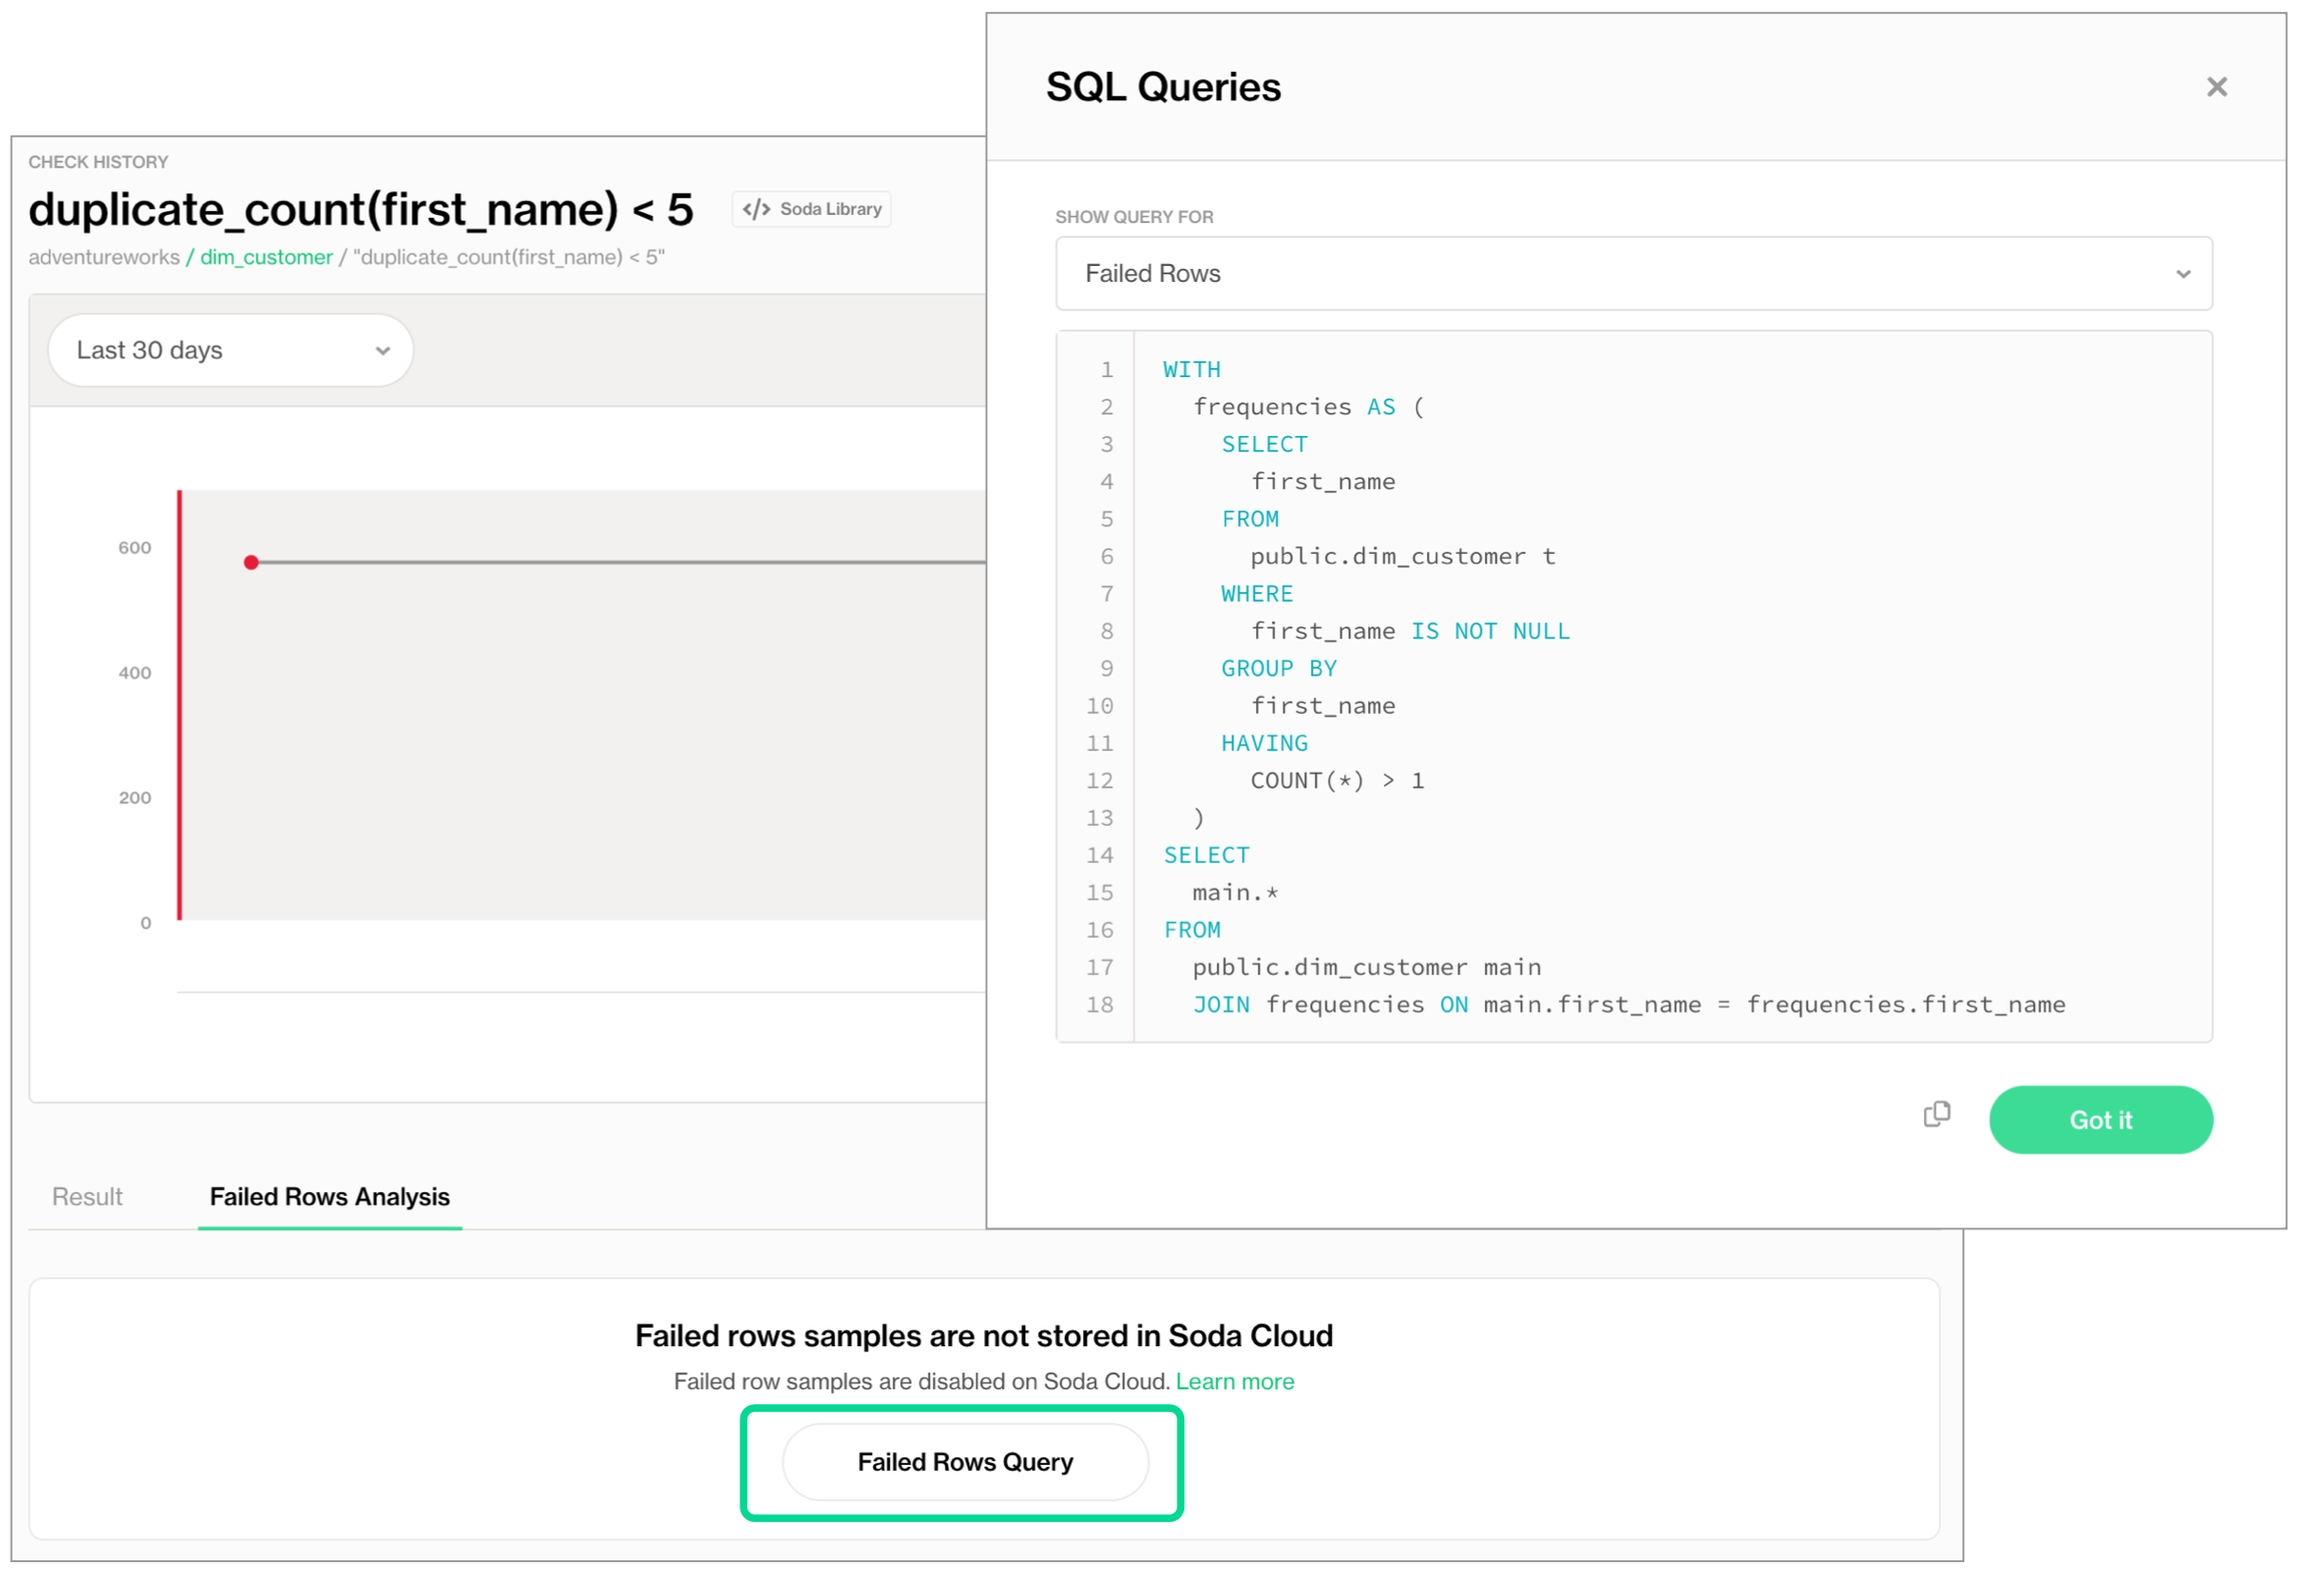
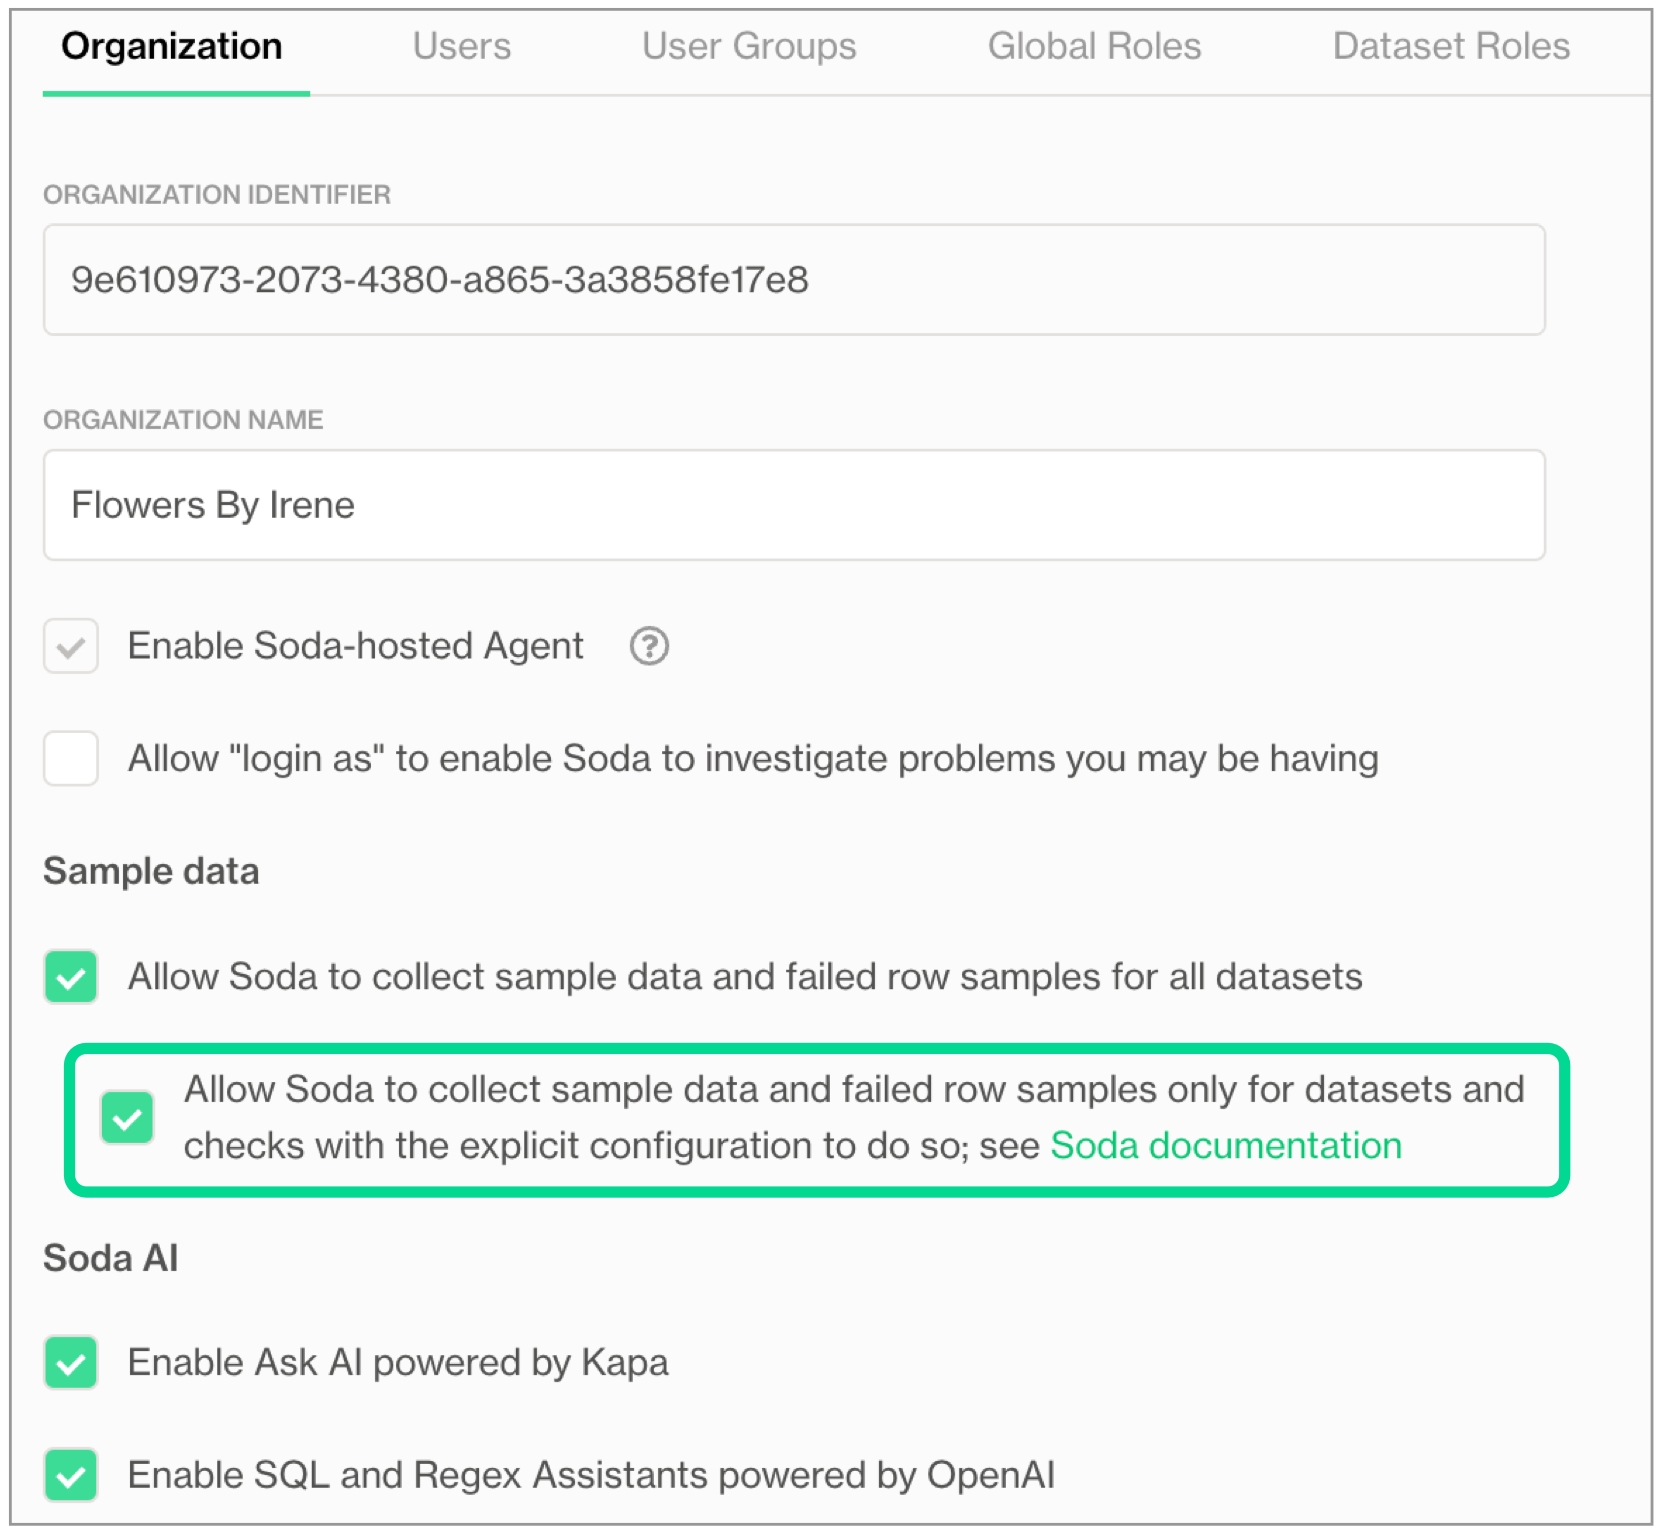
Anomaly detection checks use a machine learning algorithm to automatically detect anomalies in your time-series data.
This check is being deprecated. A new version—rebuilt from the ground up, 70% more accurate and significantly faster—was launched at the Databricks AI Summit. 2025. 👉 Try it now!
Use an anomaly detection check to automatically discover anomalies in your check metrics.
✔️ Requires Soda Core Scientific (included in a Soda Agent) ✖️ Supported in Soda Core ✔️ Supported in Soda Library 1.2.2 or greater + Soda Cloud ✔️ Supported in Soda Cloud Agreements+ Soda Agent ✖️ Available as a no-code check
The anomaly detection check is powered by a machine learning algorithm that works with measured values for a metric that occur over time. Soda leverages the algorithm to learn patterns in your data so it can identify and flag anomalies. As a relatively easy algorithm to use and tune, Facebook Prophet is ideally suited to both analyzing metrics and giving you control over optional configurations.
As this check tracks and analyzes metrics over time, the algorithm it uses learns from historical patterns in your data, including trends and seasonal variations in the measurements it collects. After learning the normal behavior of your data, the check becomes capable of detecting variations from the norm which it flags as anomalies.
Once flagged, Soda can alert you to the anomaly so that you can take action to correct any issues with your data. Alternatively, you can add a notation to an anomalous measurement to indicate that the anomaly is something you expected to see, such as a spike in order volumes during an aggressive marketing campaign, so that the check knows to discount the measurement as an anomaly.
Importantly, you can fine tune an anomaly detection check to customize some of the algorithm's parameters and improve the check's ability to recognize truly anomalous behavior in your data.
To use an anomaly detection check, you must install Soda Scientific in the same directory or virtual environment in which you installed Soda Library. Best practice recommends installing Soda Library and Soda Scientific in a virtual environment to avoid library conflicts, but you can if you prefer.
Soda Scientific is included in Soda Agent deployment.
Set up a virtual environment, and install Soda Library in your new virtual environment.
Use the following command to install Soda Scientific.
Refer to for help with issues during installation.
The following basic examples demonstrate how to use the anomaly detection with a few metrics. You can use any , , , , or metrics with an anomaly detection check.
The first example simply detects anomalies in row_count measurements for the dataset over time, while the second identifies anomalies in the calculated average of values in the order_price column.
The third example gauges anomalies in timeliness of the data in the dataset based on the value of the start_date column.
The following example includes two user-defined metrics: the first uses a SQL query to define the metric, the second uses CTE to do so.
The following examples demonstrate how to define a check that detects anomalies in the number of missing values in the id column relative to historical volumes; the second example detects anomalies in the volume of incorrectly formatted email addresses.
Because the anomaly detection check requires at least four measurements before it can start detecting what counts as an anomalous measurement, your first few scans yield a [NOT EVALUATED] check result that indicates that Soda does not have enough historical data to be able to detect an anomaly.
Though your first instinct may be to run several scans in a row to produce the four measurements that the anomaly detection needs, the measurements don’t count if the frequency of occurrence is too random, or rather, the measurements don't represent enough of a stable frequency.
If, for example, you attempt to run eight back-to-back scans in five minutes, the anomaly detection does not register the measurements resulting from those scans as a reliable pattern against which to evaluate an anomaly.
Consider using the Soda library to set up a that produces a check result for an anomaly detection check on a regular schedule.
If you have an existing anomaly score check, you can migrate to use an anomaly detection check. To migrate to the new check, you have three options.
Default The first option is to create a new anomaly detection check to replace an existing anomaly score check. This is the easiest path and the default behavior, but you lose all the historic check results for the anomaly score check and any feedback that you applied to the anomaly score check's measurements. This means that the algorithm starts from scratch to learn patterns in your data that eventually enable it to identify anomalous measurements.
To follow this path, revise your existing anomaly score check to use the anomaly detection syntax, as in the following example.
Recommended The second option is to create a new anomaly detection check and port the historic anomaly score check results and feedback to the new check. This path retains the anomaly score's historic check results and feedback to preserve the algorithm's memory of patterns in your data, though you cannot directly access the retained information via Soda Cloud.
To follow this path, revise your existing anomaly score check to use the anomaly detection syntax, and add the take-over... parameter.
The third option is to keep the existing anomaly score check as is, and create an anomaly detection check in a separate checks YAML file, essentially running two checks in parallel. This path retains the existing anomaly score's historic check results and feedback which you can continue to access directly in Soda Cloud. At the same time, the anomaly detection check begins learning the patterns in your data and accruing separate feedback you add to help it identify anomalous measurements.
To follow this path, create a new checks YAML file, then add an anomaly detection check to the file. Be sure to include both file names in any Soda scan you run programmatically or via the Soda Library CLI, as in the following example command.
If you wish, you can reset an anomaly detection's history, effectively recalibrating what Soda considers anomalous on a dataset.
In Soda Cloud, navigate to the Check History page of the anomaly check you wish to reset.
Click to select a node in the graph that represents a measurement, then click Feedback.
In the modal that appears, you can choose to exclude the individual measurement, or all previous data up to that measurement, the latter of which resets the anomaly detection's history.
You can add optional severity_level_parameters to an anomaly detection check to customize the way that Soda determines the severity level of an anomaly. The following example includes two optional severity level parameters.
The warning_ratio parameter determines the area of warning range, which is a buffer on top of the confidence interval. The aim is to help the anomaly detectio ncheck distinguish between warning and critical alerts. If the check result is within the warning range, Soda flags the check result as a warning. This behavior is similar to setting fail and warn conditions in other Soda checks.
Soda calculates the warning range using the following formula:
For example, if the model's confidence interval is [10, 20] and the warning_ratio is 0.1, the upper warning range is ]20, 22] and the lower warning range is [9, 10[. If the check result is within the warning ranges, Soda flags the check result as a warning. If you need wider warning ranges to decrease the amount of critical alerts, you can gradually increase the warning_ratio value to achieve your ideal range.
The graph below illustrates how Soda computes the warning range. The yellow area represents the warning range which is 10% of the confidence interval, as shown with blue and red arrows.
The min_confidence_interval_ratio parameter determines the minimum width of the confidence interval. The confidence interval is the range of values that the model predicts for the next measurement. If the prediction problem is too easy for the model, the confidence interval becomes too narrow and the model becomes too sensitive to small noises in the data.
In such cases, the model may flag normal measurements as anomalies due to small decimal differences. To avoid these scenarios, Soda uses a minimum confidence interval width parameter to handle very narrow confidence intervals. The formula that updates the confidence interval is as follows:
To increase the minimum confidence interval width, you can gradually increase the min_confidence_interval_ratio value until you reach your ideal minimum confidence interval.
The graph below illustrates the impact of the min_confidence_interval_ratio parameter. For this example, the min_confidence_interval_ratio is set to 0 and the measurements are very easy to predict. With such a low setting, the confidence interval is very narrow and insignificant noises produce many falsely-identified anomalies.
To artificially introduce a minimum confidence interval buffer to prevent falsely-identified anomalies, this example sets the min_confidence_interval_ratio to the default value of 0.001. The result is a wider confidence interval that is far less sensitive to small noises in the data.
A training dataset is one that Soda uses to teach the algorithm to identify patterns in the measurements the check collects. To enhance the flexibility of anomaly detection, you can add an optional training_dataset_parameters configuration to your anomaly detection check to customize the way that the check uses the training dataset. You can apply training dataset configurations to the training dataset, time-series prediction model, and/or the anomaly detection check itself.
The following example includes three optional, customizable training dataset parameters.
The frequency parameter determines the regularity of each measurement in the training dataset. If Soda cannot detect a clear frequency, it assumes a frequency of once-daily, and uses the last measurement for each day, if there is more than one measurement per day.
The window_length parameter sets the number of historical measurements that Soda uses for training the model. The default value is 1000. For instance, if your frequency is daily D, the model trains on the last 1000 days of available historical data to recognize anomalies, ignoring earlier measurements. Be aware that a small value for this parameter may result in less sensitivity to seasonality that Soda recognizes in your data.
When Soda collects more measurements than the automatically-detected or specified frequency, the aggregation_function parameter defines how Soda aggregates the data within each window. For example, if your frequency is hourly and your aggregation function is last and Soda collected two measurements for the same hour, Soda uses the most recent, or latest, measurement for that hour to gauge anomalies.
See the example below for a demonstration of how Soda aggregates the training data using the configurations.
The auto_exclude_anomalies parameter determines whether Soda ignores, or includes unusual data points in the training dataset. When set to True, Soda excludes anomalies from future model training, without the need to manually provide feedback input in the Soda Cloud user interface. Though excluded from the training dataset, Soda still issues alerts when new anomalies occur.
To understand the effect of the parameter, the examples below present the difference between settings. In the image on the left, the parameter is set to False, so Soda includes existing, recorded anomalies in the training dataset which leads to broader confidence intervals indicated in green and yellow. In contrast, with the parameter to True, as in the image on the right, Soda excludes existing anomalies in the training dataset resulting in narrower confidence intervals over time.
The alert_directionality setting lets you choose which types of anomalies you want to receive alerts for. For example, if you only want to be alerted about unusually low values (and not high ones), set alert_directionality: "lower_bound_only".
By default, alert_directionality is set to "upper_and_lower_bounds", which means you'll get alerts for both high and low anomalies, just like before this option was available. If you prefer not to be alerted about values that fall below the lower confidence interval, switch to "upper_bound_only", as shown in the right of the image below.
The anomaly detection check uses to train the model that detects anomalies. If you wish, you can add a model configuration to customize the hyperparameters and tune the model.
Facebook Prophet uses a variety of hyperparameters that influence the model's ability to accurately detect anomalies in time-series data. Because fine-tuning these customizable parameters can be quite complex, Soda offers two out-of-the-box, fine-tuned profiles that automatically optimize the model's performance according to your anomaly sensitivity preference.
There are two values you can use for the profile parameter:
coverage
MAPE
alternatively, you can customize your own hyperparameters;
For each of these values, Soda has adjusted the values of a few of the model's hyperparameters to tailor its sensitivity to anomalies, particularly the changepoint_prior_scale and seasonality_prior_scale hyperparameters.
coverage refers to the concept of and represents the percentage of actual measurements within the model's predicted confidence intervals. For example, if a model forecasts a sales between 10-20 units on certain days and 90 out of 100 actual sales figures fall within this range, the coverage is 90%. This coverage-optimized profile is more tolerant of small noises in the data that can lead to falsely-identified anomalies since it has larger confidence intervals to cover as much as possible. However, the model might underfit the data if there is a fluctuating pattern.
For reference, the following lists the hyperparameters that Soda has set for the coverage profile.
The MAPE value refers to which is a statistical measure of how accurate a forecasting method is. It calculates the average percentage error between the forecasted and the actual values. This profile aims to maximize prediction precision as the lower the MAPE value, the more accurate the model's predictions are. When optimizing for MAPE, the model is more sensitive to changepoints and seasonal variations, providing a tighter fit to the training data.
For reference, the following lists the hyperparameters that Soda has set for the MAPE profile.
coverage is less sensitive to anomalies than MAPE. If you have set the profile value to coverage and find that the model seems to miss some anomalies, try changing the value to MAPE. Conversely, if you set the value to MAPE and find that the model is mistakenly identifying normal measurements as anomalies, try changing the value to coverage.
See for further guidance.
If the Soda-tuned profiles do not meet your specific data and forecasting needs for model sensitivity, you can customize the Prophet's hyperparameters using the custom_hyperparameter configuration.
You can modify any hyperparameter supported by Facebook Prophet in the custom_hyperparameters section of your configuration. For in-depth guidance, refer to Prophet's .
It is important to note that customized hyperparameters overrides the soda-tuned coverage hyperparameter profile. For example, if you set the changepoint_prior_scale hyperparameter to 0.05 in the custom_hyperparameters section, the model uses this value instead of the 0.001 value set by Soda for the coverage profile. The other hyperparameters remain the same as the coverage profile.
The following example specifies custom values for the seasonality_mode and interval_width hyperparameters; not shown are the remaining parameters set to mimic the coverage profile settings.
Add a holidays_country_code parameter to customize your anomaly detection check to account for country-specific holidays. Access the list of available country codes in the public repository.
For example, the following configuration accounts for US American holidays in the model.
Facebook Prophet's holidays_prior_scale hyperparameter, defaulted at 10.0, controls how much holidays influence the model. If holidays have a minimal impact on your data, set a lower value for holidays_prior_scale between 0.01 and 10 as in the following example, to decrease holiday sensitivity and ensure more accurate model representation for non-holiday periods.
To dynamically tune Prophet to evaluate and select the best hyperparameters values to use before each scan, you can add a dynamic parameter and any number of optional hyperparameter configurations. Be aware that hyperparameter tuning can be time-consuming and resource-intensive, so best practice dictates that you use these configurations sparingly.
The following offers an example of how to add automatic hyperparameter tuning. This configuration allows the anomaly detection model to adapt and improve over time by identifying the most effective hyperparameter settings for your specific data. Remember to weigh the benefits of improved accuracy against the increased computational demands of this process.
The objective_metric hyperparameter evaluates the model's performance. You can set the value to use a single string, or a list of strings. If you provide a list, the model optimizes each metric in sequence. In the example above, the model first optimizes for coverage, then SMAPE in the event of a tie. Best practice dictates that you use coverage as the first objective metric, and SMAPE as the second objective metric to optimize for a model that is more tolerant of noise in your data.
The parallel hyperparameter specifies whether the model saves time by using multiprocess to parallelize the cross validations. Set the value to True if you have multiple cores.
The cross_validation_folds hyperparameter sets the number of periods for each cross-validation fold. For example, with the frequency set to daily D and a cross_validation_folds of 5, the model conducts cross-validation in five-day intervals. It trains on the first n-5 days, then tests on the n-4th day. Subsequently, it trains on n-4 days, testing on the n-3rd day, and so on. The cross-validation process computes the objective_metric across different data segments for each hyperparameter combination. The model then uses the best objective_metric according to the value or list of values configured for that hyperparameter.
The parameter_grid hyperparameter is a dictionary that lists hyperparameters and their possible values. The model tests every possible combination of the listed values for each hyperparameter to identify the best value to use to detect anomalies. You can configure any .
The execution time for dynamic hyperparameter tuning varies based on several factors including the number of hyperparameters and the number of folds. For example, the default hyperparameter grid has 16 combinations since changepoint_prior_scale and seasonality_prior_scale have four values each. Consider using a small number of hyperparameters to avoid long execution times. By default, the model processes each fold in parallel. If you use multiple cores, you can set the parallel parameter to True to speed up the execution time.
Use the following tables to estimate the execution time for checks with dynamic hyperparameter tuning.
Set the value of the profile parameter to coverage. This profile is more tolerant of small noises in the data that could lead to falsely identified anomalies. If you need a very sensitive model, then try to use MAPE profile.
Only use the custom_hyperparameters configuration if you know how Facebook Prophet works. Before making any customizations, consult the . Thechange_point_prior_scale and seasonality_prior_scale hyperparameters have the most impact on the model so best practice dictates that you experiment with the values of these two hyperparameters first before customizing or tuning others.
Requires Soda Library CLI
Soda provides an anomaly detection simulator to enable you to test and observe how parameter adjustments you make impact the algorithm's confidence interval and anomaly detection sensitivity. The purpose of this local, simulator application is to help you to choose the most suitable parameter settings for your anomaly detection needs.
From the command-line, install the simulator package using the following command.
4. To launch the application, use the following command. After running the command, a new tab opens in your default browser displaying the simulator as shown in the screenshot below.
Paste the check URL you copied for your anomaly check into the main field and press enter. Refer to the screenshot below.
Use the slider that appears to simulate the most recent n measurements, ideally not more than 60 so as to keep the simulator execution time reasonable.
Click Start Simulation to display graphic results using the default parameter values.
For Model Hyperparameter Profiles, the first two options correspond with the coverage, MAPE profiles described in , and the third option, custom corresponds to the ability to . Experiment with the coverage and MAPE profiles first, before considering the custom profile.
For further hyperparameter customization, turn on the Advanced toggle in the simulator and edit hyperparameters in the Custom Prophet Hyperparameters field which accepts JSON, as in the example below. Note that if you do not specify a customized value for a hyperparameter, Soda uses the default values from the coverage profile.
For Training Dataset Parameters, the adjustable settings correspond to the parameters in .
For Severity Level Parameters, the adjustable settings correspond to the parameters in .
What follows are some examples of how to adjust optional configurations to address common issues with the sensitivity of anomaly detection checks.
The default coverage hyperparameter profile is more tolerant of small noises in data quality measurements. However, as in the following example, the profile may not be sensitive enough if there are fluctuating data patterns. This is because the coverage profile uses a low changepoint_prior_scale=0.001 value and a low seasonality_prior_scale=0.01 which make the model less sensitive to changepoints.
As in the following graph, the predicted yˆ values produce a steady trend and the algorithm does not capture the fluctuating pattern of the actual measurements. As a result, it missed the anomaly in the red rectangle.
In such a case, consider using the MAPE profile which is more sensitive to changepoints and seasonal variations.
With the profile set to MAPE, the model uses higher changepoint_prior_scale=0.1 and seasonality_prior_scale=0.1 values which makes it more sensitive to changepoints and seasonal variations. The graph below illustrates the higher sensitivity wherein the algorithm recognizes more measurements as anomalous. As a result, yˆ values better capture the fluctuating pattern of the actual measurements over time.
To decrease the rate of falsely-detected anomalies, Soda optimized the default hyperparameters of the anomaly detection check to detect anomalies in time-series data which exhibits a stable pattern. If the data exhibits pattern changes, as illustrated in the graph below, you may need to adjust the default parameters to improve the model's ability to detect anomalies to prevent alert fatigue.
As an example, the graph below indicates that up until November 2023, the data follows a stable pattern and the coverage profile is sufficient to detect anomalies. However, after November 2023, the pattern changes and the model needs to adapt to the new pattern. The default coverage profile has very low changepoint_prior_scale=0.001 and seasonality_prior_scale=0.01 values which makes the model insensitive for the trend changes. For this reason, during the adaptation period, the model falsely identified consecutive measurements as anomalies for a long time; refer to the red rectangle in the graph below.
In such a case, consider using the MAPE as the first action as it is explained in the . Because the MAPE profile is more sensitive, it converges faster than the coverage profile when a pattern changes; see graph below.
The MAPE profile achieves a much better fit since yˆ values closely follow the actual measurements. Compared to the coverage profile, MAPE causes fewer false positives but it still falsely identifies consecutive measurements as anomalies for a long time. This is because the model uses the last 1000 measurements to gauge pattern changes and it takes time to adapt to the new pattern which, in this case, is a weekly seasonality.
Each Monday, there is a jump in the y value and the other days follow a steady increase. Thus, using last four weeks' data points, or the 30 measurements, is a better way to calibrate the model than using the last 1000 measurements so it can capture the weekly seasonality effect. In such a case, consider decreasing the window_length parameter to 30 or experiment with different values to find the optimal window_length for your data and business use case. Refer to the for guidance.
Having adjusted the window_length and MAPE profile, the graph below illustrates that the model is more sensitive to recent measurements and does not create alert fatigue after November 2023; refer to the green rectangle.
Anomalous records can confuse the model and cause excessively large confidence intervals if the model does not ignore anomalous measurements. Consider the graph below: because of the anomalies in the red rectangle, the model's confidence interval is very large and the model is not sensitive to anomalies in the blue rectangle.
The anomalies create larger intervals because the model uses them for training data. To address the issue, consider removing these anomalous records from the training dataset. Use Soda Cloud to ignore the anomalies in the red rectangle by using the Feedback feature. Hover over the anomalous measurement in your anomaly detection check page, then click the Feedback button and choose to Ignore this value in future anomaly detection as in the screenshot below.
After instructing Soda to ignore the anomalous measurements, the model's confidence interval is smaller and the model is more sensitive to anomalies, as indicated in the graph below.
You can use a group by configuration to detect anomalies by category, and monitor relative changes over time in each category.
✔️ Requires Soda Core Scientific for anomaly check (included in a Soda Agent) ✖️ Supported in Soda Core ✔️ Supported in Soda Library 1.1.27 or greater + Soda Cloud ✔️ Supported in Soda Cloud Agreements + Soda Agent 0.8.57 or greater ✖️ Available as a no-code check
The following example includes three checks grouped by gender.
The first check uses the custom metric average_children to collect measurements and gauge them against an absolute threshold of 2.
Soda Cloud displays the check results grouped by gender.
The second check uses the same custom metric to detect anomalous measurements relative to previous measurements. Soda must collect a minimum of four, regular-cadence, measurements to have enough data from which to gauge an anomolous measurement. Until it has enough measurements, Soda returns a check result of [NOT EVALUATED].
Soda Cloud displays any detected anomalies grouped by gender.
While installing Soda Scientific works on Linux, you may encounter issues if you install Soda Scientific on Mac OS (particularly, machines with the M1 ARM-based processor) or any other operating system. If that is the case, consider using one of the following alternative installation procedures.
Need help? Ask the team in the .
Set up a virtual environment, and install Soda Library in your new virtual environment.
Use the following command to install Soda Scientific.
Use Soda’s Docker image in which Soda Scientific is pre-installed. You need Soda Scientific to be able to use SodaCL or .
If you have not already done so, in your local environment.
From Terminal, run the following command to pull Soda Library’s official Docker image; adjust the version to reflect the most .
Verify the pull by running the following command.
Output:
When you run the Docker image on a non-Linux/amd64 platform, you may see the following warning from Docker, which you can ignore.
If you encounter the following error, follow the procedure below.
You need to give Docker permission to acccess your configuration.yml and checks.yml files in your environment. To do so:
Access your Docker Dashboard, then select Preferences (gear symbol).
Select Resources, then follow the to add your Soda project directory—the one you use to store your configuration.yml and checks.yml files—to the list of directories that can be bind-mounted into Docker containers.
Click Apply & Restart, then repeat steps 2 - 4 above.
If you encounter the following error, double check the syntax of the scan command in step 4 above.
Be sure to prepend /sodacl/ to both the congifuration.yml filepath and the checks.yml filepath.
Be sure to mount your files into the container by including the -v option. For example, -v /Users/MyName/soda_project:/sodacl.
If you have defined an anomaly detection check and you use an M1 MacOS machine, you may get aLibrary not loaded: @rpath/libtbb.dylib error. This is a known issue in the MacOS community and is caused by issues during the installation of the . There currently are no official workarounds or releases to fix the problem, but the following adjustments may address the issue.
Install soda-scientific as per the local environment installation instructions and activate the virtual environment.
Use the following command to navigate to the directory in which the stan_model of the prophet package is installed in your virtual environment.
For example, if you have created a python virtual environment in a /venvs directory in your home directory and you use Python 3.9, you would use the following command.
Learn more about the for datasets.
Reference .
# Basic example for row count
checks for dim_customer:
- anomaly detection for row_count# Advanced example with optional training and model configurations
checks for dim_customer:
- anomaly detection for row_count:
name: "Anomaly detection for row_count" # optional
identity: "anomaly-detection-row-count" # optional
severity_level_parameters: # optional
warning_ratio: 0.1
min_confidence_interval_ratio: 0.001
training_dataset_parameters: # optional
frequency: auto
window_length: 1000
aggregation_function: last
auto_exclude_anomalies: True
alert_directionality: "upper_and_lower_bounds" # optional
model: # optional
hyperparameters:
static:
profile:
custom_hyperparameters:
changepoint_prior_scale: 0.05
seasonality_prior_scale: 10
seasonality_mode: additive
interval_width: 0.999
changepoint_range: 0.8
dynamic:
objective_metric: ["mape", "rmse"]
parallelize_cross_validation: True
cross_validation_folds: 2
parameter_grid:
changepoint_prior_scale: [0.001]
seasonality_prior_scale: [0.01, 0.1]
seasonality_mode: ['additive', 'multiplicative']
changepoint_range: [0.8]
interval_width: [0.999]scipy>=1.8.0
numpy>=1.23.3, <2.0.0
inflection==0.5.1
httpx>=0.18.1,<2.0.0
PyYAML>=5.4.1,<7.0.0
cython>=0.22
prophet>=1.1.0,<2.0.0
✓
Use quotes when identifying dataset names; see . Note that the type of quotes you use must match that which your data source uses. For example, BigQuery uses a backtick (`) as a quotation mark.
Use wildcard characters ( % or * ) in values in the check.
-
✓
Use for each to apply anomaly detection checks to multiple datasets in one scan; see .
✓
Apply a dataset filter to partition data during a scan.
Yes
8
5
30
4.5 sec
Yes
8
5
90
6.05 sec
No
4
5
30
5.8 sec
No
4
5
90
8.05 sec
No
4
10
30
7.2 sec
No
4
10
90
10.6 sec
Yes
4
10
30
2.5 sec
Yes
4
10
90
3.06 sec
Adjust the value of the interval_width hyperparameter to obtain a more anomaly-sensitive model. The default value for this hyperparameter is 0.999 which means that the model applies a confidence interval of 99.9% which, in turn, means that if the predicted value is outside of the 99.9% interval, Soda flags it as an anomaly. If you want to have a more sensitive model, you can decrease this value though be aware that a lower value may result in more falsely-identified anomalies.
Use the dynamic tuning configuration only if necessary. Hyperparameter tuning is a computationally expensive process since the model tries all possible combinations of each hyperparameter's listed values to dynamically determine the best value to use to detect anomalies. See Execution time analysis for dynamic hyperparameter tuning. If you need to use hyperparameter tuning, experiment with tuning the values of the change_point_prior_scale and seasonality_prior_scale hyperparameters first as these two have the most impact on the model's sensitivity.
Use the tools in the sidebar to adjust parameter settings until the simulator displays your ideal anomaly sensitivity results. Apply your optimized parameter settings to the check configuration in your checks YAML file.
between -5 and 5 relative to the previously-recorded measurement. See Change-over-time thresholds for supported syntax variations for change-over-time checks.
Soda Cloud displays any detected changes grouped by gender.scipy>=1.8.0
numpy>=1.23.3, <2.0.0
inflection==0.5.1
httpx>=0.18.1,<2.0.0
PyYAML>=5.4.1,<7.0.0
cython>=0.22
prophet>=1.1.0,<2.0.0
When you are ready to run a Soda scan, use the following command to run the scan via the docker image. Replace the placeholder values with your own file paths and names.
Optionally, you can specify the version of Soda Library to use to execute the scan. This may be useful when you do not wish to use the latest released version of Soda Library to run your scans. The example scan command below specifies Soda Library version 1.0.0.
sodadata/soda-library refers to the image that docker run must use.
scan instructs Soda Library to execute a scan of your data.
-d indicates the name of the data source to scan.
-c specifies the filepath and name of the configuration YAML file.
Use the ls command to determine the version number of cmndstan that prophet installed. The cmndstan directory name includes the version number.
Add the rpath of the tbb library to your prophet installation using the following command.
With cmdstan version 2.26.1, you would use the following command.
✓
Define a name for an anomaly detection check.
✓
Add an identity to a check.
Define alert configurations to specify warn and fail thresholds. See alternative: Manage alert security levels
-
✓
Apply an in-check filter to return results for a specific portion of the data in your dataset.
warning_ratio
decimal between 0 and 1
0.1
min_confidence_interval_ratio
decimal between 0 and 1
0.001
frequency
auto: automatically detected by Soda
T or min: by minute
H: by hour
D: by calendar day
B: by business day
W: by week
M: by month end
MS: by month start
Q: by quarter end
QS: by quarter start
A: by year end
AS: by year start
customized, such as 5H for every 5 hours
auto
window_length
integer, number of historical measurements
1000
aggregation_function
last: uses the last non-null value in the window
first: uses the first non-null value in the window
mean: calculates the average of values in the window
min: uses the minimum value in the window
max: uses the maximum value in the window
last
auto_exclude_anomalies
boolean, True or False
type
prophet
prophet
profile
coverage
MAPE
coverage
objective_metric
coverage
MSE
RMSE
MAE
MAPE
MDAPE
SMAPE
n/a
parallel
true
false
true
cross_validation_folds
integer
5
parameter_grid
any Prophet-supported hyperparameters
Model Name
MacBook Pro
Model Identifier
MacBookPro18,3
Chip
Apple M1 Pro
Number of Cores
10; 8 performance and 2 efficiency
Memory
16 GB
Yes
4
5
30
2.23 sec
Yes
4
5
90
2.80 sec

Need help? Join the Soda community on Slack.
False as Soda automatically includes anomalies the training dataset unless you add this parameter and set it to true.
changepoint_prior_scale: [0.001, 0.01, 0.1, 0.5]
seasonality_prior_scale: [0.01, 0.1, 1.0, 10.0]
other hyperparameters set to the defaults in the coverage profile
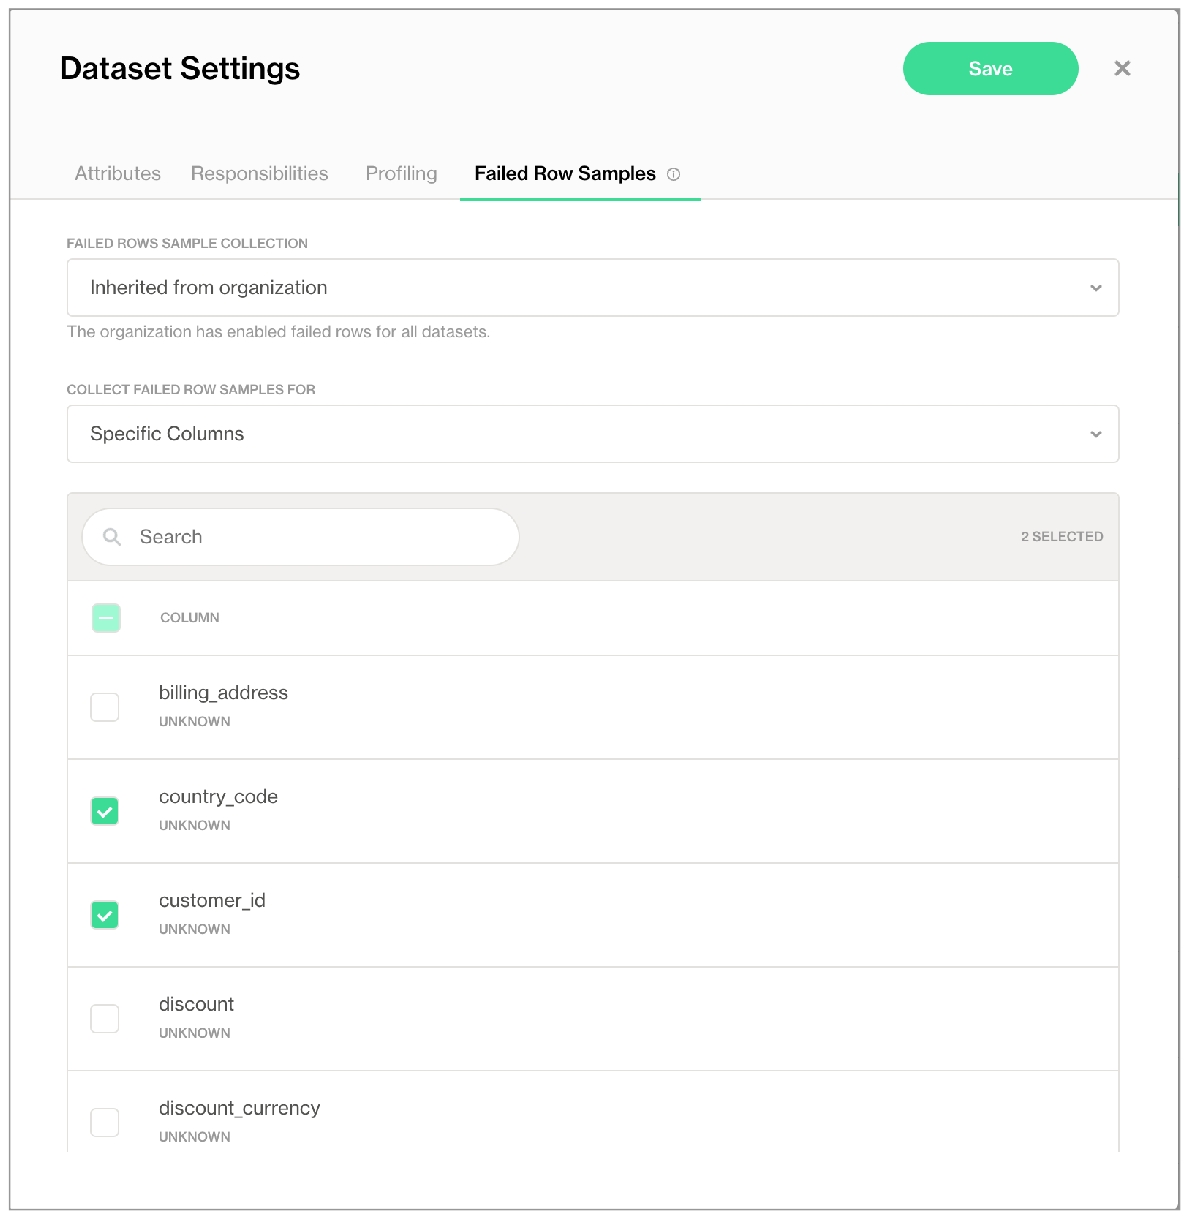
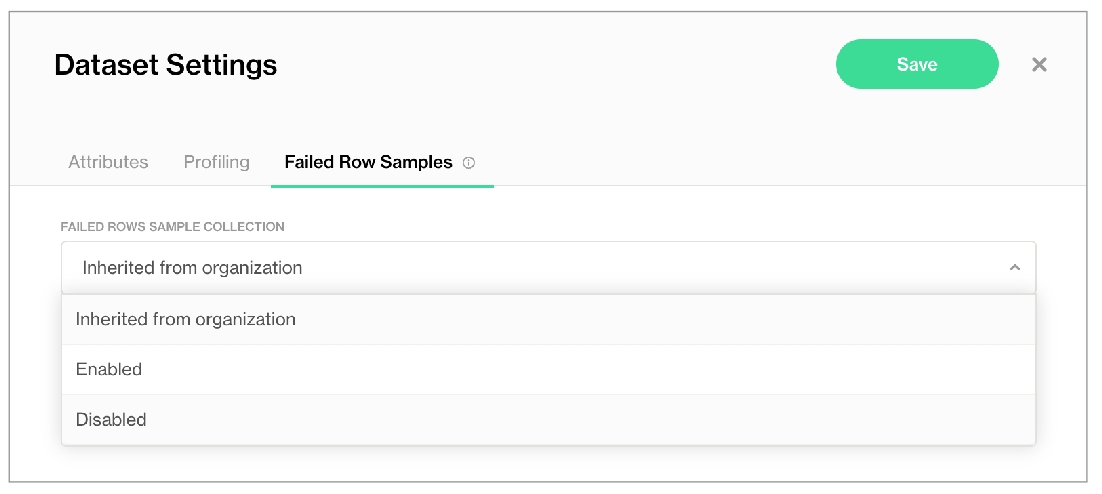
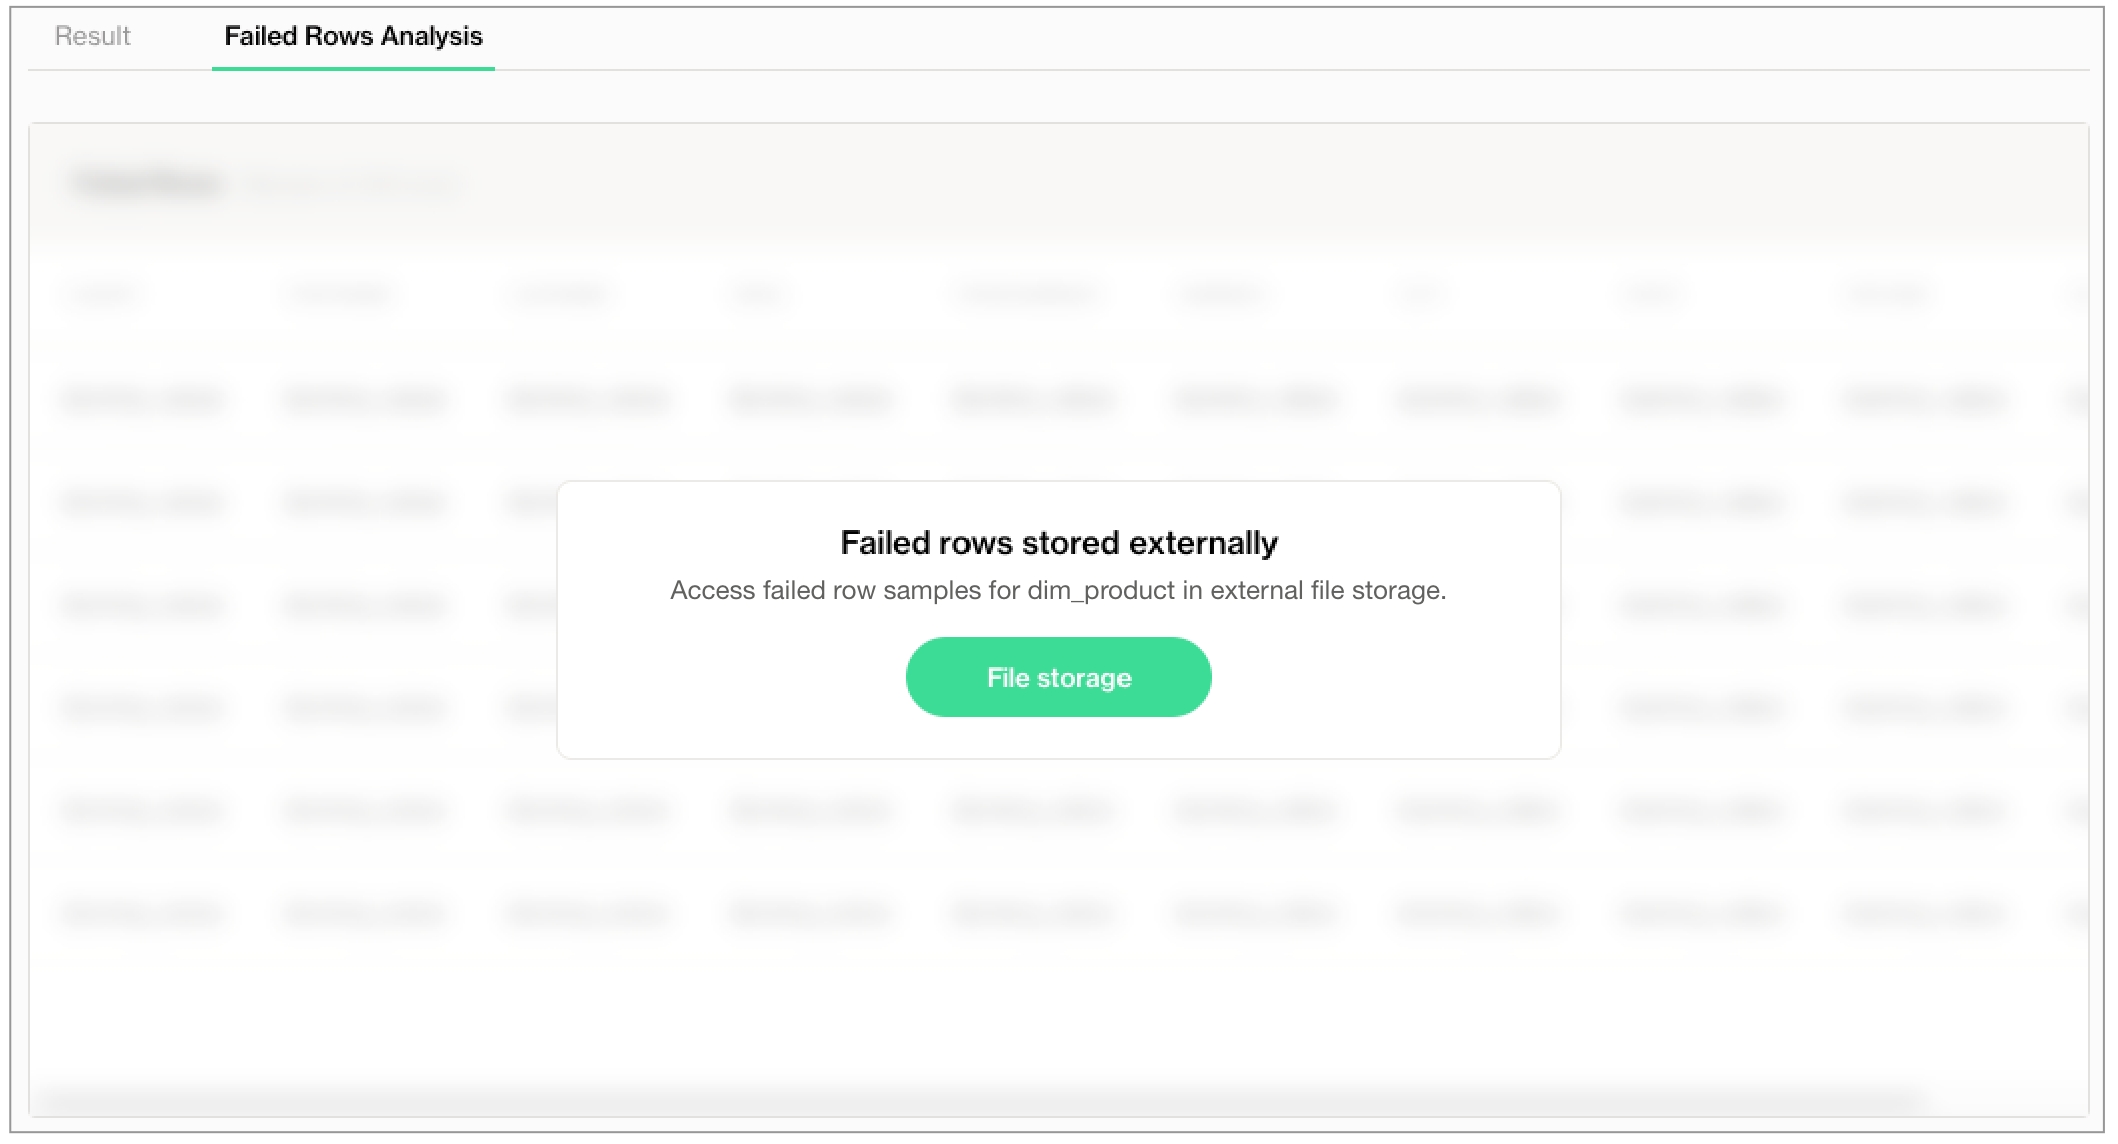
docker run -v /path/to/your_soda_directory:/sodacl sodadata/soda-library scan -d your_data_source -c /sodacl/your_configuration.yml /sodacl/your_checks.ymldocker run -v /path/to/your_soda_directory:/sodacl sodadata/soda-library:v1.0.0 scan -d your_data_source -c /sodacl/your_configuration.yml /sodacl/your_checks.ymlls
cmdstan-2.26.1 prophet_model.bininstall_name_tool -add_rpath @executable_path/cmdstanyour_cmdstan_version/stan/lib/stan_math/lib/tbb prophet_model.bininstall_name_tool -add_rpath @executable_path/cmdstan-2.26.1/stan/lib/stan_math/lib/tbb prophet_model.binpip install -i https://pypi.cloud.soda.io soda-scientificchecks for dim_customer:
- anomaly detection for row_countchecks for orders:
- anomaly detection for avg(order_price)checks for dim_promotion:
- anomaly detection for freshness(start_date)checks for dim_customer
- anomaly detection for customers:
customers query: |
SELECT COUNT(*)
FROM dim_customer
checks for dim_reseller:
- avg_order_span between 5 and 10:
avg_order_span expression: AVG(last_order_year - first_order_year)
- anomaly detection for avg_order_spanchecks for orders:
- anomaly detection for missing_count(id):
missing values: [None, No Value] checks for dim_customer:
- anomaly detection for invalid_count(user_email):
valid format: emailSoda Library 1.0.x
Soda Core 3.0.0x
Anomaly Detection Frequency Warning: Coerced into daily dataset with last daily time point kept
Data frame must have at least 4 measurements
Skipping anomaly metric check eval because there is not enough historic data yet
Scan summary:
1/1 check NOT EVALUATED:
dim_customer in adventureworks
anomaly detection for missing_count(last_name) [NOT EVALUATED]
check_value: None
1 checks not evaluated.
Apart from the checks that have not been evaluated, no failures, no warnings and no errors.
Sending results to Soda Cloudchecks for dim_customer:
# previous syntax
# - anomaly score for row_count < default
# new syntax
- anomaly detection for row_count
name: Anomalies in datasetchecks for dim_customer:
- anomaly detection for row_count:
name: Anomalies in dataset
take_over_existing_anomaly_score_check: Truesoda scan -d adventureworks -c configuration.yml checks_anomaly_score.yml checks_anomaly_detection.ymlchecks for dim_product:
- anomaly detection for avg("order_price")for each dataset T:
datasets:
- dim_customer
checks:
- anomaly detection for row_countchecks for dim_customer:
- anomaly detection for row_count:
severity_level_parameters:
warning_ratio: 0.1
min_confidence_interval_ratio: 0.001upper confidence interval: u
lower confidence interval: l
confidence interval width: w = u - l
upper warning range = between u and (u + warning_ratio * w)
lower warning range = between l and (l - warning_ratio * w)upper confidence interval: u
lower confidence interval: l
predicted value: y^
upper confidence interval width: w_u = u - y^
lower confidence interval width: w_l = y^ - l
u = max(u, y^ + y^ * min_confidence_interval_ratio)
l = min(l, y^ - y^ * min_confidence_interval_ratio)checks for dim_customer:
- anomaly detection for row_count:
training_dataset_parameters:
frequency: auto
window_length: 1000
aggregation_function: last
auto_exclude_anomalies: Falsechecks for dim_customer:
- anomaly detection for row_count:
name: Anomaly detection for row_count
model:
hyperparameters:
static:
profile: coverage # hyperparameters set by Soda for the coverage profile
seasonality_mode = "multiplicative"
seasonality_prior_scale = 0.01
changepoint_prior_scale = 0.001
interval_width = 0.999
# other default hyperparameters set by Facebook Prophet
growth = "linear"
changepoints = None
n_changepoints: = 25
changepoint_range = 0.8
yearly_seasonality = "auto"
weekly_seasonality = "auto"
daily_seasonality = "auto"
holidays = None
holidays_prior_scale = 10.0
mcmc_samples = 0
uncertainty_samples = 1000
stan_backend = None
scaling = "absmax"
holidays_mode = None# hyperparameters set by Soda for the MAPE profile
seasonality_mode = "multiplicative"
seasonality_prior_scale = 0.1
changepoint_prior_scale = 0.1
interval_width = 0.999
# other default hyperparameters set by Facebook Prophet
growth = "linear"
changepoints = None
n_changepoints: = 25
changepoint_range = 0.8
yearly_seasonality = "auto"
weekly_seasonality = "auto"
daily_seasonality = "auto"
holidays = None
holidays_prior_scale = 10.0
mcmc_samples = 0
uncertainty_samples = 1000
stan_backend = None
scaling = "absmax"
holidays_mode = Nonechecks for dim_customer:
- anomaly detection for row_count:
name: Anomaly detection for row_count
model:
hyperparameters:
static:
profile:
custom_hyperparameters:
seasonality_mode: additive
interval_width: 0.8
...checks for dim_customer:
- anomaly detection for row_count:
name: Anomaly detection for row_count
model:
holidays_country_code: USchecks for dim_customer:
- anomaly detection for row_count:
name: Anomaly detection for row_count
model:
holidays_country_code: US
hyperparameters:
static:
profile:
custom_hyperparameters:
holidays_prior_scale: 0.1checks for dim_customer:
- anomaly detection for row_count:
model:
hyperparameters:
dynamic:
objective_metric: ["coverage", "SMAPE"]
parallelize_cross_validation: True
cross_validation_folds: 5
parameter_grid:
changepoint_prior_scale: [0.001, 0.01, 0.1, 0.5]
seasonality_prior_scale: [0.01, 0.1, 1.0, 10.0]
seasonality_mode: ['additive', 'multiplicative']pip install -i https://pypi.cloud.soda.io "soda-scientific[simulator]"soda simulate-anomaly-detection -c configuration.yaml{
"growth": "linear",
"change_pointprior_scale": 0.1,
"seasonality_prior_scale": 0.1,
"n_changepoints": 20,
}checks for your-table-name:
- anomaly detection for your-metric-name:
model:
hyperparameters:
static:
profile: MAPEchecks for your-table-name:
- anomaly detection for your-metric-name:
training_dataset:
window_length: 30
model:
hyperparameters:
static:
profile: MAPEchecks for dim_customer:
- group by:
name: Group by gender
query: |
SELECT gender, AVG(total_children) as average_children
FROM dim_customer
GROUP BY gender
fields:
- gender
checks:
- average_children > 2:
name: Average children per gender should be more than 2
- anomaly detection for average_children:
name: Detect anomaly for average children
- change for average_children between -5 and 5:
name: Detect unexpected changes for average childrenpip install -i https://pypi.cloud.soda.io soda-scientificdocker pull sodadata/soda-library:v1.0.3docker run sodadata/soda-library:v1.0.3 --help Usage: soda [OPTIONS] COMMAND [ARGS]...
Soda Library CLI version 1.0.x, Soda Core CLI version 3.0.xx
Options:
--version Show the version and exit.
--help Show this message and exit.
Commands:
ingest Ingests test results from a different tool
scan Runs a scan
suggest Generates suggestions for a dataset
test-connection Tests a connection
update-dro Updates contents of a distribution reference fileWARNING: The requested image's platform (linux/amd64) does not match the detected host platform (linux/arm64/v8) and no specific platform was requesteddocker: Error response from daemon: Mounts denied:
The path /soda-library-test/files is not shared from the host and is not known to Docker.
You can configure shared paths from Docker -> Preferences... -> Resources -> File Sharing.
See https://docs.docker.com/desktop/mac for more info.Soda Library 1.0.x
Configuration path 'configuration.yml' does not exist
Path "checks.yml" does not exist
Scan summary:
No checks found, 0 checks evaluated.
2 errors.
Oops! 2 errors. 0 failures. 0 warnings. 0 pass.
ERRORS:
Configuration path 'configuration.yml' does not exist
Path "checks.yml" does not existcd path_to_your_python_virtual_env/lib/pythonyour_version/site_packages/prophet/stan_model/cd ~/venvs/soda-library-prophet11/lib/python3.9/site-packages/prophet/stan_model/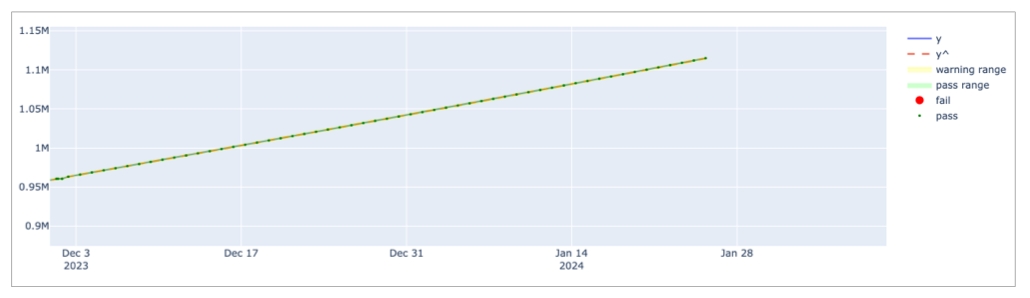
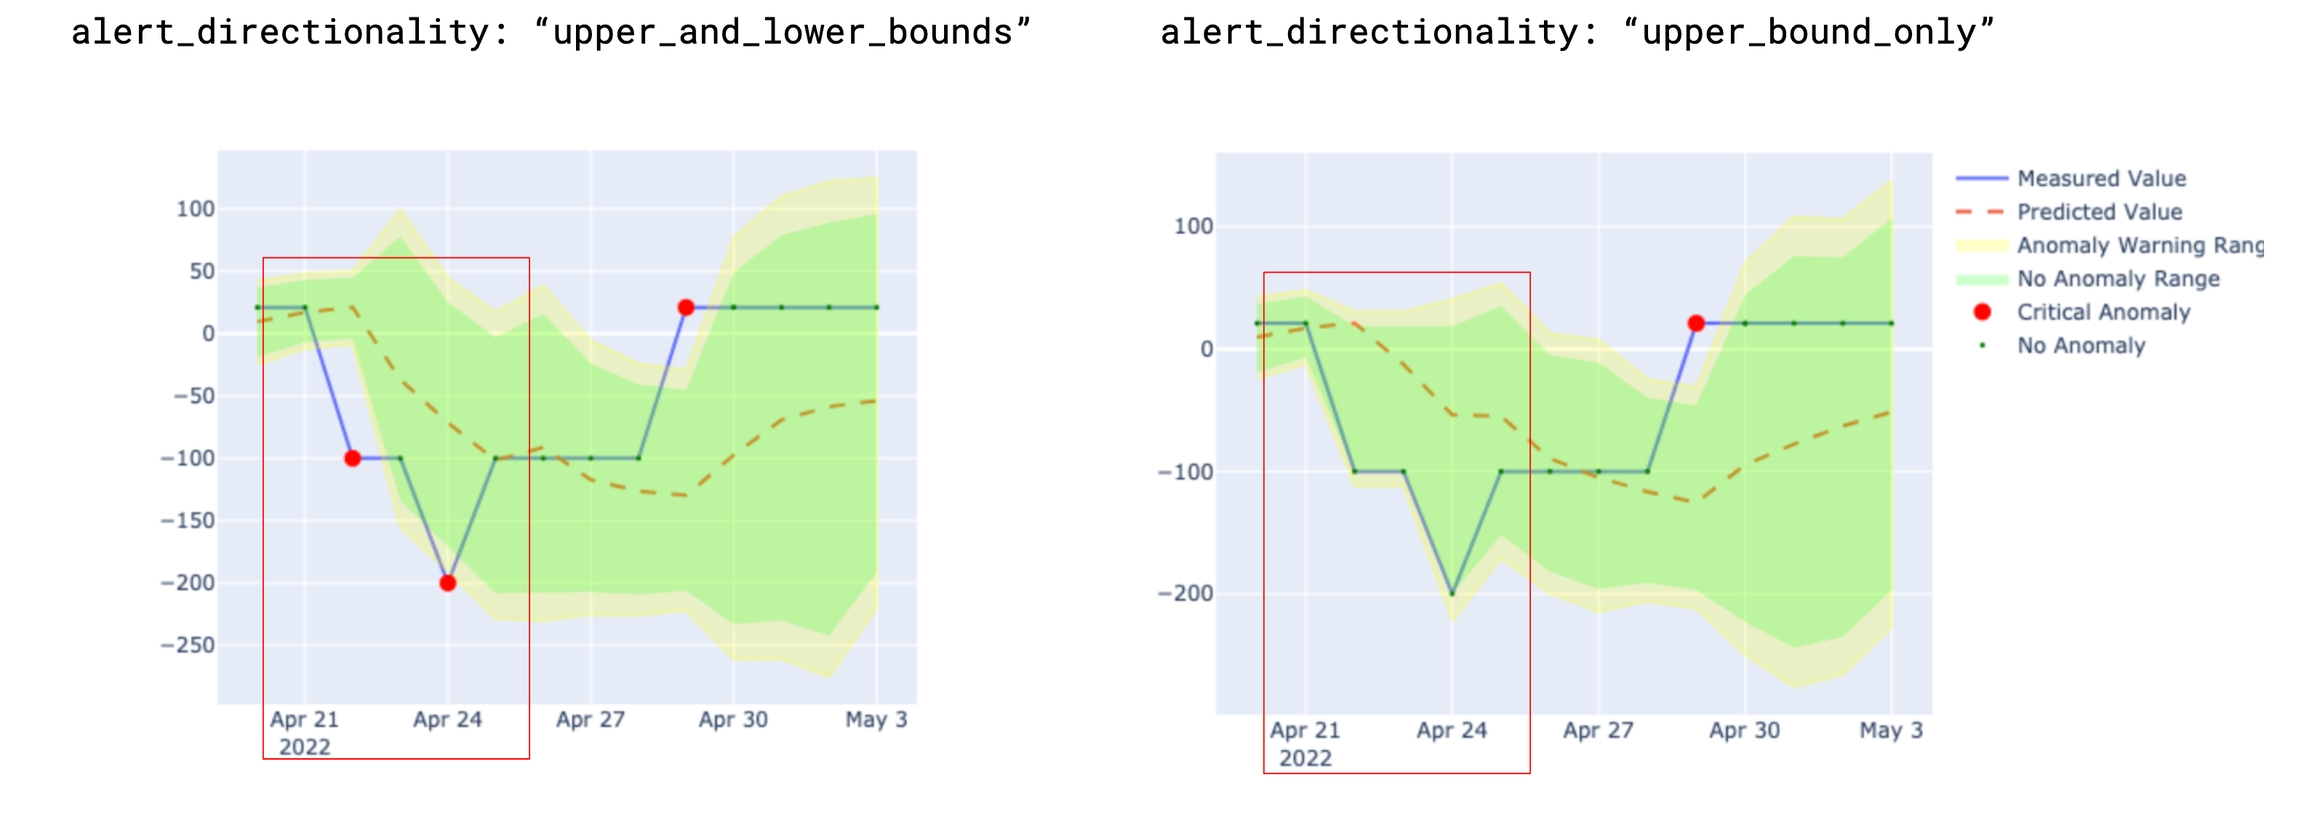
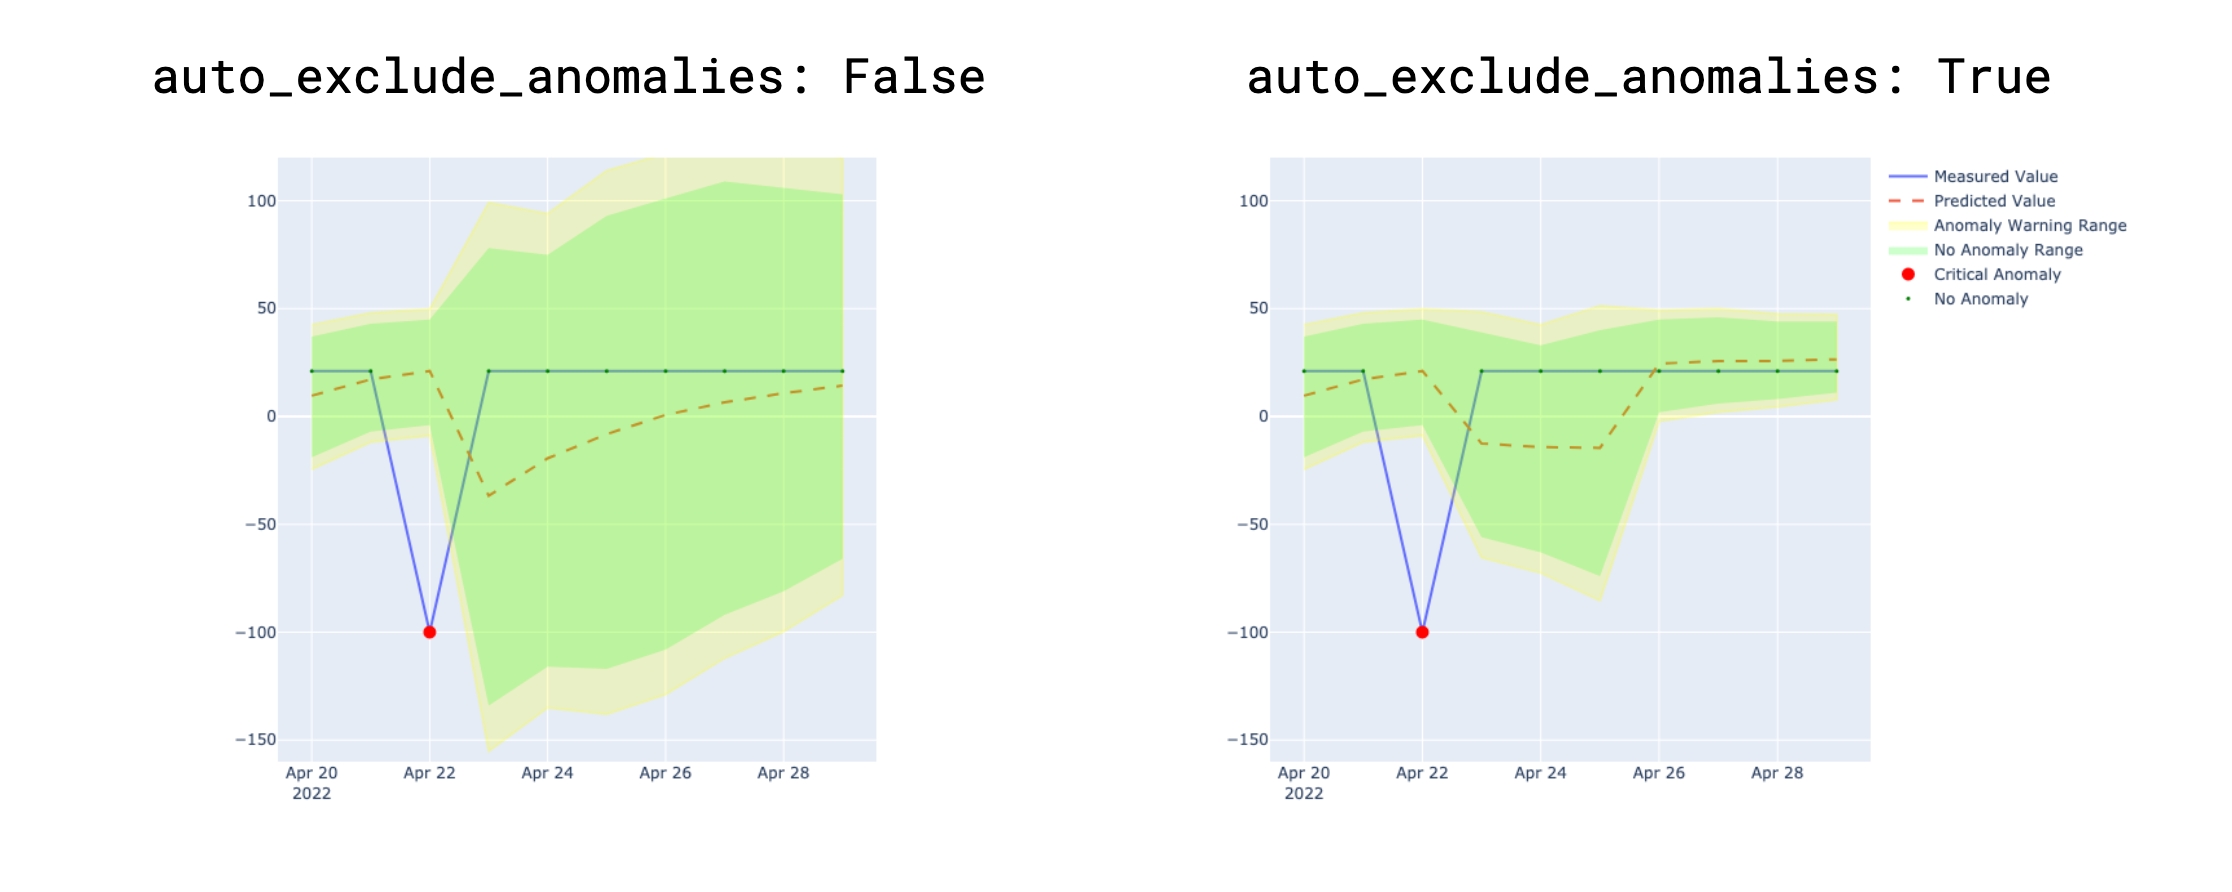
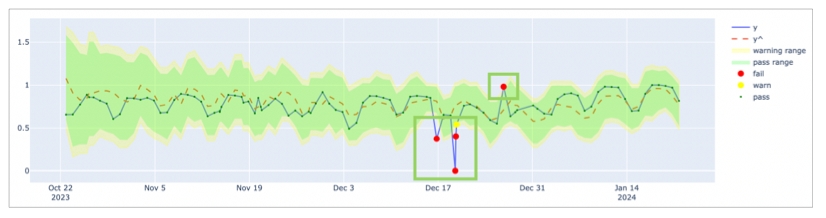
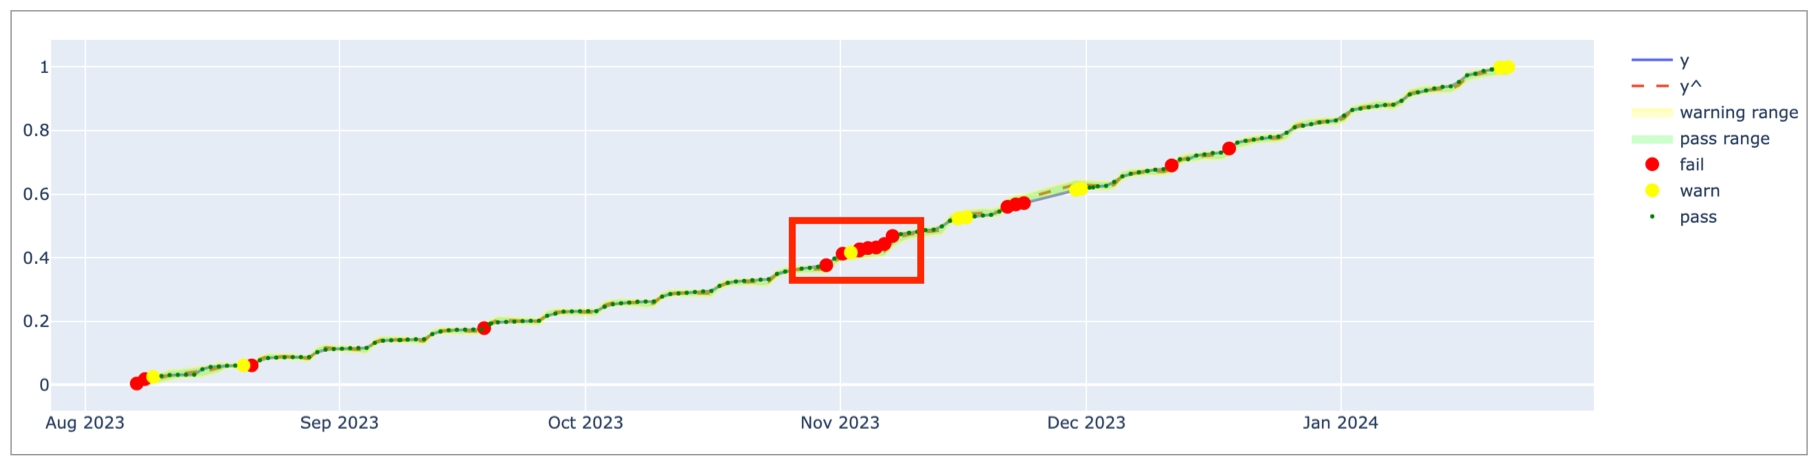
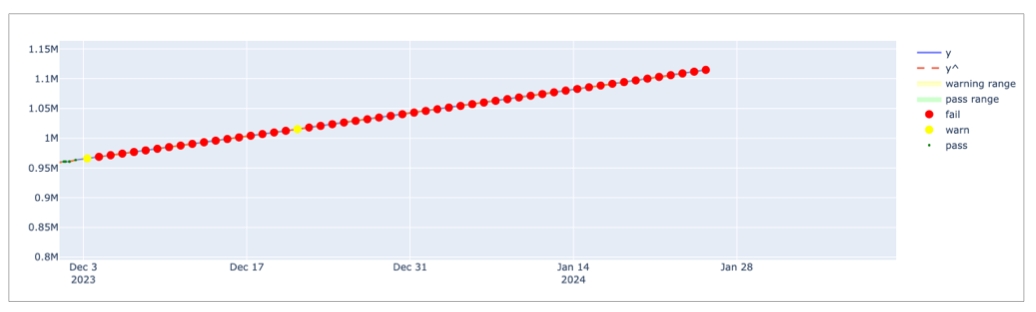

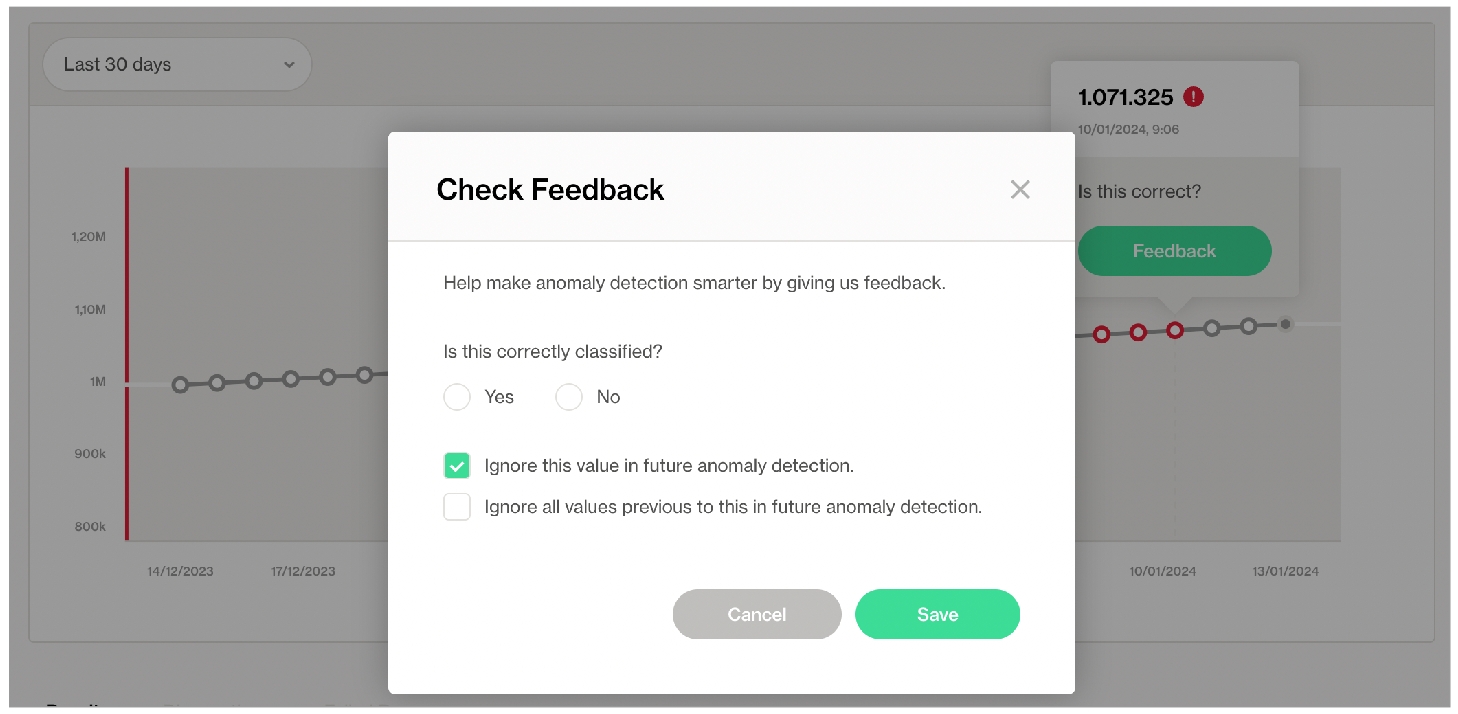
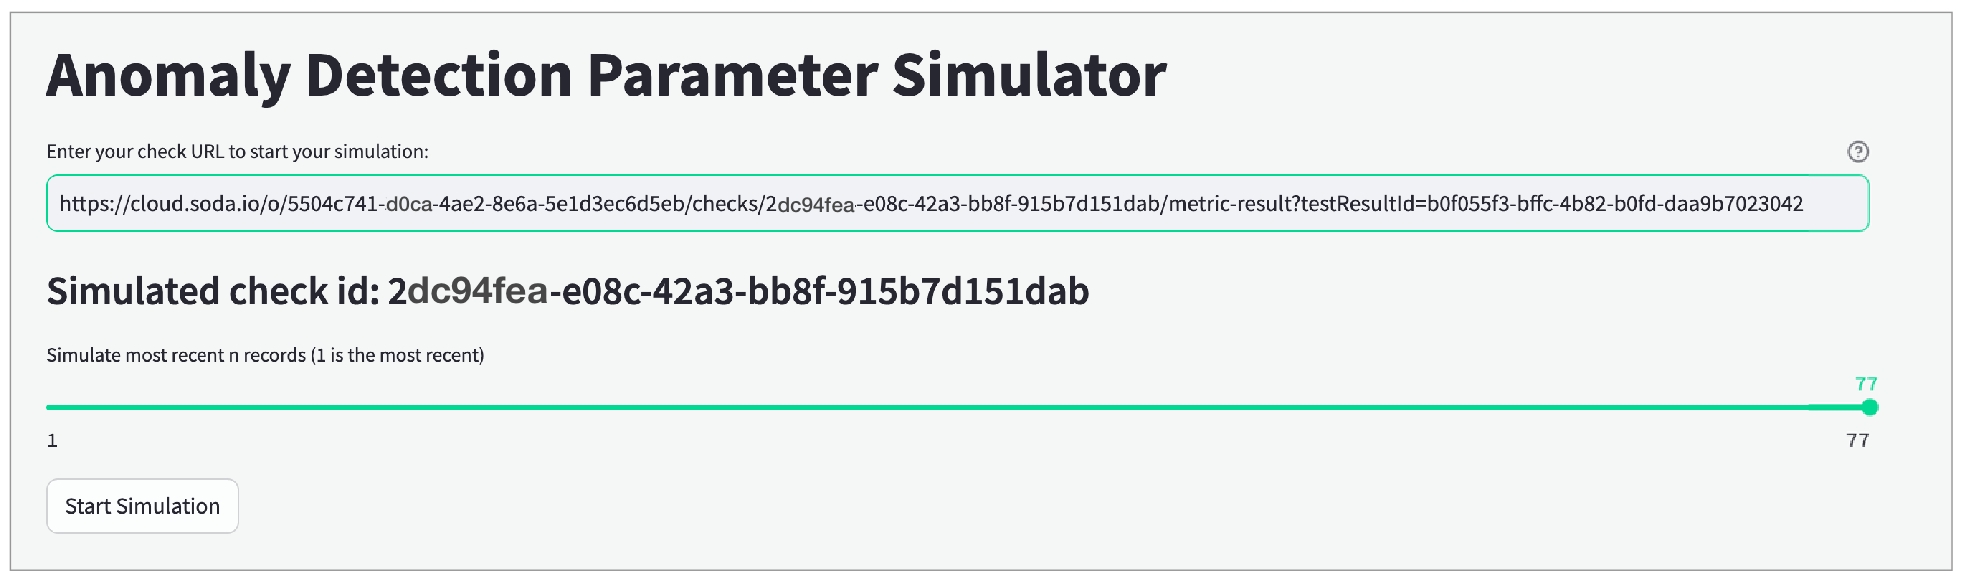
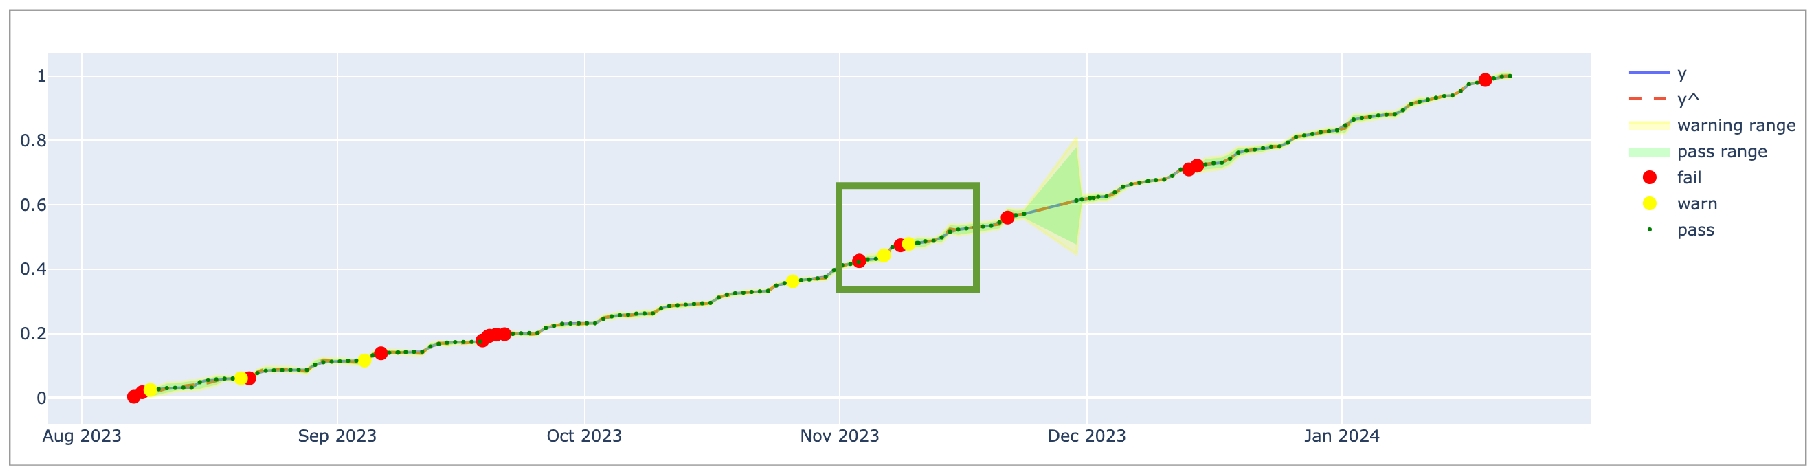
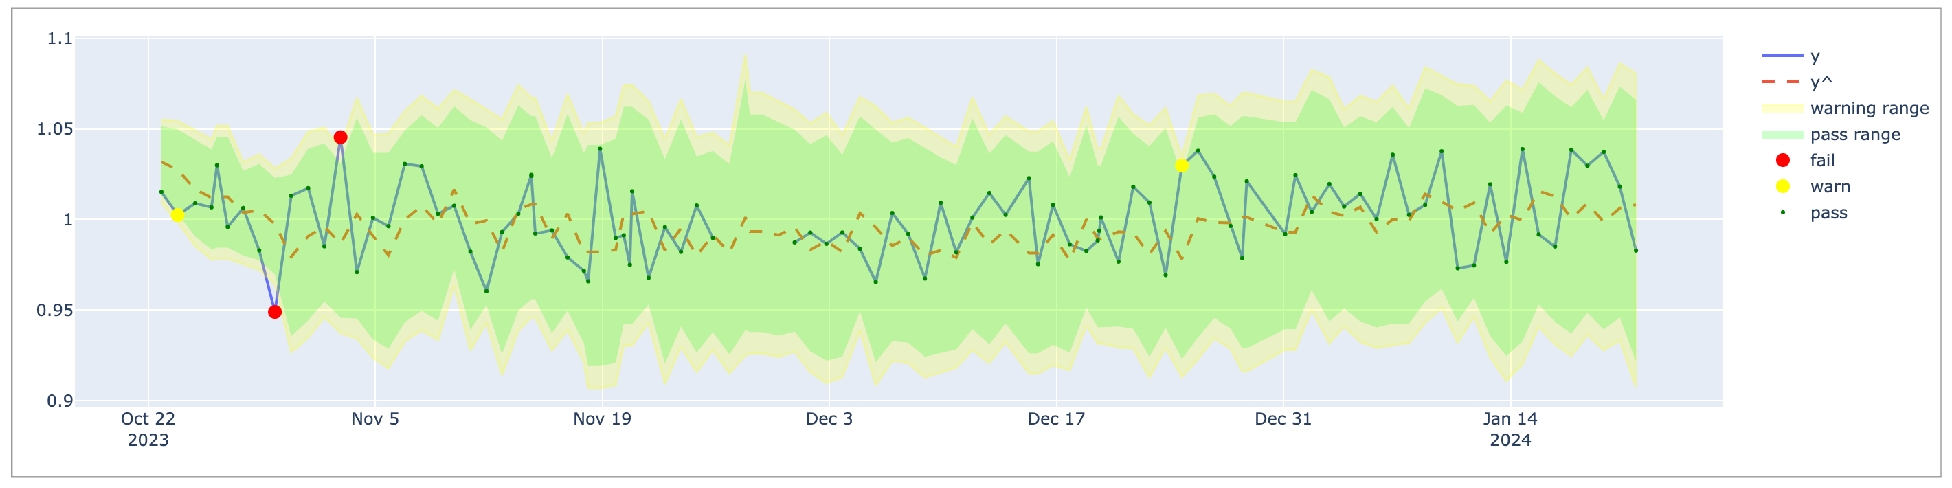
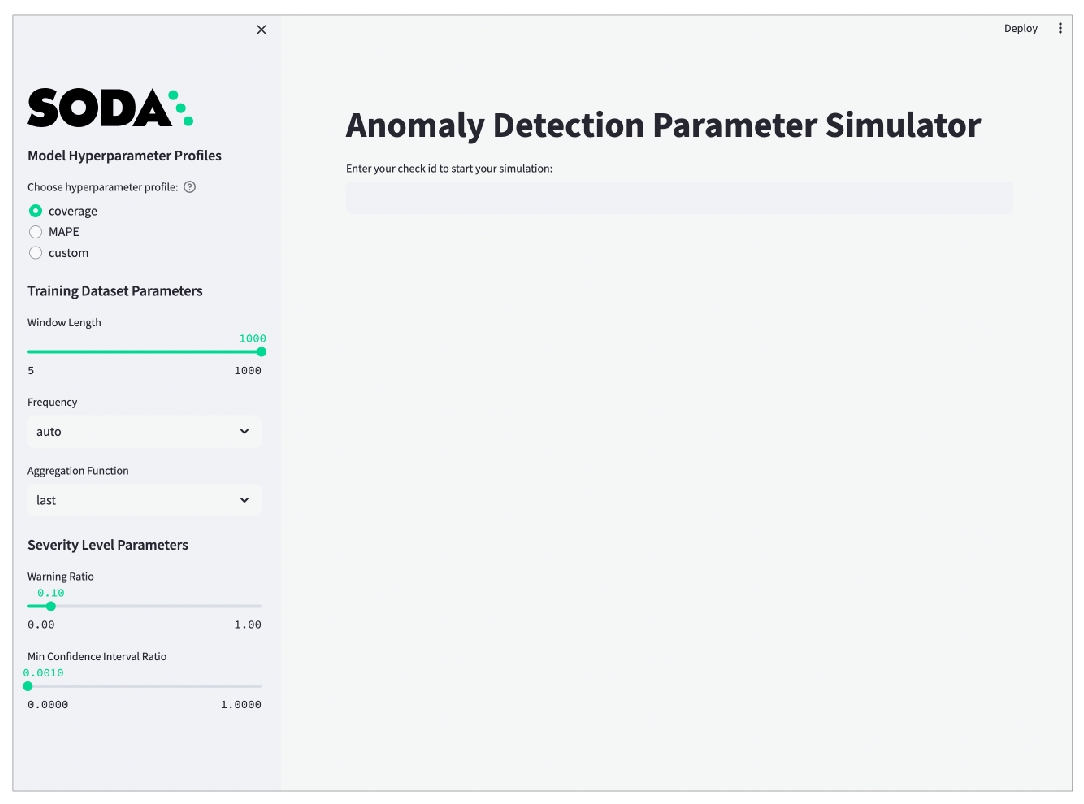

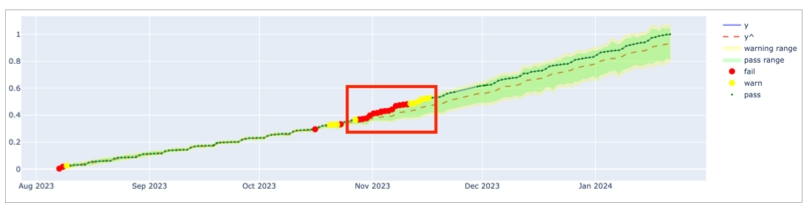
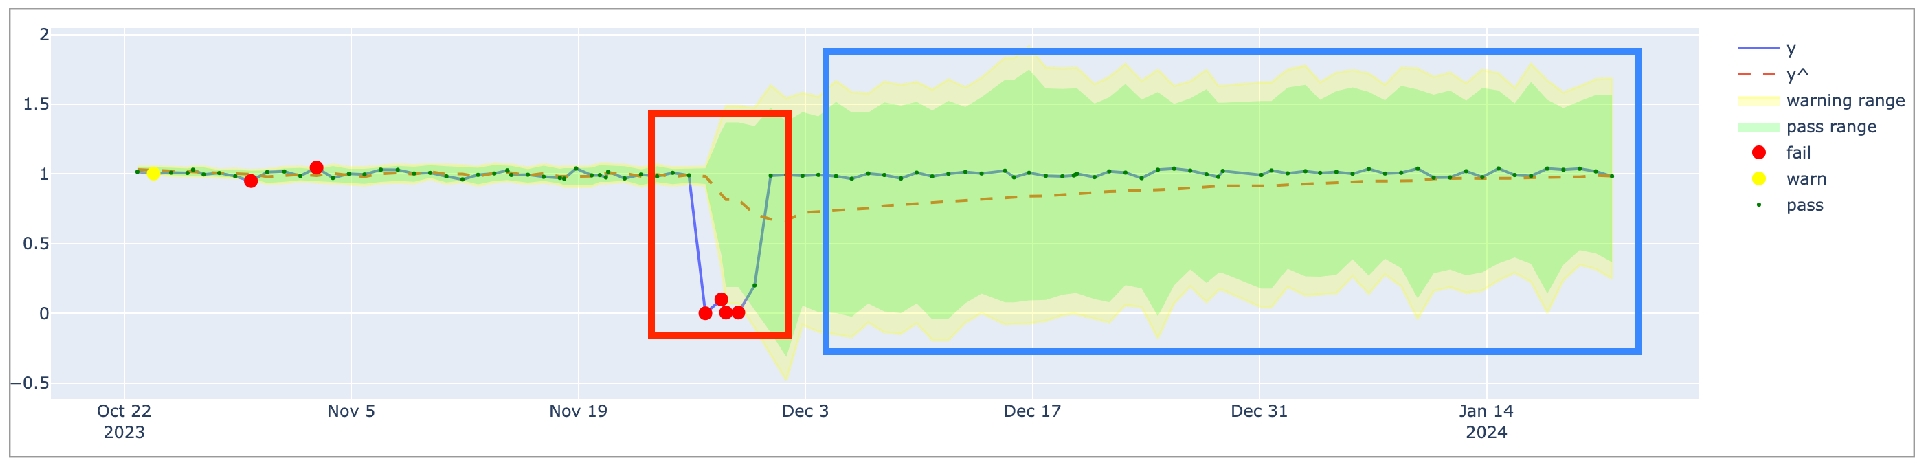
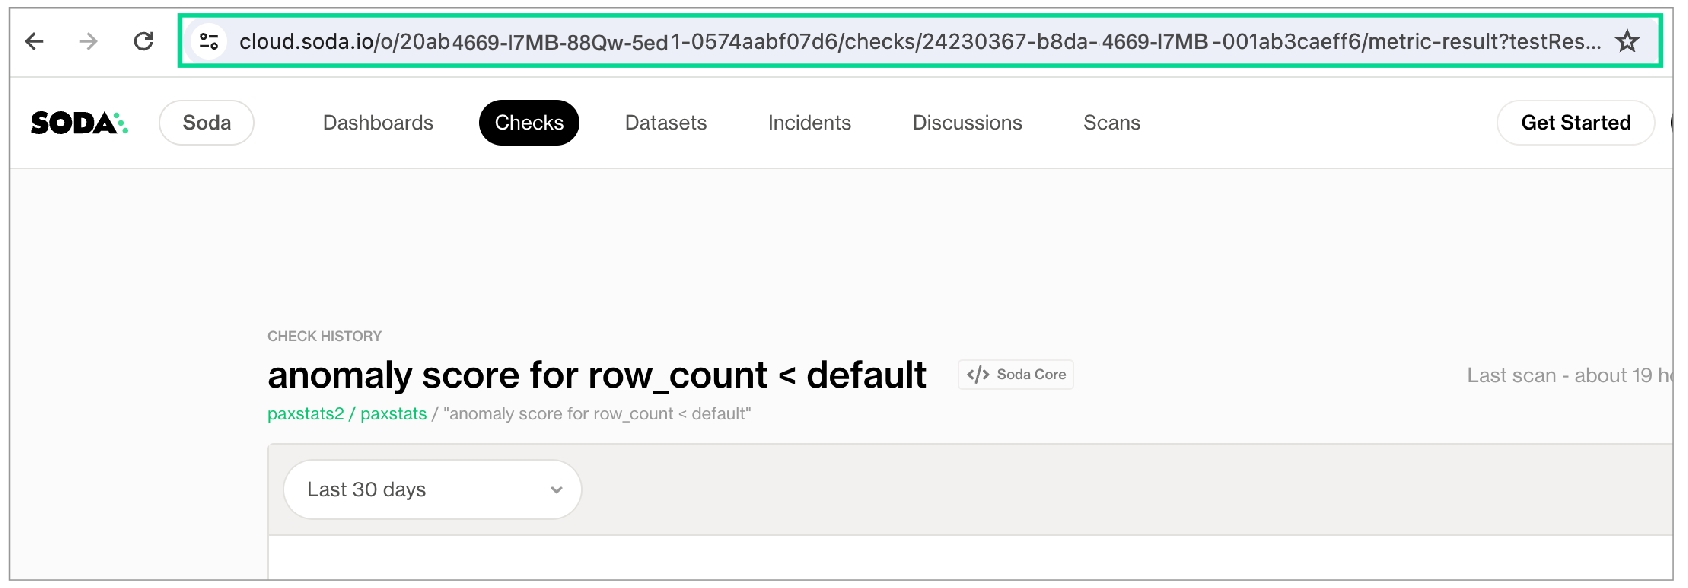
Learn how to deploy a Soda Agent in a Kubernetes cluster.
The Soda environment has been updated since this tutorial.
Refer to v4 documentation for updated tutorials.
The Soda Agent is a tool that empowers Soda Cloud users to securely access data sources to scan for data quality. Create a Kubernetes cluster, then use Helm to deploy a self-hosted Soda Agent in the cluster.
This setup enables Soda Cloud users to securely connect to data sources (BigQuery, Snowflake, etc.) from within the Soda Cloud web application. Any user in your Soda Cloud account can add a new data source via the agent, then write their own no-code checks and agreements to check for data quality in the new data source. Alternatively, if you use a BigQuery, Databricks SQL, MS SQL Server, MySQL, PostgreSQL, Redshift, or Snowflake data source, you can use a secure, out-of-the-box made available for every Soda Cloud organization.
As a step in the Get started roadmap, this guide offers instructions to set up, install, and configure Soda in a .
Get started roadmap
Choose a flavor of Soda
Set up Soda: self-hosted agent 📍 You are here! a. b. c.
Write SodaCL checks
Run scans and review results
The Soda Agent communicates with your Soda Cloud account using API public and private keys. Note that the keys a Soda Agent uses are different from the API keys Soda Library uses to connect to Soda Cloud.
If you have not already done so, create a Soda Cloud account at . If you already have a Soda account, log in.
In your Soda Cloud account, navigate to your avatar > Data Sources, then navigate to the Agents tab. Click New Soda Agent.
The dialog box that appears offers abridged instructions to set up a new Soda Agent from the command-line; more thorough instructions exist in this documentation, below. For now, copy and paste the values for both the API Key ID and API Key Secret to a temporary, secure place in your local environment. You will need these values when you deploy the agent in your Kubernetes cluster.
You can keep the dialog box open in Soda Cloud, or close it.
What follows are detailed deployment instructions according to the type of environment in which you create a cluster to deploy an agent. The high-level steps to complete the deployment remain the same regardless of environment.
(Optional) Familiarize yourself with .
Install, or confirm the installation of, a few required command-line tools.
Create a new Kubernetes cluster in your environment, or identify an existing cluster you can use to deploye a Soda Agent.
Deploy the Soda Agent in the cluster.
Soda supports Kubernetes cluster version 1.21 or greater.
You can deploy a Soda Agent to connect with the following data sources:
1 MS SQL Server/MS Fabric with Windows Authentication does not work with Soda Agent out-of-the-box.
In your Soda Cloud account, navigate to your avatar > Data Sources. Click New Data Source, then follow the guided steps to create a new data source. Refer to the sections below for insight into the values to enter in the fields and editing panels in the guided steps.
In the editing panel, provide the connection configurations Soda Cloud needs to be able to access the data in the data source. Connection configurations are data source-specific and include values for things such as a database's host and access credentials.
To more securely provide sensitive values such as usernames and passwords, use environment variables in a values.yml file when you deploy the Soda Agent. See for details.
Access the data source-specific connection configurations listed below to copy+paste the connection syntax into the editing panel, then adjust the values to correspond with your data source's details. Access connection configuration details in [ section of Soda documentation.
See also:
During its initial scan of your datasource, Soda Cloud discovers all the datasets the data source contains. It captures basic information about each dataset, including a dataset names and the columns each contains.
In the editing panel, specify the datasets that Soda Cloud must include or exclude from this basic discovery activity. The default syntax in the editing panel instructs Soda to collect basic dataset information from all datasets in the data source except those with names that begin with test_. The % is a wildcard character. See for more detail on profiling syntax.
Known issue: SodaCL does not support using variables in column profiling and dataset discovery configurations.
To gather more detailed profile information about datasets in your data source and automatically build an anomaly dashboard for data quality observability (preview, only), you can configure Soda Cloud to profile the columns in datasets.
Profiling a dataset produces two tabs' worth of data in a dataset page:
In the Columns tab, you can see column profile information including details such as the calculated mean value of data in a column, the maximum and minimum values in a column, and the number of rows with missing data.
In the Anomalies tab, you can access an out-of-the-box anomaly dashboard that uses the column profile information to automatically begin detecting anomalies in your data relative to the patterns the machine learning algorithm learns over the course of approximately five days. (available in 2025)
In the editing panel, provide details that Soda Cloud uses to determine which datasets to include or exclude when it profiles the columns in a dataset. The default syntax in the editing panel instructs Soda to profile every column of every dataset in this data source, and, superfluously, all datasets with names that begin with prod. The % is a wildcard character. See for more detail on profiling syntax.
Column profiling and automated anomaly detection can be resource-heavy, so carefully consider the datasets for which you truly need column profile information. Refer to for more detail.
When Soda Cloud automatically discovers the datasets in a data source, it prepares automated monitoring checks for each dataset. These checks detect anomalies and monitor schema evolution, corresponding to the SodaCL and checks, respectively.
(Note that if you have signed up for early access to for datasets, this Check tab is unavailable as Soda performs all automated monitoring automatically in the dashboards.)
In the editing panel, specify the datasets that Soda Cloud must include or exclude when preparing automated monitoring checks. The default syntax in the editing panel indicates that Soda will add automated monitoring to all datasets in the data source except those with names that begin with test_. The % is a wildcard character.
This tab is the fifth step in the guided workflow if the 5. Check tab is absent because you requested access to the anomaly dashboards feature.
If you already store information about your data source in a JSON file in a secure location, you can configure your BigQuery data source connection details in Soda Cloud to refer to the JSON file for service account information. To do so, you must add two elements:
volumes and volumeMounts parameters in the values.yml file that your Soda Agent helm chart uses
the account_info_json_path in your data source connection configuration
You, or an IT Admin in your organization, can add the following scanlauncher parameters to the existing values.yml that your Soda Agent uses for deployment and redployment in your Kubernetes cluster. Refer to Google GKE instruction above.
Use the following command to add the service account information to a Kubernetes secret that the Soda Agent consumes according to the configuration above.
After you make both of these changes, you must redeploy the Soda Agent.
Adjust the data source connection configuration to include the account_info_json_path configuration, as per the following example.
Choose a flavor of Soda
Set up Soda: self-hosted agent
Run scans and review results
Need help? Join the .
Organize, alert, investigate
Verify the existence of your new Soda Agent in your Soda Cloud account.
You have installed v1.22 or v1.23 of kubectl. This is the command-line tool you use to run commands against Kubernetes clusters. If you have installed Docker Desktop, kubectl is included out-of-the-box. With Docker running, use the command kubectl version --output=yaml to check the version of an existing install.
You have installed Helm. This is the package manager for Kubernetes which you will use to deploy the Soda Agent Helm chart. Run helm version to check the version of an existing install.
Kubernetes cluster size and capacity: 2 CPU and 2GB of RAM. In general, this is sufficient to run up to six scans in parallel.
Scan performance may vary according to the workload, or the number of scans running in parallel. To improve performance for larger workloads, consider fine-tuning the cluster size using the resources parameter for the agent-orchestrator and soda.scanlauncher.resources for the scan-launcher. Adding more resources to the scan-launcher can improve scan times by as much as 30%. Be aware, however, that allocating too many resources may be costly relative to the small benefit of improved scan times.
To specify resources, add the following parameters to your values.yml file during deployment. Refer to Kubernetes documentation for Resource Management for Pods and Containers for information on values to supply for x.
For reference, a Soda-hosted agent specifies resources as follows:
The following table outlines the two ways you can install the Helm chart to deploy a Soda Agent in your cluster.
Install the Helm chart via CLI by providing values directly in the install command.
Use this as a straight-forward way of deploying an agent on a cluster in a secure or local environment.
Install the Helm chart via CLI by providing values in a values YAML file.
Use this as a way of deploying an agent on a cluster while keeping sensitive values secure. - provide sensitive API key values in this local file - store data source login credentials as environment variables in this local file or in an external secrets manager; Soda needs access to the credentials to be able to connect to your data source to run scans of your data. See: .
(Optional) You have familarized yourself with basic Soda, Kubernetes, and Helm concepts.
Add the Soda Agent Helm chart repository.
Use the following comand to install the Helm chart to deploy a Soda Agent in your custer. Learn more about the helm install command.
Replace the values of soda.apikey.id and soda-apikey.secret with the values you copy+pasted from the New Soda Agent dialog box in your Soda Cloud account. By default, Soda uses as part of the Soda Agent deployment. The agent automatically converts any sensitive values you add to a values YAML file, or directly via the CLI, into Kubernetes Secrets.
Replace the value of soda.agent.name with a custom name for you agent, if you wish.
Specify the value for soda.cloud.endpoint according to your local region: https://cloud.us.soda.io for the United States, or https://cloud.soda.io for all else.
(Optional) Specify the format for log output: raw for plain text, or json for JSON format.
(Optional) Specify the level of log information you wish to see when deploying the agent: ERROR, WARN, INFO, DEBUG, or TRACE.
The command-line produces output like the following message:
(Optional) Validate the Soda Agent deployment by running the following command:
In your Soda Cloud account, navigate to your avatar > Agents. Refresh the page to verify that you see the agent you just created in the list of Agents.
Be aware that this may take several minutes to appear in your list of Soda Agents. Use the describe pods command in step 3 to check the status of the deployment. When State: Running and Ready: True, then you can refresh and see the agent in Soda Cloud.
If you do no see the agent listed in Soda Cloud, use the following command to review status and investigate the logs.
(Optional) You have familarized yourself with basic Soda, Kubernetes, and Helm concepts.
Create or navigate to an existing Kubernetes cluster in your environment in which you can deploy the Soda Agent helm chart.
Using a code editor, create a new YAML file called values.yml.
In that file, copy+paste the content below, replacing the following values:
id and secret with the values you copy+pasted from the New Soda Agent dialog box in your Soda Cloud account. By default, Soda uses as part of the Soda Agent deployment. The agent automatically converts any sensitive values you add to a values YAML file, or directly via the CLI, into Kubernetes Secrets.
Replace the value of name with a custom name for your agent, if you wish.
Specify the value for endpoint according to your local region:
Save the file. Then, in the same directory in which the values.yml file exists, use the following command to install the Soda Agent helm chart.
(Optional) Validate the Soda Agent deployment by running the following command:
In your Soda Cloud account, navigate to your avatar > Agents. Refresh the page to verify that you see the agent you just created in the list of Agents.
Be aware that this may take several minutes to appear in your list of Soda Agents. Use the describe pods command in step three to check the status of the deployment. When State: Running and Ready: True, then you can refresh and see the agent in Soda Cloud.
If you do no see the agent listed in Soda Cloud, use the following command to review status and investigate the logs.
If you use private key authentication with a Soda Agent, refer to Soda Agent extras.
helm install
the action helm is to take
soda-agent (the first one)
a release named soda-agent on your cluster
soda-agent (the second one)
the name of the helm repo you installed
soda-agent (the third one)
the name of the helm chart that is the Soda Agent
The --set options either override or set some of the values defined in and used by the Helm chart. You can override these values with the --set files as this command does, or you can specify the override values using a values.yml file.
--set soda.agent.name
A unique name for your Soda Agent. Choose any name you wish, as long as it is unique in your Soda Cloud account.
--set soda.apikey.id
With the apikey.secret, this connects the Soda Agent to your Soda Cloud account. Use the value you copied from the dialog box in Soda Cloud when adding a new agent. You can use a values.yml file to pass this value to the cluster instead of exposing it here.
--set soda.apikey.secret
With the apikey.id, this connects the Soda Agent to your Soda Cloud account. Use the value you copied from the dialog box in Soda Cloud when adding a new agent. You can use a values.yml file to pass this value to the cluster instead of exposing it here.
--set soda.agent.logFormat
(Optional) Specify the format for log output: raw for plain text, or json for JSON format.
--set soda.agent.loglevel
(Optional) Specify the leve of log information you wish to see when deploying the agent: ERROR, WARN, INFO, DEBUG, or TRACE.
--namespace soda-agent
Uninstall the Soda Agent in the cluster.
Delete the cluster.
Problem: After setting up a cluster and deploying the agent, you are unable to see the agent running in Soda Cloud.
Solution: The value you specify for the soda-cloud-enpoint must correspond with the region you selected when you signed up for a Soda Cloud account:
Usehttps://cloud.us.soda.io for the United States
Use https://cloud.soda.io for all else
Problem: You need to define the outgoing port and IP address with which a self-hosted Soda Agent can communicate with Soda Cloud. Soda Agent does not require setting any inbound rules as it only polls Soda Cloud looking for instruction, which requires only outbound communication. When Soda Cloud must deliver instructions, the Soda Agent opens a bidirectional channel.
Solution: Use port 443 and passlist the fully-qualified domain names for Soda Cloud:
cloud.us.soda.io for Soda Cloud account created in the US region
OR
cloud.soda.io for Soda Cloud account created in the EU region
AND
collect.soda.io
These deployment instructions offer guidance for setting up an Amazon Elastic Kubernetes Service (EKS) cluster and deploying a Soda Agent in it.
Prerequisites
System requirements
Deploy an agent
Deploy using CLI only
Deploy using a values YAML file
(Optional) Connect via AWS PrivateLink
About the helm install command
Decommission the Soda Agent and the EKS cluster
Troubleshoot deployment
You have an AWS account and the necessary permissions to enable you to create, or gain access to an EKS cluster in your region.
You have installed v1.22 or v1.23 of . This is the command-line tool you use to run commands against Kubernetes clusters. If you have installed Docker Desktop, kubectl is included out-of-the-box. Run kubectl version --output=yaml to check the version of an existing install.
You have installed . This is the package manager for Kubernetes which you will use to deploy the Soda Agent Helm chart. Run helm version to check the version of an existing install.
Kubernetes cluster size and capacity: 2 CPU and 2GB of RAM. In general, this is sufficient to run up to six scans in parallel.
Scan performance may vary according to the workload, or the number of scans running in parallel. To improve performance for larger workloads, consider:
fine-tuning the cluster size using the resources parameter for the agent-orchestrator and soda.scanlauncher.resources for the scan-launcher. Adding more resources to the scan-launcher can improve scan times by as much as 30%.
adding more nodes to the node group; see AWS documentation for .
Be aware, however, that allocating too many resources may be costly relative to the small benefit of improved scan times.
To specify resources, add the following parameters to your values.yml file during deployment. Refer to Kubernetes documentation for for information on values to supply for x.
For reference, a Soda-hosted agent specifies resources as follows:
The following table outlines the two ways you can install the Helm chart to deploy a Soda Agent in your cluster.
(Optional) You have familarized yourself with .
(Optional) If you wish, you can establish an to provide private connectivity with Soda Cloud. Refer to before deploying an agent.
(Optional) If you are deploying to an existing Virtual Private Cloud (VPC), consider supplying public or private subnets with your deployment. Consult the eksctl documentation to .
Create or navigate to an existing Kubernetes cluster in your environment in which you can deploy the Soda Agent helm chart. Best practices advises
If you do no see the agent listed in Soda Cloud, use the following command to review status and investigate the logs.
If you use AWS services for your infrastructure and you have deployed or will deploy a Soda Agent in an EKS cluster, you can use an to provide private connectivity with Soda Cloud.
Log in to your AWS console and navigate to your VPC dashboard.
Follow the AWS documentation to . For security reasons, Soda does not publish its Service name. Email with your AWS account ID to request the PrivateLink service name. Refer to for instructions on how to obtain your account ID.
After creating the endpoint, return to the VPC dashboard. When the status of the endpoint becomes Available, the PrivateLink is ready to use. Be aware that this make take more than 10 minutes.
If you do no see the agent listed in Soda Cloud, use the following command to review status and investigate the logs.
helm install commandThe --set options either override or set some of the values defined in and used by the Helm chart. You can override these values with the --set files as this command does, or you can specify the override values using a values.yml file.
Uninstall the Soda Agent in the cluster.
Delete the EKS cluster itself.
(Optional) Access your , then click Stacks to view the status of your decommissioned cluster. If you do not see your Stack, use the region drop-down menu at upper-right to select the region in which you created the cluster.
Problem: After setting up a cluster and deploying the agent, you are unable to see the agent running in Soda Cloud.
Solution: The value you specify for the soda-cloud-enpoint must correspond with the region you selected when you signed up for a Soda Cloud account:
Usehttps://cloud.us.soda.io for the United States
Use https://cloud.soda.io for all else
Problem: You need to define the outgoing port and IP address with which a self-hosted Soda Agent can communicate with Soda Cloud. Soda Agent does not require setting any inbound rules as it only polls Soda Cloud looking for instruction, which requires only outbound communication. When Soda Cloud must deliver instructions, the Soda Agent opens a bidirectional channel.
Solution: Use port 443 and passlist the fully-qualified domain names for Soda Cloud:
cloud.us.soda.io for Soda Cloud account created in the US region
OR
cloud.soda.io for Soda Cloud account created in the EU region
AND
collect.soda.io
Problem: UnauthorizedOperation: You are not authorized to perform this operation.
Solution: This error indicates that your user profile is not authorized to create the cluster. Contact your AWS Administrator to request the appropriate permissions.
These deployment instructions offer guidance for setting up an Azure Kubernetes Service (AKS) cluster and deploying a Soda Agent in it.
Prerequisites
System requirements
Deploy an agent
Deploy using CLI only
Deploy using a values YAML file
About the helm install command
Decommission the Soda Agent and the AKS cluster
Troubleshoot deployment
You have an Azure account and the necessary permissions to enable you to create, or gain access to an existing AKS cluster in your region. Consult the for details.
You have installed the . This is the command-line tool you need to access your Azure account from the command-line. Run az --version to check the version of an existing install. Consult the for details.
You have logged in to your Azure account. Run az login to open a browser and log in to your account.
You have installed v1.22 or v1.23 of . This is the command-line tool you use to run commands against Kubernetes clusters. If you have already installed the Azure CLI tool, you can install kubectl using the following command: az aks install-cli.
Run kubectl version --output=yaml to check the version of an existing install.
You have installed . This is the package manager for Kubernetes which you will use to deploy the Soda Agent Helm chart. Run helm version to check the version of an existing install.
Kubernetes cluster size and capacity: 2 CPU and 2GB of RAM. In general, this is sufficient to run up to six scans in parallel.
Scan performance may vary according to the workload, or the number of scans running in parallel. To improve performance for larger workloads, consider fine-tuning the cluster size using the resources parameter for the agent-orchestrator and soda.scanlauncher.resources for the scan-launcher. Adding more resources to the scan-launcher can improve scan times by as much as 30%. Be aware that allocating too many resources may be costly relative to the small benefit of improved scan times.
To specify resources, add the following parameters to your values.yml file during deployment. Refer to Kubernetes documentation for for information on values to supply for x.
For reference, a Soda-hosted agent specifies resources as follows:
The following table outlines the ways you can install the Helm chart to deploy a Soda Agent in your cluster.
(Optional) You have familiarized yourself with .
Create or navigate to an existing Kubernetes cluster in your environment in which you can deploy the Soda Agent helm chart.
Use Helm to add the Soda Agent Helm chart repository.
Use the following command to install the Helm chart which deploys a Soda Agent in your cluster. (Learn more about the .)
If you do no see the agent listed in Soda Cloud, use the following command to review status and investigate the logs.
(Optional) You have familiarized yourself with .
Create or navigate to an existing Kubernetes cluster in your environment in which you can deploy the Soda Agent helm chart.
Use Helm to add the Soda Agent Helm chart repository.
Using a code editor, create a new YAML file called values.yml.
If you do no see the agent listed in Soda Cloud, use the following command to review status and investigate the logs.
helm install commandThe --set options either override or set some of the values defined in and used by the Helm chart. You can override these values with the --set files as this command does, or you can specify the override values using a values.yml file.
Delete everything in the namespace which you created for the Soda Agent.
Delete the cluster. Be patient; this task may take some time to complete.
Problem: After setting up a cluster and deploying the agent, you are unable to see the agent running in Soda Cloud.
Solution: The value you specify for the soda-cloud-enpoint must correspond with the region you selected when you signed up for a Soda Cloud account:
Usehttps://cloud.us.soda.io for the United States
Use https://cloud.soda.io for all else
Problem: You need to define the outgoing port and IP address with which a self-hosted Soda Agent can communicate with Soda Cloud. Soda Agent does not require setting any inbound rules as it only polls Soda Cloud looking for instruction, which requires only outbound communication. When Soda Cloud must deliver instructions, the Soda Agent opens a bidirectional channel.
Solution: Use port 443 and passlist the fully-qualified domain names for Soda Cloud:
cloud.us.soda.io for Soda Cloud account created in the US region
OR
cloud.soda.io for Soda Cloud account created in the EU region
AND
collect.soda.io
Problem: When you attempt to create a cluster, you get an error that reads, An RSA key file or key value must be supplied to SSH Key Value. You can use --generate-ssh-keys to let CLI generate one for you.
Solution: Run the same command to create a cluster but include an extra line at the end to generate RSA keys.
These deployment instructions offer guidance for setting up a Google Kubernetes Engine (GKE) cluster and deploying a Soda Agent in it.
Prerequisites
System requirements
Deploy an agent
Deploy using CLI only
Deploy using a values YAML file
About the helm install command
Decommission the Soda Agent and cluster
Troubleshoot deployment
You have a Google Cloud Platform (GCP) account and the necessary permissions to enable you to create, or gain access to an existing Google Kubernetes Engine (GKE) cluster in your region.
You have installed the . Use the command glcoud version to verify the version of an existing install.
If you have already installed the gcloud CLI, use the following commands to login and verify your configuration settings, respectively: gcloud auth login gcloud config list
If you are installing the gcloud CLI for the first time, be sure to complete in the installation to properly install and configure the setup.
You have installed v1.22 or v1.23 of . This is the command-line tool you use to run commands against Kubernetes clusters. If you have installed Docker Desktop, kubectl is included out-of-the-box. With Docker running, use the command kubectl version --output=yaml to check the version of an existing install.
You have installed . This is the package manager for Kubernetes which you will use to deploy the Soda Agent Helm chart. Run helm version to check the version of an existing install.
Kubernetes cluster size and capacity: 2 CPU and 2GB of RAM. In general, this is sufficient to run up to six scans in parallel.
Scan performance may vary according to the workload, or the number of scans running in parallel. To improve performance for larger workloads, consider fine-tuning the cluster size using the resources parameter for the agent-orchestrator and soda.scanlauncher.resources for the scan-launcher. Adding more resources to the scan-launcher can improve scan times by as much as 30%. Be aware, however, that allocating too many resources may be costly relative to the small benefit of improved scan times.
To specify resources, add the following parameters to your values.yml file during deployment. Refer to Kubernetes documentation for for information on values to supply for x.
For reference, a Soda-hosted agent specifies resources as follows:
The following table outlines the two ways you can install the Helm chart to deploy a Soda Agent in your cluster.
(Optional) You have familiarized yourself with .
Create or navigate to an existing Kubernetes cluster in your environment in which you can deploy the Soda Agent helm chart.
Add the Soda Agent Helm chart repository.
Use the following command to install the Helm chart to deploy a Soda Agent in your custer. (Learn more about the .)
If you do no see the agent listed in Soda Cloud, use the following command to review status and investigate the logs.
(Optional) You have familiarized yourself with .
Create or navigate to an existing Kubernetes cluster in your environment in which you can deploy the Soda Agent helm chart.
Using a code editor, create a new YAML file called values.yml.
In that file, copy+paste the content below, replacing the following values:
If you do no see the agent listed in Soda Cloud, use the following command to review status and investigate the logs.
helm install commandThe --set options either override or set some of the values defined in and used by the Helm chart. You can override these values with the --set files as this command does, or you can specify the override values using a values.yml file.
Uninstall the Soda Agent in the cluster.
Delete the cluster.
Refer to for details.
Problem: After setting up a cluster and deploying the agent, you are unable to see the agent running in Soda Cloud.
Solution: The value you specify for the soda-cloud-enpoint must correspond with the region you selected when you signed up for a Soda Cloud account:
Usehttps://cloud.us.soda.io for the United States
Use https://cloud.soda.io for all else
Problem: You need to define the outgoing port and IP address with which a self-hosted Soda Agent can communicate with Soda Cloud. Soda Agent does not require setting any inbound rules as it only polls Soda Cloud looking for instruction, which requires only outbound communication. When Soda Cloud must deliver instructions, the Soda Agent opens a bidirectional channel.
Solution: Use port 443 and passlist the fully-qualified domain names for Soda Cloud:
cloud.us.soda.io for Soda Cloud account created in the US region
OR
cloud.soda.io for Soda Cloud account created in the EU region
AND
collect.soda.io
Amazon Athena
Amazon Redshift
Azure Synapse
ClickHouse
Databricks SQL
Denodo
Dremio
DuckDB
GCP BigQuery
Google CloudSQL
IBM DB2
MotherDuck
MS SQL Server1
MS Fabric1
MySQL
OracleDB
PostgreSQL
Presto
Snowflake
Trino
Vertica
Data Source Label
Provide a unique identifier for the data source. Soda Cloud uses the label you provide to define the immutable name of the data source against which it runs the Default Scan.
Default Scan Agent
Select the Soda-hosted agent, or the name of a Soda Agent that you have previously set up in your secure environment. This identifies the Soda Agent to which Soda Cloud must connect in order to run its scan.
Check Schedule
Provide the scan frequency details Soda Cloud uses to execute scans according to your needs. If you wish, you can define the schedule as a cron expression.
Starting At
Select the time of day to run the scan. The default value is midnight.
Cron Expression
(Optional) Write your own cron expression to define the schedule Soda Cloud uses to run scans.
Anomaly Dashboard Scan Schedule (Available in 2025)
Provide the scan frequency details Soda Cloud uses to execute a daily scan to automatically detect anomalies for the anomaly dashboard.
Data Source Owner
The Data Source Owner maintains the connection details and settings for this data source and its Default Scan Definition.
Default Dataset Owner
The Datasets Owner is the user who, by default, becomes the owner of each dataset the Default Scan discovers. Refer to Manage roles and permissions in Soda Cloud to learn how to adjust the Dataset Owner of individual datasets.

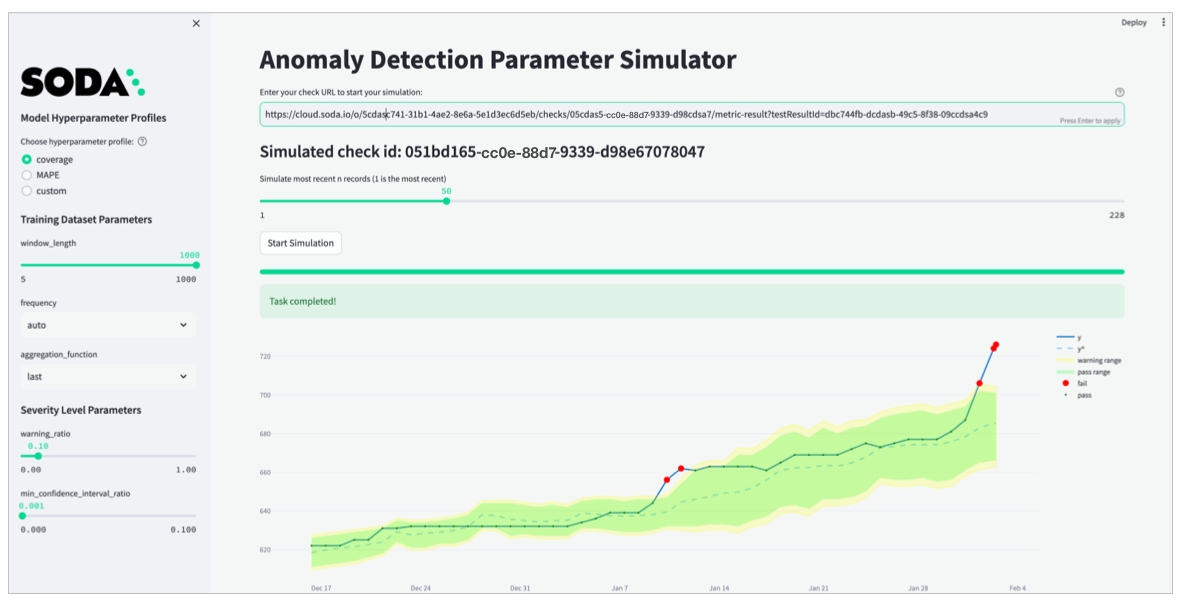
helm repo add soda-agent https://helm.soda.io/soda-agent/helm uninstall soda-agent -n soda-agentminikube delete💀 Removed all traces of the "minikube" cluster.discover datasets:
datasets:
- include %
- exclude test_%profile columns:
columns:
- "%.%" # Includes all your datasets
- prod% # Includes all datasets that begin with 'prod'automated monitoring:
datasets:
- include %
- exclude test_%soda:
scanlauncher:
volumeMounts:
- name: gcloud-credentials
mountPath: /opt/soda/etc
volumes:
- name: gcloud-credentials
secret:
secretName: gcloud-credentials
items:
- key: serviceaccount.json
path: serviceaccount.jsonkubectl create secret -n <soda-agent-namespace> gcloud-credentials --from-file=serviceaccount.json=<local path to the serviceccount.json>my_datasource_name:
type: bigquery
account_info_json_path: /opt/soda/etc/serviceaccount.json
auth_scopes:
- https://www.googleapis.com/auth/bigquery
- https://www.googleapis.com/auth/cloud-platform
- https://www.googleapis.com/auth/drive
project_id: ***
dataset: sodacoresoda:
agent:
resources:
limits:
cpu: x
memory: x
requests:
cpu: x
memory: x
scanlauncher:
resources:
limits:
cpu: x
memory: x
requests:
cpu: x
memory: xsoda:
agent:
resources:
limits:
cpu: 250m
memory: 375Mi
requests:
cpu: 250m
memory: 375Mikubectl logs -l agent.soda.io/component=orchestrator -n soda-agent -fkubectl logs -l agent.soda.io/component=orchestrator -n soda-agent -fhelm install soda-agent soda-agent/soda-agent \
--set soda.agent.name=myuniqueagent \
--set soda.apikey.id=*** \
--set soda.apikey.secret=**** \
--namespace soda-agenthttps://cloud.us.soda.iohttps://cloud.soda.io(Optional) Specify the format for log output: raw for plain text, or json for JSON format.
(Optional) Specify the level of log information you wish to see when deploying the agent: ERROR, WARN, INFO, DEBUG, or TRACE.
Use Helm to add the Soda Agent Helm chart repository.
Use the following command to install the Helm chart which deploys a Soda Agent in your custer.
Replace the values of soda.apikey.id and soda-apikey.secret with the values you copy+pasted from the New Soda Agent dialog box in your Soda Cloud. By default, Soda uses Kubernetes Secrets as part of the Soda Agent deployment. The agent automatically converts any sensitive values you add to a values YAML file, or directly via the CLI, into Kubernetes Secrets.
Replace the value of soda.agent.name with a custom name for your agent, if you wish.
Specify the value for soda.cloud.endpoint according to your local region: https://cloud.us.soda.io for the United States, or https://cloud.soda.io for all else.
(Optional) Specify the format for log output: raw for plain text, or json for JSON format.
(Optional) Specify the level of log information you wish to see when deploying the agent: ERROR, WARN, INFO, DEBUG, or TRACE.
Read more .
The command-line produces output like the following message:
(Optional) Validate the Soda Agent deployment by running the following command:
In your Soda Cloud account, navigate to your avatar > Agents. Refresh the page to verify that you see the agent you just created in the list of Agents.
Be aware that this may take several minutes to appear in your list of Soda Agents. Use the describe pods command in step 3 to check the status of the deployment. When State: Running and Ready: True, then you can refresh and see the agent in Soda Cloud.
Using a code editor, create a new YAML file called values.yml.
To that file, copy+paste the content below, replacing the following values:
id and secret with the values you copy+pasted from the New Soda Agent dialog box in your Soda Cloud account. By default, Soda uses Kubernetes Secrets as part of the Soda Agent deployment. The agent automatically converts any sensitive values you add to a values YAML file, or directly via the CLI, into Kubernetes Secrets.
Replace the value of name with a custom name for your agent, if you wish.
Specify the value for endpoint according to your local region: https://cloud.us.soda.io for the United States, or https://cloud.soda.io for all else.
(Optional) Specify the format for log output: raw for plain text, or json for JSON format.
(Optional) Specify the level of log information you wish to see when deploying the agent: ERROR, WARN, INFO, DEBUG, or TRACE.
Save the file. Then, in the same directory in which the values.yml file exists, use the following command to install the Soda Agent helm chart.
(Optional) Validate the Soda Agent deployment by running the following command:
In your Soda Cloud account, navigate to your avatar > Agents. Refresh the page to verify that you see the agent you just created in the list of Agents.
Be aware that this may take several minutes to appear in your list of Soda Agents. Use the describe pods command in step four to check the status of the deployment. When State: Running and Ready: True, then you can refresh and see the agent in Soda Cloud.
Deploy a Soda Agent to your AWS EKS cluster, or, if you have already deployed one, restart your Soda Agent to begin sending data to Soda Cloud via the PrivateLink.
After you have started the agent and validated that it is running, log into your Soda Cloud account, then navigate to your avatar > Agents. Refresh the page to verify that you see the agent you just created in the list of Agents.
Replace the values of soda.apikey.id and soda-apikey.secret with the values you copy+pasted from the New Soda Agent dialog box in your Soda Cloud. By default, Soda uses Kubernetes Secrets as part of the Soda Agent deployment. The agent automatically converts any sensitive values you add to a values YAML file, or directly via the CLI, into Kubernetes Secrets.
Replace the value of soda.agent.name with a custom name for your agent, if you wish.
Specify the value for soda.cloud.endpoint according to your local region: https://cloud.us.soda.io for the United States, or https://cloud.soda.io for all else.
(Optional) Specify the format for log output: raw for plain text, or json for JSON format.
(Optional) Specify the level of log information you wish to see when deploying the agent: ERROR, WARN, INFO, DEBUG, or TRACE.
The command-line produces output like the following message:
(Optional) Validate the Soda Agent deployment by running the following command:
In your Soda Cloud account, navigate to your avatar > Agents. Refresh the page to verify that you see the agent you just created in the list of Agents. Be aware that this may take several minutes to appear in your list of Soda Agents.
To that file, copy+paste the content below, replacing the following values:
id and secret with the values you copy+pasted from the New Soda Agent dialog box in your Soda Cloud account. By default, Soda uses Kubernetes Secrets as part of the Soda Agent deployment. The agent automatically converts any sensitive values you add to a values YAML file, or directly via the CLI, into Kubernetes Secrets.
Replace the value of name with a custom name for your agent, if you wish.
Specify the value for endpoint according to your local region: https://cloud.us.soda.io for the United States, or https://cloud.soda.io for all else.
(Optional) Specify the format for log output: raw for plain text, or json for JSON format.
(Optional) Specify the level of log information you wish to see when deploying the agent: ERROR, WARN, INFO, DEBUG, or TRACE.
Save the file. Then, create a namespace for the agent.
In the same directory in which the values.yml file exists, use the following command to install the Soda Agent helm chart.
(Optional) Validate the Soda Agent deployment by running the following command:
In your Soda Cloud account, navigate to your avatar > Agents. Refresh the page to verify that you see the agent you just created in the list of Agents.
Consider using the following command to learn a few basic glcoud commands: gcloud cheat-sheet.
Replace the values of soda.apikey.id and soda-apikey.secret with the values you copy+pasted from the New Soda Agent dialog box in your Soda Cloud account. By default, Soda uses Kubernetes Secrets as part of the Soda Agent deployment. The agent automatically converts any sensitive values you add to a values YAML file, or directly via the CLI, into Kubernetes Secrets.
Replace the value of soda.agent.name with a custom name for your agent, if you wish.
Specify the value for soda.cloud.endpoint according to your local region: https://cloud.us.soda.io for the United States, or https://cloud.soda.io for all else.
(Optional) Specify the format for log output: raw for plain text, or json for JSON format.
(Optional) Specify the level of log information you wish to see when deploying the agent: ERROR, WARN, INFO, DEBUG, or TRACE.
The command-line produces output like the following message:
(Optional) Validate the Soda Agent deployment by running the following command:
In your Soda Cloud account, navigate to your avatar > Agents. Refresh the page to verify that you see the agent you just created in the list of Agents.
Be aware that this may take several minutes to appear in your list of Soda Agents. Use the describe pods command in step three to check the status of the deployment. When Status: Running, then you can refresh and see the agent in Soda Cloud.
id and secret with the values you copy+pasted from the New Soda Agent dialog box in your Soda Cloud account. By default, Soda uses Kubernetes Secrets as part of the Soda Agent deployment. The agent automatically converts any sensitive values you add to a values YAML file, or directly via the CLI, into Kubernetes Secrets.
Replace the value of name with a custom name for your agent, if you wish.
Specify the value for endpoint according to your local region: https://cloud.us.soda.io for the United States, or https://cloud.soda.io for all else.
(Optional) Specify the format for log output: raw for plain text, or json for JSON format.
(Optional) Specify the level of log information you wish to see when deploying the agent: ERROR, WARN, INFO, DEBUG, or TRACE.
Save the file. Then, in the same directory in which the values.yml file exists, use the following command to install the Soda Agent helm chart.
(Optional) Validate the Soda Agent deployment by running the following command:
In your Soda Cloud account, navigate to your avatar > Agents. Refresh the page to verify that you see the agent you just created in the list of Agents.
Be aware that this may take several minutes to appear in your list of Soda Agents. Use the describe pods command in step four to check the status of the deployment. When Status: Running, then you can refresh and see the agent in Soda Cloud.
Use the namespace value to identify the namespace in which to deploy the agent.
Install the Helm chart via CLI by providing values directly in the install command.
Use this as a straight-forward way of deploying an agent on a cluster.
Install the Helm chart via CLI by providing values in a values YAML file.
Use this as a way of deploying an agent on a cluster while keeping sensitive values secure. - provide sensitive API key values in this local file - store data source login credentials as environment variables in this local file or in an external secrets manager; Soda needs access to the credentials to be able to connect to your data source to run scans of your data. See: Soda Agent extras.
helm install
the action helm is to take
soda-agent (the first one)
a release named soda-agent on your cluster
soda-agent (the second one)
the name of the helm repo you installed
soda-agent (the third one)
the name of the helm chart that is the Soda Agent
--set soda.agent.name
A unique name for your Soda Agent. Choose any name you wish, as long as it is unique in your Soda Cloud account.
--set soda.apikey.id
With the apikey.secret, this connects the Soda Agent to your Soda Cloud account. Use the value you copied from the dialog box in Soda Cloud when adding a new agent. You can use a values.yml file to pass this value to the cluster instead of exposing it here.
--set soda.apikey.secret
With the apikey.id, this connects the Soda Agent to your Soda Cloud account. Use the value you copied from the dialog box in Soda Cloud when adding a new agent. You can use a values.yml file to pass this value to the cluster instead of exposing it here.
--set soda.agent.logFormat
(Optional) Specify the format for log output: raw for plain text, or json for JSON format.
--set soda.agent.loglevel
(Optional) Specify the leve of log information you wish to see when deploying the agent: ERROR, WARN, INFO, DEBUG, or TRACE.
--namespace soda-agent
Install the Helm chart via CLI by providing values directly in the install command.
Use this as a straight-forward way of deploying an agent on a cluster.
Install the Helm chart via CLI by providing values in a values YAML file.
Use this as a way of deploying an agent on a cluster while keeping sensitive values secure. - provide sensitive API key values in this local file or in an external secrets manager - store data source login credentials as environment variables in this local file; Soda needs access to the credentials to be able to connect to your data source to run scans of your data. See: Soda Agent extras.
helm install
the action helm is to take
soda-agent (the first one)
a release named soda-agent on your cluster
soda-agent (the second one)
the name of the helm repo you installed
soda-agent (the third one)
the name of the helm chart that is the Soda Agent
Install the Helm chart via CLI by providing values directly in the install command.
Use this as a straight-forward way of deploying an agent on a cluster in a secure or local environment.
Install the Helm chart via CLI by providing values in a values YAML file.
Use this as a way of deploying an agent on a cluster while keeping sensitive values secure. - provide sensitive API key values in this local file - store data source login credentials as environment variables in this local file or in an external secrets manager; Soda needs access to the credentials to be able to connect to your data source to run scans of your data. See: Soda Agent extras.
helm install
the action helm is to take
soda-agent (the first one)
a release named soda-agent on your cluster
soda-agent (the second one)
the name of the helm repo you installed
soda-agent (the third one)
the name of the helm chart that is the Soda Agent
--set soda.agent.name
A unique name for your Soda Agent. Choose any name you wish, as long as it is unique in your Soda Cloud account.
--set soda.apikey.id
With the apikey.secret, this connects the Soda Agent to your Soda Cloud account. Use the value you copied from the dialog box in Soda Cloud when adding a new agent. You can use a values.yml file to pass this value to the cluster instead of exposing it here.
--set soda.apikey.secret
With the apikey.id, this connects the Soda Agent to your Soda Cloud account. Use the value you copied from the dialog box in Soda Cloud when adding a new agent. You can use a values.yml file to pass this value to the cluster instead of exposing it here.
--set soda.agent.logFormat
(Optional) Specify the format for log output: raw for plain text, or json for JSON format.
--set soda.agent.loglevel
(Optional) Specify the leve of log information you wish to see when deploying the agent: ERROR, WARN, INFO, DEBUG, or TRACE.
--namespace soda-agent


Use the namespace value to identify the namespace in which to deploy the agent.
Use the namespace value to identify the namespace in which to deploy the agent.

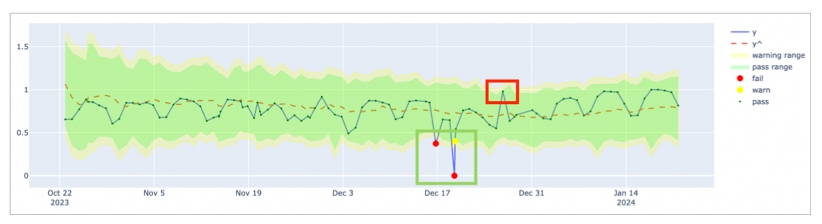
soda:
apikey:
id: "***"
secret: "***"
agent:
name: "myuniqueagent"
logformat: "raw"
loglevel: "ERROR"
cloud:
# Use https://cloud.us.soda.io for US region
# Use https://cloud.soda.io for EU region
endpoint: "https://cloud.soda.io"helm repo add soda-agent https://helm.soda.io/soda-agent/kubectl describe pods...
Containers:
soda-agent-orchestrator:
Container ID: docker://081*33a7
Image: sodadata/agent-orchestrator:latest
Image ID: docker-pullable://sodadata/agent-orchestrator@sha256:394e7c1**b5f
Port: <none>
Host Port: <none>
State: Running
Started: Thu, 16 Jun 2022 15:50:28 -0700
Ready: True
...helm install soda-agent soda-agent/soda-agent \
--values values.yml \
--namespace soda-agentkubectl describe pods -n soda-agent...
Containers:
soda-agent-orchestrator:
Container ID: docker://081*33a7
Image: sodadata/agent-orchestrator:latest
Image ID: docker-pullable://sodadata/agent-orchestrator@sha256:394e7c1**b5f
Port: <none>
Host Port: <none>
State: Running
Started: Thu, 16 Jun 2022 15:50:28 -0700
Ready: True
...kubectl -n soda-agent rollout restart deploykubectl get pods -n soda-agentNAME READY STATUS RESTARTS AGE
soda-agent-orchestrator-ffd74c76-5g7tl 1/1 Running 0 32skubectl create ns soda-agentnamespace/soda-agent createdhelm install soda-agent soda-agent/soda-agent \
--values values.yml \
--namespace soda-agentkubectl describe pods -n soda-agenthelm install soda-agent soda-agent/soda-agent \
--set soda.agent.name=myuniqueagent \
# Use https://cloud.us.soda.io for US region; use https://cloud.soda.io for EU region
--set soda.cloud.endpoint=https://cloud.soda.io \
--set soda.apikey.id=*** \
--set soda.apikey.secret=*** \
--set soda.agent.logFormat=raw \
--set soda.agent.loglevel=ERROR \
--namespace soda-agent NAME: soda-agent
LAST DEPLOYED: Wed Dec 14 11:45:13 2022
NAMESPACE: soda-agent
STATUS: deployed
REVISION: 1kubectl describe podsName: soda-agent-orchestrator-66-snip
Namespace: soda-agent
Priority: 0
Service Account: soda-agent
Node: <none>
Labels: agent.soda.io/component=orchestrator
agent.soda.io/service=queue
app.kubernetes.io/instance=soda-agent
app.kubernetes.io/name=soda-agent
pod-template-hash=669snip
Annotations: seccomp.security.alpha.kubernetes.io/pod: runtime/default
Status: Running
...helm install soda-agent soda-agent/soda-agent \
--values values.yml \
--namespace soda-agentkubectl describe podsName: soda-agent-orchestrator-66-snip
Namespace: soda-agent
Priority: 0
Service Account: soda-agent
Node: <none>
Labels: agent.soda.io/component=orchestrator
agent.soda.io/service=queue
app.kubernetes.io/instance=soda-agent
app.kubernetes.io/name=soda-agent
pod-template-hash=669snip
Annotations: seccomp.security.alpha.kubernetes.io/pod: runtime/default
Status: Running
...helm install soda-agent soda-agent/soda-agent \
--set soda.agent.name=myuniqueagent \
# Use https://cloud.us.soda.io for US region; use https://cloud.soda.io for EU region
--set soda.cloud.endpoint=https://cloud.soda.io \
--set soda.apikey.id=*** \
--set soda.apikey.secret=**** \
--set soda.agent.logFormat=raw \
--set soda.agent.loglevel=ERROR \
--namespace soda-agentNAME: soda-agent
LAST DEPLOYED: Thu Jun 16 15:03:10 2022
NAMESPACE: soda-agent
STATUS: deployed
REVISION: 1minikube kubectl -- describe pods...
Containers:
soda-agent-orchestrator:
Container ID: docker://081*33a7
Image: sodadata/agent-orchestrator:latest
Image ID: docker-pullable://sodadata/agent-orchestrator@sha256:394e7c1**b5f
Port: <none>
Host Port: <none>
State: Running
Started: Thu, 16 Jun 2022 15:50:28 -0700
Ready: True
...helm install soda-agent soda-agent/soda-agent \
--values values.yml \
--namespace soda-agentminikube kubectl -- describe pods...
Containers:
soda-agent-orchestrator:
Container ID: docker://081*33a7
Image: sodadata/agent-orchestrator:latest
Image ID: docker-pullable://sodadata/agent-orchestrator@sha256:394e7c1**b5f
Port: <none>
Host Port: <none>
State: Running
Started: Thu, 16 Jun 2022 15:50:28 -0700
Ready: True
...soda:
agent:
resources:
limits:
cpu: x
memory: x
requests:
cpu: x
memory: x
scanlauncher:
resources:
limits:
cpu: x
memory: x
requests:
cpu: x
memory: xsoda:
agent:
resources:
limits:
cpu: 250m
memory: 375Mi
requests:
cpu: 250m
memory: 375Mikubectl logs -l agent.soda.io/component=orchestrator -n soda-agent -fkubectl logs -l agent.soda.io/component=orchestrator -n soda-agent -fkubectl logs -l agent.soda.io/component=orchestrator -n soda-agent -fhelm install soda-agent soda-agent/soda-agent \
--set soda.agent.name=myuniqueagent \
--set soda.apikey.id=*** \
--set soda.apikey.secret=**** \
--namespace soda-agenthelm uninstall soda-agent -n soda-agenteksctl delete cluster --name soda-agentsoda:
agent:
resources:
limits:
cpu: x
memory: x
requests:
cpu: x
memory: x
scanlauncher:
resources:
limits:
cpu: x
memory: x
requests:
cpu: x
memory: xsoda:
agent:
resources:
limits:
cpu: 250m
memory: 375Mi
requests:
cpu: 250m
memory: 375Mihelm repo add soda-agent https://helm.soda.io/soda-agent/kubectl logs -l agent.soda.io/component=orchestrator -n soda-agent -fhelm repo add soda-agent https://helm.soda.io/soda-agent/kubectl logs -l agent.soda.io/component=orchestrator -n soda-agent -fhelm install soda-agent soda-agent/soda-agent \
--set soda.agent.name=myuniqueagent \
--set soda.apikey.id=*** \
--set soda.apikey.secret=**** \
--namespace soda-agentkubectl delete ns soda-agentaz aks delete --resource-group SodaAgent --name soda-agent-cli-test --yesaz aks create \
> --resource-group SodaAgent \
> --name SodaAgentCluster \
> --node-count 1 \
> --generate-ssh-keyssoda:
agent:
resources:
limits:
cpu: x
memory: x
requests:
cpu: x
memory: x
scanlauncher:
resources:
limits:
cpu: x
memory: x
requests:
cpu: x
memory: xsoda:
agent:
resources:
limits:
cpu: 250m
memory: 375Mi
requests:
cpu: 250m
memory: 375Mihelm repo add soda-agent https://helm.soda.io/soda-agent/kubectl logs -l agent.soda.io/component=orchestrator -n soda-agent -fkubectl logs -l agent.soda.io/component=orchestrator -n soda-agent -fhelm install soda-agent soda-agent/soda-agent \
--set soda.agent.name=myuniqueagent \
--set soda.apikey.id=*** \
--set soda.apikey.secret=**** \
--namespace soda-agenthelm uninstall soda-agent -n soda-agentgcloud container clusters delete soda-agent-gke

helm install soda-agent soda-agent/soda-agent \
--set soda.agent.name=myuniqueagent \
# Use https://cloud.us.soda.io for US region; use https://cloud.soda.io for EU region
--set soda.cloud.endpoint=https://cloud.soda.io \
--set soda.apikey.id=*** \
--set soda.apikey.secret=**** \
--set soda.agent.logFormat=raw \
--set soda.agent.loglevel=ERROR \
--namespace soda-agentNAME: soda-agent
LAST DEPLOYED: Thu Jun 16 10:12:47 2022
NAMESPACE: soda-agent
STATUS: deployed
REVISION: 1soda:
apikey:
id: "***"
secret: "***"
agent:
name: "myuniqueagent"
logformat: "raw"
loglevel: "ERROR"
cloud:
# Use https://cloud.us.soda.io for US region; use https://cloud.soda.io for EU region
endpoint: "https://cloud.soda.io"helm install soda-agent soda-agent/soda-agent \
--set soda.agent.name=myuniqueagent \
# Use https://cloud.us.soda.io for US region; use https://cloud.soda.io for EU region
--set soda.cloud.endpoint=https://cloud.soda.io \
--set soda.apikey.id=*** \
--set soda.apikey.secret=**** \
--set soda.agent.logFormat=raw \
--set soda.agent.loglevel=ERROR \
--namespace soda-agentNAME: soda-agent
LAST DEPLOYED: Mon Nov 21 16:29:38 2022
NAMESPACE: soda-agent
STATUS: deployed
REVISION: 1soda:
apikey:
id: "***"
secret: "***"
agent:
name: "myuniqueagent"
logformat: "raw"
loglevel: "ERROR"
cloud:
# Use https://cloud.us.soda.io for US region; use https://cloud.soda.io for EU region
endpoint: "https://cloud.soda.io"soda:
apikey:
id: "***"
secret: "***"
agent:
name: "myuniqueagent"
logformat: "raw"
loglevel: "ERROR"
cloud:
# Use https://cloud.us.soda.io for US region; use https://cloud.soda.io for EU region
endpoint: "https://cloud.soda.io"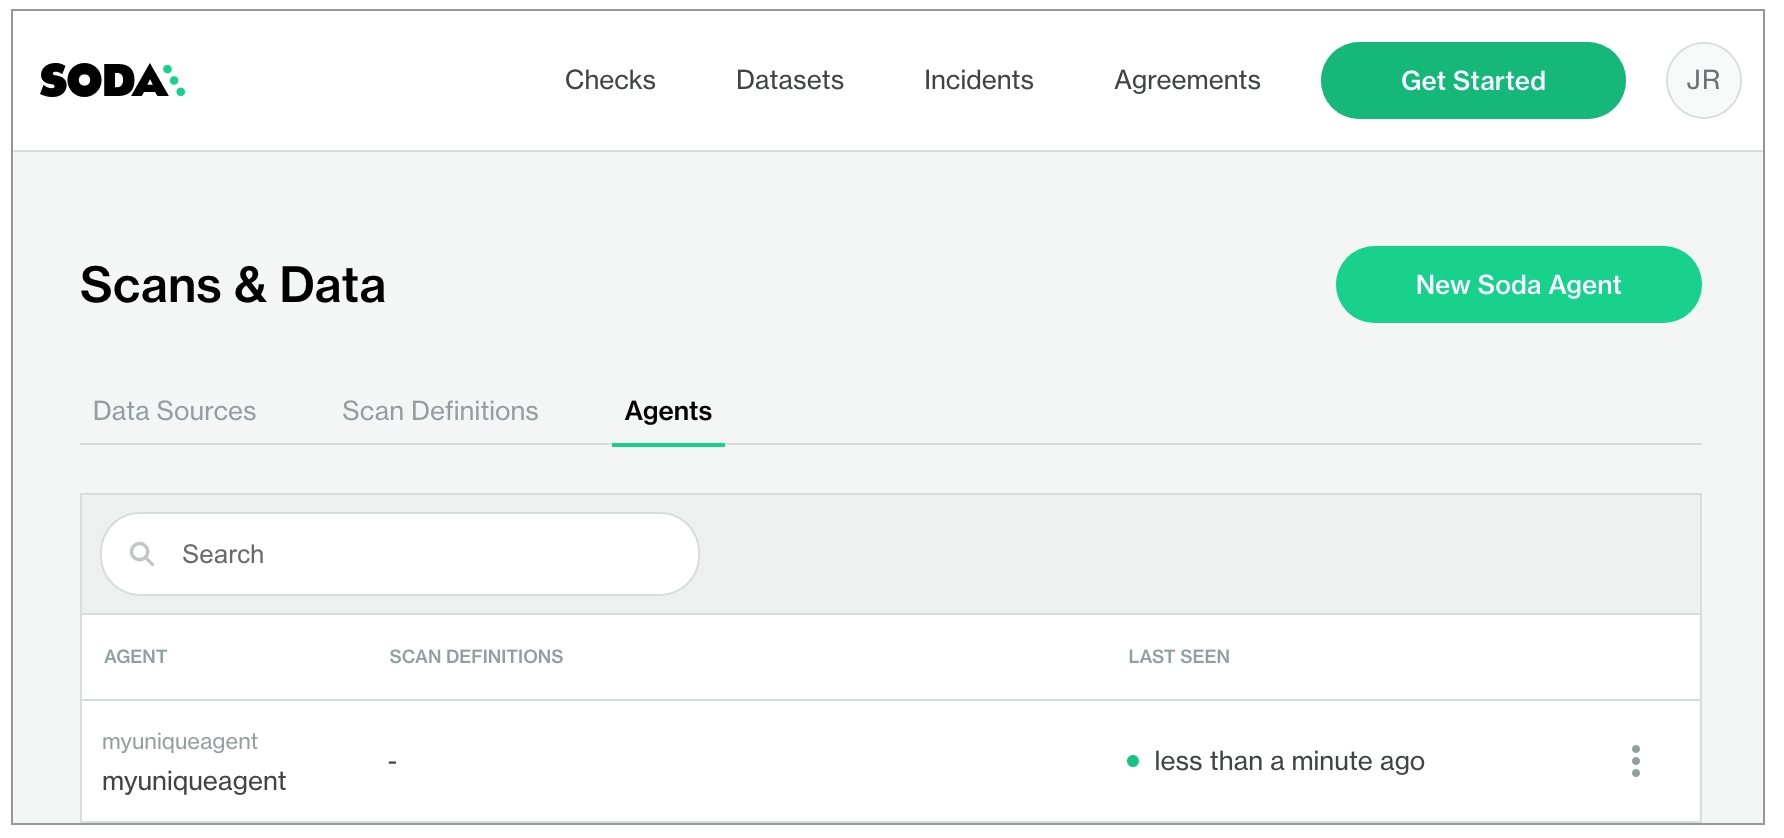

