> For the complete documentation index, see [llms.txt](https://docs.soda.io/llms.txt). Markdown versions of documentation pages are available by appending `.md` to page URLs; this page is available as [Markdown](https://docs.soda.io/onboard-data-sources-and-datasets/onboard-datasets-on-soda-cloud.md).

# Via Soda Cloud

## Onboard a new data source

Before you can define contracts, you need to **connect Soda Cloud to your data source**. This allows Soda to access your datasets for profiling, metric monitoring, and contract verification.

First, **navigate to the Data Sources page** from the left navigation bar in Soda Cloud. On this page, you'll see a list of connected sources and a **New Data Source** button.

<figure><img src="/files/SWJGCivaIeTX5Kr5EXuI" alt=""><figcaption></figcaption></figure>

{% hint style="warning" %}
You need the "**Manage data sources**" global permission to add a new data source.

Learn more about [Global and Dataset Roles](/organization-and-admin-settings/global-and-dataset-roles.md)
{% endhint %}

{% stepper %}
{% step %}

### Establish connection

{% stepper %}
{% step %}
On the **Data Sources** page, click on **New Data Source**

<figure><img src="/files/W01FshHEWp1Pi89QsfyW" alt="" width="485"><figcaption></figcaption></figure>
{% endstep %}

{% step %}
Select your data source provider

<figure><img src="/files/7hq0SAF2KjxWJfcm9avu" alt="" width="375"><figcaption></figcaption></figure>

After selecting a source, you'll be presented with a configuration form.

<figure><img src="/files/E2aN2jBtWZc3dwkism5M" alt="" width="563"><figcaption></figcaption></figure>
{% endstep %}

{% step %}
**Name your data source** under Data Source Identifier

Enter a friendly, unique label. A unique identifier will be automatically generated from this label. This becomes the immutable ID of the data source and can also be used to reference the same connection in Soda Core.
{% endstep %}

{% step %}
**Set a default runner**

You’ll be asked to select a runner. This is the component that connects to your data source and runs scans.

<figure><img src="/files/U7IId7cS0d914pO92S4b" alt="" width="563"><figcaption></figcaption></figure>

You can choose from:

* **Soda-hosted runner** – Quickest option, fully managed by Soda (recommended for getting started)
* **Self-hosted runner** – For custom or secure deployments where you manage the runner yourself
* **\[Preview feature]** [Bind a runner to a service account](/organization-and-admin-settings/service-accounts/bind-a-runner-to-a-service-account.md) - If you need to scope the permissions of a runner to those of a service account.

> Learn more about deployment options: [Deployment options](/deployment-options.md)
> {% endstep %}

{% step %}
\[Optional] **Set a default schedule** for contracts

Toggle on **Default schedule** to pre-fill contract schedules for this data source. When off, contracts created against this data source default to **midnight UTC**.

{% hint style="info" %}
**Existing contracts are not affected.** Contracts keep their own schedule once saved, so changes to the Default schedule only apply to contracts that have not been configured yet.
{% endhint %}

<figure><img src="/files/F8D714eULObq6baAxxHp" alt=""><figcaption></figcaption></figure>

The default schedule is used by:

<table data-header-hidden><thead><tr><th width="186"></th><th></th></tr></thead><tbody><tr><td><strong>Contract Editor</strong></td><td>When the default schedule is enabled, the time zone and cron pre-fill from the Default schedule.</td></tr><tr><td><strong>Contract Autopilot</strong></td><td><ul><li>During dataset onboarding: when the default schedule is enabled, the <strong>Add schedule to generated contracts</strong> section pre-fills with the Default schedule.</li><li>When generating data contracts <a href="/pages/SIhP0wH6BwPidEAnAUIS#select-datasets">in bulk</a>: you can choose <strong>Use the data source's default schedule</strong> so each contract picks up its own data source's default, or <strong>Manual schedule</strong> to apply one schedule to all selected datasets.</li></ul></td></tr></tbody></table>
{% endstep %}

{% step %}
Secure your credentials with secrets

<figure><img src="/files/T9RQCAQ5Kg5ttIhyxoBK" alt="" width="375"><figcaption></figcaption></figure>

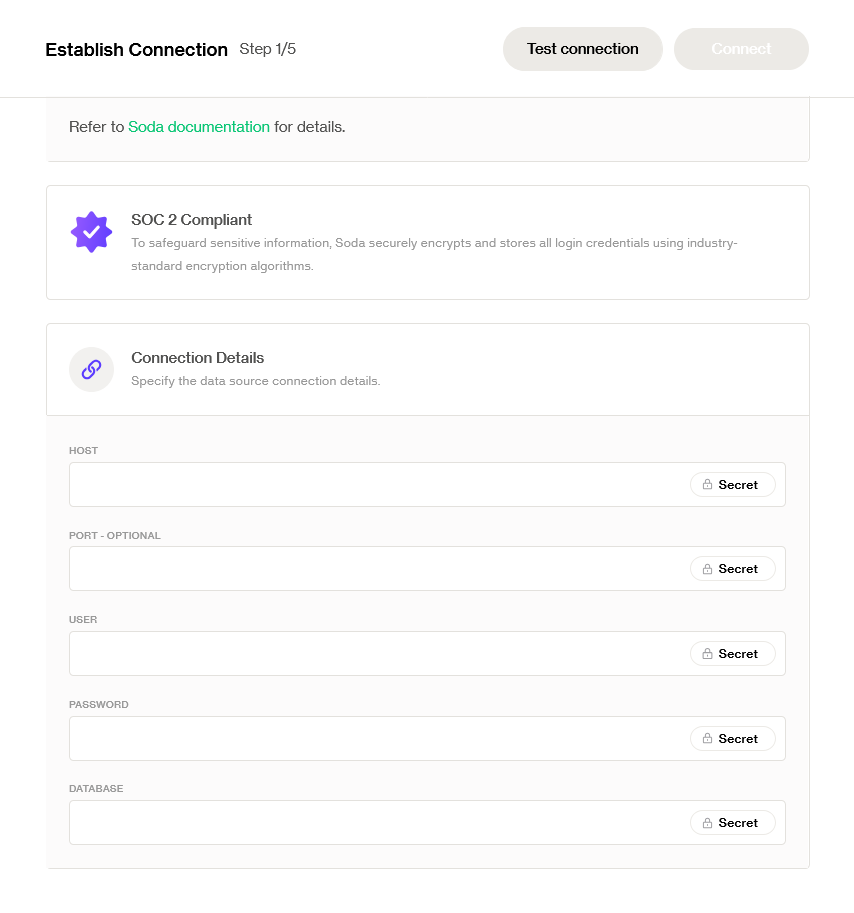
You’ll need to fill in the connection details. Soda uses the **official Python packages** for each supported data source, which means you can define any properties required by those libraries, flexibly and reliably.

This includes common fields like host, port, database name, username, and more, depending on the data source.

#### **Using secrets for sensitive credentials**

For sensitive values such as passwords, tokens, or keys, you should use **Soda Secrets** instead of entering them directly in the configuration.

* Secrets are **encrypted and securely stored** in Soda Cloud.
* They can be safely referenced in your data source configuration without exposing them in plain text.

To add secrets:

{% stepper %}
{% step %}
Navigate to the **Data Sources** tab in the top navigation.
{% endstep %}

{% step %}
Click the **Secrets** tab.
{% endstep %}

{% step %}
Define key-value pairs for your sensitive credentials.
{% endstep %}
{% endstepper %}

You can then reference a secret in your data source configuration using this syntax:

```javascript
${secret.SECRET_NAME}
```

This ensures your sensitive values stay secure while still being accessible to the runner at runtime.

<figure><img src="/files/Akedir2j2ymDZN5COxgJ" alt=""><figcaption></figcaption></figure>
{% endstep %}

{% step %}
**Test** and **Connect**

Once the form is complete:

* Click **Test Connection** to validate that Soda can successfully connect to your data source.
* If the test passes, click **Connect** to finalize the setup.

<figure><img src="/files/R84Y6iSpeTiIqVxsTy8C" alt="" width="350"><figcaption></figcaption></figure>
{% endstep %}
{% endstepper %}
{% endstep %}

{% step %}

### \[Optional] Enable Diagnostics Warehouse

**Enable** [**Diagnostics Warehouse**](broken://pages/UZCAHd8ZBgl01336NkZa) to store record-level diagnostics, such as failed rows, in a warehouse you own.

<figure><img src="/files/BZkVCxowlSClDcPYjajm" alt="" width="563"><figcaption><p>Enable Diagnostics Warehouse</p></figcaption></figure>

{% stepper %}
{% step %}
Choose the Diagnostics Warehouse connection

<figure><img src="/files/jdWMKDNUEyi4WFZkLxN8" alt="" width="375"><figcaption><p>Choose the Diagnostics Warehouse connection</p></figcaption></figure>
{% endstep %}

{% step %}
\[Optional] Diagnostics Warehouse **Advanced Configuration**

* Provide a **schema configuration**

This will be the default schema where Soda creates diagnostic tables. If not provided, Soda will create a new schema with the default name `soda_diagnostics`.

* Provide **table names**

For your own organization, you can add prefixes/suffixes to the table names that Soda will create in your diagnostics warehouse.

<figure><img src="/files/gGaB5iKowxj4tt884M2R" alt="" width="505"><figcaption></figcaption></figure>
{% endstep %}

{% step %}
\[Optional] Allow **collections of check results & scans**

You can allow Soda to collect check results and scans (only for this data source) in order to store them securely on your diagnostics warehouse.

<figure><img src="/files/SO4TRwkbsCAcQckLe4SS" alt="" width="505"><figcaption></figcaption></figure>
{% endstep %}

{% step %}
\[Optional] Allow **failed row collection**

You can allow Soda to collect failed rows (only for this data source) in order to store them securely on your diagnostics warehouse.

<figure><img src="/files/eCikr5dp1owD1o9Z4QDH" alt="" width="505"><figcaption></figcaption></figure>

> Learn more about this options when [setting up Diagnostics Warehouse](broken://pages/E1KTiEL4c6zytpedbEZg).
> {% endstep %}

{% step %}
Click **Test connection**, then click **Save**
{% endstep %}
{% endstepper %}

{% hint style="warning" %}
The Diagnostics Warehouse connection **must have write access** in order to perform correctly.
{% endhint %}

> Learn more about [setting up Diagnostics Warehouse](broken://pages/E1KTiEL4c6zytpedbEZg#set-up-diagnostics-warehouse).
> {% endstep %}

{% step %}

### Onboard datasets

After connecting, Soda will perform an **automated dataset discovery**. Soda triggers a scan that analyzes the datasets and retrieves their metadata, including columns and column data types. This **reduces manual setup** efforts, **ensures data coverage** in your environment and **keeps Soda's dataset inventory aligned with your data sources**. This feature allows other Soda features to work seamlessly:

* **Contract generation**
* Automated discovery of **time partition column**

{% if visitor.claims.plan === 'enterprise' || visitor.claims.plan === 'enterpriseUserBased' || visitor.claims.plan === 'datasetStandard' %}

* Automated discovery of **Primary Keys** for [Broken mention](broken://pages/UZCAHd8ZBgl01336NkZa)
  {% endif %}

{% if !(visitor.claims.plan === 'enterprise' || visitor.claims.plan === 'enterpriseUserBased' || visitor.claims.plan === 'datasetStandard') %}

* Automated discovery of **Primary Keys** for [Diagnostics Warehouse](/diagnostics-warehouse.md)
  {% endif %}

{% stepper %}
{% step %}
Choose a dataset selection strategy

Dataset selection can be **manual** or **rules-based.**

<details>

<summary><strong>Manual dataset selection</strong></summary>

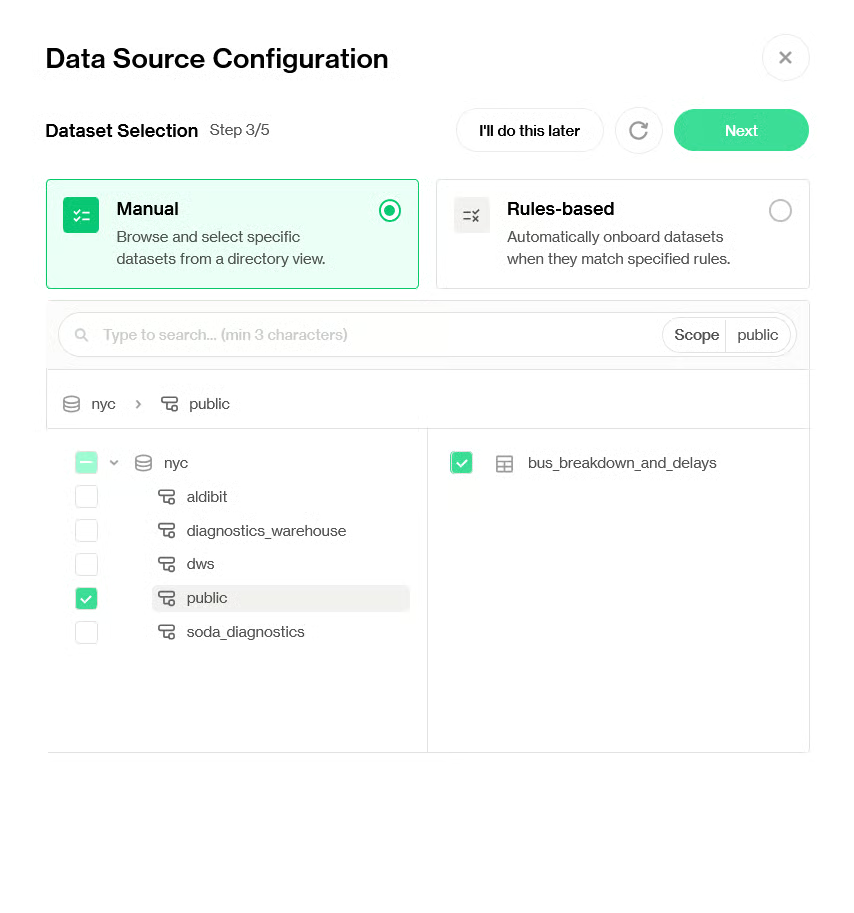
**Manual** selection allows you to browse a directory view of all the datasets in your data source.

<figure><img src="/files/WV1lzJNlG27zG41xqYqW" alt=""><figcaption></figcaption></figure>

The **Scope** can range from the entire data source to a specific schema. Any element selected on the left panel becomes the **scope** of the dataset search.

The **manual selection is made for scale**; it can easily handle thousands of schemas and hundreds of thousands of datasets.

{% hint style="warning" %}
Datasets that have already been onboarded **will not be visible** in the manual dataset selection.
{% endhint %}

</details>

<details>

<summary><strong>Rules-based dataset selection</strong></summary>

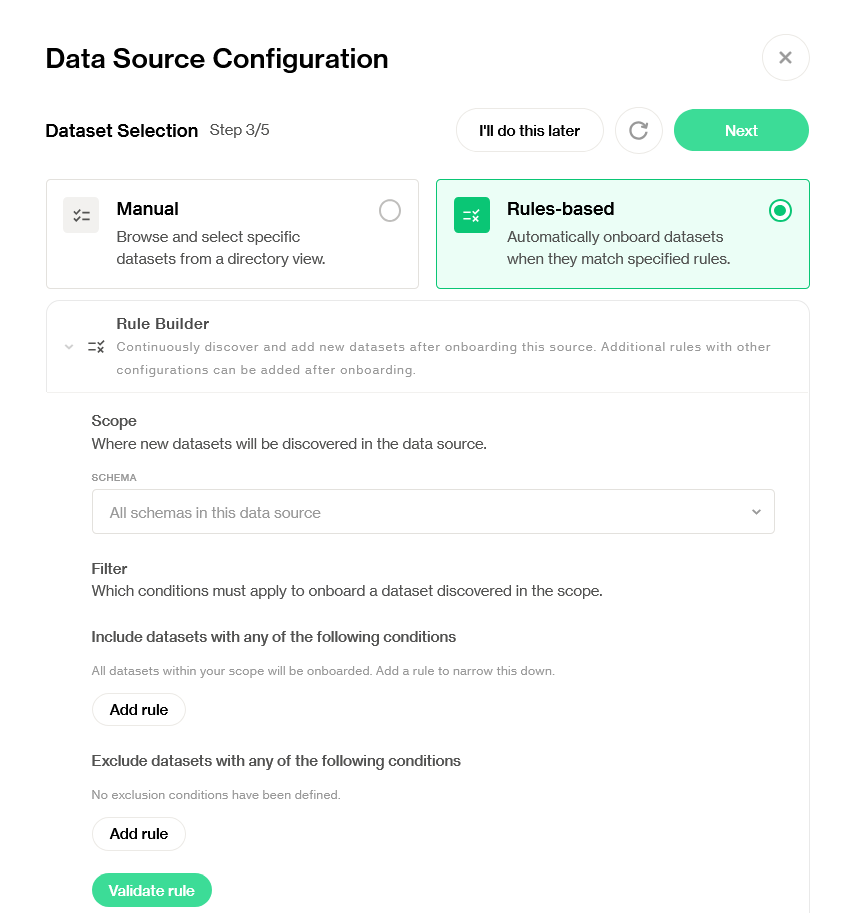
**Rules-based** selection allows you to automate the dataset onboarding process, only selecting those which match specified rules.

<figure><img src="/files/C0P0ekECxjYSQMHgbU5d" alt="" width="375"><figcaption></figcaption></figure>

{% hint style="info" %}
Rules-based selection includes **existing** and **future** datasets that match the conditions.

Soda will run discovery scans once per day at a random time on the data source. When Soda discovers a **new dataset that matches the conditions** set in the rules, it will **automatically onboard** it.
{% endhint %}

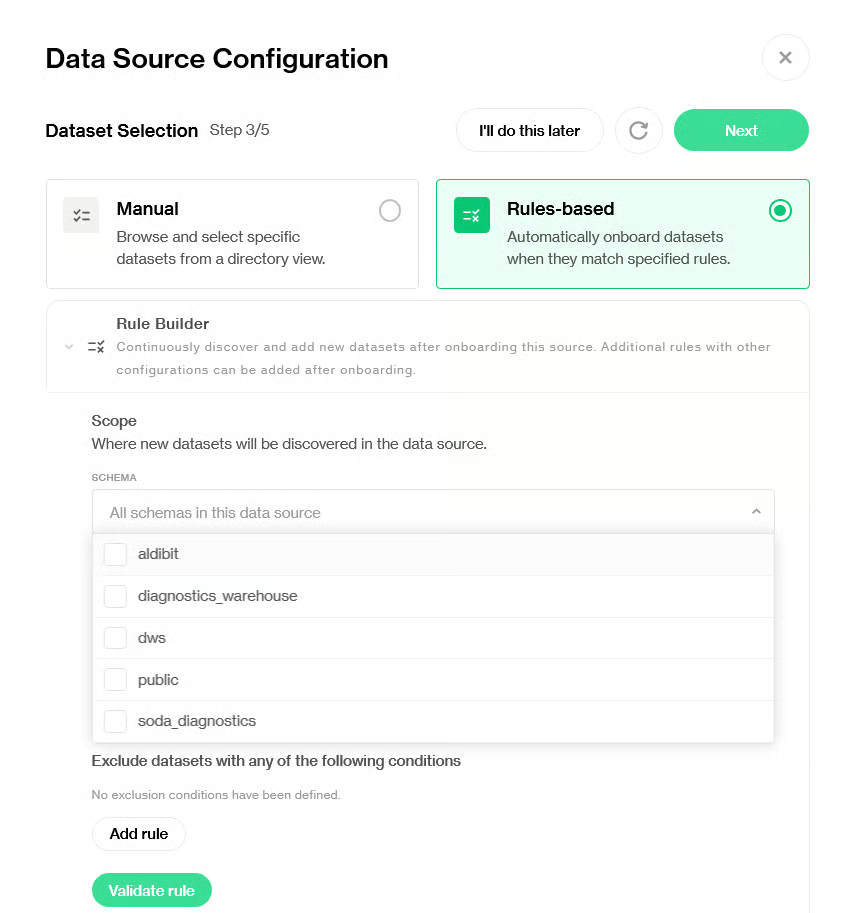
* You can choose the specific schemas where your datasets of interest are located.
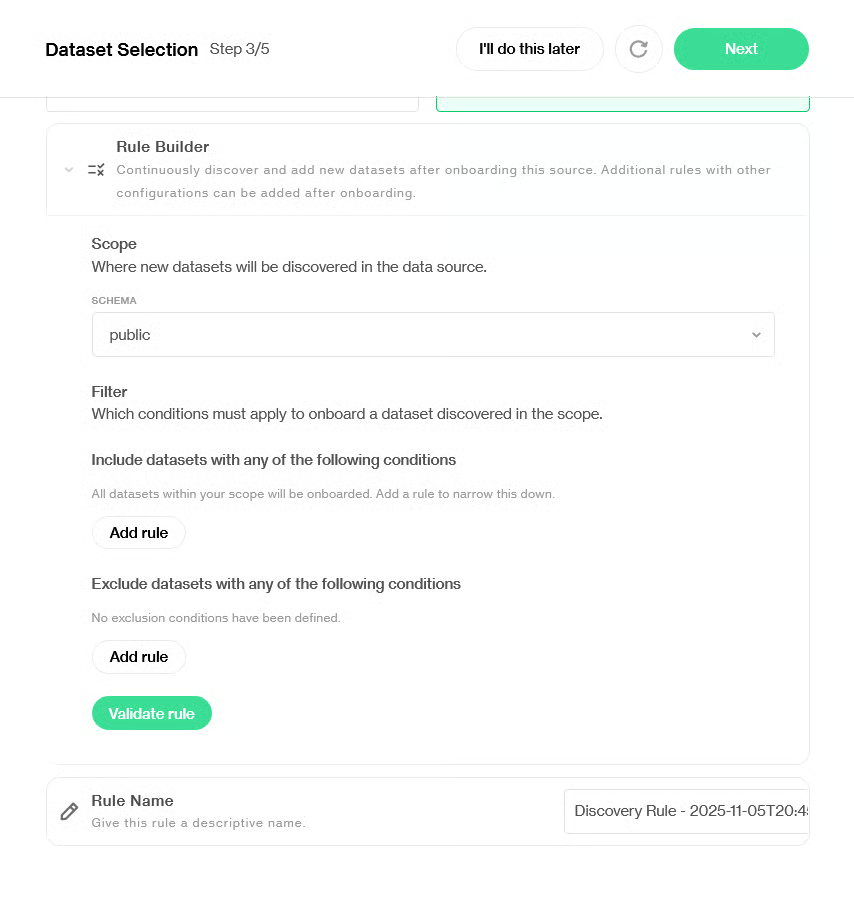
<figure><img src="/files/MHPY6SESkga4OcI8ScfN" alt="" width="375"><figcaption><p>Choose the specific schemas where your datasets of interest are located.</p></figcaption></figure>

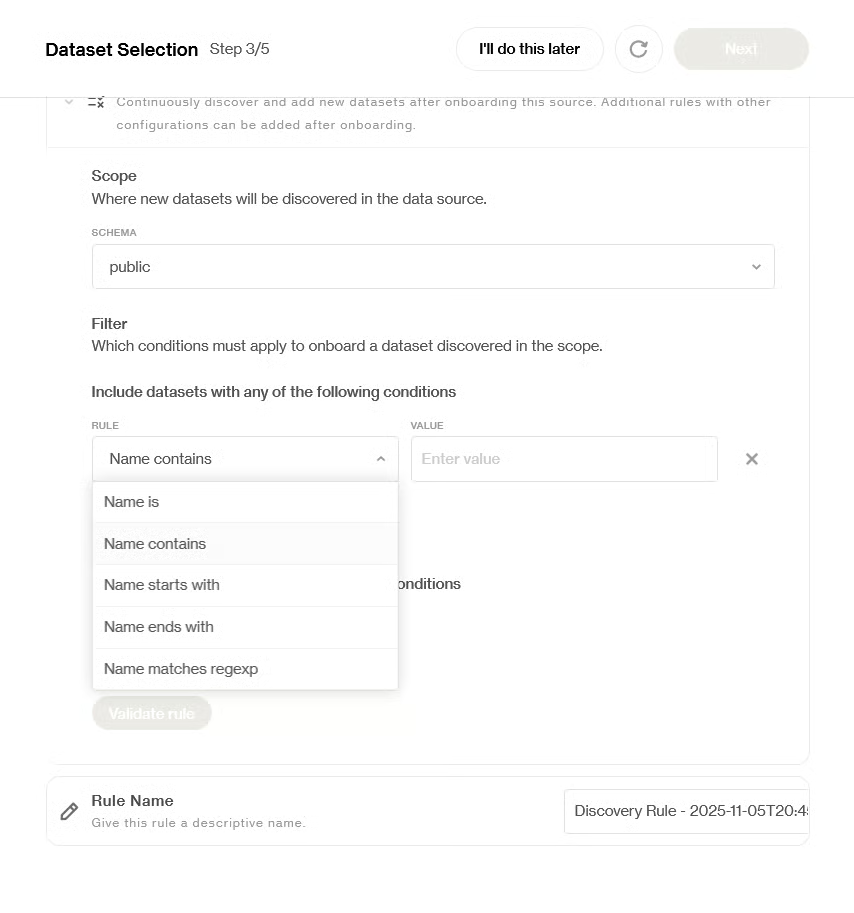
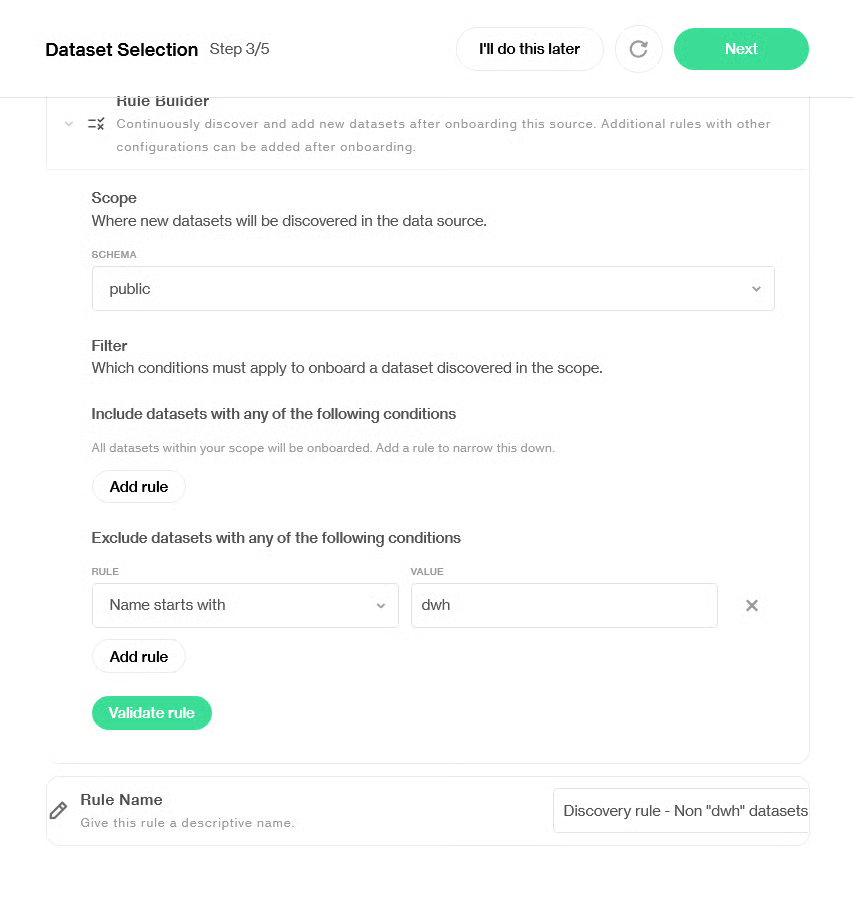
* You can add rules to include or exclude datasets that match certain conditions, such as "name contains" or "name starts with", or provide your own regex pattern.

<figure><img src="/files/2KKvMaLknT1RL9HJaV6q" alt="" width="375"><figcaption><p>After selecting a scope, you can filter datasets by different conditions, including or excluding rules.</p></figcaption></figure>

* To create a rule, choose a condition that datasets must match in order to be onboarded.
<figure><img src="/files/MZHdKEeF3PoxjtQQUbJ7" alt="" width="375"><figcaption><p>Choose a condition that datasets must match in order to be onboarded.</p></figcaption></figure>

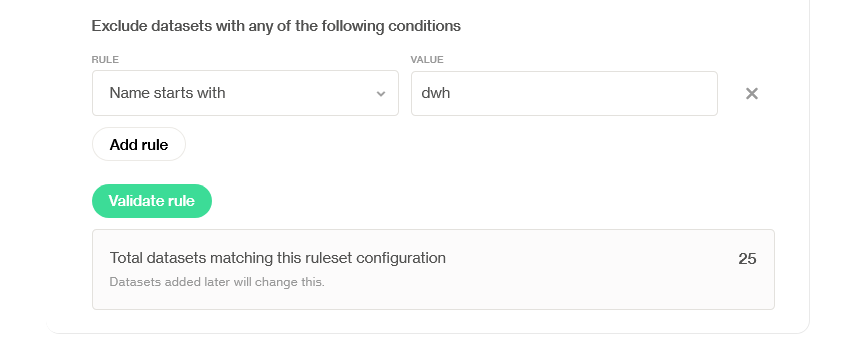
* In the example below, only datasets whose name **does not** start with "`dwh`" from the `public` schema will be onboarded.

<figure><img src="/files/RXrYaRoOUSSOk3gcO1lV" alt="" width="375"><figcaption><p>A Rule Name can be provided to identify this dataset selection rule.</p></figcaption></figure>

Once you click on **Validate rule**, Soda will calculate how many datasets currently match the defined conditions:

<figure><img src="/files/c4MtCy941EAhS70O9rvk" alt="" width="563"><figcaption></figcaption></figure>

***

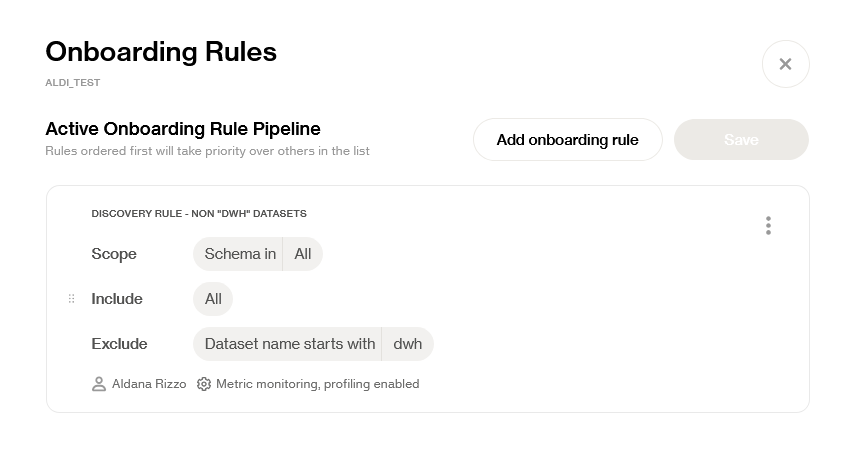
#### Onboarding rules review

**Once the onboarding process is finished** (after [Enabling Metric Monitoring](#id-3.-enable-metric-monitoring-and-profiling-optional)), **an overview of the Onboarding Rules will be provided**. From this view, rules can be edited or deleted:

<figure><img src="/files/w01Lj3WUyhgESX2735h7" alt="" width="563"><figcaption></figcaption></figure>

* Rules will be executed in order of appearance on this view.
* The order of the rules can be changed. **As soon as a dataset matches a rule, it will be onboarded** automatically; datasets can only be onboarded once.

</details>
{% endstep %}

{% step %}
Confirm onboarding

<i class="fa-octagon-check">:octagon-check:</i> Click on **Next** to finish the process.

Once onboarded, datasets will appear in your Soda Cloud UI and become available for contract creation or metric monitoring.

{% hint style="info" %}
**Refresh dataset discovery:** Soda runs discovery scans once per day at a random time to get the latest view of tables and schemas within a data source. **By pressing on the** <i class="fa-arrow-rotate-right">:arrow-rotate-right:</i> **icon** on the top right of the page, you can run the scan on demand.

**To configure the discovery scan schedule, go to** [#configure-discovery-scan](#configure-discovery-scan "mention").
{% endhint %}
{% endstep %}

{% step %}
Enable/disable **Contract Autopilot**

Enable [Contract Autopilot](/soda-ai/contract-autopilot.md) to auto-generate contracts tailored to your data. This is a **hands-off, AI-powered feature** that allows you to have a first contract draft that is made to fit your dataset's columns.

<figure><img src="/files/Tktfn2RTqafWj7hrfQ6Q" alt="" width="375"><figcaption></figcaption></figure>
{% endstep %}

{% step %}
\[Optional] Schedule generated contracts

You can **add a schedule to generated contracts** to define when Soda will run them, including frequency and time. Default is daily at 00:00 UTC.

<figure><img src="/files/C0PTTTxBors5xv6Et1Jx" alt="" width="375"><figcaption></figcaption></figure>
{% endstep %}

{% step %}
\[Optional] Enable **Metric Monitoring** & **Profiling**

Through Metric Monitoring, you can enable built-in monitors to automatically track row counts, schema changes, freshness, and more across your datasets. This step is optional but recommended. **This can be enabled in bulk when onboarding data sources and datasets**.

> Learn more about Metric Monitoring: [Metric Monitoring dashboard](/data-observability/metric-monitoring-dashboard.md)

{% stepper %}
{% step %}
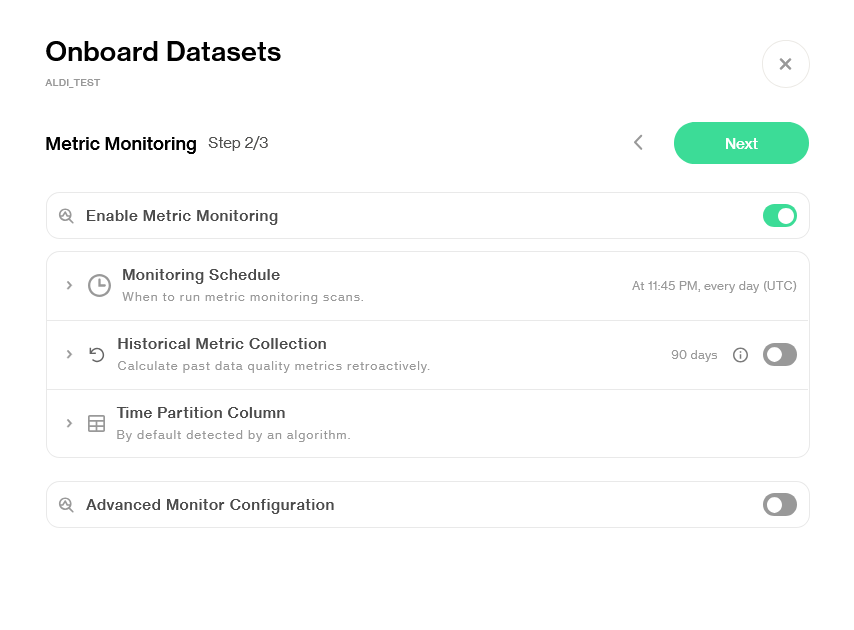
Toggle on **Metric Monitoring**

When metric monitoring is enabled it's possible to later add column monitors on dataset level or overwrite any of the settings.

<figure><img src="/files/sedAUKw0bxavn2gN0ifk" alt="" width="563"><figcaption></figcaption></figure>
{% endstep %}

{% step %}
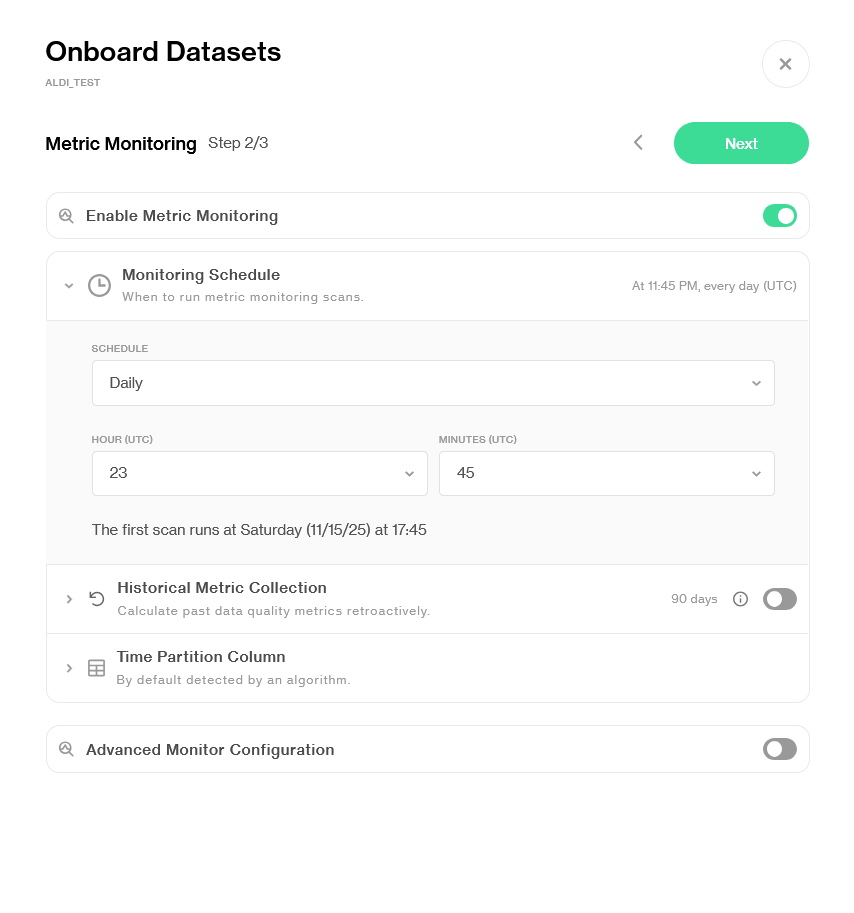
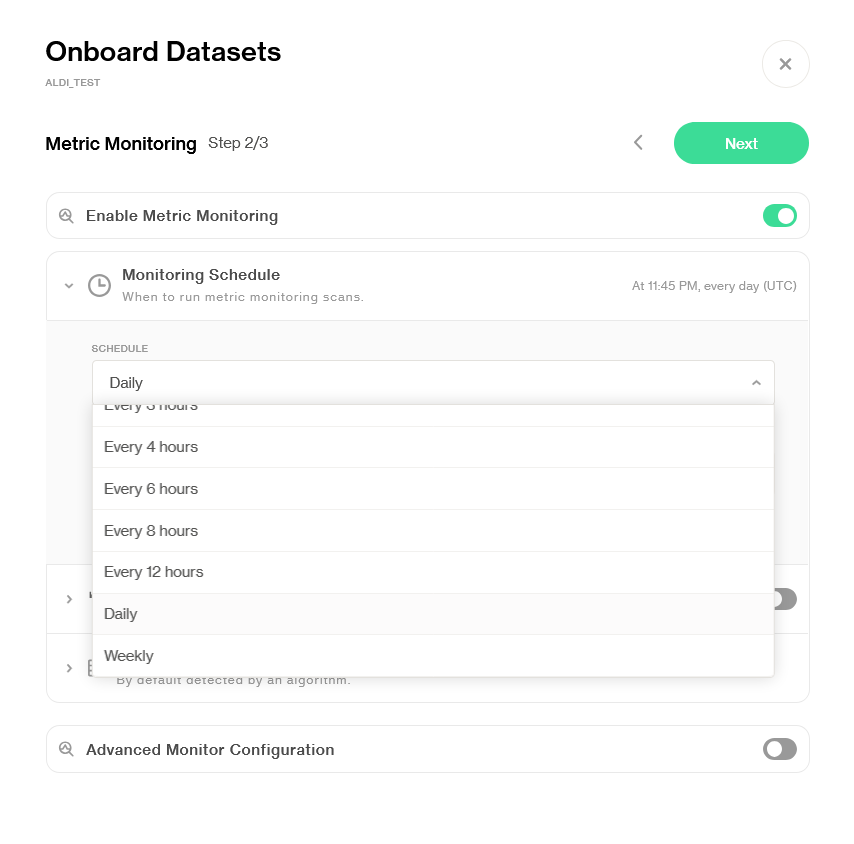
Set a **Monitoring Schedule**

The monitoring schedule defines when Soda scans a dataset to capture and evaluate metrics. While scans may run slightly later due to system delays, Soda uses the **actual execution time,** not the scheduled time, when visualizing **time-sensitive metadata metrics** like insert lag or row count deltas. This ensures accuracy.

Data-based metrics like averages or null rates are not affected by small delays, as Soda only scans complete partitions, keeping these metrics stable and reliable.

<figure><img src="/files/2W51B9qGxFiFr55bqRmt" alt="" width="375"><figcaption></figcaption></figure>

Scans can be scheduled to occur from **hourly** to **weekly**, depending on your needs.

> Learn more about [how to pick a scan time](/data-observability/scan-time-and-scan-time-strategy.md).

<figure><img src="/files/77ylV4bHng27kWTaFCL7" alt="" width="375"><figcaption></figcaption></figure>
{% endstep %}

{% step %}
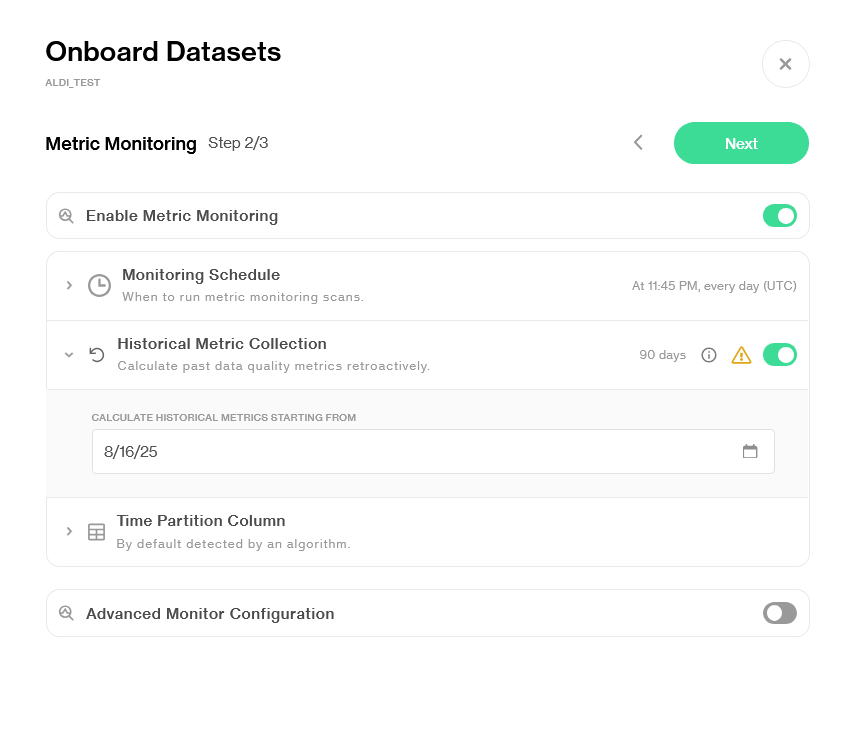
Toggle on/off **Historical Metric Collection**

When **Historical Metric Collection** is enabled, Soda automatically calculates past data quality metrics through backfilling and applies the anomaly detection algorithm to that historical data through backtesting. This gives you immediate visibility into past data quality issues, even before monitoring was activated.

The historical data also helps train the anomaly detection algorithm, improving its accuracy from day one. You can specify a start date to control how far back the backfilling process should begin.

<figure><img src="/files/W0yXpaqL49qarsFIN75T" alt="" width="375"><figcaption></figcaption></figure>
{% endstep %}

{% step %}
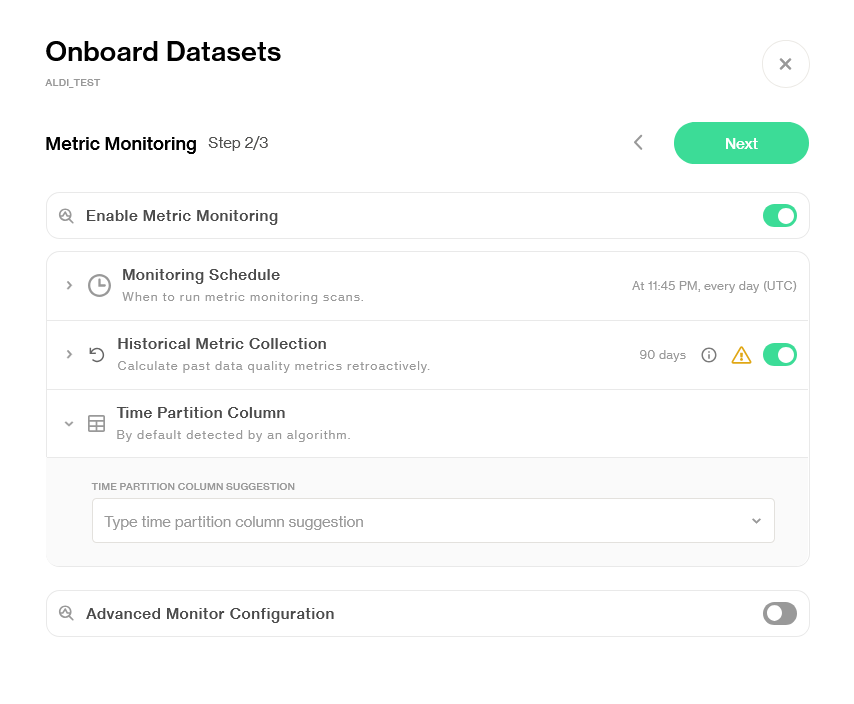
Suggest a **Time Partition Column**

Metrics that are not based on metadata require a **time partition column** to group data into daily intervals or 24-hour buckets, depending on the monitoring schedule. This column must be a **timestamp field**, ideally something like a `created_at` or `last_updated` column. It's important that this timestamp reflects **when the data arrives in the database**, rather than when the record was originally created.

<figure><img src="/files/YoHFYZ6zXzsZzQbynxQM" alt="" width="375"><figcaption></figcaption></figure>

Soda uses a list of **suggested time partition columns** to determine which column to apply. If multiple columns are suggested, Soda checks them **in the order they are listed**, starting with the first. It will try to match one by validating that the column is a proper timestamp and suitable for partitioning.

If none of the suggested columns match, Soda falls back to a **heuristic approach**. This heuristic looks at metadata, typical naming conventions, and column content to infer the most likely time partition column.

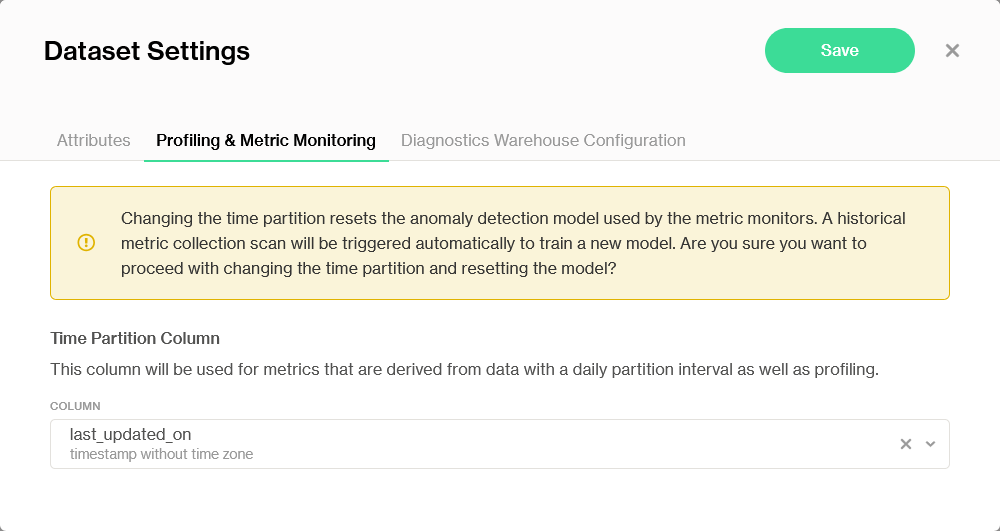
If the heuristic fails to find a suitable column or selects the wrong one, the time partition column can be manually configured after onboarding under **dataset settings**.

<figure><img src="/files/oOm37SLHM1CUBk83A2ul" alt="" width="563"><figcaption><p>To access Dataset Settings: Navigate to a dataset > Click on "<strong>⋮</strong>" > <strong>Edit Dataset</strong> > <strong>Profiling &#x26; Metric Monitoring</strong> tab.</p></figcaption></figure>
{% endstep %}

{% step %}
\[Optional] Toggle on **Advanced monitor configuration**

Enable or disable each monitor to suit your data quality needs.
{% endstep %}

{% step %}
Click on **Next**
{% endstep %}
{% endstepper %}
{% endstep %}

{% step %}
Define a **dataset owner**

**Define a dataset owner** by choosing a user from the drop-down menu.

<figure><img src="/files/mV9EQtbzbaYVCNh1pAAx" alt="" width="505"><figcaption></figcaption></figure>
{% endstep %}

{% step %}
\[Optional] Enable **check results & scans collection**

From this onboarding view, you can also enable **check results & scans collection** if Diagnostics Warehouse is enabled for this data source.
{% endstep %}

{% step %}
\[Optional] Enable **failed row collection**

From this onboarding view, you can also enable **Failed row collection** if Diagnostics Warehouse is enabled for this data source. When you enable **Collect failed rows**, select a **storage** and a **detection strategy**.

{% hint style="info" %}
Profiling scheduled execution is set at 12:00AM UTC by default.
{% endhint %}
{% endstep %}

{% step %}
\[Optional] Enable **Profiling**

> Learn more about [Profiling](/data-observability/profiling.md).
> {% endstep %}

{% step %}
Click on **Finish**

If you used **Rules-based** **selection** to onboard datasets, an **Active Onboarding Rule Pipeline** view will appear now to confirm the conditions.
{% endstep %}
{% endstepper %}
{% endstep %}

{% step %}
**Access the datasets**

Once onboarding is completed, your data source will appear in the **Data Sources** list. You can click the **Onboarded Datasets** button to access the connected datasets.
{% endstep %}
{% endstepper %}

Soda Cloud will now spin up its **Soda-hosted Runner** and perform an initial **Profiling** & **Historical Metric Collection scan**, if configured. This usually takes only a few minutes.

🎉 **Congrats! You've successfully onboarded your data source and datasets.**\
You're now ready to create data contracts and start monitoring the quality of your data.

> To generate a first contract for the datasets you just onboarded, refer to [Contract Autopilot](/soda-ai/contract-autopilot.md#generate-a-contract-with-autopilot).

***

## Onboard datasets from an existing data source

Note that you can repeat the datasets onboarding process at any time to add more datasets from the same data source. Datasets that previously have been onboarded will not re-appear in the data selection step.

Simply return to the data source page and click **Onboard Datasets** to update your selection. You will be prompted to follow the [dataset onboarding steps](file:///#id-1.-choose-a-dataset-selection-strategy).

<figure><img src="/files/YI3fBmIRVETi32n9NKSy" alt=""><figcaption></figcaption></figure>

{% hint style="warning" %}
You need the **Manage data sources** global permission to add a new data source. Learn about [Global and Dataset Roles](/organization-and-admin-settings/global-and-dataset-roles.md)
{% endhint %}

## Connect a data source onboarded with Soda Core to a Runner

When you create or push a [new data source from **Soda Core**](/onboard-data-sources-and-datasets/via-soda-core.md), it becomes available in Soda Cloud, but it is **not automatically connected to a Soda Runner**.

Connecting the data source to a Runner enables Soda Cloud features that require a Runner runtime, such as:

* **Metric Monitoring**
* **Profiling**
* Running **Data Contracts on the Soda Runner** (via scheduling and the Soda Cloud interface)

{% stepper %}
{% step %}
Locate the partially onboarded data source in Soda Cloud

* Navigate to **Data Sources**. Find the data source that was created or pushed from Soda Core.
* Click on "**⋮**" > **Edit connection**.

<figure><img src="/files/BmszpRVNa7PLalSEZccR" alt="" width="190"><figcaption></figcaption></figure>
{% endstep %}

{% step %}
Edit the connection and select a Runner

{% stepper %}
{% step %}
Fill in the connection form:

* **Select the Runner** you want to use ([Soda-hosted](/deployment-options.md#soda-hosted) or [self-hosted](/deployment-options.md#self-hosted-runner))
* **Provide the required connection details** and credentials (use Soda Secrets for sensitive values)
  {% endstep %}

{% step %}
Click **Test Connection**.
{% endstep %}

{% step %}
Click **Connect** to save the configuration.
{% endstep %}
{% endstepper %}
{% endstep %}

{% step %}
Enable Runner-powered features on your datasets

<i class="fa-octagon-check">:octagon-check:</i> Once the data source is connected to a Runner, you can enable Runner-powered features on your datasets, including:

* Metric Monitoring
* Profiling
* Running Contracts on the Runner
  {% endstep %}
  {% endstepper %}

## Configure discovery scan

By default, Soda runs discovery scans once per day at a random time; if you need a different cadence, you can configure a custom schedule for each data source.

{% stepper %}
{% step %}
Navigate to **Scans** and click on the scan you want to configure.

<figure><img src="/files/7EXRrnGhgIPiOhjGBfFy" alt=""><figcaption></figcaption></figure>
{% endstep %}

{% step %}
Click on **Edit Scan Definition** (top right).

<figure><img src="/files/fycgXWiRWW10J0gYIwWL" alt=""><figcaption></figcaption></figure>
{% endstep %}

{% step %}
**Edit** the schedule.

You can choose to trigger the scan **on schedule** or **externally** using a Soda Library CLI command.

<figure><img src="/files/VEDf69gf3rInCfNJJmPn" alt=""><figcaption></figcaption></figure>
{% endstep %}

{% step %}
Click on **Save**.
{% endstep %}
{% endstepper %}

***

{% if visitor.claims.plan === 'datasetStandard' %}
{% hint style="success" %}
You are **logged in to Soda** and seeing the **Dataset Standard license** documentation. Learn more about [Documentation access & licensing](/reference/documentation-access-and-licensing.md).
{% endhint %}
{% endif %}

{% if visitor.claims.plan === 'enterprise' %}
{% hint style="success" %}
You are **logged in to Soda** and seeing the **Team license** documentation. Learn more about [Documentation access & licensing](/reference/documentation-access-and-licensing.md).
{% endhint %}
{% endif %}

{% if visitor.claims.plan === 'enterpriseUserBased' %}
{% hint style="success" %}
You are **logged in to Soda** and seeing the **Enterprise license** documentation. Learn more about [Documentation access & licensing](/reference/documentation-access-and-licensing.md).
{% endhint %}
{% endif %}

{% if !(visitor.claims.plan === 'enterprise' || visitor.claims.plan === 'enterpriseUserBased' || visitor.claims.plan === 'datasetStandard') %}
{% hint style="info" %}
You are **not logged in to Soda** and are viewing the default public documentation. Learn more about [Documentation access & licensing](/reference/documentation-access-and-licensing.md).

If you do have a Soda license, make sure to **log in to Soda Cloud in this same browser**.
{% endhint %}
{% endif %}


---

# Agent Instructions
This documentation is published with GitBook. GitBook is the documentation platform designed so that both humans and AI agents can read, navigate, and reason over technical content effectively. Learn more at gitbook.com.

## Querying This Documentation
If you need additional information that is not directly available in this page, you can query the documentation dynamically by asking a question.

Perform an HTTP GET request on the current page URL with the `ask` query parameter, and the optional `goal` query parameter:

```
GET https://docs.soda.io/onboard-data-sources-and-datasets/onboard-datasets-on-soda-cloud.md?ask=<question>&goal=<endgoal>
```

`ask` is the immediate question: it should be specific, self-contained, and written in natural language.
`goal` is optional and describes the broader end goal you are ultimately trying to accomplish on behalf of the user. GitBook uses it to tailor the answer towards what is most useful for that goal.

The response will contain a direct answer to the question and relevant excerpts and sources from the documentation.

Use this mechanism when the answer is not explicitly present in the current page, you need clarification or additional context, or you want to retrieve related documentation sections.